Tags
Introduction
Tags are strings that identify items such as machines, applications, desktops, Delivery Groups, Application Groups, and policies. After creating a tag and adding it to an item, you can tailor certain operations to apply to only items that have a specified tag.
- Tailor search displays in Studio.
For example, to display only applications that have been optimized for testers, create a tag named “test” and then add (apply) it to those applications. You can now filter the Studio search with the tag “test”.
- Publish applications from an Application Group or specific desktops from a Delivery Group, considering only a subset of the machines in selected Delivery Groups. This is called a tag restriction.
With tag restrictions, you can use your existing machines for more than one publishing task, saving the costs associated with deploying and managing additional machines. A tag restriction can be thought of as subdividing (or partitioning) the machines in a Delivery Group. Its functionality is similar, but not identical, to worker groups in XenApp releases earlier than 7.x.
Using an Application Group or desktops with a tag restriction or can be helpful when isolating and troubleshooting a subset of machines in a Delivery Group.
See below for details and examples of using a tag restriction.
- Schedule periodic restarts for a subset of machines in a Delivery Group.
Using a tag restriction for machines enables you to use new PowerShell cmdlets to configure multiple restart schedules for subsets of machines in a Delivery Group. For examples and details, see the “Create multiple restart schedules for machines in a Delivery Group” section in the Manage Delivery Groups article.
- Tailor the application (assignment) of Citrix® policies to a subset of machines in Delivery Groups, Delivery Group types, or OUs that have (or do not have) a specified tag.
For example, if you want to apply a Citrix policy only to the more powerful workstations, add a tag named “high power” to those machines. Then, on the Assign Policy page of the Create Policy wizard, select that tag and also the Enable checkbox. You can also add a tag to a Delivery Group and then apply a Citrix policy to that group. For details, see the Create policies article. (Note that the Studio interface for adding a tag to a machine has changed since the blog post was published.)
You can apply tags to the following items:
- Machines
- Applications
- Delivery Groups
- Application Groups
You can configure a tag restriction can be configured when creating or editing the following in Studio:
- A desktop in a shared Delivery Group
- An Application Group
Tag restrictions for a desktop or an Application Group
A tag restriction involves several steps:
- Create the tag and then add (apply) it to machines.
- Create or edit a group with the tag restriction (in other words, “restrict launches to machines with tag x”).
A tag restriction extends the broker’s machine selection process. The broker selects a machine from an associated Delivery Group subject to access policy, configured user lists, zone preference, and launch readiness, plus the tag restriction (if present). For applications, the broker falls back to other Delivery Groups in priority order, applying the same machine selection rules for each considered Delivery Group.
Example 1
This example introduces a simple layout that uses tag restrictions to limit which machines will be considered for certain desktop and application launches. The site has one shared Delivery Group, one published desktop, and one Application Group configured with two applications.
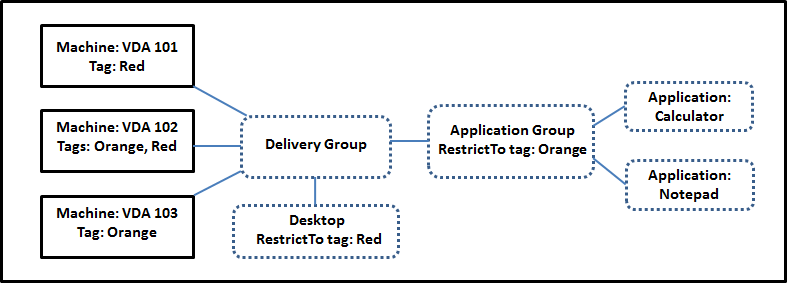
- Tags have been added to each of the three machines (VDA 101-103).
- The desktop in the shared Delivery Group was created with a tag restriction named “Red,” so that desktop can be launched only on machines in that Delivery Group that have the tag “Red”: VDA 101 and 102.
- The Application Group was created with the “Orange” tag restriction, so each of its applications (Calculator and Notepad) can be launched only on machines in that Delivery Group that have the tag “Orange”: VDA 102 and 103.
Note that machine VDA 102 has both tags (Red and Orange), so it can be considered for launching the applications and the desktop.
Example 2
This example contains several Application Groups that were created with tag restrictions. This results in the ability to deliver more applications with fewer machines than would otherwise be needed if you used only Delivery Groups.
(The “How to configure example 2” section shows the steps used to create and apply the tags, and then configure the tag restrictions in this example.)
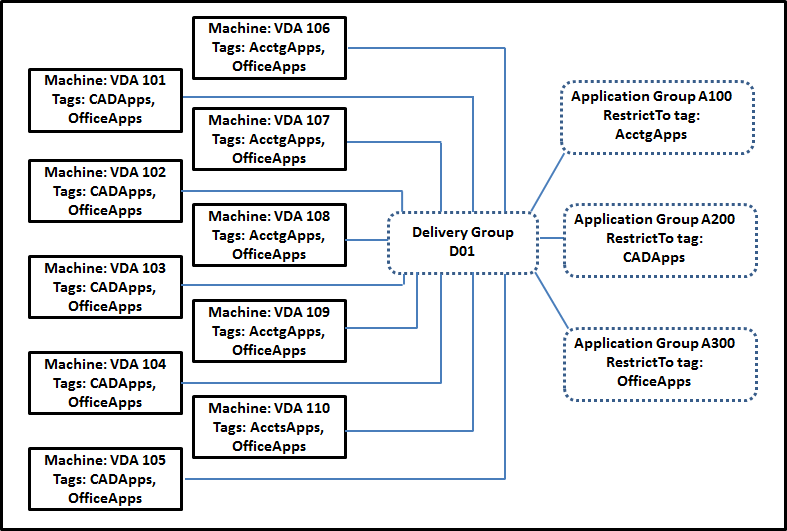
This example uses ten machines (VDA 101-110), one Delivery Group (D01), and three Application Groups (A100, A200, A300). By applying tags to each machine and then specifying tag restrictions when creating each Application Group:
- Accounting users in the group can access the apps they need on five machines (VDA 101–105)
- CAD designers in the group can access the apps they need on five machines (VDA 106-110)
- Users in the group who need Office applications can access the Office apps on ten machines (VDA 101-110)
Only ten machines are used, with only one Delivery Group. Using Delivery Groups alone (without Application Groups) would require twice as many machines, because a machine can belong to only one Delivery Group.
Manage tags and tag restrictions
Tags are created, added (applied), edited, and deleted from selected items through the Manage Tags action in Studio.
Exception: Tags used for policy assignments are created, edited, and deleted through the Manage Tags action in Studio; however, tags are applied (assigned) when you create the policy; see the Create policies article for details.
Tag restrictions are configured when you create or edit desktops in Delivery Groups, and when you create and edit Application Groups. For complete information about creating and editing groups, see the following articles:
Use the Manage Tags dialogs in Studio
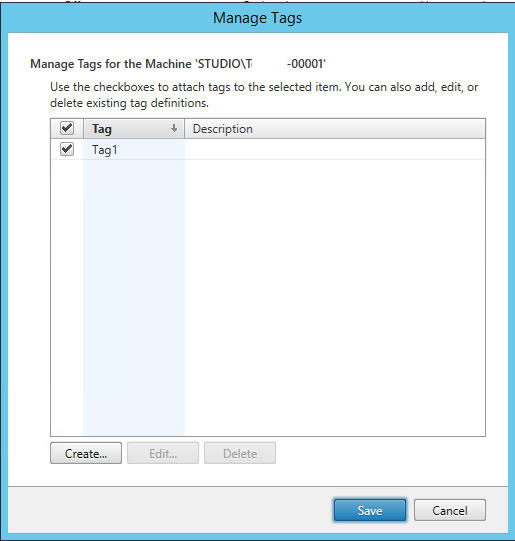
In Studio, select the items you want to apply a tag to (one or more machines, applications, a desktop, a Delivery Group, or an Application Group) and then select Manage Tags in the Actions pane. The Manage Tags dialog box lists all the tags that have been created in the Site, not just for the items you selected.
- A check box containing a check mark indicates that tag has already been added to the selected items. (In the screen capture below, the selected machine has the tag named “Tag1” applied.)
- If you selected more than one item, a check box containing a hyphen indicates that some, but not all selected items have that tag added.
The following actions are available from the Manage Tags dialog box. Be sure to review the Cautions section.
To create a tag:
Click Create. Enter a name and description. Tag names must be unique and are not case-sensitive. Then click OK. (Creating a tag does not automatically apply it to any items you have selected. Use the check boxes to apply the tag.)
To add (apply) one or more tags:
Enable the check box next to the tag name. Note: If you selected multiple items and the check box next to a tag contains a hyphen (indicating that some, but not all selected items already have the tag applied), changing it to a check mark will affect all the selected machines.
If you attempt to add a tag to one or more machines, and that tag is currently used as a restriction in an Application Group, you are warned that the action could result in making those machines available for launch. If that’s what you intended, proceed.
To remove one or more tags:
Clear the check box next to the tag name. Note: If you selected multiple items and the check box next to a tag contains a hyphen (indicating that some, but not all selected items already have the tag applied), clearing the check box will remove the tag from all the selected machines.
If you attempt to remove a tag from a machine that is using that tag as a restriction, a warning message will be displayed, indicating that could affect which machines are considered for launch. If that’s what you intended, proceed.
To edit a tag:
Select a tag and then click Edit. Enter a new name and/or description. You can edit only one tag at a time.
To delete one or more tags:
Select the tags and then click Delete. The Delete Tag dialog box indicates how many items currently use the selected tags (for example “2 machines”). Click an item to display more information. For example, clicking a “2 machines” item displays the names of the two machines that have that tag applied. Confirm whether you want to delete the tags.
You cannot use Studio to delete a tag that is used as a restriction. You must first edit the Application Group and remove the tag restriction or select a different tag.
When you’re done in the Manage Tags dialog box, click Save.
Tip: To see if a machine has any tags applied:
Select Delivery Groups in the navigation pane. Select a Delivery Group in the middle pane and then select View Machines in the Actions pane. Select a machine in the middle pane and then select the Tags tab on the Details pane below.
Manage tag restrictions
Configuring a tag restriction is a multi-step process: You first create the tag and add/apply it to machines. Then, you add the restriction to the Application Group or the desktop.
Create and apply the tag:
Create the tag and then add (apply) it to the machines that will be affected by the tag restriction, using the Manage Tags actions described above.
To add a tag restriction to an Application Group:
Create or edit the Application Group. On the Delivery Groups page, select Restrict launches to machines with the tag and then select the tag from the dropdown.
To change or remove the tag restriction on an Application Group:
Edit the group. On the Delivery Groups page, either select a different tag from the dropdown or remove the tag restriction entirely by clearing Restrict launches to machines with the tag.
To add a tag restriction to a desktop:
Create or edit a Delivery Group. Click Add or Edit on the Desktops page. In the Add Desktop dialog box, select Restrict launches to machines with the tag and then select the tag from the dropdown.
To change or remove the tag restriction on a Delivery Group:
Edit the group. On the Desktops page, click Edit. In the dialog box, either select a different tag from the dropdown or remove the tag restriction entirely by clearing Restrict launches to machines with the tag.
Cautions when adding, removing, or deleting tags from items
A tag applied to an item can be used for different purposes, so keep in mind that adding, removing, and deleting a tag can have unintended effects. You can use a tag to sort machine displays in the Studio search field. You can use the same tag as a restriction when configuring an Application Group or a desktop, which will limit launch consideration to only machines in specified Delivery Groups that have that tag.
If you attempt to add a tag to one or more machines after that tag has been configured as a tag restriction for a desktop or an Application Group, Studio warns you that adding that tag might make the machines available for launching additional applications or desktops. If that is what you intended, proceed. If not, you can cancel the operation.
For example, let’s say you create an Application Group with the “Red” tag restriction. Later, you add several other machines in the same Delivery Groups used by that Application Group. If you then attempt to add the “Red” tag to those machines, Studio will display a message similar to: “The tag “Red” is used as a restriction on the following Application Groups. Adding this tag might make the selected machines available to launch applications in this Application Group.” You can then confirm or cancel adding that tag to those additional machines.
Similarly, if a tag is being used in an Application Group to restrict launches, Studio warns that you cannot delete the tag until you remove it as a restriction by editing the group. (If you were allowed to delete a tag that’s used as a restriction in an Application Group, that could result in allowing applications to launch on all machines in the Delivery Groups associated with the Application Group.) The same prohibition against deleting a tag applies if the tag is currently being used as a restriction for desktop launches. After you edit the Application Group or desktops in the Delivery Group to remove that tag restriction, you can delete the tag.
All machines may not have the same sets of applications. A user may belong to more than one Application Group, each with a different tag restriction and different or overlapping sets of machines from Delivery Groups. The following table lists how machine considerations are decided.
| When an application has been added to | These machines in the selected Delivery Groups are considered for launch |
|---|---|
| One Application Group with no tag restriction | Any machine |
| One Application Group with tag restriction A | Machines that have tag A applied |
| Two Application Groups, one with tag restriction A and the other with tag restriction B | Machines that have tag A and tag B; if none are available, then machines that have tag A or tag B |
| Two Application Groups, one with tag restriction A and the other with no tag restriction | Machines that have tag A; if none are available, then any machine |
If you used a tag restriction in a machine restart schedule, any changes you make that affect tag applications or restrictions will affect the next machine restart cycle. It will not affect any restart cycles that is in progress while the changes are being made. (See the Mange Delivery Groups article.)
How to configure example 2
The following sequence shows the steps to create and apply tags, and then configure tag restrictions for the Application Groups illustrated in the second example above.
VDAs and applications have already been installed on the machines and the Delivery Group has been created.
Create and apply tags to the machines:
- In Studio, select Delivery Group D01 and then select View Machines in the Action pane.
- Select machines VDA 101-105 and then select Manage Tags in the Actions pane.
- In the Manage Tags dialog box, click Create and then create a tag named CADApps. Click OK.
- Click Create again and create a tag named OfficeApps. Click OK.
- While still in the Manage Tags dialog box, add (apply) the newly-created tags to the selected machines by enabling the check boxes next to each tag’s name (CADApps and OfficeApps), and then close the dialog box.
- Select Delivery Group D01, select View Machines in the Action pane.
- Select machines VDA 106-110 and then select Manage Tags in the Actions pane.
- In the Manage Tags dialog box, click Create and then create a tag named AcctgApps. Click OK.
- Apply the newly-created AcctgApps tag and the OfficeApps tag to the selected machines by clicking the check boxes next to each tag’s name, and then close the dialog box.
Create the Application Groups with tag restrictions.
- In Studio, select Applications in the navigation pane and then select Create Application Group in the Actions pane. The Create Application Group wizard launches.
- On the Delivery Groups page of the wizard, select Delivery Group D01. Select Restrict launches to machines with tag and then select the AcctgApps tag from the dropdown.
- Complete the wizard, specifying the accounting users and the accounting applications. (When adding the application, choose the “From Start menu” source, which will search for the application on the machines that have the AcctgApps tag.) On the Summary page, name the group A100.
- Repeat the preceding steps to create Application Group A200, specifying machines that have the CADApps tag, plus the appropriate users and applications.
- Repeat steps to create Application Group A300, specifying machines that have the OfficeApps tag, plus the appropriate users and applications.
More information
Blog post: How to assign desktops to specific servers.