nFactor Visualizer for simplified configuration
Starting from NetScaler release 13.0 build 36.27, nFactor configuration through the GUI is simplified by using the nFactor Visualizer. The nFactor Visualizer helps admins add multiple factors without losing track of each factor. The group of factors that are built in the flow are displayed in one place. Admins can add authentication success and failure paths separately. After creating the flow, admins have to bind the nFactor flow to an authentication virtual server.
Note
- All factors created by an admin in the nFactor flow are retained for any future use.
- From NetScaler feature release 13.0 build 64.35 and above, using the nFactor visualizer, you can start the nFactor flow with a decision block.
Previously, nFactor configuration was cumbersome wherein the admins had to visit many pages to configure it. If a change was required, the admins had to revisit the configured sections each time. Also, there was no option to view the complete configuration in one place.
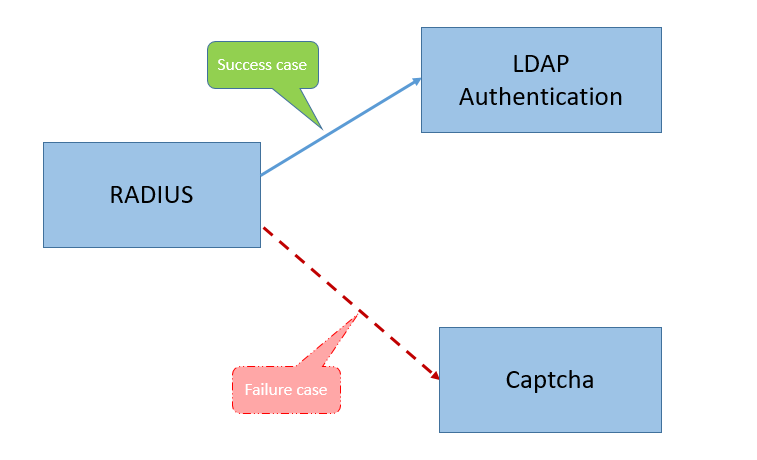
Use Case 1: RADIUS followed by LDAP authentication, else fallback to Captcha through nFactor Visualizer
Achieve RADIUS authentication as the first-level authentication followed by LDAP authentication. In case RADIUS fails, authentication must fall back to Captcha.
To achieve this use case, you can use the nFactor Visualizer. The Visualizer provides various controls that can be used to add this flow and the related items.
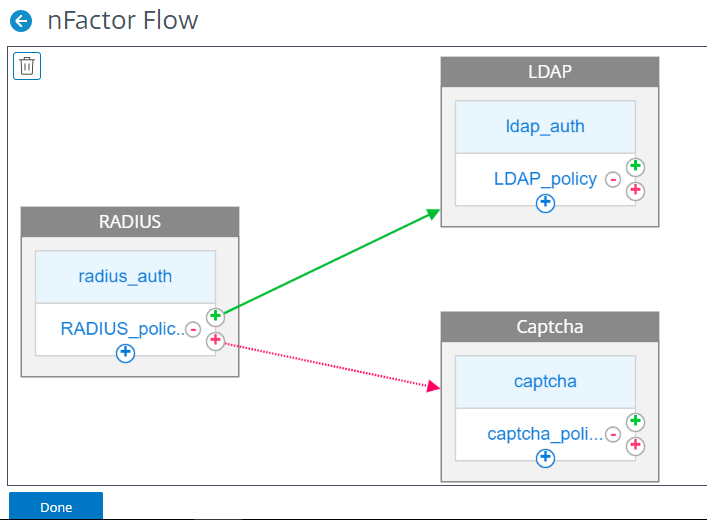
The following figure displays the nFactor flow created for the previous mentioned use case by using the visualizer.
-
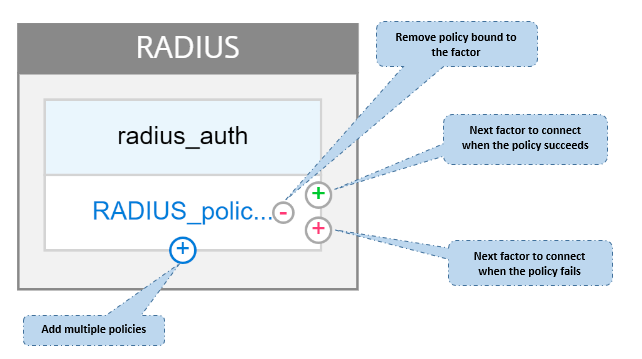
RADIUS. You configure RADIUS as the first factor. You add a login schema and a policy. In this example, radius_auth and RADIUS_policy are the login schema and policy that is added. For the RADIUS_Policy, you can add another factor for the success case. In this example, an LDAP factor block is added for the success case. For the failure case, you can add a Captcha factor.
-
LDAP. You configure LDAP authentication as the second factor. You add a login schema and a policy. In this example, ldap_auth and LDAP_policy are the login schema and policy that is added.
-
Captcha. For the RADIUS policy failure case, you create a Captcha factor. In this example, captcha and captcha_policy are the login schema and policy that is added.
Use Case 2: LDAP followed by RADIUS/Certificate authentication with Captcha based on LDAP Group Membership through nFactor Visualizer
Achieve RADIUS authentication as the first-level authentication followed by LDAP authentication. In case RADIUS fails, authentication must fall back to Captcha.

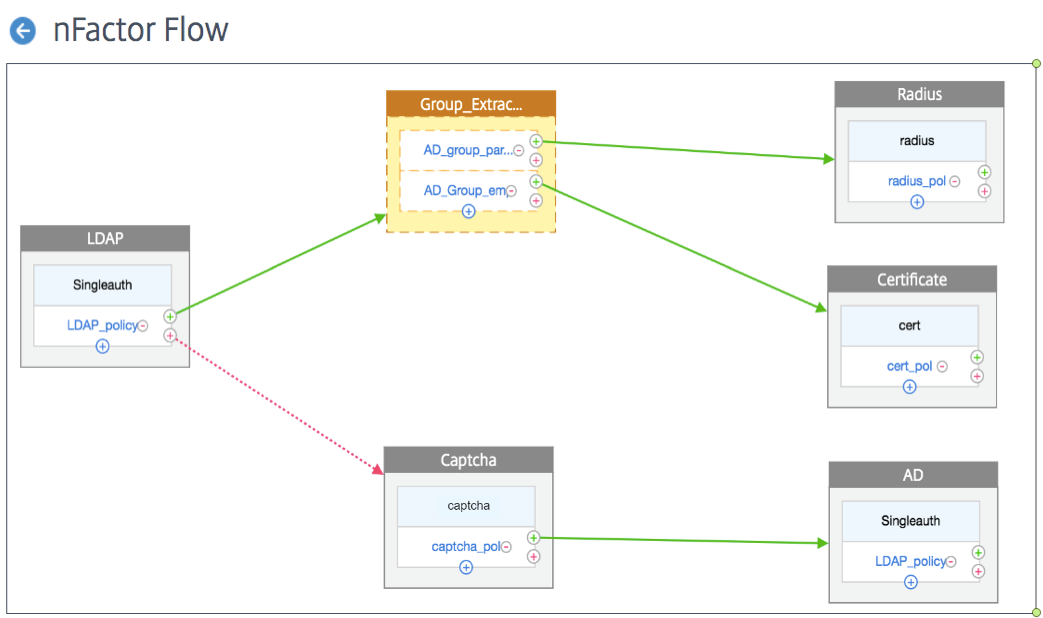
The following figure displays the nFactor flow created for the previous mentioned use case by using the visualizer.
-
LDAP. You configure LDAP as the first factor. You add a login schema and a policy. In this example SingleAuth and LDAP_Policy are the login schema and policy that is added. For the LDAP_Policy, you can add another factor for the success case. In this example, a decision block is added for the success case. For the failure case, you can add Captcha followed by AD factor.
-
Group Extraction LDAP. Is the decision block added for the LDAP success case. The decision block is used as a branch out factor to branch out the users based on the policy rules. Visualizer allows configuring only a NO_AUTHN policy for the decision block.
In this example, Group_Extraction_LDAP is the decision block. You add two policies (
AD_Group_Partner and AD_Group_Employee) to this decision block. As explained in the use cases, all requests routed through AD_Group_Partner policy use RADIUS authentication. Therefore, you connect the success case of this policy to the next factor that is RADIUS factor. Similarly, all requests routed through AD_Group_Employee policy use certification authentication. Therefore, you connect the success case of this policy to the next factor that is the certification authentication factor.-
RADIUS. For the AD_Group_Partner policy success case, you create the RADIUS authentication factor.
-
Certificate. For the AD_Group_Employee policy success case, you create the certificate authentication factor.
-
-
Captcha. For the LDAP policy failure case, you create two next factors, Captcha and AD factor.
Note
- If you have a use case to branch out as a first thing, then you can either create two flows and bind separately or create one flow with the first one as branch out, and bind it to the virtual server.
- If you have multiple blocks, and to view the entire flow in the nFactor Flow screen, click the visualizer and drag the flow to the extreme left.
- We recommend that you modify the nFactor flows using the nFactor Flows page only.
To configure nFactor by using the nFactor Visualizer
Note
The following nFactor configuration is a simple example that helps you accomplish the Use Case 1 scenario configurations.
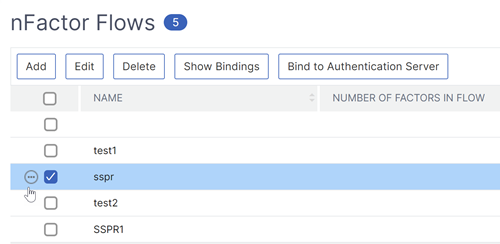
- Navigate to Security > AAA – Application Traffic > nFactor Visualizer > nFactor Flows.
- Click Add.
-
On the nFactor Flows page, click + to add a first factor for the flow. The first factor also serves as an identifier for this nFactor flow.
-
Enter the factor name and click Create.
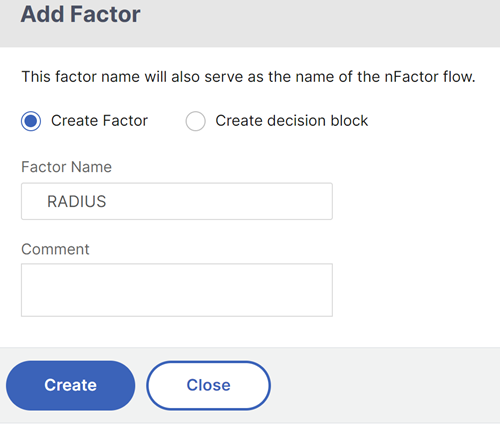
The factor name appears on the factor block in the nFactor Flow page.
Note
We recommend that you do not use policy label names such as,
__rootand__<flow_name>as suffix and_db_as prefix. It is used as the factor names that are created in the nFactor flow. -
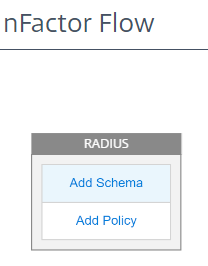
Once the RADIUS factor is created, the Add Schema and Add Policy must be created.
Note
For more information, see nFactor concepts, entities, and terminology.
-
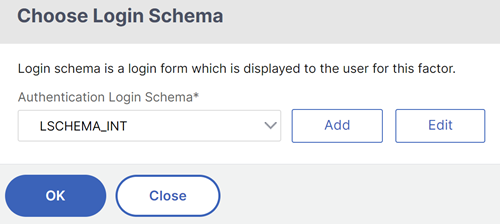
Click Add Schema. You can either add a new login schema or select an existing login schema from the Authentication Login Schema list.
-
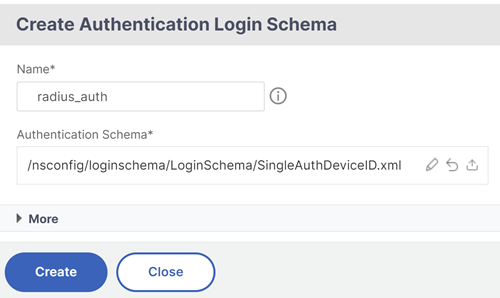
To create a login schema, click Add and in the Create Authentication Login Schema page, enter the name for the schema. Click Edit (pencil icon) to select the Login Schema Files from the list.
-
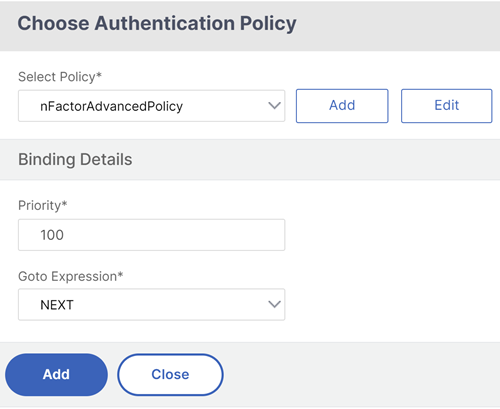
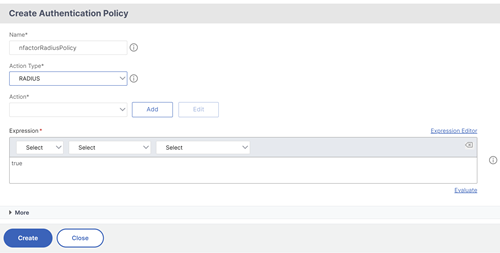
Click Add Policy. You can either create a new policy or choose an existing authentication policy.
-
To create a new policy, click Add and in the Create Authentication Policy page, enter the name for the policy and click Create.
-
After you add a login schema and policy to the factor, the login schema and policy appear on the factor in the Visualizer as displayed in the following figure. For any given factor, you can add multiple policies and define the next factor for the success and failure of each policy. You can also remove the policies that are part of the factor.
- After you create the flow, you can then bind the nFactor flow to an authentication virtual server.
Adding the next factor
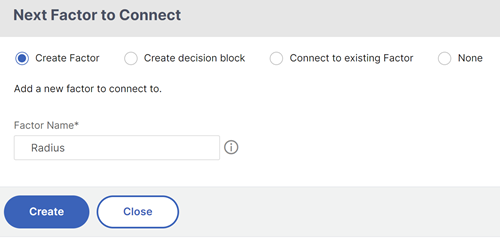
To add the next factor, you can select one of the following options as per your requirement:
- Create Factor. Create a factor. Each factor that is created in a flow is exclusive to that flow.
-
Create a decision block. Create a decision block to serve as a branch-out factor. You cannot add a login schema to the decision block. Visualizer allows configuring only a NO_AUTHN policy for the decision block.
Note
You can only add or edit the decision block through the NetScaler GUI. There is no option to configure the decision block from the CLI command.
- Connect to an existing Factor. Select an existing factor as your next factor. All the factors that appear in the existing list are created exclusively for that flow.
-
None. Remove an existing connection.
To bind the nFactor flow to authentication server
-
On the nFactor Flows page, select an nFactor flow that you prefer to bind to an authentication virtual server.
-
Click the horizontal ellipsis and select Bind to Authentication Server or on the nFactor Flows page, click Bind to Authentication Server.
-
On the Bind to Authentication Server page, you can perform the following actions:
- To add a Authentication Virtual Server, click Add.
- To select an existing authentication server from the list, click Authentication Server field.
-
Click Show Bindings from the hamburger icon to view the bindings.
-
To unbind the authentication server from the specific nFactor flow, perform the following steps:
- On the nFactor Flows page, click Show Bindings from the hamburger icon.
- On the Authentication Server Bindings page, select the authentication server to unbind and click Unbind. Click Close.
For more information on nFactor authentication, see the following topics:
-
Concept: Multi-Factor (nFactor) authentication.
-
Workflow: How nFactor authentication works.
-
Configuration: Configuring nFactor authentication.
Enhancements to the nFactor Visualizer
Starting from NetScaler release 13.0 build 41.20, the following enhancements are made in the nFactor Visualizer.
- Admins can move the created factors to the trash icon.
- View the nFactor flows in the Authentication Virtual server page.
Trash icon. Admins can only delete the nodes that have no connections. However, the underlying policies or the schemas that are created for the factor are not deleted if the factor is moved to trash.
To view the trash icon,
-
Navigate to Security > AAA – Application Traffic > nFactor Visualizer > nFactor Flows. You can view the trash icon on the top left corner.
-
To delete the factor, click the factor block and drag it to trash.
View nFactor flow from Authentication Virtual Server. Admins can also view the created nFactor flows from theAuthentication Virtual Server page.
To view the nFactor flow from Authentication Virtual Server page,
- Navigate to Security > AAA – Application Traffic > Virtual Servers. On the Authentication Virtual Servers page, you can perform the following steps:
- To add an authentication virtual server, click Add.
- To edit an existing authentication virtual server, click Edit option from the details pane.
-
On the Authentication Virtual Server page, you can view the nFactor Flow option under Advanced Authentication Policies.
- If there is no nFactor flow bound to the virtual server, you can click No nFactor Flow option under Advanced Authentication Policies section to either add a new nFactor flow or select the existing nFactor flow from the list.
In this article
- Use Case 1: RADIUS followed by LDAP authentication, else fallback to Captcha through nFactor Visualizer
- Use Case 2: LDAP followed by RADIUS/Certificate authentication with Captcha based on LDAP Group Membership through nFactor Visualizer
- To configure nFactor by using the nFactor Visualizer
- Enhancements to the nFactor Visualizer