Webhook for Alert Notifications
You can use webhooks to send Citrix Analytics alert notifications to any third-party applications that have incoming webhook URLs configured. Webhooks are HTTP callbacks that enable real-time messaging between the service provider applications and consumer applications. Since the alert notifications are sent in real time, you get notified when the events occur.
When Citrix Analytics triggers an alert, the associated webhook sends the alert message to the URL of the target application. The alert is sent in the form of a JSON payload through the HTTP POST or PUT request. For example, when a user triggers a risk indicator or the performance of a VDI machine goes down, you can set up a webhook to send the alert notifications to your Slack channel. Setting up webhooks for alert management helps you to get real-time notifications in your applications. You can take timely actions to mitigate the security risk or improve the performance of your Citrix Virtual Apps and Desktops™ deployment.
Create Webhook Profile
To create the webhook profiles on Citrix Analytics:
- Sign in to Citrix Analytics.
- Depending on your subscribed offering, click Manage to access Security Analytics or Performance Analytics.
- From the top bar, click Settings > Alert Settings > Webhook.
- Select Create Webhook.
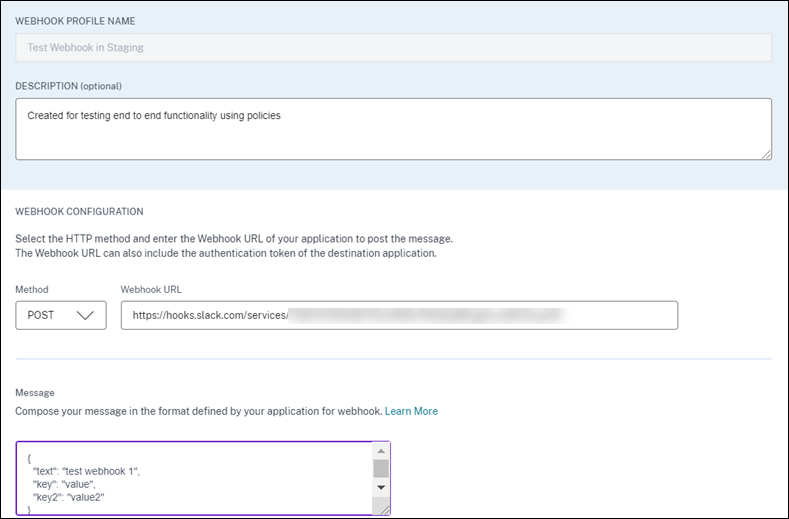
- Enter a profile name and a description of the webhook to identify its purpose.
-
Select the HTTP method and the webhook URL of your application to send the alert message.
Note: Usually the outgoing webhooks are sent through the HTTP POST request. You can also include an authentication token in the webhook URL of your application.
- Enter the message about the alert that you want to send to the webhook URL. The message must be structured in the formats such as JSON or XML as defined by the target application. For more information, see the Webhook examples.
- (Optional) Enter the header keys and values for the message. The header can include authentication tokens or other custom key-value pairs to securely send the payload to your application.
- To validate the webhook configuration, click Test. The test validates the outgoing webhook URL, the payload structure, and the header keys. If no issues are found in your configuration, you get the “Test successful” message.
Webhook Configuration Examples
The section provides examples of configuring webhooks to send alerts to third-party applications such as Slack and Microsoft Teams.
Note: Refer to the product documentation of the third-party applications on how to get the webhook URL and the required configurations for the webhook.
Sending alert message to Slack
On Slack, ensure that you have completed the following tasks before sending an alert:
- Create a Slack app for Citrix Analytics if you don’t have already one.
- For the app, enable the Incoming Webhook feature and create an incoming Webhook.
- Select a channel to which the app posts the message.
- When you authorize the app, you get the Webhook URL for sending the message. For information, see Getting started with Incoming Webhooks.
Sample message format
curl --location --request POST 'WEBHOOK URL' --header 'Content-Type: application/json' --data-raw '{"text": "Test Citrix Analytics Alert."}
Output

Sending alert message to Microsoft Teams
On Microsoft Teams, ensure that you have completed the following tasks before sending an alert:
- Create a Teams group within Teams if you don’t have already one.
- Create a Webhook connecter. Refer to the steps described in the Create and send messages article.
- Get the URL for the webhook.
Sample message format
curl --location --request POST 'WEBHOOK URL' --header 'Content-Type: application/json' --data-raw '{"text": "Test Citrix Analytics Alert."}
Output
