Connector configurations
The first time you use the App Layering service, plan to create one or more “connector configurations”. App Layering connector configurations are stored sets of credentials that the appliance uses to access locations on your hypervisor or provisioning server. A connector configuration can specify where to build a layer, or where to publish images.
Why use connector configurations
Connector configurations let the App Layering appliance access locations in your environment for creating layers or publishing layered images. Using a connector configuration automates the file transfer process and saves significant amounts of time.
You can use a connector configuration to:
- Create an app layer or platform layer, or add a version to an OS layer, and if you choose, also run a script.
- Publish layered images to your hypervisor or provisioning server, and if you choose, also run a script.
Create layers
Layer creation is easier when you use a connector configuration. The connector configuration includes the credentials for the location where you plan to install the software for a layer. This connector configuration includes a Packaging Cache option, which is enabled by default to afford you the best layering performance.
Publish layered images
You need a connector configuration for each location to which you are publishing layered images. Once published, you use layered images to provision systems for specific groups of users.
Requirements
To create a connector configuration, you need to meet the following requirements.
Credentials
Valid account credentials that the appliance can use to access a location in your environment. For details about the values you need, select the hypervisor or Provisioning Service later in this section.
About offload compositing
When creating a layer or publishing a layered image, you can use the built-in App Layering compositing engine to create layers. The compositing engine is enabled by selecting the Offload Compositing connector configuration option. The ImportOsLayer.ps1 script is used when creating an OS layer from scratch. Be sure to open the firewall ports required for the compositing engine
Note:
An OS layer is created (initially) by importing the OS from an existing virtual machine. Once created, you update the OS layer just like any other layer.
Offload Compositing:
- Reduces the layering task processing time.
- Enables support for creating UEFI images with vTPM and GPT partitions. These features are required for modern Windows OS versions such as Windows 11.
- Enables support for creating VHDX disks.
- Can automatically eliminate some file system issues with native Windows tools
To create a layer using Offload Compositing:
-
App layer, platform layer: While creating a layer, choose a connector configuration with Offload Compositing enabled.
-
OS layer: Run a script. For details, see Create OS layer.
Disk space for cache
On all supported hypervisors, except for Azure, the default Packaging cache size is set to the recommended starting level. Allow enough disk space to increase the cache size, if needed.
- Creates the layer or image as a UEFI or Generation 2 machine.
- Uses VHDX disk format for either BIOS and Generation 1 format, or UEFI and Generation 2 images.
To create an app or platform layer using Offload Compositing, you select a connector configuration with Offload Compositing enabled. To create an OS layer, you run a script instead. For details, see Create OS layer.
Packaging layers
When using Offload Compositing in the connector configuration, packaging a layer begins when you shut down the machine for finalization. The packaging is done automatically. You do not have to manually select Finalize in the management console.
Important:
You must run the script to create an OS layer. You can also build the OS on a BIOS or Generation 1 machine, then add a version to the layer with Offload Compositing selected.
When you select Offload Compositing, choose either UEFI or Generation 2 for the new layer version. Select VHDX for the disk format. VHDX format is supported on BIOS (Generation 1) and UEFI (Generation 2) machines.
Publish images
When you publish an image, the publishing machine builds the image on the hypervisor (Hyper-V, VMware vSphere) server.
Connectivity
When you use Offload Compositing, a temporary worker VM is created in your environment, which is called a compositing engine. The compositing engine requires direct connectivity to the App Layering appliance over SSL (port 443) and iSCSI (port 3260). Ensure that this traffic is permitted within your App Layering environment. Otherwise, tasks created from the appliance are not completed successfully.
About “Packaging cache size” and “Select rate”
Connector configurations for all hypervisors except Azure let you configure space for a Packaging cache. The appliance uses this cache on your hypervisor to speed up layer packaging.
Packaging cache size
We recommend using the default packaging cache starting size for your hypervisor:
- vSphere: 250 GB
- XenServer®: 480 GB
- Hyper-V: 200 GB
- Nutanix: 480 GB
The more app layers you create, the larger the cache you need. Increase the Packaging cache size, if needed.
The Hit rate
The Hit rate is the percentage of times that the appliance has found a disk in the cache. A low value in this field indicates that the cache is not providing much value. Increase the cache size to accommodate more unique layers.
You can improve a low rate by increasing the Packaging cache size. Increasing the cache size allows more disks to be stored in the cache. It also increases the likelihood of finding a disk for packaging in the cache. The result is a higher hit rate value.
View connector configurations
The Connectors tab lists the connector configurations that you have created.
Sort connector configurations
By default, connector configurations are listed in alphabetical order by name.
View connector configuration details
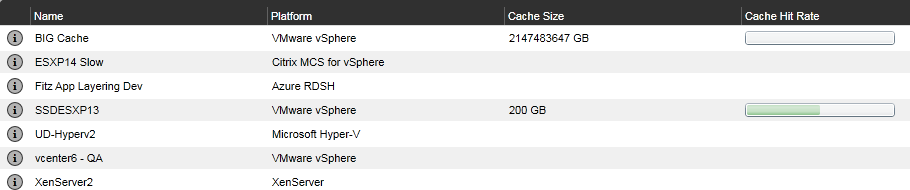
When caching is enabled for a connector configuration, the Connectors tab displays the cache size for that configuration.
To see the values for any given connector configuration:
- Click the View Details button or the info icon on the right side of the screen. Details about the connector configuration are displayed.
View Cache size and Hit rate
The Packaging Cache Size and Hit rate are displayed when the Packaging Cache Size is set to a value greater than zero (0).
Add a connector configuration
This section explains how to add and manage a connector configuration on the Connectors tab.
A connector configuration speeds up the process of creating a layer or image template. If you need one to access a specific location, you can create one by selecting Add Connector Configuration on the Connectors tab. From there, use the detailed steps later in this section.
To add a connector configuration, follow these steps:
- Access the management console, and select Connectors to see your connector configurations, if you have created any.
- Click Add Connector Configuration in the Action bar. A dialog box opens where you can select the type of connector configuration to create.
- Choose the connector type from the drop-down menu.
- Complete the fields on the connector configuration page.
- Click the Test button to verify that the connector can access the location specified using the credentials supplied.
- Click Save. The new connector configuration appears on the Connector tab.
Edit a connector configuration
To edit a connector configuration:
- Access the management console, and select Connectors.
- Select the connector and click Edit on the action panel or the right side of the screen. The connector configuration is displayed.
- Update the configuration, as needed.
- Click the Test button to verify that the connector can access the location specified using the credentials supplied.
- Click Save. The connector configuration is updated.
Increase the Cache size and Hit rate
To improve the utility of the cache and therefore increase the hit rate by editing the Packaging Cache Size:
- Select the connector and click Edit on the action panel or on the right side of the screen.
- Scroll to Layer Disk Cache Size in GB and enter the amount of space that the cache can occupy.
- Click the Test button to verify that the connector can access the location specified by using the credentials supplied.
- Click Save. The connector configuration is updated.
Continue adjusting the cache size until you achieve the layering performance you are looking for.
Disable or re-enable caching
Caching is enabled and set to a recommended starting size by default. We strongly recommend that you use caching.
If you disable caching for a connector configuration, set the cache size to zero (0). You can re-enable it by increasing the Packaging cache size.
Delete a connector configuration
To delete a connector configuration:
- In the management console, select Connectors.
- Make sure that the connector configuration is not in use.
- Click Delete on the Action bar or the right side of the screen.
- In the pop-up window that opens, select Delete. The connector configuration is deleted.
The Connectors tab takes a few minutes to update after another administrator deletes a connector configuration.
Messages when deleting connector configurations
If a connector configuration is in use when you attempt to delete it, you receive a message similar to the following example:
“Validation Error: Unable to delete connector configuration ‘Citrix Provisioning™ - ConnectorExample’ as it is in use. If you receive this error message, remove the connector configuration from the layer or image template where it is still in use. Then delete the configuration.”
In this article
- Why use connector configurations
- Requirements
- About offload compositing
- About “Packaging cache size” and “Select rate”
- View connector configurations
- Add a connector configuration
- Edit a connector configuration
- Increase the Cache size and Hit rate
- Disable or re-enable caching
- Delete a connector configuration