Azure Deployments
When creating layers or publishing images in an Azure environment, use the Azure Deployments or Machine Creation for Azure Deployments connector configuration. This article describes the connector configuration settings. For more information about connector configurations and how to add new ones, see Connector configurations.
Note:
Azure Deployments also supports Azure Government.
Overview
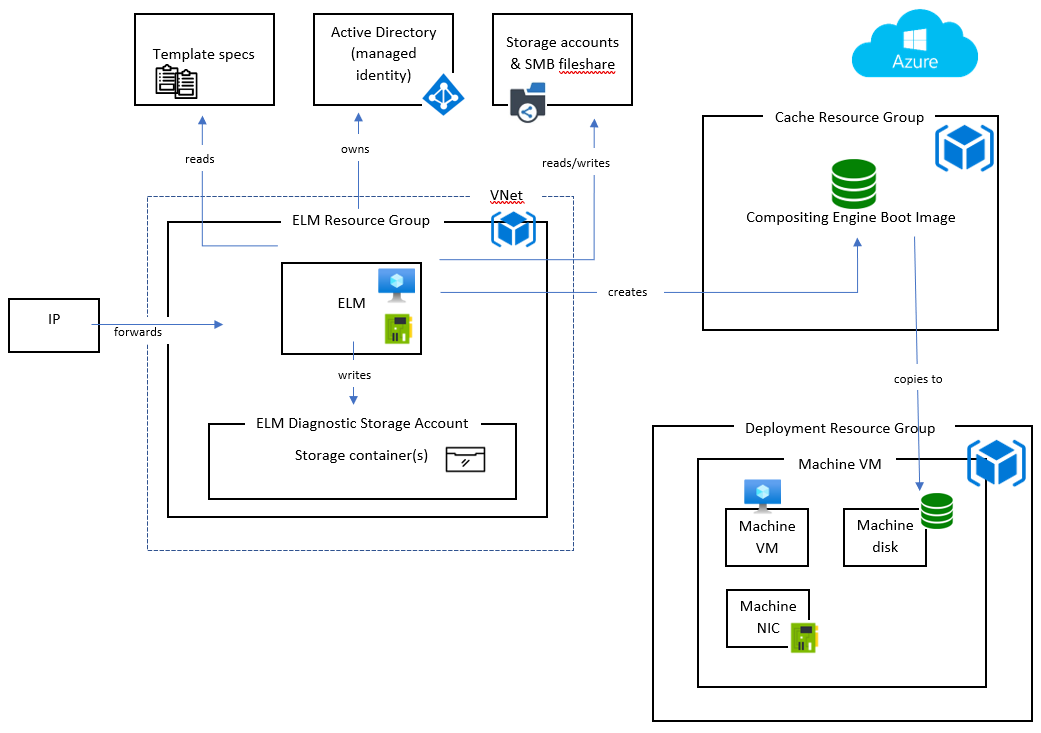
Azure Deployments in App Layering refer to the creation of Azure deployments using Azure Resource Manager (ARM) templates. ARM templates are Azure-specific JSON documents that define infrastructure and configuration as code. For more information on ARM templates, refer to the Azure documentation here.
All Azure resources created by the App Layering Azure Deployments connector are created using the deployment of a user-specified ARM template. These templates allow an administrator to extensively customize what resources are created and how they’re configured.
Identity
Information on the Identity field can be found on our Azure page.
Azure template specs
Azure template specs are a type of Azure Resource that store and version an ARM Template for later use in an ARM template deployment. You must specify between two to four template specs for each Azure Deployments connector configuration. Each deployment type in an Azure Deployments connector requires a corresponding version of a template spec. The Cache Disk and Machine deployments are required, but the Boot Image and Layered Image deployments are optional.
Deployment types
There are four deployment types, each requiring its template spec. The deployment types differ in the type of resources that they create, the inputs they receive, and the outputs they produce to override the default behavior. For more information on these concepts, see Authoring ARM templates.
Machine
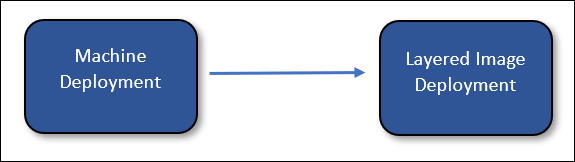
The Machine deployment creates a virtual machine (VM). VMs created by Machine deployments can composite layered images and package layers. If the optional Layered Image deployment isn’t specified, then a VM is the final result of publishing an image. In this case, the VM can be used as-is or as a Machine Creation Services™ (MCS) master image.

If a Layered Image deployment is specified, then the resources created by the Machine deployment are deleted after the Layered Image deployment completes. Otherwise, App Layering does not delete the resources (unless the deployment fails).
Cache disk
The Cache Disk deployment creates an Azure-managed disk. This disk is used to contain the Compositing Engine boot image. The App Layering appliance uploads the contents to the disk after it’s created.
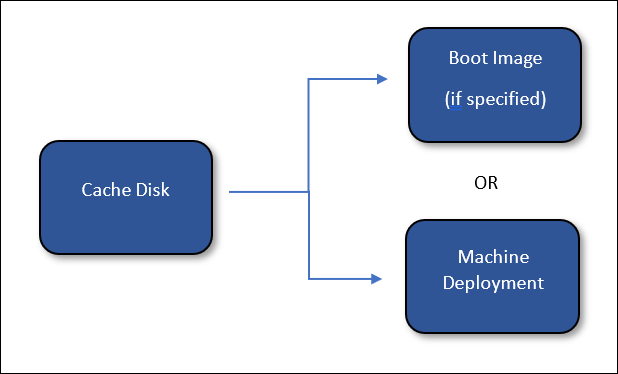
If a Boot Image deployment is specified, then the resources created by the Cache Disk deployment are deleted after the Boot Image deployment completes. Otherwise, App Layering deletes the resources during cache cleanup.
Layered image (optional)
The Layered Image deployment is an optional deployment type. The resulting resources are the final result of publishing a layered image. No particular resource type is required to be created. The Layered Image deployment can be used to produce a compute gallery image, a managed disk, or any other type of resource.
App Layering doesn’t delete the resources created by the layered image deployment (unless the deployment fails).
Boot image (optional)
The Boot Image deployment is an optional deployment type. The resulting resources are used to create the OS disks of the VMs created by Machine deployments. It isn’t required to create any particular type of resource, however it must create a resource that can be used to create an OS disk for a VM. This deployment can be used to produce a compute gallery image, or any other type of resource that can be used as the source of a disk.

App Layering deletes the resources created by the boot image deployment during cache cleanup.
Add a connector configuration
Refer to the following descriptions for information on each field in the connector configuration screen.
Defaults (optional)
Defaults are optional and can be used to apply Tags and Custom Data to all deployment types in the connector configuration. The data specified in the defaults are merged with the data specified in the corresponding fields of each deployment type.
Deployments
Each deployment type contains the following fields.
Template
The template spec used for the deployment. The user creates and manages template specs in Azure. The managed identity or the registration credentials of the appliance must have read permission on the resource group containing the template spec.
Version
The version of the template spec to use for deployment. The newest version is selected by default when the Template selection is changed.
Resource Group
The Azure resource group to which to deploy. All resources created by the deployment are created in this resource group.
The managed identity or registration credentials of the appliance must have permission to:
- Deploy templates to the resource group
- Create each type of resource in the template
- Delete each type of resource in the template
Assigning the general Contributor role to the managed identity or registration credentials on the resource group grants the required permissions. More granular permissions or roles can be specified instead, but the permissions required depend on the resources specified in the template.
Note:
The managed identity of the appliance must have permission to connect a device to the virtual network specified for the VM created by the Machine deployment. If the virtual network isn’t located in any of the resource groups specified for the deployments, then roles assigned to the managed identity or registration credentials for those resource groups won’t apply to the virtual network and a role must be assigned directly to the virtual network.
Tags (advanced)
The tags to apply to the Azure deployment artifact created by a deployment. You can include data from the input parameter (see Authoring ARM templates). To do so, put the JSON path of the field you want to reference between braces. For example, {context.user} evaluates to the name of the App Layering user who created the task that caused the deployment. This works for both the tag name and the tag value fields. If you want to use literal braces in your tags, you can escape them by doubling them. For example, evaluates to {}.
Important:
These tags are only applied to the deployment resource itself. They aren’t applied to the resources created by the deployment. To apply tags to the created resources, specify those tags in the ARM template.
Custom Data (advanced)
Arbitrary data specified in JSON format. This data can be referenced in the ARM template associated with the deployment. The data is accessed using the input parameter’s context.config.custom object. See Authoring ARM templates for more details.
Considerations
- Network connectivity is required between the App Layering appliance and the VMs created by the Machine deployment.
- From the VMs created by the Machine deployment, IP traffic must be routable to the App Layering appliance’s IP address on ports 443 (HTTPS) and 3260 (iSCSI). Also, App Layering appliance traffic must be routable to these VM’s (created by the Machine deployment) IP address on port 443 (HTTPS).
- App Layering appliances deployed on-premises must be connected to the Azure virtual network specified for VMs created by the Machine deployment. You can connect on-premises virtual networks to Azure through Azure ExpressRoute and Azure VPN Gateway.
- The Legacy Azure connectors are deprecated but are still available for a limited time. There’s no upgrade nor migration path from any Legacy Azure connectors to the new Azure Deployments connector types. For more information, see Citrix App Layering in Azure.