Resource managers - Approve and manage
As a Citrix ITSM resource manager, you can approve app and desktop requests and reclaim apps and desktops.
Required roles
You must have one of the following Citrix ITSM roles:
- Resource manager (
x_cion_citrix_it_s.ctx_itsm_resource_manager) - Operator (
x_cion_citrix_it_s.ctx_itsm_operator) - Administrator (
x_cion_citrix_it_s.ctx_itsm_admin)
Process employee separation
When employees leave your organization, start the Process employee separation service to log them out of sessions and to reclaim their apps and desktops.
-
Sign in to your ServiceNow Service Management Portal.
-
Go to Citrix IT Service Management Connector > Services > Citrix Virtual Apps and Desktops™.
-
Click Process employee separation.
-
In the User field, enter the universal principal name of an outgoing employee and then click Search.
Resources associated with the user appear:
- Sessions: Displays active and disconnected sessions launched by this user.
- Assigned Desktops: Displays desktops assigned to this user.
- Available Desktops: Displays desktops that this user has permission to launch.
- Available Applications: Displays applications that this user has permission to launch.
-
From the Deprovisioning Type list, select an option:
- Remove the desktop
- Keep the desktop but remove the user assignment
-
Click Submit.
Deprovision static VDI desktops
You can deprovision static VDI desktops to take back resources in the following ways:
For more information about static VDI desktops, see VDI desktops.
Note:
You can deprovision only static desktops deployed in Citrix DaaS.
Deprovision a static desktop depending on your needs
You can deprovision static desktops to take back resources when needed. For example, when an employee leaves your organization.
-
Sign in to your ServiceNow Service Management Portal.
-
Go to Citrix IT Service Management Connector > Services > Citrix Virtual Apps and Desktops.
-
Click Deprovision a static desktop.
- Use the following filters to locate the target desktop:
- User: select the user who is using the desktop. To ignore this filter, select All.
- Delivery Group: (optional) select the delivery group where the desktop belongs.
- Machine Catalog: (optional) select the machine catalog where the desktop belongs.
The Search Results field shows the static desktops that meet the search criteria you selected.
-
In the Search Results field, select the target desktop.
-
From the Deprovisioning Type list, select the type you want:
- Remove the desktop
- Keep the desktop but remove the user assignment
-
Click Update.
The deprovisioning task starts to run in the background. To see the task progress, go to the User Requests menu. When the task completes, the State field of this request shows Closed Complete.
Deprovision an idle static desktop
The Deprovisioning List menu provides a central place for you to view and deprovision idle static desktops. If your Citrix ITSM administrator has enabled automatic deprovisioning for a delivery group, idle desktops in this group are deprovisioned automatically.
Note:
Citrix ITSM administrators can enable deprovisioning of idle static desktops based on delivery groups. For more information, see Enable deprovisioning of idle desktops.
To deprovision an idle desktop, follow these steps:
-
Sign in to your ServiceNow Service Management Portal.
-
Go to Citrix IT Service Management Connector > Deprovisioning List. The Deprovisioning List page appears.
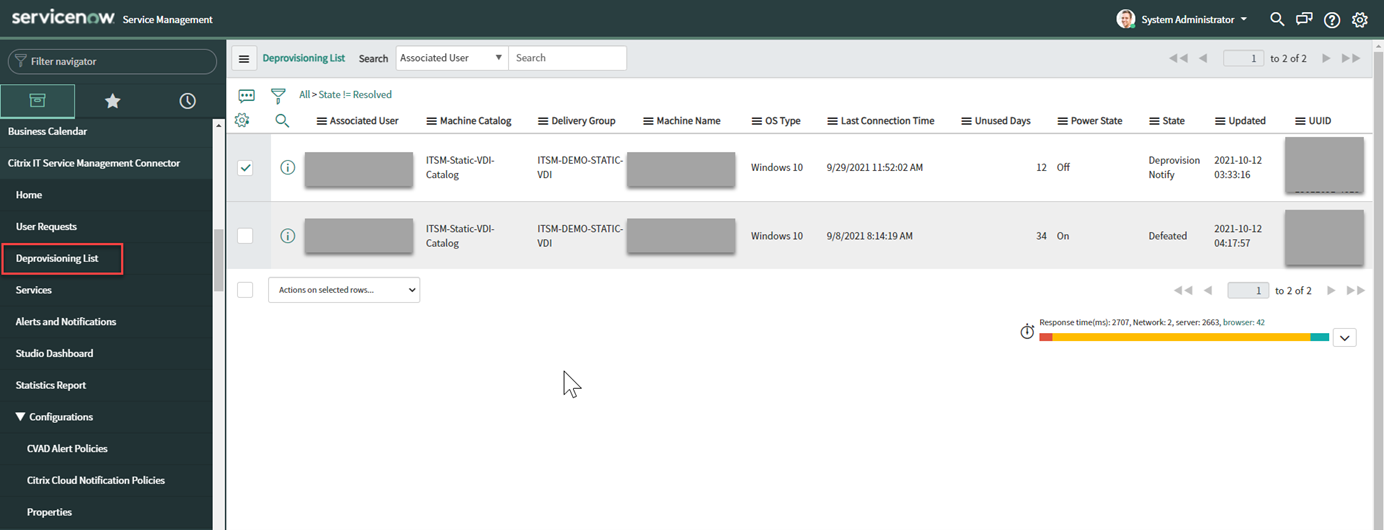
Desktops in this list can have the following states:
- Flagged for Deprovisioning. Identifies that the desktop will soon be ready for deprovisioning.
- Ready for Deprovisioning. Identifies that the desktop is ready for deprovisioning.
- Completed Deprovisioning. Identifies that the desktop is deprovisioned successfully.
-
Select an idle desktop record that has the State field shown Ready for Deprovisioning.
-
From the Actions on selected rows list in the lower left of the list, select a deprovisioning type as needed:
- Remove the desktop
- Keep the desktop but remove the user assignment
Alternatively, you can click the Associated User field to open the desktop details page, and then click Remove the desktop or Keep the desktop but remove the user assignment at the bottom of that page.
-
Click Update.
The deprovisioning task starts to run in the background. When the task completes, the State field of this record shows Completed Deprovisioning.
Approve user requests
As a resource manager, you can review and approve requests submitted by end users or IT help desks. Use the following tasks to manage and process these requests:
- View details of user requests
- Approve desktop requests
- Approve application requests
- Approve requests for MCS-created machines
- Approve requests for desktop scaling
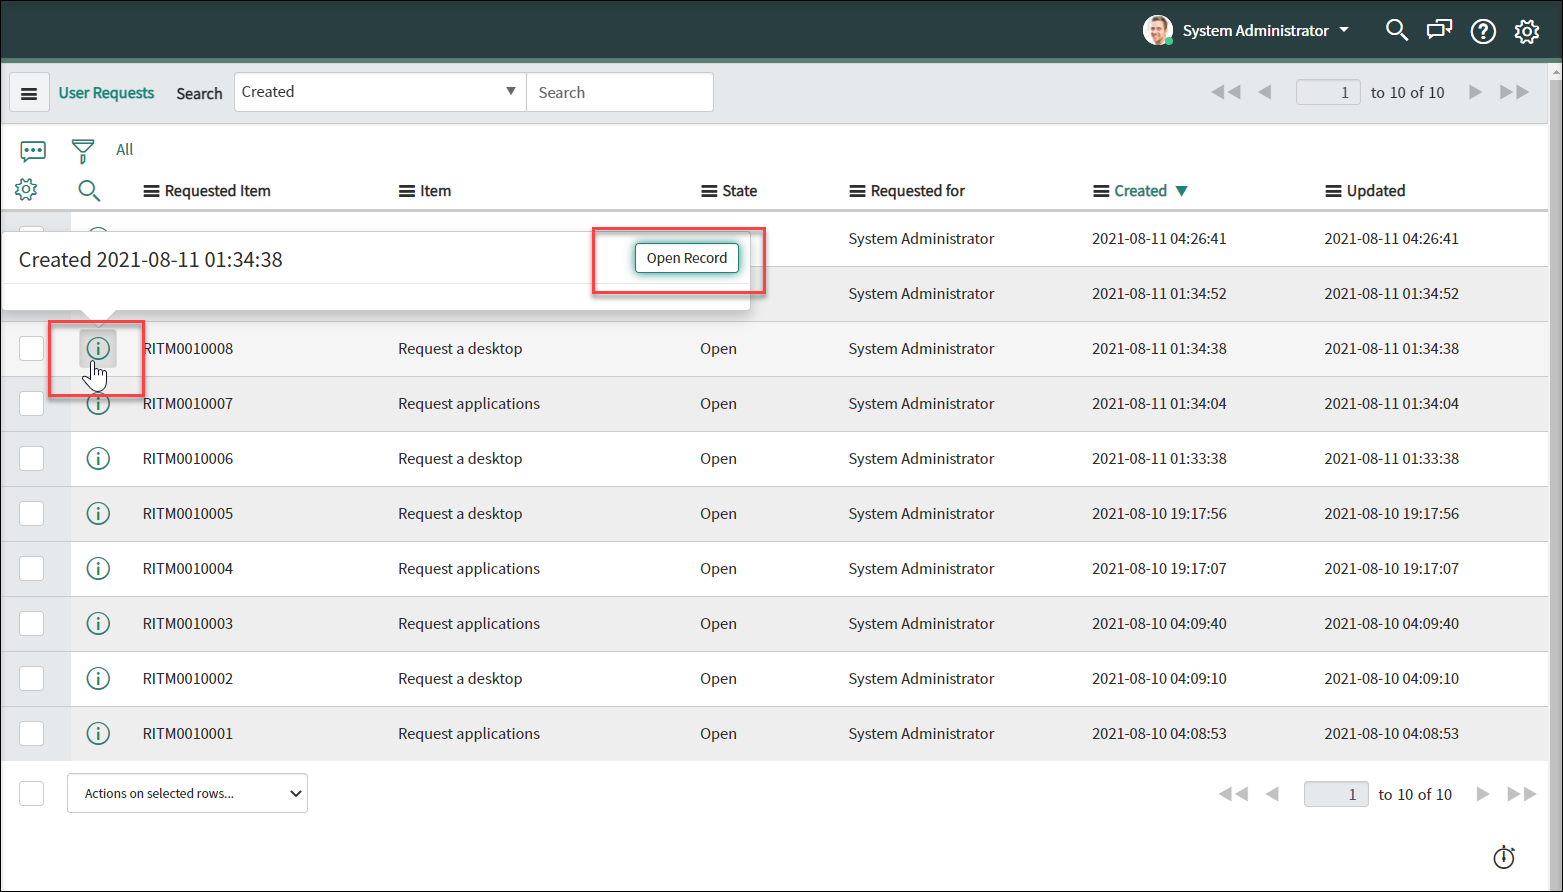
View details of user requests
After end users or IT help desks submit requests, you can view the request details in the User Requests menu. For example, you can view the processing state of a user request. For the Report Citrix session failures requests, you can view session logs from Citrix DaaS components for troubleshooting. Those components include the Delivery Controller™, Citrix Health Check service (if applicable), and more.
-
Sign in to your ServiceNow Service Management Portal.
-
Go to Citrix IT Service Management Connector > User requests.
-
On the User Requests page that appears, view the State field of each request:
- Pending. Indicates that the request is pending approval.
- Work in progress. Indicates that the request has been approved but the resources have not yet been assigned.
- Closed Complete. Indicates that the request has been completed successfully and closed.
- Closed Incomplete. Indicates that the request has been closed but not completed successfully.
Approve desktop requests
Through the User Requests menu, you can view and approve desktop requests.
Note:
By default, when you approve a desktop request, the user is added to the delivery group containing this desktop. However, if your organization manages user assignments using AD groups, you can choose to add users to those AD groups. To support adding users to AD groups, enable AD operations by using one of the following methods:
- Use ServiceNow for AD operations: Activate the Active Directory Automation solution in ServiceNow. For more information, see this ServiceNow article.
- Use ITSM for AD operations: Enable the Enable AD Operation via ITSM property. This configuration uses the Citrix Identity service to connect to your AD server. For more information, see Enable AD operations through ITSM.
Steps:
-
Sign in to your ServiceNow Service Management Portal.
-
Go to Citrix IT Service Management Connector > User Requests.
-
On the User Requests page that appears, locate a Request a desktop record whose State is Open.
-
Click the information icon next to the request ID, and then click Open Record. The request page appears.
If you are prompted the machine catalog is short on machines, you can click the hyperlink provided in the message to create a machine creation request immediately. Or you can start a machine creation request later after completing the current desktop request. For more information about detailed steps, see Request MCS-created machines.
-
To approve this request and add the user to the displayed delivery group, click Update.
-
To approve this request and add the user to an AD group that has permission to use the desktop, follow these steps:
- From the Add user to AD group instead list, select an AD group. The drop-down list displays AD groups that have permission to use the desktop.
Note:
The ITSM connector periodically syncs configurations (including the AD group information) from Citrix Cloud. Currently, the synchronization cycle is four hours.
- Click Update.
After the task completes, you can see the result (succeed or fail) in the Comments field.
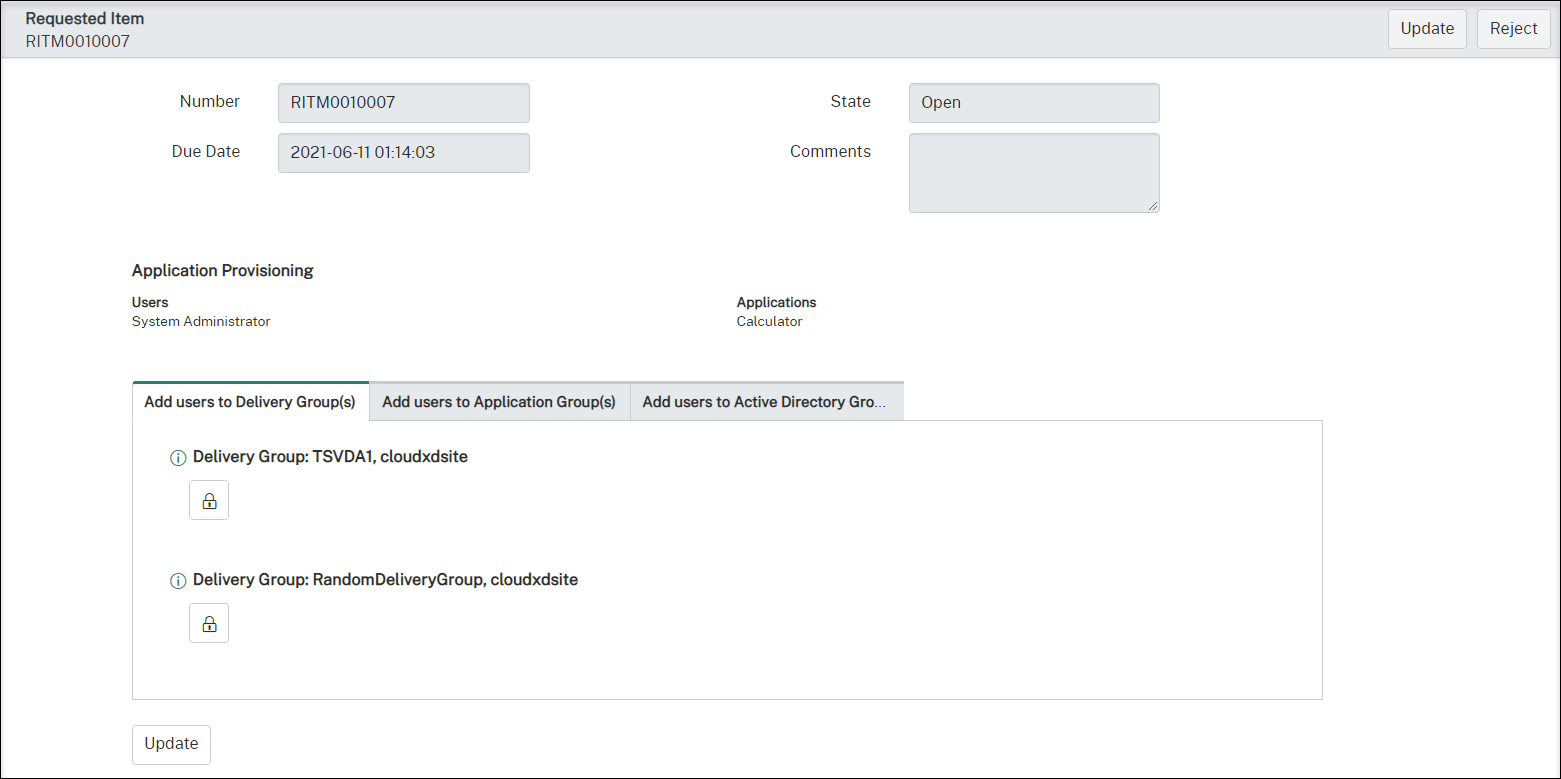
Approve application requests
Through the User Requests menu, you can view and approve application requests. When approving requests, you must assign applications to users by adding them to delivery groups, application groups, or AD groups.
Note:
To support adding users to AD groups, configure one of the following options to authorize AD operations:
- Use ServiceNow for AD operations: Activate the Active Directory Automation solution in ServiceNow. For more information, see this ServiceNow article.
- Use ITSM for AD operations: Enable the Enable AD Operation via ITSM property. This configuration uses the Citrix Identity service to connect to your AD server. For more information, see Enable AD operations through ITSM.
Steps:
-
Sign in to your ServiceNow Service Management Portal.
-
Go to Citrix IT Service Management Connector > User Requests.
-
On the User Requests page that appears, locate a Request Applications record whose State is Open.
-
Click the information icon next to the application request ID, and then click Open Record. The request details appear.
-
Assign the applications to the users by adding them to the following groups:
- Add users to Active Directory Group(s). Click the tab. Active Directory groups that have permission to use the requested applications appear. To add the users to one of the groups, click the lock icon under the group name.
- Add users to Delivery Group(s). Click the tab. Delivery groups containing the requested applications appear. To add the users to one of the groups, click the lock icon under the group name.
- Add users to Application Group(s). Click the tab. Application groups containing the requested applications appear. To add the users to one of the groups, click the lock icon under the group name.
Note:
- By default, the ITSM connector periodically syncs Citrix DaaS data to ServiceNow every four hours.
- If you add users to two or more types of groups, AD groups have higher priority than Delivery groups and Application groups. The latter two have the same priority.
- When you add users to a group, all resources (not only applications) associated with this group are assigned to the users. To avoid assigning unnecessary applications to them, create more fine-grained groups.
-
Click Update.
After the task completes, you can see the result (succeed or fail) in the Comments field.
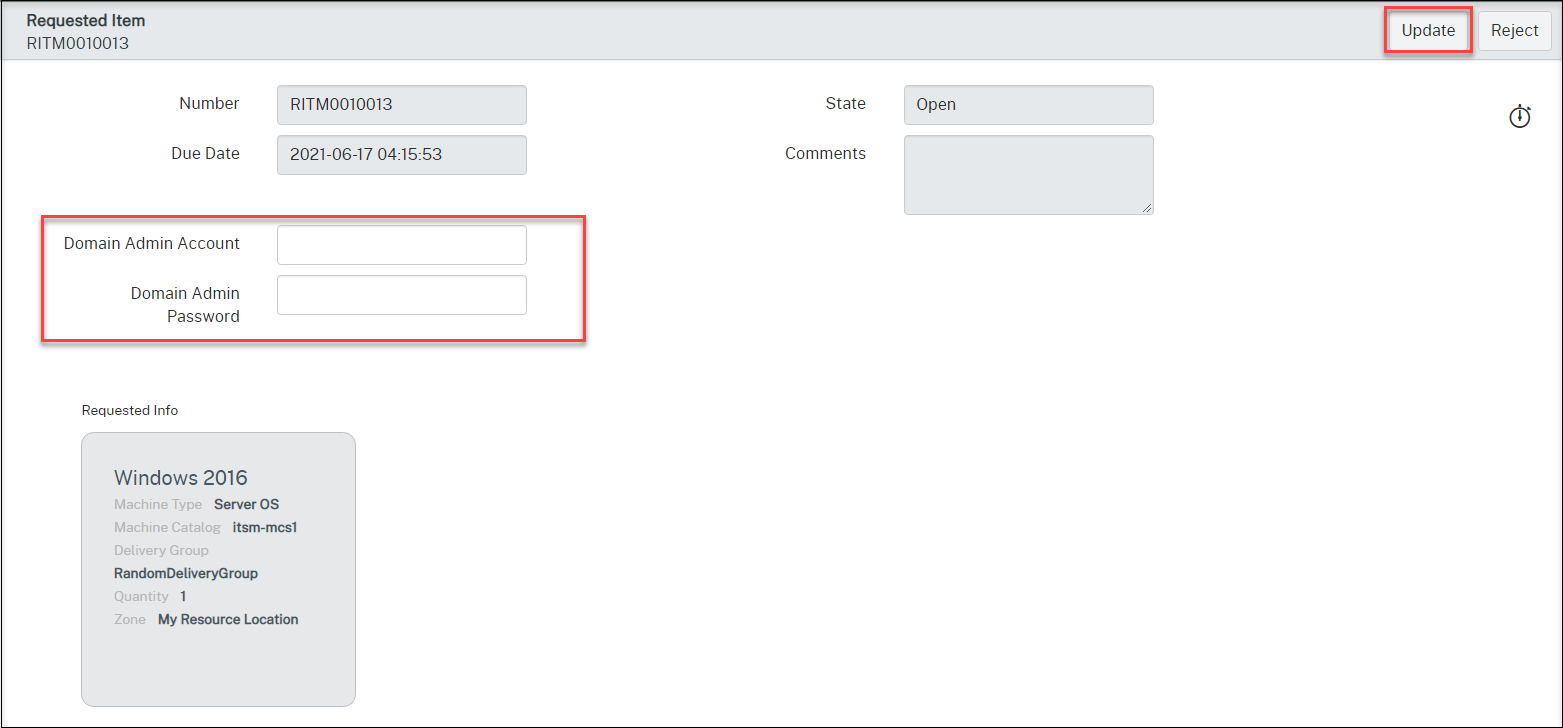
Approve requests for MCS-created machines
Through the User Requests menu, you can approve requests for MCS-created machines.
Note:
You also have permission to request MCS-created machines. For more information, see Request MCS-created machines.
Steps:
-
Before approving a request, get the credentials of the domain where the requested machines belong.
-
Sign in to your ServiceNow Service Management Portal.
-
Go to Citrix IT Service Management Connector > User Requests.
-
Open the record of a machine creation request. The Requested Item page appears.
-
Type your domain credentials, and then click Update in the upper-right corner.
Machine creation starts to run in the background. After it completes, you can see the result (succeed or fail) in the Comments field.
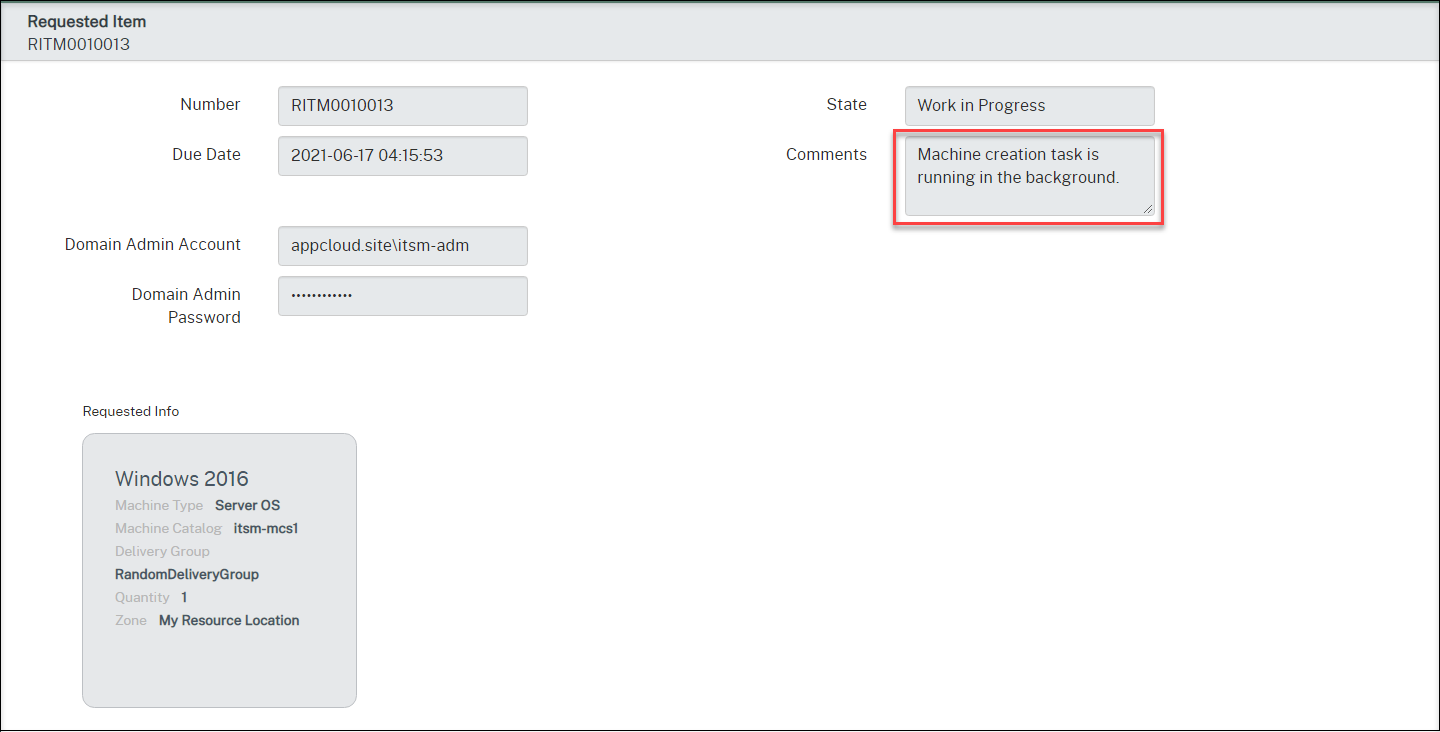
Note:
The domain credentials that you provide are for one-time use only. Your ServiceNow instance doesn’t store or cache them.
Approve requests for desktop scaling
Through the User Requests menu, you can view and approve requests for desktop scaling.
Note:
Desktop scaling occurs at the scheduled time period after you approve the request.
Steps:
-
Sign in to your ServiceNow Service Management Portal.
-
Go to Citrix IT Service Management Connector > User Requests.
-
On the User Requests page that appears, locate a Scale Citrix Virtual Desktops™ record with a State of Open.
-
Click the information icon before the request ID, and then click Open Record to view the request details.
-
Review the request details and either approve or reject the request.
The State field indicates the status and progress of the request:
- Closed Skipped: The request was rejected.
- Work in Progress: The request was approved, but the desktop scaling hasn’t yet completed.
- Closed Complete: The request was approved, and desktop scaling completes.
View Citrix DaaS deployment information
Studio Dashboard provides a central place for you to view data from your Citrix DaaS deployment.
-
Sign in to your ServiceNow Service Management Portal.
-
Go to Citrix IT Service Management Connector > Studio Dashboard. The Studio Dashboard page appears with tabs. Each tab displays a type of delivery information of your apps and desktops.
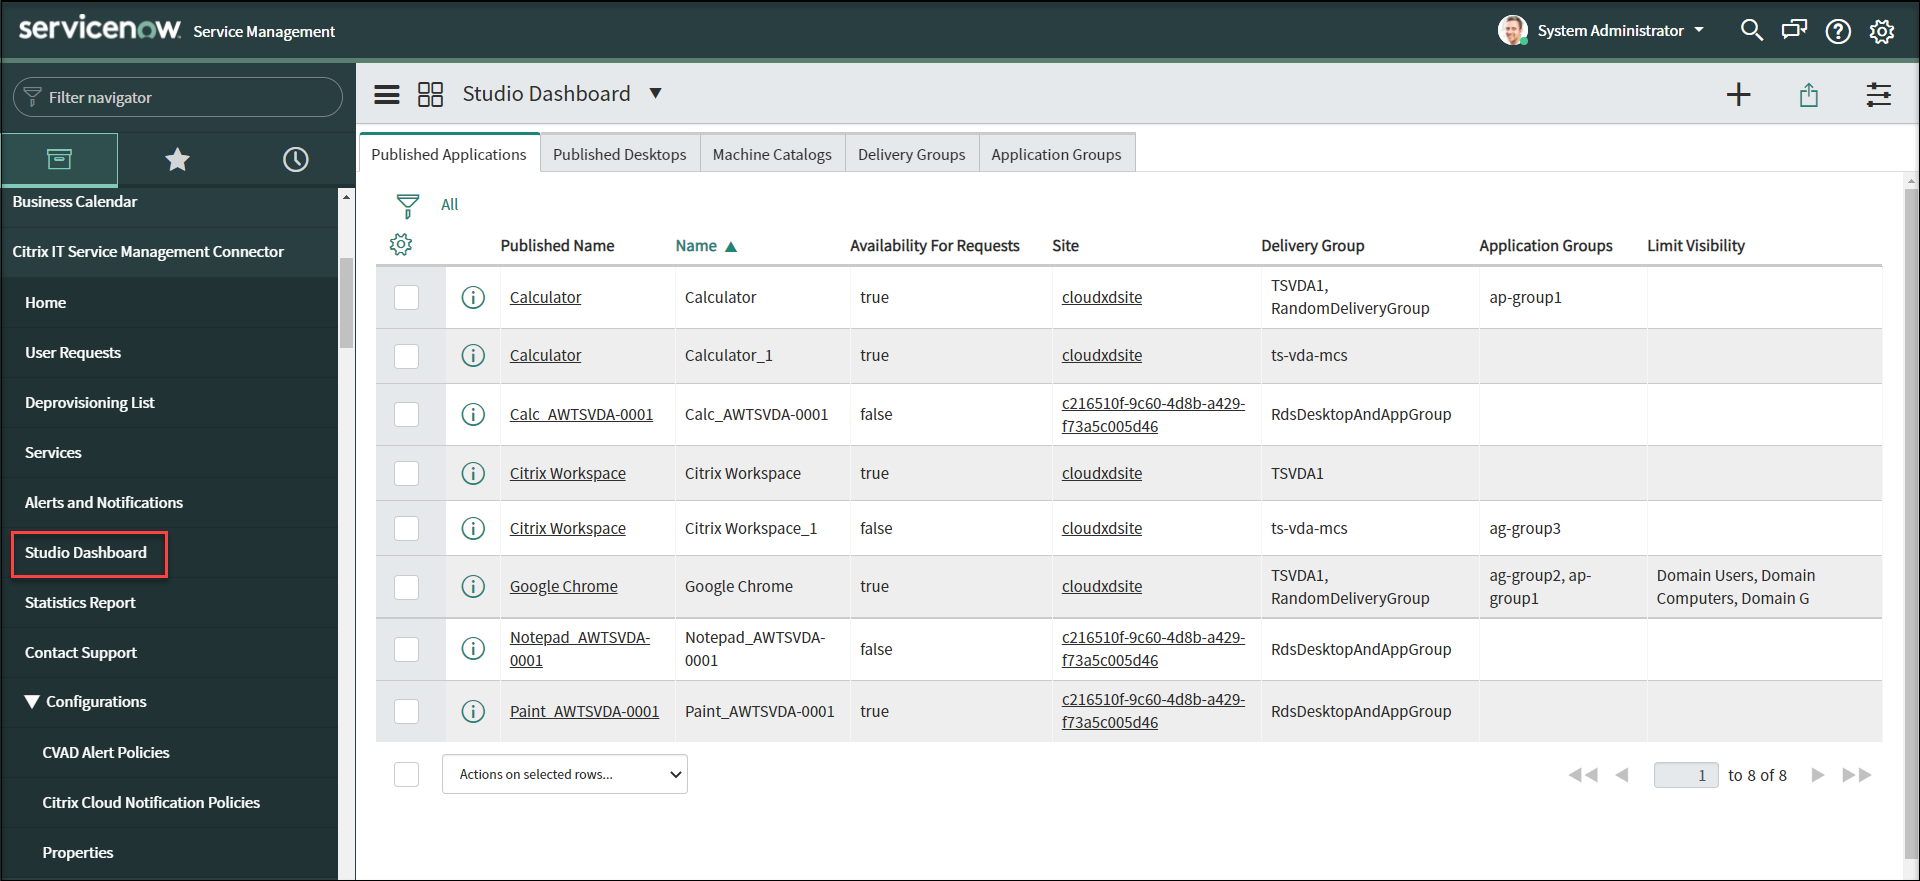
-
Click one of the following tabs to view details:
- Published Applications
- Published Desktops
- Machine Catalogs
- Delivery Groups
- Application Groups
Note:
If you have the Citrix ITSM connector 22.6 or later installed on your ServiceNow instance, more tabs might appear on this dashboard, such as VDA Info. Those tabs appear only after your ITSM administrators set up the corresponding data import policies. For more information, see Import Citrix data to ServiceNow.