Network connections
Introduction
This article provides details about several deployment scenarios when using a Citrix Managed Azure subscription.
When creating a catalog, you indicate if and how users access locations and resources on their corporate on-premises network from their Citrix DaaS Standard for Azure (formerly Citrix Virtual Apps and Desktops Standard for Azure) desktops and apps.
When using a Citrix Managed Azure subscription, the choices are:
When using one of your own customer-managed Azure subscriptions, there is no need to create a connection to Citrix DaaS for Azure. You just add the Azure subscription to Citrix DaaS for Azure.
You cannot change a catalog’s connection type after the catalog is created.
Requirements for all network connections
- When creating a connection, you must have valid DNS server entries.
- When using Secure DNS or a third-party DNS provider, you must add the address range that is allocated for use by Citrix DaaS for Azure to the DNS provider’s IP addresses on the allow list. That address range is specified when you create a connection.
- All service resources that use the connection (domain-joined machines) must be able to reach your Network Time Protocol (NTP) server, to ensure time synchronization.
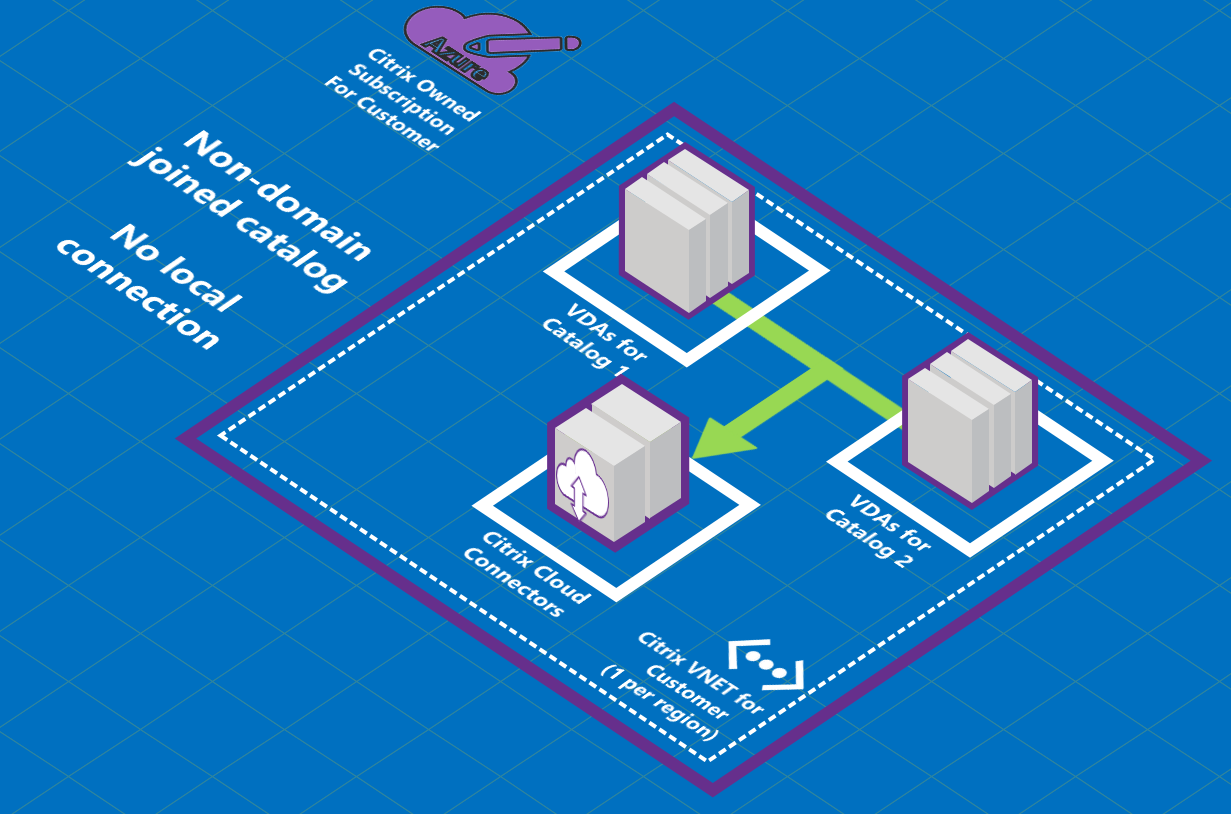
No connectivity
When a catalog is configured with No connectivity, users cannot access resources on their on-premises or other networks. This is the only choice when creating a catalog using quick create.
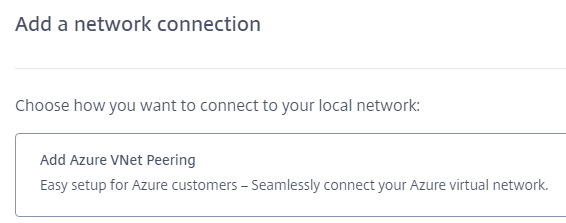
About Azure VNet peering connections
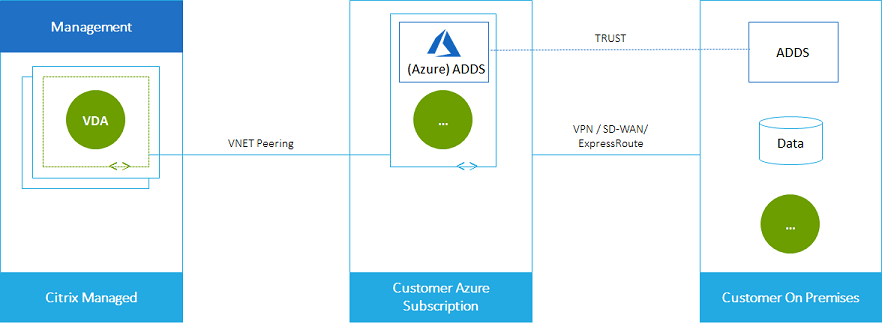
Virtual network peering seamlessly connects two Azure virtual networks (VNets): yours and the Citrix DaaS for Azure VNet. Peering also helps enable users to access files and other items from your on-premises networks.
As shown in the following graphic, you create a connection using Azure VNet peering from the Citrix Managed Azure subscription to the VNet in your company’s Azure subscription.
Here’s another illustration of VNet peering.
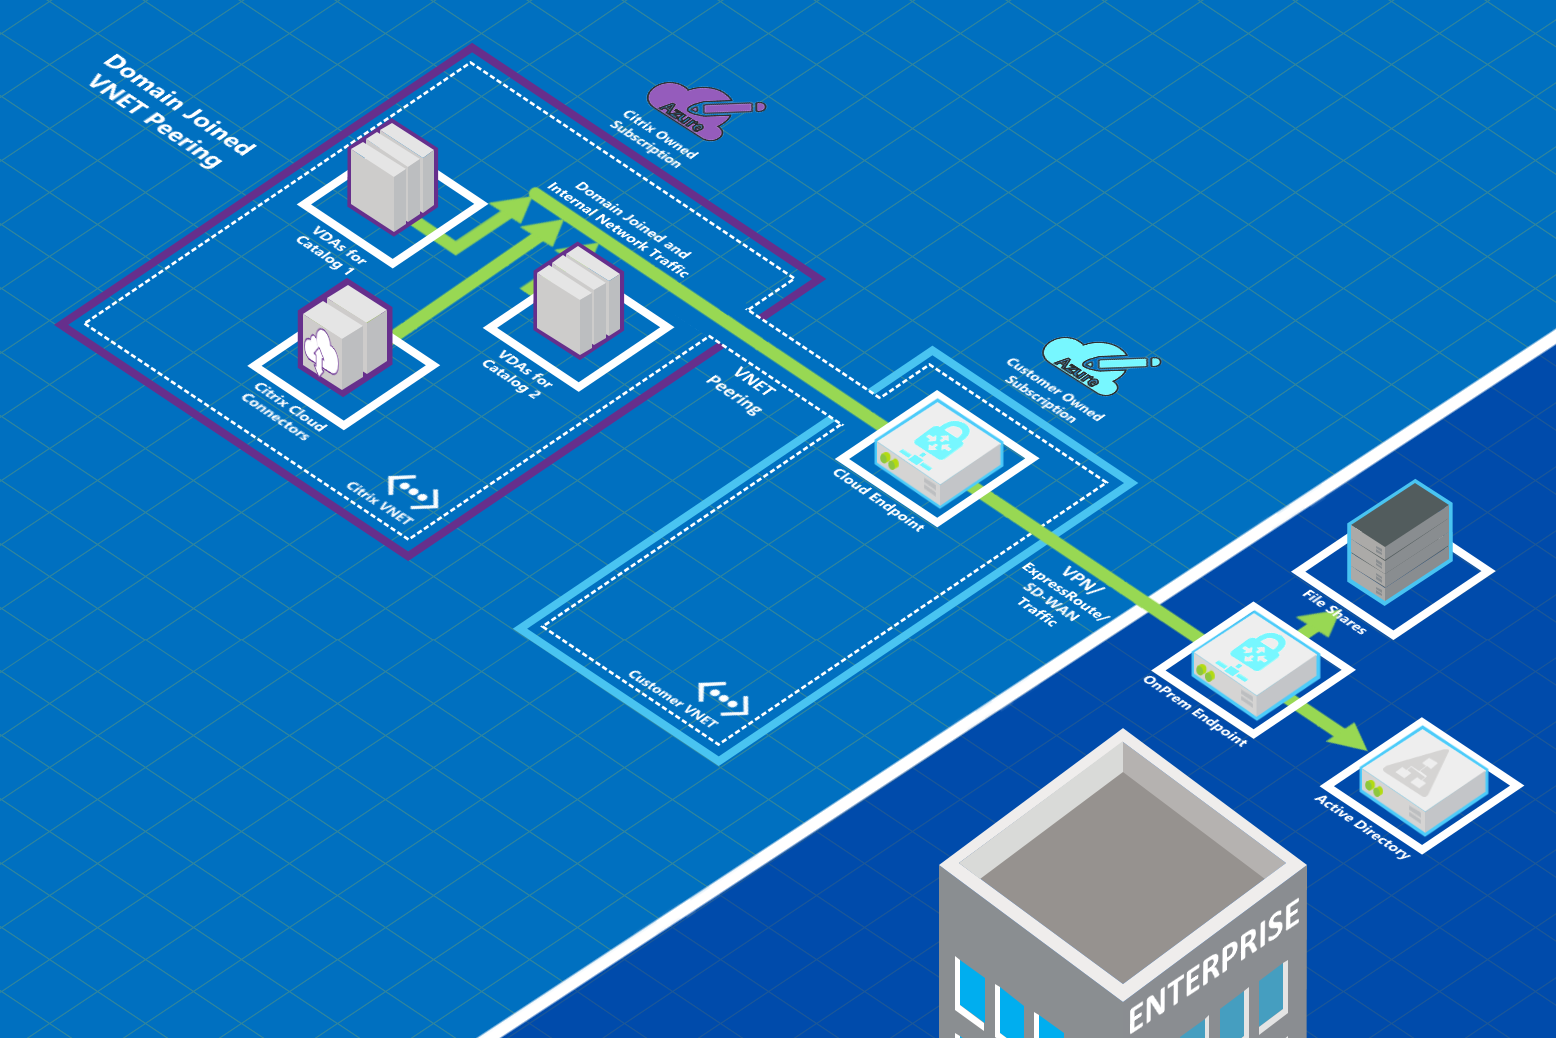
Users can access their on-premises network resources (such as file servers) by joining the local domain when you create a catalog. (That is, you join the AD domain where file shares and other needed resources reside.) Your Azure subscription connects to those resources (in the graphics, using a VPN or Azure ExpressRoute). When creating the catalog, you provide the domain, OU, and account credentials.
Important:
- Learn about VNet peering before using it in Citrix DaaS for Azure.
- Create a VNet peering connection before creating a catalog that uses it.
Azure VNet peering custom routes
Custom, or user-defined, routes override Azure’s default system routes for directing traffic between virtual machines in a VNet peering, on-premises networks, and the Internet. You might use custom routes if there are networks that Citrix DaaS for Azure resources are expected to access but aren’t directly connected through VNet peering. For example, you might create a custom route that forces traffic through a network appliance to the Internet or to an on-premises network subnet.
To use custom routes:
- You must have an existing Azure virtual network gateway or a network appliance such as Citrix SD-WAN in your Citrix DaaS for Azure environment.
- When you add custom routes, you must update your company’s route tables with the Citrix DaaS for Azure destination VNet information to ensure end-to-end connectivity.
- Custom routes are displayed in Citrix DaaS for Azure in the order in which they are entered. This display order does not affect the order in which Azure selects routes.
Before using custom routes, review the Microsoft article Virtual network traffic routing to learn about using custom routes, next hop types, and how Azure selects routes for outbound traffic.
You can add custom routes when you create an Azure VNet peering connection or to existing ones in your Citrix DaaS for Azure environment. When you’re ready to use custom routes with your VNet peering, refer to the following sections in this article:
- For custom routes with new Azure VNet peerings: Create an Azure VNet peering connection
- For custom routes with existing Azure VNet peerings: Manage custom routes for existing Azure VNet peer connections
Azure VNet peering requirements and preparation
- Credentials for an Azure Resource Manager subscription owner. This must be an Azure Active Directory account. Citrix DaaS for Azure does not support other account types, such as live.com or external Azure AD accounts (in a different tenant).
- An Azure subscription, resource group, and virtual network (VNet).
- Set up the Azure network routes so that VDAs in the Citrix Managed Azure subscription can communicate with your network locations.
- Open Azure network security groups from your VNet to the specified IP range.
-
Active Directory: For domain-joined scenarios, we recommend that you have some form of Active Directory services running in the peered VNet. This takes advantage of the low latency characteristics of the Azure VNet peering technology.
For example, the configuration might include Azure Active Directory Domain Services (AADDS), a domain controller VM in the VNet, or Azure AD Connect to your on-premises Active Directory.
After you enable AADDS, you cannot move your managed domain to a different VNet without deleting the managed domain. So, it’s important to select the correct VNet to enable your managed domain. Before proceeding, review the Microsoft article Networking considerations for Azure AD Domain Services.
-
VNet IP range: When creating the connection, you must provide an available CIDR address space (IP address and network prefix) that is unique among the network resources and the Azure VNets being connected. This is the IP range assigned to the VMs within the Citrix DaaS for Azure peered VNet.
Ensure that you specify an IP range that does not overlap any addresses that you use in your Azure and on-premises networks.
-
For example if your Azure VNet has an address space of 10.0.0.0 /16, create the VNet peering connection in Citrix DaaS for Azure as something such as 192.168.0.0 /24.
-
In this example, creating a peering connection with a 10.0.0.0 /24 IP range would be considered an overlapping address range.
If addresses overlap, the VNet peering connection might not be created successfully. It also does not work correctly for site administration tasks.
-
To learn about VNet peering, see the following Microsoft articles.
- Virtual network peering
- Azure VPN Gateway
- Create a Site-to-Site connection in the Azure portal
- VPN Gateway FAQ (search for “overlap”)
Create an Azure VNet peering connection
-
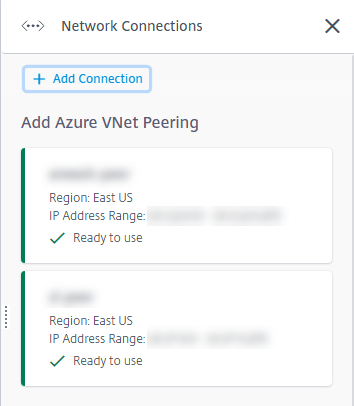
From the Manage > Azure Quick Deploy dashboard in Citrix DaaS for Azure, expand Network Connections on the right. If you have already set up connections, they’re listed.
- Click Add Connection.
-
Click anywhere in the Add Azure VNet Peering box.
-
Click Authenticate Azure Account.

-
Citrix DaaS for Azure automatically takes you to the Azure sign-in page to authenticate your Azure subscriptions. After you sign in to Azure (with the global administrator account credentials) and accept the terms, you are returned to the connection creation details dialog.
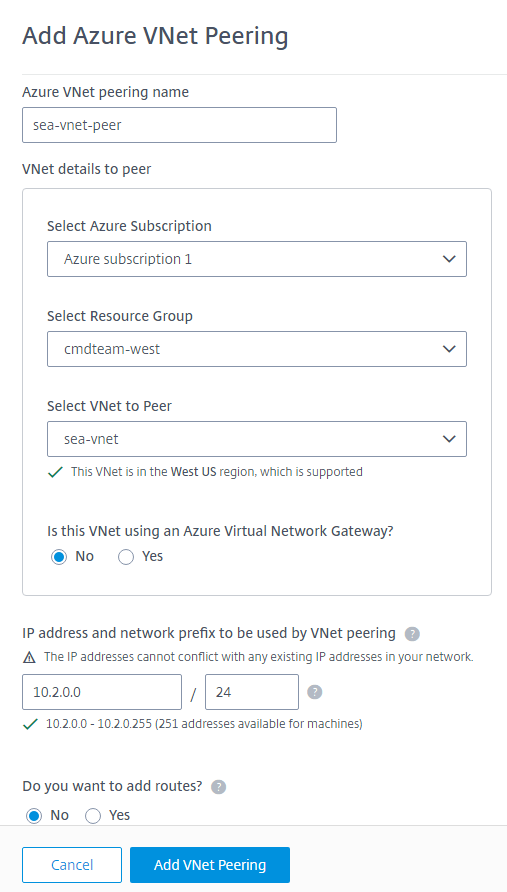
- Type a name for the Azure VNet peer.
- Select the Azure subscription, resource group, and the VNet to peer.
- Indicate whether the selected VNet uses an Azure Virtual Network Gateway. For information, see the Microsoft article Azure VPN Gateway.
-
If you answered Yes in the previous step (the selected VNet uses an Azure virtual network gateway), indicate whether you want to enable virtual network gateway route propagation. When enabled, Azure automatically learns (adds) all routes through the gateway.
You can change this setting later on the connection’s Details page. However, changing it can cause route pattern changes and VDA traffic interruptions. Also, if you disable it later, you must manually add routes to networks that VDAs will use.
-
Type an IP address and select a network mask. The address range to be used is displayed, plus how many addresses that the range supports. Ensure that the IP range does not overlap any addresses that you use in your Azure and on-premises networks.
- For example, if your Azure VNet has an address space of 10.0.0.0 /16, create the VNet peering connection in Citrix Virtual Apps and Desktops Standard as something such as 192.168.0.0 /24.
- In this example, creating a VNet peering connection with a 10.0.0.0 /24 IP range would be considered an overlapping address range.
If addresses overlap, the VNet peering connection might not be created successfully. It also won’t work correctly for site administration tasks.
- Indicate whether you want to add custom routes to the VNet peering connection. If you select Yes, enter the following information:
- Type a friendly name for the custom route.
- Enter the destination IP address and network prefix. The network prefix must be between 16 and 24.
-
Select a next hop type for where you want traffic to be routed. If you select Virtual appliance, enter the internal IP address of the appliance.
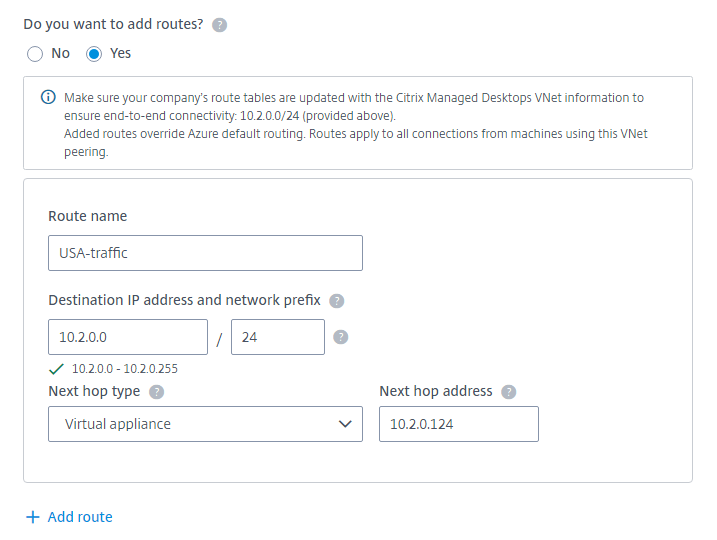
For more information about next hop types, see Custom routes in the Microsoft article Virtual network traffic routing.
- Click Add route to create another custom route for the connection.
- Click Add VNet Peering.
After the connection is created, it is listed under Network Connections > Azure VNet Peers on the right side of the Manage > Azure Quick Deploy dashboard. When you create a catalog, this connection is included in the available network connections list.
View Azure VNet peering connection details
- From the Manage > Azure Quick Deploy dashboard in Citrix DaaS for Azure, expand Network Connections on the right.
- Select the Azure VNet peering connection you want to display.
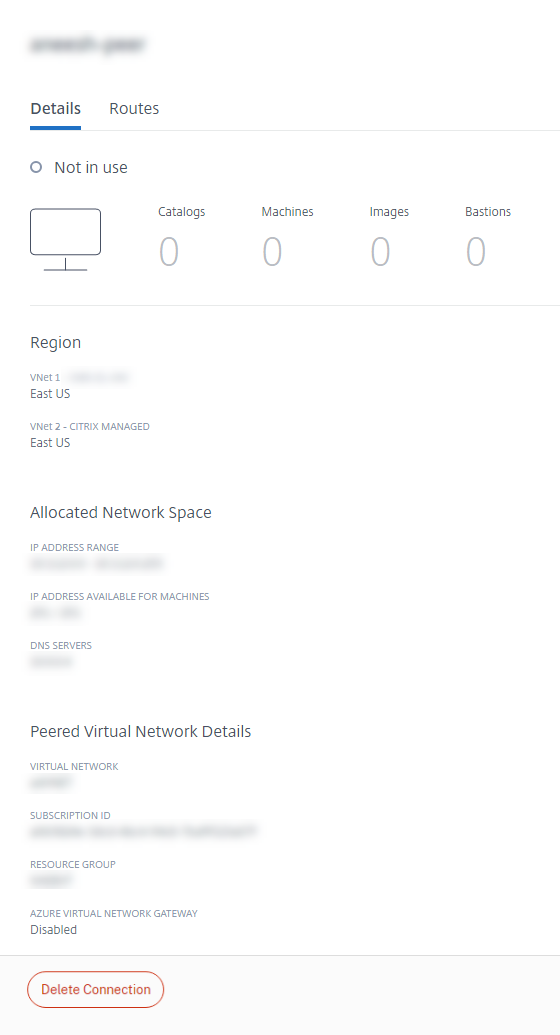
Details include:
- The number of catalogs, machines, images, and bastions that use this connection.
- The region, allocated network space, and peered VNets.
- The routes currently configured for the VNet peering connection.
Manage custom routes for existing Azure VNet peer connections
You can add new custom routes to an existing connection or modify existing custom routes, including disabling or deleting custom routes.
Important:
Modifying, disabling, or deleting custom routes changes the traffic flow of the connection and might disrupt any user sessions that might be active.
To add a custom route:
- From the VNet peering connection details, select Routes and then click Add Route.
- Enter a friendly name, the destination IP address and prefix, and the next hop type you want to use. If you select Virtual Appliance as the next hop type, enter the internal IP address of the appliance.
- Indicate whether you want to enable the custom route. By default, the custom route is enabled.
- Click Add Route.
To modify or disable a custom route:
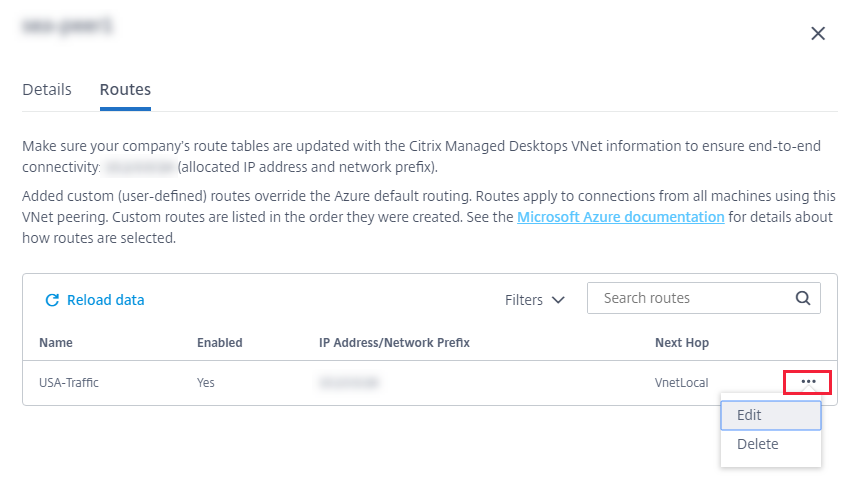
- From the VNet peering connection details, select Routes and then locate the custom route you want to manage.
-
From the ellipsis menu, select Edit.
- Make any needed changes to the destination IP address and prefix or the next hop type, as needed.
- To enable or disable a custom route, in Enable this route?, select Yes or No.
- Click Save.
To delete a custom route:
- From the VNet peering connection details, select Routes and then locate the custom route you want to manage.
- From the ellipsis menu, select Delete.
- Select Deleting a route may disrupt active sessions to acknowledge the impact of deleting the custom route.
- Click Delete Route.
Delete an Azure VNet peering connection
Before you can delete an Azure VNet peer, remove any catalogs associated with it. See Delete a catalog.
- From the Manage > Azure Quick Deploy dashboard in Citrix DaaS for Azure, expand Network Connections on the right.
- Select the connection you want to delete.
- From the connection details, click Delete Connection.
About SD-WAN connections
Important:
Citrix SD-WAN has been deprecated and all related content will be removed from the documentation in a future release. We recommend that you switch to alternative networking solutions to ensure uninterrupted access to Citrix services.
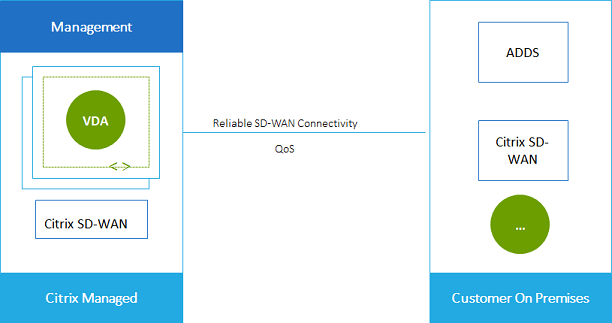
Citrix SD-WAN optimizes all the network connections needed by Citrix Virtual Apps and Desktops Standard for Azure. Working in concert with the HDX technologies, Citrix SD-WAN provides quality-of-service and connection reliability for ICA and out-of-band Citrix Virtual Apps and Desktops Standard traffic. Citrix SD-WAN supports the following network connections:
- Multi-stream ICA connection between users and their virtual desktops
- Internet access from the virtual desktop to websites, SaaS apps, and other cloud properties
- Access from the virtual desktop back to on-premises resources such as Active Directory, file servers, and database servers
- Real-time/interactive traffic carried over RTP from the media engine in the Workspace app to cloud-hosted Unified Communications services such as Microsoft Teams
- Client-side fetching of videos from sites like YouTube and Vimeo
As shown in the following graphic, you create an SD-WAN connection from the Citrix Managed Azure subscription to your sites. During connection creation, SD-WAN VPX appliances are created in the Citrix Managed Azure subscription. From the SD-WAN perspective, that location is treated as a branch.
SD-WAN connection requirements and preparation
-
If the following requirements are not met, the SD-WAN network connection option is not available.
- Citrix Cloud entitlements: Citrix Virtual Apps and Desktops Standard for Azure and SD-WAN Orchestrator.
- An installed and configured SD-WAN deployment. The deployment must include a Master Control Node (MCN), whether in the cloud or on-premises, and be managed with SD-WAN Orchestrator.
-
VNet IP range: Provide an available CIDR address space (IP address and network prefix) that is unique among the network resources being connected. This is the IP range assigned to the VMs within the Citrix Virtual Apps and Desktops Standard VNet.
Ensure that you specify an IP range that does not overlap any addresses that you use in your cloud and on-premises networks.
- For example, if your network has an address space of 10.0.0.0 /16, create the connection in Citrix Virtual Apps and Desktops Standard as something such as 192.168.0.0 /24.
- In this example, creating a connection with a 10.0.0.0 /24 IP range would be considered an overlapping address range.
If addresses overlap, the connection might not be created successfully. It also does not work correctly for site administration tasks.
-
The connection configuration process includes tasks that you (the Citrix DaaS for Azure administrator) and the SD-WAN Orchestrator administrator must complete. Also, to complete your tasks, you need information provided by the SD-WAN Orchestrator administrator.
We recommend that you both review the guidance in this document, plus the SD-WAN documentation, before actually creating a connection.
Create an SD-WAN connection
Important:
For details about SD-WAN configuration, see SD-WAN configuration for Citrix Virtual Apps and Desktops Standard for Azure integration.
- From the Manage > Azure Quick Deploy dashboard in Citrix DaaS for Azure, expand Network Connections on the right.
- Click Add Connection.
- On the Add a network connection page, click anywhere in the SD-WAN box.
- The next page summarizes what’s ahead. When you’re done reading, click Start Configuring SD-WAN.
-
On the Configure SD-WAN page, enter the information provided by your SD-WAN Orchestrator administrator.
- Deployment mode: If you select High availability, two VPX appliances are created (recommended for production environments). If you select Standalone, one appliance is created. You cannot change this setting later. To change to the deployment mode, you’ll have to delete and re-create the branch and all associated catalogs.
- Name: Type a name for the SD-WAN site.
- Throughput and number of offices: This information is provided by your SD-WAN Orchestrator administrator.
- Region: The region where the VPX appliances will be created.
- VDA subnet and SD-WAN subnet: This information is provided by your SD-WAN Orchestrator administrator. See SD-WAN connection requirements and preparation for information about avoiding conflicts.
- When you’re done, click Create Branch.
- The next page summarizes what to look for on the Manage > Azure Quick Deploy dashboard. When you’re done reading, click Got it.
- On the Manage > Azure Quick Deploy dashboard, the new SD-WAN entry under Network Connections shows the progress of the configuration process. When the entry turns orange with the message Awaiting activation by SD-WAN administrator, notify your SD-WAN Orchestrator administrator.
- For SD-WAN Orchestrator administrator tasks, see the SD-WAN Orchestrator product documentation.
- When the SD-WAN Orchestrator administrator finishes, the SD-WAN entry under Network Connections turns green, with the message You can create catalogs using this connection.
View SD-WAN connection details
- From the Manage > Azure Quick Deploy dashboard in Citrix DaaS for Azure, expand Network Connections on the right.
- Select SD-WAN if it’s not the only selection.
- Click the connection you want to display.
The display includes:
- Details tab: Information you specified when configuring the connection.
- Branch Connectivity tab: Name, cloud connectivity, availability, bandwidth tier, role, and location for each branch and MCN.
Delete an SD-WAN connection
Before you can delete an SD-WAN connection, remove any catalogs associated with it. See Delete a catalog.
- From the Manage > Azure Quick Deploy dashboard in Citrix DaaS for Azure, expand Network Connections on the right.
- Select SD-WAN if it’s not the only selection.
- Click the connection you want to delete, to expand its details.
- On the Details tab, click Delete Connection.
- Confirm the deletion.
Azure VPN Technical Preview
The Azure VPN feature is available for technical preview.
About Azure VPN gateway connections
An Azure VPN gateway connection provides a communication link between your Citrix-managed Azure VDAs (desktops and apps) and your company’s resources, such as on-premises networks or resources in other cloud locations. This is similar to setting up and connecting to a remote branch office.
The secure connectivity uses the industry-standard protocols Internet Protocol Security (IPsec) and Internet Key Exchange (IKE).
During the connection creation process:
-
You provide information that Citrix uses to create the gateway and connection.
-
Citrix creates a site-to-site route-based Azure VPN gateway. The VPN gateway forms a direct Internet Protocol Security (IPsec) tunnel between the Citrix-managed Azure subscription and your VPN’s host device.
-
After Citrix creates the Azure VPN gateway and connection, you update your VPN’s configuration, firewall rules, and route tables. For this process, you use a public IP address that Citrix provides, and a pre-shared key (PSK) that you provided for creating the connection.
An example connection is illustrated in Create an Azure VPN gateway connection.
You do not need your own Azure subscription to create this type of connection.
You can also optionally use custom routes with this connection type.
Azure VPN gateway custom routes
Custom, or user-defined, routes override default system routes for directing traffic between virtual machines in your networks, and the Internet. You might use custom routes if there are networks that Citrix Virtual Apps and Desktops Standard resources are expected to access but aren’t directly connected through an Azure VPN gateway. For example, you might create a custom route that forces traffic through a network appliance to the Internet or to an on-premises network subnet.
When you add custom routes to a connection, those routes apply to all machines that use that connection.
To use custom routes:
- You must have an existing virtual network gateway or a network appliance such as Citrix SD-WAN in your Citrix Virtual Apps and Desktops Standard environment.
- When you add custom routes, you must update your company’s route tables with the destination VPN information to ensure end-to-end connectivity.
- Custom routes are displayed on the Connection > Routes tab in the order they are entered. This display order does not affect the order in which routes are selected.
Before using custom routes, review the Microsoft article Virtual network traffic routing to learn about using custom routes, next hop types, and how Azure selects routes for outbound traffic.
You can add custom routes when you create an Azure VPN gateway connection or to existing connections in your service environment.
Azure VPN gateway connection requirements and preparation
-
To learn about Azure VPN Gateway, see the Microsoft article What is VPN Gateway?
-
Review the requirements for all network connections.
-
You must have a configured VPN. The virtual network must be able to send and receive traffic through the VPN gateway. A virtual network can’t be associated with more than one virtual network gateway.
-
You must have an IPsec device that has a public IP address. To learn about validated VPN devices, see the Microsoft article About VPN devices.
-
Review the Create an Azure VPN Gateway connection procedure before you actually start it, so you can collect the information you need. For example, you’ll need allowed addresses in your network, IP ranges for the VDAs and gateway, desired throughput and performance level, and DNS server addresses.
Create an Azure VPN gateway connection
Be sure to review this procedure before actually starting it.
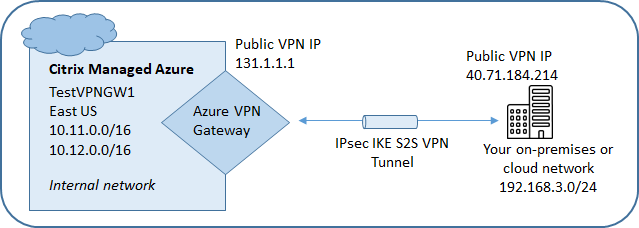
The following diagram shows an example of configuring an Azure VPN gateway connection. Generally, Citrix manages resources on the left side of the diagram, and you manage resources on the right side. Some descriptions in the following procedure include references to the diagram’s examples.
-
From the Manage dashboard in Citrix DaaS for Azure, expand Network Connections on the right.
-
Click Add Connection.
-
Click anywhere in the Azure VPN Gateway box.
-
Review the information on the Add VPN Connection page, and then click Start Configuring VPN.
-
On the Add a connection page, provide the following information.
-
Name: A name for the connection. (In the diagram, the name is TestVPNGW1.)
-
VPN IP address: Your public-facing IP address.
In the diagram, the address is 40.71.184.214.
-
Allowed networks: One or more address ranges that the Citrix service is allowed to access on your network. Usually, this address range contains the resources that your users need to access, such as file servers.
To add more than one range, click Add more IP addresses and enter a value. Repeat as needed.
In the diagram, the address range is 192.168.3.0/24.
-
Pre-shared key: A value that is used by both ends of the VPN for authentication (similar to a password). You decide what this value is. Be sure to note the value. You’ll need it later when you configure your VPN with the connection information.
-
Performance and throughput: The bandwidth level to use when your users access resources on your network.
All choices do not necessarily support Border Gateway Protocol (BGP). In those cases, the BCP settings fields aren’t available.
-
Region: Azure region where Citrix deploys machines that deliver desktops and apps (VDAs), when you create catalogs that use this connection. You cannot change this selection after you create the connection. If you decide later to use a different region, you must create or use another connection that specifies the desired region.
In the diagram, the region is EastUS.
-
Active-active (high availability) mode: Whether two VPN gateways are created for high availability. When this mode is enabled, only one gateway is active at a time. Learn about active-active Azure VPN gateway in the Microsoft document Highly Available Cross-Premises Connectivity.
-
BGP settings: (Available only if the selected Performance and throughput supports BGP.) Whether to use Border Gateway Protocol (BGP). Learn about BGP in the Microsoft document: About BGP with Azure VPN Gateway. If you enable BGP, provide the following information:
-
Autonomous system number (ASN): Azure virtual network gateways are assigned a default ASN of 65515. A BGP-enabled connection between two network gateways requires that their ASNs be different. If needed, you can change the ASN now or after the gateway is created.
-
BGP IP peering IP address: Azure supports BGP IP in the range 169.254.21.x to 169.254.22.x.
-
-
VDA subnet: The address range where Citrix VDAs (machines that deliver desktops and apps) and Cloud Connectors will reside when you create a catalog that uses this connection. After you enter an IP address and select a network mask, the address range is displayed, plus how many addresses that the range supports.
Although this address range is maintained in the Citrix-managed Azure subscription, it functions as if it is an extension of your network.
-
The IP range must not overlap any addresses that you use in your on-premises or other cloud networks. If addresses overlap, the connection might not be created successfully. Also, an overlapping address won’t work correctly for site administration tasks.
-
The VDA subnet range must be different from the gateway subnet address.
-
You cannot change this value after you create the connection. To use a different value, create another connection.
In the diagram, the VDA subnet is 10.11.0.0/16.
-
-
Gateway subnet: The address range where the Azure VPN gateway will reside when you create a catalog that uses this connection.
-
The IP range must not overlap any addresses that you use in your on-premises or other cloud networks. If addresses overlap, the connection might not be created successfully. Also, an overlapping address won’t work correctly for site administration tasks.
-
The gateway subnet range must be different from the VDA subnet address.
-
You cannot change this value after you create the connection. To use a different value, create another connection.
In the diagram, the gateway subnet is 10.12.0.9/16.
-
-
Routes: Indicate whether you want to add custom routes to the connection. If you want to add custom routes, provide the following information:
-
Type a friendly name for the custom route.
-
Enter the destination IP address and network prefix. The network prefix must be between 16 and 24.
-
Select a next hop type for where you want traffic to be routed. If you select **Virtual appliance, enter the internal IP address of the appliance. For more information about next hop types, see Custom routes in the Microsoft article Virtual network traffic routing.
-
To add more than one route, click Add route and enter the requested information.
-
DNS servers: Enter addresses for your DNS servers, and indicate the preferred server. Although you can change the DNS server entries later, keep in mind that changing them can potentially cause connectivity issues for the machines in catalogs that use this connection.
To add more than two DNS server addresses, click Add alternate DNS and then enter the requested information.
-
-
Click Create VPN Connection.
After Citrix creates the connection, it is listed under Network Connections > Azure VPN Gateway on the Manage dashboard in Citrix DaaS for Azure. The connection card contains a public IP address. (In the diagram, the address is 131.1.1.1.)
-
Use this address (and the pre-shared key you specified when creating the connection) to configure your VPN and firewalls. If you forgot your pre-shared key, you can change it on the connection’s Details page. You’ll need the new key to configure your end of the VPN gateway.
For example, allow exceptions in your firewall for the VDA and gateway subnet IP address ranges you configured.
-
Update your company’s route tables with the Azure VPN gateway connection information to ensure end-to-end connectivity.
In the diagram, new routes are required for traffic going from 192.168.3.0/24 to 10.11.0.0/16 and 10.12.0.9/16 (the VDA and gateway subnets).
-
If you configured custom routes, make the appropriate updates for them, too.
When both ends of the connection are successfully configured, the connection’s entry in Network Connections > Azure VPN Gateway indicates Ready to use.
View an Azure VPN gateway connection
-
From the Manage dashboard in Citrix DaaS for Azure, expand Network Connections on the right.
-
Select the connection you want to display.
Displays:
-
The Details tab shows the number of catalogs, machines, images, and bastions that use this connection. It also contains most of the information you configured for this connection.
-
The Routes tab lists custom route information for the connection.
Manage custom routes for an Azure VPN gateway connection
In an existing Azure VPN gateway connection, you can add, modify, disable, and delete custom routes.
For information about adding custom routes when you create a connection, see Create an Azure VPN gateway connection.
Important:
Modifying, disabling, or deleting custom routes changes the traffic flow of the connection, and might disrupt active user sessions.
-
From the Manage dashboard in Citrix DaaS for Azure, expand Network Connections on the right.
-
Select the connection you want to display.
-
To add a custom route:
-
From the connection’s Routes tab, click Add Route.
-
Enter a friendly name, the destination IP address and prefix, and the next hop type you want to use. If you select Virtual Appliance as the next hop type, enter the internal IP address of the appliance.
-
Indicate whether you want to enable the custom route. By default, the custom route is enabled.
-
Click Add Route.
-
-
To modify or enable/disable a custom route:
-
From the connection’s Routes tab, locate the custom route you want to manage.
-
From the ellipsis menu, select Edit.
-
Change the destination IP address and prefix, or the next hop type, as needed.
-
Indicate whether you want to enable the route.
-
Click Save.
-
-
To delete a custom route:
-
From the connection’s Routes tab, locate the custom route you want to manage.
-
From the ellipsis menu, select Delete.
-
Select Deleting a route may disrupt active sessions to acknowledge the impact of deleting the custom route.
-
Click Delete Route.
-
-
Reset or delete an Azure VPN gateway connection
Important:
Resetting a connection causes the current connection to be lost, and both ends must reestablish it. A reset disrupts active user sessions.
Before you can delete a connection, delete any catalogs that use it. See Delete a catalog.
To reset or delete a connection:
-
From the Manage dashboard in Citrix DaaS for Azure, expand Network Connections on the right.
-
Select the connection you want to reset or delete.
-
From the connection’s Details tab:
-
To reset the connection, click Reset Connection.
-
To delete the connection, click Delete Connection.
-
-
If prompted, confirm the action.
Create a public static IP address
If you want all machines VDAs on a connection to use a single outbound public static IP address (gateway) to the Internet, enable a NAT gateway. You can enable a NAT gateway for connections to catalogs that are domain joined or non-domain joined.
To enable a NAT gateway for a connection:
- From the Manage > Azure Quick Deploy dashboard in Citrix DaaS for Azure, expand Network Connections on the right.
- Under Network Connections, select a connection under CITRIX MANAGED or AZURE VNET PEERINGS.
- In the connection details card, click Enable NAT Gateway.
- In the Enable NAT Gateway page, move the slider to Yes and configure an idle time.
- Click Confirm Changes.
When you enable a NAT gateway:
-
Azure assigns a public static IP address to the gateway automatically. (You cannot specify this address.) All VDAs in all catalogs that use this connection will use that address for outbound connectivity.
-
You can specify an idle timeout value. That value indicates the number of minutes that an open outbound connection through the NAT gateway can remain idle before the connection is closed.
-
You must allow the public static IP address in your firewall.
You can go back to the connection details card to enable or disable the NAT gateway and change the timeout value.
In this article
- Introduction
- Requirements for all network connections
- No connectivity
- About Azure VNet peering connections
- About SD-WAN connections
-
Azure VPN Technical Preview
- About Azure VPN gateway connections
- Azure VPN gateway custom routes
- Azure VPN gateway connection requirements and preparation
- Create an Azure VPN gateway connection
- View an Azure VPN gateway connection
- Manage custom routes for an Azure VPN gateway connection
- Reset or delete an Azure VPN gateway connection
- Create a public static IP address