Use Citrix Ready® workspace hub
Citrix Casting™
Citrix Ready workspace hub enables Citrix Casting, which makes it possible to securely roam and cast a mobile session, and mirror your desktop display. To roam your session, enter the proximity authentication range or scan the QR code on the hub. Session casting, however, requires that you open the session on the mobile device and then trigger the QR code to transfer it. For Mac and Windows, you can only mirror the screen to the hub. Session roaming and session casting are not available on these platforms.
Here’s a video explaining how to use Citrix Casting.
Session roaming with proximity authentication
With proximity authentication, you can launch a session automatically without touching the device. Proximity relies on Bluetooth technology to locate the mobile device. For Android 6.0 and later, enable both Bluetooth and location permissions. After configuring the device and launching Citrix Workspace app, the session roams to the workspace hub when the device enters the proximity authentication range of the hub. This feature is available for the Android devices only.
Session roaming with QR code authentication
Scan the QR code on the hub to roam the session from your iOS or Android device. When the session roams to a hub, the workspace hub has a full control of all the peripherals available within the session. For more information, see the help documentation for iOS and Android devices.
Session casting with QR code authentication
Launch the remote session on the iOS or Android device, and transfer the screen to the hub by scanning the QR code. You can use your keyboard and mouse on the mobile device and on the hub to control the session. For more information, see the help documentation for iOS and Android devices.
Screen casting with proximity discovery
Cast your desktop display to the hub without starting a remote session. The discovery method, comprised of Bluetooth and Wi-Fi technology, detects your Mac or Windows device and mirrors the entire desktop display to the hub. You can also leverage the IP-based method by manually entering the hub’s IP address to stream your content. To exit the session on Mac or Windows platforms, close your laptop or manually disconnect the device in settings.
Your hub’s session can be controlled using the mouse and keyboard on both your device and the hub. For more information, see the documentation for Mac and Windows.
Long running session
During a long running session, you can put the device down with the screen locked. To ensure that the session runs uninterrupted, consider the following tips:
- Battery optimization can interfere with your session. To avoid the effects of battery optimization, add Citrix Workspace™ app to the Android battery optimization ignore lists:
- On a Google Pixel, go to Settings > Battery > Battery optimization > All apps > Citrix Receiver™ > Don’t optimize.
- On most Samsung devices, go to Settings > Battery > Battery usage > Optimize battery usage > All apps > Citrix Receiver > Don’t optimize.
- If you’re using a third-party battery optimization app, remove Citrix Workspace app for Linux from its optimization list.
- Citrix recommends that you bring the Citrix Workspace app’s main interface to the foreground before locking your screen. Doing so ensures that the mobile device operating system does not end the Citrix Workspace app session.
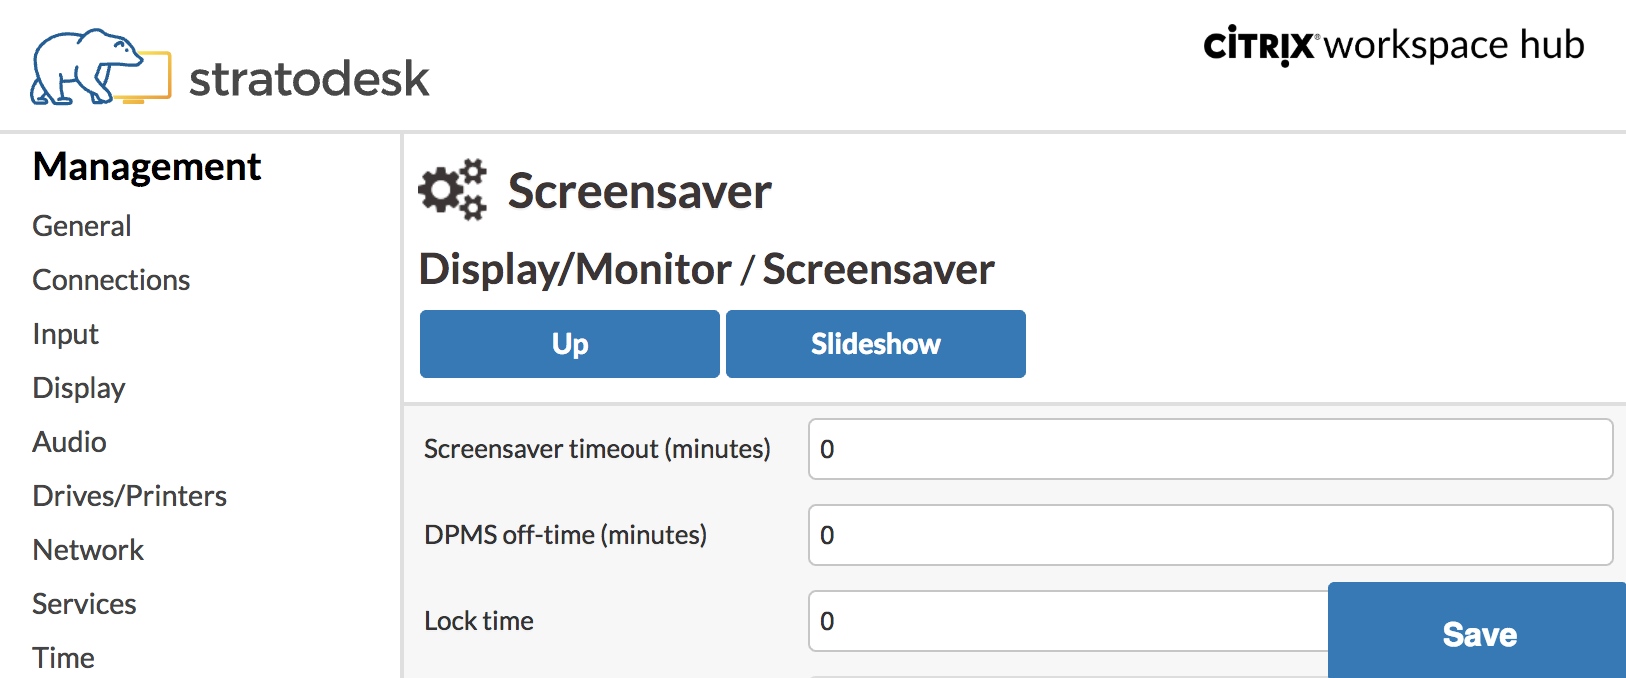
- The screen saver mode might terminate your session when the device screen turns off. To use a long running session, set the Display > Screensaver setting to 0.
Standard logging
Standard logging records the execution of the processes running in the Citrix Ready workspace hub and provides a way to dynamically change the debug level for different modules.
Support for Citrix Virtual Apps™
Citrix Ready workspace hub can seamlessly launch multiple virtual applications or only one desktop session at a time. When you launch multiple applications from the workspace hub using Citrix Workspace app, your applications might open behind the hub’s initial launch screen. There are two ways to bring applications to the foreground.
- In the menu icon on the hub’s initial launch screen, click Citrix Virtual Apps > Show all Citrix Virtual Apps to view the launched sessions in a windowed mode.
- Select Citrix Virtual Apps >
ApplicationNameto display a specific session on the foreground.
Automatic navigation of the initial launch screen
With the Citrix Ready workspace hub 1812 release, Citrix introduces automatic navigation of the initial launch screen as an experimental feature. Configure multiple URLs for the initial launch screen in the workspace hub. Click the arrows at the bottom of the page to seamlessly navigate between your resources.
Disconnect the screen casting session
Workspace hub automatically disconnects your session on Mac and Windows devices when you close your laptop.
To disable this setting on Windows,
- Go to the registry file:
HKEY_CURRENT_USER\SOFTWARE\Citrix\WorkspaceHub\Docker\LidStatusDisconnectConfigure - Set the
LidStatusDisconnectEnablevalue to False.
To disable this setting on Mac,
- Go to the preference file:
/Users/Shared/Citrix Casting/CtxCfg.plist - Set the
AutoDisconnectCastingWhenCloseLaptopvalue to False.
Configuration
The ctxlogd daemon and the setlog utility are included in the hub package. By default, the ctxlogd daemon starts when you start the hub.
ctxlogd daemon
All other services that are traced depend on the ctxlogd daemon. You can stop the ctxlogd daemon if you do not want to keep the hub traced by terminating the process relating to ctxlogd. The log file, wsh.log, is located at /opt/Citrix/WorkspaceHub/Logs.
setlog utility
The setlog utility, at /opt/Citrix/WorkspaceHub/lib/wshlog, lets you dynamically change the debug level for different modules. Only root users have permission to run it. You can add sudo to the head of the command to run the command by using the Pi user.
For example:
-
To check the current log level for all modules:
sudo /opt/Citrix/WorkspaceHub/lib/wshlog/setlog levels -
To set the log level as verbose for the controlService module:
sudo /opt/Citrix/WorkspaceHub/lib/wshlog/setlog level WSH_CONTROLSERVICE verbose
You can get more usage information from the help manual sudo /opt/Citrix/WorkspaceHub/lib/wshlog/ setlog --help.
Citrix Customer Experience Improvement Program (CEIP)
When you participate in the CEIP, Citrix receives anonymous statistics and usage information to help improve the quality and performance of Citrix products.
The Citrix Ready workspace hub uses Google Analytics as documented in How Google uses data when you use our partners’ sites or apps to do the data analysis. When you turn off the CEIP, only minimum information is collected during the workspace hub heartbeat. For more information, see the CEIP data collected from the workspace hub table.
CEIP switch
By default, you automatically participate in the CEIP. You can turn off CEIP through the Stratodesk UI.
CEIP data collected from the workspace hub
The following table lists the types of anonymous information collected. The data does not contain any details that identify you as a customer.
| Data point | Key name | Description |
|---|---|---|
| Auto navigation feature is enabled or not | auto_navigation | Indicating whether the Auto Navigation feature is enabled or not. 1: enabled. 0: disabled |
| OS release | os_release | Release information of PI OS, such as 4.9.35-v7 |
| OS version | os_version | Version information of PI OS, such as 2017-07-05-raspbian-Jessie |
| Workspace hub version | wsh_version | Version information of the workspace hub, such as 1.0.72 |
| SSL feature is enabled or not | ssl_mode | Indicating whether the SSL feature is enabled or not. 1: enabled. 0: disabled |
| Dual monitor is used or not | monitor_mode | Indicating whether the dual monitor is used or not. 1: dual monitor. 0: single monitor |
| Monitor resolution | monitor_resolution_p3 | Screen resolution for the monitor connecting with p3 |
| Monitor resolution | monitor_resolution_p0 | Screen resolution for the monitor connecting with p0 |
| Session duration time (for session roaming only) | session_time | The duration time of a session |
| Workspace hub MAC address | wsh_mac | The MAC address of the hub |
| Workspace hub CEIP mode | ceip_mode | Indicating whether the CEIP feature is enabled or not. 1: enabled. 0: disabled |
| Multiple-token feature toggle | Multiple-token | Indicating whether the multiple-token feature is enabled or not. 1: enabled. 0: disabled |
When you turn the CEIP off, Citrix collects the following types of anonymous information:
| Data point | Key name | Description |
|---|---|---|
| OS release | os_release | Release information of Pi OS, such as 4.9.35-v7 |
| OS version | os_version | Version information of Pi OS, such as 2017-07-05-raspbian-Jessie |
| Workspace hub version | wsh_version | Version information of the workspace hub, such as 1.0.72 |
| Workspace hub MAC address | wsh_mac | The MAC address of the hub |
Security connection
Citrix Ready workspace hub supports a Secure Sockets Layer (SSL) connection between the mobile devices and the hub for security purposes. You need to set a Fully Qualified Domain Name (FQDN) either manually or automatically to uniquely identify each device.
Configure the domain and host name manually
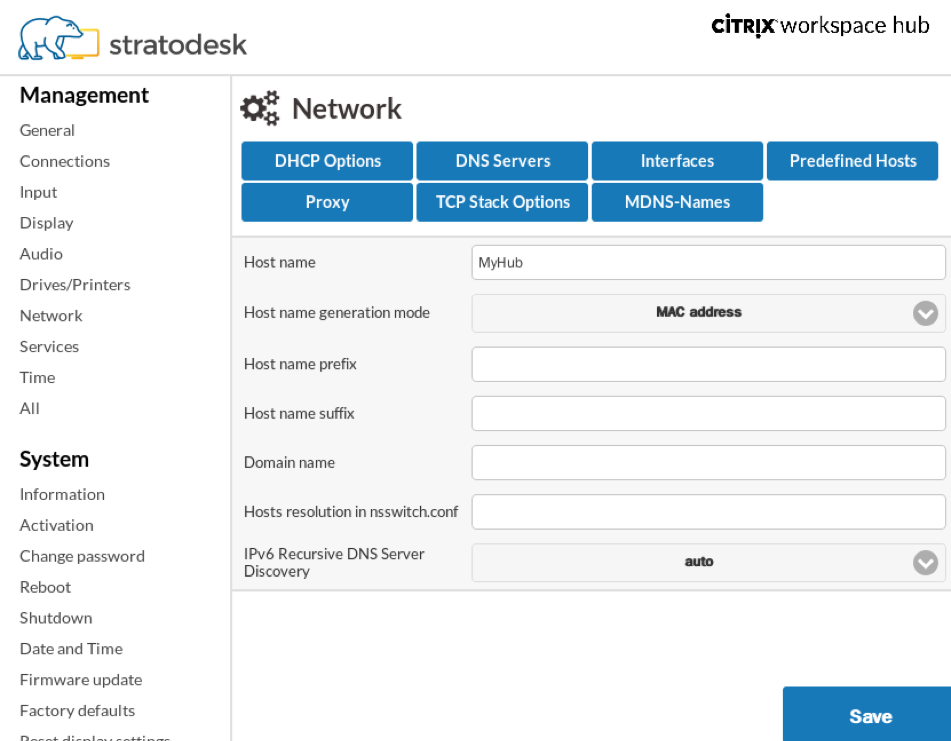
- In the Network group, enter your host name. Ensure that the common name of the Certificate Authority (CA) matches the host name.
- Save the changes and restart the hub.
- In Network > DNS server, add the DNS server name to generate the domain name. Ensure that your domain has been successfully created under System > Information.
Configure the domain and host name automatically
You can generate the FQDN directly from the Dynamic Host Configuration Protocol server. For more information, see Network Configuration.
Note:
If the SSL connection is disabled or the domain name can’t be retrieved, the QR code includes the IP address instead of the domain name.
Install a certificate
Configure the SSL key and certificate for your domain.
- For information about adding certificates and private keys to the Citrix Ready workspace hub, see https://www.stratodesk.com/kb/Certificates.
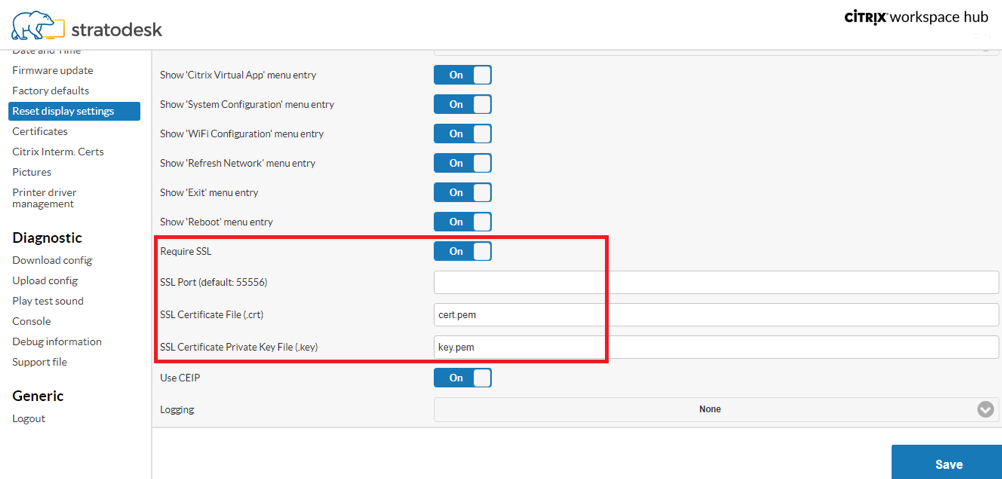
- Update the certificate file (cert.pem) and private key file (key.pem) names, and then click Save. Both options are under Connections > Workspace Hub > Workspace Hub.
- Restart the workspace hub for the changes to take effect.
If the mobile device doesn’t have the root CA certificate installed, you can configure the self-signed certificate before users start working on the hub. When the SSL connection is enabled, the client checks the certificate and verifies the host name. The certificate installation process varies depending on the model of device.
-
Download and install the certificate on the mobile device.
Note:
For iOS devices running without centralized management, ensure that you send the certificate to the users.
If the Android device does not recognize the certificate format, change the suffix from (.pem) to (.crt).
-
Enable the SSL trust settings for your certificate.
For more information, see the Help documentation for iOS and Android devices.
Shortcuts
- Control-Alt-S, gives a readout of relevant troubleshooting information.
- Control-Alt-C, brings up the configuration menu.
- When Citrix Casting, swiping down on the phone with two fingers disconnects the session, regardless of the session state or how you cast it to the workspace hub.