Orchestrator administration
This section provides you the information on administrative activities that can be performed on the Citrix SD-WAN Orchestrator for On-premises platform.
Software
You can download Citrix SD-WAN appliance software version required for all the appliances in your network and stored in Citrix SD-WAN Orchestrator for On-premises. Use the stored software to upgrade your Citrix SD-WAN Orchestrator for On-premises software to the latest version.
Note
Provider managed setup is introduced from Citrix SD-WAN Orchestrator for On-premises 10.3 release. Downgrading to software releases lower than Citrix SD-WAN Orchestrator for On-premises 10.3 release is not supported.
Publish software
In a provider managed setup, Citrix SD-WAN Orchestrator for On-premises allows provider administrators to download Citrix SD-WAN appliance software version required for all the appliances in your network. Provider administrators can publish the downloaded software version. The published software is downloaded and stored in Citrix SD-WAN Orchestrator for On-premises. Customer administrators can deploy the published software to all the appliances managed by Citrix SD-WAN Orchestrator for On-premises.
In a customer managed setup, customer administrators can download Citrix SD-WAN appliance software version required for all the appliances in the network. They can publish the software in Citrix SD-WAN Orchestrator for On-premises and deploy the software to all appliances.
To publish software, navigate to Infrastructure > Orchestrator Administration > Software Images > Appliance.
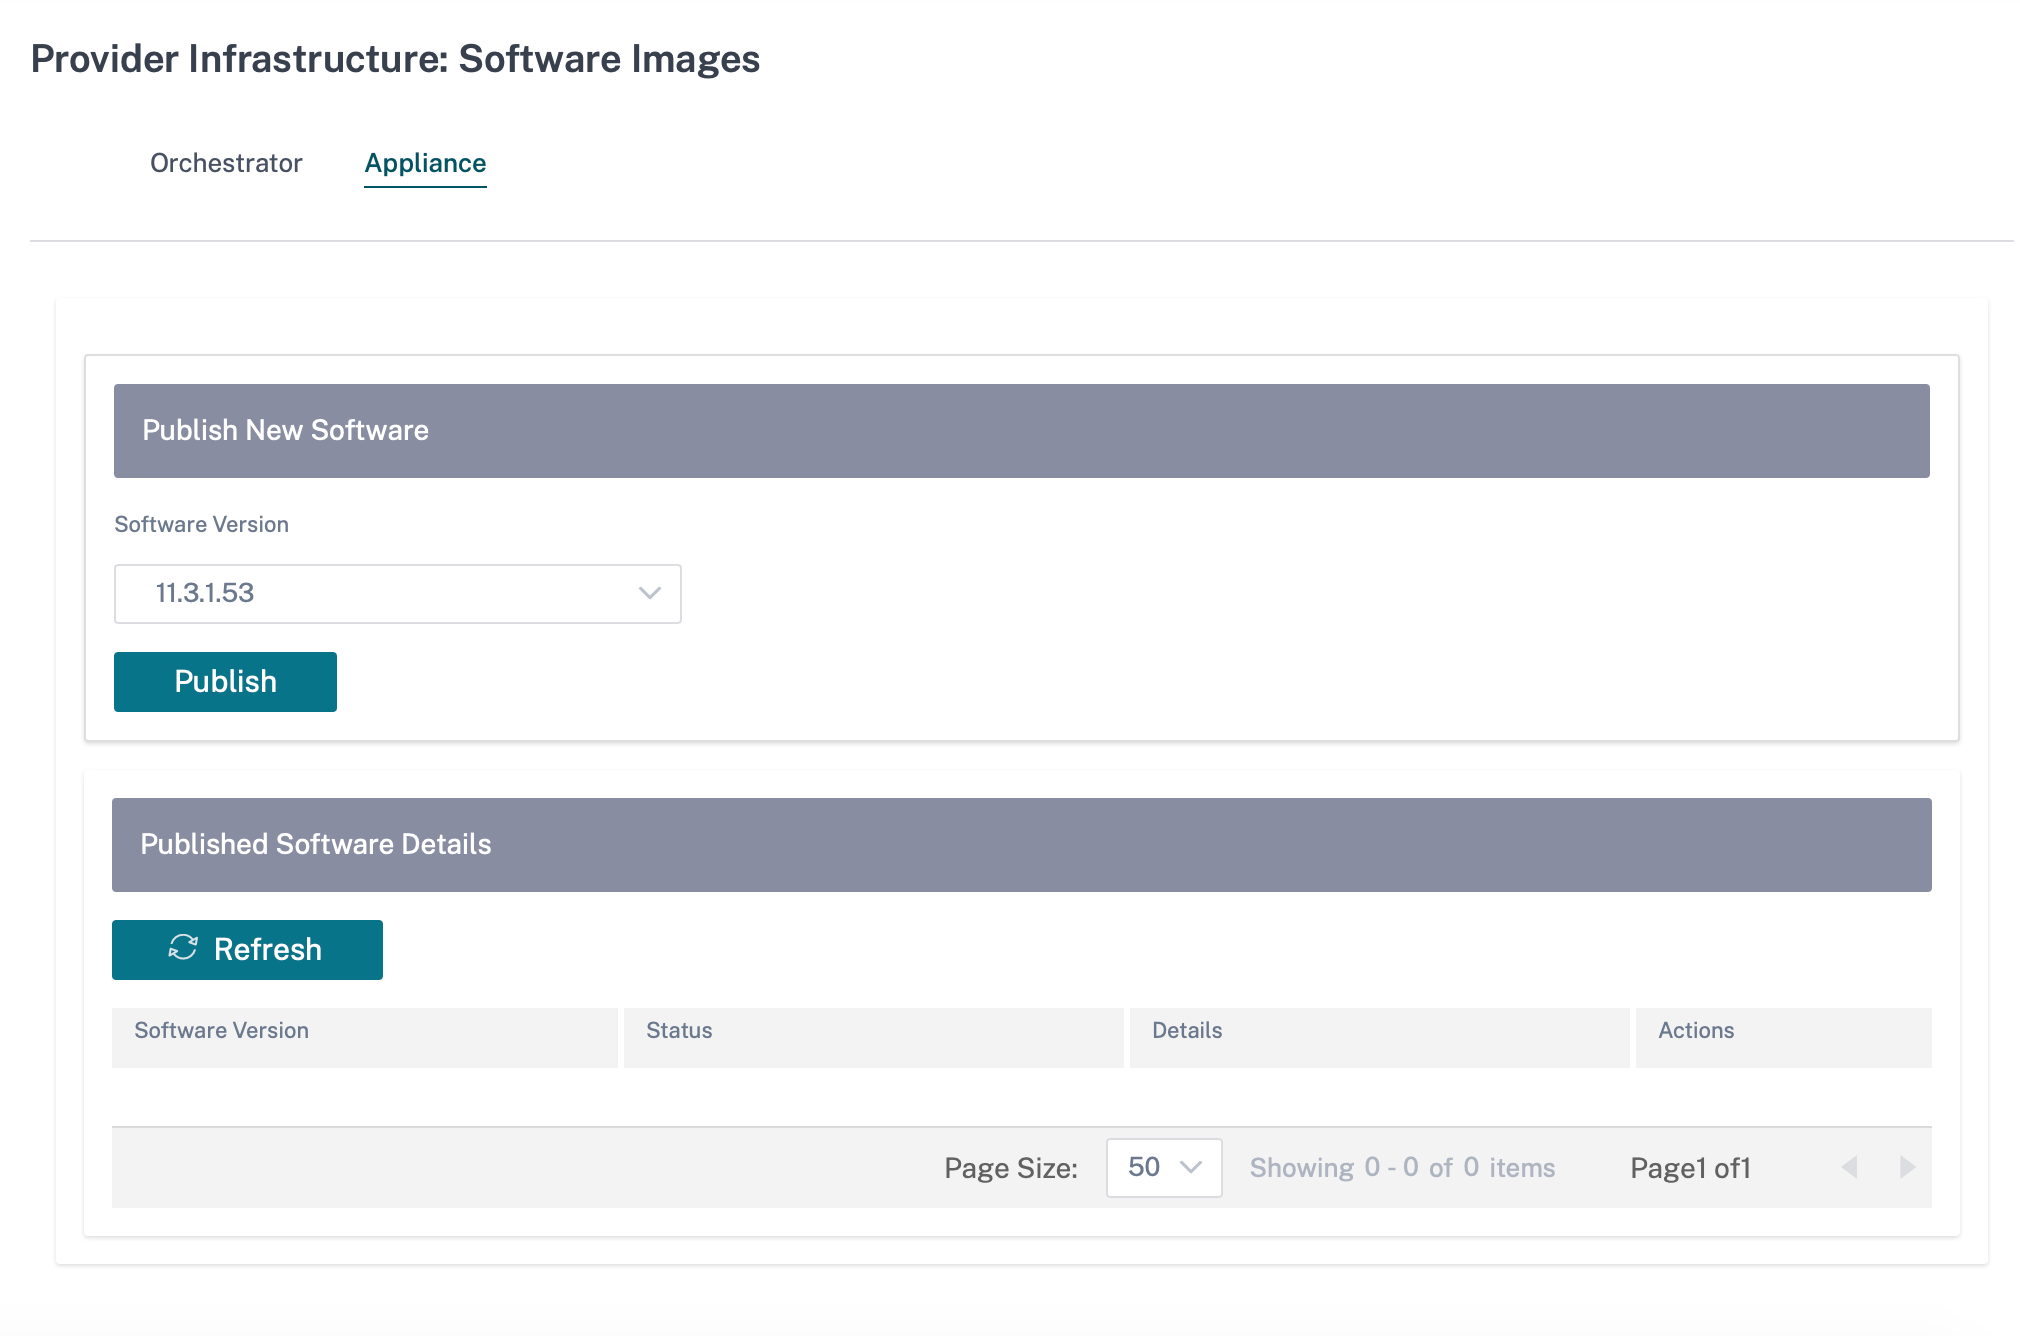
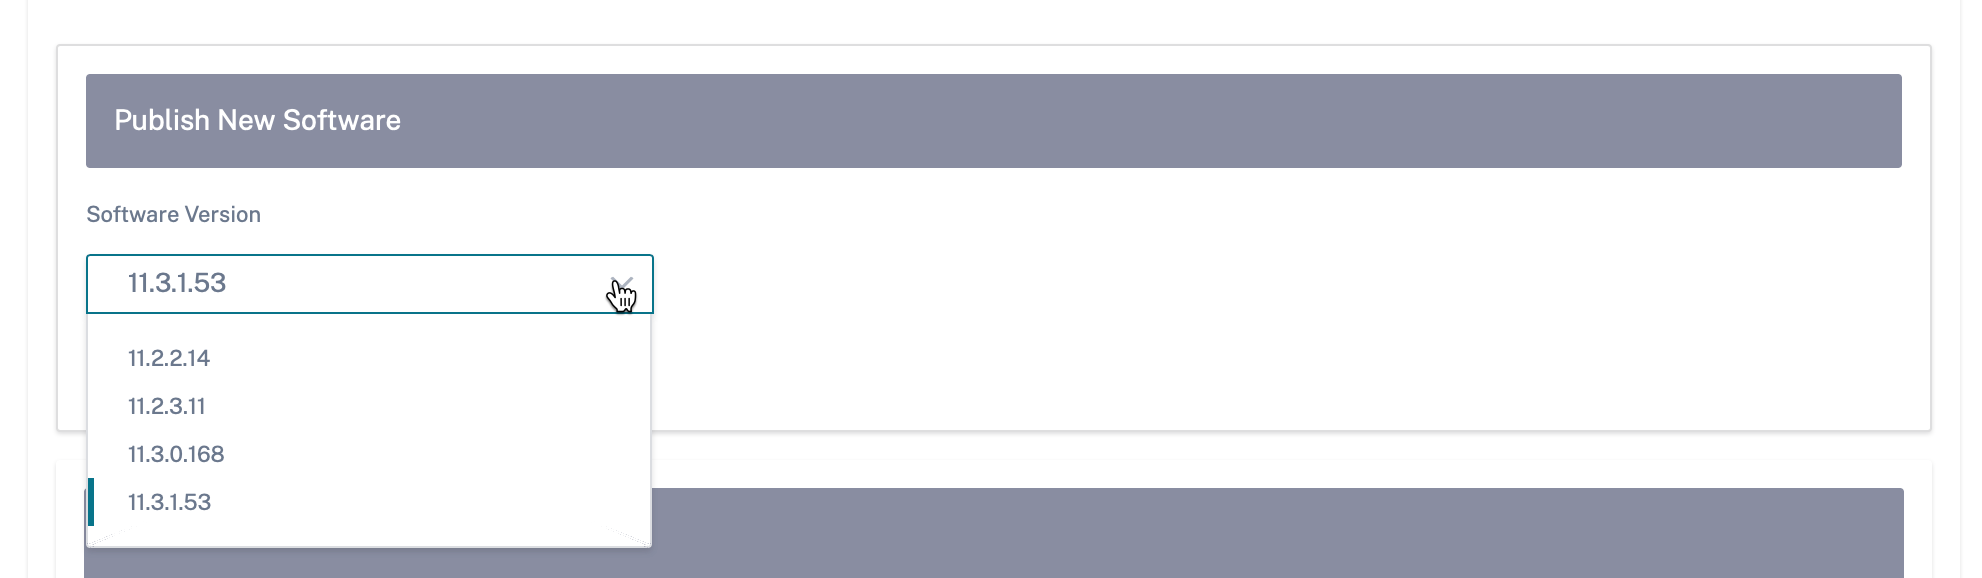
You can choose a software version to be published from a pre-built list of software versions that are supported by the current Citrix SD-WAN Orchestrator for On-premises. For newer software versions that are not available in the list, upgrade to the latest Citrix SD-WAN Orchestrator for On-premises release which supports the new software version. For information on upgrading Citrix SD-WAN Orchestrator for On-premises, see Software upgrade.
Citrix SD-WAN Orchestrator for On-premises downloads Citrix SD-WAN software of the selected version for all the platforms. A progress bar indicates the progress of the publishing process.

The published software versions are displayed under Published Software Details. At any given point Citrix SD-WAN Orchestrator for On-premises can store up to three published software versions. If you are intending to publish another software version, delete one of the three versions available before beginning the publishing process.

After the publishing is successful you can deploy, stage, and activate the software to all the appliances on the network from the Network Configuration page. For more information, see Network Configuration. For a successful deployment, ensure that all the appliances are connected to Citrix SD-WAN Orchestrator for On-premises. For more details, see Connectivity with Citrix SD-WAN appliances.
Software upgrade
In a provider managed setup, only provider administrators can upgrade the Citrix SD-WAN Orchestrator for On-premises software to the latest version.
In a customer managed setup, customer administrators can upgrade Citrix SD-WAN Orchestrator for On-premises software to the latest version.
NOTE
Download the appropriate Citrix SD-WAN Orchestrator for On-premises software package to your local computer. You can download this package from Downloads page.
Citrix recommends taking snapshots of the Virtual machine in the hypervisor. Also, the SD-WAN configuration is downloaded prior to the upgrade.
Citrix also recommends taking snapshots of the VM & SD-WAN configurations periodically.
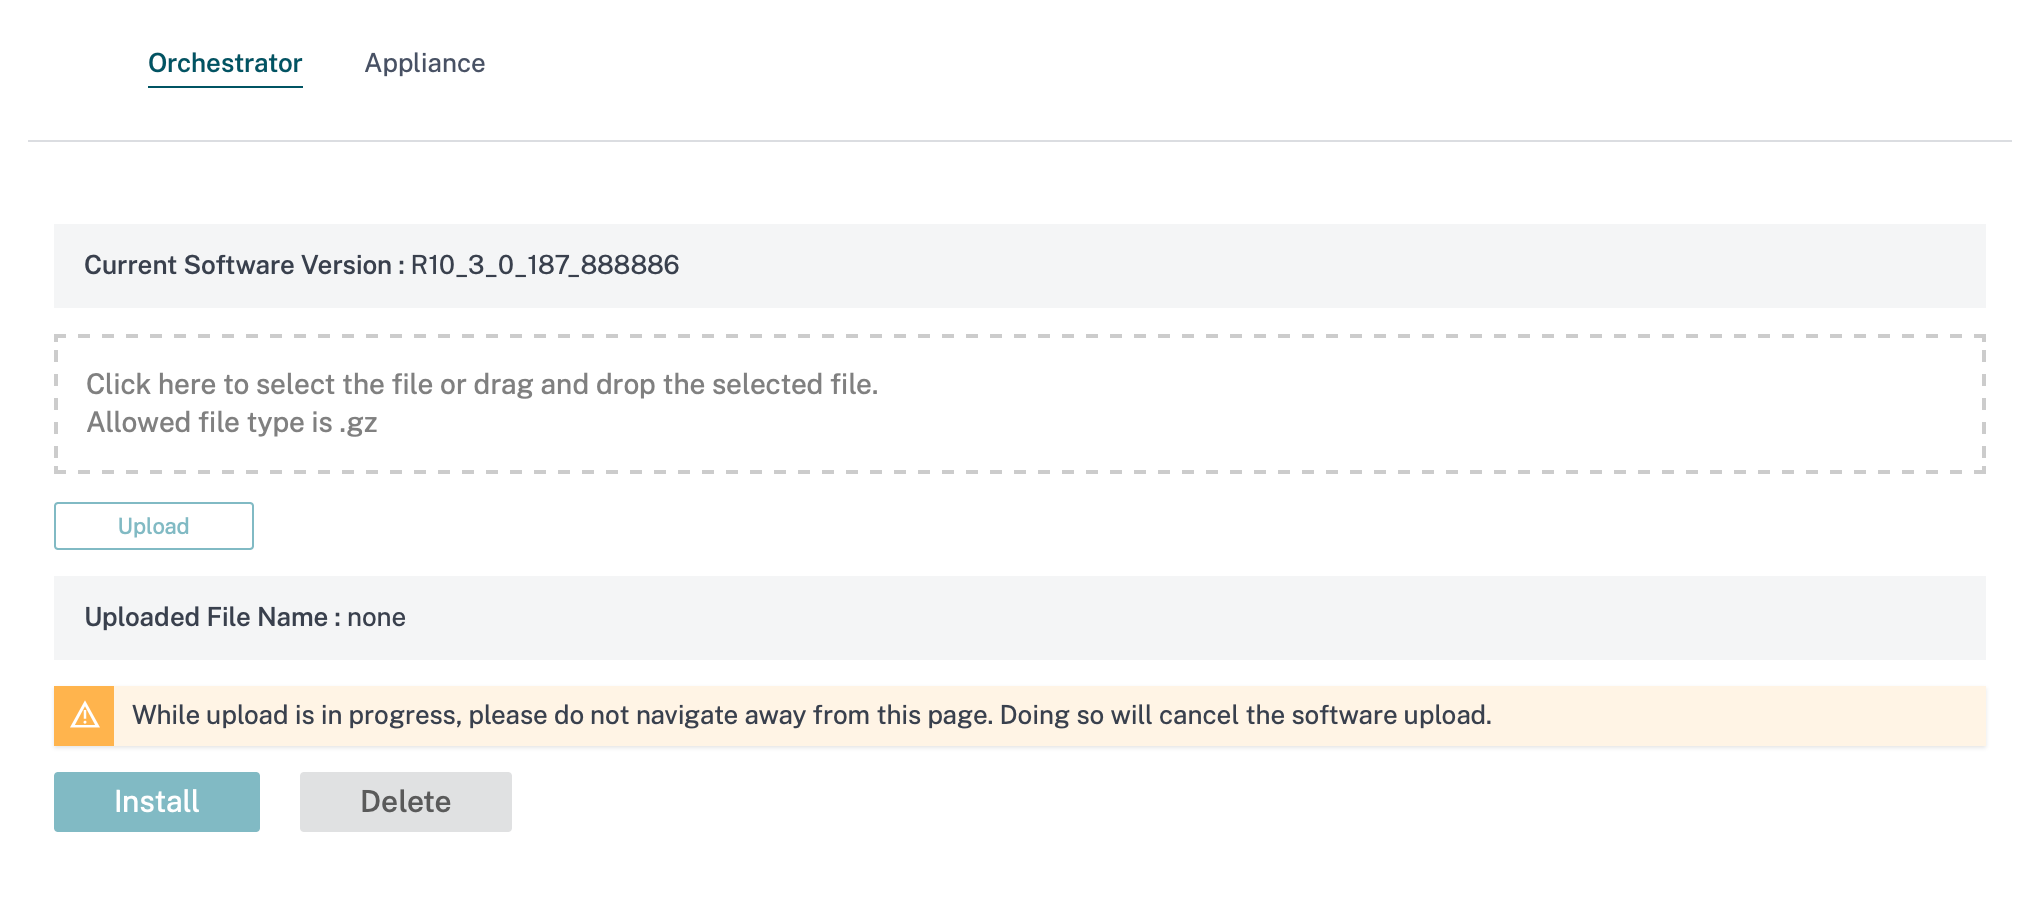
Perform the following steps to upload and install a new version of the Citrix SD-WAN Orchestrator for On-premises software:
-
In the Citrix SD-WAN Orchestrator for On-premises UI, navigate to Infrastructure > Orchestrator Administration > Software Images > Orchestrator.
-
Click inside the box and select the ctx-onprem-1 (latest date).tar.gz binary file that you have downloaded and saved on your local system.
-
Click Upload to upload the selected software package to the current Citrix SD-WAN Orchestrator for On-premises virtual machine.
-
After the upload completes, click Install.
-
When prompted to confirm, click Install.
Management settings
Note
In a provider managed setup, only provider administrators have access to edit configuration under Infrastructure > Orchestrator Administration > Management Settings.
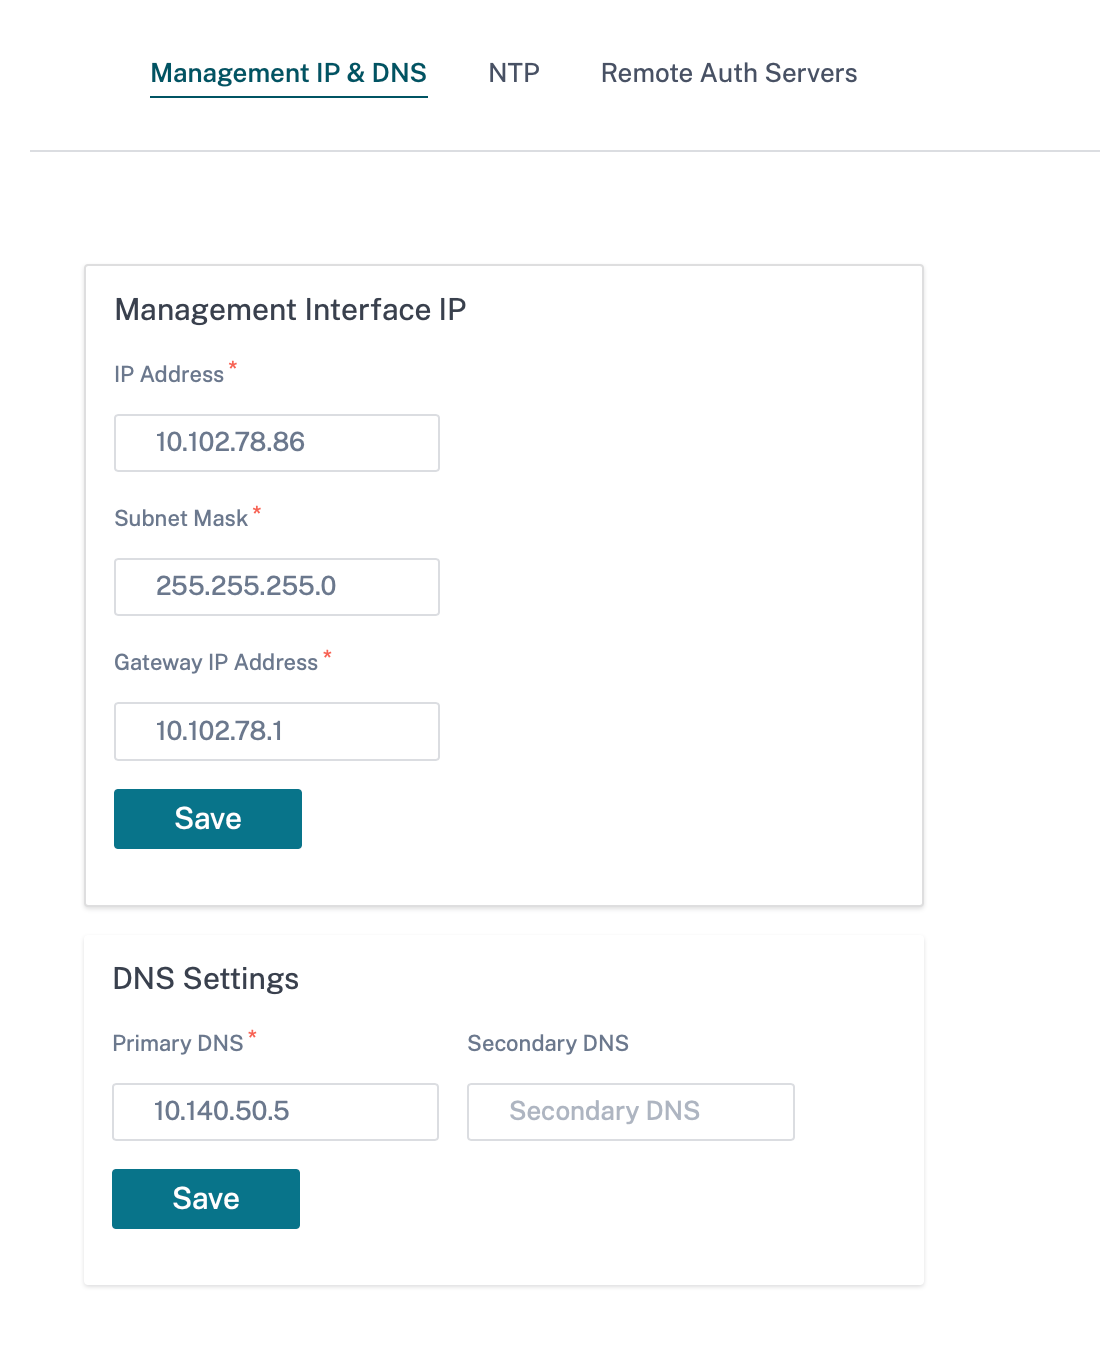
Management IP and DNS
After Citrix SD-WAN Orchestrator for On-premises Virtual Machine (VM) is deployed and a management IP is configured either manually or through DHCP, you can change the Management IP and DNS settings through Citrix SD-WAN Orchestrator for On-premises GUI. Citrix SD-WAN Orchestrator for On-premises stack takes about 3 minutes to restart. Once the management IP address is changed the SSH connections get re-established.
To configure/change the management IP and DNS settings, at the network level, navigate to Infrastructure > Orchestrator Administration > Management Settings > Management IP & DNS.
Provide the following details:
- IP Address: The IP address for Citrix SD-WAN Orchestrator for On-premises VM.
- Gateway IP Address: The Gateway IP address that Citrix SD-WAN Orchestrator for On-premises use to communicate with external networks.
- Subnet Mask: The subnet mask to define the network in which Citrix SD-WAN Orchestrator for On-premises is available.
- Primary DNS: The IP address of the primary DNS server to which all DNS requests from Citrix SD-WAN Orchestrator for On-premises are forwarded to.
- Secondary DNS: The IP address of the secondary DNS server to resolve DNS requests if the primary DNS server is not available.
NTP settings
You can either set the date and time manually, or use a Network Time Protocol (NTP) server to synchronize the clock time of Citrix SD-WAN Orchestrator for On-premises with Coordinated Universal Time (UTC).
To configure NTP server, at the network level, navigate to Infrastructure > Orchestrator Administration > Management Settings > NTP and enable Use NTP server.
Provide the NTP server IP address or domain name. You can provide up to four NTP servers, but ensure that at least one is configured. If one NTP server is down, Citrix SD-WAN Orchestrator for On-premises automatically synchronizes with the other NTP server. If you specify a domain name for an NTP server, ensure that the external DNS server is configured to point the domain name to the IP address.
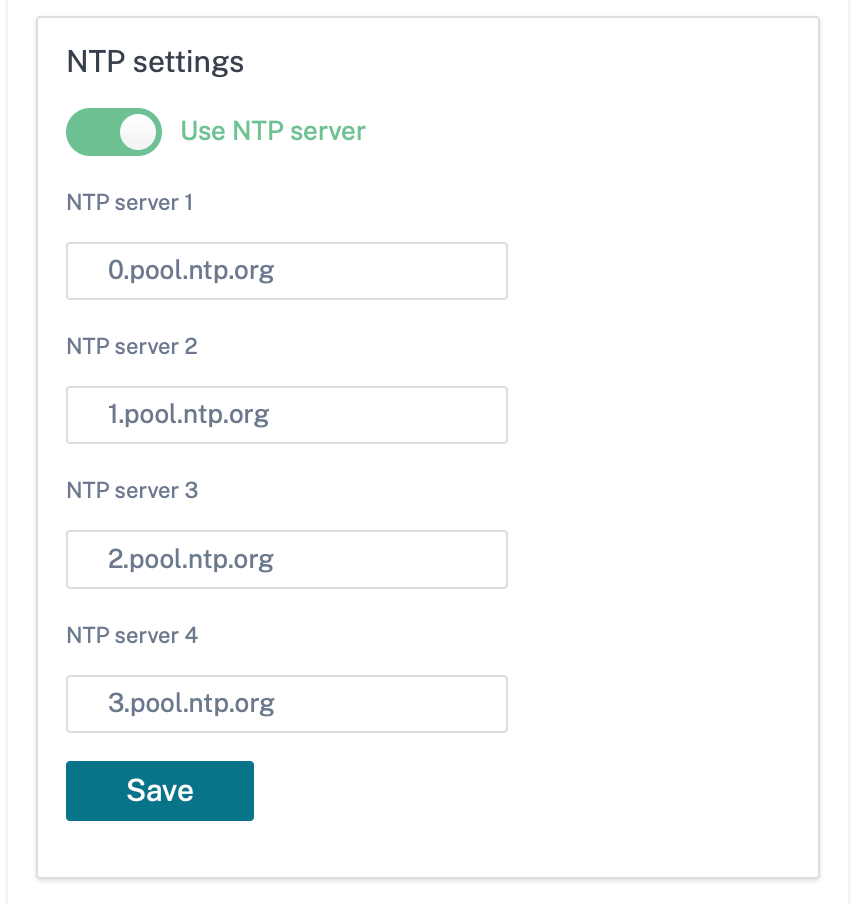
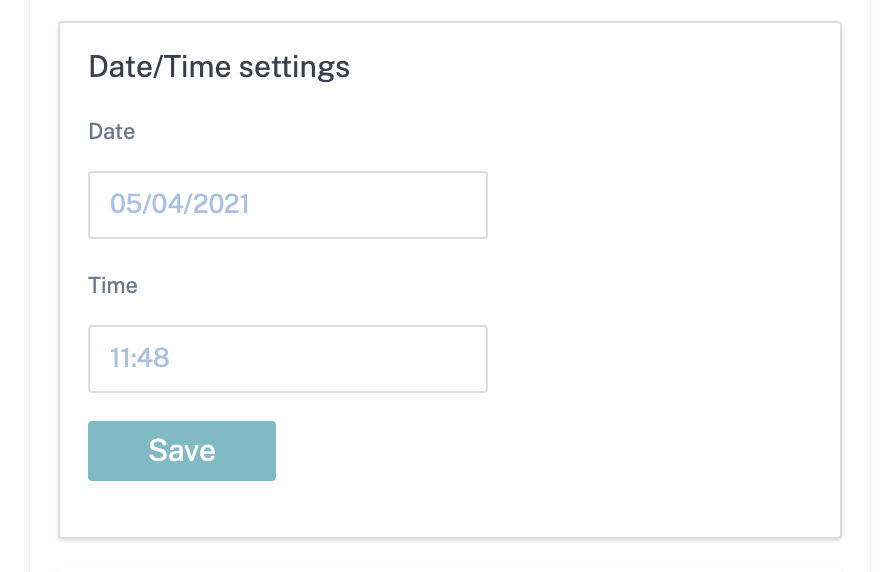
To configure date and time manually, disable the Use NTP server option and manually select the date and time.
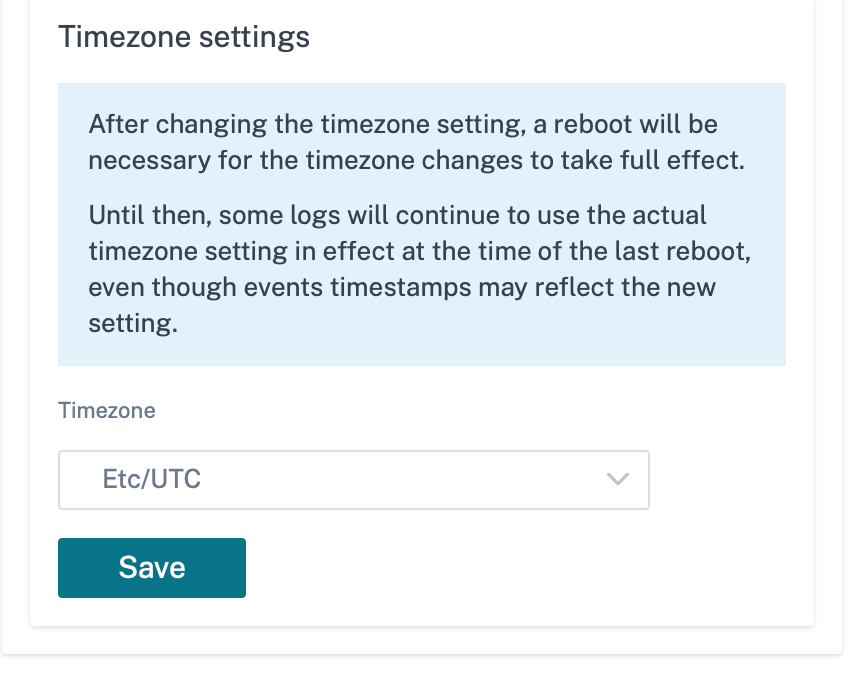
Select the time zone based on your country/city.
NOTE
Reboot the Orchestrator VM after changing the time zone. Some logs continue to use the previous time zone, until the reboot is done. For instructions, see Reboot Orchestrator VM.
Remote Authentication Servers
In a provider managed setup, only provider administrators can configure RADIUS or TACACS+ servers for the users who are authenticated remotely. Customer administrators can use the remote authentication servers configured by the provider administrators. In a customer managed setup, customer administrators can configure RADIUS or TACACS+ servers.
NOTE
Ensure that the required user accounts are created on the RADIUS or TACACS+ authentication server.
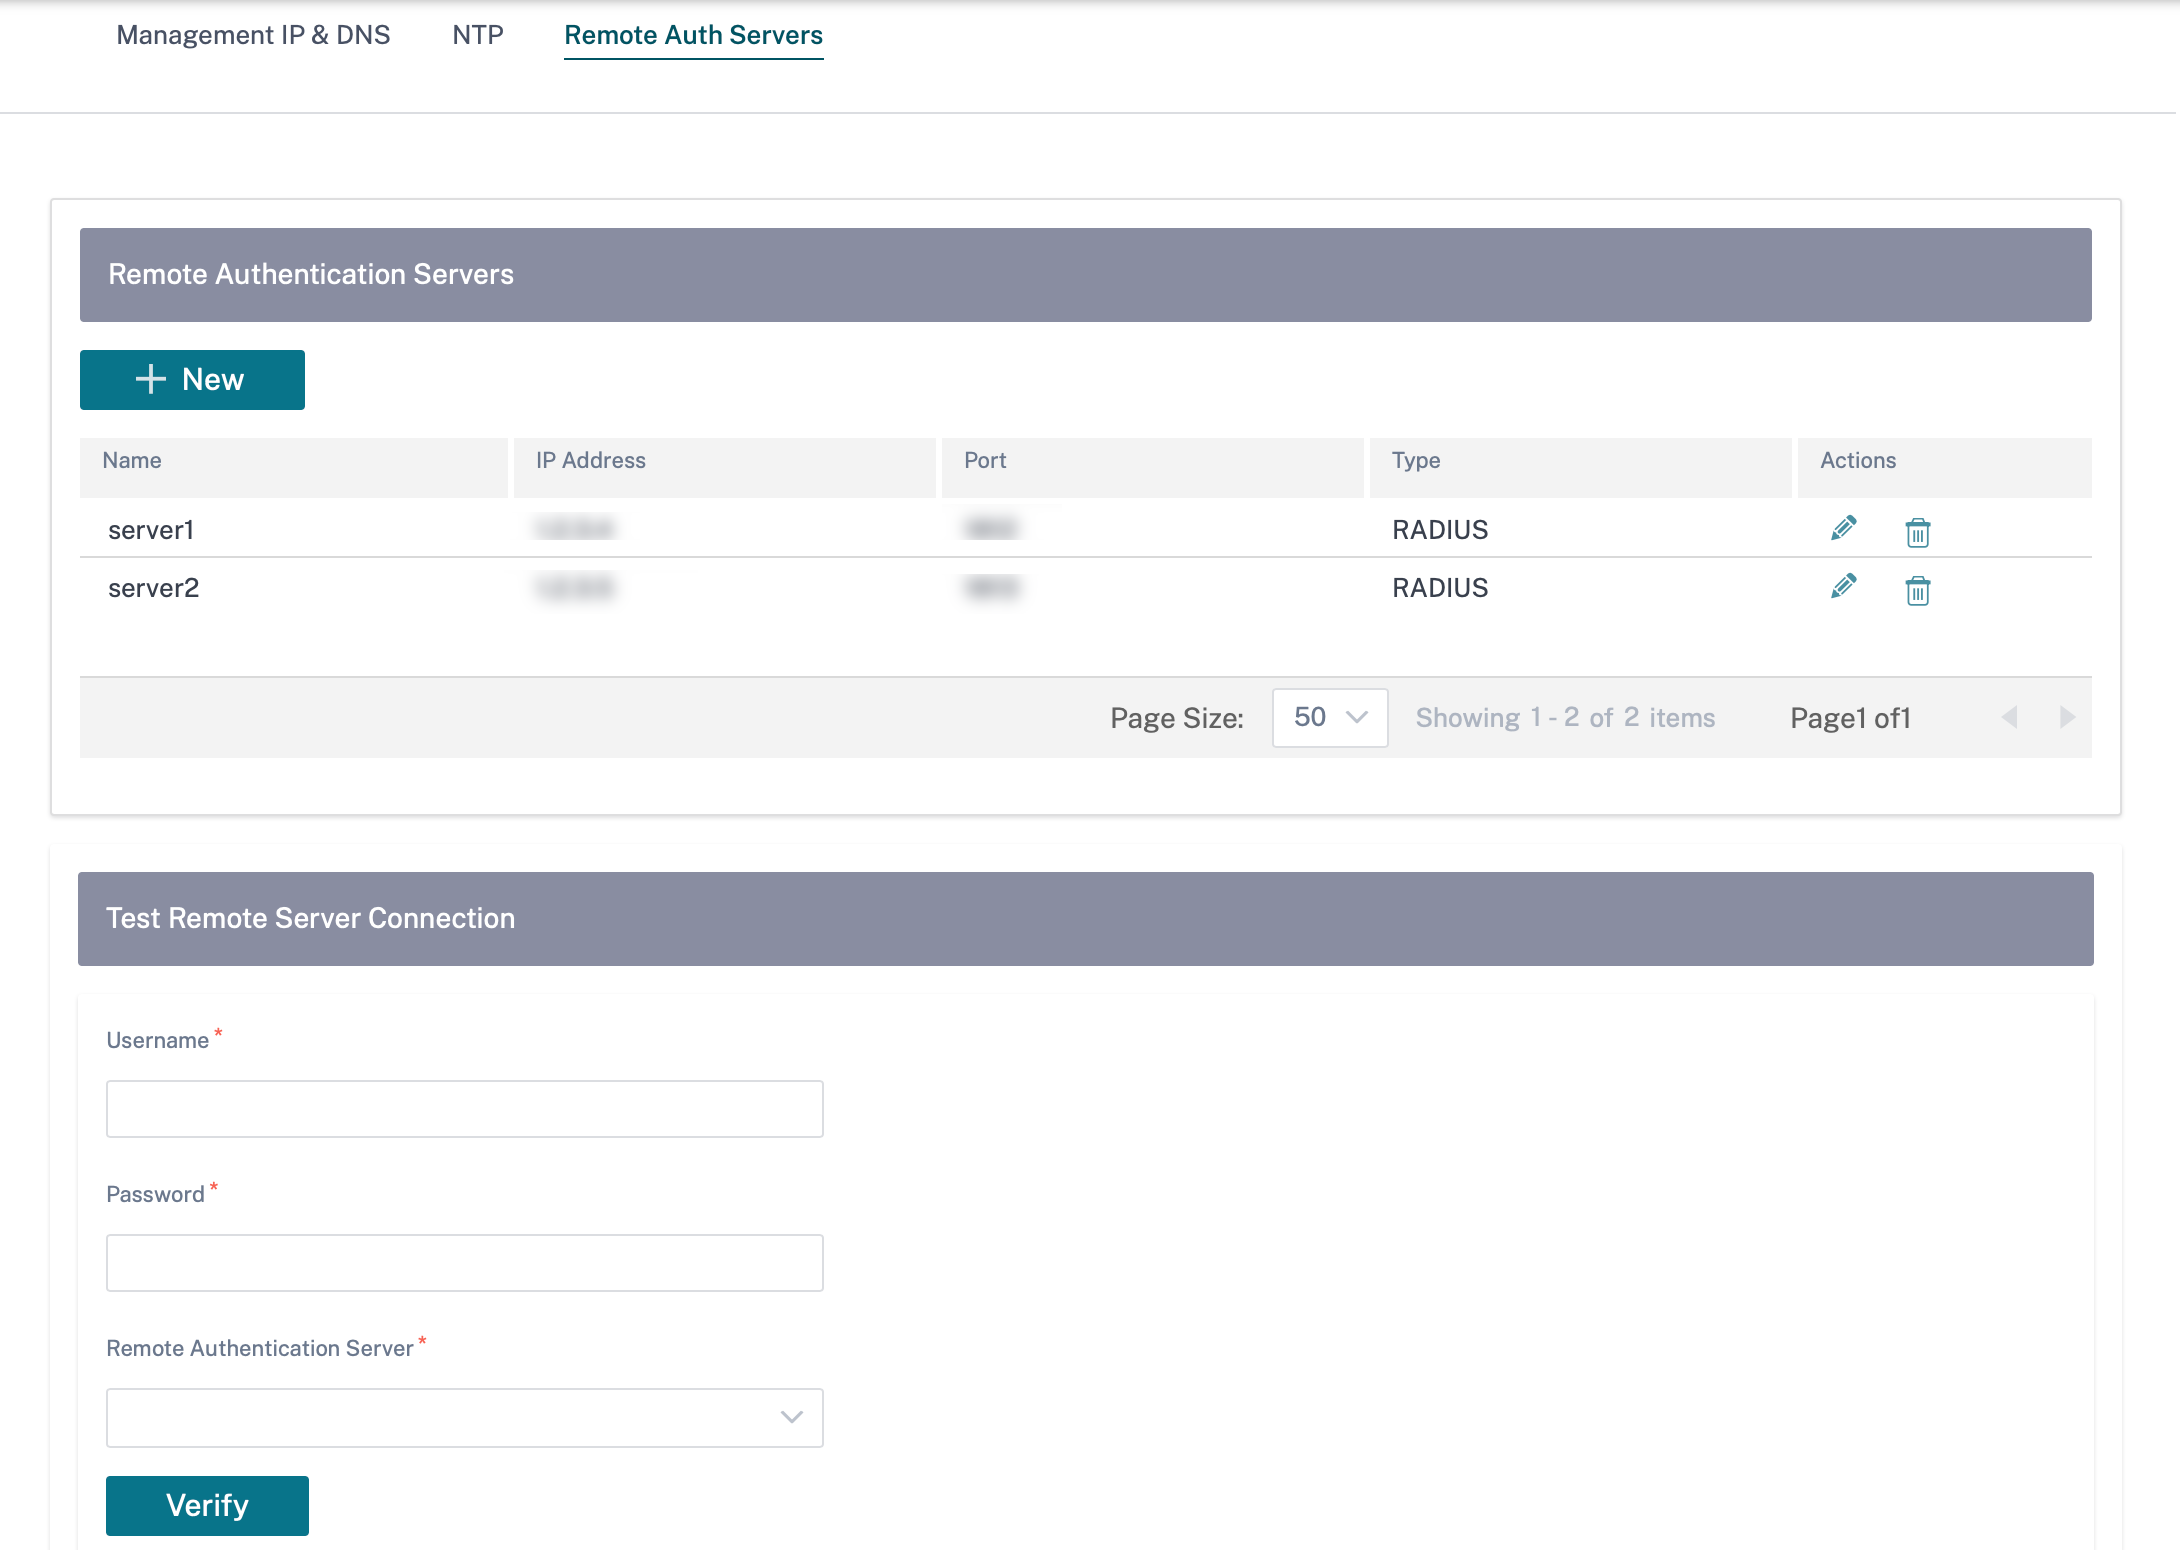
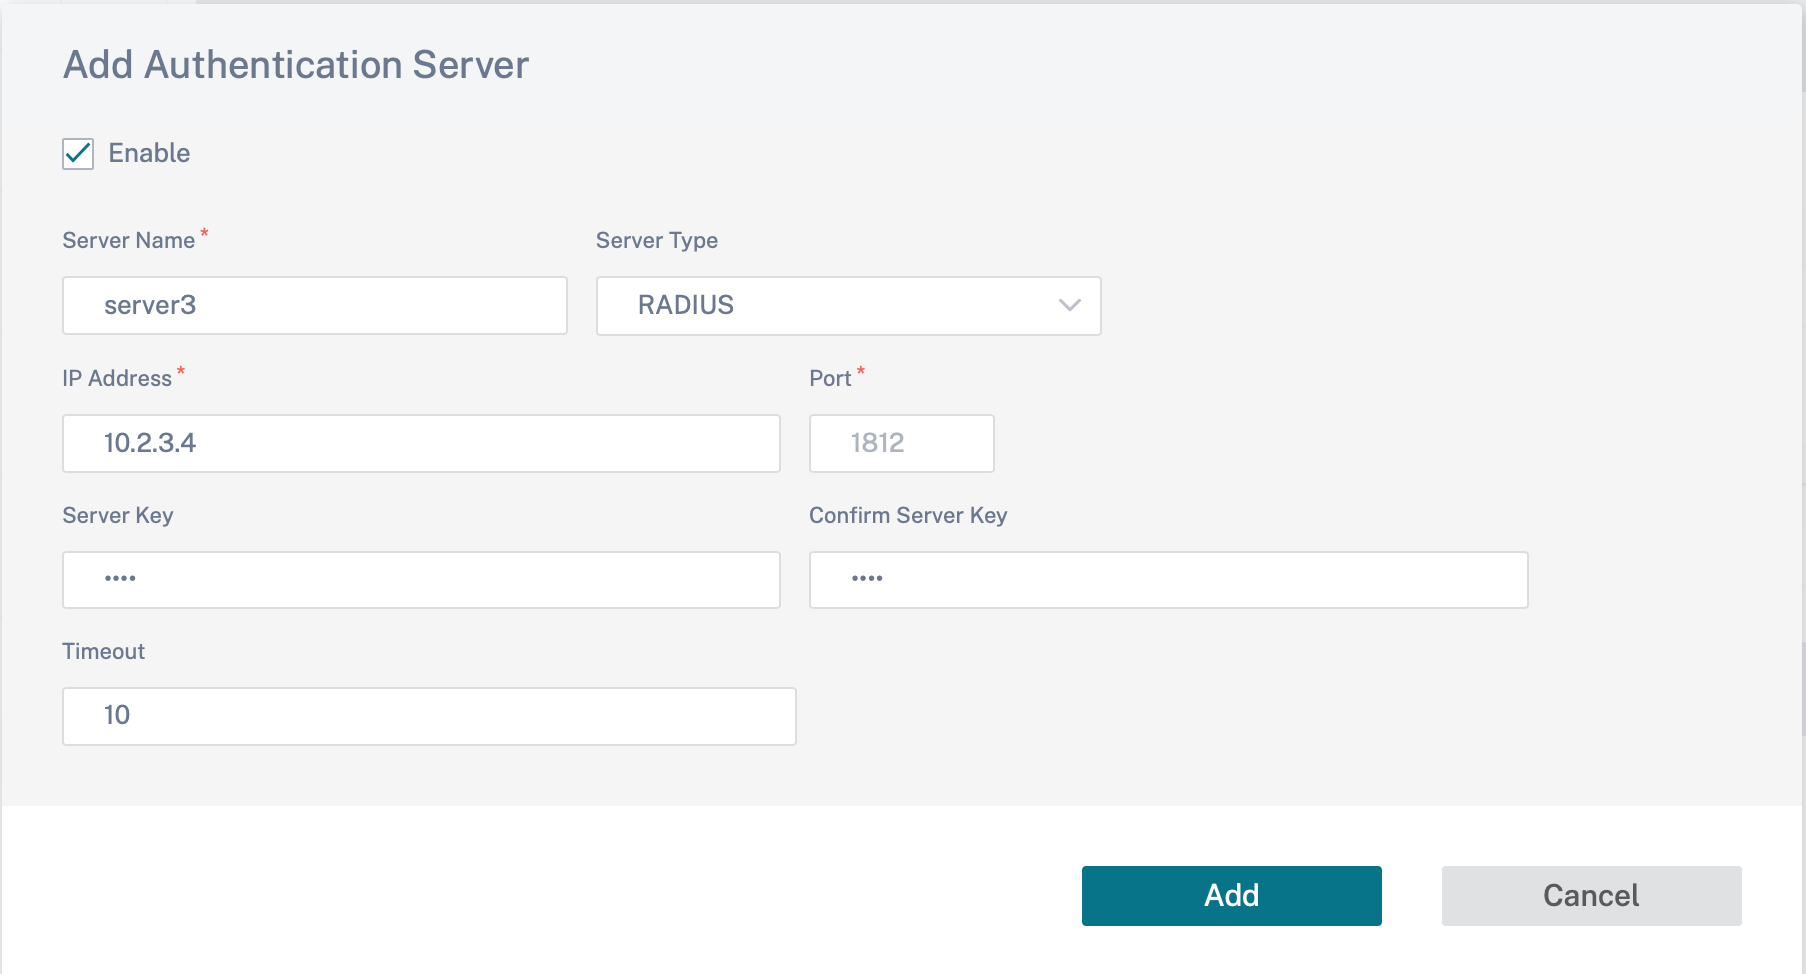
To configure remote authentication, navigate to Infrastructure > Orchestrator Administration > Management Settings > Remote Auth Servers. Click + New. Enter the following details:
- Enable: Enables remote authentication server configuration.
- Server Name: The name of the remote authentication server.
- Server Type: The type of remote authentication server - RADIUS or TACACS+.
- IP Address: The host IP address for the remote authentication server.
- Port: The port number for the remote authentication server. The default port for the RADIUS server is 1812 and the TACACS+ server is 49.
- Server Key and Confirm Server Key: A secret key to use when connecting to the remote authentication server.
-
Authentication Type: (available only for TACACS+ server) Select the encryption method to use to send the user name and password to the TACACS+ server.
- PAP: Uses Password Authentication Protocol (PAP) to strengthen user authentication by assigning a strong shared secret to the TACACS+ server.
- ASCII: Uses the ASCII character set to strengthen user authentication by assigning a strong shared secret to the TACACS+ server.
- Timeout: The time interval (in seconds) to wait for an authentication response from the remote authentication server.
You can also test the remote server connection. Under Test Remote Server Connection, provide your Username and Password. Select the remote authentication server and click Verify.
Database management
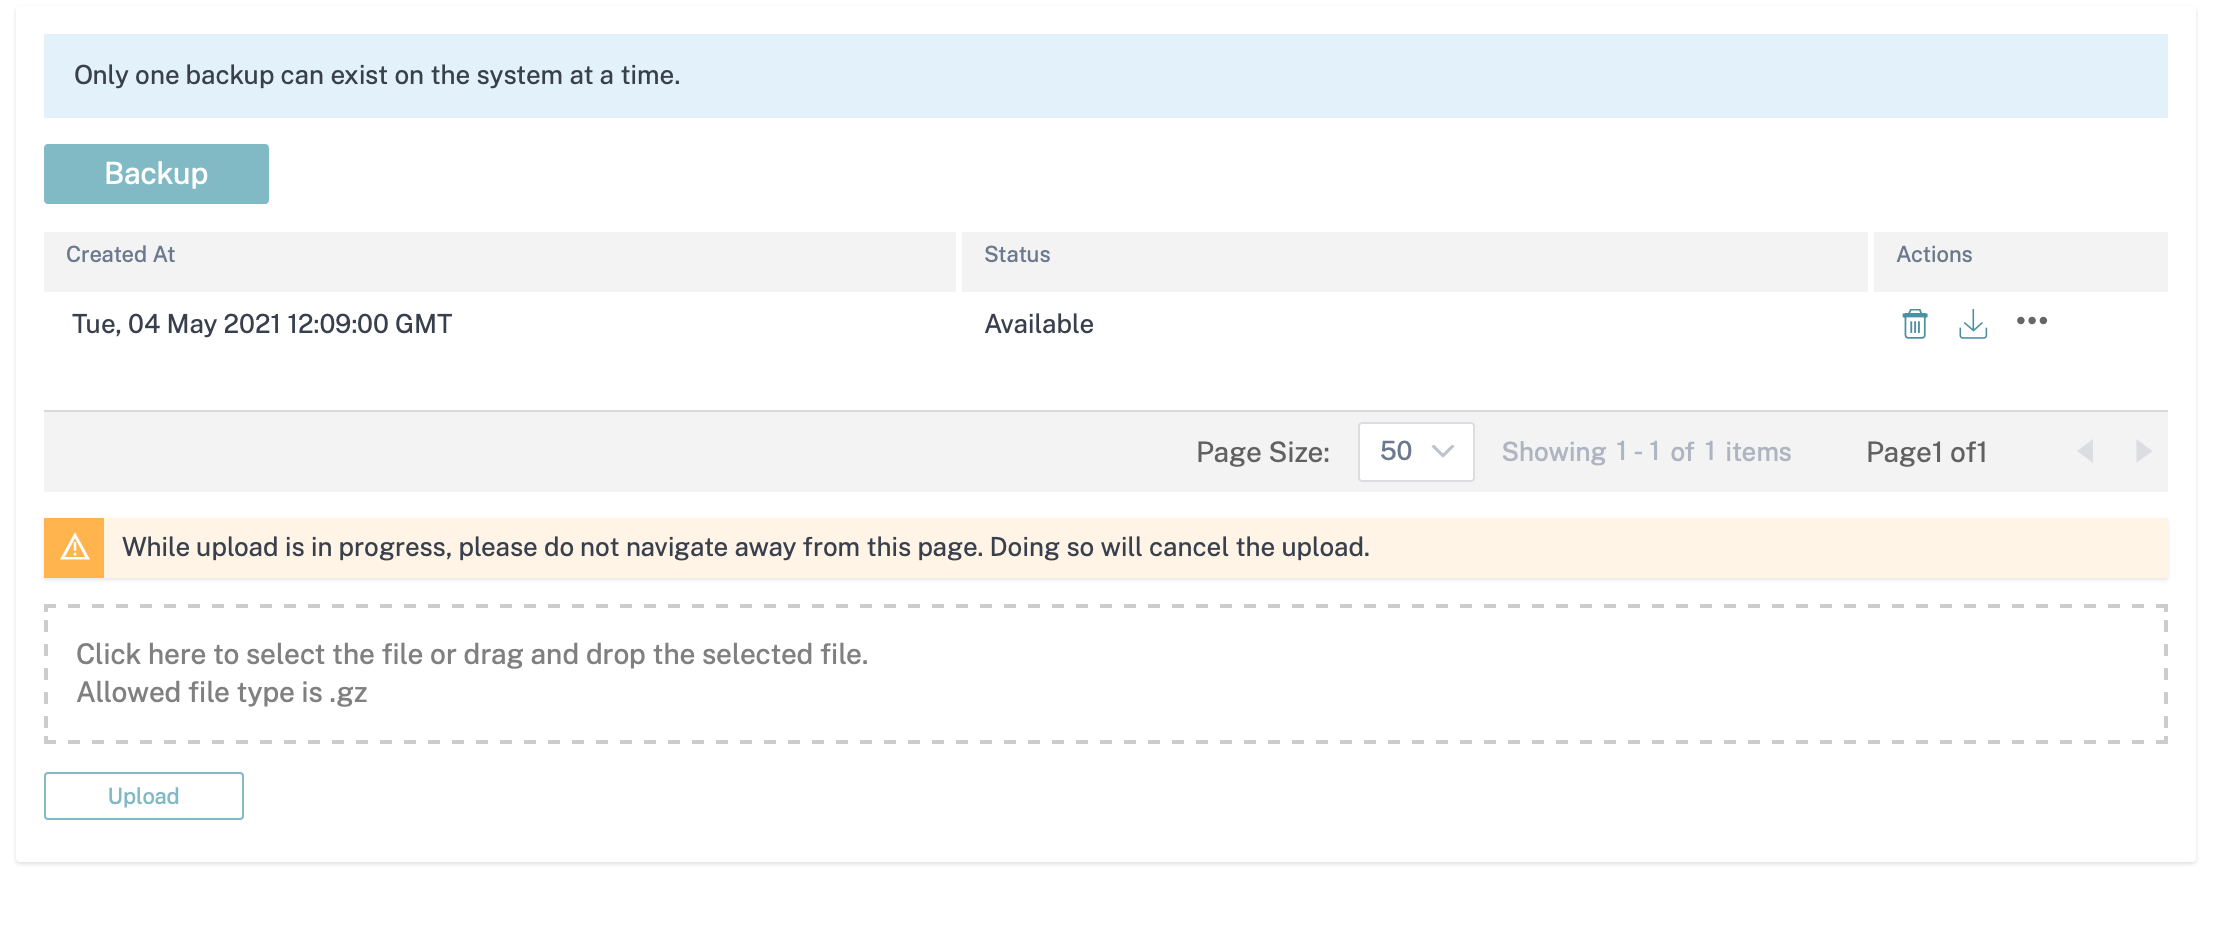
You can create backup of the current database running on Citrix SD-WAN Orchestrator for On-premises and later use the backed-up file to restore the same database state.
Note
- In a provider managed setup, only provider administrators have access to create database backup and restore the same.
- You cannot restore the database backup taken in a provider managed setup on a customer managed setup. Similarly, you cannot restore the database backup taken in a customer managed setup on a provider managed setup.
To create database backup, navigate to Infrastructure > Orchestrator Administration > Database Management. Click Backup.
Click download under the Actions column to download the backed-up database.
Click Upload to browse and upload the downloaded file. You can also drag the downloaded file and drop it on the screen.
To restore, click Restore under the Actions column.
NOTE
You can save only one database backup at a time. To replace an existing backup with the latest, delete the existing backup and click Backup.
Restore of the database must be done to the same release of Citrix SD-WAN Orchestrator for On-premises from where the data backup was taken.
The database backup only takes the backup of configuration and statistics. It does not back up the platform related data.
Storage Management
Citrix SD-WAN Orchestrator for On-premises supports migrating customer configurations, statistics, local database, and published Citrix SD-WAN release version from an existing disk to a new disk.
In a provider managed setup, only provider administrators can perform disk migration. Customer administrators in the provider managed setup do not have privileges to perform disk migration. In a customer managed setup, customer administrators can perform disk migration.
You can perform disk migration either to increase the disk space or for disaster recovery.
- Add a new disk: You can add a new disk having storage size at least twice as that of the current data consumed by the Citrix SD-WAN Orchestrator for On-premises. Through Citrix SD-WAN Orchestrator for On-premises UI, you can activate the new disk and migrate the existing customer configurations, statistics, local database, and published Citrix SD-WAN release version. Once the newly added disk is activated, Citrix SD-WAN Orchestrator for On-premises gets rebooted.
- Disaster recovery: In the event of a disaster, you can attach the disk containing the data to a new instance of Citrix SD-WAN Orchestrator for On-premises virtual machine which is on the same version of Citrix SD-WAN Orchestrator for On-premises. Activate the disk without choosing Migrate Data option in the Citrix SD-WAN Orchestrator for On-premises UI. Once the disk is activated, Citrix SD-WAN Orchestrator for On-premises gets rebooted.
NOTE
- When disk migration is in progress, do not power off or manually reboot Citrix SD-WAN Orchestrator for On-premises. Powering off or manual reboot can cause data loss.
- When a disk is migrated from a disk partition that was added earlier to a newly created disk partition, after migration, the data in the old disk is not removed. To remove the data in the old disk, attach it to another operating system and delete the data securely.
Limitations
The following are the limitations with the disk migration process:
- The users in the old release are not migrated to the new release. Post migration, delete the users and create them again.
- STS created on the old Citrix SD-WAN Orchestrator for On-premises virtual machine is not migrated. However, post migration, the UI lists the STS generated on the old Citrix SD-WAN Orchestrator for On-premises virtual machine. Delete the STS manually.
- Database backup created in the old Citrix SD-WAN Orchestrator for On-premises is not migrated. Post migration if it is getting listed, delete it manually.
- By default, it is assumed that the new Citrix SD-WAN Orchestrator for On-premises to which the disk is migrated to, has connectivity to all two factor authentication servers. If the admin account is using two factor authentication servers and if the connections to the two factor authentication servers are not available, then even the admin cannot log in. In such scenarios, contact Citrix support.
- After migrating to the new disk, you cannot increase the disk space allocated for Citrix SD-WAN Orchestrator for On-premises.
- In the disaster recovery scenario, you must reconfigure the custom domain after activating the disk.
- In the disaster recovery scenario, after activating the disk, you must either perform non-cloud zero-touch deployment or cloud brokered zero-touch deployment to establish connectivity between Citrix SD-WAN appliances on the sites with Citrix SD-WAN Orchestrator for On-premises.
Add a new disk on Citrix Hypervisor
-
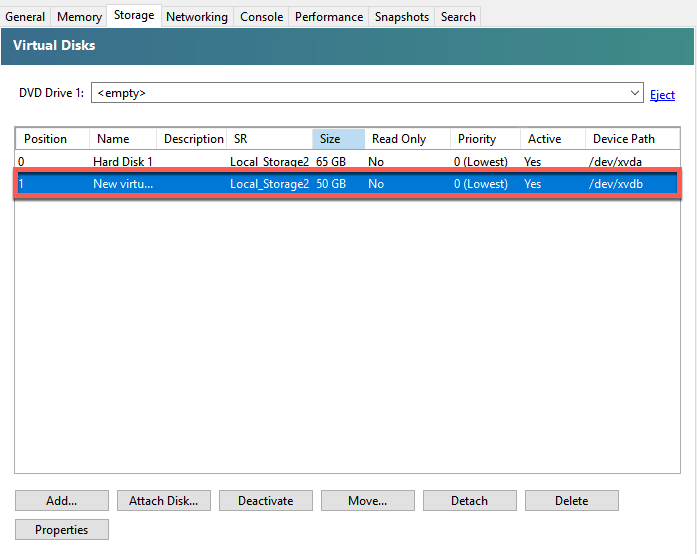
Select the virtual machine (VM) from the hypervisor. Select the Storage tab and click Add.
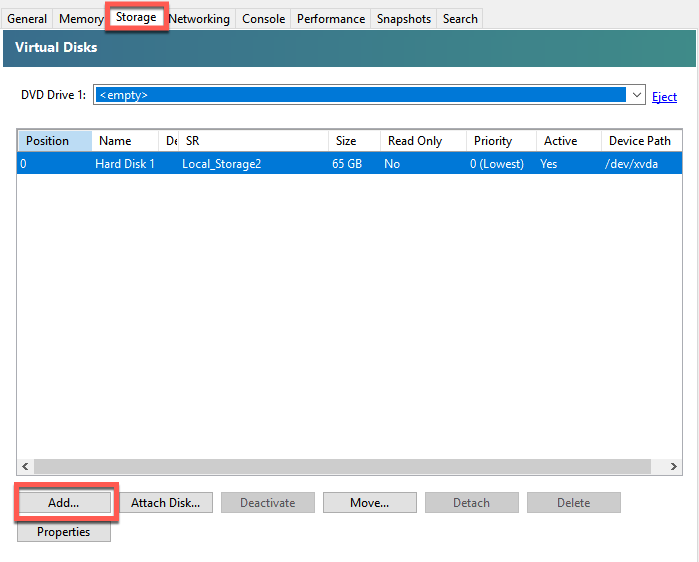
-
Provide details such as name, description, size, and location of the new disk. Click Add. The newly added disk gets listed under the Storage tab.
NOTE
The disk size must be at least twice as that of the current data consumed by the Citrix SD-WAN Orchestrator for On-premises.

-
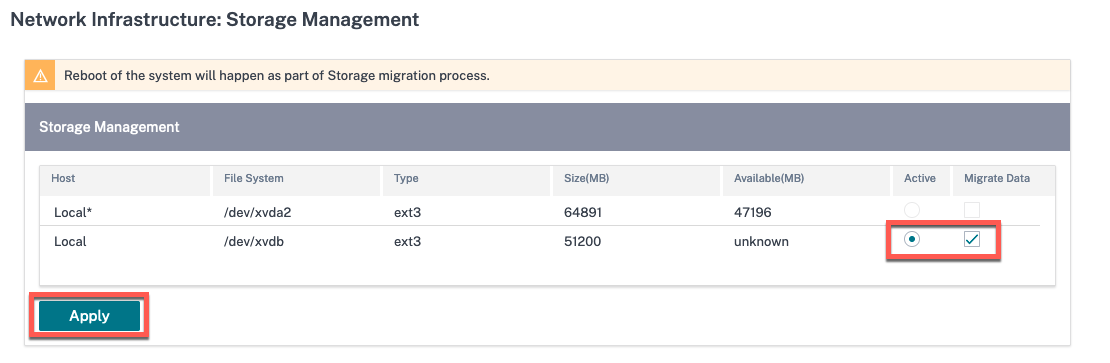
Log in to the Citrix SD-WAN Orchestrator for On-premises UI and navigate to INFRASTRUCTURE > Orchestrator Administration > Storage Management. The newly attached disk automatically gets listed under Storage Management.
-
Choose the Active radio button and select the Migrate Data check box. Click Apply.
-
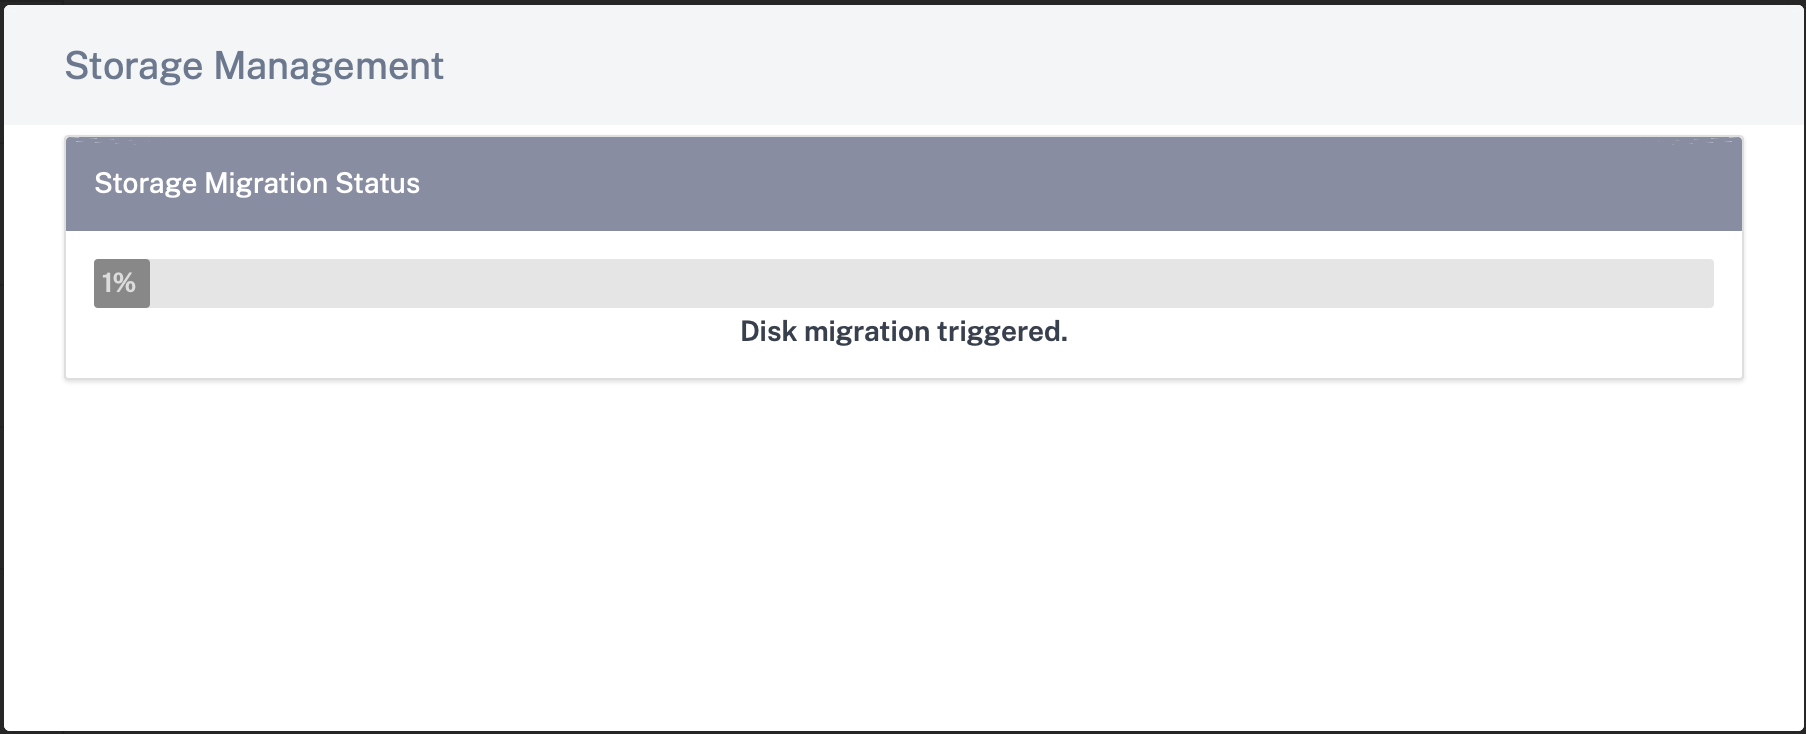
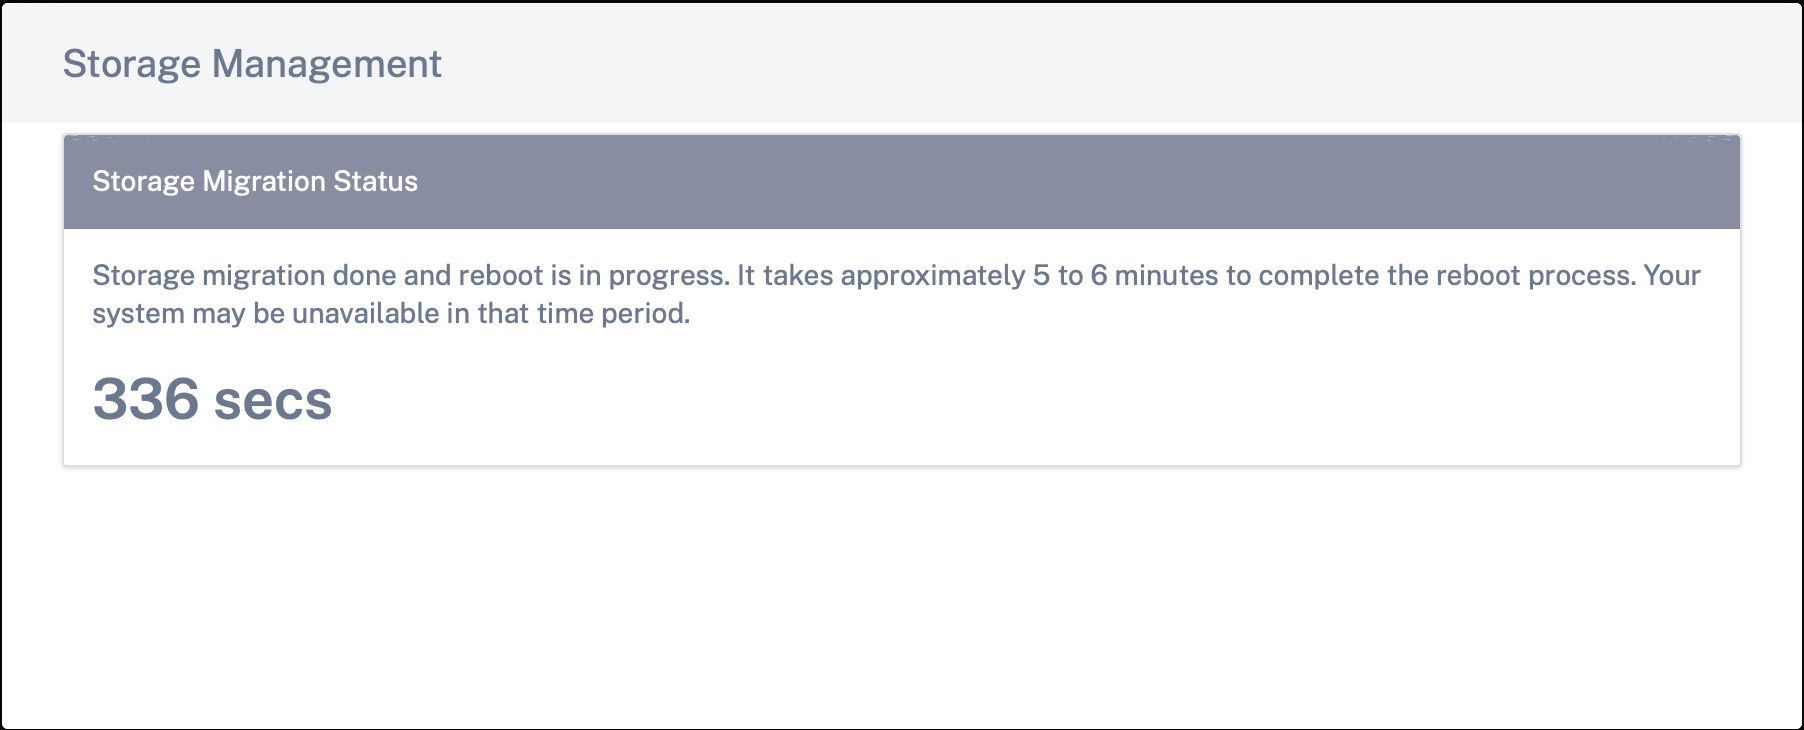
The disk migration process is triggered. Customer configurations, statistics, local database, and Citrix SD-WAN release version on the existing disk get migrated to the new disk. After the migration is completed, Citrix SD-WAN Orchestrator for On-premises gets rebooted.
Add a new disk on ESXi Server
-
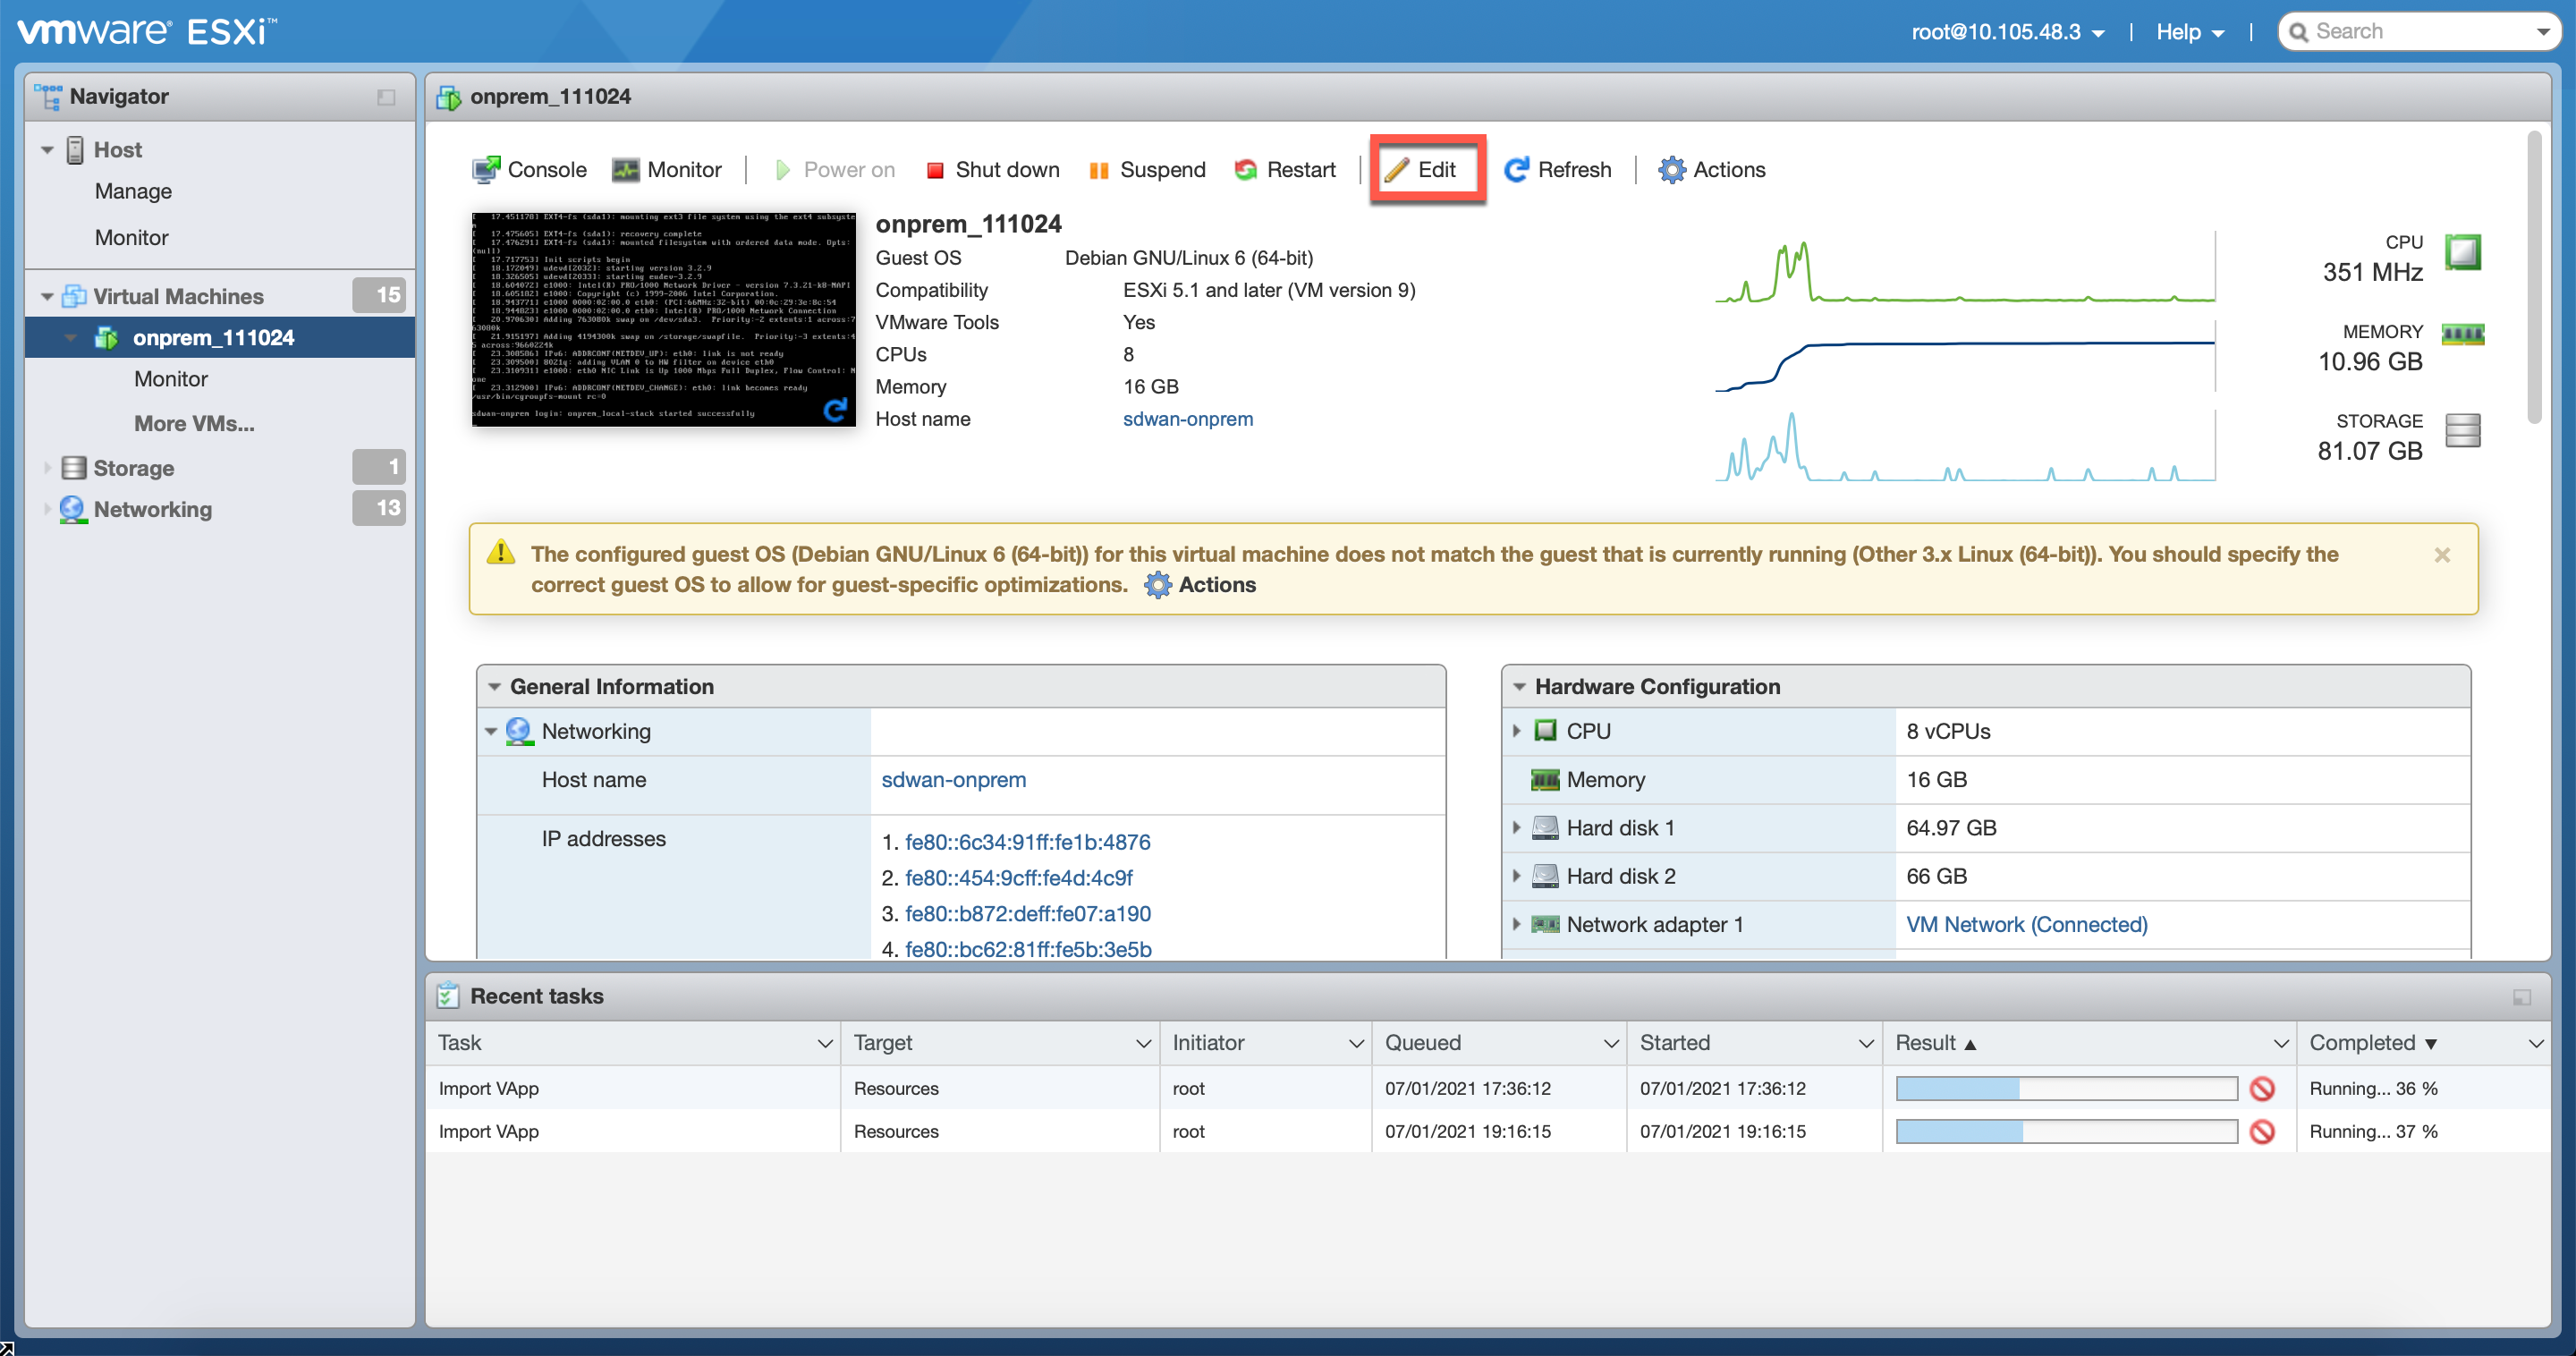
Log in to your ESXi server and select the virtual machine. Click Edit.
-
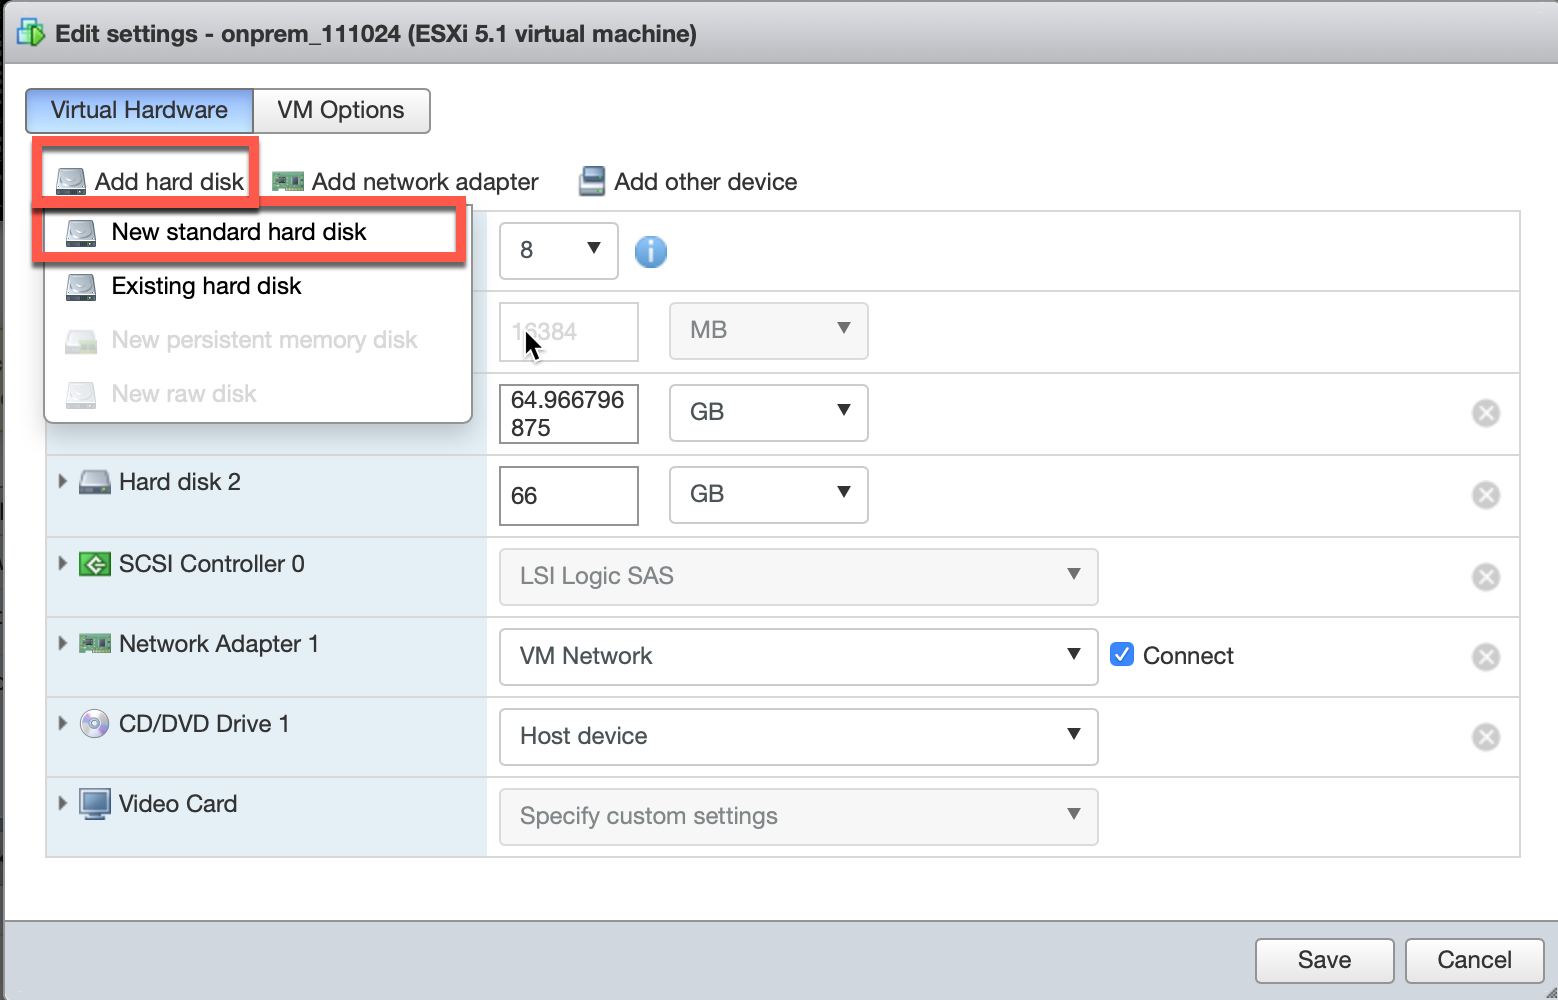
Click Add hard disk > New standard hard disk.
-
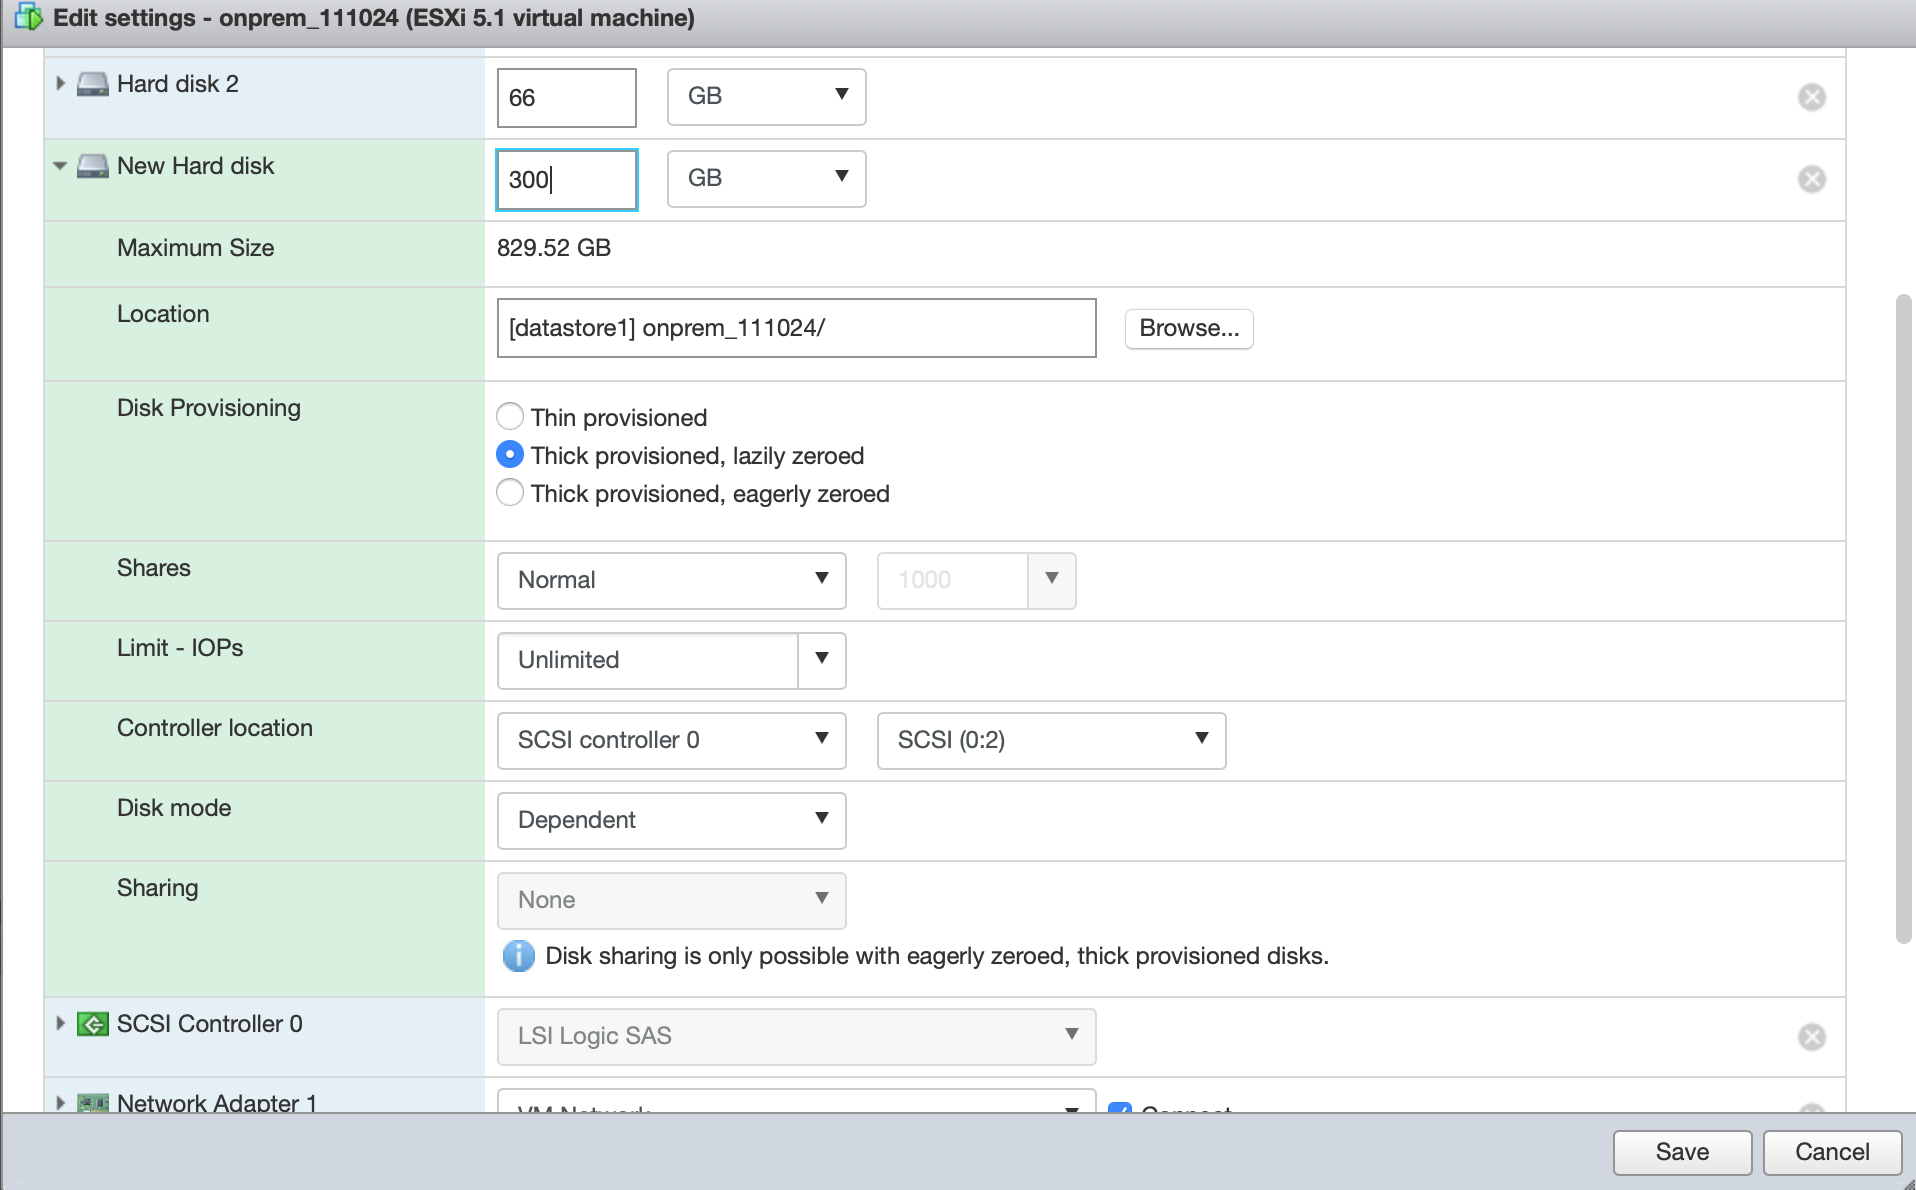
Enter the disk storage space and other settings based on your preference. Click Save.
NOTE
The disk size must be at least twice as that of the current data consumed by the Citrix SD-WAN Orchestrator for On-premises.
-
Log in to the Citrix SD-WAN Orchestrator for On-premises and navigate to INFRASTRUCTURE > Orchestrator Administration > Storage Management. The newly attached disk gets listed here.
-
Choose the Active radio button and select the Migrate Data check box. Click Apply.
-
The disk migration process is triggered. Customer configurations, local database, Citrix SD-WAN release version, and database statistics on the existing disk get migrated to the new disk. After the migration is completed, Citrix SD-WAN Orchestrator for On-premises gets rebooted.
Disaster recovery on Citrix Hypervisor
-
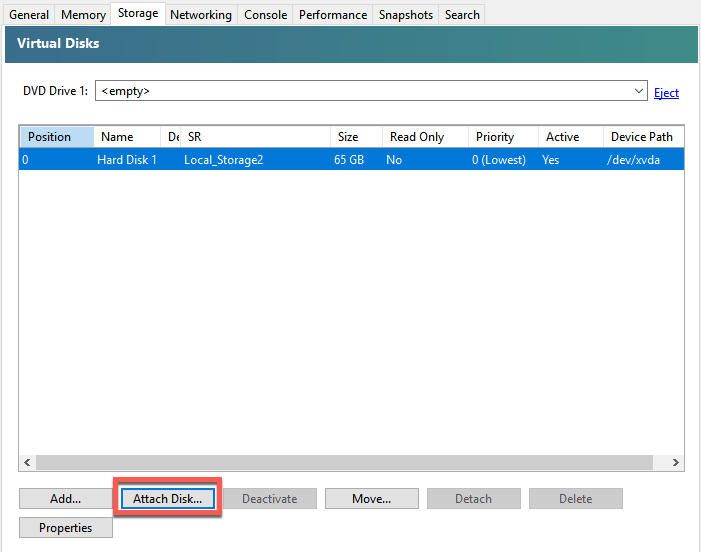
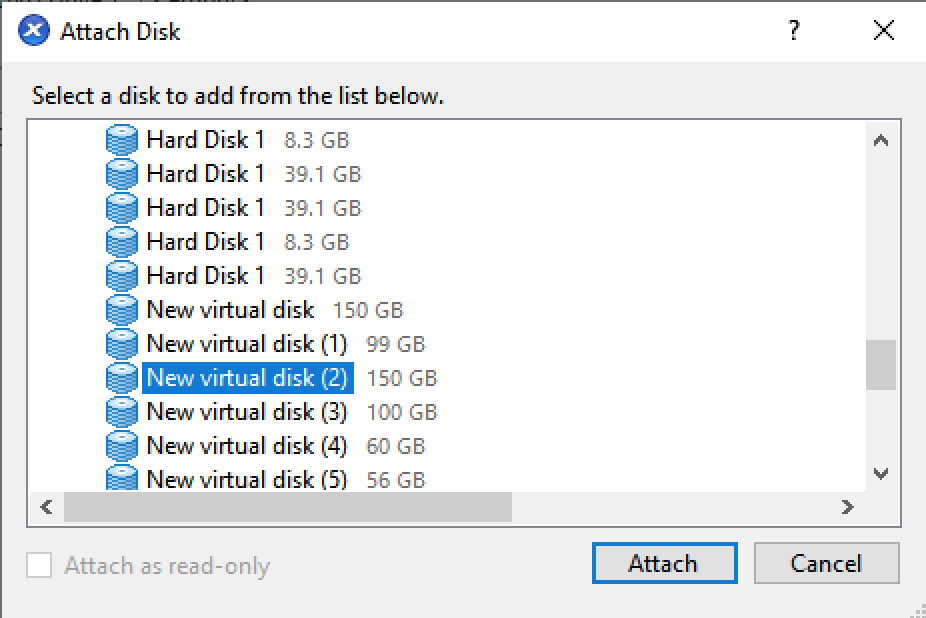
Select the virtual machine (VM) from the hypervisor. Select the Storage tab and click Attach Disk.
-
Select the disk attached to the Citrix SD-WAN Orchestrator for On-premises which hit disaster and click Attach.
If the disk is not listed, ensure that the disk attached to Citrix SD-WAN Orchestrator for On-premises which hit disaster is detached and Citrix SD-WAN Orchestrator for On-premises is in shutdown state.
-
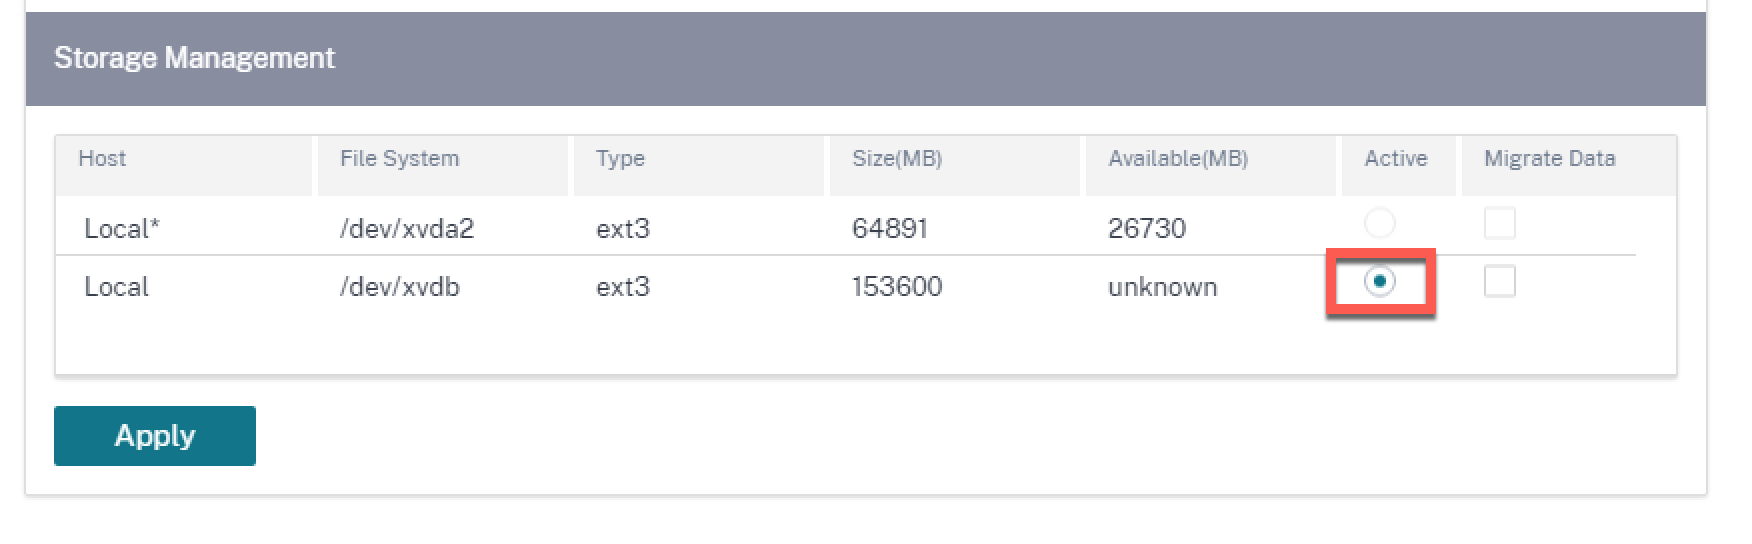
Log in to the Citrix SD-WAN Orchestrator for On-premises UI and navigate to INFRASTRUCTURE > Orchestrator Administration > Storage Management. The newly attached disk gets listed here.
-
Choose only the Active radio button (clear the Migrate Data check box if selected) and click Apply.
Note
Do not select the Migrate Data check box. Citrix SD-WAN Orchestrator for On-premises triggers the migration at the back-end and reboots itself once the migration is completed.
-
After the migration is completed, Citrix SD-WAN Orchestrator for On-premises gets rebooted.
Disaster recovery on ESXi server
-
Log in to the ESXi server and select the virtual machine. Click Edit.
-
Click Add hard disk > Existing hard disk.
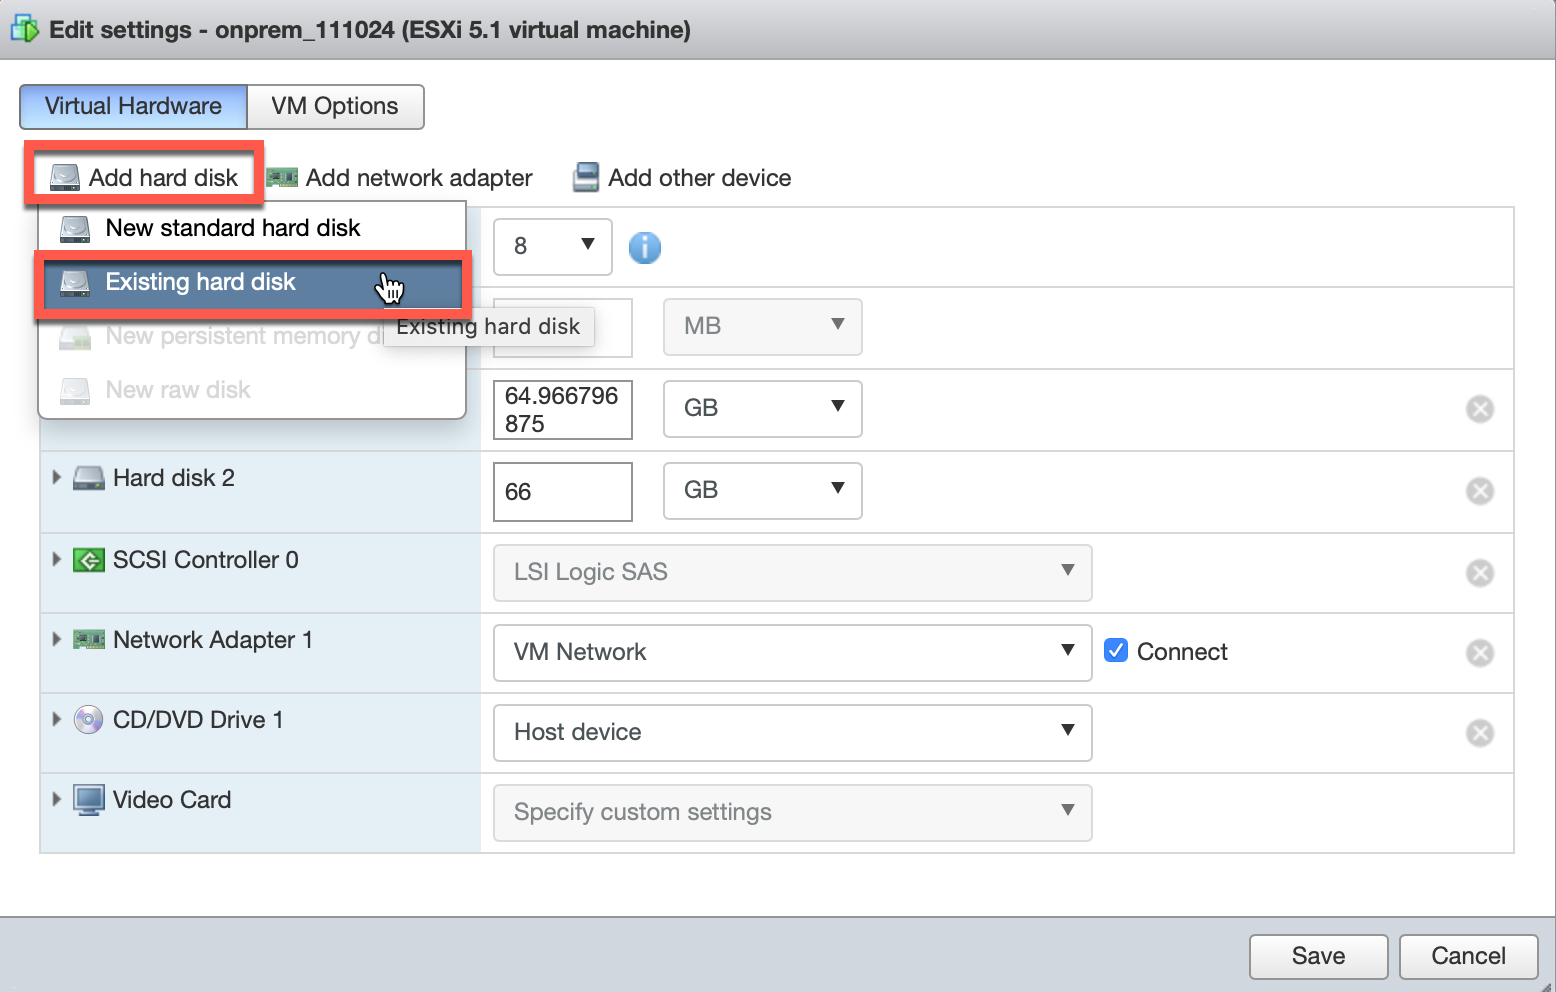
-
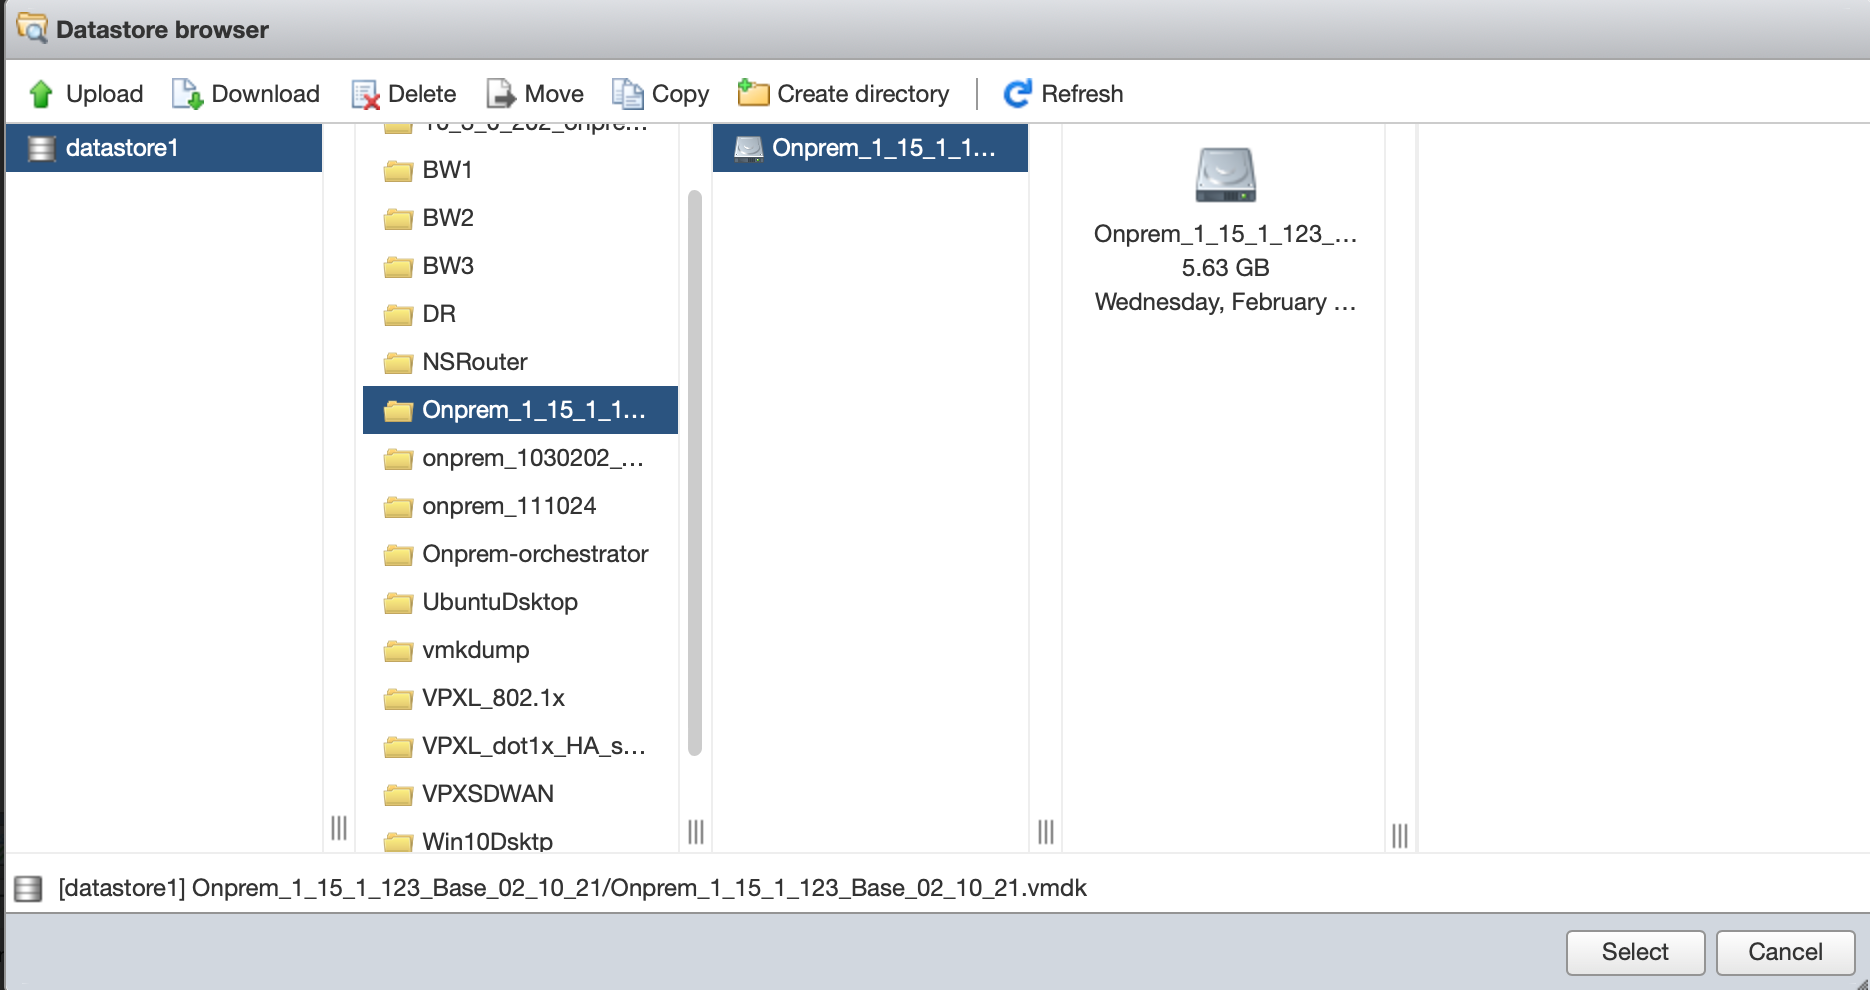
Browse for the disk attached to the Citrix SD-WAN Orchestrator for On-premises which hit disaster and click Select.
-
Log in to the Citrix SD-WAN Orchestrator for On-premises UI and navigate to INFRASTRUCTURE > Orchestrator Administration > Storage Management. The newly attached disk gets listed here.
-
Choose only the Active radio button (clear the Migrate Data check box if selected) and click Apply.
Note
Do not select the Migrate Data check box. Citrix SD-WAN Orchestrator for On-premises triggers the migration at the back-end and reboots itself once the migration is completed.
-
After the migration is completed, Citrix SD-WAN Orchestrator for On-premises gets rebooted.
HTTP Proxy
Citrix SD-WAN Orchestrator for On-premises requires an Internet connection for licensing, Cloud login, Cloud brokered ZTD, Cloud direct, and publish software. If Citrix SD-WAN Orchestrator for On-premises is connected to the Internet through an HTTP proxy server, you can configure the HTTP proxy server settings on your Citrix SD-WAN Orchestrator for On-premises virtual machine.
The HTTP proxy setting centralizes the management of all the outgoing requests made to Citrix Cloud. Administrators can route the outgoing requests from Citrix SD-WAN Orchestrator for On-premises to Citrix Cloud through an HTTP proxy server.
Before you begin
To use HTTP proxy for Cloud login for the first time, you must configure HTTP proxy settings through the CLI console of Citrix SD-WAN Orchestrator for On-premises.
On the Cloud login page of a new Citrix SD-WAN Orchestrator for On-premises virtual machine, if you want HTTP proxy to be used for all the outbound connections from Citrix SD-WAN Orchestrator for On-premises to Citrix SD-WAN Orchestrator service, you must configure the HTTP proxy details using the CLI. Once the Cloud login is complete and you access the configuration page, you can configure the HTTP proxy server details on the UI.
Configuring HTTP proxy settings on the CLI
Configure HTTP proxy settings by running the set_http_proxy command. You can configure HTTP proxy using either of the options provided below:
-
When authentication is enabled at the Proxy server:
set <ip address> <port> <user name> <password> -
When authentication is not enabled at the Proxy server:
set <ip address> <port>
Show HTTP Proxy Settings
-
show: This command displays the proxy settings on the CLI. The output does not display the password.
Clear HTTP Proxy Settings
-
clear: This command deletes the HTTP proxy settings.
Return to main_menu
-
main_menu: This command redirects you to the CLI console of Citrix SD-WAN Orchestrator for On-premises.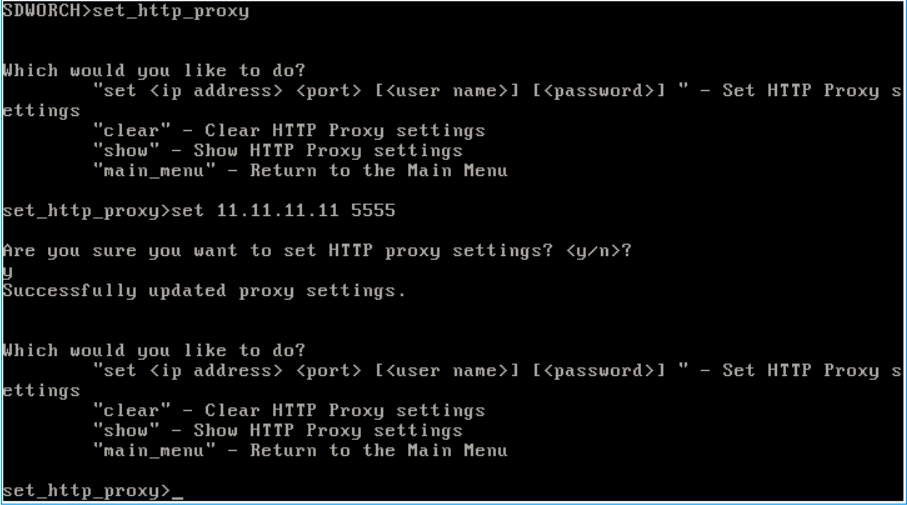
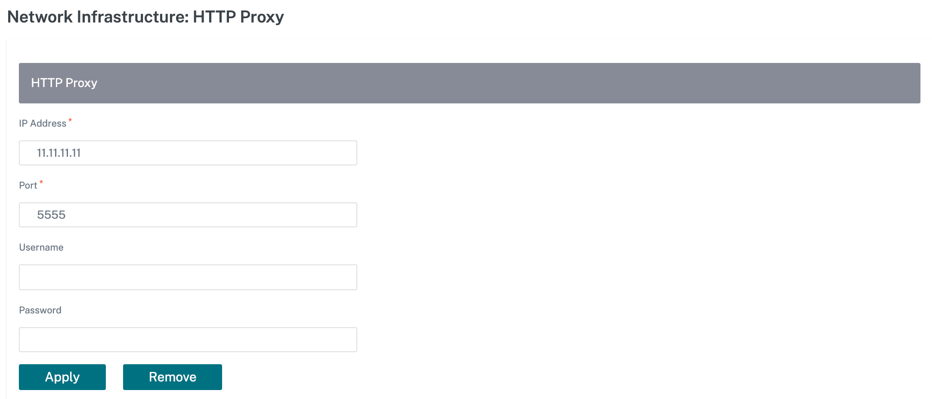
Configuring HTTP proxy server settings on the UI
-
Login to the Citrix SD-WAN Orchestrator for On-premises UI and navigate to Infrastructure > Orchestrator Administration > HTTP Proxy.
- In the Network Infrastructure: HTTP Proxy section, enter values for the following fields:
- IP Address: The IP address of the proxy server.
- Port: The network port number on which the proxy server accepts connections.
- User Name: User name of the proxy server.
- Password: The password for the proxy server.
Note
You can leave the user name and Password fields blank if there is no authentication configured on the proxy server.
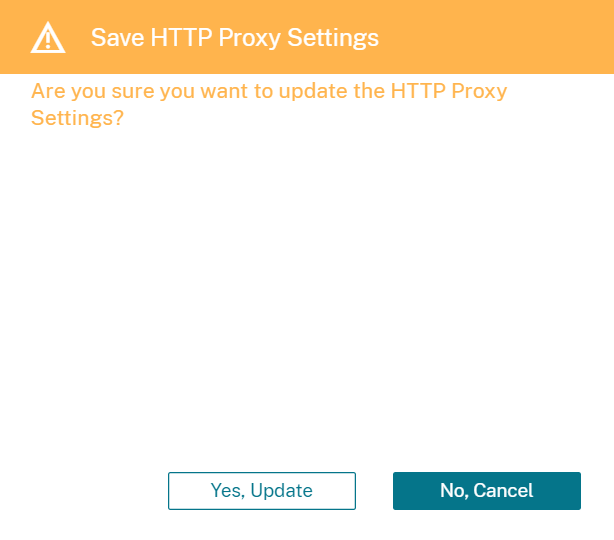
- Click Apply. A confirmation dialog box appears.
-
Click Yes, Update.
Notes
- To use the HTTP proxy server for outbound traffic from Citrix SD-WAN Orchestrator for On-premises to Citrix Cloud, the proxy server must be configured as a transparent SSL HTTP proxy or SSL bypass HTTP proxy server. The server must not spoof the Citrix SD-WAN Orchestrator service’s SSL certificate.
- You can remove the proxy server settings altogether, if Citrix SD-WAN Orchestrator for On-premises is connected to the internet directly. You can also remove the proxy server settings and configure another proxy server, if necessary.
Remove proxy server settings on the UI
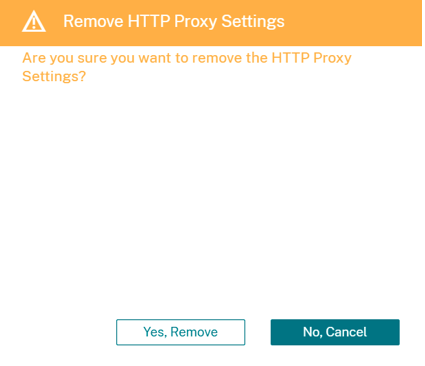
- In the Citrix SD-WAN Orchestrator for On-premises UI, navigate to Infrastructure > Orchestrator Administration > HTTP Proxy.
- In the Network Infrastructure: HTTP Proxy section, click Remove. A confirmation dialog box appears.
-
Click Yes, Remove.
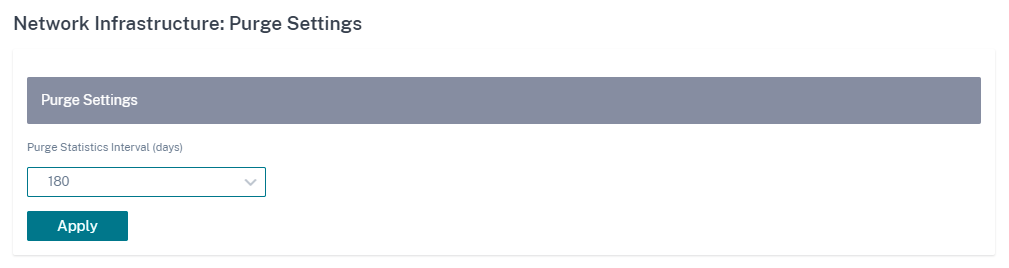
Purge Settings
You can clear historical statistics/ data for a selected time interval. The statistics / data older than the set days are cleared. Once the data is cleared, it becomes no longer available. By default, Citrix SD-WAN Orchestrator for On-premises clears historical statistics / data older than 30 days.
At the network level, navigate to Infrastructure > Orchestrator Administration > Purge Settings, select the time interval, and click Apply. For example, if you want to purge historical statistics / data older than 180 days, select 180 from the Purge Statistics Interval (days) drop-down list and click Apply. The purging process happens sometime around 12:48 AM daily at the time zone set on your SD-WAN appliance.