S/MIME for Secure Mail
Secure Mail supports Secure/Multipurpose Internet Mail Extensions (S/MIME), enabling users to sign and encrypt messages for greater security. Signing assures the recipient that the identified sender sent the message not an imposter. Encryption allows only the recipients with a compatible certificate to open the message.
For details about S/MIME, see Microsoft TechNet.
In the following table, X indicates that Secure Mail supports an S/MIME feature on a device OS.
| S/MIME Feature | iOS | Android |
|---|---|---|
| Digital identity provider integration: You can integrate Secure Mail with a supported third-party digital identity provider. Your identity provider host supplies certificates to an identity provider app on user devices. That app sends certificates to the Endpoint Management shared vault, a secure storage area for sensitive app data. Secure Mail obtains certificates from the shared vault. For more information, see the Integrating with a Digital Identity Provider section. | X | |
| Derived Credential support | Secure Mail supports the use of derived credentials as a certificate source. For more information on derived credentials, see the Derived Credentials for iOS article in the Citrix Endpoint Management documentation. | |
| Certificate distribution by email: Distributing certificates by email requires that you create certificate templates and then use those templates to request user certificates. After you install and validate the certificates, you export the user certificates and then email them to users. Users then open the email in Secure Mail and import the certificates. For details, see the Distributing Certificates by Email section. | X | X |
| Auto-import of single-purpose certificates: Secure Mail detects if a certificate is only for signing or encryption and then automatically imports the certificate and notifies the user. If a certificate is for both purposes, users are prompted to import it. | X |
Integrating with a digital identity provider
The following diagram shows the path that a certificate takes from the digital identity provider host to Secure Mail. This happens when you integrate Secure Mail with a supported third-party digital identity provider.
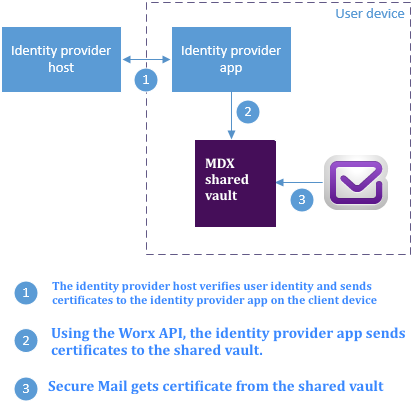
The MDX shared vault is a secure storage area for sensitive app data such as certificates. Only app enabled by Endpoint Management can access the shared vault.
Prerequisites
Secure Mail supports integration with Entrust IdentityGuard.
Configuring the integration
- Prepare the identity provider app and provide it to users:
- Contact Entrust to get the .ipa to wrap.
-
Use the MDX Toolkit to wrap the app.
If you deploy this app to users who already have a version of the app outside of the Endpoint Management environment, use a unique app ID for this app. Use the same provisioning profile for this app and Secure Mail.
- Add the app to Endpoint Management and publish it to the Endpoint Management app store.
-
Let your users know that they must install the identity provider app from Secure Hub. Provide guidance, as needed, about any post-installation steps.
Depending on how you configure the S/MIME policies for Secure Mail in the next step, Secure Mail might prompt users to install certificates or enable S/MIME in Secure Mail settings. Steps for both of those procedures are in Enabling S/MIME on Secure Mail for iOS.
-
When you add Secure Mail to Endpoint Management, be sure to configure these policies:
-
Set the S/MIME certificate source policy to Shared vault. This setting means that Secure Mail uses the certificates stored in its shared vault by your digital identity provider.
-
To enable S/MIME during the initial startup of Secure Mail, configure the Enable S/MIME during first Secure Mail startup policy. The policy determines if Secure Mail enables S/MIME when there are certificates in the shared vault. If no certificates are available, Secure Mail prompts the user to import certificates. If the policy isn’t enabled, users can enable S/MIME in the Secure Mail settings. By default, Secure Mail does not enable S/MIME, which means that users must enable S/MIME through Secure Mail settings.
-
Using derived credentials
Instead of integrating with a digital identity provider, you can allow the use of derived credentials.
When you add Secure Mail to Endpoint Management, configure the S/MIME certificate source policy to Derived Credentials. For more information on derived credentials, see Derived Credentials for iOS.
Distributing certificates by email
Instead of integrating with a digital identity provider or using derived credentials, you can distribute certificates to users by email. This option requires the following general steps, detailed in this section.
-
Use Server Manager to enable web enrollment for Microsoft Certificate Services and to verify your authentication settings in IIS.
-
Create certificate templates for signing and encrypting email messages. Use those templates to request user certificates.
-
Install and validate the certificates, then export the user certificates and email them to users.
-
Users open the email in Secure Mail and import the certificates. The certificates are thus available only to Secure Mail. They do not appear in the iOS profile for S/MIME.
Prerequisites
The instructions in this section are based on the following components:
- XenMobile® Server 10 and later
- A supported version of Citrix Gateway, formerly NetScaler® Gateway
- Secure Mail for iOS (minimum version 10.8.10); Secure Mail for Android devices (minimum version 10.8.10)
- Microsoft Windows Server 2008 R2 or later with Microsoft Certificate Services acting as the Root Certificate Authority (CA)
- Microsoft Exchange:
- Exchange Server 2016 Cumulative Update 4
- Exchange Server 2013 Cumulative Update 15
- Exchange Server 2010 SP3 Update Rollup 16
Complete the following prerequisites before configuring S/MIME:
- Deliver the root and intermediate certificates to the mobile devices either manually or through a credentials device policy in Endpoint Management. For details, see Credentials device policy.
- If you are using private server certificates to secure the ActiveSync traffic to Exchange Server, do the following: Have all the root and intermediate certificates installed on the mobile devices.
Enabling Web enrollment for Microsoft Certificate Services
- Go to Administrative Tools and the select Server Manager.
- Under Active Directory Certificate Services, check to see if Certificate Authority Web Enrollment is installed.
- Select Add Role Services to install Certificate Authority Web Enrollment, if needed.
- Check Certificate Authority Web Enrollment and then click Next.
- Click Close or Finish when the installation is complete.
Verifying your authentication settings in IIS
- Ensure that the Web enrollment site used to request user certificates (for example,
https://ad.domain.com/certsrv/) is secured with an HTTPS server certificate (private or public). - The Web enrollment site must be accessed through HTTPS.
- Go to Administrative Tools and then select Server Manager.
- In Web Server (IIS), look under Role Services. Verify that Client Certificate Mapping Authentication and IIS Client Certificate Mapping Authentication are installed. If not, install these role services.
- Go to Administrative Tools and then select Internet Information Services (IIS) Manager.
- In the left pane of the IIS Manager window, select the server running the IIS instance for web enrollment.
- Click Authentication.
- Ensure that Active Directory Client Certificate Authentication is Enabled.
- Click Sites > Default site for Microsoft Internet Information Services > Bindings in the right pane.
- If an HTTPS binding does not exist, add one.
- Go to the Default Web Site Home.
- Click SSL Settings and then click Accept for Client Certificates.
Creating new certificate templates
To sign and encrypt email messages, Citrix recommends that you create certificates on Microsoft Active Directory Certificate Services. If you use the same certificate for both purposes and archive the encryption certificate, it is possible to recover a signing certificate and allow impersonation.
The following procedure duplicates the certificate templates on the Certificate Authority (CA) server:
- Exchange Signature Only (for Signing)
- Exchange User (for Encryption)
-
Open the Certificate Authority snap-in.
-
Expand the CA and then go to Certificate Templates.
-
Right-click and then click Manage.
-
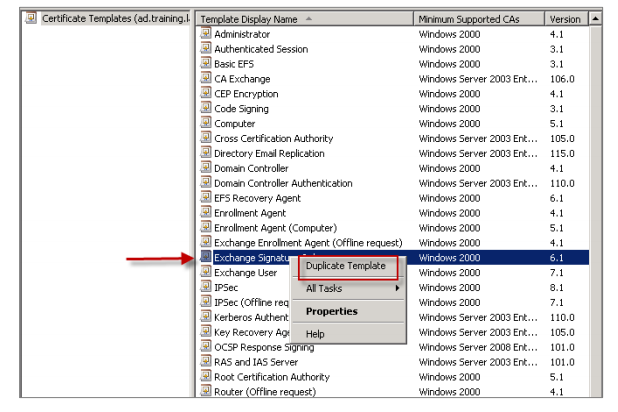
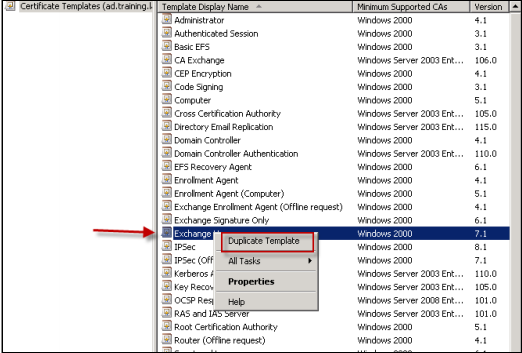
Search for the Exchange Signature Only template, right-click the template and then click Duplicate Template.
-
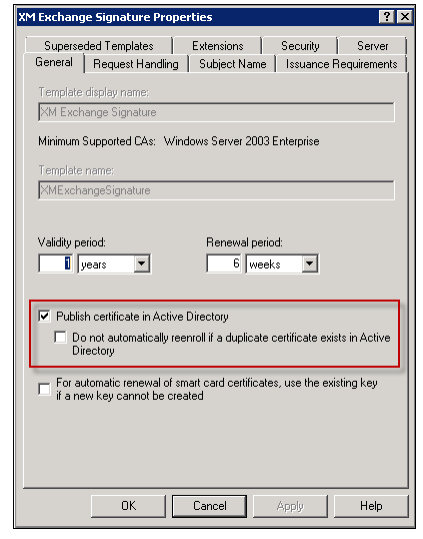
Assign any name.
-
Select the Publish certificate in Active Directory check box.
Note:
If you do not select the Publish certificate in Active Directory check box, users must publish the user certificates (for signing and encryption) manually. They can do this through Outlook mail client > Trust Center > Email Security > Publish to GAL (Global Address List).
-
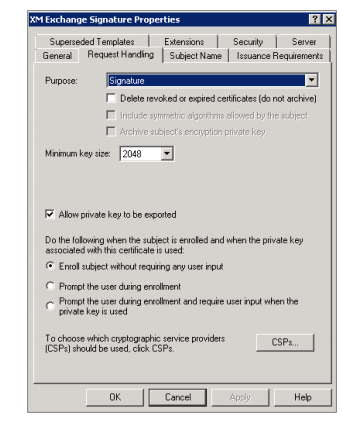
Click the Request Handling tab and then set the following parameters:
- Purpose: Signature
- Minimum key size: 2048
- Allow private key to be exported check box: selected
- Enroll subject without requiring any user input check box: selected
-
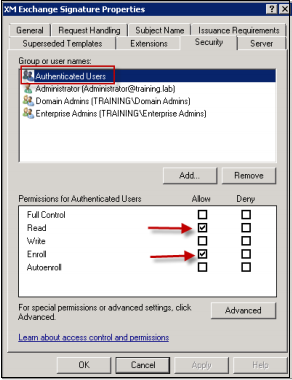
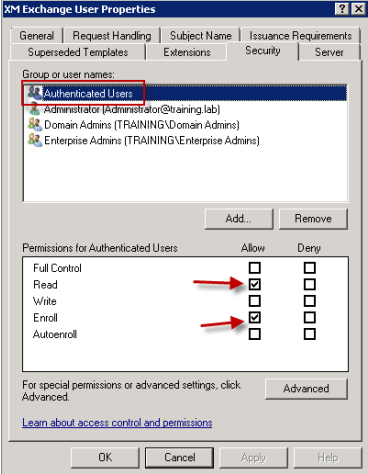
Click the Security tab and, under Group or user names, ensure that Authenticated Users (or any desired Domain Security Group) is added. Also ensure that, under Permissions for Authenticated Users, the Read and Enroll check boxes are selected for Allow.
-
For all other tabs and settings, leave the default settings.
-
In Certificate Templates, click Exchange User and then repeat steps 4 though 9.
For the new Exchange User template, use the same default settings as for the original template.
-
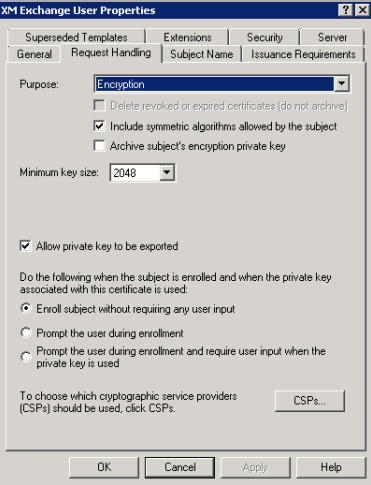
Click the Request Handling tab and then set the following parameters:
- Purpose: Encryption
- Minimum key size: 2048
- Allow private key to be exported check box: selected
-
Enroll subject without requiring any user input check box: selected
-
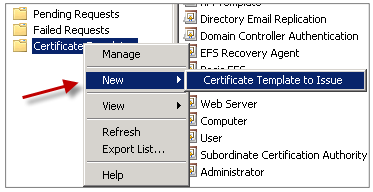
When both templates are created, be sure to issue both certificate templates. Click New and then click Certificate Template to Issue.
Requesting user certificates
This procedure uses “user1” to navigate to the Web enrollment page; for example, https://ad.domain.com/certsrv/. The procedure requests two new user certificates for secure email: one certificate for signing and the other for encryption. You can repeat the same procedure for other domain users that require the use of S/MIME through Secure Mail.
Manual enrollment is used through the Web enrollment site (example, https://ad.domain.com/certsrv/) on Microsoft Certificate Services to generate the user certificates for signing and encryption. An alternative is to configure auto-enrollment through a Group Policy for the group of users who would use this feature.
-
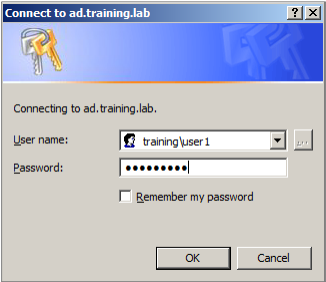
On a Windows-based computer, open Internet Explorer and go to the Web enrollment site to request a new user certificate.
Note:
Be sure you log on with the correct domain user to request the certificate.
-
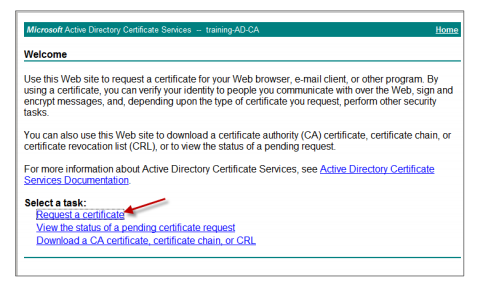
When logged in, click Request a certificate.
-
Click Advanced Certificate Request.
-
Click Create and Submit a request to this CA.
-
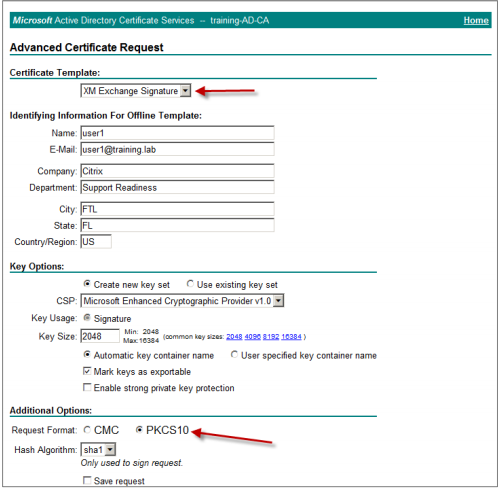
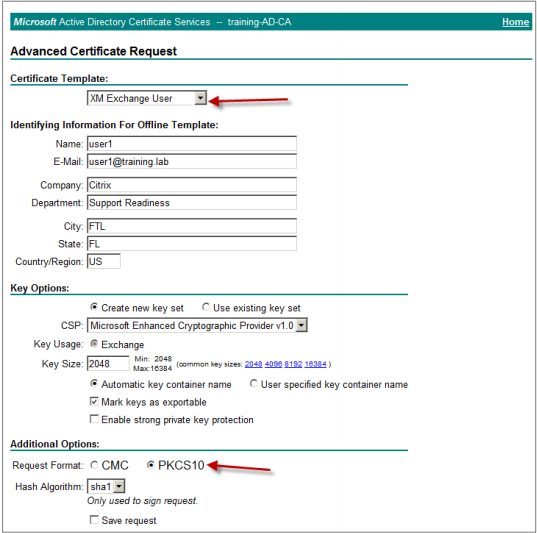
Generate the user certificate for signing purposes. Select the appropriate template name and type your user settings, and then next to Request Format, select PKCS10.
The request has been submitted.
-
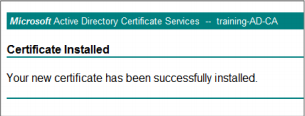
Click Install this certificate.
-
Verify that the certificate is installed successfully.
-
Repeat the same procedure but now for encrypting email messages. With the same user logged on to the Web enrollment site, go to the Home link to request a new certificate.
-
Select the new template for encryption and then type the same user settings you entered in step 5.
-
Ensure you installed the certificate successfully and then repeat the same procedure to generate a pair of user certificates for another domain user. This example follows the same procedure and generates a pair of certificates for “User2”.
Note:
This procedure uses the same Windows-based computer to request the second pair of certificates for “User2”.
Validating Published Certificates
-
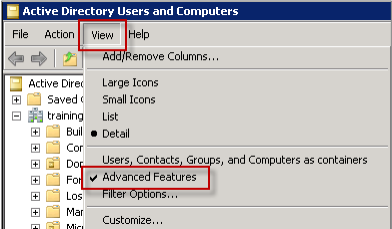
To ensure that the certificates are properly installed in the domain user profile, go to Active Directory Users and Computers > View > Advanced Features.
-
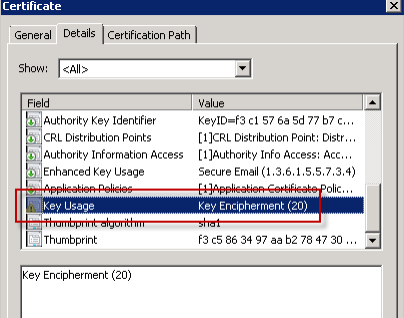
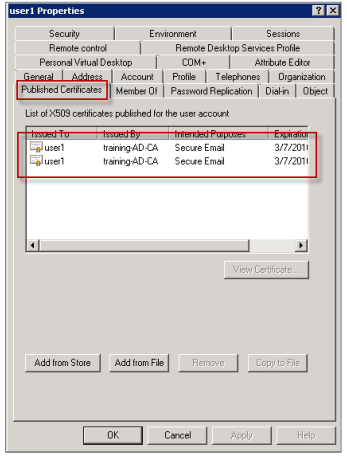
Go to the properties of the user (User1 for this example) and then click the Published Certificates tab. Ensure that both certificates are available. You can also verify that each certificate has a specific usage.
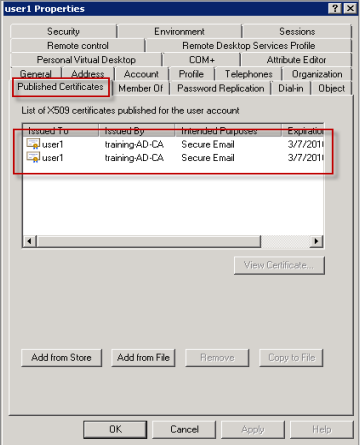
This figure shows a certificate to encrypt email messages.
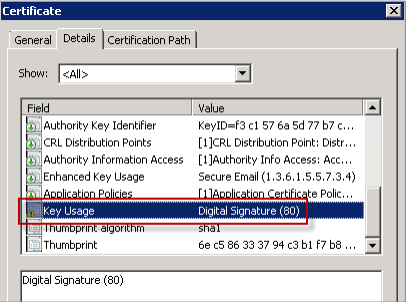
This figure shows a certificate to sign email messages.
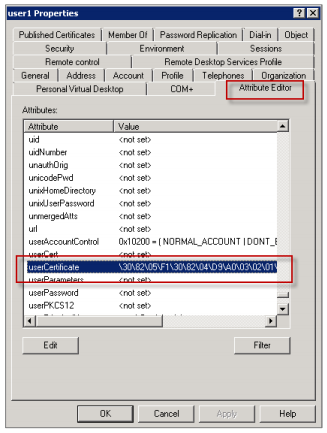
Ensure that the correct encrypted certificate is assigned to the user. You can verify this information under Active Directory Users and Computers > user properties.
The way Secure Mail works is by checking the userCertificate user object attribute via LDAP queries. You can read this value on the Attribute Editor tab. If this field is empty or has the incorrect user certificate for encryption, Secure Mail cannot encrypt (or decrypt) a message.
Exporting the user certificates
This procedure exports both “User1” and “User2” pair certificates in .PFX (PKCS#12) format with the private key. When exported, the certificates are sent through email to the user using Outlook Web Access (OWA).
-
Open the MMC console and go to the snap-in for Certificates - Current User. You see both “User1” and User2” pair of certificates.

-
Right-click the certificate and then click All Tasks > Export.
-
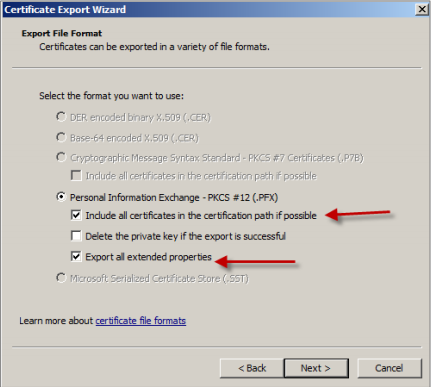
Export the private key by selecting Yes, export the private key.
-
Select the Include all certificates in the certification path if possible and Export all extended properties check boxes.
-
When you export the first certificate, repeat the same procedure for the remaining certificates for users.
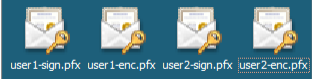
Note:
Clearly label which certificate is the signing certificate and which certificate is the encryption certificate. In the example, the certificates are labeled as userX-sign.pfx and “userX-enc.pfx.
Sending certificates through email
When all certificates are exported in PFX format, you can use Outlook Web Access (OWA) to send them through email. The logon name for this example is User1 the sent email contains both certificates.
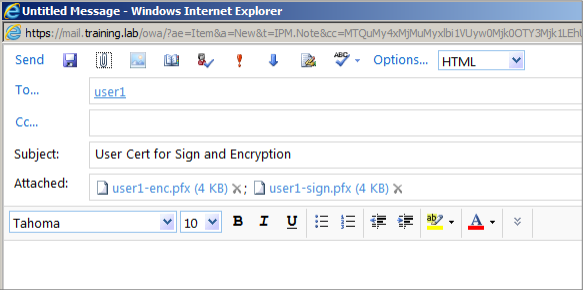
Repeat the same procedure for User2 or other users in your domain.
Enabling S/MIME on Secure Mail for iOS and Android
After the email is delivered, the next step is to open the message using Secure Mail and enable S/MIME with the appropriate certificates for signing and encryption.
To enable S/MIME with individual signing and encryption certificates
-
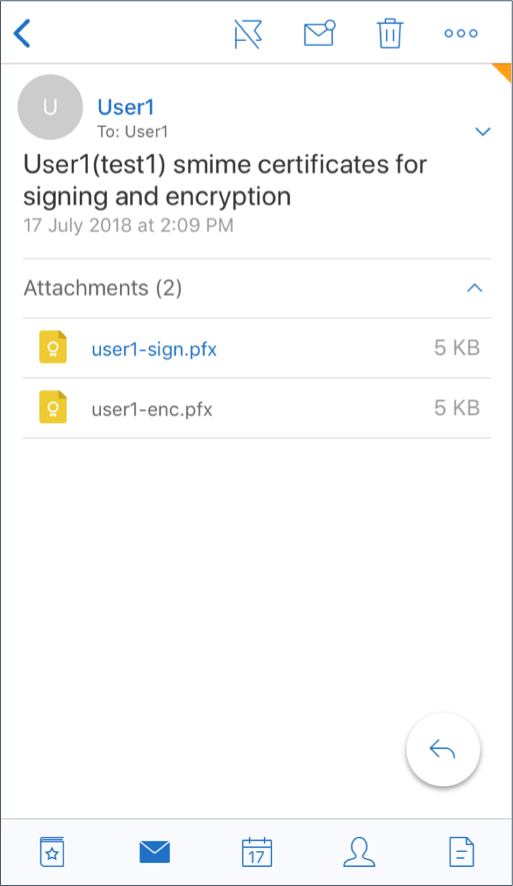
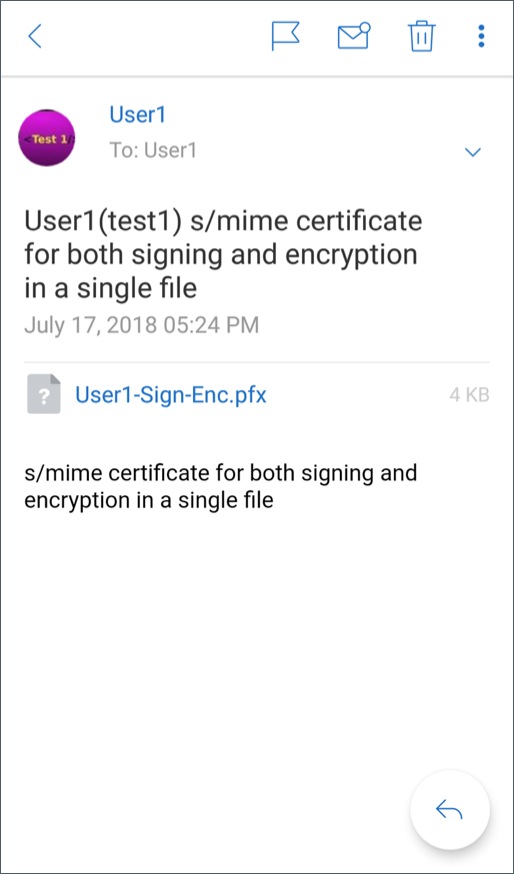
Open Secure Mail, navigate to the email containing the S/MIME certificates.
-
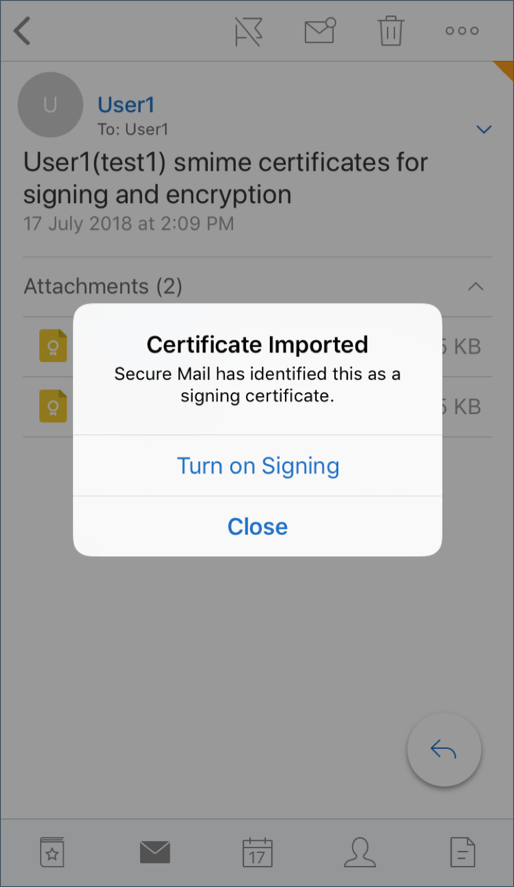
Tap on the signing certificate to download and import.
-
Type the password assigned to the private key when the signing certificate was exported from the server.
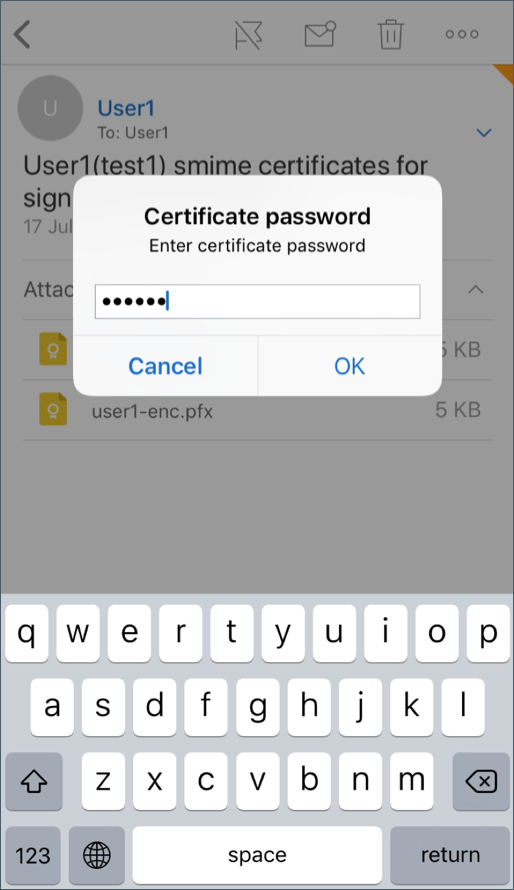
Your certificate has been imported.
-
Tap Turn on signing
-
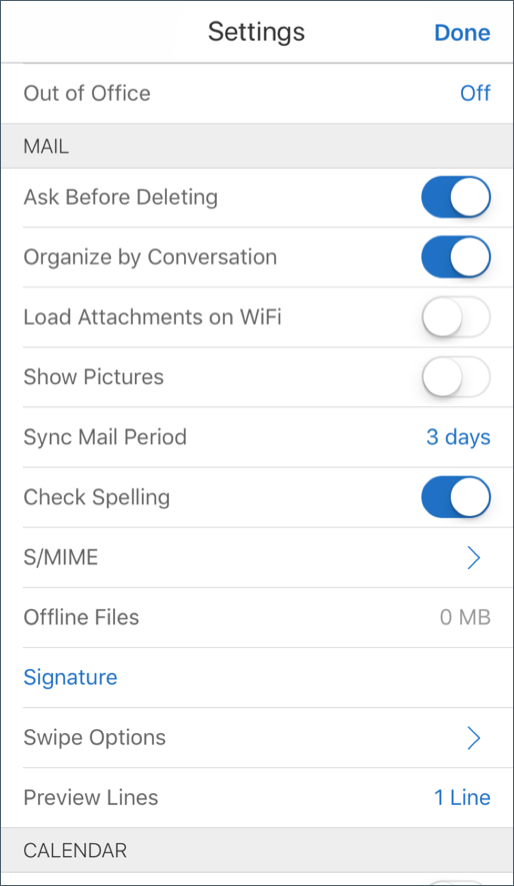
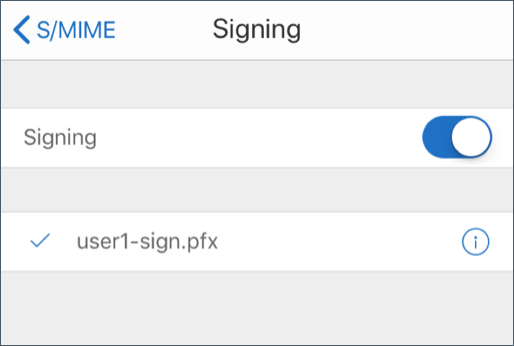
Alternatively, you can navigate to Settings > and S/MIME and tap S/MIME to turn on signing certificate.
-
In the Signing screen, verify that the correct signing certificate is imported.
-
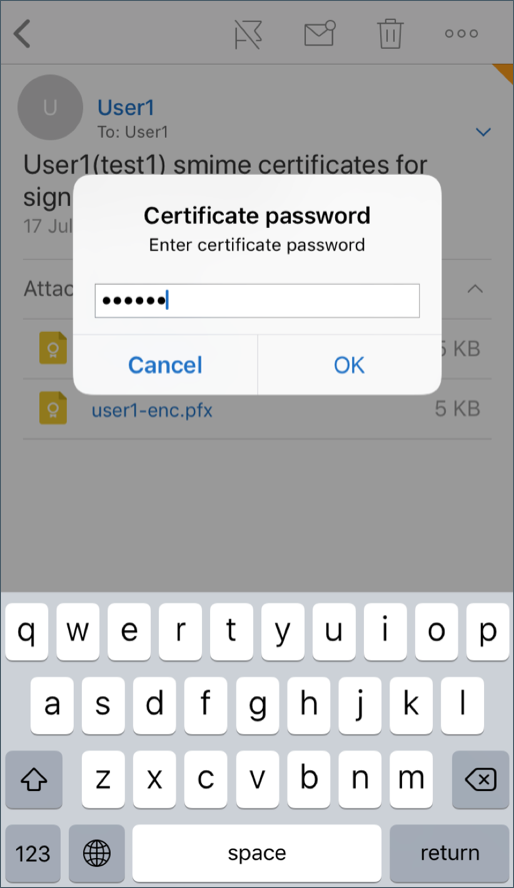
Go back to the email and tap on the encryption certificate to download and import.
-
Type the password assigned to the private key when the encryption certificate was exported from the server.
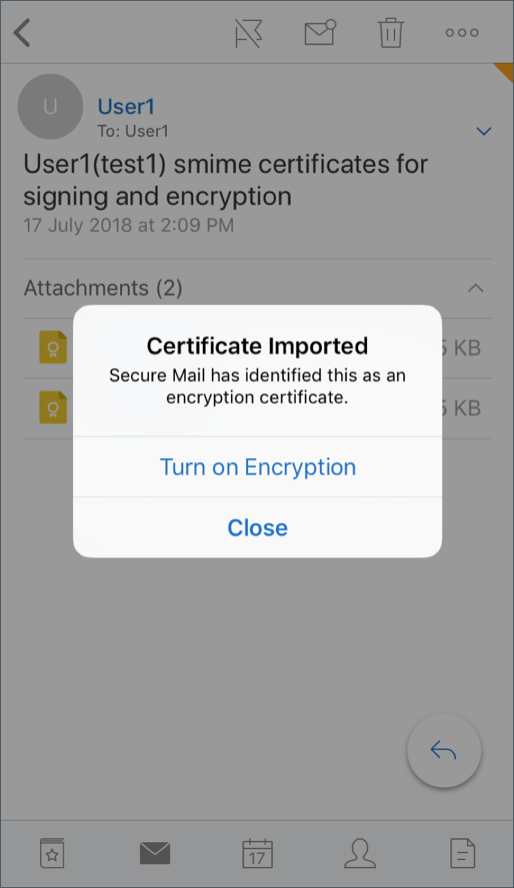
Your certificate has been imported.
-
Tap Turn on Encryption
-
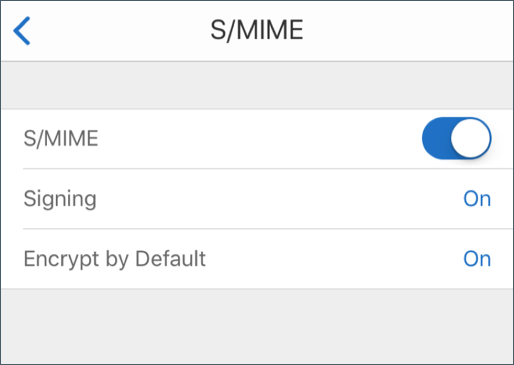
Alternatively, you can navigate to Settings > and S/MIME and tap S/MIME to enable Encrypt by Default.
-
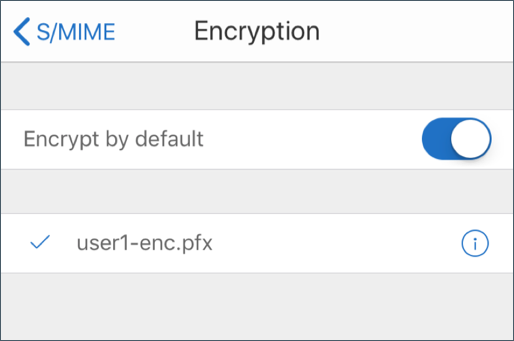
In the Encryption screen, verify that the correct encryption certificate is imported.
Note:
-
If an email is digitally signed with S/MIME, has attachments, and the recipient does not have S/MIME enabled, attachments are not received. This behavior is an Active Sync limitation. To receive S/MIME messages effectively, turn on S/MIME in Secure Mail settings.
-
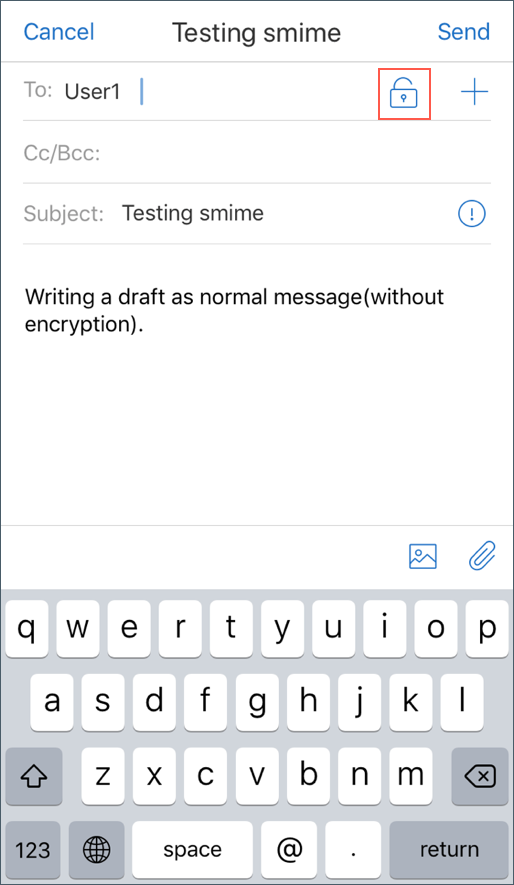
The Encrypt by Default option allows you to minimize the steps required to encrypt your email. If this feature is On, your email will be in the encrypted state while composing. If this feature is Off, your email will be in the unencrypted state while composing and you must tap the Lock icon to encrypt.
-
To enable S/MIME with a single signing and encryption certificate
-
Open Secure Mail, navigate to the email containing the S/MIME certificate.
-
Tap on the S/SMIME certificate to download and import.
-
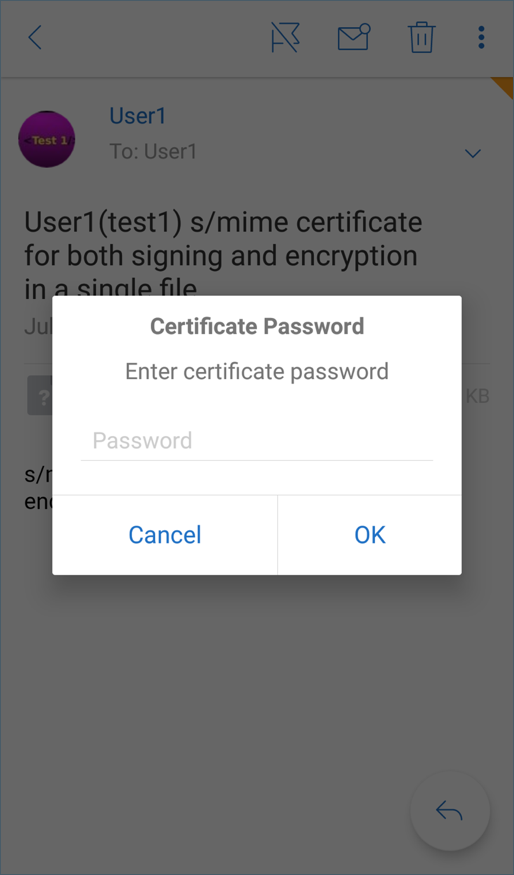
Type the password assigned to the private key when the certificate was exported from the server.
-
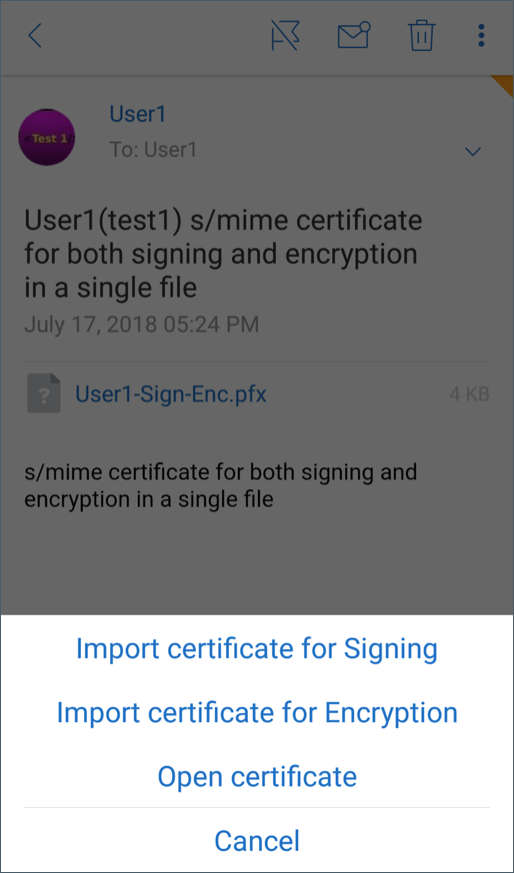
From the certificate options that appear, tap the appropriate option to import signing certificate or encryption cerficate. Tap Open certificate to view details about the certificate.
Your certificate has been imported.
You can view the imported certificates by navigating to Settings > S/MIME
Testing S/MIME on iOS and Android
Once you have performed the steps listed in the preceding section, your recipient can read your mail which is signed and encrypted.
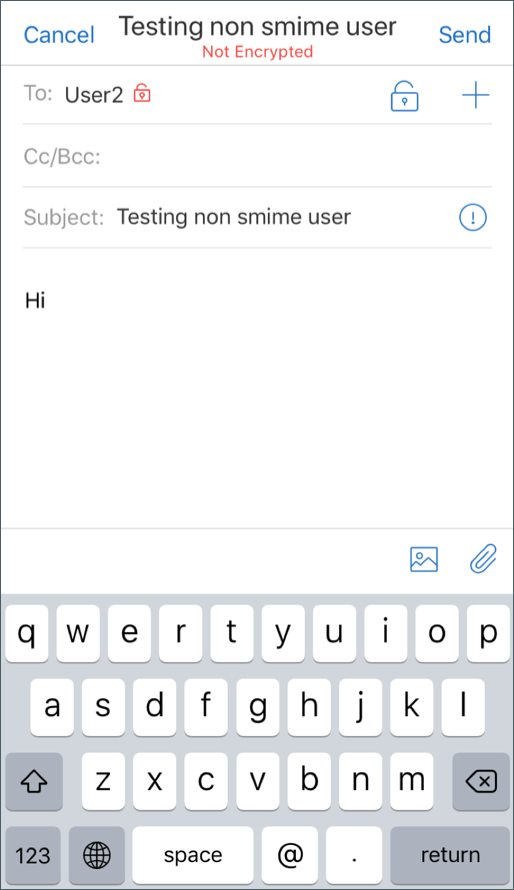
The following image shows an example of an encrypted message as read by the recipient.

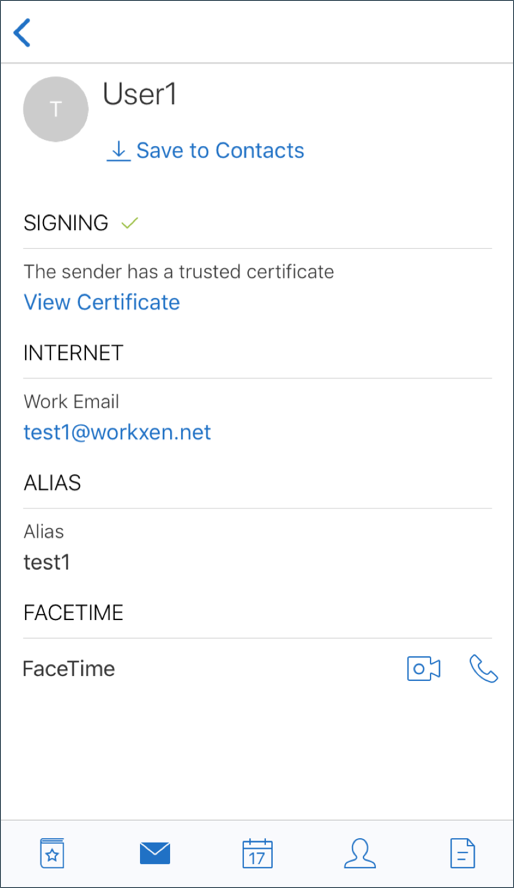
The following image shows an example of verification of signed trusted certificate.
Secure Mail searches the Active Directory domain for public encryption certificates of recipients. If a user sends an encrypted message to a recipient who does not have a valid public encryption key, the message is sent unencrypted. In a group message, if even one recipient doesn’t have a valid key, the message is sent unencrypted to all recipients.
Configuring public certificate sources
To use S/MIME public certificates, configure the S/MIME public certificate source, LDAP server address, LDAP Base DN, and Access LDAP Anonymously policies.
In addition to the app policies, do the following.
- If the LDAP servers are public, ensure that the traffic goes directly to LDAP servers. To do so, configure the network policy for Secure Mail to be Tunneled to the internal network and configure split DNS for Citrix ADC.
- If the LDAP servers are on an internal network, do the following:
- For iOS, ensure that you don’t configure the Background network service gateway policy. If you do configure the policy, users receive frequent authentication prompts.
- For Android, ensure that you add the LDAP server URL in the list for the Background network service gateway policy.
In this article
- Integrating with a digital identity provider
- Prerequisites
- Configuring the integration
- Using derived credentials
- Distributing certificates by email
- Prerequisites
- Enabling Web enrollment for Microsoft Certificate Services
- Verifying your authentication settings in IIS
- Creating new certificate templates
- Requesting user certificates
- Validating Published Certificates
- Exporting the user certificates
- Sending certificates through email
- Enabling S/MIME on Secure Mail for iOS and Android
- Testing S/MIME on iOS and Android
- Configuring public certificate sources