Configure Secure Private Access for on-premises deployments - Legacy
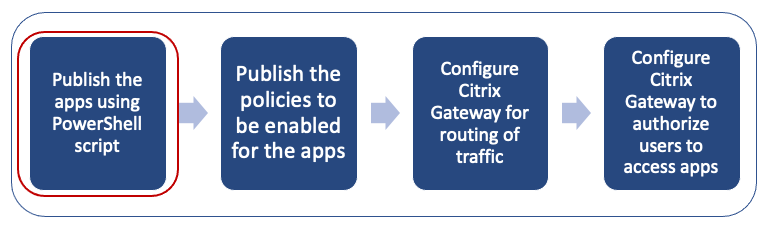
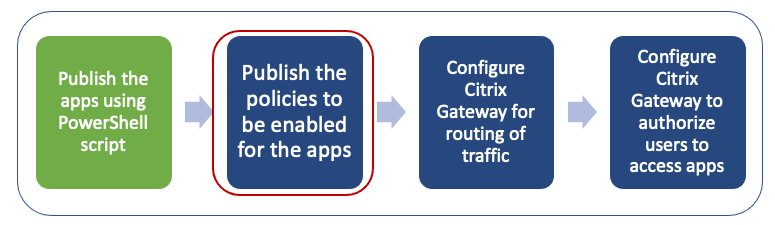
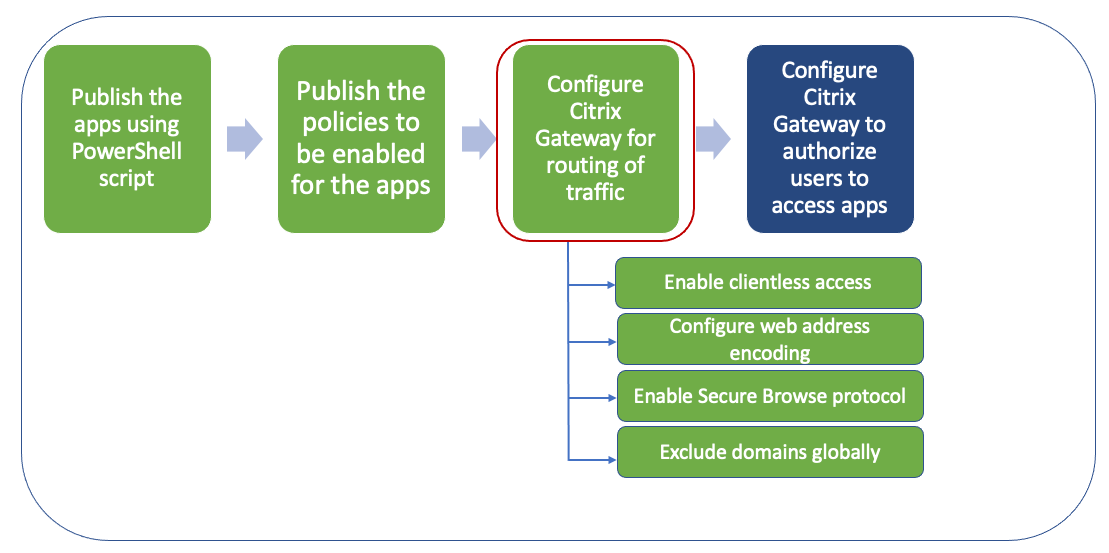
The Secure Private Access for on-premises solution configuration is a four-step process.
- Publish the apps
- Publish the policies for the apps
- Enable routing of traffic through NetScaler Gateway
- Configure authorization policies
Important:
A config tool is available to quickly onboard apps and policies for the apps and also configure the NetScaler Gateway and StoreFront settings. However, note the following before using the tool.
Read the Publish the apps and Publish policies for the apps sections to ensure that you have the complete understanding of the configuration requirements for the on-premises solution configuration.
This tool can only be used as a complement to the existing procedures documented in this topic and does not replace the configuration that must be performed manually.
For complete details about the tool, see Configure apps and policies using the Secure Private Access config tool.
Step 1: Publish the apps
You must use the PowerShell script to publish the URLs. Once the app is published, it can then be managed using the Citrix Studio console.
You can download the PowerShell script from https://www.citrix.com/downloads/workspace-app/powershell-module-for-configuring-secure-private-access-for-storefront/configure-secure-private-access-for-storefront.html.
- On the machine containing the PowerShell SDK, open PowerShell.
-
Run the following command:
Add-PsSnapin Citrix* $dg = Get-BrokerDesktopGroup –Name PublishedContentApps <!--NeedCopy--> -
Define the variables for the Web app.
$citrixUrl: “<URL of the app>”
$appName: <app name as it must appear on Workspace>
$DesktopGroupId: 1
$desktopgroupname: <your desktop group name>
$AppIconFilePath:  <path of the image file>
<!--NeedCopy-->
Note:
Ensure to update the placeholders marked with angular brackets (< >) before running the command.
After assigning the location and application name, run the following command to publish the application.
New-BrokerApplication –ApplicationType PublishedContent –CommandLineExecutable $citrixURL –Name $appName –DesktopGroup $dg.Uid
<!--NeedCopy-->
The published app appears under the Applications section in Citrix Studio. You can now modify the app details from the Citrix Studio console itself.
For more info on publishing the app and changing the default icon of the published app, see Publish content.
Step 2: Publish policies for the apps
The policy file defines each published app’s routing and security controls. You must update the policy file on how a Web or a SaaS app is routed (via gateway or without gateway).
To enforce access policies on the apps, you must publish the policies for each of the Web or SaaS app. To do this, you must update the policy JSON file and the Web.config file.
-
Policy JSON file: Update the policy JSON file with the app details and the security policies for the apps. The policy JSON file must then be placed in the StoreFront server at
C:\inetpub\wwwroot\Citrix\Store\Resources\SecureBrowser.Note:
You must create the folders named Resources and SecureBrowser and then add the policy JSON file in the SecureBrowser folder. For more details on the various policy actions and their values, see Application access policy details.
-
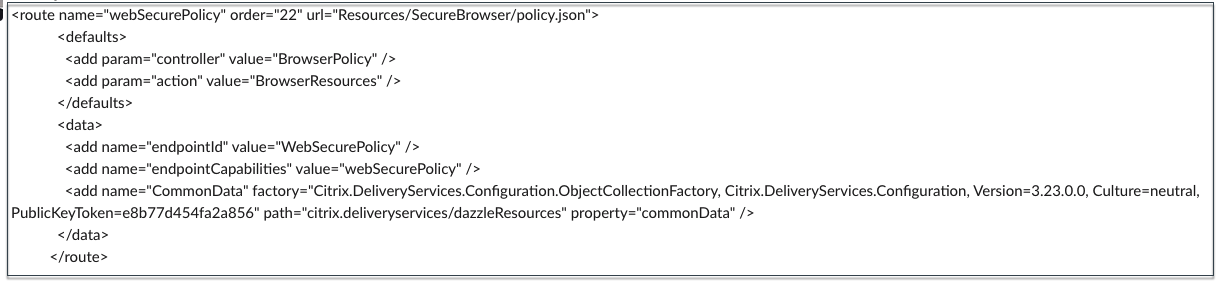
Web.config file: To make the new policy details available for the Citrix Workspace app and Citrix Enterprise Browser, you must modify the web.config file in the StoreFront store directory. You must edit the file to add a new XML tag with the name route. The Web.config file must then be placed in the location C:\inetpub\wwwroot\Citrix\Store1.
See Sample end-to-end configuration for an example XML file.
Note:
In the path, “store1” refers to the name specified for the store when it was created. If a different store name is used, then an appropriate folder must be created.
It is recommended that you add a new route at the end of existing routes. In case you add a route in the middle, you must manually update the order number for all the subsequent routes.
Step 3: Enable routing of traffic through NetScaler Gateway
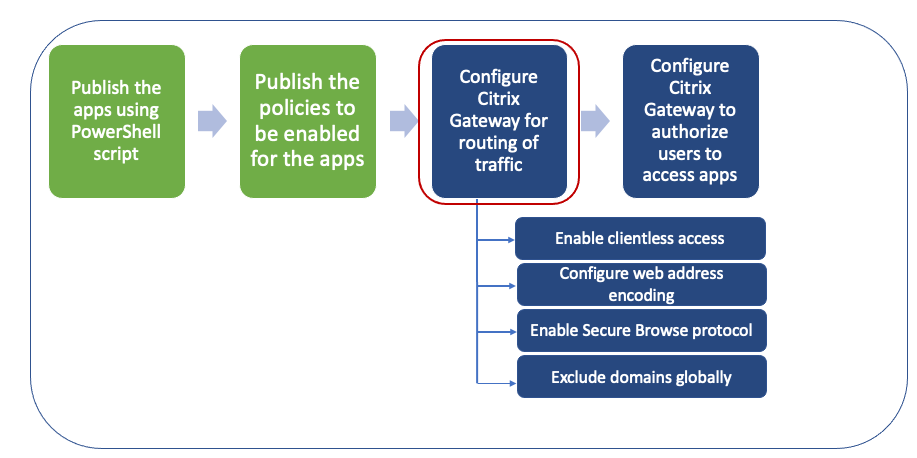
Enabling routing of traffic through NetScaler Gateway involves the following steps:
- Enable clientless access
- Enable URL encoding
- Enable Secure Browse
- Exclude domains from being rewritten in clientless access mode
Clientless access, URL encoding, and secure browse can be enabled globally or per session policy.
- The globally enabled setting applies to all configured NetScaler Gateway virtual servers.
- Per session policy setting applies for users, groups, or Gateway virtual servers.
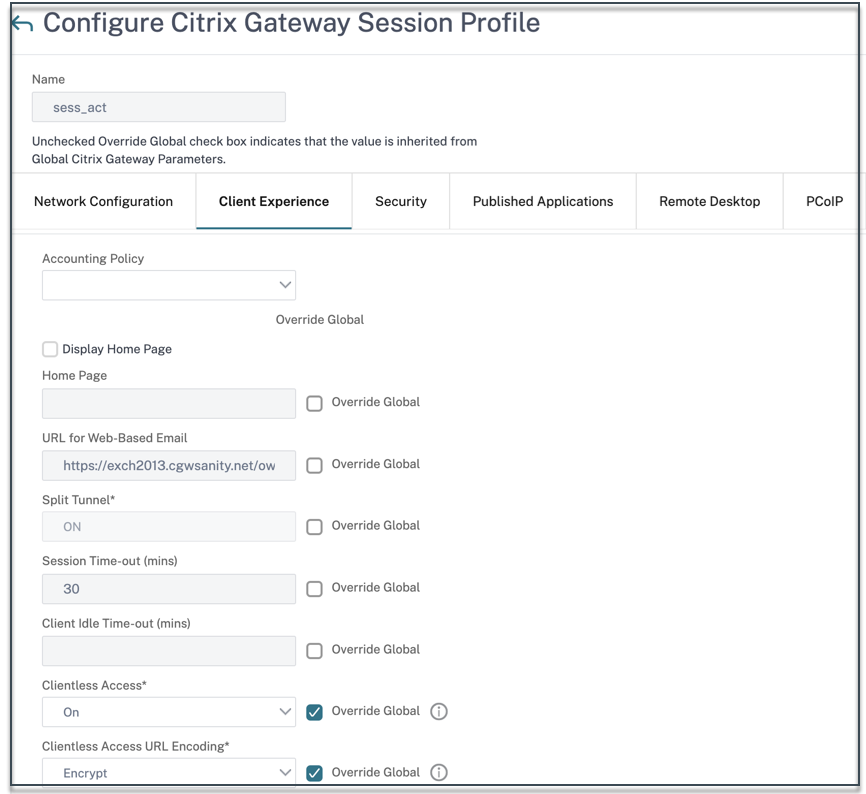
Enable clientless access
To enable clientless access globally by using the NetScaler Gateway GUI:
On the Configuration tab, expand Citrix Gateway and then click Global Settings. In the Global Settings page, click Change global settings. On the Client Experience tab, in Clientless Access, select ON, and then click OK.
To enable clientless access by using a session policy by using the NetScaler Gateway GUI:
If you want only a select group of users, groups, or virtual servers to use clientless access, disable or clear clientless access globally. Then, using a session policy, enable clientless access and bind it to users, groups, or virtual servers.
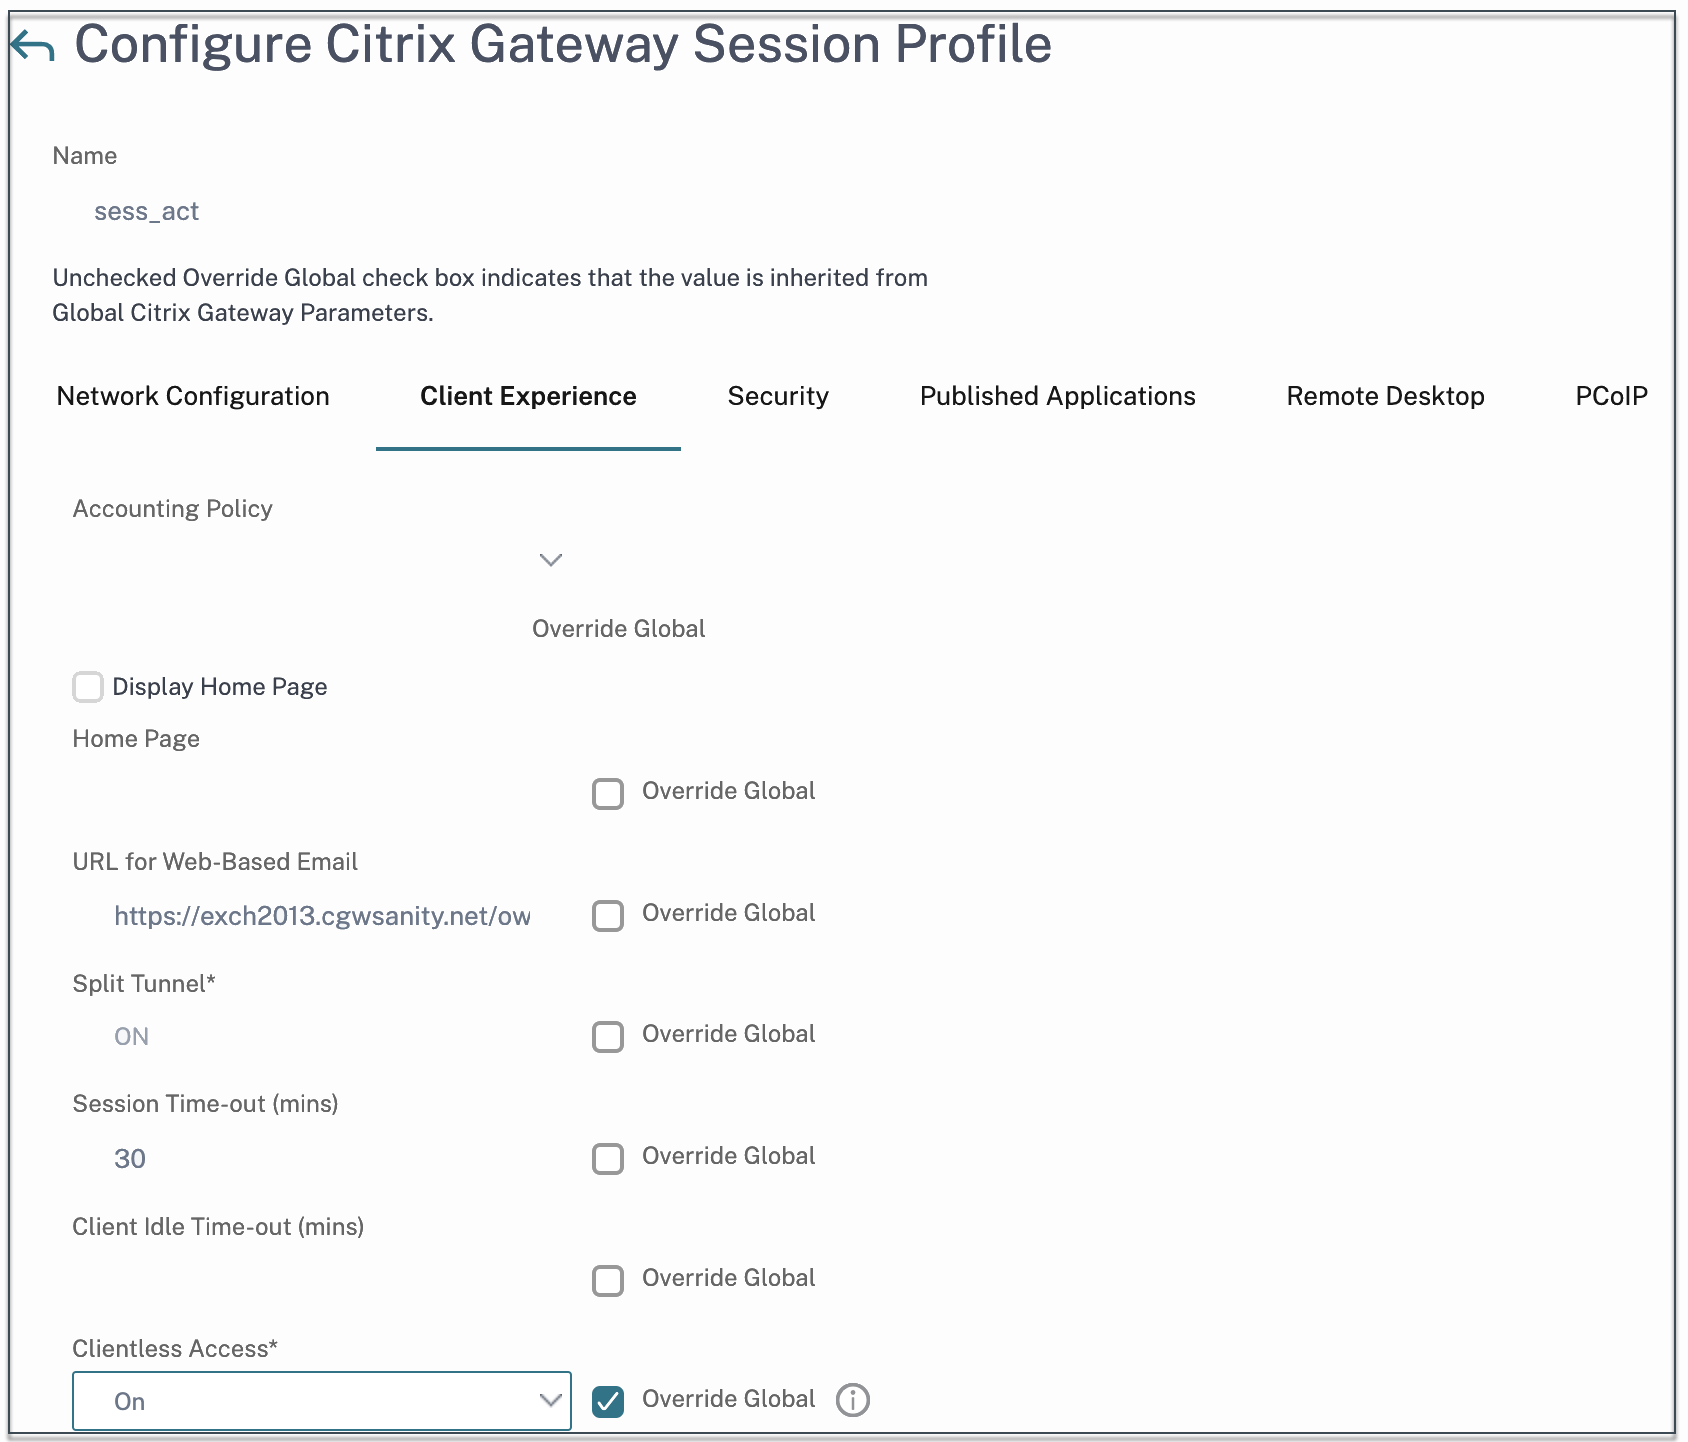
- On the Configuration tab, expand Citrix Gateway and then click Policies > Session.
- Click the Session Policy tab, and then click Add.
- In Name, type a name for the policy.
- Next to Profile, click New.
- In Name, type a name for the profile.
- On the Client Experience tab, next to Clientless Access, click Override Global, select On, and then click Create.
- In Expression, enter
true. When you enter the valuetrue, the policy is always applied to the level to which it is bound. - Click Create, and then click Close.
To enable clientless access globally by using the NetScaler Gateway CLI:
At the command prompt, run the following command:
set vpn parameter -clientlessVpnMode On -icaProxy OFF
<!--NeedCopy-->
To enable clientless access per session policy by using the NetScaler Gateway CLI:
At the command prompt, run the following command:
set vpn sessionAction <session-profile-name> -clientlessVpnMode On -icaProxy OFF
<!--NeedCopy-->
Enable URL encoding
When you enable clientless access, you can choose to encode the addresses of internal Web applications or to leave the address as clear text. It is recommended that you leave the web address as clear text for clientless access.
To enable URL encoding globally by using the NetScaler Gateway GUI:
- On the Configuration tab, expand Citrix Gateway and then click Global Settings.
- In the Global Settings page, click Change global settings.
- On the Client Experience tab, in Clientless Access URL Encoding, select the setting for encoding your web URL, and then click OK.
To enable URL encoding at the session policy level by using the NetScaler Gateway GUI:
- On the Configuration tab, expand Citrix Gateway and then click Policies > Session.
- Click the Session Policy, tab and then click Add.
- In Name, type a name for the policy.
- Next to Profile, click New.
- In Name, type a name for the profile.
- On the Client Experience tab, next to Clientless Access URL Encoding, click Override Global, select the encoding level, and then click OK.
- In Expression, enter
true. When you enter the valuetrue, the policy is always applied to the level to which it is bound.
To enable URL encoding globally by using the NetScaler Gateway CLI:
At the command prompt, run the following command:
set vpn parameter -clientlessModeUrlEncoding TRANSPARENT
<!--NeedCopy-->
To enable URL encoding per session policy by using the NetScaler Gateway CLI:
At the command prompt, run the following command:
set vpn sessionAction <session-profile-name> -clientlessModeUrlEncoding TRANSPARENT
<!--NeedCopy-->
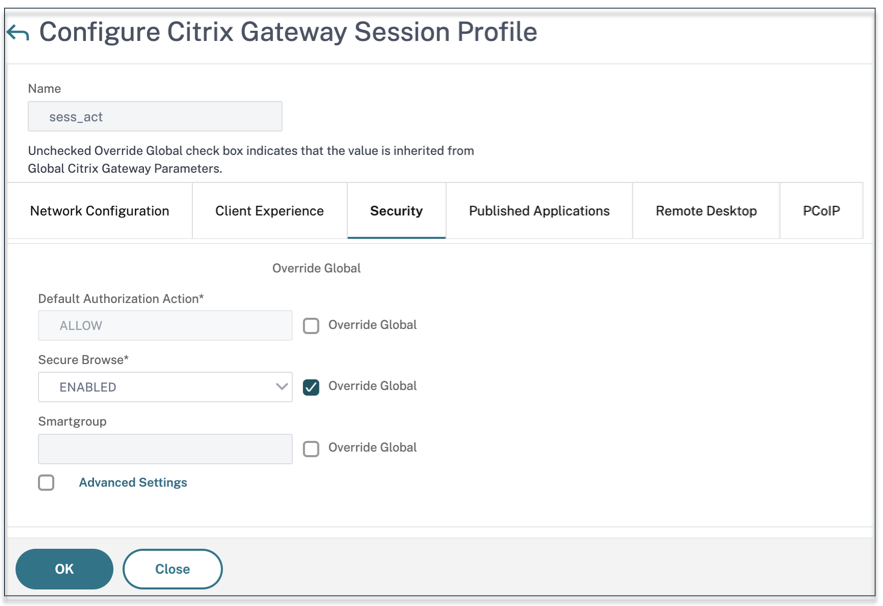
Enable Secure Browse
Secure browse and clientless access work together to allow connections using the clientless VPN mode. You must enable the secure browse mode so that Citrix Enterprise Browser can use the secure browse mode to access apps without the legacy VPN.
Note:
When the end user doesn’t have Citrix Enterprise Browser installed, the published URLs with the SPAEnabled tag open through the device’s default browser instead of Citrix Enterprise Browser. In such a case, the security policies don’t apply. The issue occurs on the StoreFront deployments only.
To enable secure browse mode globally by using the NetScaler Gateway GUI:
- On the Configuration tab, expand Citrix Gateway and then click Global Settings.
- In the Global Settings page, click Change global settings.
- On the Security tab, in Secure Browse, select ENABLED, and then click OK.
To enable secure browse mode at the session policy level by using the NetScaler Gateway GUI:
- On the Configuration tab, expand Citrix Gateway and then click Policies > Session.
- Click the Session Policy tab, and then click Add.
- In Name, type a name for the policy.
- Next to Profile, click New.
- In Name, type a name for the profile.
- On the Security tab, click Override global, and set Secure Browse to ENABLED.
To enable secure browse globally by using the NetScaler Gateway CLI:
At the command prompt, run the following command:
set vpn parameter -secureBrowse ENABLED
<!--NeedCopy-->
To enable secure browse per session policy by using the NetScaler Gateway CLI:
At the command prompt, run the following command:
set vpn sessionAction <session-profile-name> -secureBrowse ENABLED
<!--NeedCopy-->
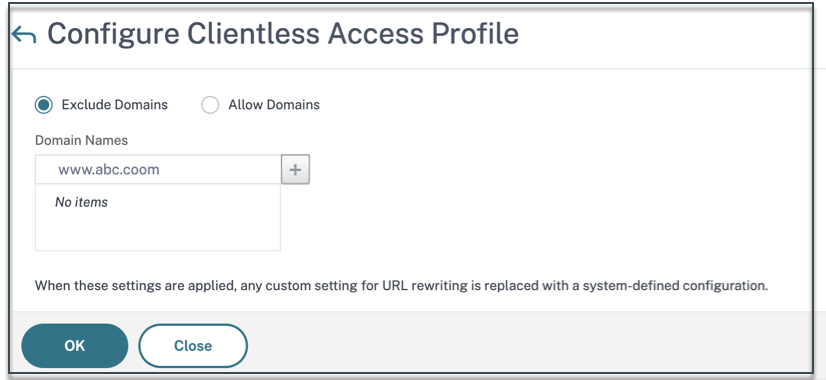
Exclude domains from being rewritten in clientless access mode
You must specify the domains to prevent StoreFront from rewriting the URLs in clientless access mode. Exclude StoreFront server FQDNs, or StoreFront load balancer FQDNs, and citrix.com. This setting can be applied only globally.
- Navigate to Citrix Gateway > Global Settings.
- In Clientless Access, click Configure Domains for Clientless Access.
- Select Exclude Domain.
- In Domain Names, and enter the domain names (StoreFront server FQDNs, or StoreFront load balancer FQDNs).
- Click the + sign and enter
citrix.com. - Click OK.
To exclude domains by using the NetScaler Gateway CLI:
At the command prompt, run the following command:
bind policy patset ns_cvpn_default_bypass_domains <StoreFront-FQDN>
bind policy patset ns_cvpn_default_bypass_domains citrix.com
<!--NeedCopy-->
Step 4: Configure authorization policies
Authorization specifies the network resources to which users have access when they log on to NetScaler Gateway. The default setting for authorization is to deny access to all network resources. Citrix recommends using the default global setting and then creating authorization policies to define the network resources users can access.
You configure authorization on NetScaler Gateway by using an authorization policy and expressions. After you create an authorization policy, you can bind it to the users or groups that you configured on the appliance. User policies have a higher priority than group-bound policies.
Default authorization policies: Two authorization policies must be created to allow access to the StoreFront server and deny access to all published web apps.
- Allow_StoreFront
- Deny_ALL
Web app authorization policies: After creating the default authorization policies, you must create authorization policies for each published web app.
Allow_<app1>Allow_<app2>
To configure an authorization policy by using the NetScaler Gateway GUI:
- Navigate to Citrix Gateway > Policies > Authorization.
- In the details pane, click Add.
- In Name, type a name for the policy.
- In Action, select Allow or Deny.
- In Expression, click Expression Editor.
- To configure an expression, click Select and choose the necessary elements.
- Click Done.
- Click Create.
To configure an authorization policy by using the NetScaler Gateway CLI:
At the command prompt, run the following command:
add authorization policy <policy-name> "HTTP.REQ.HOSTNAME.CONTAINS(\"<StoreFront-FQDN>\")" ALLOW
<!--NeedCopy-->
To bind an authorization policy to a user/group by using the NetScaler Gateway GUI:
- Navigate to Citrix Gateway > User Administration.
- Click AAA Users or AAA Groups.
- In the details pane, select a user/group and then click Edit.
- In Advanced Settings, click Authorization Policies.
- In the Policy Binding page, select a policy or create a policy.
- In Priority, set the priority number.
- In Type, select the request type and then click OK.
To bind an authorization policy by using the NetScaler Gateway CLI:
At the command prompt, run the following command:
bind aaa group <group-name> -policy <policy-name> -priority <priority> -gotoPriorityExpression END
<!--NeedCopy-->
Sample end-to-end configuration
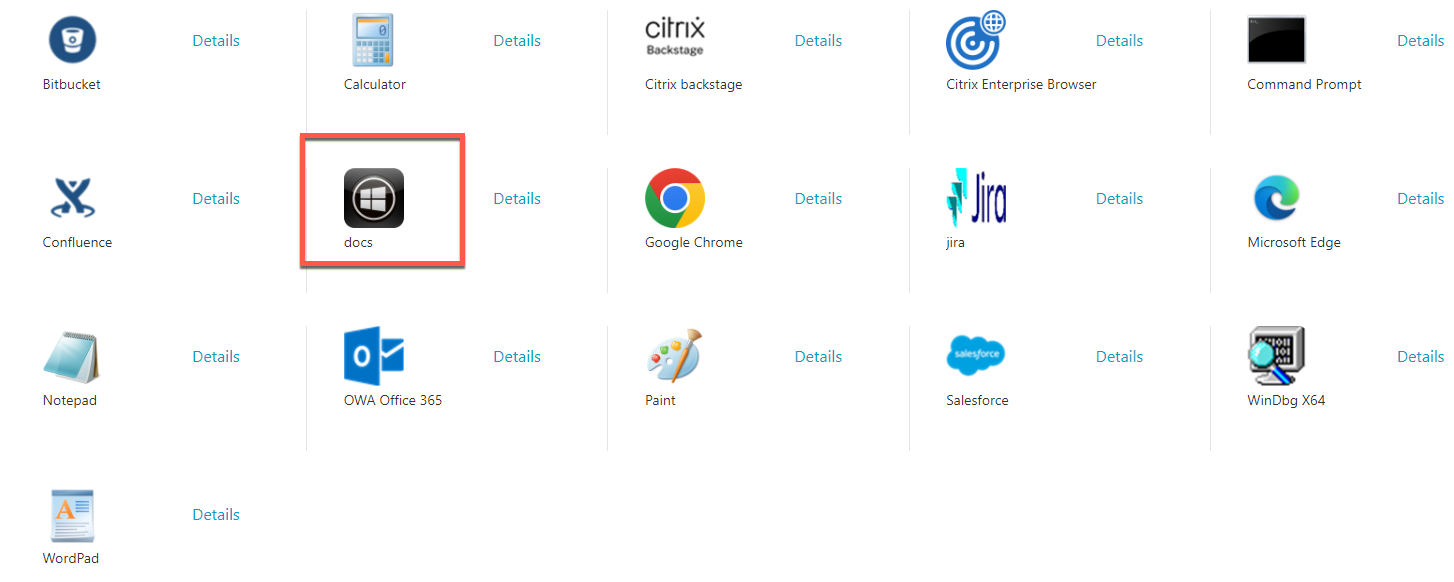
In this example, an app named “Docs” with the URL https://docs.citrix.com is published to Citrix Workspace.
- On the machine containing the PowerShell SDK, open PowerShell.
-
Run the following command.
Add-PsSnapin Citrix\* $dg = Get-BrokerDesktopGroup –Name PublishedContentApps <!--NeedCopy--> -
Add the following details to the cmdlet.
$citrixUrl: “https://docs.citrix.com” $appName: docs $DesktopGroupId: 1 $desktopgroupname: <mydesktop23> <!--NeedCopy--> -
Run the following command.
New-BrokerApplication –ApplicationType PublishedContent –CommandLineExecutable $citrixURL –Name $appName –DesktopGroup $dg.Uid
<!--NeedCopy-->
The app is now published on Citrix Workspace.
-
Update the policy JSON file with the app (“docs”) details. Ensure the following:
-
proxytraffic_v1value is always set tosecureBrowse. This setting ensures that the Citrix Enterprise Browser tunnels the traffic to the webpage via NetScaler Gateway using the secure browse protocol. -
browser_v1value is always set toembeddedBrowser. This setting is only applicable when Citrix Enterprise Browser (CEB) is configured as a work browser. When set toembeddedBrowser, links related to configured Secure Private Access domains open in CEB. -
secureBrowseAddressvalue is your NetScaler Gateway URL.

-
- Place the policy JSON file at C:\inetpub\wwwroot\Citrix\Store\Resources\SecureBrowser.
-
Modify the Web.config file to point to the policy file that you updated.
-
On your NetScaler Gateway on-premises appliance, do the following:
- Enable clientless access to the apps. You can enable clientless access globally or at a session level.
- Enable web address encoding
- Enable Secure Browse mode
- Exclude domains from being rewritten in clientless access mode
For details, see Step 3: Enable authentication and authorization using the on-premises NetScaler Gateway.
End-user flow
-
Log on to StoreFront as a user who can access applications in the PublishedContentApps delivery group.
-
Once you log on, you must see the new application with the default icon. You can customize the icon as required. For details, see https://www.citrix.com/blogs/2013/08/21/xd-tipster-changing-delivery-group-icons-revisited-xd7/.
-
When you click the app, the app opens in Citrix Enterprise Browser.
Application access policy details
The following table lists the available access policy options and their values.
| Key name | Policy description | Value | ||
|---|---|---|---|---|
| screencapture_v1 | Enable or disable the anti-screen capture feature for the webpage | enabled or disabled | ||
| keylogging_v1 | Enable or disable anti-keylogging for the webpage | enabled or disabled | ||
| watermark_v1 | Display or not display the watermark on the webpage | enabled or disabled | ||
| upload_v1 | Enable or disable uploads the webpage | enabled or disabled | ||
| printing_v1 | Enable or disable printing from the webpage | enabled or disabled | ||
| download_v1 | Enable or disable downloads from the webpage | enabled or disabled | ||
| clipboard_v1 | Enable or disable the clipboard on the webpage | enabled or disabled | ||
| proxytraffic_v1 | Determines whether the Citrix Enterprise Browser tunnels the traffic to the webpage via NetScaler Gateway using secure browse or enables direct access | direct or secureBrowse | ||
| browser_v1 | Applicable only when Citrix Enterprise Browser is configured as the Work Browser. When set to embeddedBrowser, links related to configured Secure Private Access domains open in Citrix Enterprise Browser | systemBrowser or embeddedBrowser | ||
| name | Name of the Web or the SaaS app published | It is recommended that you use the same name that you have entered while publishing the app patterns | Comma-separated list of domain names related to this app. You can also use wildcards. These domain names are used to apply policies on the apps by the Citrix Enterprise Browser. | Examples: “.office.com/”, “.office.net/”, “.microsoft.com/“.sharepoint.com/*” |
Note:
Anti-keylogging and anti-screen capturing require the installation of the App protection feature that comes with the Citrix Workspace app.