-
-
Cloud Connector Standalone Citrix Secure Ticketing Authority (STA) service
-
Publish content
-
-
-
-
-
This content has been machine translated dynamically.
Dieser Inhalt ist eine maschinelle Übersetzung, die dynamisch erstellt wurde. (Haftungsausschluss)
Cet article a été traduit automatiquement de manière dynamique. (Clause de non responsabilité)
Este artículo lo ha traducido una máquina de forma dinámica. (Aviso legal)
此内容已经过机器动态翻译。 放弃
このコンテンツは動的に機械翻訳されています。免責事項
이 콘텐츠는 동적으로 기계 번역되었습니다. 책임 부인
Este texto foi traduzido automaticamente. (Aviso legal)
Questo contenuto è stato tradotto dinamicamente con traduzione automatica.(Esclusione di responsabilità))
This article has been machine translated.
Dieser Artikel wurde maschinell übersetzt. (Haftungsausschluss)
Ce article a été traduit automatiquement. (Clause de non responsabilité)
Este artículo ha sido traducido automáticamente. (Aviso legal)
この記事は機械翻訳されています.免責事項
이 기사는 기계 번역되었습니다.책임 부인
Este artigo foi traduzido automaticamente.(Aviso legal)
这篇文章已经过机器翻译.放弃
Questo articolo è stato tradotto automaticamente.(Esclusione di responsabilità))
Translation failed!
Publish content
Note:
Starting with version 2511, Citrix Web Studio (web-based) is the only management console for Citrix Virtual Apps and Desktops™. Citrix Studio (MMC-based) has been removed from the installer. This article applies only to Web Studio. For information about Citrix Studio, see the equivalent article in Citrix Virtual Apps and Desktops 7 2212 or earlier.
You can publish an application that is simply a URL or UNC path to a resource, such as a Microsoft Word document or a web link. This feature is known as published content. The ability to publish content adds flexibility to how you deliver content to users. You benefit from the existing access control and management of applications. You can also specify whether to use local or published applications to open the content.
The published content appears just like other applications in StoreFront™ and Citrix Workspace™ app. Users access it in the same way they access applications. On the client, the resource opens as usual.
- If a locally installed application is appropriate, it is launched to open the resource.
- If a File Type Association has been defined, a published application launches to open the resource.
You publish content using the PowerShell SDK. You cannot use Web Studio to publish content. However, you can use Web Studio to edit application properties later, after they are published.
Configuration overview and preparation
Publishing content uses the New-BrokerApplication cmdlet with the following key properties. (See the cmdlet help for descriptions of all cmdlet properties.)
New-BrokerApplication –ApplicationType PublishedContent -CommandLineExecutable location -Name app-name -DesktopGroup delivery-group-name
<!--NeedCopy-->
The ApplicationType property must be PublishedContent.
The CommandLineExecutable property specifies the location of the published content. The following formats are supported, with a limit of 255 characters.
- HTML website address (for example, http://www.citrix.com)
- Document file on a web server (for example,
https://www.citrix.com/press/pressrelease.doc) - Directory on an FTP server (for example,
ftp://ftp.citrix.com/code) - Document file on an FTP server (for example,
ftp://ftp.citrix.com/code/Readme.txt>) - UNC directory path (for example,
file://myServer/myShare or \\\\myServer\\myShare) - UNC file path (for example,
file://myServer/myShare/myFile.asfor\\myServer\myShare\myFile.asf)
Ensure that you have the correct SDK.
- For Citrix DaaS (formerly Citrix Virtual Apps and Desktops service) deployments, download and install the Citrix Virtual Apps and Desktops Remote PowerShell SDK.
- For on-premises Citrix Virtual Apps and Desktops deployments, use the PowerShell SDK that is installed with the Delivery Controller. Adding a published content application requires a minimum version 7.11 Delivery Controller.
The following procedures use examples. In the examples:
- A machine catalog has been created.
- A delivery group named
PublishedContentAppshas been created. The group uses a multi-session OS machine from the catalog. The WordPad application has been added to the group. - Assignments are made for the delivery group name, the
CommandLineExecutablelocation, and the application name.
Get started
On the machine containing the PowerShell SDK, open PowerShell.
The following cmdlet adds the appropriate PowerShell SDK snap-in, and assigns the returned delivery group record.
Add-PsSnapin Citrix\* $dg = Get-BrokerDesktopGroup –Name PublishedContentApps
If you are using Citrix DaaS, authenticate by entering your Citrix Cloud™ credentials. If there is more than one customer, choose one.
Publish a URL
After assigning the location and application name, the following cmdlet publishes the Citrix home page as an application.
$citrixUrl = "https://www.citrix.com/"
$appName = "Citrix Home Page"

New-BrokerApplication –ApplicationType PublishedContent –CommandLineExecutable $citrixURL –Name $appName –DesktopGroup $dg.Uid
<!--NeedCopy-->
Verify success:
- Open StoreFront and log on as a user who can access applications in the PublishedContentApps delivery group. The display includes the newly created application with the default icon. To learn about customizing the icon, see https://www.citrix.com/blogs/2013/08/21/xd-tipster-changing-delivery-group-icons-revisited-xd7/.
- Click the Citrix Home Page application. The URL launches in a new tab in a locally running instance of your default browser.
Publish resources located at UNC paths
In this example, the administrator has already created a share named PublishedResources. After assigning the locations and application names, the following cmdlets publish an RTF and a DOCX file in that share as a resource.
$rtfUNC = "\\GMSXJ-EDGE0.xd.local\\PublishedResources\\PublishedRTF.rtf"
$rtfAppName = "PublishedRTF"

New-BrokerApplication –ApplicationType PublishedContent
–CommandLineExecutable $rtfUNC -Name $rtfAppName
-DesktopGroup $dg.Uid

$docxUNC = "\\GMSXJ-EDGE0.xd.local\PublishedResources\PublishedDOCX.docx"
$docxAppName = "PublishedDOCX"

New-BrokerApplication –ApplicationType PublishedContent
–CommandLineExecutable $docxUNC -Name $docxAppName
-DesktopGroup $dg.Uid
<!--NeedCopy-->
Verify success:
- Refresh your StoreFront window to see the newly published documents.
- Click the PublishedRTF and PublishedDOCX applications. Each document opens in a locally running WordPad.
View and edit PublishedContent applications
You manage published content using the same methods that you use for other application types.
To view and edit PublishedContent applications, follow these steps:
- Sign in to Web Studio and select Applications in the left pane.
-
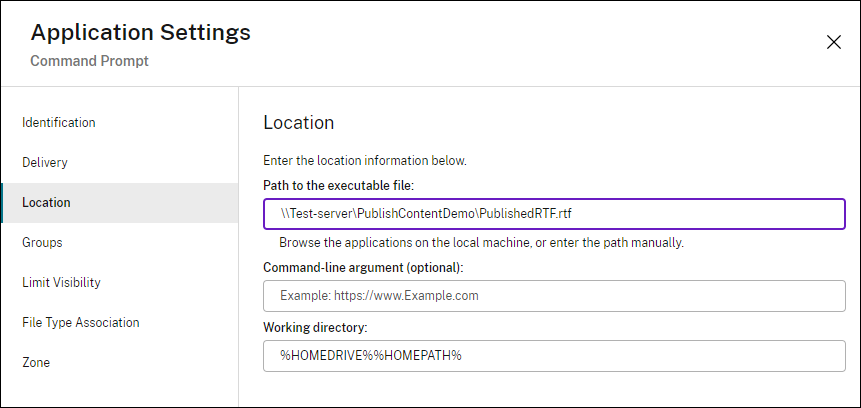
On the Applications tab, select a PublishedContent application, and then select Properties.
Application properties (such as user visibility, group association, and shortcut) apply to the published content. However, you cannot change the command-line argument or working directory properties on the Location page.
-
To change the resource, modify the Path to the executable file field on that page.
-
To use a published application to open a
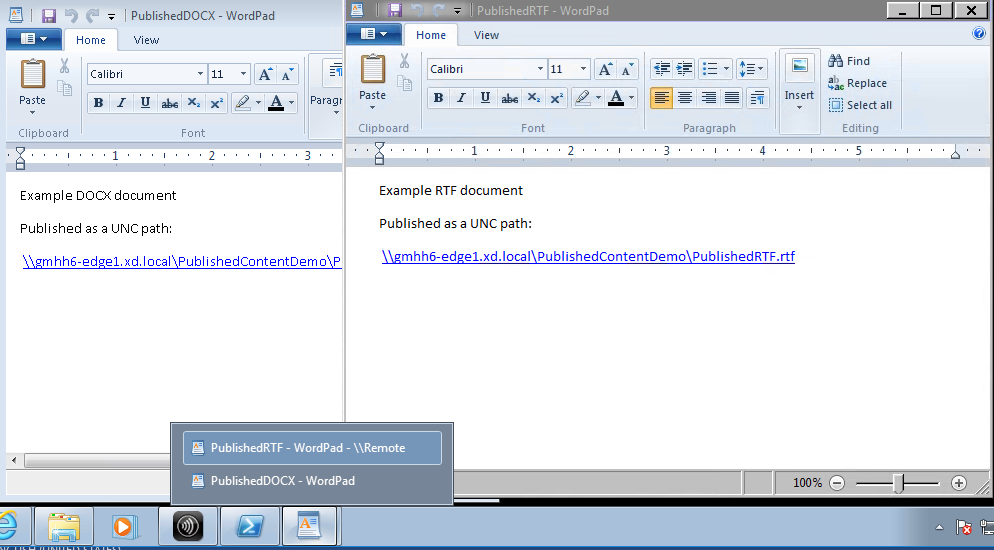
PublishedContentapplication (rather than a local application), follow these steps:In this example, the published WordPad application is edited to create a File Type Association for .rtf files.
- Turn on maintenance mode for the delivery group.
- Edit the File Type Association property.
- Turn off maintenance mode when you’re done.
- Refresh StoreFront to load the File Type Association changes, and then click the PublishedRTF and PublishedDOCX applications. Notice the difference. PublishedDOCX still opens in the local WordPad. However, PublishedRTF now opens in the published WordPad due to the file type association.
For more information
Share
Share
This Preview product documentation is Citrix Confidential.
You agree to hold this documentation confidential pursuant to the terms of your Citrix Beta/Tech Preview Agreement.
The development, release and timing of any features or functionality described in the Preview documentation remains at our sole discretion and are subject to change without notice or consultation.
The documentation is for informational purposes only and is not a commitment, promise or legal obligation to deliver any material, code or functionality and should not be relied upon in making Citrix product purchase decisions.
If you do not agree, select I DO NOT AGREE to exit.