URL Categorization
URL Categorization restricts user access to specific websites and website categories. As a subscribed service offered by Citrix Secure Web Gateway (SWG), the feature enables enterprise customers to filter web traffic by using a commercial categorization database. The database has a vast number (billions) of URLs classified into different categories, such as social networking, gambling, adult content, new media, and shopping. In addition to categorization, each URL has a reputation score kept up to date based on the site’s historical risk profile. To filter your traffic, you can configure advanced policies based on categories, category groups (such as Terrorism, Illegal drugs), or site-reputation scores.
For example, you might block access to dangerous sites, such as sites known to be infected with malware, and selectively restrict access to content such as adult content or entertainment streaming media for enterprise users. You can also capture the user’s transactional details and outbound traffic details for monitoring web traffic analytics on the Citrix ADM server.
Citrix ADC uploads or downloads data from the pre-configured NetSTAR device nsv10.netstar-inc.com and incompasshybridpc.netstar-inc.com is used as a cloud host by default for cloud-categorization requests. The appliance uses its NSIP address as source IP address and 443 as the destination port for communication.
How URL categorization works
The following figure shows how Citrix SWG URL categorization service is integrated with a commercial URL Categorization database and cloud services for frequent updates.
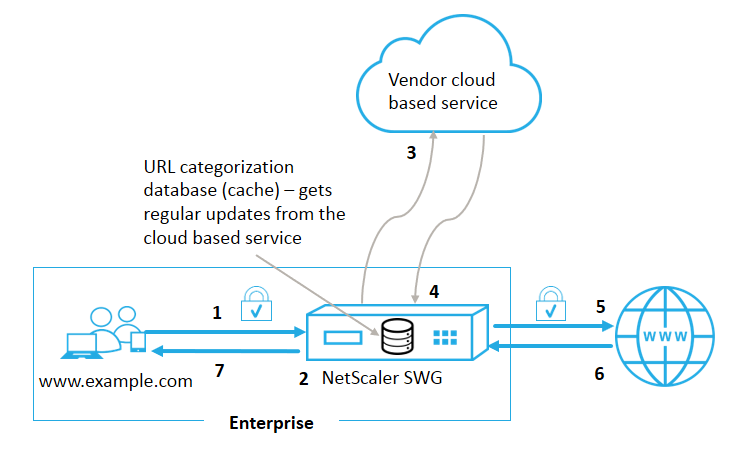
The components interact as follows:
-
A client sends internet bound URL request.
-
The Citrix SWG proxy applies a policy enforcement to the request based on the category details (such as, category, category group, and site-reputation score) retrieved from the URL categorization database. If the database returns the category details, the process jumps to step 5.
-
If the database misses the categorization details, the request is sent to a cloud-based lookup service maintained by a URL categorization vendor. However, the appliance does not wait for a response, instead, the URL is marked as uncategorized and a policy enforcement is performed (jump to step 5). The appliance continues to monitor the cloud query feedback and updates the cache so that future requests can benefit from the cloud lookup.
-
The SWG appliance receives the URL category details (category, category group, and reputation score) from the cloud-based service and stores it in the categorization database.
-
The policy allows the URL and the request is sent to the origin server. Otherwise, the appliance drops, redirects, or responds with a custom HTML page.
-
The origin server responds with the requested data to the SWG appliance.
-
The appliance sends the response to the client.
Use Case: Internet usage under corporate compliance for enterprises
You can use the URL Filtering feature to detect and implement compliance policies to block sites that violate corporate compliance. These can be sites such as adult, streaming media, social networking which might be deemed nonproductive or consume excess internet bandwidth in an enterprise network. Blocking access to these websites can improve employee productivity, reduce operating costs for bandwidth usage, and reduce the overhead of network consumption.
Prerequisites
The URL Categorization feature works on a Citrix SWG platform only if it has an optional subscription service with URL filtering capabilities and threat intelligence for Citrix Secure Web Gateway. The subscription allows customers to download the latest threat categorizations for websites and then enforce those categories on the Secure Web Gateway. The subscription is available for both hardware appliances and software (VPX) versions of Secure Web Gateway. Before enabling and configuring the feature, you must install the following licenses: CNS_WEBF_SSERVER_Retail.lic
CNS_XXXXX_SERVER_SWG_Retail.lic.
Where, XXXXX is the platform type, for example: V25000
Responder policy expressions
The following table lists the different policy expressions that you can use to verify if an incoming URL must be allowed, redirected, or blocked.
-
<text>. URL_CATEGORIZE (<min_reputation>, <max_reputation>)- Returns aURL_CATEGORYobject. If<min_reputation>is greater than 0, the returned object does not contain a category with a reputation lower than<min_reputation>. If<max_reputation>is greater than 0, the returned object does not contain a category with a reputation higher than<max_reputation>. If the category fails to resolve in a timely manner, the undef value is returned. -
<url_category>. CATEGORY()- Returns the category string for this object. If the URL does not have a category, or if the URL is malformed, the returned value is “Unknown.” -
<url_category>. CATEGORY_GROUP()- Returns a string identifying the object’s category group. This is a higher level grouping of categories, which is useful in operations that require less detailed information about the URL category. If the URL does not have a category, or if the URL is malformed, the returned value is “Unknown.” -
<url_category>. REPUTATION()- Returns the reputation score as a number from 0 to 5, where 5 indicates the riskiest reputation. If there is the category is “Unknown”, the reputation value is 1.
Policy types:
- Policy to select requests for URLs that are in the Search Engine category -
add responder policy p1 ‘HTTP.REQ.HOSTNAME.APPEND(HTTP.REQ.URL).URL_CATEGORIZE(0,0). CATEGORY().EQ("Search Engine") - Policy to select requests for URLs that are in the Adult category group -
add responder policy p1 ‘HTTP.REQ.HOSTNAME.APPEND(HTTP.REQ.URL).URL_CATEGORIZE(0,0). CATEGORY_GROUP().EQ("Adult")’ - Policy to select requests for Search Engine URLs with a reputation score lower than 4 -
add responder policy p2 ‘HTTP.REQ.HOSTNAME.APPEND (HTTP.REQ.URL).URL_CATEGORIZE(4,0).HAS_CATEGORY("Search Engine") - Policy to select requests for Search Engine and Shopping URLs -
add responder policy p3 ‘HTTP.REQ.HOSTNAME.APPEND(HTTP.REQ.URL).URL_CATEGORIZE(0,0).CATEGORY().EQ ("good_categories") - Policy to select requests for Search Engine URLs with a reputation score equal to or greater than 4 -
add responder policy p5 ‘CLIENT.SSL.DETECTED_DOMAIN.URL_CATEGORIZE(4,0). CATEGORY().EQ("Search Engines") - Policy to select requests for URLs that are in the Search Engine category and compare them with a URL Set -
‘HTTP.REQ.HOSTNAME.APPEND(HTTP.REQ.URL).URL_CATEGORIZE(0,0). CATEGORY().EQ("Search Engine") && HTTP.REQ.HOSTNAME.APPEND(HTTP.REQ.URL).URLSET_MATCHES_ANY("u1")’
Responder policy types
There are two types of policies used in the URL Categorization feature and each of these policy types is explained below:
| Policy Type | Description |
|---|---|
| URL Category | Categorize web traffic and based on evaluation result blocks, allows, or redirects traffic. |
| URL Reputation Score | Determines the reputation score of the website and allows you to control access based on the reputation score threshold level set by the administrator. |
Configure URL categorization
To configure URL categorization on a Citrix SWG appliance, do the following:
- Enable URL filtering.
- Configure a proxy server for Web traffic.
- Configure SSL interception for Web traffic in explicit mode.
- Configure shared memory to limit cache memory.
- Configure URL categorization parameters.
- Configure URL categorization by using the Citrix SWG wizard.
- Configure URL categorization parameters by using the SWG wizard.
- Configure seed database path and cloud server name
Step 1: Enabling URL Filtering
To enable URL categorization, enable the URL filtering feature and enable modes for URL categorization.
To enable URL Categorization by using the Citrix SWG: CLI
At the command prompt, type:
enable ns feature URLFiltering
disable ns feature URLFiltering
Step 2: Configure a proxy server for web traffic in explicit mode
The Citrix SWG appliance supports transparent and explicit proxy virtual servers. To configure a proxy virtual server for SSL traffic in explicit mode, do the following:
- Add a proxy server.
- Bind an SSL policy to the proxy server.
To add a proxy server by using the Citrix SWG CLI
At the command prompt, type:
add cs vserver <name> [-td <positive_integer>] <serviceType>  [-cltTimeout <secs>]
<!--NeedCopy-->
Example:
add cs vserver starcs PROXY 10.102.107.121 80 -cltTimeout 180
<!--NeedCopy-->
Bind an SSL policy to a proxy virtual server by using the Citrix SWG CLI
bind ssl vserver <vServerName> -policyName <string> [-priority <positive_integer>]
<!--NeedCopy-->
Step 3: Configure SSL interception for HTTPS traffic
To configure SSL interception for HTTPS traffic, do the following:
- Bind a CA certificate-key pair to the proxy virtual server.
- Configure the default SSL profile with SSL parameters.
- Bind a front-end SSL profile to the proxy virtual server and enable SSL interception in the front-end SSL profile.
To bind a CA certificate-key pair to the proxy virtual server by using the Citrix SWG CLI
At the command prompt, type:
bind ssl vserver <vServerName> -certkeyName <certificate-KeyPairName> -CA –skipCAName
<!--NeedCopy-->
To configure the default SSL profile by using the Citrix SWG CLI
At the command prompt, type:
set ssl profile <name> -denySSLReneg <denySSLReneg> -sslInterception (ENABLED | DISABLED) -ssliMaxSessPerServer positive_integer>
<!--NeedCopy-->
Bind a front-end SSL profile to a proxy virtual server by using the Citrix SWG CLI
At the command prompt, type:
set ssl vserver <vServer name>  -sslProfile ssl_profile_interception
<!--NeedCopy-->
Step 4: Configure shared memory to limit cache memory
To configure shared memory to limit cache memory by using the Citrix SWG CLI
At the command prompt, type:
set cache parameter [-memLimit <megaBytes>]
<!--NeedCopy-->
Where, the memory limit configured for caching is set as 10 MB.
Step 5: Configure URL categorization parameters
To configure the URL categorization parameters by using the Citrix SWG CLI
At the command prompt, type:
set urlfiltering parameter [-HoursBetweenDBUpdates <positive_integer>] [-TimeOfDayToUpdateDB <HH:MM>]
<!--NeedCopy-->
Example:
Set urlfiltering parameter –urlfilt_hours_betweenDB_updates 20
<!--NeedCopy-->
Step 6: Configure URL Categorization by using the Citrix SWG Wizard
To configure URL Categorization by using the Citrix SWG GUI
- Log on to the Citrix SWG appliance and navigate to Secured Web Gateway page.
- In the details pane, do one of the following:
- Click Secured Web Gateway Wizard to create a new configuration.
- Select an existing configuration and click Edit.
- In the URL Filtering section, click Edit.
- Select the URL Categorization check box to enable the feature.
- Select a URL Categorization policy and Click Bind.
- Click Continue and then Done.
For more information about URL Categorization policy, see How to Create a URL Categorization Policy.
Step 7: Configuring URL Categorization parameters by using SWG Wizard
To configure URL Categorization parameters by using the Citrix SWG GUI
- Log on to Citrix SWG appliance and navigate to Secured Web Gateway > URL Filtering.
- In the URL Filtering page, click Change URL filtering settings link.
- In the Configuring URL Filtering Params page, specify the following parameters.
- Hours Between DB Updates. URL Filtering hours between database updates. Minimum value: 0 and Maximum value: 720.
- Time of Day to Update DB. URL Filtering time of day to update database.
- Cloud Host. The URL path of the cloud server.
- Seed DB Path. The URL path of the seed database lookup server.
- Click OK and Close.
Sample Configuration:
enable ns feature LB CS SSL IC RESPONDER AppFlow URLFiltering

enable ns mode FR L3 Edge USNIP PMTUD

set ssl profile ns_default_ssl_profile_frontend -denySSLReneg NONSECURE -sslInterception ENABLED -ssliMaxSessPerServer 100

add ssl certKey swg_ca_cert -cert ns_swg_ca.crt -key ns_swg_ca.key

set cache parameter -memLimit 100

add cs vserver starcs PROXY 10.102.107.121 80 -cltTimeout 180

add responder action act1 respondwith "\"HTTP/1.1 200 OK\r\n\r\n\" + http.req.url.url_categorize(0,0).reputation + \"\n\""

add responder policy p1 "HTTP.REQ.URL.URL_CATEGORIZE(0,0).CATEGORY.eq(\"Shopping/Retail\") || HTTP.REQ.URL.URL_CATEGORIZE(0,0).CATEGORY.eq(\"Search Engines & Portals

\")" act1

bind cs vserver starcs_PROXY -policyName p1 -priority 10 -gotoPriorityExpression END -type REQUEST

add dns nameServer 10.140.50.5

set ssl parameter -denySSLReneg NONSECURE -defaultProfile ENABLED -sigDigestType RSA-MD5 RSA-SHA1 RSA-SHA224 RSA-SHA256 RSA-SHA384 RSA-SHA512 -ssliErrorCache ENABLED

-ssliMaxErrorCacheMem 100000000

add ssl policy pol1 -rule "client.ssl.origin_server_cert.subject.  URL_CATEGORIZE(0,0).CATEGORY.eq(\"Search Engines & Portals\")"" -action INTERCEPT

add ssl policy pol3 -rule "client.ssl.origin_server_cert.subject.ne(\"citrix\")" -action INTERCEPT

add ssl policy swg_pol -rule "client.ssl.client_hello.SNI.URL_CATEGORIZE(0,0).CATEGORY.ne(\"Uncategorized\")" -action INTERCEPT

set urlfiltering parameter -HoursBetweenDBUpdates 3 -TimeOfDayToUpdateDB 03:00
<!--NeedCopy-->
Configure seed database path and cloud server name
You can now configure the seed database path and cloud lookup server name for manual setting of the cloud lookup server name and the seed database path. To do this, two new parameters, “CloudHost” and “SeedDBPath”, are added to the URL filtering parameter command.
At the command prompt, type:
set urlfiltering parameter [-HoursBetweenDBUpdates <positive_integer>] [-TimeOfDayToUpdateDB <HH:MM>] [-LocalDatabaseThreads <positive_integer>] [-CloudHost <string>] [-SeedDBPath <string>]
Example
set urlfiltering parameter -HoursBetweenDBUpdates 3 -TimeOfDayToUpdateDB 03:00 –CloudHost localhost –SeedDBPath /mypath
The Communication between a Citrix ADC appliance and NetSTAR might require a domain name server. You can test using a simple console or telnet connection from the appliance.
Example:
root@ns# telnet nsv10.netstar-inc.com 443
Trying 1.1.1.1...
Connected to nsv10.netstar-inc.com.
Escape character is '^]'.

root@ns# telnet incompasshybridpc.netstar-inc.com 443
Trying 10.10.10.10...
Connected to incompasshybridpc.netstar-inc.com.
Escape character is '^]'.
<!--NeedCopy-->
Configure audit log messaging
Audit logging enables you to review a condition or a situation in any phase of URL Categorization process. When a Citrix ADC appliance receives an incoming URL, if the responder policy has a URL Filtering expression, the audit log feature collects URL Set information in the URL and stores it as log messages for any target allowed by audit logging.
- Source IP address (the IP address of the client that made the request).
- Destination IP address (the IP address of the requested server).
- Requested URL containing the schema, the host, and the domain name (http://www.example.com.
- URL category that the URL filtering framework returns.
- URL category group that the URL filtering framework returned.
- URL reputation number that the URL filtering framework returned.
- Audit log action taken by the policy.
To configure audit logging for the URL List feature, you must complete the following tasks:
- Enable Audit Log.
- Create Audit Log message action.
- Set URL List responder policy with Audit Log message action.
For more information, see Audit Logging topic.
Storing failure errors using SYSLOG messaging
At any stage of the URL Filtering process, if there is a system-level failure, the Citrix ADC appliance uses the audit log mechanism to store logs in the ns.log file. The errors are stored as text messages in SYSLOG format so that, an administrator can view it later in a chronological order of event occurrence. These logs are also sent to an external SYSLOG server for archival. For more information, see article CTX229399.
For example, if a failure occurs when you initialize the URL Filtering SDK, the error message is stored in the following messaging format.
Oct 3 15:43:40 <local0.err> ns URLFiltering[1349]: Error initializing NetStar SDK (SDK error=-1). (status=1).
The Citrix ADC appliance stores the error messages under four different failure categories:
- Download failure. If an error occurs when you try to download the categorization database.
- Integration failure. If an error occurs when you integrate an update into the existing categorization database.
- Initialization failure. If an error occurs when you initialize the URL Categorization feature, set categorization parameters, or end a categorization service.
- Retrieval failure. If an error occurs when the appliance retrieves the categorization details of the request.
Display URL Categorization result through Command Interface
URL categorization enables you to enter a URL and retrieve categorization results (such as category, group, and reputation score) from the NetSTAR third-party URL categorization database.
When you enter a URL, the URL filtering feature retrieves and displays the categorization result on the command interface. When you enter further URLs, the appliance excludes older URLs from the list and displays the result for the latest three URLs.
To display URL category result up to three URLs, complete the following steps:
- Add URL categorization URL
- Display URL categorization details up to three URLs
- Clear URL categorization data.
To add URL filtering categorization URL
To add a URL and retrieve its categorization details, do the following: At the command prompt, type:
add urlfiltering categorization –Url <string>
Example:
add urlfiltering categorization –Url www.facebook.com
To display URL categorization details up to three URLs
At the command prompt, type:
> show urlfiltering categorization
Example:
show urlfiltering categorization
Url: http://www.facebook.com    Categorization: Facebook,Social Networking,1
Url: http://www.google.com      Categorization: Search Engines & Portals,Search,1
Url: http://www.citrix.com      Categorization: Computing & Internet,Computing & Internet,1
Done
<!--NeedCopy-->
Sample Configuration:
add urlfiltering categorization -url www.facebook.com
Done
show urlfiltering categorization
Url: http://www.facebook.com    Categorization: Facebook,Social Networking,1
Done

add urlfiltering categorization -url www.google.com
Done
show urlfiltering categorization
Url: http://www.facebook.com    Categorization: Facebook,Social Networking,1
Url: http://www.google.com      Categorization: Search Engines & Portals,Search,1
Done

add urlfiltering categorization -url www.citrix.com
Done
show urlfiltering categorization
Url: http://www.facebook.com    Categorization: Facebook,Social Networking,1
Url: http://www.google.com      Categorization: Search Engines & Portals,Search,1
Url: http://www.citrix.com      Categorization: Computing & Internet,Computing & Internet,1
Done

add urlfiltering categorization -url www.in.gr
Done
show urlfiltering categorization
Url: http://www.google.com      Categorization: Search Engines & Portals,Search,1
Url: http://www.citrix.com      Categorization: Computing & Internet,Computing & Internet,1
Url: http://www.in.gr   Categorization: Search Engines & Portals,Search,1 Done
<!--NeedCopy-->
To clear URL categorization result
At the command prompt, type:
clear urlfiltering categorization
done

show urlfiltering categorization
done
<!--NeedCopy-->
Display URL Categorization result through GUI Interface
- In the navigation pane, expand Secure Web Gateway > URL Filtering.
- In the details pane, click URL Filtering Search Categorization link from the Tools section.
-
In the URL Filtering Search Categorization page, enter a URL request and click Search.
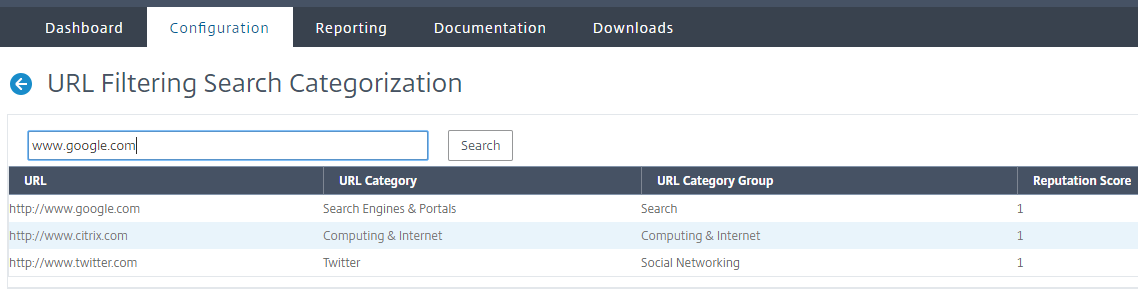
- The appliance displays the category result for the requested URL and for the previous two URL requests.
In this article
- How URL categorization works
- Use Case: Internet usage under corporate compliance for enterprises
- Prerequisites
- Responder policy expressions
- Responder policy types
- Configure URL categorization
- Configure audit log messaging
- Storing failure errors using SYSLOG messaging
- Display URL Categorization result through Command Interface
- Display URL Categorization result through GUI Interface