Citrix DaaS for Azure for Citrix Service Providers
This article describes how Citrix Service Providers (CSPs) can set up Citrix DaaS Standard for Azure (formerly Citrix Virtual Apps and Desktops Standard for Azure service) for customers (tenants) in Citrix Cloud.
For an overview of the features available for Citrix Partners, see Citrix Cloud for Partners.
Requirements
- You are a Citrix Service Provider partner.
- You have a Citrix Cloud account.
- You have a subscription to Citrix DaaS for Azure.
Limitations
- Customer name changes can take up to 24 hours to apply across all interfaces.
- When creating a customer, the email address must be unique.
Known issues
- After a customer’s user is assigned to a resource, you cannot remove or unassign them.
- The management console does not enforce customer user separation. You are responsible for adding users to the appropriate catalogs and resources.
Add a customer
- Sign in to Citrix Cloud with your CSP credentials. Click Customers in the upper left menu.
-
From the Customer dashboard, click Invite or Add. Provide the requested information.
If the customer does not have a Citrix Cloud account, adding the customer creates a customer account. Adding the customer also automatically adds you as a full access administrator of that customer’s account.
-
If the customer has a Citrix Cloud account:
- A Citrix Cloud URL displays, which you copy and send to the customer. For details of this process, see Inviting a customer to connect.
- The customer must add you as a full access administrator to their account. See Add administrators to a Citrix Cloud account.
You can add more administrators later and control which customers they can see on the Citrix DaaS for Azure Manage and Monitor dashboards.
Add Citrix DaaS for Azure to a customer
- Sign in to Citrix Cloud with your CSP credentials. Click Customers in the upper left menu.
- From the Customer dashboard, select Add Service in the ellipsis menu for the customer.
- In Select a Service to Add, click Citrix DaaS Standard for Azure.
- Click Continue.
After you complete this procedure, the customer is onboarded to your Citrix DaaS for Azure subscription.
When the onboarding completes, a new customer is created automatically in Citrix DaaS for Azure. The customer is visible in Manage > Quick Deploy.
Filter resources by customer
You can filter resources by customer on the Citrix DaaS for Azure Manage > Azure Quick Deploy dashboard. (By default, all resources are displayed.) When working with resources such as catalogs, machine images, and Azure subscriptions, you can select specific customer displays to help organize your tenants’ resources.
SD-WAN connections are created on a per-customer basis. The customer must have an SD-WAN Orchestrator service entitlement.
- To create an SD-WAN connection for a customer, follow the guidance in Create an SD-WAN connection. On the Add a network connection page, select the customer. You can select the SD-WAN connection type box only if that customer has an SD-WAN Orchestrator service entitlement.
- For the connection creation to succeed, the customer must also have an installed Master Control Node (MCN). However, only the SD-WAN Orchestrator service entitlement determines whether the SD-WAN connection type can be selected.
Create catalogs to deliver apps and desktops
A catalog is a group of users and the collection of virtual machines they have access to. When you create a catalog, an image is used (with other settings) as a template for creating the machines. For details, see Create catalogs.
Federated domains
Federated domains enable customer users to use credentials from a domain attached to your resource location to sign in to their workspace. You can provide dedicated workspaces to your customers that their users can access through a custom workspace URL (for example, customer.cloud.com), while the resource location remains on your Citrix Cloud account.
You can provide dedicated workspaces alongside the shared workspace that customers can access using your CSP workspace URL (for example, csppartner.cloud.com). To enable customer access to their dedicated workspace, you add them to the appropriate domains that you manage.
After configuring the workspace through Workspace Configuration, customers’ users can sign in to their workspace and access the apps and desktops that you’ve made available.
Add a customer to a domain
- Sign in to Citrix Cloud with your CSP credentials. Click Customers in the upper left menu.
- From the Customer dashboard, select Identity and Access Management in the upper left menu.
- On the Domains tab, select Manage Federated Domain in the domain’s ellipsis menu.
- On the Manage Federated Domain card, in the Available customers column, select a customer you want to add to the domain. Click the plus sign next to the customer name. The selected customer now appears in the Federated customers column. Repeat to add other customers.
- When you’re done, click Apply.
Remove a customer from a domain
When you remove a customer from a domain that you manage, the customer’s users can no longer access their workspaces using credentials from your domain.
- From Citrix Cloud, select Identity and Access Management in the upper left menu.
- On the Domains tab, select Manage Federated Domain from the ellipsis menu for the domain you want to manage.
-
From the list of federated customers, locate or search for the customers you want to remove.
- Click X to remove a customer.
- To remove all listed customers from the domain, click Remove all.
The selected customers move to the list of Available customers.
- Click Apply.
- Review the customers you selected, and then click Remove Customers.
Add an administrator with restricted access
- Sign in to Citrix Cloud with your CSP credentials. Click Customers in the upper left menu.
- From the Customer dashboard, select Identity and Access Management in the upper left menu.
- On the Administrators tab, click Add Administrators From, and then select Citrix Identity.
- Type the email address of the person you’re adding as an administrator, and then click Invite.
- Configure the appropriate access permissions for the administrator. Citrix recommends selecting Custom access, unless you want the administrator to have management control of Citrix Cloud and all subscribed services.
- Select one or more role and scope pairs for Citrix DaaS for Azure, as needed.
- When you’re done, click Send Invite.
When the administrator accepts the invitation, they have the access that you assigned.
Partner access to customer identity provider
You can manage users from the Citrix DaaS for Azure Manage > Azure Quick Deploy dashboard or the Citrix Cloud console.
When you use a non-AD identity provider for users (such as Citrix Managed Azure AD), you must be a Citrix Cloud Identity and Workspace administrator for the customer before you can manage users for that customer. If you’re not an administrator for a customer, you cannot add or delete users for that customer.
To manage users for a customer from Manage > Azure Quick Deploy dashboard, select the partner or customer in Show items for.
- Example 1: Select customer A from Show items for. The dashboard now shows only the items for customer A. When you select a catalog, you see only customer A’s users on the Subscribers tab. You can add or remove users for customer A (assuming you’re an administrator for that customer).
- Example 2: You select the partner entry in Show items for. The dashboard now shows only partner items. On the Subscribers tab, you see only users created for the partner. No customer entries appear. You can add or remove users for that partner (assuming you’re an administrator of that partner), but you can’t manage any customer users from this location.
To manage users for a customer from the Citrix Cloud console, select the customer when prompted after sign-in (or later, using Change Customer in the upper right area of the Citrix Cloud console). When using the Library to manage users, the display context reflects the selected customer. For example, if you selected customer A, the Library shows only customer A’s offerings.
Edit Delegated Administration permissions for administrators
- Sign in to Citrix Cloud with your CSP credentials. Click Customers in the upper left menu.
- From the Customer dashboard, select Identity and Access Management in the upper left menu.
- On the Administrators tab, select Edit Access from the ellipsis menu for the administrator.
- Select or clear the role and scope pairs for Citrix DaaS for Azure, as needed. Be sure to enable only entries that contain the unique scope that was created for the customer.
- Click Save.
Access and configure workspaces
Each customer gets their own workspace with a unique customer.cloud.com URL. This URL is where the customer’s users access their published apps and desktops.
- From Citrix DaaS Standard for Azure: On the Manage > Azure Quick Deploy dashboard, view the URL by expanding User Access & Authentication on the right.
- From Citrix Cloud: From the Customer dashboard, select Workspace Configuration from the upper left menu. View the URL on the Access tab.
You can change access and authentication to a workspace. You can also customize the workspace appearance and preferences. For details, see the following articles:
Monitor a customer’s service
The Citrix Daas for Azure Monitor dashboard in a CSP environment is essentially the same as a non-CSP environment. See Monitor for details.
By default, the Monitor dashboard displays information about all customers. To display information about one customer, use Select Customer.
Keep in mind that the ability to see Monitor displays for a customer is controlled by the administrator’s configured access.
Remove a Service
Before you begin, ensure that your customer scope is not linked to any Citrix DaaS Standard for Azure objects. If they are linked, you cannot remove the service. To unlink scopes, go to Citrix Studio > Administrators > Scopes and edit the scope. For more information about unlinking scopes, see Create and manage scope.
-
Sign in to Citrix Cloud with your Citrix Service Providers credentials.
-
On the Customer dashboard, click the ellipsis menu (…) of the customer from where you want to remove a service and select Remove Service.
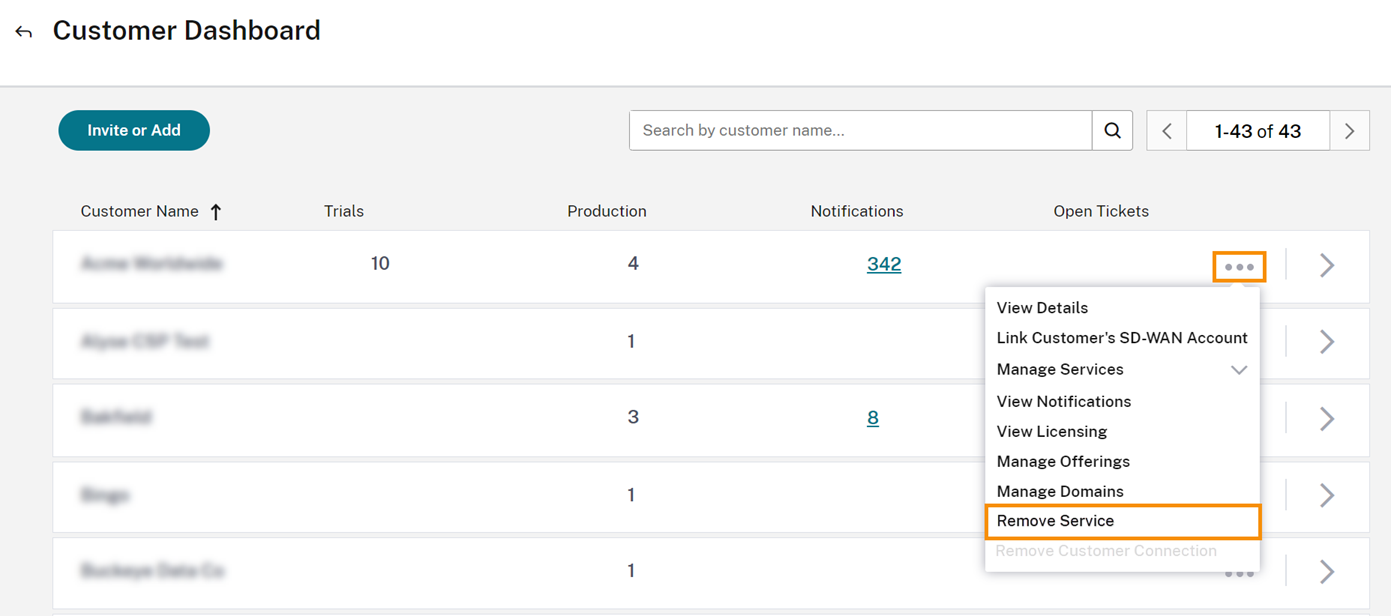
The Service to Remove page appears.
-
Click Remove to remove the service.
In this article
- Requirements
- Limitations
- Known issues
- Add a customer
- Add Citrix DaaS for Azure to a customer
- Filter resources by customer
- Create catalogs to deliver apps and desktops
- Federated domains
- Partner access to customer identity provider
- Edit Delegated Administration permissions for administrators
- Access and configure workspaces
- Monitor a customer’s service
- Remove a Service