Secure a Web Studio deployment (optional)
When you install Web Studio along with a Delivery Controller, the installer creates a self-signed certificate, bound to the 443 port of the current server. Web Studio and the Delivery Controller will use the certificate as the TLS certificate. When accessing from a different machine, you might not be able to access Web Studio, or might see an error in the Web Studio logon screen.
If you want to access Web Studio from a different machine, you can do the following:
-
Export the self-signed certificate from the Delivery Controller.
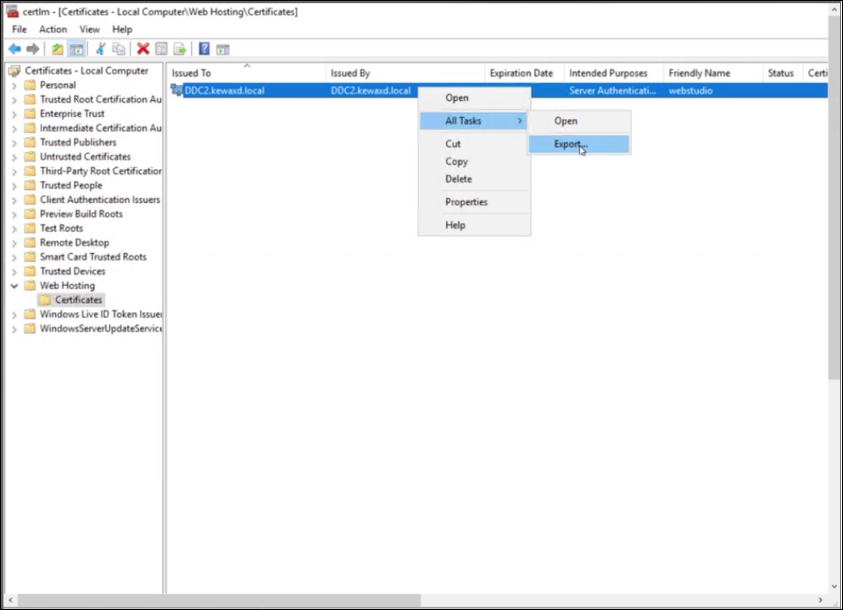
-
For Export Private Key, select No, do not export the private key.
-
For Export File Format, select DER encoded binary X.509 (.CER).
-
-
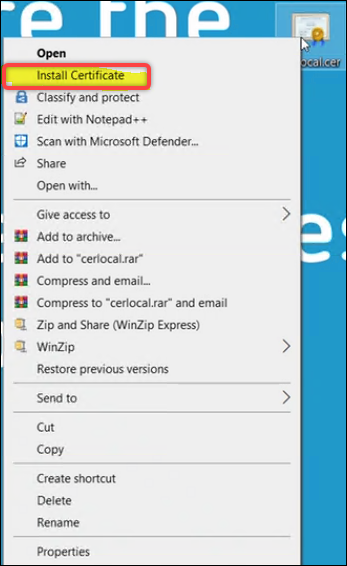
Go to the machine where you want to access Web Studio and then install the certificate.
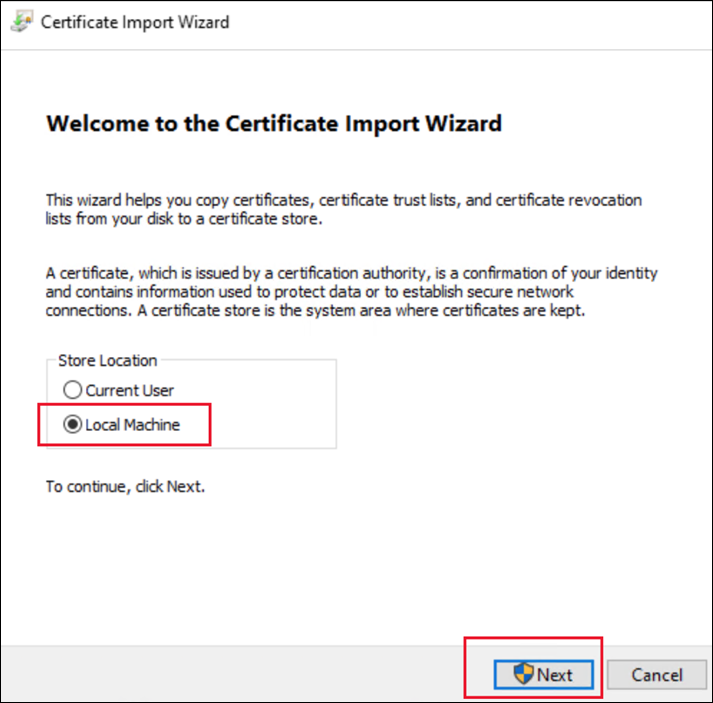
- For Store Location, select Local Machine.
If you choose to install Web Studio on a dedicated server that is remote from the Delivery Controller, you need to perform two tasks:
-
Task 1: Export the certificates from the Web Studio server and the Delivery Controller, respectively.
-
Task 2: Install the two certificates on the machine where you want to access Web Studio.
Note:
As a best practice, we recommend that you secure your Web Studio deployment by using an external public trust certificate or a certificate from an enterprise CA.
Use an external public trust certificate
You can import an external public trust certificate into the Web Studio server using any of the following three methods:
-
Install the PFX file.
-
Double click the PFX file.
-
For Store Location, select Local Machine.
-
Enter the password if required.

-
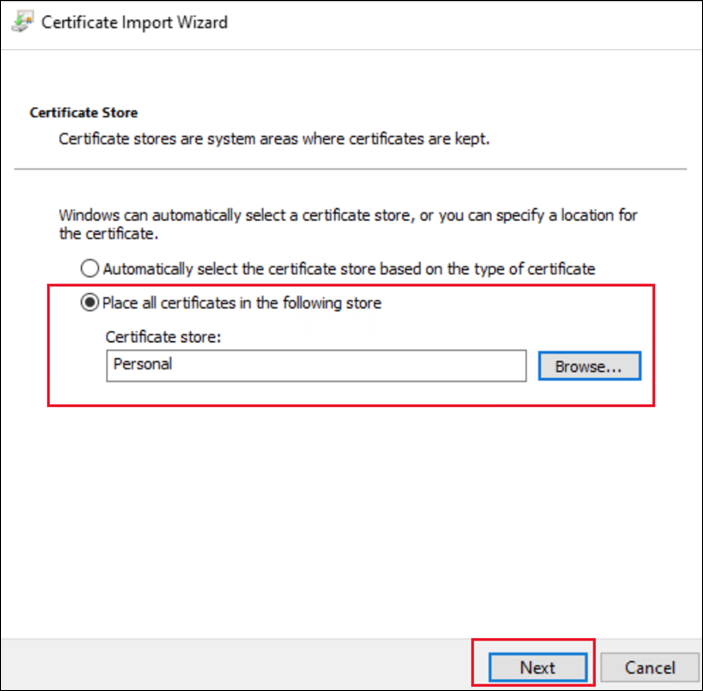
For Certificate Store, select Personal.
-
-
Use the Manage Computer certificates console.
-
Open the Manage Computer Certificates console and go to Personal > Certificates > All Tasks > Import.
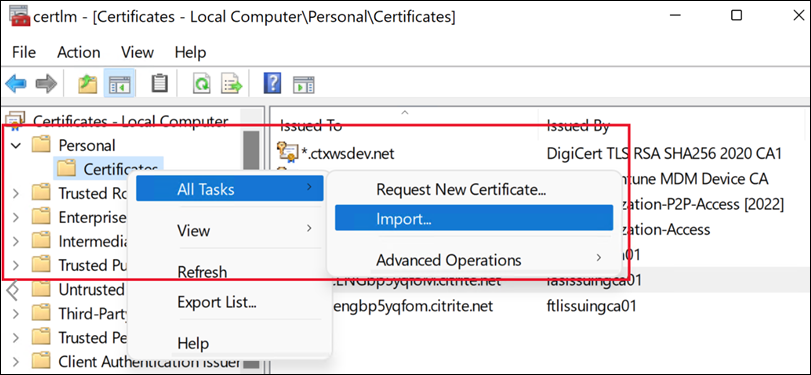
-
Select the PFX file and enter the password if required.
-
-
Use PowerShell.
 Import-PfxCertificate -Password $(ConvertTo-SecureString -String "123456" -AsPlainText -Force) -CertStoreLocation Cert:\LocalMachine\My\ -FilePath .\Desktop\certificate.pfx
 <!--NeedCopy-->
You then bind the certificate to the 443 port. You can do that either before installation or upgrade or after installation or upgrade. The installer doesn’t do anything if certificate binding is configured for the 443 port. For more information, see Before installation or upgrade.
Use a certificate from an enterprise CA
Before you start, make sure that you have the enterprise Certification Authority (CA) server deployed in your domain.
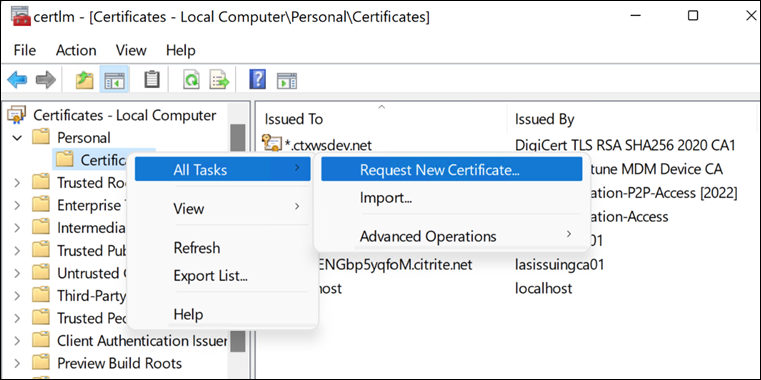
To request a certificate, perform the following steps:
-
On the server, open the Manage Computer Certificates console.
-
Go to Personal > Certificates > All Tasks > Request New Certificate.
-
Go to Certificate Enrollment, select the Web Server, and click the warning message to fill in necessary information.
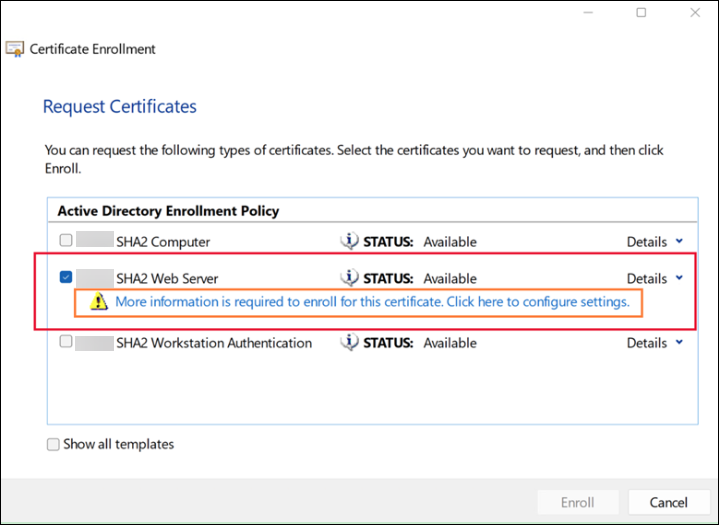
-
Select Common name as the subject name type and enter your FQDN or DNS. Also, enter the alternative name.
Note:
If you require a wildcard certificate, you can enter
CN=*.bvttree.localfor the subject name, and*.bvttree.local and bvttree.localfor the alternative DNS name.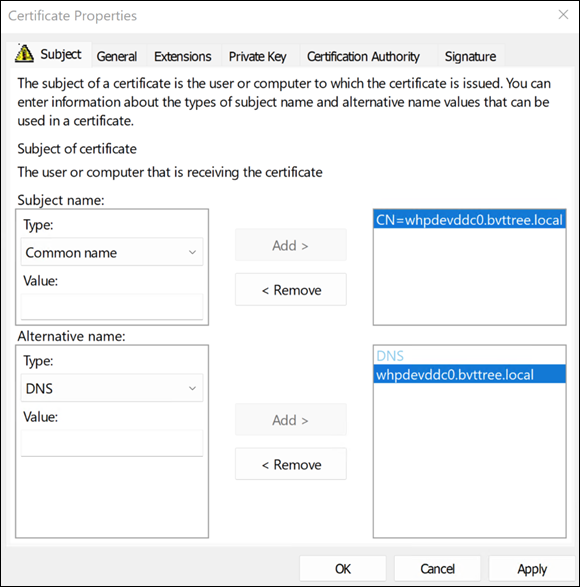
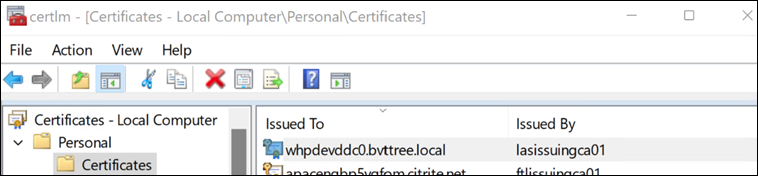
The certificate is available under Personal > Certificates.
You then bind the certificate to the 443 port. You can do that either before installation or upgrade or after installation or upgrade. The installer doesn’t do anything if certificate binding is configured for the 443 port.
Before installation or upgrade
To bind the certificate to the 443 port, perform the following steps (provided that certificate binding is not yet configured for 443 and the IIS is enabled on the server):
-
Log on to the Web Studio server as an administrator.
-
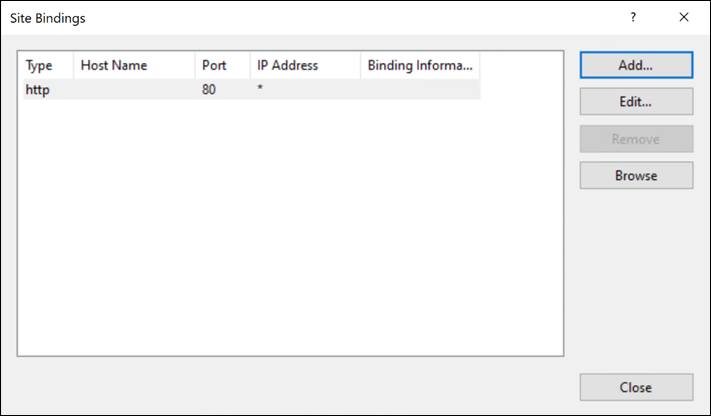
Open the IIS Manager, browse to Sites > Default Web Site > Bindings.
-
In Site Bindings, click Add.
-
In Add Site Binding, set the type to
httpsand the port to 443, select the SSL certificate you requested from the CA, and then click OK.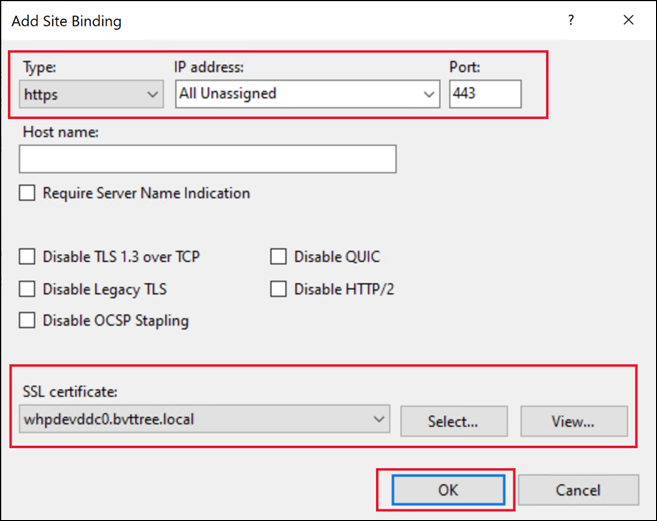
After you install Web Studio, the Web Studio and the Delivery Controller are automatically configured to use the certificate to secure connections.
Alternatively, you can change the certificate using PowerShell.
$certSName = 'CN=whpdevddc0.bvttree.local'  # The subject name of the certificate
$certificate = Get-ChildItem -Path Cert:\LocalMachine\My\ | ? {$_.Subject -eq $certSName}
netsh http add sslcert ipport=0.0.0.0:443 certhash=$($certificate.Thumbprint) certstorename=My appid="$($(New-Guid).ToString("B"))"
<!--NeedCopy-->
After installation or upgrade
Go to the Web Studio server and change the certificate using the IIS Manager. Alternatively, you can change the certificate using PowerShell.
$certSName = 'CN=whpdevddc0.bvttree.local' # The Enterprise CA certificate subject.
$certificate = Get-ChildItem -Path Cert:\LocalMachine\My\ | ? {$_.Subject -eq $certSName}
netsh http update sslcert ipport=0.0.0.0:443 certhash=$($certificate.Thumbprint)
<!--NeedCopy-->
Use a new self-signed certificate
You can generate a new self-signed certificate and use it to replace the existing one. Perform the following steps:
-
Log on to the Web Studio server as an administrator.
-
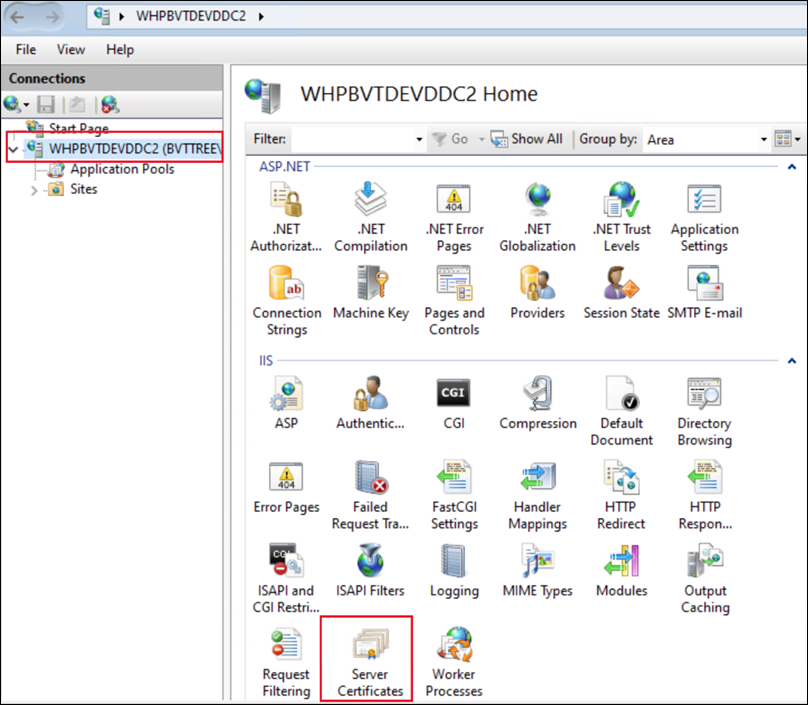
Open the IIS Manager, browse to Server Certificates, and select Create Self-Signed Certificate in the Actions pane.
-
In Create Self-Signed Certificate, enter a name for the certificate and click OK. The self-signed certificate is then created.

-
Browse to Sites > Default Web Site, select Bindings in the Actions pane, select the
httpsentry, and select Edit.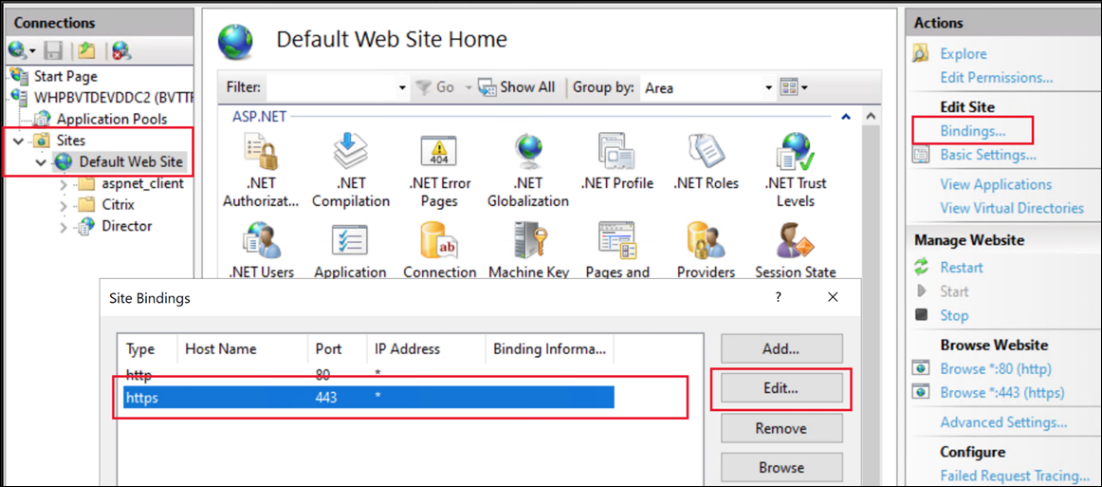
-
In Edit Site Binding, select the certificate from the list and click OK.

This completes changing the certificate.
Alternatively, you can change the certificate using PowerShell.
$certSubject = "CN=WHPBVTDEVDDC2.BVTTREE.LOCAL" # The FQDN of the server.
$frindlyName = "Self-Signed-3"
$expireYears = 5

## new self-signed certificate under LocalMachine\My
$certificate = New-SelfSignedCertificate -Subject $certSubject -CertStoreLocation "Cert:\LocalMachine\My\" -KeyExportPolicy Exportable -KeySpec Signature -KeyLength 2048 -KeyAlgorithm RSA -HashAlgorithm SHA256 -FriendlyName $frindlyName -NotAfter $([System.DateTime]::Now.AddYears($expireYears))
Remove-Item -Path $Env:TEMP\tempCertificate.cer -Force -ErrorAction SilentlyContinue

## Import this certificate into LocalMachine\Root to let this OS trust this certificate
Export-Certificate -Type CERT -Force -Cert $certificate -FilePath $Env:TEMP\tempCertificate.cer -NoClobber
Import-Certificate -FilePath $Env:TEMP\tempCertificate.cer -CertStoreLocation "Cert:\LocalMachine\Root\"

## Update bind the 0.0.0.0:443 with this certificate
Invoke-Command -ScriptBlock { Param ($param1) netsh http update sslcert ipport=0.0.0.0:443 certhash=$param1 } -ArgumentList @($certificate.Thumbprint)
<!--NeedCopy-->