Secure communications
To secure the communication between Citrix Virtual Apps and Desktops server and Citrix Workspace app, you can integrate your Citrix Workspace app connections using secure technologies such as the following:
-
Citrix Gateway: For information, see the topics in this section and the Citrix Gateway, and StoreFront documentation.
Note:
Citrix recommends using Citrix Gateway between StoreFront servers and user devices.
- A firewall: Network firewalls can allow or block packets based on the destination address and port. If you are using Citrix Workspace app through a network firewall that maps the server’s internal network IP address to an external Internet address (that is, network address translation, or NAT), configure the external address.
- Trusted server.
- For Citrix Virtual Apps or Web Interface deployments only (not applicable to XenDesktop 7) : A SOCKS proxy server or secure proxy server (also known as security proxy server, HTTPS proxy server). You can use proxy servers to limit access to and from your network and to handle connections between Citrix Workspace app and server. Citrix Workspace app supports SOCKS and secure proxy protocols.
- For Citrix Virtual Apps or Web Interface deployments only; not applicable to XenDesktop 7, XenDesktop 7.1, XenDesktop 7.5, or XenApp 7.5: SSL Relay solutions with Transport Layer Security (TLS) protocols.
- For Citrix Virtual Apps and Desktops 7.6, you can enable an SSL connection directly between users and VDAs.
Outbound proxy support
Smart Control allows administrators to define granular policies to configure and enforce user environment attributes for Citrix Virtual Apps and Desktops™ and Citrix DaaS (formerly Citrix Virtual Apps and Desktop service) using Citrix Gateway. For instance, you might want to prohibit users from mapping drives to their remote desktops. This can be achieved using the Smart Control feature on Citrix Gateway.
However, the scenario changes when Citrix Workspace app and Citrix Gateway belong to separate enterprise accounts. In such scenarios, the client domain cannot apply the Smart Control feature because the gateway does not exist on the client domain. Instead, you can leverage thr, Outbound ICA proxy. Outbound ICA proxy lets you use the Smart Control feature even when Citrix Workspace app and Citrix Gateway are deployed in different organizations.
Citrix Workspace app supports session launches using the NetScaler LAN proxy. Either a single, static proxy can be configured or the proxy server can be selected at runtime using the outbound proxy plug-in.
You can configure outbound proxies using the following methods:
- Static proxy: Proxy server is configured by providing a proxy hostname and port number.
- Dynamic proxy: A single proxy server can be selected among one or more proxy servers using the proxy plug-in DLL.
You can configure the outbound proxy using the Group Policy Object administrative template and the Registry editor.
For more information about outbound proxy, see Outbound ICA Proxy support in the Citrix Gateway documentation.
Outbound proxy support - Configuration
Note:
If both static proxy and dynamic proxies are configured, the dynamic proxy configuration takes precedence.
Configuring outbound proxy using the GPO administrative template:
- Open the Citrix Workspace app Group Policy Object administrative template by running gpedit.msc.
- Under the Computer Configuration node, go to Administrative Templates > Citrix Workspace > Network routing.
- Select one of the following options:
- For static proxy: Select the Configure NetScaler® LAN proxy manually policy. Select Enabled and then provide the hostname and port number.
- For dynamic proxy: Select the Configure NetScaler LAN proxy using DLL policy. Select Enabled and then provide the full path to the DLL file. For example,
C:\Workspace\Proxy\ProxyChooser.dll.
- Click Apply and OK.
Configuring outbound proxy using the Registry editor:
-
For static proxy:
- Launch the Registry editor and navigate to
HKEY_LOCAL_MACHINE\SOFTWARE\Policies\Citrix\ICA Client\Engine\Network Routing\Proxy\NetScaler. -
Create DWORD value keys as follows:
"StaticProxyEnabled"=dword:00000001"ProxyHost"="testproxy1.testdomain.com"ProxyPort"=dword:000001bb
- Launch the Registry editor and navigate to
-
For dynamic proxy:
- Launch the Registry editor and navigate to
HKEY_LOCAL_MACHINE\SOFTWARE\Policies\Citrix\ICA Client\Engine\Network Routing\Proxy\NetScaler LAN Proxy. - Create DWORD value keys as follows:
"DynamicProxyEnabled"=dword:00000001"ProxyChooserDLL"="c:\\Workspace\\Proxy\\ProxyChooser.dll"
- Launch the Registry editor and navigate to
TLS
This topic applies to Citrix Virtual Apps and Desktops Version 7.6 and later.
To use TLS encryption for all Citrix Workspace app communication with the server, configure the user device, Citrix Workspace app, and, if using Web Interface, the server running the Web Interface. For information about securing StoreFront communications, see Secure section in the StoreFront documentation.
Pre-requisites:
User devices must meet the requirements specified in the System requirements.
Use this policy to configure the TLS options that ensure the Citrix Workspace app securely identifies the server that it is connecting to, and encrypts all communication with the server.
You can use the options below to:
- Enforce use of TLS: Citrix recommends that all connections over untrusted networks, including the Internet, use TLS.
- Enforce use of FIPS (Federal Information Processing Standards): Approved cryptography and help comply with the recommendations in NIST SP 800-52. These options are disabled by default.
- Enforce use of a specific version of TLS, and specific TLS cipher suites: Citrix supports TLS 1.0, TLS 1.1 and TLS 1.2 protocols between Citrix Workspace app for Windows, and Citrix Virtual Apps and Desktops and Citrix DaaS.
- Connect only to specific servers.
- Check for revocation of the server certificate.
- Check for a specific server certificate issuance policy.
- Select a particular client certificate, if the server is configured to request one.
TLS support
- Open the Citrix Workspace app GPO administrative template by running gpedit.msc.
-
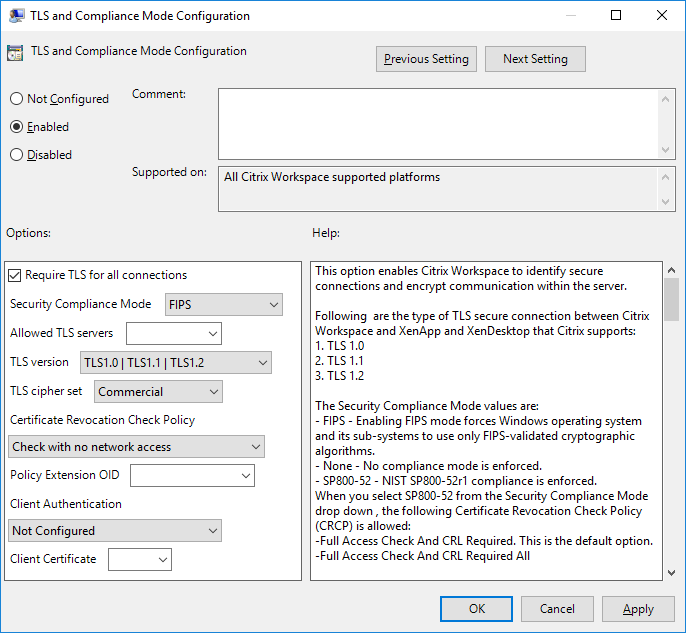
Under the Computer Configuration node, go to Administrative Templates > Citrix Workspace > Network routing, and select the TLS and Compliance Mode Configuration policy.
-
Select Enabled to enable secure connections and to encrypt communication on the server. Set the following options:
Note:
Citrix recommends TLS for secure connections.
-
Select Require TLS for all connections to force Citrix Workspace app to use TLS for all connections to published applications and desktops.
-
From the Security Compliance Mode menu, select the appropriate option:
- None - No compliance mode is enforced.
- SP800-52 – Select SP800-52 for compliance with NIST SP 800-52. Select this option only if the servers or gateway complies with NIST SP 800-52 recommendations.
Note:
If you select SP800-52, FIPS Approved cryptography is automatically used, even if Enable FIPS is not selected. You must also enable the Windows security option, System Cryptography: Use FIPS-compliant algorithms for encryption, hashing, and signing. Otherwise, Citrix Workspace app might fail to connect to the published applications and desktops.
If you select SP800-52, you must select either the Certificate Revocation Check Policy setting with Full Access Check, or Full access check and CRL required.
When you select SP800-52, Citrix Workspace app verifies that the server certificate complies with the recommendations in NIST SP 800-52. If the server certificate does not comply, Citrix Workspace app might fail to connect.
- Enable FIPS – Select this option to enforce the use of FIPS approved cryptography. You must also enable the Windows security option from the operating system group policy, System Cryptography: Use FIPS-compliant algorithms for encryption, hashing, and signing. Otherwise, Citrix Workspace app might fail to connect to published applications and desktops.
-
From the Allowed TLS servers drop-down, select the port number. You can ensure that Citrix Workspace app for Windows connects only to a specified server by a comma-separated list. You can specify wildcards and port numbers. For example, *.citrix.com: 4433 allows connections to any server whose common name ends with .citrix.com on port 4433. The issuer of the certificate asserts the accuracy of the information in a security certificate. If Citrix Workspace does not recognize and trust the issuer, the connection is rejected.
-
From the TLS version menu, select one of the following options:
-
TLS 1.0, TLS 1.1, or TLS 1.2 - This is the default setting. This option is recommended only if there is a business requirement for TLS 1.0 for compatibility.
-
TLS 1.1 or TLS 1.2 – Use this option to ensure that the ICA connections use either TLS 1.1 or TLS 1.2.
-
TLS 1.2 - This option is recommended if TLS 1.2 is a business requirement.
- TLS cipher set - To enforce the use of specific TLS cipher set, select either Government (GOV), Commercial (COM), or All (ALL). In certain cases of Citrix Gateway configurations, you might need to select COM. Citrix Workspace app supports RSA keys of 1024, 2048, and 3072-bit lengths. Root certificates with RSA keys of 4096-bit length are also supported.
Note:
Citrix does not recommend using RSA keys of 1024-bit length
-
Any: When “Any” is set, the policy is not configured and any of the following cipher suites are allowed:
- TLS_RSA_WITH_RC4_128_MD5
- TLS_RSA_WITH_RC4_128_SHA
- TLS_RSA_WITH_3DES_EDE_CBC_SHA
- TLS_RSA_WITH_AES_128_CBC_SHA
- TLS_RSA_WITH_AES_256_CBC_SHA
- TLS_RSA_WITH_AES_128_GCM_SHA256
- TLS_RSA_WITH_AES_256_GCM_SHA384
-
Commercial: When “Commercial” is set, only the following cipher suites are allowed:
- TLS_RSA_WITH_RC4_128_MD5
- TLS_RSA_WITH_RC4_128_SHA
- TLS_RSA_WITH_AES_128_CBC_SHA
- TLS_RSA_WITH_AES_128_GCM_SHA256
-
Government: When “Government” is set, only the following cipher suites are allowed:
- TLS_RSA_WITH_AES_256_CBC_SHA
- TLS_RSA_WITH_3DES_EDE_CBC_SHA
- TLS_RSA_WITH_AES_128_GCM_SHA256
- TLS_RSA_WITH_AES_256_GCM_SHA384
- From the Certificate Revocation Check Policy menu, select any of the following:
-
Check with No Network Access - Certificate Revocation list check is performed. Only local certificate revocation list stores are used. All distribution points are ignored. Finding the Certificate Revocation List is not mandatory to verify the server certificate that is presented by the target SSL Relay/Citrix Secure Web Gateway server.
-
Full Access Check - Certificate Revocation List check is performed. Local Certificate Revocation List stores and all distribution points are used. If revocation information for a certificate is found, the connection is rejected. Finding a Certificate Revocation List is not critical for verification of the server certificate presented by the target server.
-
Full Access Check and CRL Required - Certificate Revocation List check is performed, excluding the root CA. Local Certificate Revocation List stores and all distribution points are used. If revocation information for a certificate is found, the connection is rejected. Finding all required Certificate Revocation Lists is critical for verification.
-
Full Access Check and CRL Required All - Certificate Revocation List check is performed, including the root CA. Local Certificate Revocation List stores and all distribution points are used. If revocation information for a certificate is found, the connection is rejected. Finding all required Certificate Revocation Lists is critical for verification.
-
No Check - No Certificate Revocation List check is performed.
-
Using the Policy Extension OID, you can limit Citrix Workspace app to connect only to servers with a specific certificate issuance policy. When you select Policy Extension OID, Citrix Workspace app accepts only server certificates containing that Policy Extension OID.
-
From the Client Authentication menu, select any of the following:
-
Disabled - Client Authentication is disabled.
-
Display certificate selector - Always prompt the user to select a certificate.
-
Select automatically if possible - Prompt the user only if there a choice of the certificate to identify.
-
Not configured – Indicates that client authentication is not configured.
-
Use specified certificate - Use the client certificate as set in the Client Certificate option.
-
Use the Client Certificate setting to specify the identifying certificate’s thumbprint to avoid prompting the user unnecessarily.
-
Click Apply and OK to save the policy.
-
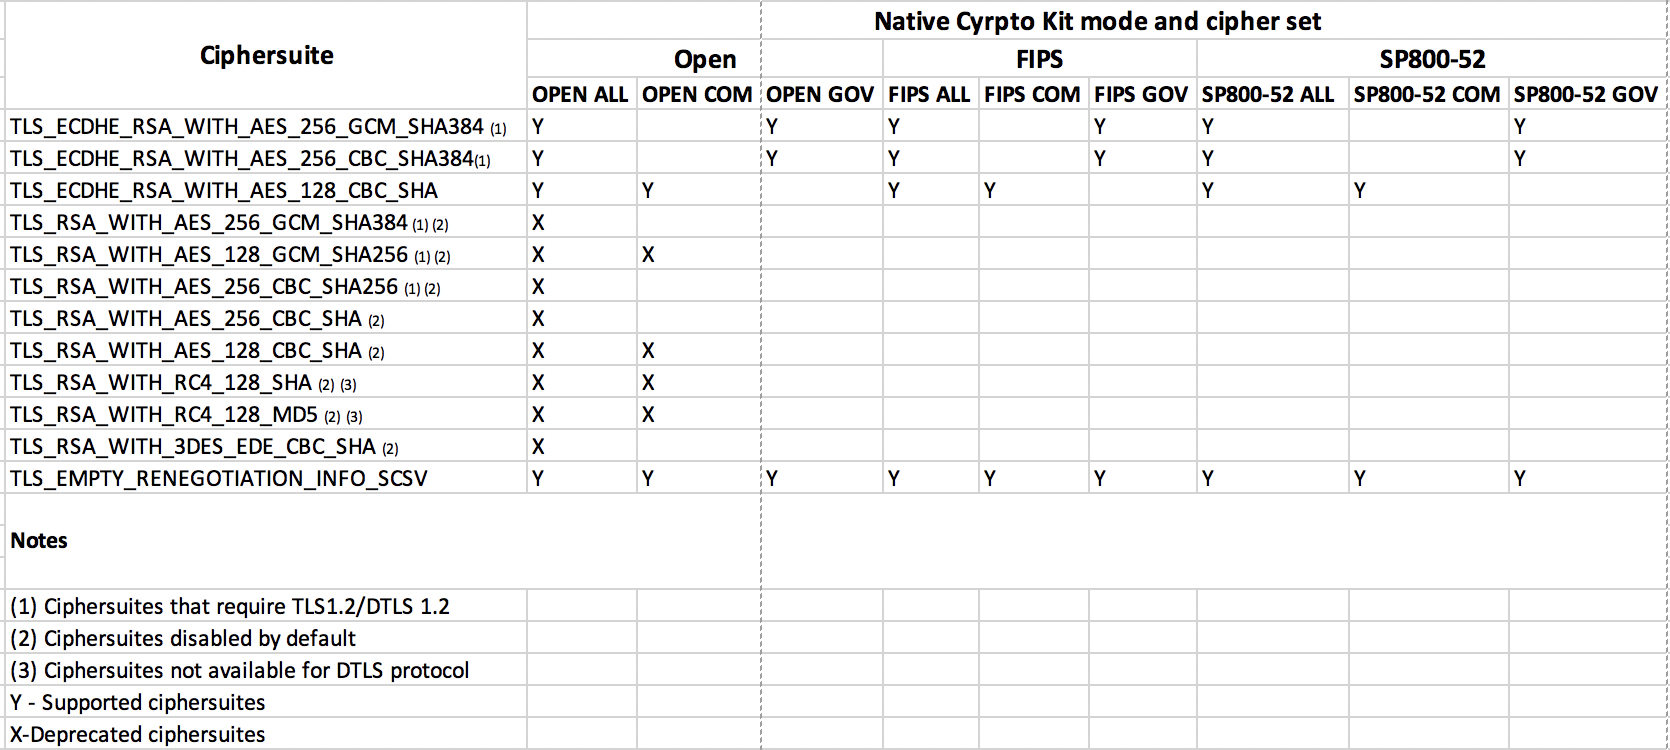
The following table lists the cipher suites in each set:
Firewall
Network firewalls can allow or block packets based on the destination address and port. If you are using a firewall in your deployment, Citrix Workspace app for Windows must be able to communicate through the firewall with both the Web server and Citrix server.
Common Citrix Communication Ports
| Source | Type | Port | Details |
|---|---|---|---|
| Citrix Workspace app | TCP | 80/443 | Communication with StoreFront |
| ICA/HDX | TCP | 1494 | Access to applications and virtual desktops |
| ICA/HDX with Session Reliability | TCP | 2598 | Access to applications and virtual desktops |
| ICA/HDX over SSL | TCP | 443 | Access to applications and virtual desktops |
For more information on ports, see Knowledge Center article CTX101810.
If the firewall is configured for Network Address Translation (NAT), use the Web Interface to define mappings from internal addresses to external addresses and ports. For example, if your Citrix Virtual Apps and Desktops server is not configured with an alternate address, you can configure the Web Interface to provide an alternate address to Citrix Workspace app. Citrix Workspace app then connects to the server using the external address and port number.
Proxy server
Proxy servers are used to limit access to and from your network, and to handle connections between Citrix Workspace app for Windows and servers. Citrix Workspace app supports SOCKS and secure proxy protocols.
When communicating with the server, Citrix Workspace app uses proxy server settings that are configured remotely on the server running Workspace for Web or the Web Interface. For information about proxy server configuration, refer to StoreFront or Web Interface documentation.
In communicating with the Web server, Citrix Workspace app uses the proxy server settings that are configured through the Internet settings of the default Web browser on the user device. You must configure the Internet settings of the default Web browser on the user device accordingly.
Configure the proxy settings using the registry editor to enforce Citrix Workspace app to honor or discard the proxy server during connections.
Warning
Editing the registry incorrectly can cause serious problems that may require you to reinstall your operating system. Citrix cannot guarantee that problems resulting from the incorrect use of Registry Editor can be solved.
- Navigate to
\HKEY_LOCAL_MACHINE\SOFTWARE\WOW6432Node\Citrix\AuthManager - Set the ProxyEnabled(REG_SZ) .
- True – indicates that Citrix Workspace app honors the proxy server during connections.
- False - indicates that Citrix Workspace app discards the proxy server during connections.
- Restart the Citrix Workspace app for the changes to take effect.
Trusted server
Trusted server configuration identifies and enforces trust relations in Citrix Workspace app connections.
When you enable Trusted server, Citrix Workspace app specifies the requirements and decides if the connection to the server can be trusted or not. For example, a Citrix Workspace app connecting to a certain address (such as https://\*.citrix.com with a specific connection type (such as TLS) is directed to a trusted zone on the server
When you enable this feature, connected server resides in the Windows Trusted Sites zone. For instructions about adding servers to the Windows Trusted Sites zone, see the Internet Explorer online help.
To enable trusted server configuration using Group Policy Object administrative template
Pre-requisite:
Exit from the Citrix Workspace app components including the Connection Center.
- Open the Citrix Workspace app GPO administrative template by running gpedit.msc.
- Under the Computer Configuration node, go to Administrative Templates > Classic Administrative Templates(ADM) > Citrix Components > Citrix Workspace > Network Routing > Configure trusted server configuration.
- Select Enabled to force Citrix Workspace app to perform region identification.
- Select Enforce trusted server configuration. This forces the client to perform the identification using a trusted server.
- From the Windows internet zone drop-down, select the client server address. This setting is applicable only to Windows Trusted Site zone.
- In the Address field, set the client server address for trusted site zone other than Windows. You can use a comma-separated list.
- Click OK and Apply.
ICA® file signing
The ICA file signing helps protect you from an unauthorized application or desktop launch. Citrix Workspace app verifies that a trusted source generated the application or desktop launch based on an administrative policy and protects against the launch from untrusted servers. You can configure ICA file signing using the Group policy objects administrative template or StoreFront. ICA file signing is not enabled by default.
For information about enabling ICA file signing for StoreFront, see Enable ICA file signing in StoreFront documentation.
For Web Interface deployment, the Web Interface enables and configures the application or desktop launch to include a signature during the launch using the Citrix ICA file signing service. The service can sign the ICA file using a certificate from the computer’s personal certificate store.
Configure ICA file signature
Note:
If the CitrixBase.admx\adml is not added to the local GPO, the Enable ICA File Signing policy might not be present.
- Open the Citrix Workspace app Group Policy Object administrative template by running gpedit.msc
- Under the Computer Configuration node, go to Administrative Templates > Citrix Components.
- Select Enable ICA File Signing policy and select one of the options as required:
- Enabled - Indicates that you can add the signing certificate thumbprint to the whitelist of trusted certificate thumbprints.
- Trust Certificates - Click Show to remove the existing signing certificate thumbprint from the whitelist. You can copy and paste the signing certificate thumbprints from the signing certificate properties.
- Security policy - Select one of the following options from the menu.
- Only allow signed launches (more secure): Allows only signed-application or desktop launch from a trusted server. A security warning appears in case of an invalid signature. You cannot launch the session due to non-authorization.
- Prompt user on unsigned launches (less secure) - A message prompt appears when an unsigned or invalidly signed session is launched. You can choose to either continue the launch or cancel the launch (default).
- Click Apply and OK to save the policy.
- Restart the Citrix Workspace app session for the changes to take effect.
To select and distribute a digital signature certificate:
When selecting a digital signature certificate, Citrix recommends you choose from the following prioritized list:
- Buy a code-signing certificate or SSL signing certificate from a public Certificate Authority (CA).
- If your enterprise has a private CA, create a code-signing certificate or SSL signing certificate using the private CA.
- Use an existing SSL certificate, such as the Web Interface server certificate.
- Create a root CA certificate and distribute it to user devices using GPO or manual installation.