Clustered License Servers – configure, install, upgrade, and uninstall
Why clustered License Servers
Cluster servers are groups of computers that are combined to increase availability, reliability, and scalability. Clustering the License Server lets users continue working during failure situations without interrupting their access to critical applications.
How clustered License Servers work
When the active node in a cluster-enabled License Server suffers from hardware failure, failover occurs automatically. Resources are available again in a few seconds.
A typical cluster configuration has, at a minimum, one active and one passive (backup) server. When the active server in a cluster fails, the ownership of the resources in the cluster are transferred to another node in the cluster. Typically, users cannot detect when one server in a cluster fails over to another.
When the active node of a clustered License Server fails, there is no impact on users connected to the Citrix product. The product might briefly enter the License caching mode and an event might be written in the product’s event log.
Important:
If Citrix Licensing is installed in a clustered environment and Windows Firewall is enabled, connections can fail. Connecting remotely to the console or checking out licenses works until failover occurs in the cluster. Exception rules for CITRIX.exe and lmgrd.exe are created during the installation of Licensing, but do not work after a cluster failover. To work around this issue, create exceptions for Licensing components on the Exceptions tab of the Windows Firewall panel. Create an exception for each of the following ports:
- License Server port number is 27000
- Vendor daemon port number is 7279
- Web Services for Licensing port number is 8083
Citrix Licensing in a clustered environment
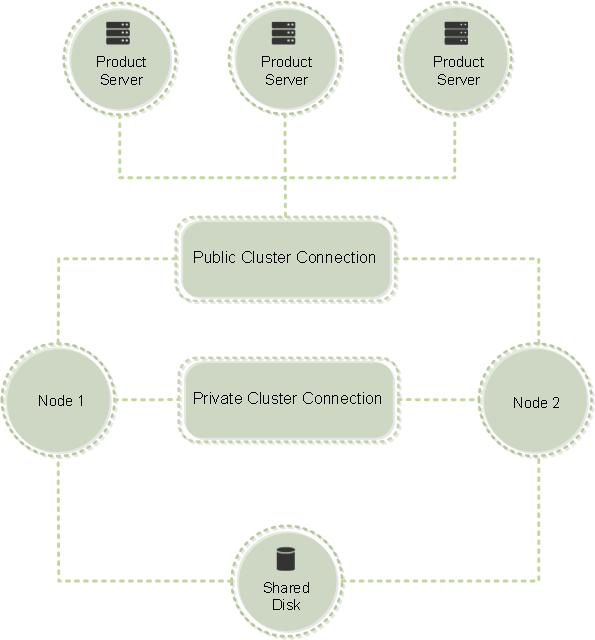
Like most clusters, a private network is used to send heartbeats, commands, and state information between the nodes of the cluster. If the connection is interrupted, the nodes try to reconnect by the private network first, then the public network. The following diagram illustrates a cluster-enabled licensing deployment:
Communications in a clustered licensing environment:
Only one node can use the resources in a cluster at any given time. If you already deployed Citrix Licensing and you want to migrate your deployment to a cluster-enabled server, keep the following points in mind:
-
Because you already generated license files that reference a specific server name, you must give the client access point the same name as the original License Server. If not, then rehost your license files with the new name of the License Server cluster.
-
Host names in license files are case-sensitive; therefore, the client access point names must be the same case as the host names in the license file. If they are not, you must rehost your license files with the correct capitalization of the names. You can use the Failover Cluster Manager to ensure that the client access point name matches the host name specified in the license file. Cluster and host name case is not an issue if you use Studio in Citrix Virtual Apps and Desktops or the Citrix Licensing Manager (from the Start menu on your License Server) to download your licenses.
-
Point all product installations (for example, servers running Citrix Virtual Apps and Desktops) serviced by the old License Server to the new License Server cluster. Change product communication settings so that they use the name of the client access point as the License Server name. For information about editing product-side communication settings, see the product’s documentation.
Prerequisites to configure a clustered License Server
The following list outlines the requirements for setting up a License Server in a Microsoft Cluster:
-
Microsoft clustering functionality exists in:
- Windows Server 2019
- Windows Server 2016
- Windows Server 2012 R2
-
Citrix Licensing does not support Clustered Shared Volumes or third party Volume Management products for clusters.
-
Before configuring Citrix Licensing for Microsoft clustering, you must have a fully functional Microsoft cluster environment. Citrix Licensing Services runs on only one node at a time.
-
To cluster the License Server, follow these cluster requirements in addition to any requirements from Microsoft for hardware and clustering in general.
-
Install licensing on the cluster with the License Server installer CitrixLicensing.exe.
-
When you install Citrix Licensing on a cluster, specify the name of the client access point. You are prompted for the name of the License Server during product installation.
-
We recommend that you use identical License Server hardware for each node in the cluster. In particular, Citrix recommends two network adapters on each node and the servers configured with a shared disk.
-
Ensure that each node has two network adapters. One for the connection to the public network and the other for the node-to-node private cluster network. We do not support using one network adapter for both connections.
-
The public and the private IP address must be on different subnets because the Cluster Service recognizes only one network interface per subnet.
-
A name resolution method, such as DNS, WINS, HOSTS, or LMHOSTS, is necessary to resolve the client access point name.
-
Each server that forms the cluster must be in the same domain.
-
Set static IP addresses for the private network connector.
-
We recommend that you use the Citrix Licensing Manager to allocate licenses to the cluster.
-
When you generate a license file at citrix.com, use the name of the client access point when prompted for the Host ID.
-
After you download a license file, copy it to the
F:\Program Files\Citrix\Licensing\MyFilesfolder (where F: is the shared drive for the cluster) on the License Server and reread it.
Important:
Citrix recommends setting static IP addresses for all network adapters in the cluster, both private and public. If using Dynamic Host Configuration Protocol (DHCP) to obtain IP addresses, access to cluster nodes might become unavailable if the DHCP server goes down. If you must use DHCP for your public network adapter, use long lease periods to ensure that the dynamically assigned lease address remains valid even if the DHCP service is temporarily lost or perform a DHCP reservation.
Configure a clustered License Server
The following steps describe the overall process involved in installing and configuring licensing on a cluster-enabled server. These steps assume you configured the clustering on the hardware on which you intend to install the License Server.
-
Create a cluster resource group. Assign a client access point and shared storage to the resource group. Ensure that the first node has control of the cluster resources and the resource group you created points to the first node.
-
On the first node of the cluster, start the Citrix Licensing installer, CitrixLicensing.exe, as an administrator. Install it on the first node to the shared cluster drive (not the quorum drive). Leave the Last Node in the Cluster check box cleared.
-
Move the resources from the active node in the cluster to the second node.
-
Install the License Server on the second node to the same shared location as the first node. You can add more than two nodes to a cluster.
-
When installing the License Server on the last node in the cluster, ensure that you check the Last Node in the Cluster check box.
-
Obtain license files that specify the client access point name of the License Server as the host name. After obtaining license files, you must add them to the License Server and then reread them.
-
Configure your Citrix product to use the client access point name, not the node name of the License Server cluster.
Important:
When a clustered License Server fails over, the cluster service renames the lmgrd_debug.log to the name of the node that previously hosted the services. Then it starts the services on the new active node and creates a lmgrd_debug.log.
Install licensing on a cluster-enabled server
Important:
The .msi does not support clustering. To install or upgrade for clustering, use CitrixLicensing.exe.
The following drive letters and paths/variables are used in this procedure:
-
D is the drive for your product media.
-
C is the local hard drive on the specified node.
-
F is the cluster shared drive resource. (This drive is the installation drive. That is, the place where installation files used by each node are stored.)
Because of a NetBios restriction, ensure that the client access point name is fewer than 15 characters. On non-English platforms, when starting a License Service installation on a cluster node, the Cluster Group list on the Configure screen might contain the system default Cluster Group. Select one of the non-default Cluster Groups and the installation continues normally.
-
Create a separate, noncore cluster resource group. The resource group must have the attached storage assigned a drive letter and a client access point. The client access point must have the same host name used when obtaining the license file. Use the Failover Cluster Manager and Roles > Configure Role in Windows Server 2012 R2, Windows Server 2016, and Windows Server 2019. Then select the Other Server type in the menu. Ensure that the first node of the cluster owns all cluster resources.
-
Run the License Server installer, CitrixLicensing.exe, as an administrator. On the Install Location page, set the drive letter to correspond with the cluster shared drive. By default, the licensing components are installed in
F:\Program Files\Citrix\Licensing. -
Leave the Last Node in the Cluster check box cleared during the installation on the first node.
-
Move the resources for the resource group you created in Step 1 to the second node.
-
In node 2 of the cluster, run CitrixLicensing.exe as an administrator.
-
Go back to Step 3. You can install more than two nodes on the cluster. You can install more than two nodes on the cluster. For each additional cluster, repeat Step 3.
-
When installing the License Server on the last node in the cluster, ensure that the Last node in the cluster check box is checked. The last node is where the ports are configured.
-
Use the Citrix Licensing Manager to import your license files.
Open the console or run commands
All licensing administration features available in standard deployments are also available on clustered License Servers. These features include the management console and the ability to run license administration commands.
Browse to the following location to open the Citrix Licensing Manager in a cluster:
https://client access point name:web service port
Where the client access point name is the name of the cluster and the web service port is the port number for console communications. The default port number is 8083. To specify the location of the license files in the cluster, you can run many license administration commands using the argument -c @client access point name. For example:
lmreread -c @client access point name -all
Upgrade a clustered License Server
To upgrade your clustered License Server (from versions 11.12.1 onwards) to the latest version, complete the following steps:
-
Download the latest License Server build.
-
Run the License Server installer CitrixLicensing.exe as an administrator.
-
Move the resources for the resource group you created when you installed licensing on a clustered enabled server, to the second node.
-
In node 2 of the cluster, run CitrixLicensing.exe as an administrator.
-
If you have more than 2 nodes on the cluster, repeat Step 3.
-
Use the Citrix Licensing Manager to import your license files.
Known issue
When you begin the upgrade steps, an unnecessary Configure Ports page appears. You can safely ignore it and click Next. [LIC-1434]
Note:
If you are running a version of a License Server older than 11.12.1, uninstall it and then install the 11.16.6 version. These older versions of License Server do not conform to current Microsoft cluster guidelines. The 11.16.6 version of the License Server has the functionality required to support Windows Server versions 2008 and later.
Uninstall a clustered License Server
Uninstall licensing from a clustered License Server using the Control Panel > Programs and Features option from the active node. Ensure that the first node contains all the resources.
-
From the first node in the cluster, start Control Panel > Programs and Features.
-
Remove Citrix Licensing.
-
Using the failover cluster manager, move the resources in the Citrix Licensing resource group to the second node.
-
Remove Citrix Licensing from the second node. If there are more nodes, repeat Steps 3 and 4 for each node, and then proceed to Step 5.
-
Remove the remaining files from the shared drive.
Note:
The uninstallation process does not remove the license files and options file from the shared drive. For more information, see Troubleshoot Licensing.
In this article
- Why clustered License Servers
- How clustered License Servers work
- Citrix Licensing in a clustered environment
- Prerequisites to configure a clustered License Server
- Configure a clustered License Server
- Install licensing on a cluster-enabled server
- Open the console or run commands
- Upgrade a clustered License Server
- Uninstall a clustered License Server