Custom risk indicators
There are two types of risk indicators that you see in Citrix Analytics for Security™:
-
Default risk indicators: These risk indicators are based on the machine learning algorithm. For more information, see Citrix user risk indicators.
-
Custom risk indicators: These risk indicators are created manually by the administrators.
When you create a custom risk indicator, you can define the triggering conditions and the parameters based on your use cases. If the user events match your defined criteria, Citrix Analytics triggers the custom risk indicator and displays it on the user’s risk timeline.
Create custom risk indicators for the following data sources:
- Citrix Gateway
- Citrix Secure Private Access™
- Citrix Virtual Apps and Desktops™ on-premises
- Citrix DaaS (formerly Citrix Virtual Apps and Desktops service)
- Citrix Secure Browser
Preconfigured custom risk indicators
Citrix also provides a few custom risk indicators with preconfigured conditions to help you monitor the security of your Citrix infrastructure. You can modify the preconfigured conditions based on your use cases. For more information, see Preconfigured custom risk indicators.
Custom risk indicators page
The Custom Risk Indicators page provides insights into all the custom risk indicators generated for a user, severity, data source, number of policies, risk category, status, and the last modified date and time of the indicator. To create a custom risk indicator, see Creating a custom risk indicator.
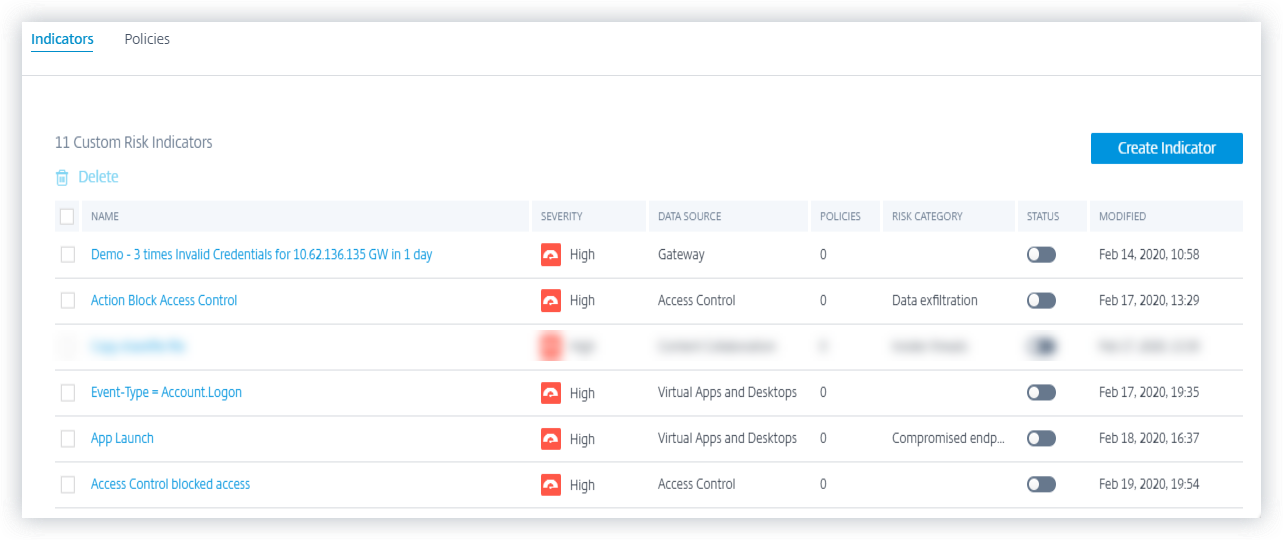
When you select the risk indicator, you are redirected to the Modify Risk Indicator page. For more information, see Modifying a custom risk indicator.
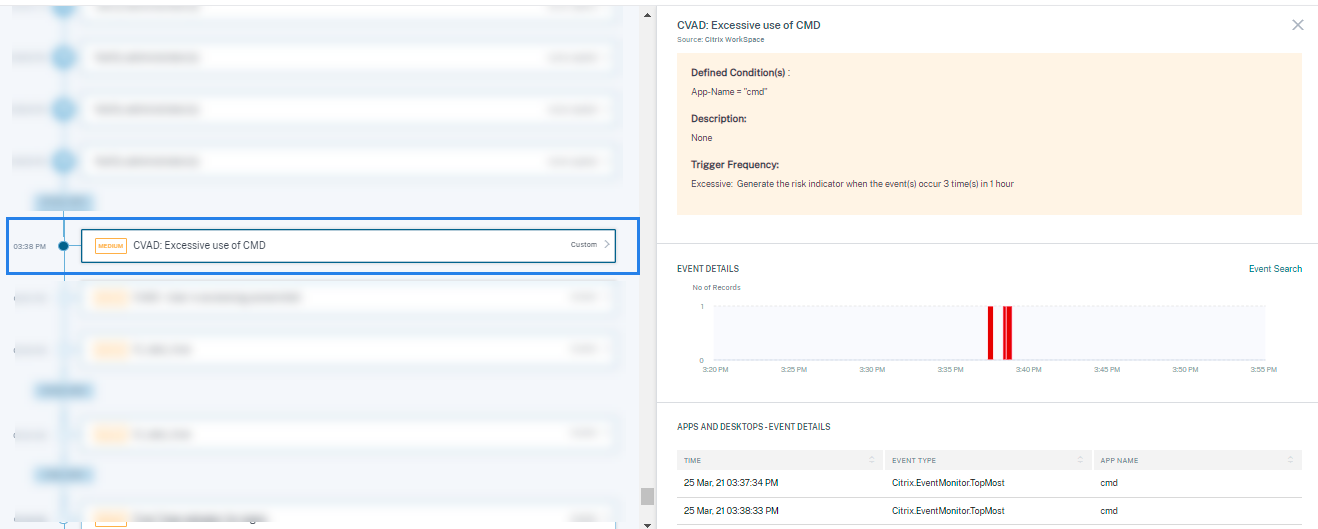
Analyzing a custom risk indicator
Consider a user whose action triggered a custom risk indicator that you have defined. Citrix Analytics displays the custom risk indicator on the user’s risk timeline.
When you select the custom risk indicator on the user’s risk timeline, the right pane displays the following information:
-
Defined Condition(s): Shows a summary of the conditions that you define while creating a custom risk indicator.
-
Description: Provides a summary of the description you provide while creating the custom risk indicator. If no description is provided while creating the custom risk indicator, this section reflects None.
-
Trigger Frequency: Displays the option that you select in the Advanced options section while creating the custom risk indicator.
-
Event Details: Displays the timeline and the details of the user events that triggered the custom risk indicator. You can click Event Search to view the user events on the self-service search page. The self-service search page displays the events associated with the user and the custom risk indicator. The search query shows the conditions defined for the custom risk indicator.
Note
Custom risk indicators are represented with a label on the user risk timeline.
Actions you can apply to the user
When a custom risk indicator is triggered for a user, you can apply an action manually or create a policy to apply an action automatically. For more information, see Policies and actions.
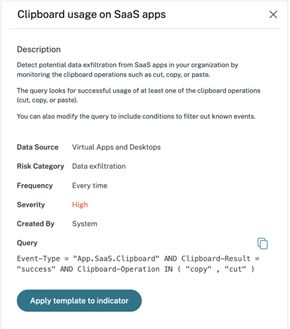
Custom risk indicator templates
You can create a custom risk indicator by using one of the predefined templates or proceed without using a template.
The templates act as a starting point for creating a custom risk indicator. It guides you to create a custom risk indicator by providing predefined queries and parameters that you can select based on your use cases.
You can use a template as is or modify it to meet your requirements. Using the templates, administrators can create risk indicators of interest with no additional training.
A template consists of the following information:
-
Description: Indicates the purpose of the query defined in the template.
-
Data source: Indicates the data source on which the template applies.
-
Risk category: Indicates the risk category associated with the events searched by the query. There are four categories of risky events- Data exfiltration, Insider threats, Compromised users, and Compromise end points. For information, see risk categories.
-
Frequency: Indicates the frequency at which the query triggers.
-
Severity: Indicates the severity of the risk associated with the event. The risk can be high, medium, or low.
-
Created by: Indicates the creator of the template. The templates are always system defined.
-
Query: Indicates the conditions defined in the template. The query retrieves the user events that satisfy the conditions.
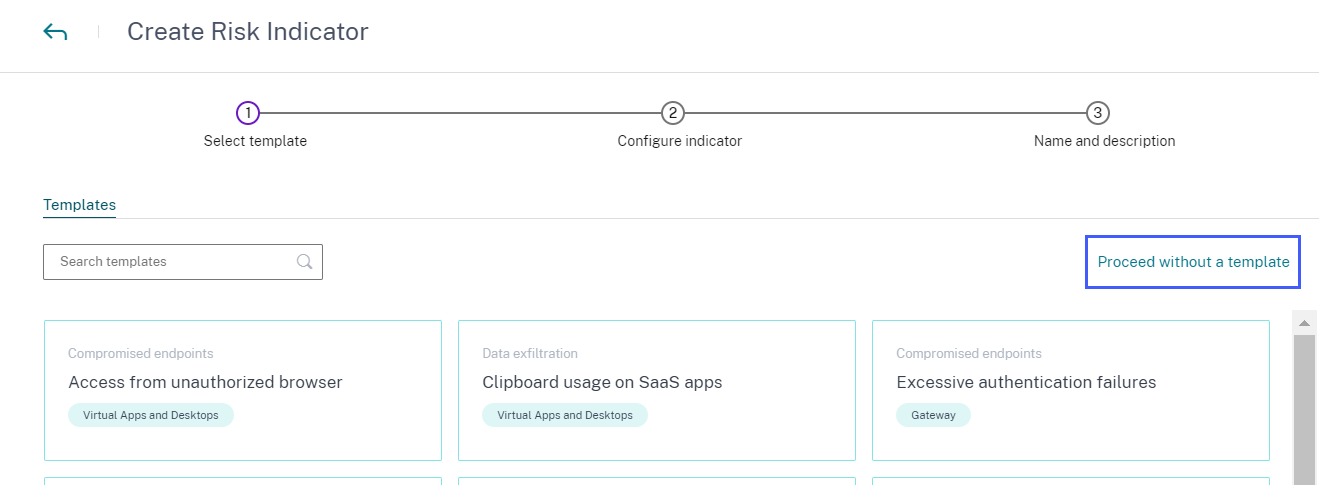
The following image shows the template for the use case-clipboard usage on SaaS apps.
If you don’t find a template for your use case or you want to define your own query, you can proceed without a template.
Creating a custom risk indicator
To create a custom risk indicator:
-
Navigate to Security > Custom Risk Indicators > Create Indicator.

-
Select a template to view the use case. If it meets your requirement, select Apply template to indicator.
Note
You can also modify the predefined conditions and the parameters of a template.
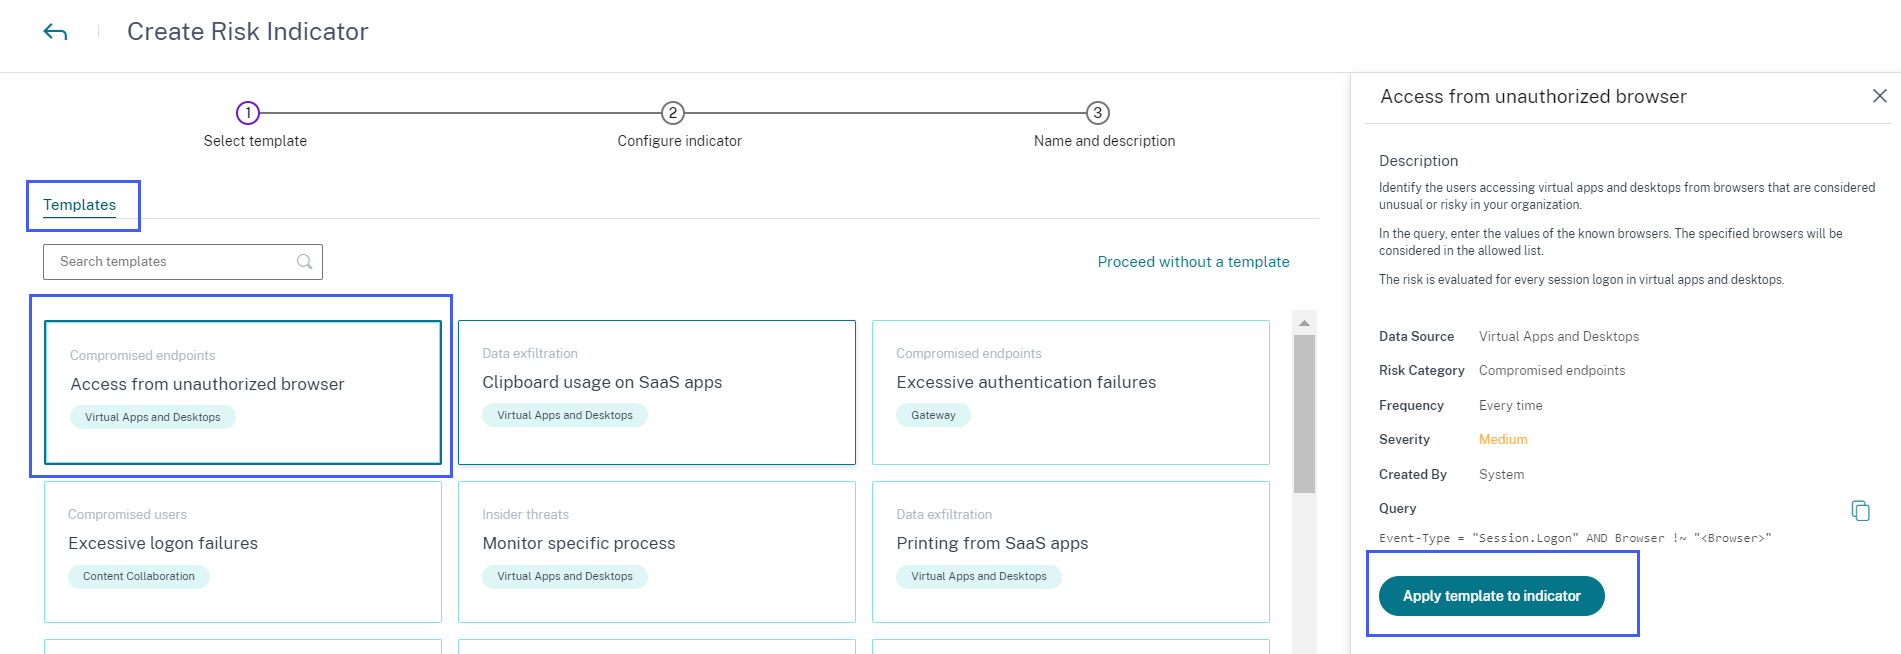
-
If you don’t find a desired template or want to create your own condition, select Proceed without a template.
-
Follow the onscreen instructions to create an indicator.
Notes
You can create custom risk indicators up to a maximum limit of 50. If you reach this maximum limit, you must either delete or edit any existing custom risk indicator to create a custom risk indicator.
When a custom risk indicator is triggered, it gets displayed on the user timeline immediately. However, the risk summary and the risk score of the user get updated after a few minutes (approximately 15- 20 minutes).
Defining a condition for a custom risk indicator
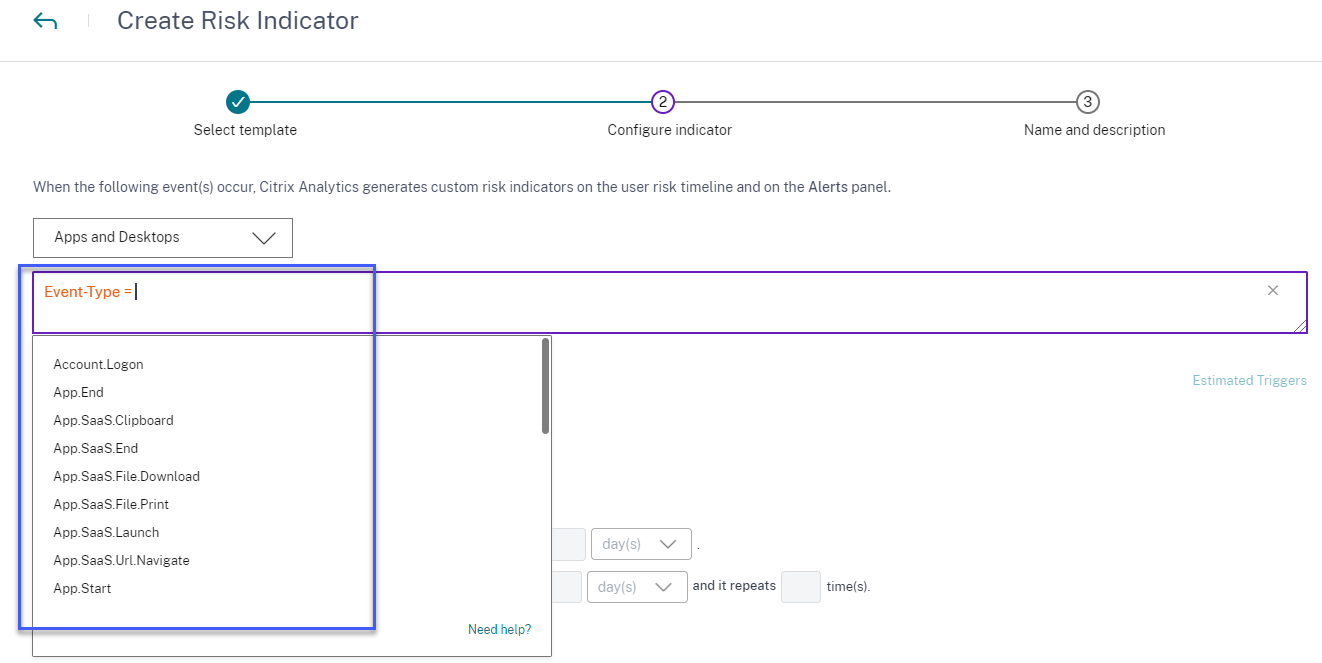
Use the query box to define your conditions for the custom risk indicator. Depending on the selected data source, you get the corresponding dimensions and the valid operators for defining your conditions.
When selecting certain dimensions like Event-Type and Clipboard-Operation along with a valid operator, the values of the dimension are shown automatically. You can choose a value from the suggested options or enter a new value depending on your requirements.
The following image shows the suggested values of the dimension Event-Type.
If you use a template, the condition is predefined. However, you can append or modify the predefined condition based on your use case.
Below the query box, you see the Estimated Triggers link. Click the link to predict the approximate instances of the custom risk indicator that would be triggered for the defined conditions. These instances are calculated based on the historical data that Citrix Analytics maintains and meets the defined conditions.
Ensure to click Estimated Triggers to predict the number of custom risk indicator occurrences for the last defined condition.
Using the advanced options
On the Advanced options section, select the frequency of the event to trigger the custom risk indicator. When you do not select any option, Citrix Analytics considers Every time: Generate the risk indicator every time the event(s) occur as the default option and generates the custom risk indicator. You can select one of the following options:
-
Every time: The risk indicator is triggered whenever the events meet the defined conditions.
-
First time: The risk indicator is triggered when the events meet the defined conditions for the first time.
-
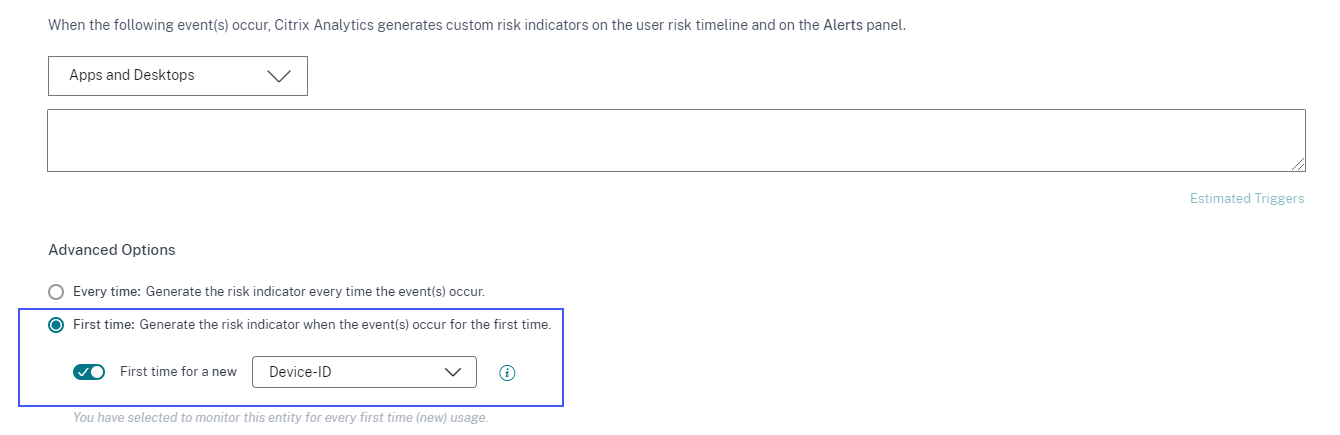
First time for a new: Enable this option to detect events received from a new entity for the first time. Some examples of the entities are Client IP, Country, City, and Device-ID. You can select only one entity based on the data source. This option allows you to create a risk indicator without specifying an explicit value for the entities. For example, when you select the entity as “City”, you need not specify the city name. The risk indicator is triggered when events are received from a new city for the first time.
The following table lists the entities corresponding to each data source and describes the trigger conditions.
Data source Entity Trigger condition Secure Private Access City When a user logs on from a new city for the first time. Client-IP When a user logs on from a new IP address for the first time. Country When a user logs on from a new country for the first time. Apps and Desktops App-Name When a user opens a new virtual application or a SaaS application for the first time. App-URL When a user enters a new app URL on a browser in their Virtual desktop for the first time. City When a user launches apps or desktops from a new city for the first time. Client-IP When a user logs on from a new IP address for the first time. Country When a user launches apps or desktops from a new country for the first time. Device-ID When a user launches virtual apps or virtual desktops from a new device such as a mobile, laptop, or desktop machine for the first time. Download-Device-Type When a user uses a new storage media such as a USB drive for the first time. Print-File-Format Format of the printed file. Print-File-Size Size of the printed file in bytes. Print-File-Name Name of the printed file. Printer-Name Name of the printer used. Total-Copies-Printed Total number of copies printed by the user. Total-Pages-Printed Total number of the document pages printed by the user. Gateway Client-IP When a user logs on from a new IP address for the first time. Secure Browser User-Name The name of the user who initiated the event. Access-Allowed Whether the user is allowed or denied access to the host service. Client-IP The IP address of the user device. Host-Name-Accessed The host service accessed by the user over the network. Session-ID The unique number assigned to the user session. The following example shows a custom risk indicator created for the Apps and Desktops data source. The risk indicator is triggered when a user launches a virtual desktop or a virtual app from a new device for the first time.
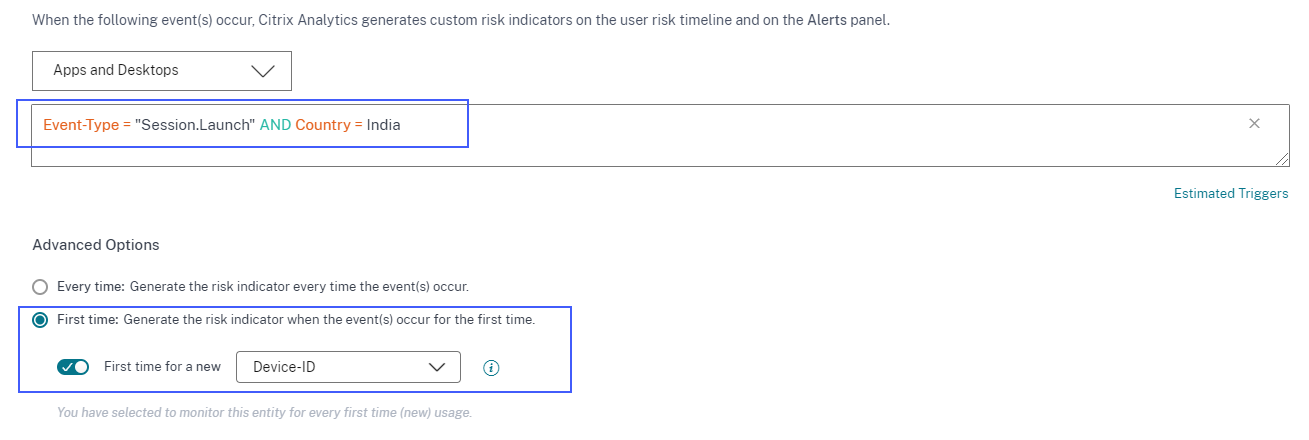
You can also add a condition along with the First time for a new option. In this case, the risk indicator is triggered when it detects the events from the new entity for the first time and when the events meet the defined condition.
The following example shows a condition defined for the custom risk indicator and the First time for a new Device-ID option enabled. The risk indicator is triggered when a user located in India launches a virtual desktop session from a new device for the first time.
-
-
Excessive: The risk indicator is triggered after the following conditions are met:
-
Events meet the defined conditions.
-
Events occur for a specified number of times during the specified period.
-
-
Frequent: The risk indicator is triggered after the following conditions are met:
-
The events meet the defined conditions.
-
The events occur for the specified number of times during the specified period.
-
The event pattern repeats for the specified number of times.
-
Selecting the risk category
Select the risk category for your custom risk indicator.
Risk indicators are grouped based on the type of risk exposure of the custom risk indicator. For assistance on the risk category selection, see Risk Categories.
Selecting the severity
Severity indicates the level of seriousness of a risky event, which is detected by the risk indicator. When you create a custom risk indicator, select a severity-high, medium, or low.
If you apply a template, the severity option is preselected. You can modify this preselection depending on your use case.
Supported operators for defining a condition
You can use the following operators while defining a condition.
| Operator | Description | Example | Output |
|---|---|---|---|
| Assign a value to the search query. | User-Name : John | Displays events for the user John. | |
| = | Assign a value to the search query. | User-Name = John | Displays events for the user John. |
| ~ | Search similar values. | User-Name ~ test | Displays events having similar user names. |
| ”” | Enclose values separated by spaces. | User-Name = “John Smith” | Displays events for the user John Smith. |
| <, > | Search for relational value. | Data Volume > 100 | Displays events where data volume is greater than 100 GB. |
| AND | Search values where both conditions are true. | User-Name : John AND Data Volume > 100 | Displays events of user John where data volume is greater than 100 GB. |
| * | Search values that match the character zero or more times. | User-Name = John* | Displays events for all user names that begin with John. |
| User-Name = John | Displays events for all user names that contain John. | ||
| User-Name = *Smith | Displays events for all user names that end with Smith. | ||
| !~ | Checks the user events for the matching pattern that you specify. This NOT LIKE operator returns the events that do not contain the matching pattern anywhere in the event string. | User-Name !~ John | Displays events for the users except John, John Smith, or any such users that contain the matching name “John”. |
| != | Checks the user events for the exact string that you specify. This NOT EQUAL operator returns the events that do not contain the exact string anywhere in the event string. | Country != USA | Displays events for the countries except USA. |
| IN | Assign multiple values to a dimension to get the events related to one or more values. | User-Name IN (John, Kevin) | Find all events related to John or Kevin. |
| NOT IN | Assign multiple values to a dimension and find the events that do not contain the specified values. | User-Name NOT IN (John, Kevin) | Find the events for all users except John and Kevin. |
| IS EMPTY | Checks for null value or empty value for a dimension. This operator works for only string type dimensions such as App-Name, Browser, and Country. It does not work for non-string (number) type dimensions such as Upload-File-Size, Download-File-Size, and Client-IP. |
Country IS EMPTY | Find events where the country name is not available or empty (not specified). |
| IS NOT EMPTY | Checks for not null value or a specific value for a dimension. This operator works for only string type dimensions such as App-Name, Browser, and Country. It does not work for non-string (number) type dimensions such as Upload-File-Size, Download-File-Size, and Client-IP. |
Country IS NOT EMPTY | Find events where the country name is available or specified. |
| OR | Searches for values where either or both conditions are true. | (User-Name = John* OR User-Name = *Smith) AND Event-Type = “Session.Logon” |
Displays Session.Logon events for all user names that begin with John or end with Smith. |
Note
For the NOT EQUAL operator, while entering the values for the dimensions in your condition, use the exact values available on the self-service search page for a data source. The dimension values are case-sensitive.
Modifying a custom risk indicator
-
Navigate to Security > Custom Risk Indicators.
-
Select the custom risk indicator that you want to modify.
-
On the Modify Indicator page, modify the information as required.
-
Click Save Changes.
Note
If you modify the attributes such as condition, risk category, severity, and name of an existing custom risk indicator, on the user timeline, you can still view the previous occurrences of the custom risk indicator (with the old attributes) that were triggered for the user.
For example, you have created a custom risk indicator with the condition Country != India. So, this custom risk indicator is triggered when a user logs on from outside the country India. Now, you modify the condition of the custom risk indicator to Country != “United States”. In this case, you can still view the previous occurrences of the custom risk indicator with the condition Country != India on the user timelines who triggered the risk indicator.
Deleting a custom risk indicator
-
Navigate to Security > Custom Risk Indicators.
-
Select the custom risk indicator that you want to delete.
-
Click Delete.
-
In the dialog, confirm your request to delete the custom risk indicator.
Note
If you delete a custom risk indicator, on the user timeline, you can still view the previous occurrences of the custom risk indicator that were triggered for the user.
For example, you delete an existing custom risk indicator with the condition Country != India. In this case, you can still view the previous occurrences of the custom risk indicator with the condition Country != India on the user timelines who triggered the risk indicator.
In this article
- Preconfigured custom risk indicators
- Custom risk indicators page
- Analyzing a custom risk indicator
- Actions you can apply to the user
- Custom risk indicator templates
- Creating a custom risk indicator
- Supported operators for defining a condition
- Modifying a custom risk indicator
- Deleting a custom risk indicator