Create a single Fully Qualified Domain Name (FQDN) to access a store internally and externally
Note: To use this feature with native desktop receivers, the following versions are required.
- Windows Receiver 4.2
- MAC Receiver 11.9
You can provide access to resources from within your corporate network and from the Internet through a NetScaler Gateway and simplify the user experience by creating a single FQDN for both internal and roaming external clients.
Creating a single FQDN is helpful to users who configure any of the native Receivers. They need remember only a single URL whether they are currently connected to an internal or public network.
StoreFront beacons for native Receivers
Citrix Receiver attempts to contact beacon points and uses the responses to determine whether users are connected to local or public networks. When a user accesses a desktop or application, the location information is passed to the server providing the resource so that appropriate connection details can be returned to Citrix Receiver. This ensures that users are not prompted to log on again when they access a desktop or application. For information about configuring beacon points, see Configure beacon points.
Configure the NetScaler Gateway vServer and SSL Certificate
The shared FQDN resolves either to an external firewall router interface IP or NetScaler Gateway vServer IP in the DMZ when external clients try to access resources from outside of the corporate network. Ensure the Common Name and Subject Alternative Name fields of the SSL certificate contain the shared FQDN to be used to access the store externally. By using a third party root CA such as Verisign instead of an enterprise Certification Authority (CA) to sign the gateway certificate, any external client automatically trusts the certificate bound to the gateway vServer. If you use a third party root CA such as Verisign, no additional root CA certificates need to be imported on to external clients.
To deploy a single certificate with the Common Name of the shared FQDN to both the NetScaler Gateway and the StoreFront server, consider whether you want to support remote discovery. If so, make sure the certificate follows the specification for the Subject Alternative Names.
NetScaler Gateway vServer example certificate: storefront.example.com
-
Ensure that the shared FQDN, the callback URL, and the accounts alias URL are included in the DNS field as Subject Alternative Name (SANs).
-
Ensure that the private key is exportable so the certificate and key can be imported into the NetScaler Gateway.
-
Ensure that Default Authorization is set to Allow.
-
Sign the certificate using a third party CA such as Verisign or an enterprise root CA for your organization.
Two-node server group example SANs:
storefront.example.com (mandatory)
storefrontcb.example.com (mandatory)
accounts.example.com (mandatory)
storefrontserver1.example.com (optional)
storefrontserver2.example.com (optional)
Sign the Netscaler Gateway vServer SSL certificate using a Certification Authority (CA)
Based on your requirements, you have two options for choosing the type of CA signed certificate.
-
Option 1 - Third Party CA signed certificate: If the certificate bound to the Netscaler Gateway vServer is signed by a trusted third party, external clients will likely NOT need any root CA certificates copied to the their trusted root CA certificate stores. Windows clients ship with the root CA certificates of the most common signing agencies. Examples of commercial third party CAs that could be used include DigiCert, Thawte, and Verisign. Note that mobile devices such as iPads, iPhones, and Android tablets and phones might still require the root CA to be copied onto the device to trust the NetScaler Gateway vServer.
-
Option 2 - Enterprise Root CA signed certificate: If you choose this option, every external client requires the enterprise root CA certificate copied to their trusted root CA stores. If using portable devices with native Receiver installed, such as iPhones and iPads, create a security profile on these devices.
Import the root certificate into portable devices
- iOS devices can import .CER x.509 certificate files using email attachments, because accessing the local storage of iOS devices is usually not possible.
- Android devices require the same .CER x.509 format. The certificate can be imported from the device local storage or email attachments.
External DNS: storefront.example.com
Ensure that the DNS resolution provided by your organization’s Internet service provider resolves to the externally facing IP of the firewall router on the outside edge of DMZ or to the NetScaler Gateway vServer VIP.
Split view DNS
- When split-view DNS is correctly configured, the source address of the DNS request should send the client to the correct DNS A record.
- When clients roam between public and corporate networks, their IP should change. Depending on the network to which they are currently connected, they should receive the correct A record when they query storefront.example.com.
Import certificates issued from a Windows CA to NetScaler Gateway
WinSCP is a useful and free third party tool to move files from a Windows machine to a NetScaler Gateway file system. Copy certificates for import to the /nsconfig/ssl/ folder within the NetScaler Gateway file system. You can use the OpenSSL tools on the NetScaler Gateway to extract the certificate and key from a PKCS12/PFX file to create two separate .CER and .KEY X.509 files in PEM format that can be used by the NetScaler Gateway
- Copy the PFX file into /nsconfig/ssl on the NetScaler Gateway appliance or VPX.
- Open the NetScaler Gateway command line interface.
- To switch to the FreeBSD shell, type Shell to exit the NetScaler Gateway command line interface.
- To change directory, use cd /nsconfig/ssl.
- Run openssl pkcs12 -in <imported cert file>.pfx -nokeys -out <certfilename>.cer and enter the PFX password when prompted.
- Run openssl pkcs12 -in <imported cert file>.pfx -nocerts -out <keyfilename>.key
- Enter the PFX password when prompted and then set a private key PEM passphrase to protect the .KEY file.
- To ensure that the .CER and .KEY files were successfully created inside /nsconfig/ssl/, run ls –al.
- To return to the NetScaler Gateway command line interface, type Exit.
Native Windows/Mac Receiver Gateway session policy
REQ.HTTP.HEADER User-Agent CONTAINS CitrixReceiver && REQ.HTTP.HEADER X-Citrix-Gateway EXISTS
Receiver for Web Gateway session policy
REQ.HTTP.HEADER User-Agent NOTCONTAINS CitrixReceiver && REQ.HTTP.HEADER Referer EXISTS
cVPN and Smart Access Settings
If you use SmartAccess, enable smart access mode on the NetScaler Gateway vServer properties page. Universal Licenses are required for every concurrent user who accesses remote resources.
Receiver profile

Configure the session profile accounts service URL to be https://accounts.example.com/Citrix/Roaming/Accounts NOT https://storefront.example.com/Citrix/Roaming/Accounts.

Also add this URL as an additional <allowedAudiences> in the authentication and roaming web.config files on the StoreFront server. For more information, see the “Configure the StoreFront server host base URL, gateway, and SSL certificate” section below.
Receiver for Web profile

ICA Proxy & Basic Mode settings
If you use ICA proxy, enable basic mode on the NetScaler Gateway vServer properties page. Only a Netscaler platform license is required.
Receiver profile


Receiver for Web profile


Configure the StoreFront server host base URL, gateway, and SSL certificate
The same shared FQDN that resolves to the NetScaler Gateway vServer should also resolve directly to the StoreFront load balancer, if a StoreFront cluster was created or a single StoreFront IP that hosts the store.
Internal DNS: Create three DNS A records.
-
storefront.example.comshould resolve to the storefront load balancer or single StoreFront server IP. -
storefrontcb.example.comshould resolve to the gateway vServer VIP so if a firewall exists between the DMZ and the enterprise local network, allow for this. -
accounts.example.com— create as a DNS alias forstorefront.example.com. It also resolves to the load balancer IP for the StoreFront cluster or a single StoreFront server IP.
StoreFront server example certificate: storefront.example.com
-
Create a suitable certificate for the StoreFront server or server group before installing StoreFront.
-
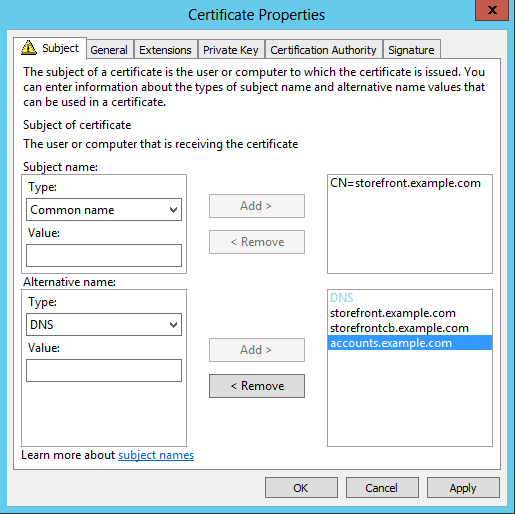
Add the shared FQDN to the Common name and DNS fields. Ensure this matches the FQDN used in the SSL certificate bound to the NetScaler Gateway vServer that you created earlier or use the same certificate bound to the NetScaler Gateway vServer.
-
Add the accounts alias (
accounts.example.com) as another SAN to the certificate. Note that the accounts alias used in the SAN is the one used in the Netscaler Gateway Session Profile in the earlier procedure - Native Receiver Gateway session policy and profile.![]()
-
Ensure that the private key is exportable so the certificate can be transferred to another server or to multiple StoreFront server group nodes.
![]()
-
Sign the certificate using a third party CA such as VeriSign, your enterprise root CA, or intermediate CA.
-
Export the certificate in PFX format including the private key.
-
Import the certificate and private key into the StoreFront server. If deploying a Windows NLB StoreFront cluster, import the certificate into every node. If using an alternative load balancer such as a Netscaler LB vServer, import the certificate there instead.
-
Create an HTTPS binding in IIS on the StoreFront server and bind the imported SSL certificate to it.
![]()
-
Configure the host base URL on the StoreFront server to match the already chosen shared FQDN.
Note: StoreFront always auto selects the last Subject Alternative Name in the list of SANs within the certificate. This is merely a suggested host base URL to assist StoreFront administrators and is usually correct. You can manually set it to any valid HTTPS://<FQDN> provided it exists within the certificate as a SAN. Example:
https://storefront.example.com


Configure the Gateway on the StoreFront server: storefront.example.com
1. From the Stores node, click on Manage NetScaler Gateways in the Actions pane.
2. Select the Gateway from the list and click Edit.

3. On the General Settings page, type the shared FQDN in the NetScaler Gateway URL field.
4. Select the Authentication Settings tab and type the callback FQDN into the Callback URL field.

5. Select the Secure Ticket Authority tab and ensure that the Secure Ticket Authority (STA) servers match the list of delivery controllers already configured within the Store node.
6. Enable remote access for the store.
7. Manually set the internal beacon to the accounts alias (accounts.example.com) and it must not be resolvable from outside the gateway. This FQDN must be distinct from the external beacon that is shared by the StoreFront hostbase URL and NetScaler Gateway vServer (storefront.example.com). DO NOT use the shared FQDN, as this creates a situation where both the internal and external beacons are identical.

8. Note that if you want to support discovery using FQDNs, follow these steps. If the provisioning file configuration is enough or if you are using only Receiver for Web, you can skip the following steps.
Add an additional <allowedAudiences> entry in C:\inetpub\wwwroot\Citrix\Authentication\web.config. There are two <allowedAudiences> entries in the authentication web.config file. Only the first entry in the file for the Authentication Token Producer requires you to add an additional <allowedAudience>.
9. Perform a search for the <allowedAudiences> string. Locate the following entry below and add the line shown in bold, save, and close the web.config file.
<service id=”abd6f54b-7d1c-4a1b-a8d7-14804e6c8c64” displayName=”Authentication Token Producer”>
……….
………. <allowedAudiences> <add name=”https-storefront.example.com” audience=”https://storefront.example.com/” /> ** <add name=”https-accounts.example.com” audience=”https://accounts.example.com/” />** </allowedAudiences>
9. In C:\inetpub\wwwroot\Citrix\Roaming\web.config. Locate the following entry below and add the line shown in bold, save, and close the web.config file.
<tokenManager> <services> <clear /> ……….
……….
               \</trustedIssuers\>
               \<allowedAudiences\>
                   \<add name="https-storefront.example.com" audience="https://storefront.example.com/" /\>
                           **\<add name="https-accounts.example.com" audience="https://accounts.example.com/" /\>**
                   \</allowedAudiences\>
                 \</service\>
               \</services\>
             \</tokenManager\>
Alternatively, it is possible to export the native receiver .CR provisioning file for the store. This eliminates the need for First Time Use configuration of native Receivers. Distribute this file to all Windows and MAC Receiver clients.

If a Receiver is installed on the client, the .CR file type is recognized and double clicking on the provisioning file triggers it to be automatically imported.
