Configure the authentication service
Manage authentication methods
You can enable or disable user authentication methods set up when the authentication service was created by selecting an authentication method in the results pane of the Citrix StoreFront management console and, in the Actions pane, clicking Manage Authentication Methods.
- On the Windows Start screen or Apps screen, locate and click the Citrix StoreFront tile.
- Select the Store node in the left pane of the Citrix StoreFront management console and, in the Actions pane, click Manage Authentication Methods.
- Specify the access methods that you want to enable for your users.

- Select the Username and password check box to enable explicit authentication. Users enter their credentials when they access their stores.
- Select the SAML Authentication check box to enable integration with a SAML Identity Provider. Users authenticate to an Identity Provider and are automatically logged when they access their stores. From the Settings drop-down menu:
- Select Identity Provider to configure the trust to the Identity Provider.
- Select Service Provider to configure the trust for the Service Provider. This information is required by the Identity Provider.
- Select the Domain pass-through check box to enable pass-through of Active Directory domain credentials from users’ devices. Users authenticate to their domain-joined Windows computers and are automatically logged on when they access their stores. In order to use this option, pass-through authentication must be enabled when Citrix Receiver for Windows is installed on users’ devices.
- Select the Smart card check box to enable smart card authentication. Users authenticate using smart cards and PINs when they access their stores.
- Select the HTTP Basic check box to enable HTTP Basic authentication. Users authenticate with the StoreFront server’s IIS web server.
- Select the Pass-through from NetScaler Gateway check box to enable pass-through authentication from NetScaler Gateway. Users authenticate to NetScaler Gateway and are automatically logged on when they access their stores.
To enable pass-through authentication for smart card users accessing stores through NetScaler Gateway, use the Configure Delegated Authentication task.
Configure trusted user domains
Use the Trusted Domains task to restrict access to stores for users logging on with explicit domain credentials, either directly or using pass-through authentication from NetScaler Gateway.
-
On the Windows Start screen or Apps screen, locate and click the Citrix StoreFront tile.
-
Select the Stores node in the left pane of the Citrix StoreFront management console and, in the results pane, select the appropriate authentication method. In the Actions pane, click Manage Authentication Methods.
-
From the User name and password (explicit) > Settings drop-down menu, select Configure Trusted Domains.
-
Select Trusted Domains only and click Add to enter the name of a trusted domain. Users with accounts in that domain will be able to log on to all stores that use the authentication service. To modify a domain name, select the entry in the Trusted domains list and click Edit. Select a domain in the list and click Remove to discontinue access to stores for user accounts in that domain.
The way in which you specify the domain name determines the format in which users must enter their credentials. If you want users to enter their credentials in domain user name format, add the NetBIOS name to the list. To require that users enter their credentials in user principal name format, add the fully qualified domain name to the list. If you want to enable users to enter their credentials in both domain user name format and user principal name format, you must add both the NetBIOS name and the fully qualified domain name to the list.
-
If you configure multiple trusted domains, select from the Default domain list the domain that is selected by default when users log on.
-
If you want to list the trusted domains on the logon page, select the Show domains list in logon page check box.
Enable users to change their passwords
Use the Manage Password Options task to enable desktop Receivers and Receiver for Web site users logging on with domain credentials to change their passwords. When you create the authentication service, the default configuration prevents Citrix Receiver and Citrix Receiver for Web site users from changing their passwords, even if the passwords have expired. If you decide to enable this feature, ensure that the policies for the domains containing your servers do not prevent users from changing their passwords. Enabling users to change their passwords exposes sensitive security functions to anyone who can access any of the stores that use the authentication service. If your organization has a security policy that reserves user password change functions for internal use only, ensure that none of the stores are accessible from outside your corporate network.
-
Citrix Receiver for Web supports password changes on expiration, as well as elective password changes. All desktop Citrix Receivers support password change through NetScaler Gateway on expiration only. On the Windows Start screen or Apps screen, locate and click the Citrix StoreFront tile.
-
Select the Stores node in the left pane of the Citrix StoreFront management console and in the Actions pane, click Manage Authentication Methods.
-
From the User name and passwords > Settings drop-down menu select Manage Password Options, specify the circumstances under which Citrix Receiver for Web site users logging on with domain credentials are able to change their passwords.
- To enable users to change their passwords whenever they want, select At any time. Local users whose passwords are about to expire are shown a warning when they log on. Password expiry warnings are only displayed to users connecting from the internal network. By default, the notification period for a user is determined by the applicable Windows policy setting. For more information about setting custom notification periods, see Configure the password expiry notification period. Supported only with Citrix Receiver for Web.
- To enable users to change their passwords only when the passwords have already expired, select When expired. Users who cannot log on because their passwords have expired are redirected to the Change Password dialog box. Supported for desktop Citrix Receivers and Citrix Receiver for Web.
- To prevent users from changing their passwords, do not select Allow users to change passwords. If you do not select this option, you must make your own arrangements to support users who cannot access their desktops and applications because their passwords have expired.
If you enable Citrix Receiver for Web site users to change their passwords at any time, ensure that there is sufficient disk space on your StoreFront servers to store profiles for all your users. To check whether a user’s password is about to expire, StoreFront creates a local profile for that user on the server. StoreFront must be able to contact the domain controller to change users’ passwords.
Citrix Receivers User can change an expired password if enabled on StoreFront User is notified that password will expire User can change password before it expires if enabled on StoreFront Windows Yes Mac Yes Android iOS Linux Yes Web Yes Yes Yes
Self-Service Password Reset security questions
Self-Service Password Reset enables end users to have greater control over their user accounts. Once you configure Self-Service Password Reset, if end users have problems logging on to their systems, they can unlock their accounts or reset their passwords to something new by correctly answering several security questions.
When setting up Self-Service Password Reset, you specify which users are able to perform password resets and unlock their accounts using the management console. If you enable these features for the StoreFront, users might still be denied permission to perform these tasks based on the settings configured in the Self-Service Password Reset configuration console.
Self-Service Password Reset is available only to users accessing StoreFront using HTTPS connections. They cannot access StoreFront using an HTTP connection and have Self-Service Password Reset available. Self-Service Password Reset is available only when authenticating directly to StoreFront with a user name and password.
Self-Service Password Reset does not support UPN logons, such as username@domain.com.
Before configuring Self-Service Password Reset for a store, you must ensure that:
- The store is configured to use user name and password authentication.
- The store is configured to use only one Self-Service Password Reset. If StoreFront is configured to use multiple farms within the same or trusted domains, you must configure Self-Service Password Reset to accept credentials from all of those domains.
- The store is configured to allow users to change their password at any time if you want to enable password reset functionality.
- You must associate a StoreFront store with a Receiver for Web site, and you must configure that site to use the unified experience.
Before being able to use Self-Service Password Reset, you must install and configure it. It is available on the XenApp and XenDesktop media. For information, see the Self-Service Password Reset documentation.
- Enable Self-Service Password Reset support in StoreFront by selecting the Stores node in the left pane of the Citrix StoreFront management console and in the Actions pane, click Manage Authentication Methods > User name and Password, and choose Manage Password Options from the drop-down menu.
- Choose when you want users to change passwords and click OK.
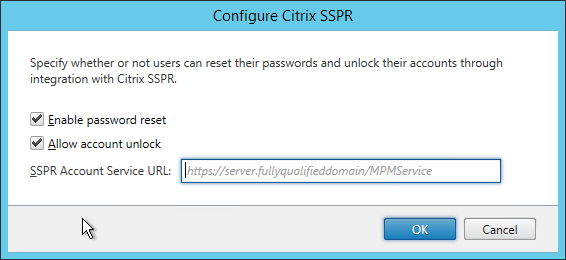
- From the User name and passwords drop-down menu, choose Configure Account Self-Service, select Citrix SSPR from the drop-down menu, and click OK.
- Specify whether or not users can reset their passwords and unlock their accounts with Self-Service Password Reset, add the Password Reset Service account URL, click OK, and then click OK.

This option is available only when the StoreFront base URL is HTTPS (not HTTP) and the Enable password reset option is available only after you use Manage Password Options to allow users to change passwords at any time.
The next time the user logs on to Citrix Receiver or Citrix Receiver for Web, security enrollment is available. After clicking Start, questions are displayed to which the user must specify answers.

Once configured in StoreFront, users see the Account Self-Service link on the Citrix Receiver for Web logon screen (it displays as a button in other Citrix Receivers).
Clicking this link takes the user through a series of forms to first select between Unlock account and Reset password (if both are available).
After choosing a radio button and clicking Next, the next screen prompts for a domain and username (domain\user) if that information was not entered in the log on form. Note that account self-service does not support UPN log ons, such as username@domain.com
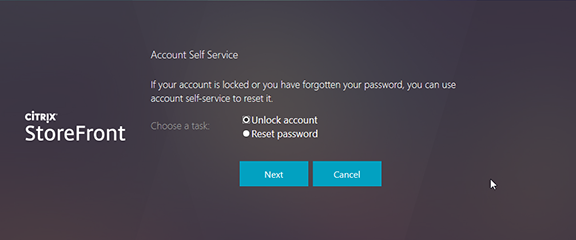
They are required to answer the security question. If all the answers match those supplied by the user, the requested operation (unlock or reset) is performed and the user is notified that it succeeded.
Shared authentication service settings
Use the Shared Authentication Service Settings task to specify stores that will share the authentication service enabling single sign on between them.
- On the Windows Start screen or Apps screen, locate and click the Citrix StoreFront tile.
- Select the Stores node in the left pane of the Citrix StoreFront management console and, in the results pane, select a store. In the Actions pane, click Manage Authentication Methods.
- From the Advanced drop-down menu, select Shared authentication service settings.
- Click the Use shared authentication service check box and select a store from the Store name drop-down menu.
Note: There is no functional difference between a shared and dedicated authentication service. An authentication service shared by more than two stores is treated as a shared authentication service and any configuration changes affect the access to all the stores using the shared authentication service.
Delegate credential validation to NetScaler Gateway
Use the Configure Delegated Authentication task to enable pass-through authentication for smart card users accessing stores through NetScaler Gateway. This task is only available when Pass-through from NetScaler Gateway is enabled and selected in the results pane.
When credential validation is delegated to NetScaler Gateway, users authenticate to NetScaler Gateway with their smart cards and are automatically logged on when they access their stores. This setting is disabled by default when you enable pass-through authentication from NetScaler Gateway, so that pass-through authentication only occurs when users log on to NetScaler Gateway with a password.