Set up highly available multi-site stores
For stores that aggregate resources from multiple deployments, particularly geographically dispersed deployments, you can configure load balancing and failover between deployments, mapping of users to deployments, and specific disaster recovery deployments to provide highly available resources. Where you have configured separate NetScaler Gateway appliances for your deployments, you can define the optimal appliance for users to access each of the deployments.
Since StoreFront 3.5, the StoreFront management console has supported common multi-site scenarios. Citrix recommends you use the management console when it meets your requirements.
Configure user mapping and aggregation
The StoreFront management console enables you to:
- Map users to deployments: Based on Active Directory group membership, you can limit which users have access to particular deployments.
- Aggregate deployments: You can specify which deployments have resources that you want to aggregate. Matching resources from aggregated deployments are presented to the user as a single highly-available resource.
- Associate a zone with a deployment: When accessed with NetScaler Gateway in a global load-balancing configuration, StoreFront prioritizes deployments from zones matching the gateway zone when launching resources.
Important: In multiple server deployments, use only one server at a time to make changes to the configuration of the server group. Ensure that the Citrix StoreFront management console is not running on any of the other servers in the deployment. Once complete, propagate your configuration changes to the server group so that the other servers in the deployment are updated.
- Ensure that you have configured the store with details of all the XenDesktop and XenApp deployments that you want to use in your configuration. For more information about adding deployments to stores, see Manage the resources made available in stores.
- On the Windows Start screen or Apps screen, locate and click the Citrix StoreFront tile.
- Select the Stores node in the left pane of the Citrix StoreFront management console and click Manage Delivery Controllers in the Actions pane.
- If two or more controllers are defined, click User Mapping and Multi-Site Aggregation Configuration > Configure.
- Click Map users to controllers and make selections on the screens to specify which Delivery Controllers are available to which users.
- Click Aggregate resources, choose controllers, and click Aggregate to specify whether or not Delivery Controllers are aggregated. If you enable aggregation of Delivery Controllers, applications and desktops from those Delivery Controllers with the same display name and path are presented as a single application/desktop in Citrix Receiver.
-
Choose one, or both, of the Aggregated Controller Settings check boxes and click OK.
Controllers publish identical resources - When checked, StoreFront enumerates resources from only one of the controllers in the aggregated set. When unchecked, StoreFront enumerates resources from all controllers in the aggregated set (to accumulate the user’s entire set of available resources). Checking this option gives a performance improvement when enumerating resources, but we do not recommend it unless you are certain that the list of resources is identical across all aggregated deployments.
Load balance resources across controllers - When checked, launches are distributed evenly among the available controllers. When unchecked, launches are directed to the first controller specified in the user mapping dialog screen, failing over to subsequent controllers if the launch fails.
Advanced configurations
Although you can configure many common multi-site and high availability operations with the StoreFront management console, you can still configure StoreFront using the configuration files in the same manner as earlier StoreFront versions.
Extra functionality available using PowerShell or by editing the StoreFront configuration files:
- The ability to specify multiple groupings of deployments for aggregation.
- The management console allows only a single grouping of deployments, which is sufficient for most cases.
- For stores with many deployments with disjointed sets of resources, multiple groupings might give performance improvements.
- The ability to specify complex preference orders for aggregated deployments. The management console allows aggregated deployments to be load balanced or to be used as a single failover list.
- The ability to define disaster recovery deployments (deployments accessed only when all other deployments are unavailable).
Warning: After configuring advanced multi-site options by manually editing the configuration file, some tasks become unavailable in the Citrix StoreFront management console to prevent misconfiguration.
Important: In multiple server deployments, use only one server at a time to make changes to the configuration of the server group. Ensure that the Citrix StoreFront management console is not running on any of the other servers in the deployment. Once complete, propagate your configuration changes to the server group so that the other servers in the deployment are updated.
-
Ensure that you have configured the store with details of all the XenDesktop and XenApp deployments that you want to use in your configuration, including disaster recovery deployments. For more information about adding deployments to stores, see Manage the resources made available in stores.
-
Use a text editor to open the web.config file for the store, which is typically located in the C:\inetpub\wwwroot\Citrix\storename\ directory, where storename is the name specified for the store when it was created.
-
Locate the following section in the file.
<resourcesWingConfigurations> <resourcesWingConfiguration name=”Default” wingName=”Default” /> </resourcesWingConfigurations>
-
Specify your configuration as shown below.
<resourcesWingConfigurations> <resourcesWingConfiguration name=”Default” wingName=”Default”> <userFarmMappings> <clear /> <userFarmMapping name=”user_mapping”> <groups> <group name=”domain\usergroup” sid=”securityidentifier” /> <group … /> … </groups> <equivalentFarmSets> <equivalentFarmSet name=”setname” loadBalanceMode=”{LoadBalanced | Failover}” aggregationGroup=”aggregationgroupname”> <primaryFarmRefs> <farm name=”primaryfarmname” /> <farm … /> … </primaryFarmRefs> <backupFarmRefs> <farm name=”backupfarmname” /> <farm … /> … </backupFarmRefs> </equivalentFarmSet> <equivalentFarmSet … > … </equivalentFarmSet> </equivalentFarmSets> </userFarmMapping> <userFarmMapping> … </userFarmMapping> </userFarmMappings> </resourcesWingConfiguration> </resourcesWingConfigurations>
Use the following elements to define your configuration.
- userFarmMapping Specifies groups of deployments and defines the load balancing and failover behavior between those deployments. Identifies deployments to be used for disaster recovery. Controls user access to resources by mapping Microsoft Active Directory user groups to the specified groups of deployments.
-
groups
Specifies the names and security identifiers (SIDs) of Active Directory user groups to which the associated mapping applies. User group names must be entered in the format domain\usergroup. Where more than one group is listed, the mapping is only applied to users who are members of all the specified groups. To enable access for all Active Directory user accounts, set the group name & sid to everyone. -
equivalentFarmSet
Specifies a group of equivalent deployments providing resources to be aggregated for load balancing or failover, plus an optional associated group of disaster recovery deployments.The loadBalanceMode attribute determines the allocation of users to deployments. Set the value of the loadBalanceMode attribute to LoadBalanced to randomly assign users to deployments in the equivalent deployment set, evenly distributing users across all the available deployments. When the value of the loadBalanceMode attribute is set to Failover, users are connected to the first available deployment in the order in which they are listed in the configuration, minimizing the number of deployments in use at any given time. Specify names for aggregation groups to identify equivalent deployment sets providing resources to be aggregated. Resources provided by equivalent deployment sets belonging to the same aggregation group are aggregated. To specify that the deployments defined in a particular equivalent deployment set should not be aggregated with others, set the aggregation group name to the empty string ”“.
The identical attribute accepts the values true and false, and specifies whether all deployments within an equivalent deployment set provide exactly the same set of resources. When the deployments are identical, StoreFront enumerates the user’s resources from just one primary deployment in the set. When the deployments provide overlapping but not identical resources, StoreFront enumerates from each deployment to obtain the full set of resources available to a user. Load balancing (at launch time) can take place whether or not the deployments are identical. The default value for the identical attribute is false, although it is set to true when StoreFront is upgraded to avoid altering the pre-existing behavior following an upgrade.
-
primaryFarmRefs
Specifies a set of equivalent XenDesktop or XenApp sites where some or all of the resources match. Enter the names of deployments that you have already added to the store. The names of the deployments you specify must match exactly the names you entered when you added the deployments to the store. -
optimalGatewayForFarms
Specifies groups of deployments and defines the optimal NetScaler Gateway appliances for users to access resources provided by these deployments. Typically, the optimal appliance for a deployment is colocated in the same geographical location as that deployment. You only need to define optimal NetScaler Gateway appliances for deployments where the appliance through which users access StoreFront is not the optimal appliance.
Configure subscription synchronization
To configure periodic pull synchronization of users’ application subscriptions from stores in different StoreFront deployments, you execute Windows PowerShell commands.
Note: The StoreFront and PowerShell consoles cannot be open at the same time. Always close the StoreFront admin console before using the PowerShell console to administer your StoreFront configuration. Likewise, close all instances of PowerShell before opening the StoreFront console.
Important: In multiple server deployments, use only one server at a time to make changes to the configuration of the server group. Ensure that the Citrix StoreFront management console is not running on any of the other servers in the deployment. Once complete, propagate your configuration changes to the server groups so that the other servers in the deployment are updated.
When establishing your subscription synchronization, note that the configured Delivery Controllers must be named identically between the synchronized Stores and that the Delivery Controller names are case sensitive. Failing to duplicate the Delivery Controller names exactly may lead to users having different subscriptions across the synchronized Stores.
-
Use an account with local administrator permissions to start Windows PowerShell and, at a command prompt, type the following commands to import the StoreFront modules.
Import-Module "installationlocation\Management\Cmdlets\UtilsModule.psm1"
Import-Module "installationlocation\Management\Cmdlets\
  SubscriptionSyncModule.psm1"
<!--NeedCopy-->
Where installationlocation is the directory in which StoreFront is installed, typically C:\Program Files\Citrix\Receiver StoreFront\.
-
To specify the remote StoreFront deployment containing the store to be synchronized, type the following command.
Add-DSSubscriptionsRemoteSyncCluster -clusterName deploymentname
  -clusterAddress deploymentaddress
<!--NeedCopy-->
Where deploymentname is a name that helps you identify the remote deployment and deploymentaddress is the externally accessible address of the StoreFront server or load-balanced server group for the remote deployment.
-
To specify the remote store with which to synchronize users’ application subscriptions, type the following command.
Add-DSSubscriptionsRemoteSyncStore -clusterName deploymentname
  -storeName storename
<!--NeedCopy-->
Where deploymentname is the name that you defined for the remote deployment in the previous step and storename is the name specified for both the local and remote stores when they were created. To synchronize application subscriptions between the stores, both stores must have the same name in their respective StoreFront deployments.
-
To configure synchronization to occur at a particular time every day, type the following command.
Add-DSSubscriptionsSyncSchedule -scheduleName
  synchronizationname -startTime hh:mm
<!--NeedCopy-->
Where synchronizationname is a name that helps you identify the schedule you are creating. Use the -startTime setting to specify a time of day at which you want to synchronize subscriptions between the stores. Configure further schedules to specify additional synchronization times throughout the day.
-
Alternatively, to configure regular synchronization at a specific interval, type the following command.
Add-DSSubscriptionsSyncReoccuringSchedule -scheduleName
  synchronizationname -startTime hh:mm:ss -repeatMinutes interval
<!--NeedCopy-->
Where synchronizationname is a name that helps you identify the schedule you are creating. Use the -startTime setting to specify the a time of day at which you want to start the reoccurring schedule. For interval, specify the time in minutes between each synchronization.
-
Add the Microsoft Active Directory domain machine accounts for each StoreFront server in the remote deployment to the local Windows user group CitrixSubscriptionSyncUsers on the current server.
This will allow the servers in the remote deployment to access the subscription store service on the local deployment once you have configured a synchronization schedule on the remote deployment. The CitrixSubscriptionSyncUsers group is automatically created when you import the subscription synchronization module in Step 1. For more information about modifying local user groups, see https://docs.microsoft.com/en-us/previous-versions/windows/it-pro/windows-server-2008-R2-and-2008/cc772524(v=ws.11).
-
If your local StoreFront deployment consists of multiple servers, use the Citrix StoreFront management console to propagate the configuration changes to the other servers in the group.
For more information about propagating changes in a multiple server StoreFront deployment, see Configure server groups.
-
Repeat Steps 1 to 7 on the remote StoreFront deployment to configure a complementary subscription synchronization schedule from the remote deployment to the local deployment.
When configuring the synchronization schedules for your StoreFront deployments, ensure that the schedules do not lead to a situation where the deployments are attempting to synchronize simultaneously.
-
To start synchronizing users’ application subscriptions between the stores, restart the subscription store service on both the local and remote deployments. At a Windows PowerShell command prompt on a server in each deployment, type the following command.
Restart-DSSubscriptionsStoreSubscriptionService <!--NeedCopy--> -
To remove an existing subscription synchronization schedule, type the following command. Then, propagate the configuration change to the other StoreFront servers in the deployment and restart the subscription store service.
 Remove-DSSubscriptionsSchedule -scheduleName synchronizationname
 <!--NeedCopy-->
Where synchronizationname is the name that you specified for the schedule when you created it.
-
To list the subscription synchronization schedules currently configured for your StoreFront deployment, type the following command.
 Get-DSSubscriptionsSyncScheduleSummary
 <!--NeedCopy-->
Configure optimal HDX routing for a store
Important: In multiple server deployments, use only one server at a time to make changes to the configuration of the server group. Ensure that the Citrix StoreFront management console is not running on any of the other servers in the deployment. Once complete, propagate your configuration changes to the server group so that the other servers in the deployment are updated.
The difference between a farm and a zone when defining optimal gateway mappings for a store
In StoreFront versions released before 3.5, you could map an optimal gateway only to a farm or farms. The concept of zones enables you to divide a XenApp 7.8 or XenDesktop 7.8 deployment into zones based on the data center or geographic location where the XenApp or XenDesktop controllers and published resources reside. Define zones in XenApp or XenDesktop 7.8 Studio. StoreFront now interoperates with XenApp 7.8 and XenDesktop 7.8 and any zones defined in StoreFront must exactly match the zone names defined in XenApp and XenDesktop.
This version of StoreFront also allows you to create an optimal gateway mapping for all of the delivery controllers located in the defined zone. Mapping a zone to an optimal gateway is almost identical to creating mappings using farms, with which you might already be familiar. The only difference is that zones typically represent much larger containers with many more delivery controllers. You do not need to add every delivery controller to an optimal gateway mapping. To place the controllers into the desired zone, you need only tag each delivery controller with a zone name that matches a zone already defined in XenApp or XenDesktop. You can map an optimal gateway to more than one zone, but typically you should use a single zone. A zone usually represents a data center in a geographic location. It is expected that each zone has at least one optimal NetScaler Gateway that is used for HDX connections to resources within that zone.
For more information about zones, see Zones.
Place a delivery controller into a zone
Set the zone attribute on every delivery controller you wish to place within a Zone.
- On the Windows Start screen or Apps screen, locate and click the Citrix StoreFront tile.
- Select the Stores node in the left pane of the Citrix StoreFront management console and click Manage Delivery Controllers in the Actions pane.
- Select a controller, click Edit, and then click Settings on the Edit Delivery Controller screen.
- On the Zones row, click in the second column.
- Click Add on the Delivery Controller Zone Names screen and then add a zone name.

Configure optimal NetScaler Gateway routing to optimize the handling of ICA connection routing from the HDX engine to published resources such as XenDesktop VDAs or XenApp or XenDesktop published applications using StoreFront. Typically, the optimal gateway for a site is collocated in the same geographical location.
You need only define optimal NetScaler Gateway appliances for deployments where the appliance through which users access StoreFront is not the optimal gateway. If launches should be directed back through the gateway making the launch request, StoreFront does this automatically.
Example scenario using farms
1 x UK Gateway -> 1 x UK StoreFront |
-> UK Apps and Desktops local -> US Apps and Desktops used only for UK failover |
1 x US Gateway -> 1 x US StoreFront |
-> US Apps and Desktops local -> UK Apps and Desktops used only for US failover |
A UK gateway provides remote access to UK hosted resources such as apps and desktops using a UK StoreFront.
The UK storefront has both a UK based and US based NetScaler Gateway defined and UK and US farms in its delivery controller list. UK users access remote resources through their geographically collocated gateway, StoreFront, and farms. If their UK resources become unavailable, they can connect to US resources as a temporary failover alternative.
Without optimal gateway routing all ICA launches would pass through the UK gateway that made the launch request regardless of where the resources are geographically located. By default, gateways used to make launch requests are identified dynamically by StoreFront when the request is made. Optimal gateway routing overrides this and forces US connections through the gateway closest to the US farms that provides apps and desktops.
Note: You can map only a single optimal gateway per site for each StoreFront store.
Example scenario using zones
1 x CAMZone -> 2 x UK StoreFronts |
-> Cambridge, UK: Apps and Desktops -> Fort Lauderdale, Eastern US: Apps and Desktops -> Bangalore, India: Apps and Desktops |
1 x FTLZone -> 2 x US StoreFronts |
-> Fort Lauderdale, Eastern US: Apps and Desktops -> Cambridge, UK: Apps and Desktops -> Bangalore, India: Apps and Desktops |
| 1 x BGLZone -> 2 x IN StoreFronts |
-> Bangalore, India: Apps and Desktops -> Cambridge, UK: Apps and Desktops -> Fort Lauderdale, Eastern US: Apps and Desktops |
Figure 1. Suboptimal gateway routing
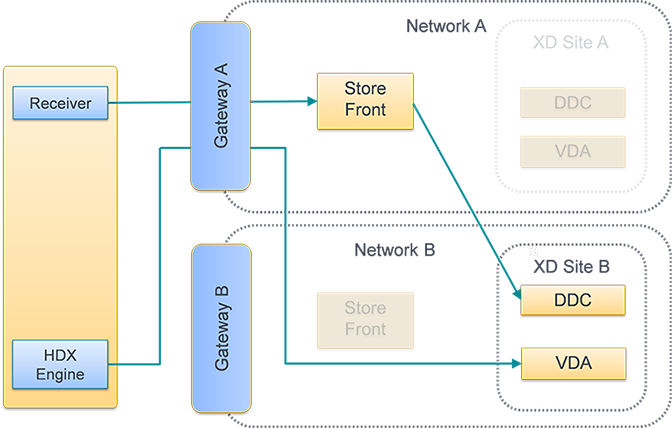
Figure 2. Optimal gateway routing

Use the Citrix StoreFront management console
After you configure separate NetScaler Gateway appliances for your deployments, you can define the optimal appliance for users to access each of the deployments.
- On the Windows Start screen or Apps screen, locate and click the Citrix StoreFront tile.
- Select the Stores node in the left pane of the Citrix StoreFront management console and, in the results pane, select a store. In the Actions pane, click Configure Store Settings.
- On the Settings > Optimal HDX Routing page, select a gateway.
- If you select the External Only check box, it is equivalent to -enabledOnDirectAccess = false and Direct HDX Connection is equivalent to using Set-DSFarmsWithNullOptimalGateway for farms or zones.

Add a new gateway
One of the options in the previous procedure is to Add gateway. After you choose Add gateway, the Add NetScaler Gateway screen displays.
- On the General Settings screen, complete the Display name, NetScaler Gateway URL, and Usage or Role settings to configure access to stores through NetScaler Gateway for users connecting from public networks. Remote access through a NetScaler Gateway cannot be applied to unauthenticated stores.
- On the Secure Ticket Authority (STA) screen, complete the options displayed. STA is hosted on XenDesktop and XenApp servers and issues session tickets in response to connection requests. These session tickets form the basis of authentication and authorization for access to XenDesktop and XenApp resources.
- On the Authentication Settings screen, enter the settings that specify how the remote user provides authentication credentials.
Use PowerShell to configure optimal NetScaler Gateway routing for a store
PowerShell API parameters
-SiteId (Int)—Site ID within IIS. This is typically 1 for the site in IIS where StoreFront is installed by default.
-ResourcesVirtualPath (String)—Path to the store that is to be configured to have a farm to optimal gateway mapping.
Example: “/Citrix/Store”
-GatewayName (String)—Name given to identify the Netscaler Gateway within StoreFront.
Example 1: ExternalGateway
Example 2: InternalGateway
-Hostnames (String Array)—Specifies the fully qualified domain name (FQDN) and port of the optimal NetScaler Gateway appliance.
Example1 for standard vServer port 443: gateway.example.com
Example2 for nonstandard vServer port 500: gateway.example.com:500
-Farms (String Array)—Specifies a set of (typically colocated) XenDesktop, XenApp, and App Controller deployments that share a common optimal NetScaler Gateway appliance. A farm can contain just a single delivery controller or multiple delivery controller that provides published resources.
You can configure a XenDesktop site in StoreFront under delivery controllers as “XenDesktop”. This represents a single farm. This could contain multiple delivery controllers in its failover list.
Example: “XenDesktop”
XenDesktop-A.example.com
XenDesktop-B.example.com
XenDesktop-C.example.com
-Zones (String Array)—Specifies a data center or data centers containing many delivery controllers. This requires you tag delivery controller objects in StoreFront with the appropriate zone to which you want to allocate them.
-staUrls (String Array)—Specifies the URLs for XenDesktop or XenApp servers running the Secure Ticket Authority (STA). If using multiple farms, list the STA servers on each using a comma separated list:
Example: http://xenapp-a.example.com/scripts/ctxsta.dll,http://xendesktop-a.example.com/scripts/ctxsta.dll
-StasUseLoadBalancing (Boolean)—Set to true: randomly obtains session tickets from all STAs, evenly distributing requests across all the STAs. Set to false: users are connected to the first available STA in the order in which they are listed in the configuration, minimizing the number of STAs in use at any given time.
-StasBypassDuration—Set the time period, in hours, minutes, and seconds, for which an STA is considered unavailable after a failed request.
Example: 02:00:00
-EnableSessionReliability (Boolean)—Set to true: keeps disconnected sessions open while Receiver attempts to reconnect automatically. If you configured multiple STAs and want to ensure that session reliability is always available, set the value of the useTwoTickets attribute to true to obtain session tickets from two different STAs in case one STA becomes unavailable during the session.
-UseTwoTickets (Boolean)—Set to true: obtains session tickets from two different STAs in case one STA becomes unavailable during the session. Set to false: uses only a single STA server.
-EnabledOnDirectAccess (Boolean)—Set to true: ensures that when local users on the internal network log on to StoreFront directly, connections to their resources are still routed through the optimal appliance defined for the farm. Set to false: connections to resources are not routed through the optimal appliance for the farm unless users access StoreFront through a NetScaler Gateway.
When PowerShell scripts span multiple lines such as shown below, each line must end with the backtick character.
Citrix recommends copying any code examples into the Windows PowerShell Integrated Scripting Environment (ISE) to validate the Powershell code using the format checker before you run it.
Configure an optimal gateway for a farm
Note
Configuration of Optimal HDX routing with the old PowerShell cmdlet, Set-DSOptimalGatewayForFarms, does not work.
To work around this issue:
- Configure a global gateway with the settings you want for Optimal HDX routing using the Add-DSGlobalV10Gateway command and provide default values for the authentication settings.
- Use the Add-DSStoreOptimalGateway command to add the optimal gateway configuration.
Example:
Add-DSGlobalV10Gateway -Id 2eba0524-af40-421e-9c5f-a1ccca80715f -Name LondonGateway -Address “http://example” -Logon Domain -SecureTicketAuthorityUrls @(“http://staurl1”, “http://staurl2”)
Add-DSStoreOptimalGateway -SiteId 1 -VirtualPath /Citrix/Store1 -GatewayId 2eba0524-af40-421e-9c5f-a1ccca80715f -Farms @(“Controller”) -EnabledOnDirectAccess $true
Example:
Create or overwrite Optimal Gateway For Farms mappings for the store Internal.
& "$Env:PROGRAMFILES\\Citrix\\Receiver StoreFront\\Scripts\\ImportModules.ps1"

Set-DSOptimalGatewayForFarms -SiteId 1 \`

-ResourcesVirtualPath /Citrix/Internal \`
\-GatewayName "gateway1" \`
\-Hostnames "gateway1.example.com:500" \`
\-Farms "XenApp","XenDesktop" \`
\-StaUrls "https://xenapp.example.com/scripts/ctxsta.dll","https://xendesktop.example.com/scripts/ctxsta.dll" \`
\-StasUseLoadBalancing:$false \`
\-StasBypassDuration 02:00:00 \`
\-EnableSessionReliability:$false \`
**-UseTwoTickets:$false \`
\-EnabledOnDirectAccess:$true
<!--NeedCopy-->
Configure an optimal gateway for a zone
Example:
Create or overwrite Optimal Gateway For Farms mappings for the zone “CAMZone”
```& “$Env:PROGRAMFILES\Citrix\Receiver StoreFront\Scripts\ImportModules.ps1”
Set-DSOptimalGatewayForFarms -SiteId 1 `
-ResourcesVirtualPath /Citrix/Internal ` -GatewayName “gateway1” ` -Hostnames “gateway1.example.com:500” ` -Zones “CAMZone” ` -StaUrls “https://xenapp.example.com/scripts/ctxsta.dll”,”https://xendesktop.example.com/scripts/ctxsta.dll” ` -StasUseLoadBalancing:$false ` -StasBypassDuration 02:00:00 ` -EnableSessionReliability:$false ` -UseTwoTickets:$false ` -EnabledOnDirectAccess:$true
Example:

This script returns all Optimal Gateway For Farms mappings for the store called Internal.

**Get-DSOptimalGatewayForFarms -SiteId 1 –ResourcesVirtualPath "/Citrix/Internal"**

Example:

Remove all optimal gateway for farms mappings for store called Internal.

**Remove-DSOptimalGatewayForFarms -SiteId 1 -ResourcesVirtualPath "/Citrix/Internal"**

**Configure direct HDX connections for farms**

Example:

This script prevents all ICA launches from passing through a gateway for the list of specified farms for the store calledInternal.

**Set-DSFarmsWithNullOptimalGateway -SiteId 1 -ResourcesVirtualPath /Citrix/Store -Farms "Farm1","Farm2"**

Example:

This script returns all farms that are configured to prevent ICA launches from passing through a gateway for a store called Internal.

**Get-DSFarmsWithNullOptimalGateway -SiteId 1 -ResourcesVirtualPath "/Citrix/Internal"**


**Determine if your Optimal Gateway For Farms mappings are being used by StoreFront**

1.  Enable StoreFront tracing on all server group nodes using PowerShell by running:

    ```
    & "$Env:PROGRAMFILES\\Citrix\\Receiver StoreFront\\Scripts\\ImportModules.ps1"

    \#Traces output is to c:\\Program Files\\Citrix\\Receiver Storefront\\admin\\trace\\
    Set-DSTraceLevel -All -TraceLevel Verbose
    <!--NeedCopy-->
-
Open the Debug View tool on the desktop of a StoreFront server. If you are using a storefront server group, you might have to do this on all nodes to ensure you obtain traces from the node that receives the launch request.
-
Enable Capture Global Win32 events.
![]()
-
Save the trace output as a .log file and open the file with Notepad. Search for the log entries shown in the example scenarios below.
-
Turn tracing off afterwards, as it consumes a lot of disk space on your StoreFront servers.
Set-DSTraceLevel -All -TraceLevel Off
Tested optimal gateway scenarios
-
External client logs on Gateway1. Launch is directed through the designated optimal gateway Gateway2 for the farm Farm2.
Set-DSOptimalGatewayForFarms -onDirectAccess=false
Farm2 is configured to use the optimal gateway Gateway2.
Farm2 has optimal gateway on direct access disabled.
The optimal gateway Gateway2 will be used for the launch.
-
Internal client logs on using StoreFront. Launch is directed through the designated optimal gatewayGateway1 for the farm Farm1.
Set-DSOptimalGatewayForFarms -onDirectAccess=true
No dynamically identified gateway in request. StoreFront was contacted directly.
Farm1 is configured to use the optimal gateway Gateway1.
Farm1 has optimal gateway on direct access enabled.
The optimal gateway Gateway1 will be used for the launch.
-
Internal client logs on using Gateway1. Launches of resources on Farm1 are prevented from passing through any gateway and StoreFront is contacted directly.
Set-DSFarmsWithNullOptimalGateway
Dynamically identified gateway in request: Gateway1
Farm1 is configured to not use a gateway. No gateway will be used for launch.
-

In this article
- Configure user mapping and aggregation
- Advanced configurations
- Configure subscription synchronization
- Configure optimal HDX routing for a store
- Use the Citrix StoreFront management console
- Use PowerShell to configure optimal NetScaler Gateway routing for a store
- Configure an optimal gateway for a farm