Citrix ADC and Amazon Web Services Validated Reference Design
Overview Citrix Networking VPX
Citrix ADC is an all-in-one application delivery controller that makes applications run up to five times better, reduces application ownership costs, optimizes the user experience, and ensures that applications are always available by using:
- Advanced Layer 4-7 services load balancing and traffic management
- Proven application acceleration such as HTTP compression and caching
- An integrated application firewall for application security
- Server offloading to significantly reduce costs and consolidate servers
As an undisputed leader of service and application delivery, Citrix ADC is deployed in thousands of networks around the world to optimize, secure, and control the delivery of all enterprise and cloud services. Deployed directly in front of web and database servers, Citrix ADC combines high-speed load balancing and content switching, HTTP compression, content caching, SSL acceleration, application flow visibility, and a powerful application firewall into an integrated, easy-to-use platform. Meeting SLAs is greatly simplified with end-to-end monitoring that transforms network data into actionable business intelligence. Citrix ADC allows policies to be defined and managed using a simple declarative policy engine with no programming expertise required.
Overview Citrix ADC in Amazon Web Services
Support for the Citrix Networking VPX within Amazon Web Services (AWS) is available beginning with version 10.5–61.11. Citrix Networking VPX is available as an Amazon Machine Image (AMI) in AWS marketplace. Citrix Networking VPX on AWS enables customers to leverage AWS Cloud computing capabilities and use Citrix ADC load balancing and traffic management features for their business needs. Citrix ADC on AWS supports all the traffic management features of a physical Citrix ADC appliance. Citrix ADC instances running in AWS can be deployed as standalone instances or in HA pairs.
The Citrix Networking VPX AMI is packaged as an EC2 instance that is launched within an AWS VPC. The VPX AMI instance requires a minimum of 2 virtual CPUs and 2 GB of memory. An EC2 instance launched within an AWS VPC can also provide the multiple interfaces, multiple IP addresses per interface, and public and private IP addresses needed for VPX configuration. Currently, on AWS, VPX can be launched only within a VPC, because each VPX instance requires at least three IP addresses. (Although VPX on AWS can be implemented with one or two elastic network interfaces, Citrix recommends three network interfaces for a standard VPX on AWS installation.) AWS currently makes multi-IP functionality available only to instances running within an AWS VPC. A VPX instance in a VPC can be used to load balance servers running in EC2 instances.
An Amazon VPC allows you to create and control a virtual networking environment, including your own IP address range, subnets, route tables, and network gateways.
Note:
By default, you can create up to 5 VPC instances per AWS region for each AWS account. You can request higher VPC limits by submitting Amazon’s Request Form.
An EC2 instance of Citrix Networking VPX (AMI image) is launched within the AWS VPC.
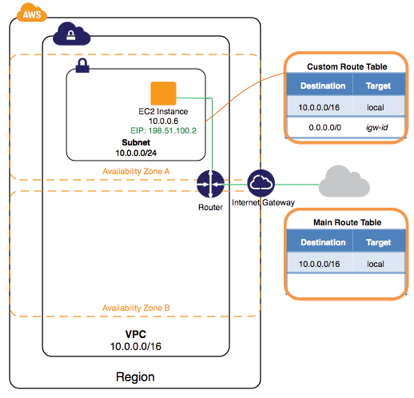
The following figure shows a typical VPX on AWS deployment.
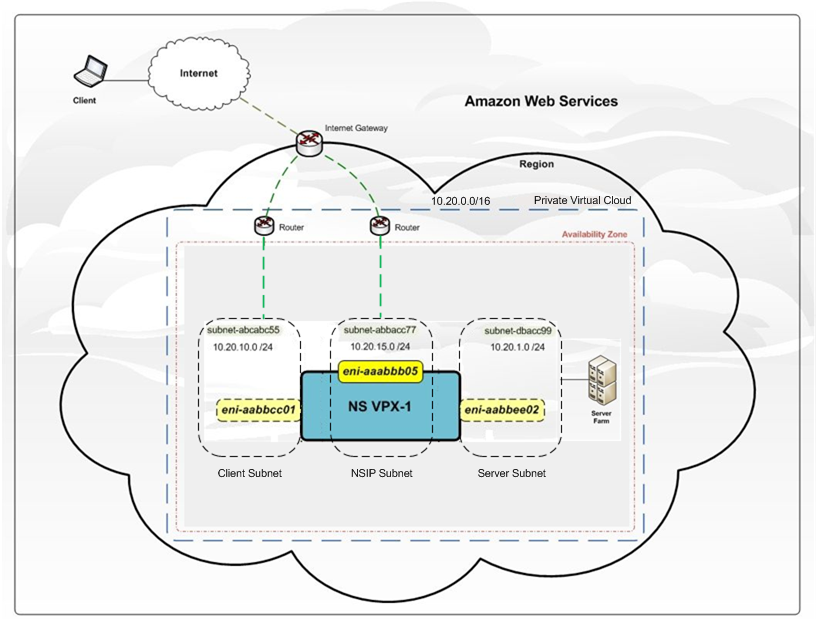
The figure shows a simple topology of an AWS VPC with a Citrix Networking VPX deployment. The AWS VPC has:
- A single Internet gateway to route traffic in and out of the VPC.
- Network connectivity between the Internet gateway and the Internet.
- Three subnets, one each for management, client, and server.
- Network connectivity between the Internet gateway and the two subnets (management and client).
- A single Citrix Networking VPX deployed within the VPC. The VPX instance has three Elastic Network Interfaces (ENIs), one attached to each subnet.
Limitations and usage guidelines
- The clustering feature is not supported for VPX.
- For HA to work as expected, associate a dedicated NATing device to management Interface or associate EIP to NSIP. For more information on NAT, see NAT Instances the AWS documentation.
- Data traffic and management traffic should be segregated by using ENIs belonging to different subnets.
- Only the NSIP address should be present on the management ENI.
- If a NAT instance is used for security instead of assigning an EIP to the NSIP, appropriate VPC level routing changes are required. For instructions on making VPC level routing changes, in the AWS documentation, see Scenario 2: VPC with Public and Private Subnets.
- A VPX instance can be moved from one EC2 instance type to another (for example, from m3.large to an m3.xlarge).
- For storage options for VPX on AWS, Citrix recommends EBS, because it is durable and the data is available even after it is detached from instance.
- Dynamic addition of ENIs to VPX is not supported. You have to restart the VPX instance to apply the update. Citrix recommends you to stop the standalone or HA instance, attach the new ENI, and then restart the instance.
- You can assign multiple IP addresses to an ENI. The maximum number of IP addresses per ENI is determined by the EC2 instance type, see EC2 Support for ENIs and IP Addresses.
- Citrix recommends that you avoid using the enable and disable interface commands on Citrix Networking VPX interfaces.
Due to AWS limitations, these features are not supported:
Layer 3 limitations:
- Dynamic Routing
- IPV6
Layer 2 Limitations:
- Gratuitous ARP(GARP)
- L2 mode
- Tagged VLAN
- Virtual MAC (VMAC)
Supported EC2 instances, ENI, and IP address capacities
The Citrix ADC AMI can be launched on any of the following EC2 instance types. This table lists each supported EC2 instance type and its corresponding number of supported ENIs, and number of private IPv4 addresses per ENI.
| Instance Name | Number of ENIs | Private IPv4 Addresses per ENI |
|---|---|---|
| t2.small | 3 | 4 |
| t2.medium | 3 | 6 |
| t2.large | 3 | 12 |
| t2.xlarge | 3 | 15 |
| t2.2xlarge | 3 | 15 |
| m3.large | 3 | 10 |
| m3.xlarge | 4 | 15 |
| m3.2xlarge | 4 | 30 |
| m4.large | 2 | 10 |
| m4.xlarge | 4 | 15 |
| m4.2xlarge | 4 | 15 |
| m4.4xlarge | 8 | 30 |
| m4.10xlarge | 8 | 30 |
| m4.16xlarge | 8 | 30 |
| m5.large | 3 | 10 |
| *m5.xlarge | 4 | 15 |
| m5.2xlarge | 4 | 15 |
| m5.4xlarge | 8 | 30 |
| m5.8xlarge | 8 | 30 |
| m5.12xlarge | 8 | 30 |
| m5.16xlarge | 15 | 50 |
| m5.24xlarge | 15 | 50 |
| m5a.large | 3 | 10 |
| m5a.xlarge | 4 | 15 |
| m5a.2xlarge | 4 | 15 |
| m5a.4xlarge | 8 | 30 |
| m5a.8xlarge | 8 | 30 |
| m5a.12xlarge | 8 | 30 |
| m5a.16xlarge | 15 | 50 |
| m5a.24xlarge | 15 | 50 |
| c4.large | 3 | 10 |
| c4.xlarge | 4 | 15 |
| c4.2xlarge | 4 | 15 |
| c4.4xlarge | 8 | 30 |
| c4.8xlarge | 8 | 30 |
| c5.large | 3 | 10 |
| c5.xlarge | 4 | 15 |
| c5.2xlarge | 4 | 15 |
| c5.4xlarge | 8 | 30 |
| c5.9xlarge | 8 | 30 |
| c5.12xlarge | 8 | 30 |
| c5.18xlarge | 15 | 50 |
| c5.24xlarge | 15 | 50 |
| c5a.large | 3 | 10 |
| c5a.xlarge | 4 | 15 |
| c5a.2xlarge | 4 | 15 |
| c5a.4xlarge | 8 | 30 |
| c5a.9xlarge | 8 | 30 |
| c5a.12xlarge | 8 | 30 |
| c5a.18xlarge | 15 | 50 |
| c5a.24xlarge | 15 | 50 |
| c5n.large | 3 | 10 |
| c5n.xlarge | 4 | 15 |
| c5n.2xlarge | 4 | 15 |
| c5n.4xlarge | 8 | 30 |
| c5n.9xlarge | 8 | 30 |
| c5n.18xlarge | 15 | 50 |
| d2.xlarge | 4 | 15 |
| d2.2xlarge | 4 | 15 |
| d2.4xlarge | 8 | 30 |
| d2.8xlarge | 8 | 30 |
* Preferred Instance Type
For more information, see Amazon EC2 Instances
Use cases
Compared to alternative solutions that require each service to be deployed as a separate virtual appliance, Citrix ADC on AWS combines L4 load balancing, L7 traffic management, server offload, application acceleration, application security, and other essential application delivery capabilities in a single VPX instance, conveniently available via the AWS Marketplace. Furthermore, everything is governed by a single policy framework and managed with the same, powerful set of tools used to administer on-premises Citrix ADC deployments. The net result is that Citrix ADC on AWS enables several compelling use cases that not only support the immediate needs of today’s enterprises, but also the ongoing evolution from legacy computing infrastructures to enterprise cloud data centers.
Production delivery for Web and Virtual Apps and Desktops applications
Enterprises actively embracing AWS as an infrastructure-as-a-service (IaaS) offering for production delivery of applications can now front-end those applications with the same cloud networking platform used by the largest websites and cloud service providers in the world. Extensive offload, acceleration, and security capabilities can be leveraged to enhance performance and reduce costs.
Citrix Desktops as as Service is a cloud ready solution for delivering any Windows application or desktop into a cloud service delivered across any network, to any device. By deploying this expanded app and desktop delivery platform today, you are positioned to leverage any virtual infrastructure or cloud management platform. This gives you the ability to take advantage of the automation and orchestration capabilities of cloud computing.
Hybrid Cloud designs
Enterprise IT organizations that follow a hybrid cloud strategy get the best of both worlds by selecting which applications and which usage scenarios fit best in their private cloud and which fit best in a public cloud enabling them to flex, grow and transform to meet the demands of the modern workplace.
With Citrix ADC on AWS, hybrid clouds that span enterprise data centers and extend into AWS can benefit from the same cloud networking platform. Citrix ADC significantly eases the transition of applications and workloads back and forth between a private data center and AWS. The full suite of capabilities, ranging from intelligent database load balancing with DataStream to unprecedented application visibility with AppFlow®, and real-time monitoring and response with Action Analytics, can be leveraged with Citrix ADC on AWS.
Business continuity
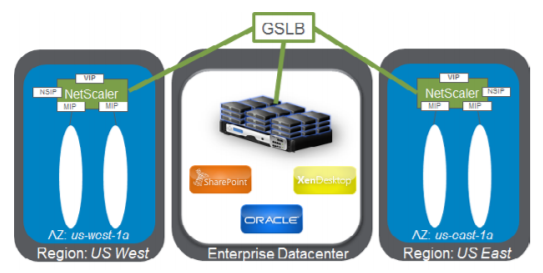
Enterprises looking to use AWS as part of their disaster recovery and business continuity plans can rely upon Citrix ADC global server load balancing running both on-premises and within AWS to continuously monitor availability and performance of both enterprise data centers and AWS environments, ensuring users are always sent to the optimal location.
When you configure GSLB on Citrix ADC appliances and enable Metric Exchange Protocol (MEP), the appliances use the DNS infrastructure to connect the client to the data center that best meets the criteria that you set. The criteria can designate the least loaded data center, the closest data center, the data center that responds most quickly to requests from the client’s location, a combination of those metrics, and SNMP metrics. An appliance keeps track of the location, performance, load, and availability of each data center and uses these factors to select the data center to which to send a client request. A GSLB configuration consists of a group of GSLB entities on each appliance in the configuration. These entities include GSLB sites, GSLB services, GSLB virtual servers, load balancing and/or content switching servers, and ADNS services.
Development and testing
Enterprises run production delivery on-premises, but using AWS for development and testing can now include Citrix ADC within their AWS test environments, speeding time-to-production due to better mimicry of the production implementation within their test environments.
In each use case, network architects can also leverage Citrix CloudBridge—-configured either as a standalone instance or as feature of a Citrix ADC platinum edition instance—-to secure and optimize the connection between one or more enterprise data centers and the AWS Cloud, thereby speeding data transfer/synchronization and minimizing network cost.
AWS Network architecture – ENI and EIP
Citrix ADC instances launched into a VPC can have up to eight elastic network interfaces (ENIs). In turn, each ENI can be assigned one or more private IP addresses, with each of these optionally being mapped to an elastic IP address that is publicly routable.
What makes the network interfaces and IP addresses “elastic” in this case is the ability to programmatically remap them to other instances — a feature that enables recovery from instance or Availability Zone failures without having to wait for hardware replacements, or for DNS changes to fully propagate to all of your customers.
Other details to account for include the following:
- An instance can have different ENIs in different subnets (but not in different Availability Zones).
- Each ENI must have at least one IP address assigned to it, and must be assigned to a Security Group (see below).
- Addresses 1–4 for each subnet (that is, 10.x.x.1-4) are reserved for use by Amazon.
- Citrix ADC is only aware of private IP addresses. Any EIPs that are assigned, do not show up within the Citrix ADC CLI or any related management tools.

EC2 versus VPC
AWS encompasses multiple different services, such as Amazon Simple Storage Services (S3), Amazon Elastic Compute Cloud (EC2), and Amazon Virtual Private Cloud (VPC). The distinction between the latter two is important in this case. In particular, with EC2, virtual machine instances are limited to a single networking interface and single IP address. Furthermore, there are minimal networking features and controls. This precludes the use of EC2 for Citrix ADC—-which requires a minimum of three IP addresses—-and is why Citrix ADC instances can only be launched within an AWS VPC.
VPCs not only support virtual machines with multiple interfaces and multiple private and public IP addresses, but also allow you to create and control an isolated virtual networking environment, with its own IP address range, subnets, routing tables, and network gateways.
Regions and availability zones
Within the AWS Cloud, Regions refer to a specific geographic location, such as US East. Within each Region there are at least two Availability Zones, each of which can be thought of as an independent cloud data center that has been engineered to be insulated from failures in other Availability Zones and to provide inexpensive, low-latency network connectivity to other Availability Zones within the same Region.
By implementing instances in separate Availability Zones, you can protect your applications from failures that impact a single location.
Limitations and dependencies for network architects to be aware of at this level include the following:
- Although a Virtual Private Cloud can span multiple Availability Zones, it cannot span multiple Regions.
- Individual subnets within a VPC cannot span multiple Availability Zones.
- All traffic entering or leaving a VPC must be routed via a corresponding default Internet gateway
Configure VPX on AWS
In this exercise, you’ll create a VPC and subnet, and launch a public-facing instance into your subnet. Your instance will be able to communicate with the Internet, and you’ll be able to access your instance from your local computer using SSH (if it’s a Linux instance) or Remote Desktop (if it’s a Windows instance). In your real world environment, you can use this scenario to create a public-facing web server; for example, to host a blog.
Note:
This exercise is intended to help you set up your own nondefault VPC quickly. If you already have a default VPC and you want to get started launching instances into it (and not creating or configuring a new VPC), see Launching an EC2 Instance into Your Default VPC.
To complete this exercise, you’ll do the following:
- Create a nondefault VPC with a single public subnet. Subnets enable you to group instances based on your security and operational needs. A public subnet is a subnet that has access to the Internet through an Internet gateway.
- Create a security group for your instance that allows traffic only through specific ports.
- Launch an Amazon EC2 instance into your subnet.
- Associate an Elastic IP address with your instance. This allows your instance to access the Internet.
Before you can use Amazon VPC for the first time, you must sign up for AWS. When you sign up, your AWS account is automatically signed up for all services in AWS, including Amazon VPC. If you haven’t created an AWS account already, go to http://aws.amazon.com, and then choose Create a Free Account.
Step 1: Create the VPC
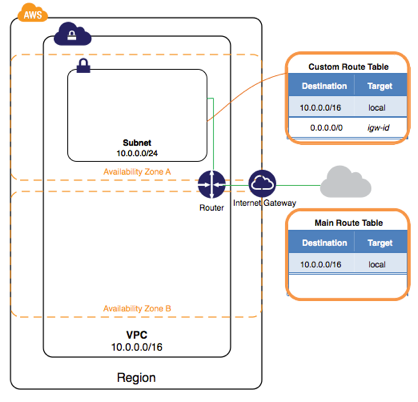
In this step, you’ll use the Amazon VPC wizard in the Amazon VPC console to create a VPC. The wizard performs the following steps for you:
- Creates a VPC with a /16 CIDR block (a network with 65,536 private IP addresses). For more information about CIDR notation and the sizing of a VPC, see Your VPC.
- Attaches an Internet gateway to the VPC. For more information about Internet gateways, see Internet Gateways.
- Creates a size /24 subnet (a range of 256 private IP addresses) in the VPC.
- Creates a custom route table, and associates it with your subnet, so that traffic can flow between the subnet and the Internet gateway. For more information about route tables, see Route Tables.
The following diagram represents the architecture of your VPC after you’ve completed this step.
Create a VPC using the Amazon VPC Wizard
-
Open the Amazon VPC console at https://console.aws.amazon.com/vpc/.
-
In the navigation bar, on the top-right, take note of the region in which you’ll be creating the VPC. Ensure that you continue working in the same region for the rest of this exercise, as you cannot launch an instance into your VPC from a different region. For more information about regions, see Regions and Availability Zones.
-
In the navigation pane, choose VPC dashboard, and then choose Start VPC Wizard.

Note:
Do not choose Your VPCs in the navigation pane; you cannot access the VPC wizard from this page.
-
Choose the first option, VPC with a Single Public Subnet, and then choose Select.
-
On the configuration page, enter a name for your VPC in the VPC name field; for example, my-vpc, and enter a name for your subnet in the Subnet name field. This helps you to identify the VPC and subnet in the Amazon VPC console after you’ve created them. For this exercise, you can leave the rest of the configuration settings on the page, and choose Create VPC.
(Optional) If you prefer, you can modify the configuration settings as follows, and then choose Create VPC.
-
The IP CIDR block displays the IP address range that you’ll use for your VPC (10.0.0.0/16), and the Public subnet field displays the IP address range you’ll use for the subnet (10.0.0.0/24). If you don’t want to use the default CIDR ranges, you can specify your own. For more information, see VPC and Subnet Sizing.
-
The Availability Zone list enables you to select the Availability Zone in which to create the subnet. You can leave No Preference to let AWS choose an Availability Zone for you. For more information, see Regions and Availability Zones.
-
In the Add endpoints for S3 to your subnets section, you can select a subnet in which to create a VPC endpoint to Amazon S3 in the same region. For more information, see VPC Endpoints.
-
The
Enable DNS hostnamesoption, when set to Yes, ensures that instances that are launched into your VPC receive a DNS hostname. For more information, see Using DNS with Your VPC. -
The Hardware tenancy option enables you to select whether instances launched into your VPC are run on shared or dedicated hardware. Selecting a dedicated tenancy incurs additional costs. For more information about hardware tenancy, see Dedicated Instances.
-
-
A status window shows the work in progress. When the work completes, choose OK to close the status window.
-
The
Your VPCs pagedisplays your default VPC and the VPC that you just created. The VPC that you created is a nondefault VPC, therefore the Default VPC column displays No.

View information about your VPC
After you’ve created the VPC, you can view information about the subnet, the Internet gateway, and the route tables. The VPC that you created has two route tables — a main route table that all VPCs have by default, and a custom route table that was created by the wizard. The custom route table is associated with your subnet, which means that the routes in that table determine how the traffic for the subnet flows. If you add a new subnet to your VPC, it uses the main route table by default.
To view information about your VPC
- Open the Amazon VPC console at https://console.aws.amazon.com/vpc/.
- In the navigation pane, choose Your VPCs. Take note of the name and the ID of the VPC that you created (look in the Name and VPC ID columns). You will use this information to identify the components that are associated with your VPC.
- In the navigation pane, choose Subnets. The console displays the subnet that was created when you created your VPC. You can identify the subnet by its name in Name column, or you can use the VPC information that you obtained in the previous step and look in the VPC column.
- In the navigation pane, choose Internet Gateways. You can find the Internet gateway that’s attached to your VPC by looking at the VPC column, which displays the ID and the name (if applicable) of the VPC.
- In the navigation pane, choose Route Tables. There are two route tables associated with the VPC. Select the custom route table (the Main column displays No), and then choose the Routes tab to display the route information in the details pane:
- The first row in the table is the local route, which enables instances within the VPC to communicate. This route is present in every route table by default, and you can’t remove it.
- The second row shows the route that the Amazon VPC wizard added to enable traffic destined for an IP address outside the VPC (0.0.0.0/0) to flow from the subnet to the Internet gateway.
- Select the main route table. The main route table has a local route, but no other routes.
Step 2: Create a security group 12
A security group acts as a virtual firewall to control the traffic for its associated instances. To use a security group, you add the inbound rules to control incoming traffic to the instance, and outbound rules to control the outgoing traffic from your instance. To associate a security group with an instance, you specify the security group when you launch the instance. If you add and remove rules from the security group, we apply those changes to the instances associated with the security group automatically.
Your VPC comes with a default security group. Any instance not associated with another security group during launch is associated with the default security group. In this exercise, you’ll create a new security group, WebServerSG, and specify this security group when you launch an instance into your VPC.
Topics
Creating Your WebServerSG Security Group
You can create your security group using the Amazon VPC console.
Rules for the WebServerSG Security Group
The following table describes the inbound and outbound rules for the WebServerSG security group. You’ll add the inbound rules yourself. The outbound rule is a default rule that allows all outbound communication to anywhere — you do not need to add this rule yourself.
| Inbound | |||
|---|---|---|---|
| Source IP | Protocol | Port Range | Comments |
| 0.0.0.0/0 | TCP | 80 | Allows inbound HTTP access from anywhere. |
| 0.0.0.0/0 | TCP | 443 | Allows inbound HTTPS access from anywhere. |
| Public IP address range of your home network | TCP | 22 | Allows inbound SSH access from your home network to a Linux/UNIX instance. |
| Public IP address range of your home network | TCP | 3389 | Allows inbound RDP access from your home network to a Windows instance. |
| Outbound | |||
|---|---|---|---|
| Destination IP | Protocol | Port Range | Comments |
| 0.0.0.0/0 | All | All | The default outbound rule that allows all outbound communication. |
To create the WebServerSG security group and add rules
- Open the Amazon VPC console at https://aws.amazon.com/console/.
- In the navigation pane, choose Security Groups.
- Choose Create Security Group.
- In the Group name field, enter WebServerSG as the name of the security group, and provide a description. You can optionally use the Name tag field to create a tag for the security group with a key of Name and a value that you specify.
- Select the ID of your VPC from the VPC menu, and then choose Yes, Create.
- Select the WebServerSG security group that you just created (you can view its name in the Group Name column).
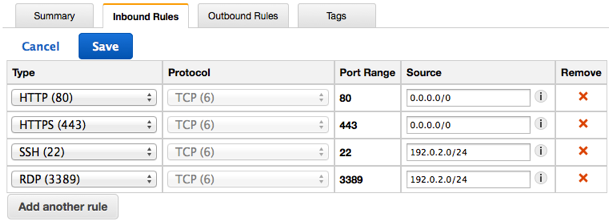
- On the Inbound Rules tab, choose Edit and add rules for inbound traffic as follows, and then choose Save when you’re done:
- Select HTTP from the Type list, and enter 0.0.0.0/0 in the Source field.
- Choose Add another rule, then select HTTPS from the Type list, and enter 0.0.0.0/0 in the Source field.
- Choose Add another rule. If you’re launching a Linux instance, select SSH from the Type list, or if you’re launching a Windows instance, select RDP from the Type list. Enter your network’s public IP address range in the Source field. If you don’t know this address range, you can use 0.0.0.0/0 for this exercise.
Caution:
If you use 0.0.0.0/0, you enable all IP addresses to access your instance using SSH or RDP. This is acceptable for the short exercise, but it’s unsafe for production environments. In production, you’ll authorize only a specific IP address or range of addresses to access your instance.
Step 3: Launch an instance into your VPC 14
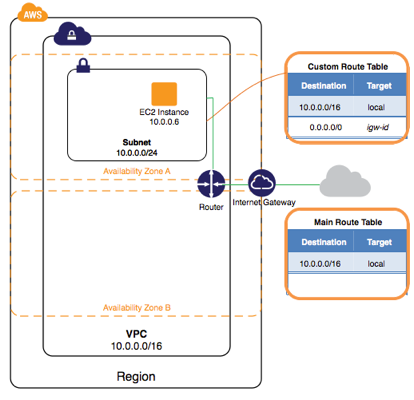
When you launch an EC2 instance into a VPC, you must specify the subnet in which to launch the instance. In this case, you’ll launch an instance into the public subnet of the VPC you created. You’ll use the Amazon EC2 launch wizard in the Amazon EC2 console to launch your instance.
The following diagram represents the architecture of your VPC after you’ve completed this step.
To launch an EC2 instance into a VPC
- Open the Amazon EC2 console.
- In the navigation bar, on the top-right, ensure that you select the same region in which you created your VPC and security group.
- From the dashboard, choose Launch Instance.
- On the first page of the wizard, choose the AMI that you want to use. For this exercise, we recommend that you choose an Amazon Linux AMI or a Windows AMI.
- On the Choose an Instance Type page, you can select the hardware configuration and size of the instance to launch. By default, the wizard selects the first available instance type based on the AMI you selected. You can leave the default selection, and then choose Next: Configure Instance Details.
- On the Configure Instance Details page, select the VPC that you created from the Network list, and the subnet from the Subnet list. Leave the rest of the default settings, and go through the next pages of the wizard until you get to the Tag Instance page.
- On the Tag Instance page, you can tag your instance with a Name tag; for example, Name=MyWebServer. This helps you to identify your instance in the Amazon EC2 console after you’ve launched it. Choose Next: Configure Security Group when you are done.
- On the Configure Security Group page, the wizard automatically defines the launch-wizard-x security group to allow you to connect to your instance. Instead, choose the Select an existing security group option, select the WebServerSG group that you created previously, and then choose Review and Launch.
- On the Review Instance Launch page, check the details of your instance, and then choose Launch.
- In the Select an existing key pair or create a new key pair dialog box, you can choose an existing key pair, or create a new one. If you create a new key pair, ensure that you download the file and store it in a secure location. You’ll need the contents of the private key to connect to your instance after it’s launched. To launch your instance, select the acknowledgment check box, and then choose Launch Instances.
- On the confirmation page, choose View Instances to view your instance on the Instances page. Select your instance, and view its details in the Description tab. The Private IPs’ field displays the private IP address that’s assigned to your instance from the range of IP addresses in your subnet.
Step 4: Assign an elastic IP address to your instance
In the previous step, you launched your instance into a public subnet - a subnet that has a route to an Internet gateway. However, the instance in your subnet also needs a public IP address to be able to communicate with the Internet. By default, an instance in a nondefault VPC is not assigned a public IP address. In this step, you’ll allocate an Elastic IP address to your account, and then associate it with your instance. For more information about Elastic IP addresses, see Elastic IP Addresses.
The following diagram represents the architecture of your VPC after you’ve completed this step.
To allocate and assign an Elastic IP address
- Open the Amazon VPC console at https://console.aws.amazon.com/vpc/.
- In the navigation pane, choose Elastic IPs.
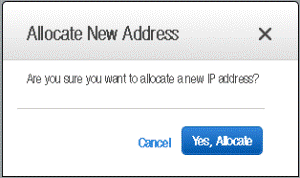
-
Choose Allocate New Address, and then Yes, Allocate.
Note:
If your account supports EC2-Classic, first select EC2-VPC from the Network platform list.
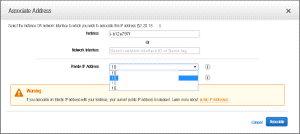
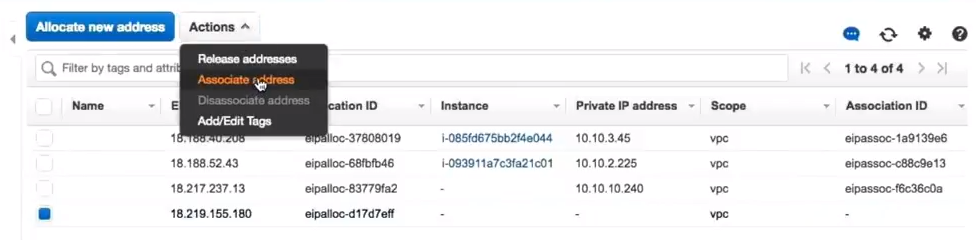
- Select the Elastic IP address from the list, choose Actions, and then choose Associate Address.
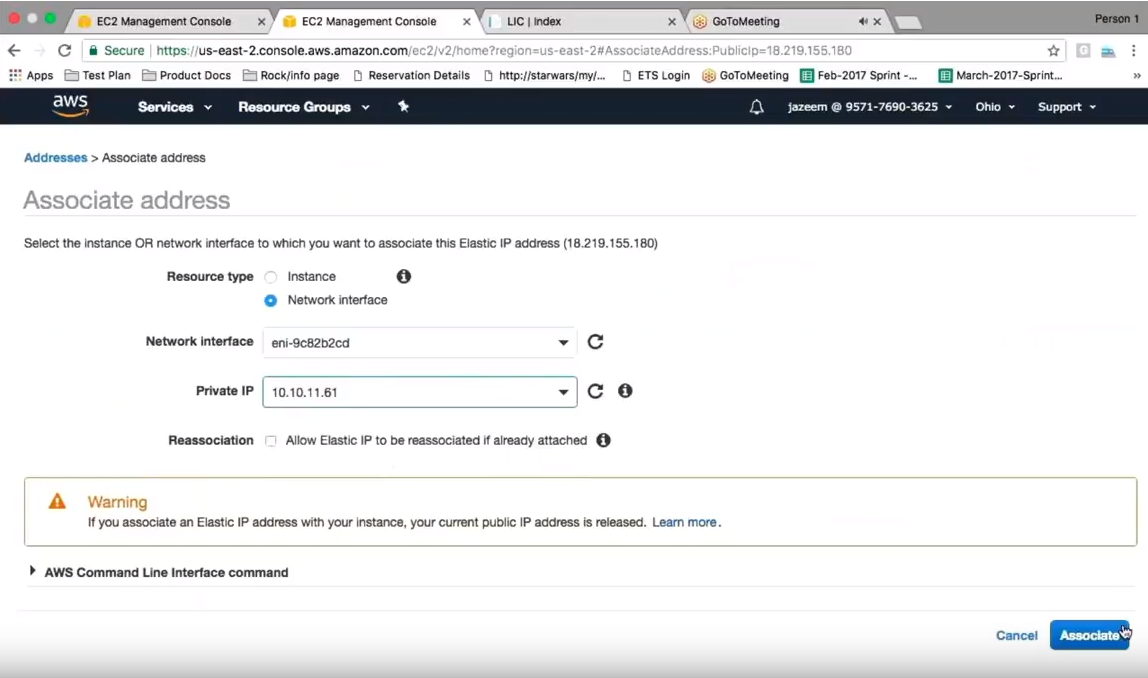
- In the dialog box, choose Instance from the Associate with list, and then select your instance from the Instance list. Choose Yes, Associate when you’re done.
Your instance is now accessible from the Internet. You can connect to your instance through its Elastic IP address using SSH or Remote Desktop from your home network. For more information about how to connect to a Linux instance, see Connecting to Your Linux Instance in the Amazon EC2 User Guide for Linux Instances. For more information about how to connect to a Windows instance, see Connect to Your Windows Instance Using RDP in the Amazon EC2 User Guide for Windows Instances.
This completes the exercise; you can choose to continue using your instance in your VPC, or if you do not need the instance, you can terminate it and release its Elastic IP address to avoid incurring charges for them. You can also delete your VPC — note that you are not charged for the VPC and VPC components created in this exercise (such as the subnets and route tables).
Configure Unified Gateway for Citrix Virtual Apps and Desktops
Navigate to the admin console of your Citrix ADC.
Log into the Citrix ADC using nsroot and the Instance ID that AWS assigned during the build process.
Install SSL Certificate:
- Navigate to Traffic Management – SSL. Right-click and enable this feature.
- Import SSL certificate a key pair.
Install SSL Certificate:
- Expand Citrix Gateway and select Virtual Servers.
-
Click Add.
Enter a name for the gateway and IP Address that is in the Public Subnet you assigned during the Citrix ADC Build process.
NOTE:
Write down this IP Address as we need it when allocating the Elastic IP Addresses later on.
- Click OK, then click No Server Certificate, and select the certificate you imported earlier. Click Bind.
- Click OK and Done, and at this stage you should have a Citrix Gateway shown in an “Up” state.
To configure the Unified Gateway, see https://support.citrix.com/article/CTX205485/how-do-i-configure-unified-gateway-for-common-enterprise-applications.
Provide external access to the Unified Gateway Instance:
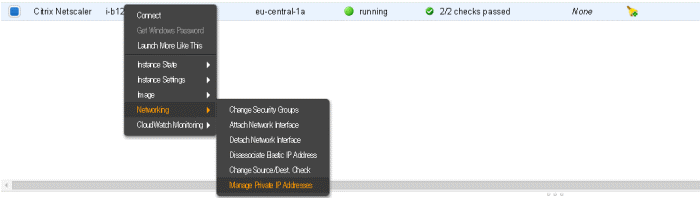
- Log in to your AWS Portal at aws.amazon.com and navigate to your instances.
-
Right click your Citrix ADC, select Networking and then Manage Private IP Addresses.
- Click Assign New IP on the interface you want to run the Citrix ADC Gateway on.
-
Assign the IP Address make sure you use the SAME address that you assigned to your Citrix ADC Gateway.
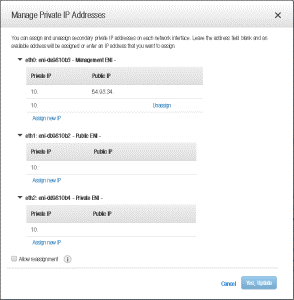
- Click Yes Update. This will assign the new IP Address to the instance at an AWS level. You can now assign a new Elastic IP to this Private IP.
- Navigate to Network and Security and Elastic IPs.
-
Click Allocate New Address, when prompted – select Yes to get a new IP Address.
-
Select the address from the list and select Associate Address.

-
Select the Citrix ADC instance you built previously from the Instance List. Once this is selected you will be able to select the IP Address you statically assigned to the instance (the same address as your Citrix Gateway) and select Associate.
- Point your DNS name record to the elastic IP address Amazon assigned you.
- Log into your Citrix Gateway.
High availability load balancing for StoreFront
Please see Citrix configuration steps.
Configure GSLB in two AWS locations
Setting up GSLB for Citrix ADC on AWS largely consists of configuring the Citrix ADC to load balance traffic to servers located outside the VPC that the Citrix ADC belongs to, such as within another VPC in a different Availability Region or an on-premises data center and so on.
Domain-Name based services (GSLB DBS) with Cloud load balancers
GSLB and DBS overview
Citrix ADC GSLB support using DBS (Domain Based Services) for Cloud load balancers allows for the autodiscovery of dynamic cloud services using a cloud load balancer solution. This configuration allows the Citrix ADC to implement Global Server Load Balancing Domain-Name Based Services (GSLB DBS) in an Active-Active environment. DBS allows the scaling of back-end resources in AWS and Microsoft Azure environments from DNS discovery.
This section covers integrations between Citrix ADC in the AWS and Azure Auto Scaling environments. The final section of the document details the ability to set up a HA pair of Citrix ADCs that span two different Availability Zones (AZs) specific to an AWS region.
Prerequisites
The prerequisites for the Citrix ADC GSLB Service Groups include a functioning AWS / Microsoft Azure environment with the knowledge and ability to configure Security Groups, Linux Web Servers, Citrix ADCs within AWS, Elastic IPs, and Elastic Load Balancers.
GSLB DBS Service integration requires Citrix ADC version 12.0.57 for AWS ELB and Microsoft Azure ALB load balancer instances.
Citrix ADC GSLB Service Group feature enhancements
GSLB Service Group entity: Citrix ADC version 12.0.57
GSLB Service Group is introduced which supports autoscale using BDS dynamic discovery.
DBS Feature Components (domain based service) shall be bound to the GSLB service group
Example:
> add server sydney_server LB-Sydney-xxxxxxxxxx.ap-southeast-2.elb.amazonaws.com
> add gslb serviceGroup sydney_sg HTTP -autoScale DNS -siteName sydney
> bind gslb serviceGroup sydney_sg sydney_server 80
<!--NeedCopy-->
Domain-name based services – AWS ELB
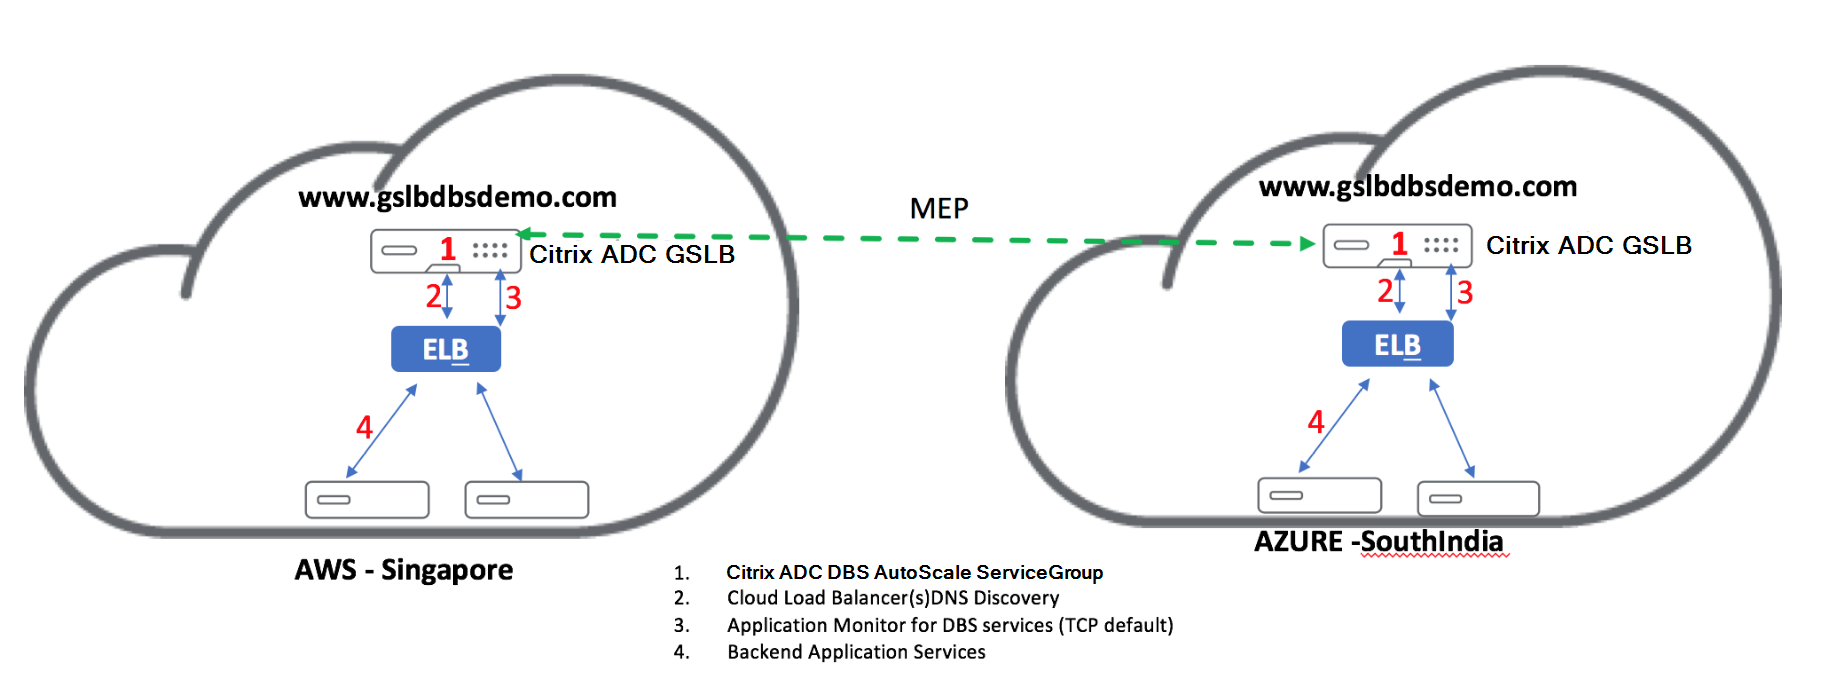
GLSB DBS utilizes the FQDN of your Elastic Load Balancer to dynamically update the GSLB Service Groups to include the back-end servers that are being created and deleted within AWS. The back-end servers or instances in AWS can be configured to scale based on network demand or CPU utilization. To configure this feature, we point the Citrix ADC to our Elastic Load Balancer to dynamically route to different servers in AWS without having to manually update the Citrix ADC every time an instance is created and deleted within AWS. The Citrix ADC DBS feature for GSLB Service Groups uses DNS aware service discovery to determine the member service resources of the DBS namespace identified in the AutoScaler group.
Diagram:
Citrix ADC GSLB DBA AutoScale components with Cloud Load Balancers
Use Citrix ADC HA in AWS across multiple availability zones
Deploying the Citrix ADC in AWS across different availability zones is a new feature released for the Citrix ADC 12.1. This is done by attaching the Citrix ADC to an Elastic Network IP address (ENI).
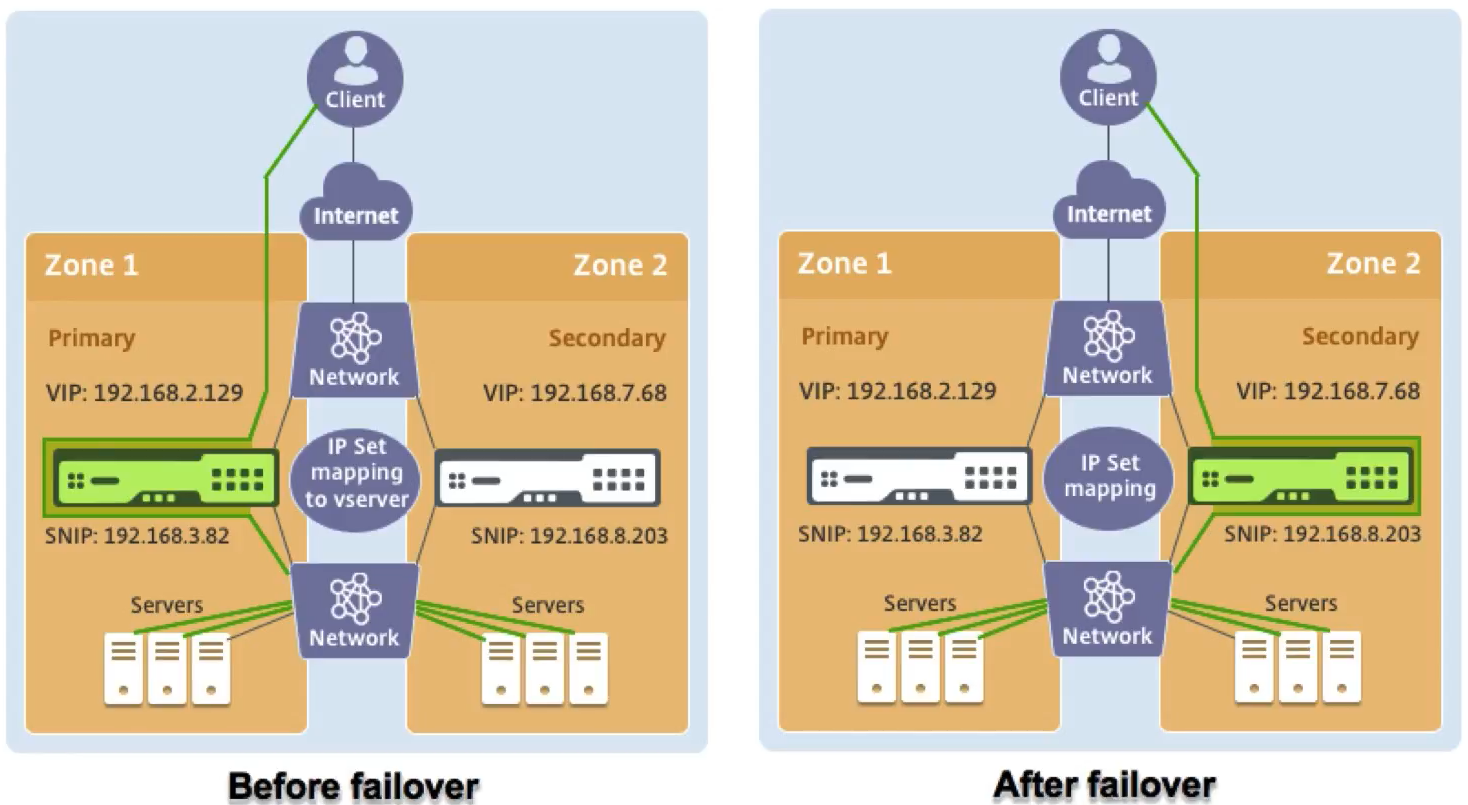
The way the solution works is slightly different than others, as it requires you to set up the HA on the VPX and an independent network configuration. This solution uses a new capability of the IP set feature for the virtual server to maintain failover.
To get started, you must log into the Citrix ADC and define or stand up a server-side network address, client-side address, as well as the routing to both.
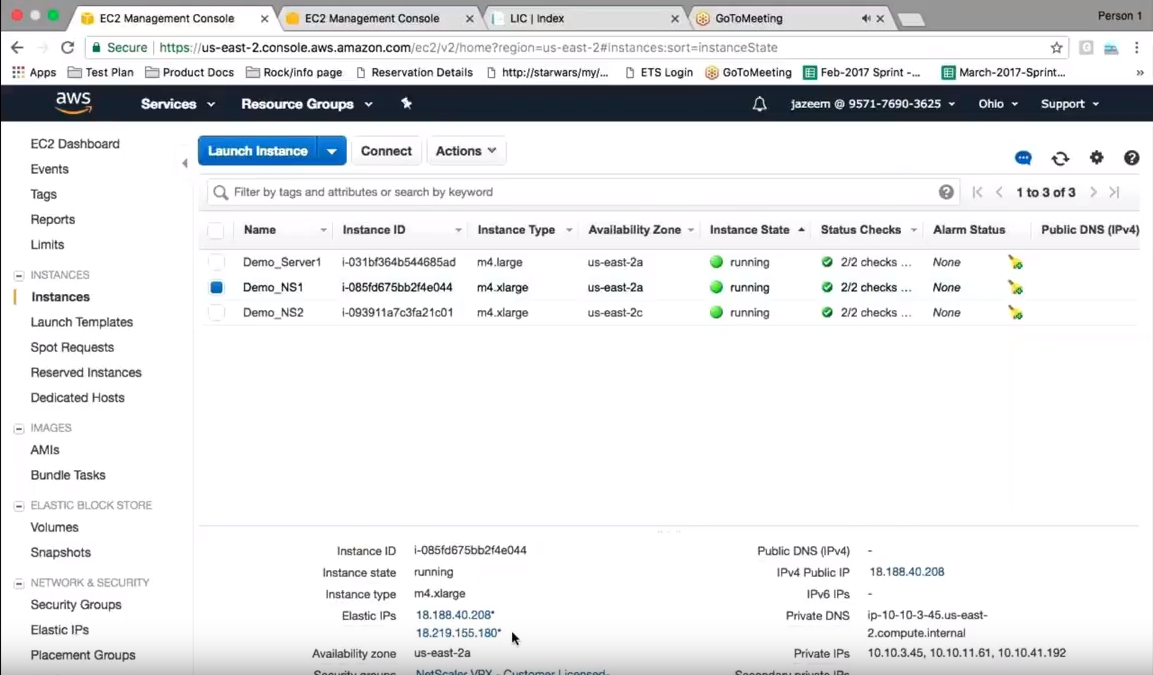
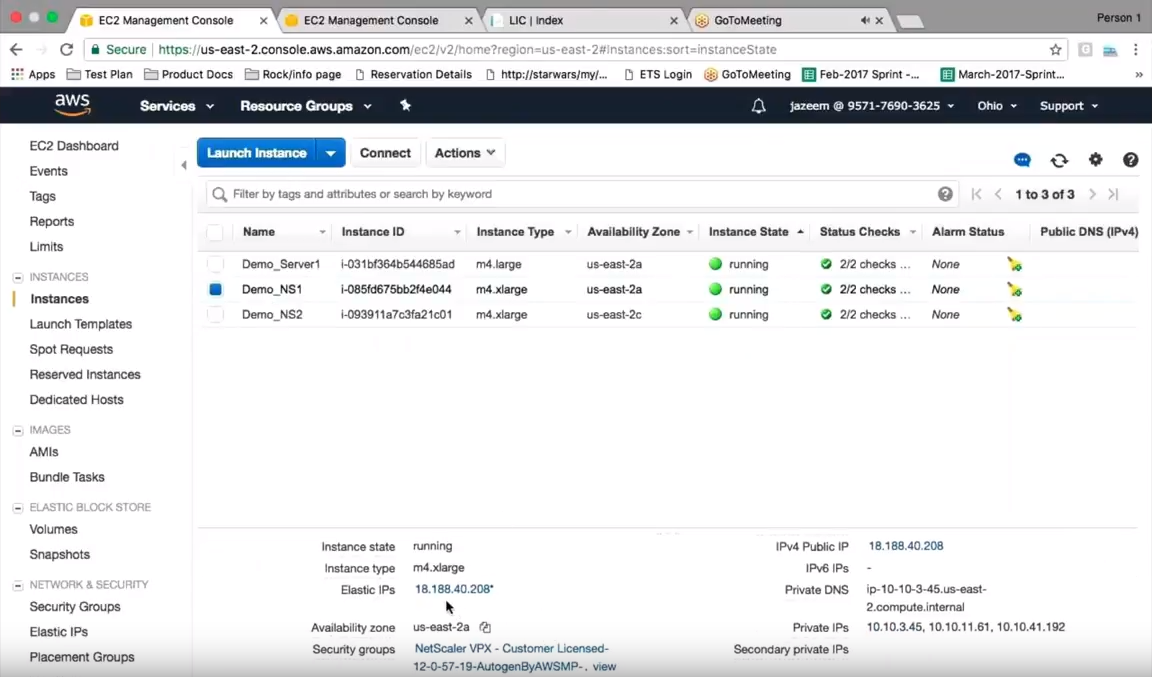
In the AWS console, the first VPX has been set up with an elastic IP.
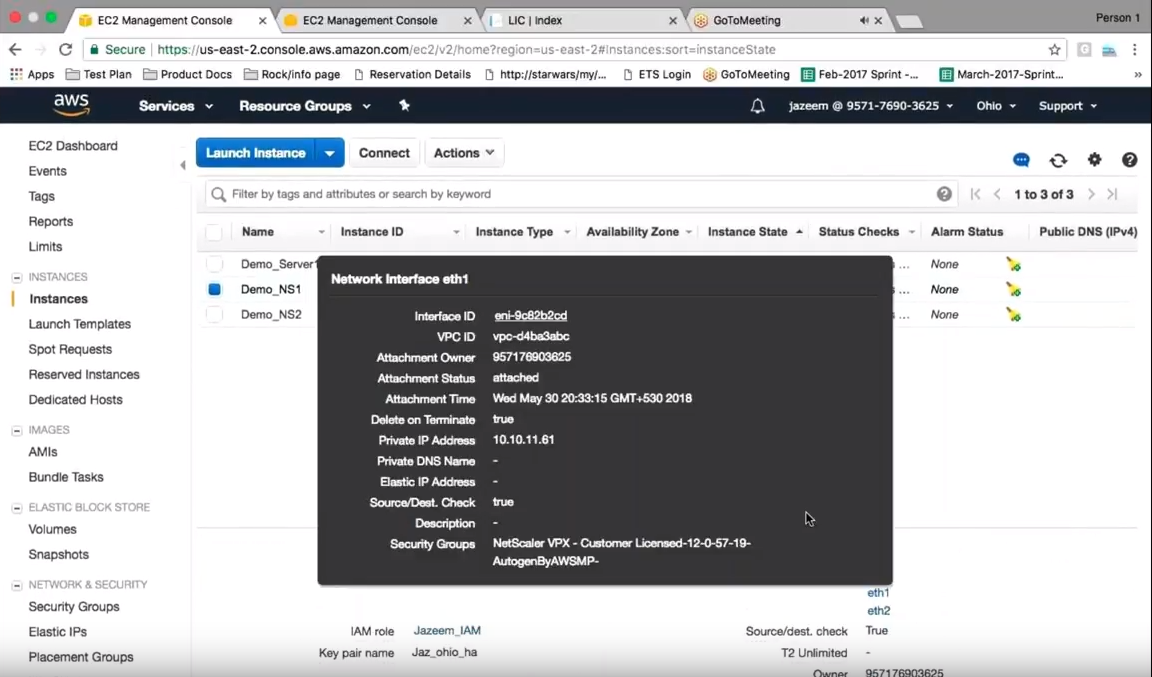
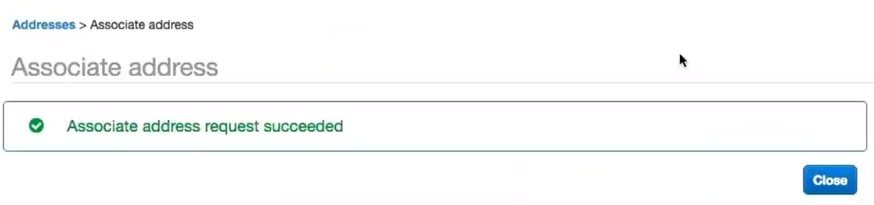
Going into the elastic interface, the first thing to make the solution work is to associate that elastic IP to the existing private address on that interface.
After that association is made, you are ready to go ahead and do the failover.
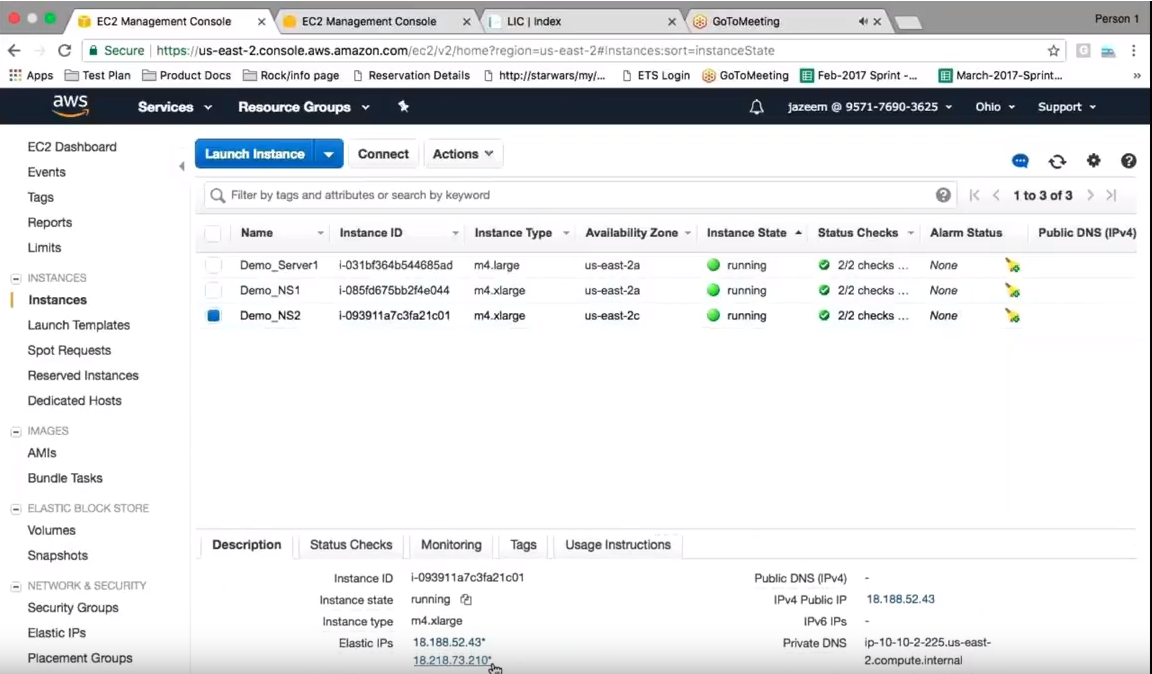
At the bottom, there should be a second elastic IP now on the VPX.
So go to the VPX to initiate a failover and go back into the AWS console. This time looking at the elastic IPs belonging to the first Citrix ADC, notice that the new EIP is not there, as it’s now been moved to the second Citrix ADC.
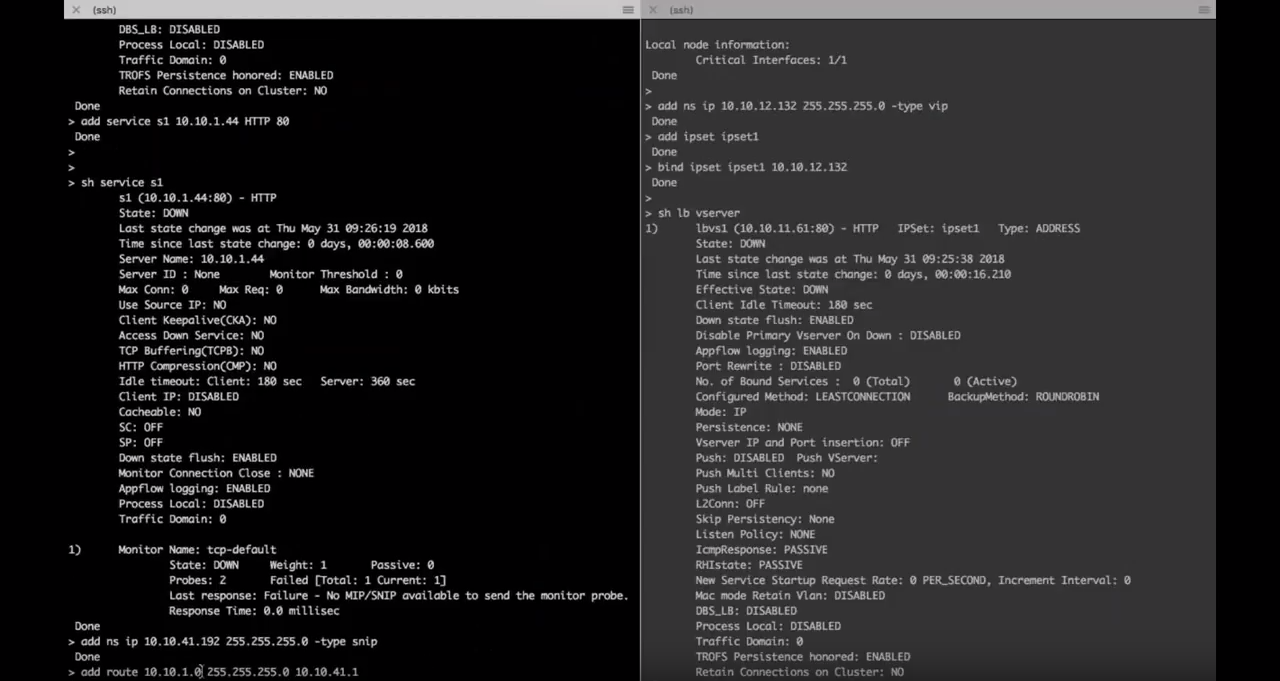
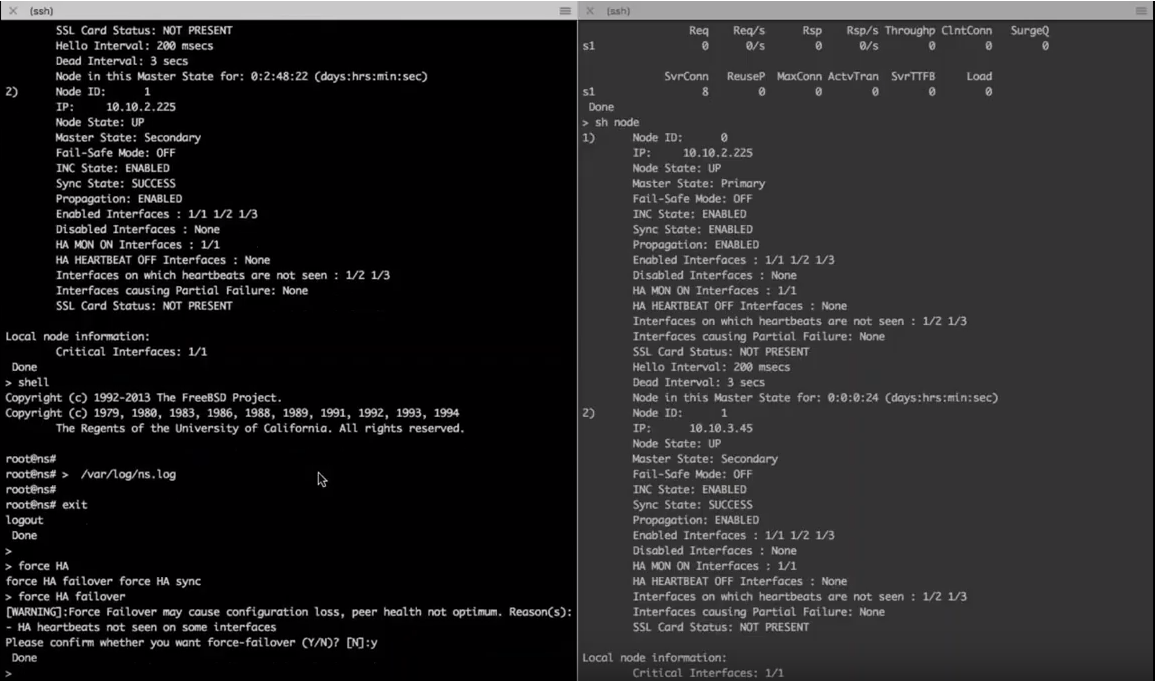
To verify this, enter a show node command on the first and second Citrix ADC to see that the second Citrix ADC is now set up in a Primary state as before it was in standby.
Now you can look at real time traffic flow.
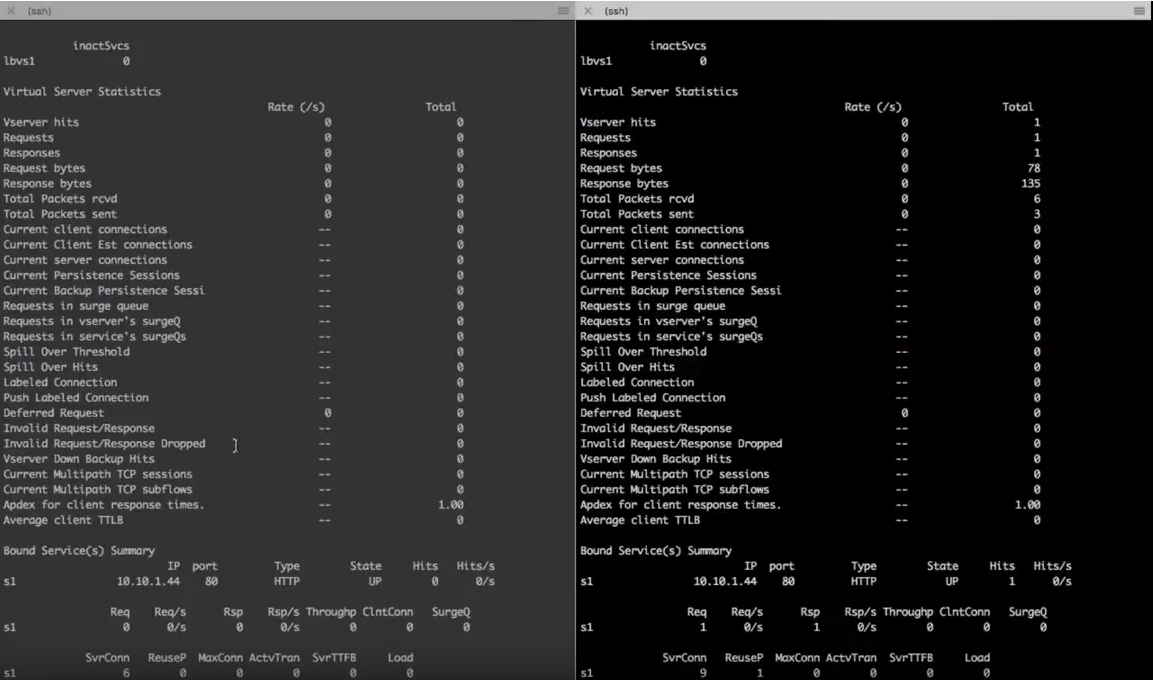
You can send a request over to the VIP after the failover. If you do a stat on the LB virtual server on the Citrix ADC that was first active, notice that there’s no requests hit there. If you run the same command on the previously standby, now active Citrix ADC, you can see that there is a virtual server hit there. Showing that after the HA transition, the traffic went to the new Citrix ADC.
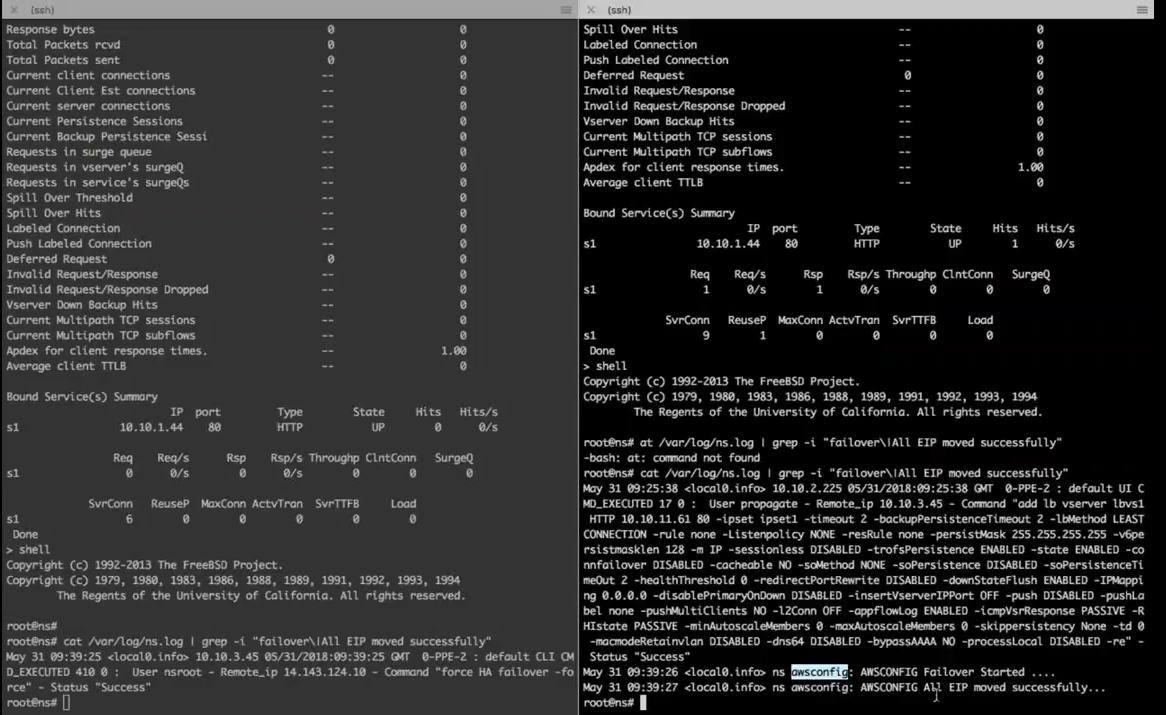
Now if you want to do some debugging or see what the current status is, you can drop to the shell and look for the records to show you when the HA failover happened, as well as when the AWS config or API call out was made to swing all the EIPs over from the primary Citrix ADC to the secondary.
Configure AWS components
Security groups
Note:
Recommendation should be to create different security groups for ELB, Citrix ADC GSLB Instance, and Linux instance, as the set of rules required for each of these entities will be different. This example has a consolidated Security Group configuration for brevity.
See Security Groups for Your VPC to ensure the proper configuration of the virtual firewall.
Step 1:
Log in to your AWS resource group and navigate to EC2. Within EC2 navigate to NETWORK & SECURITY > Security Groups.
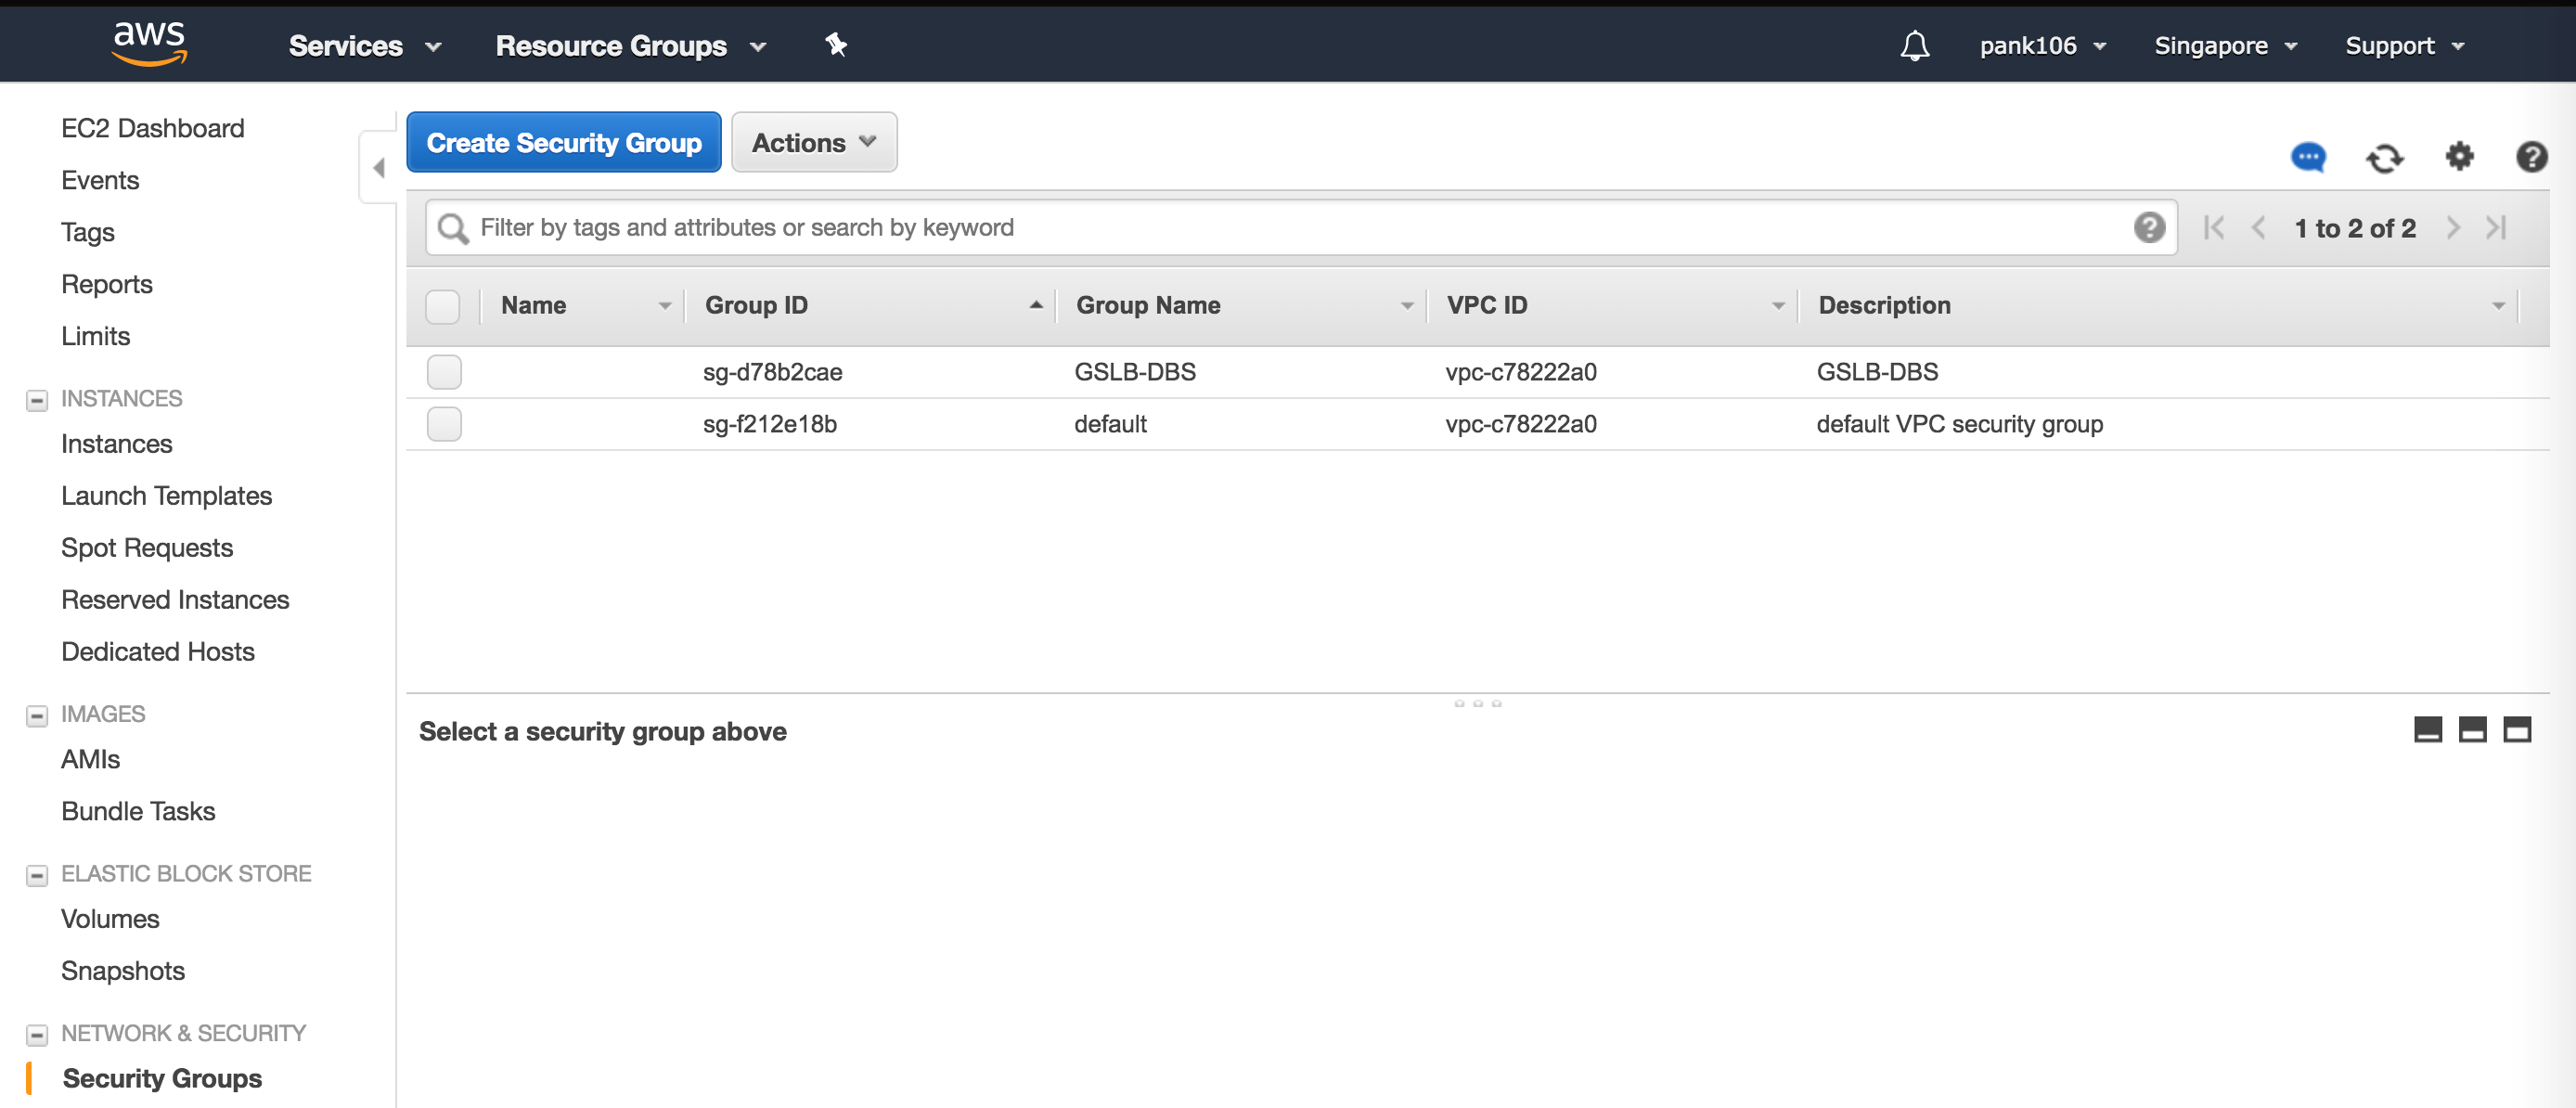
Step 2:
Click Create Security Group and provide a name and description. This security group encompasses the Citrix ADC and Linux back-end web servers.
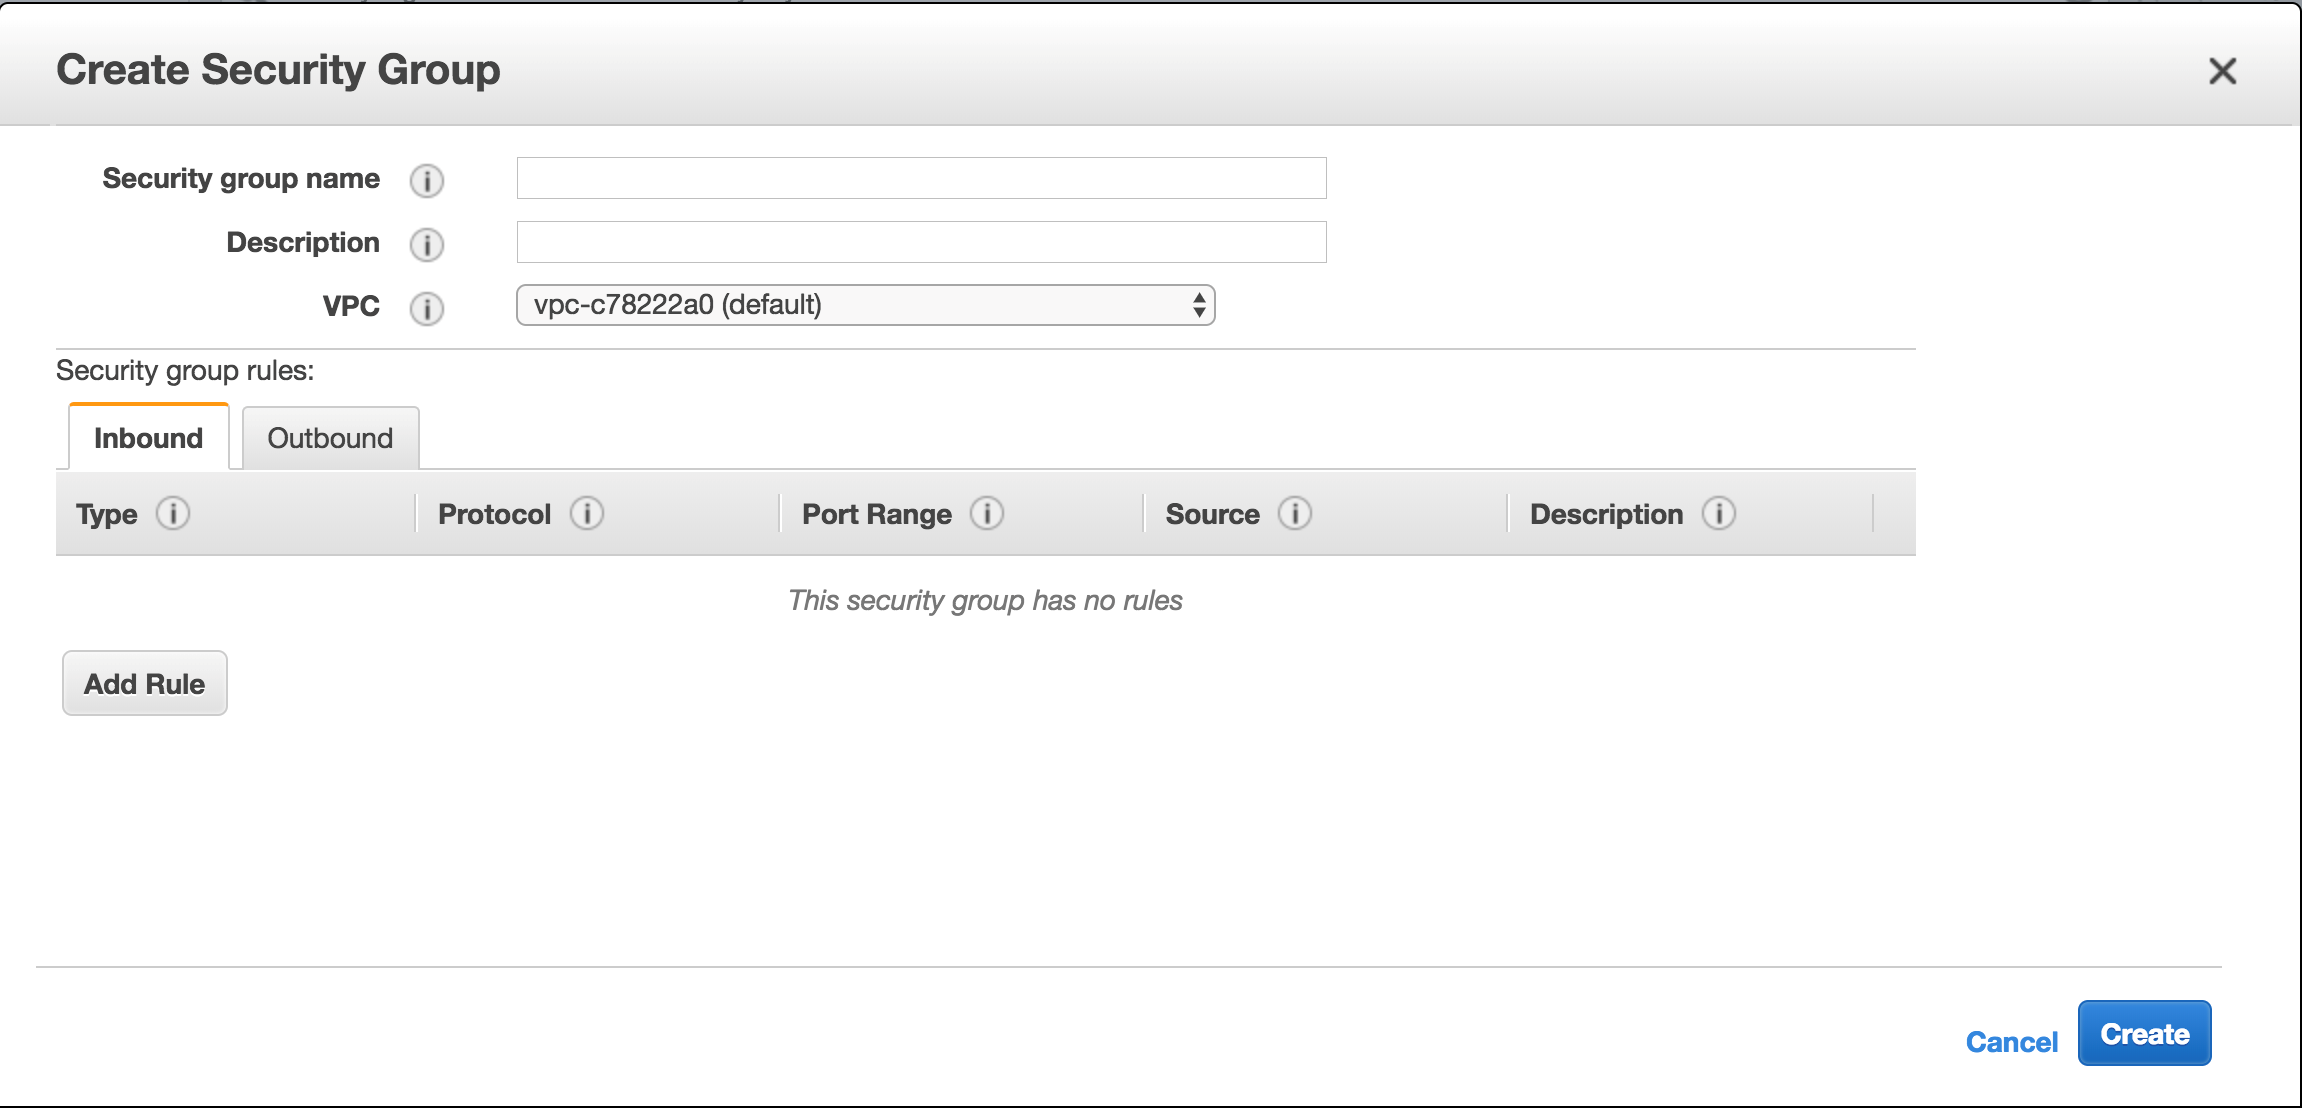
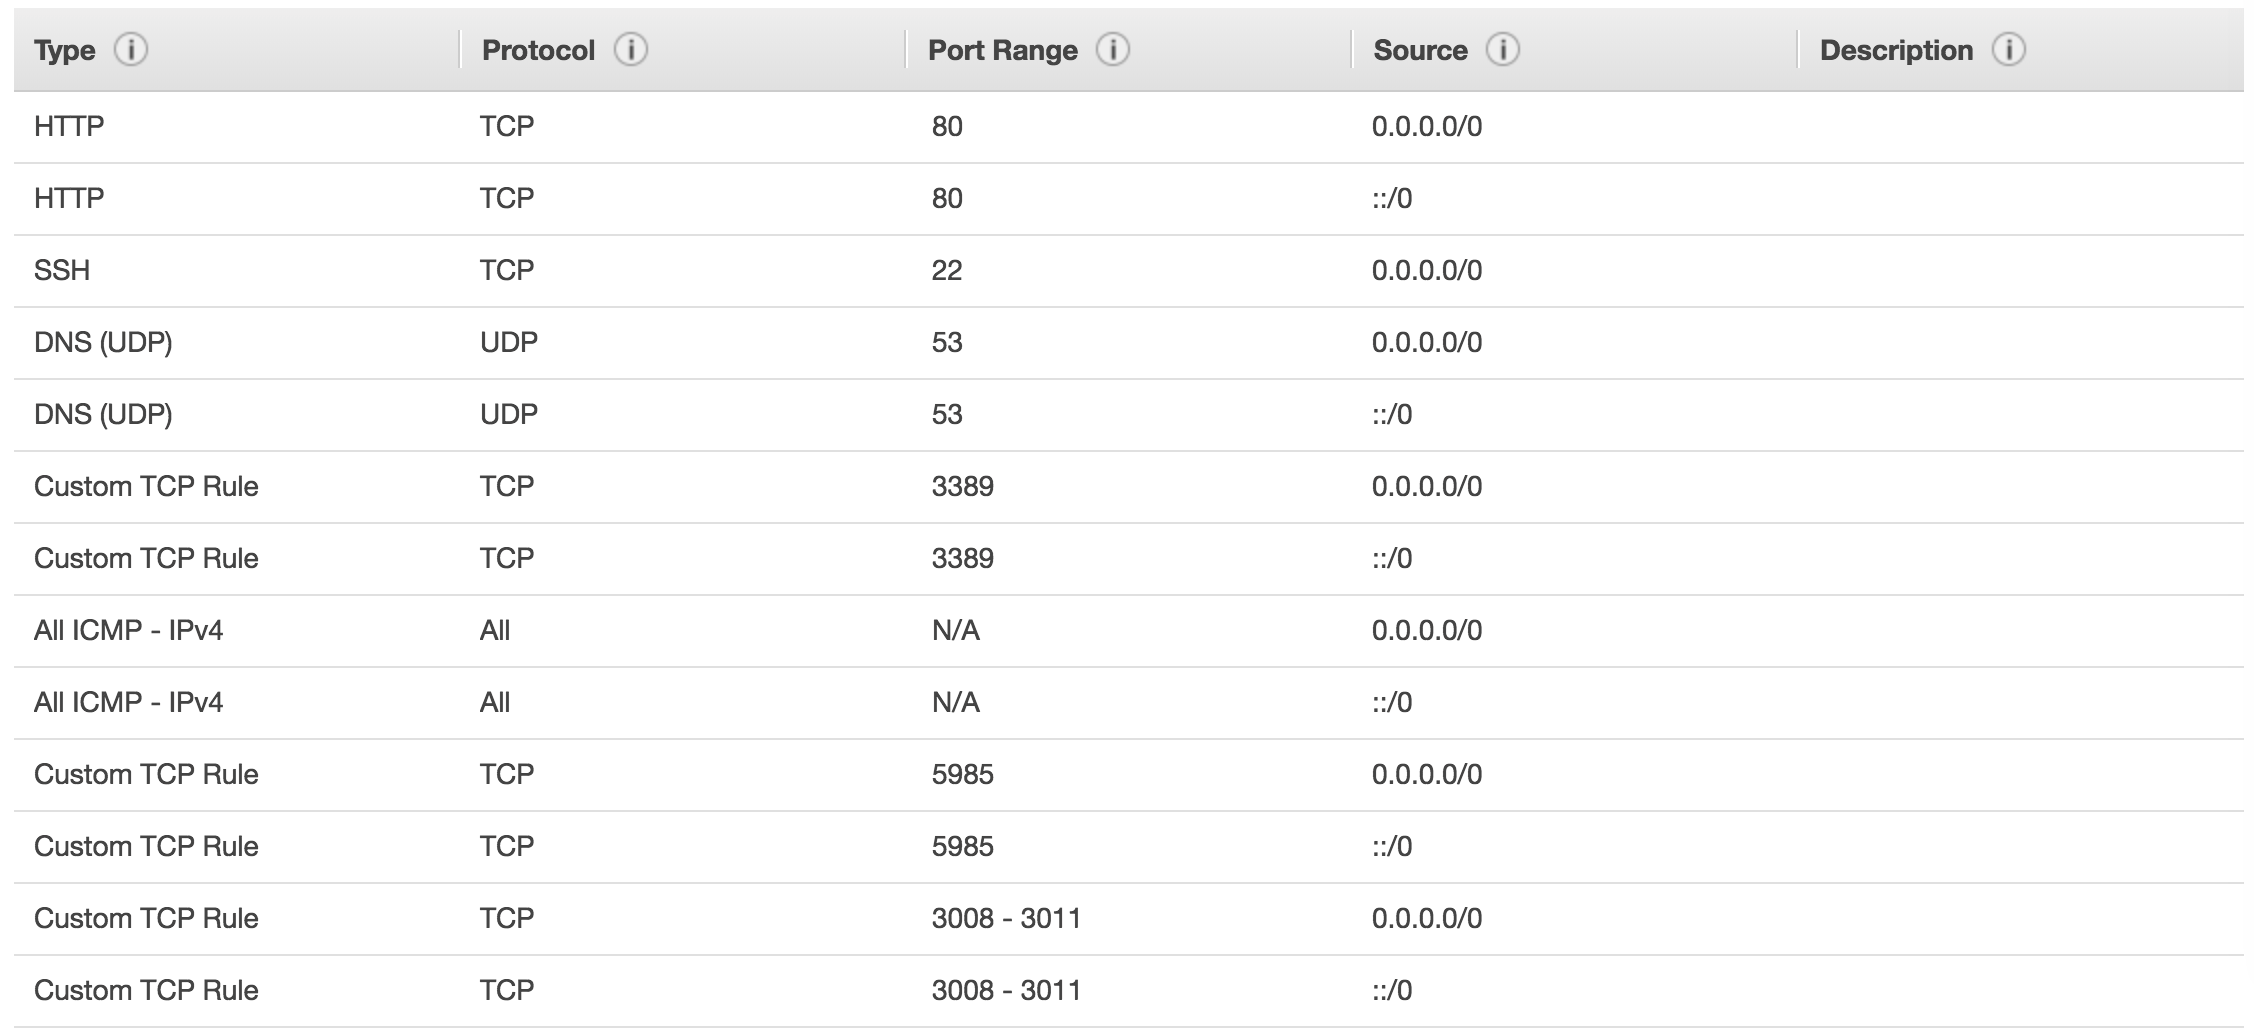
Step 3:
Add the inbound port rules from the screenshot below.
Note:
Limiting Source IP access is recommended for granular hardening.
Amazon Linux back-end Web Services
Step 4:
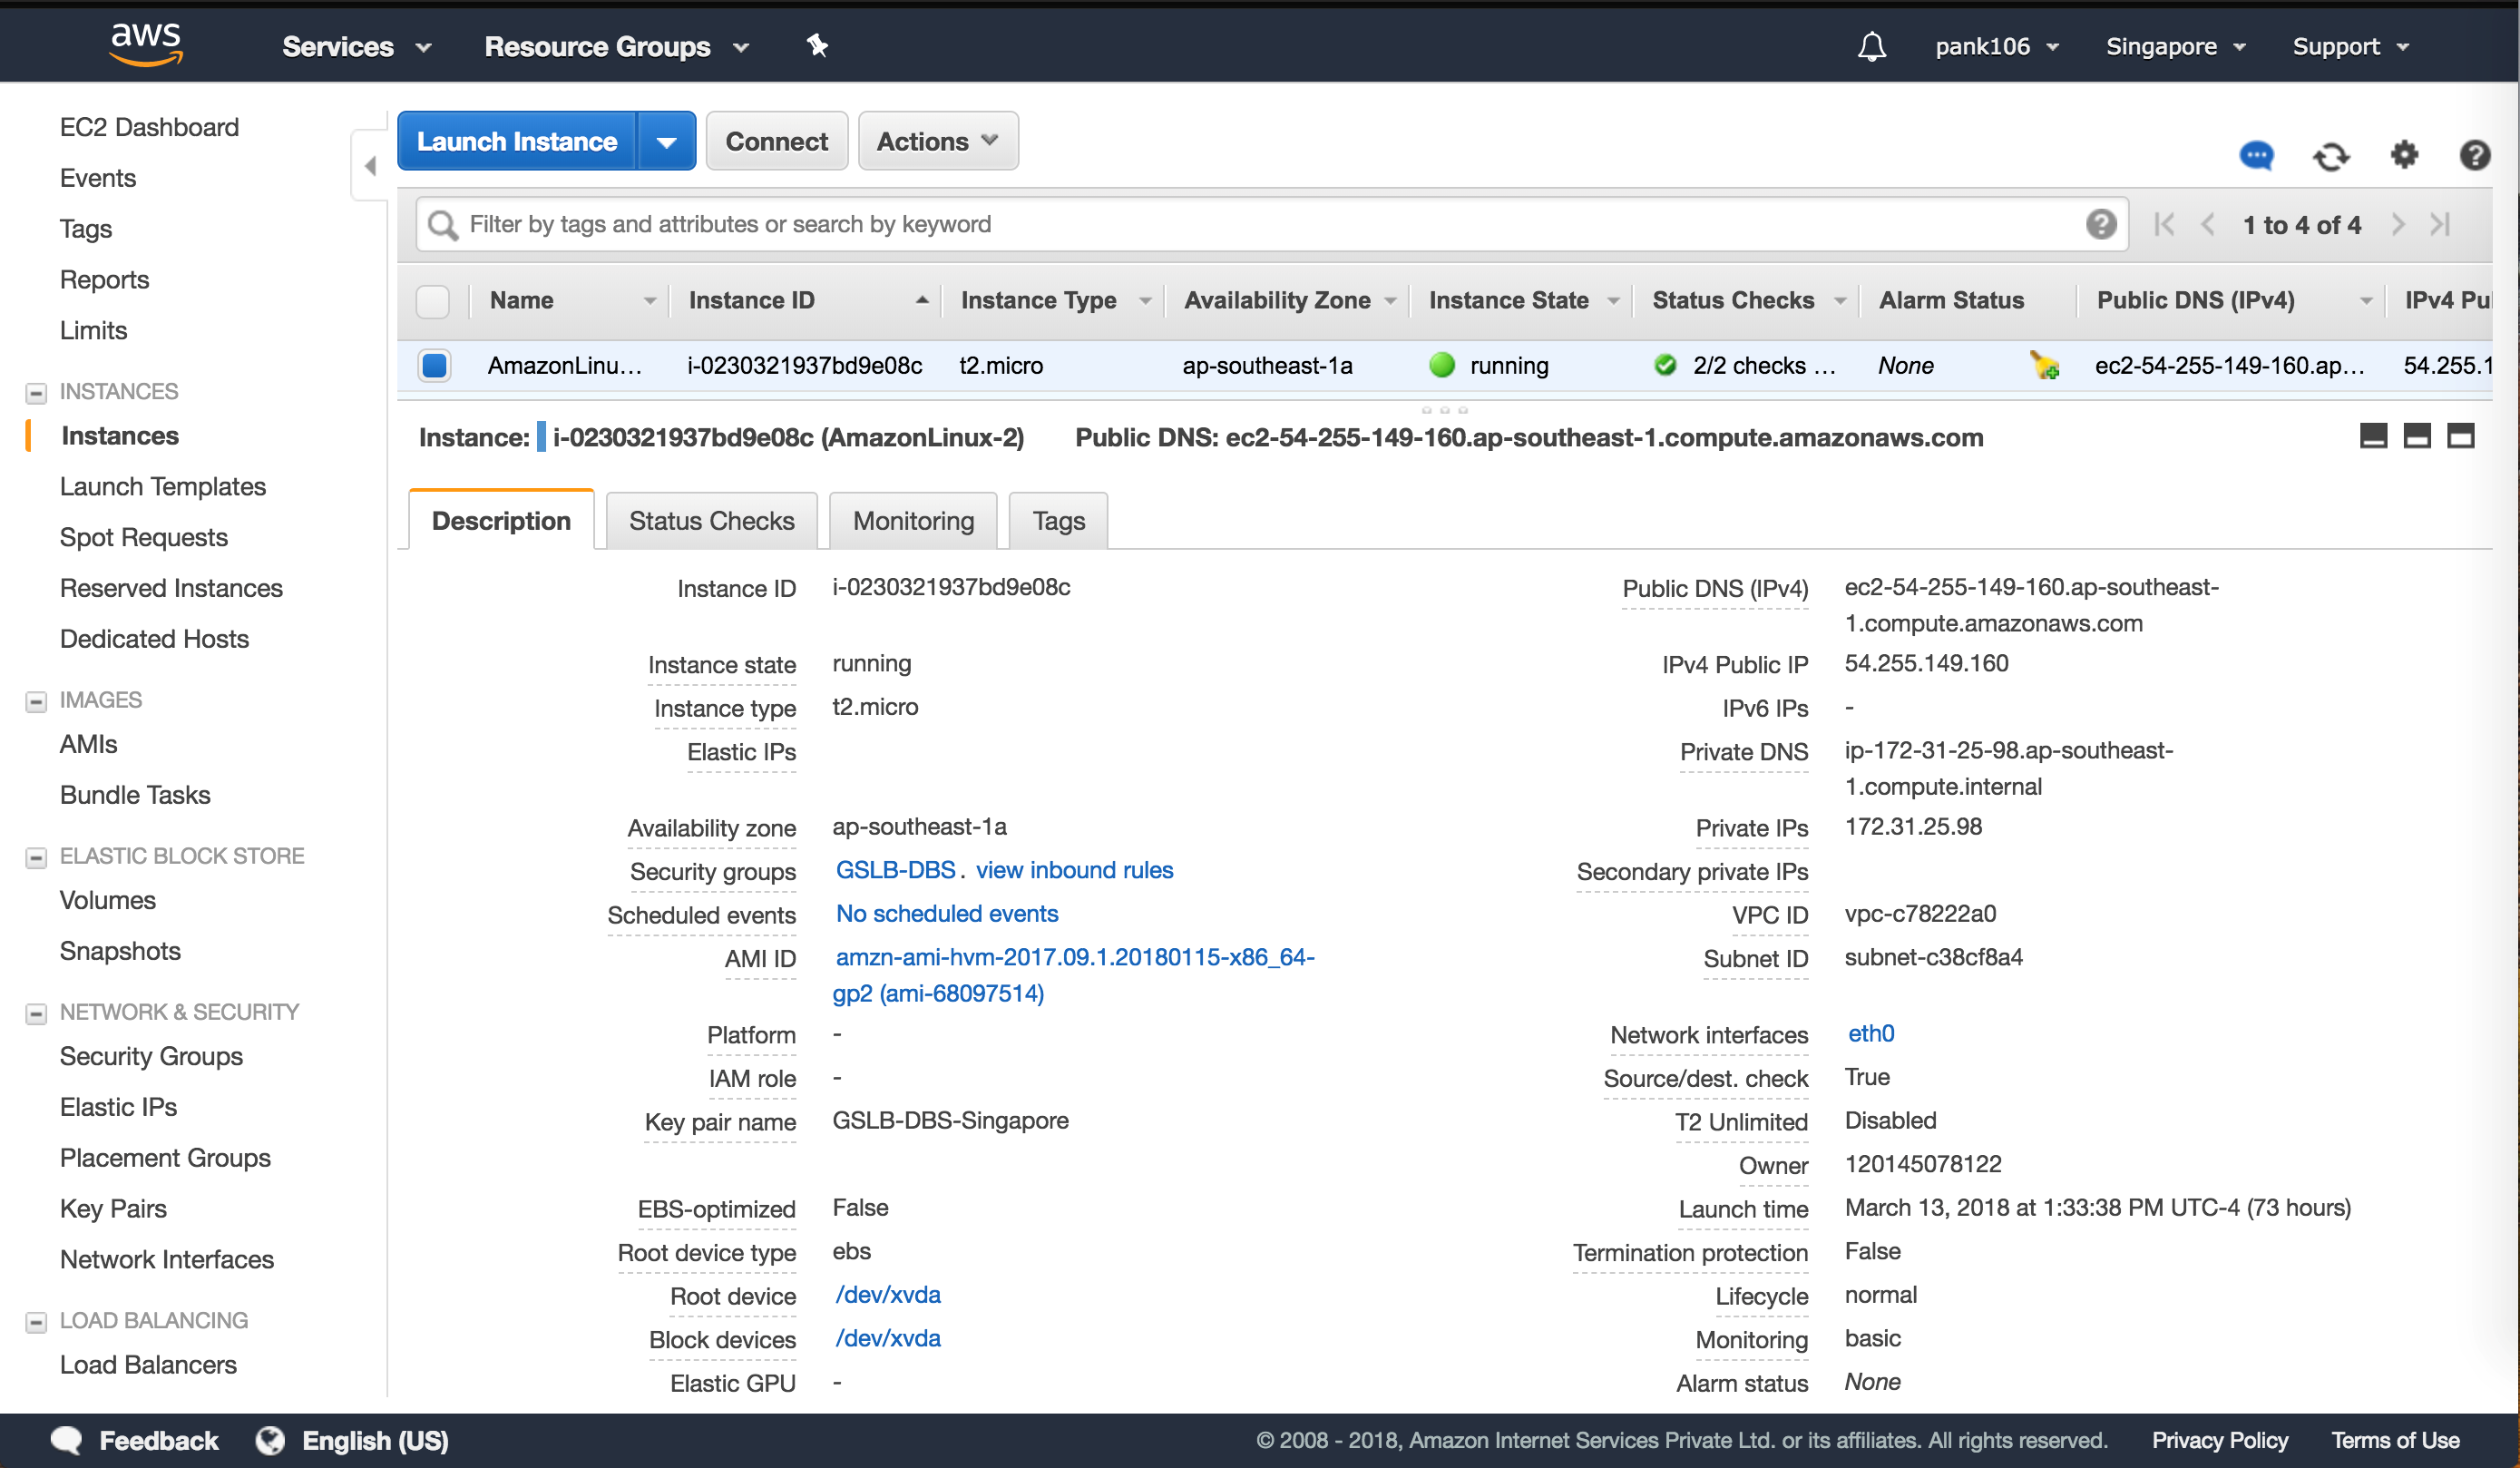
Log in to your AWS resource group and navigate to EC2. Within EC2 navigate to Instances.

Step 5:
Click Launch Instance using the details below configure the Amazon Linux instance.
Fill in details about setting up a Web Server or back-end service on this instance.
Citrix ADC configuration
Step 6:
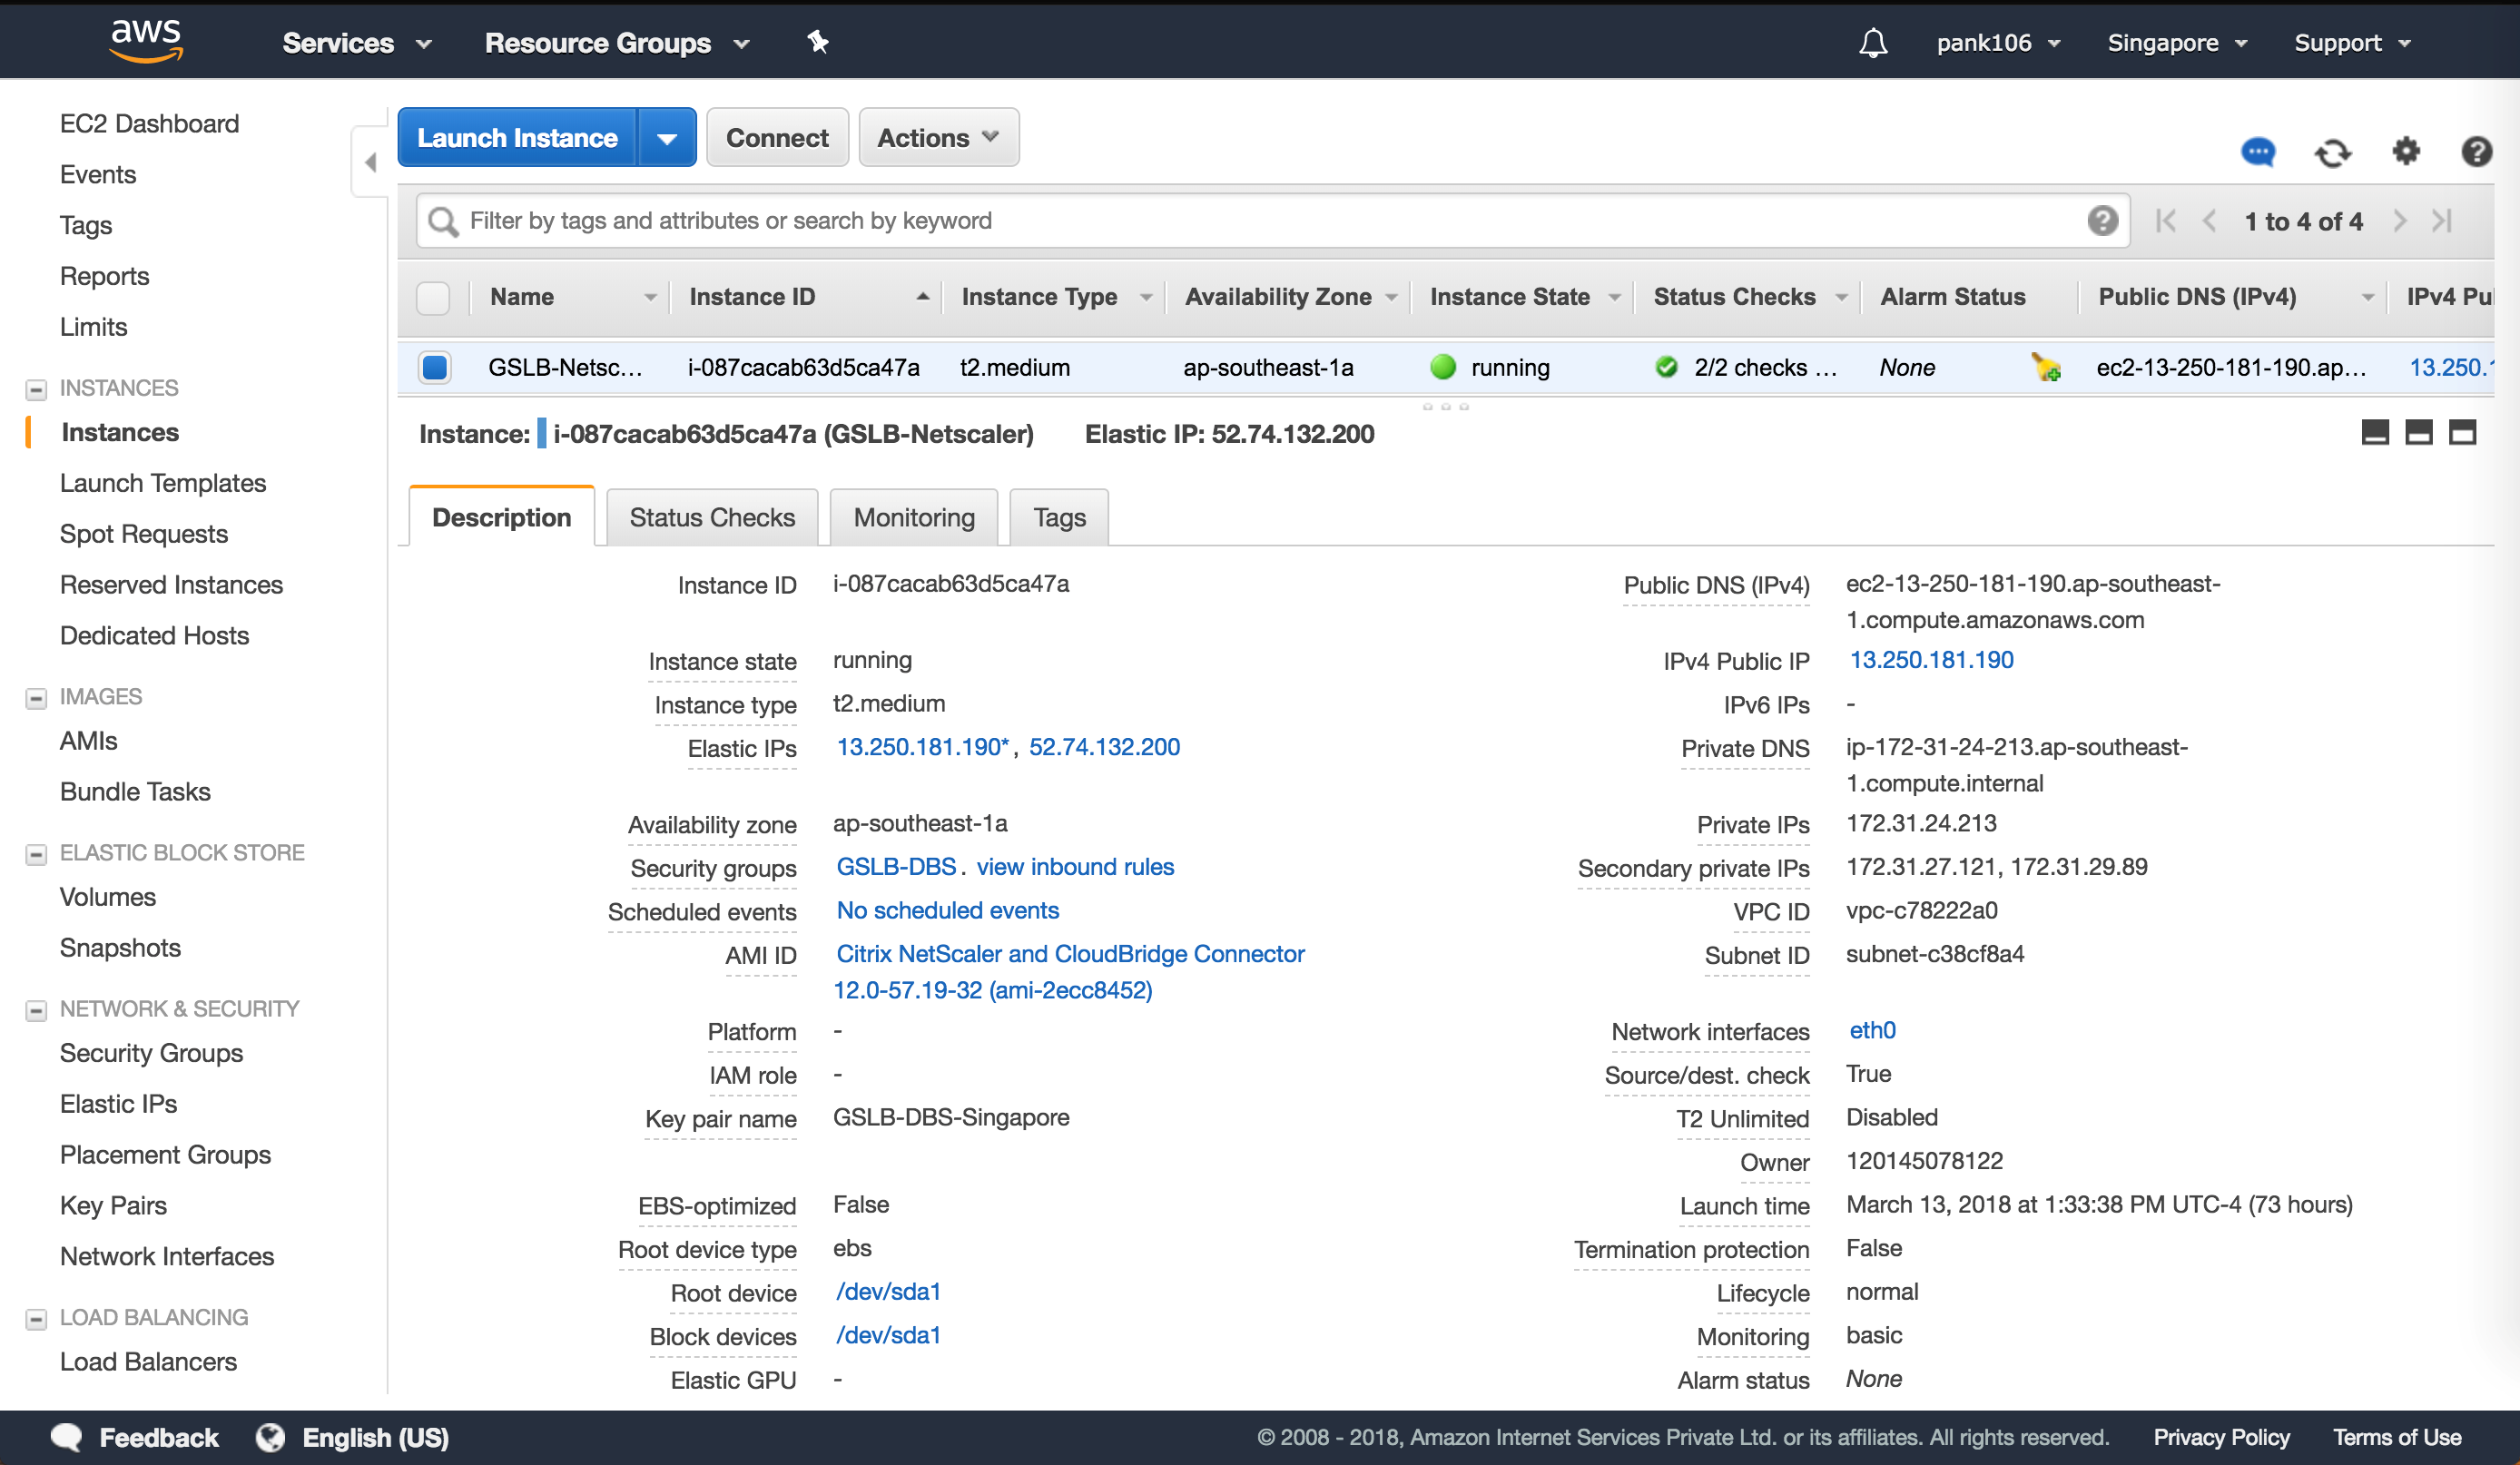
Log in to your AWS resource group and navigate to EC2. Within EC2 navigate to Instances.
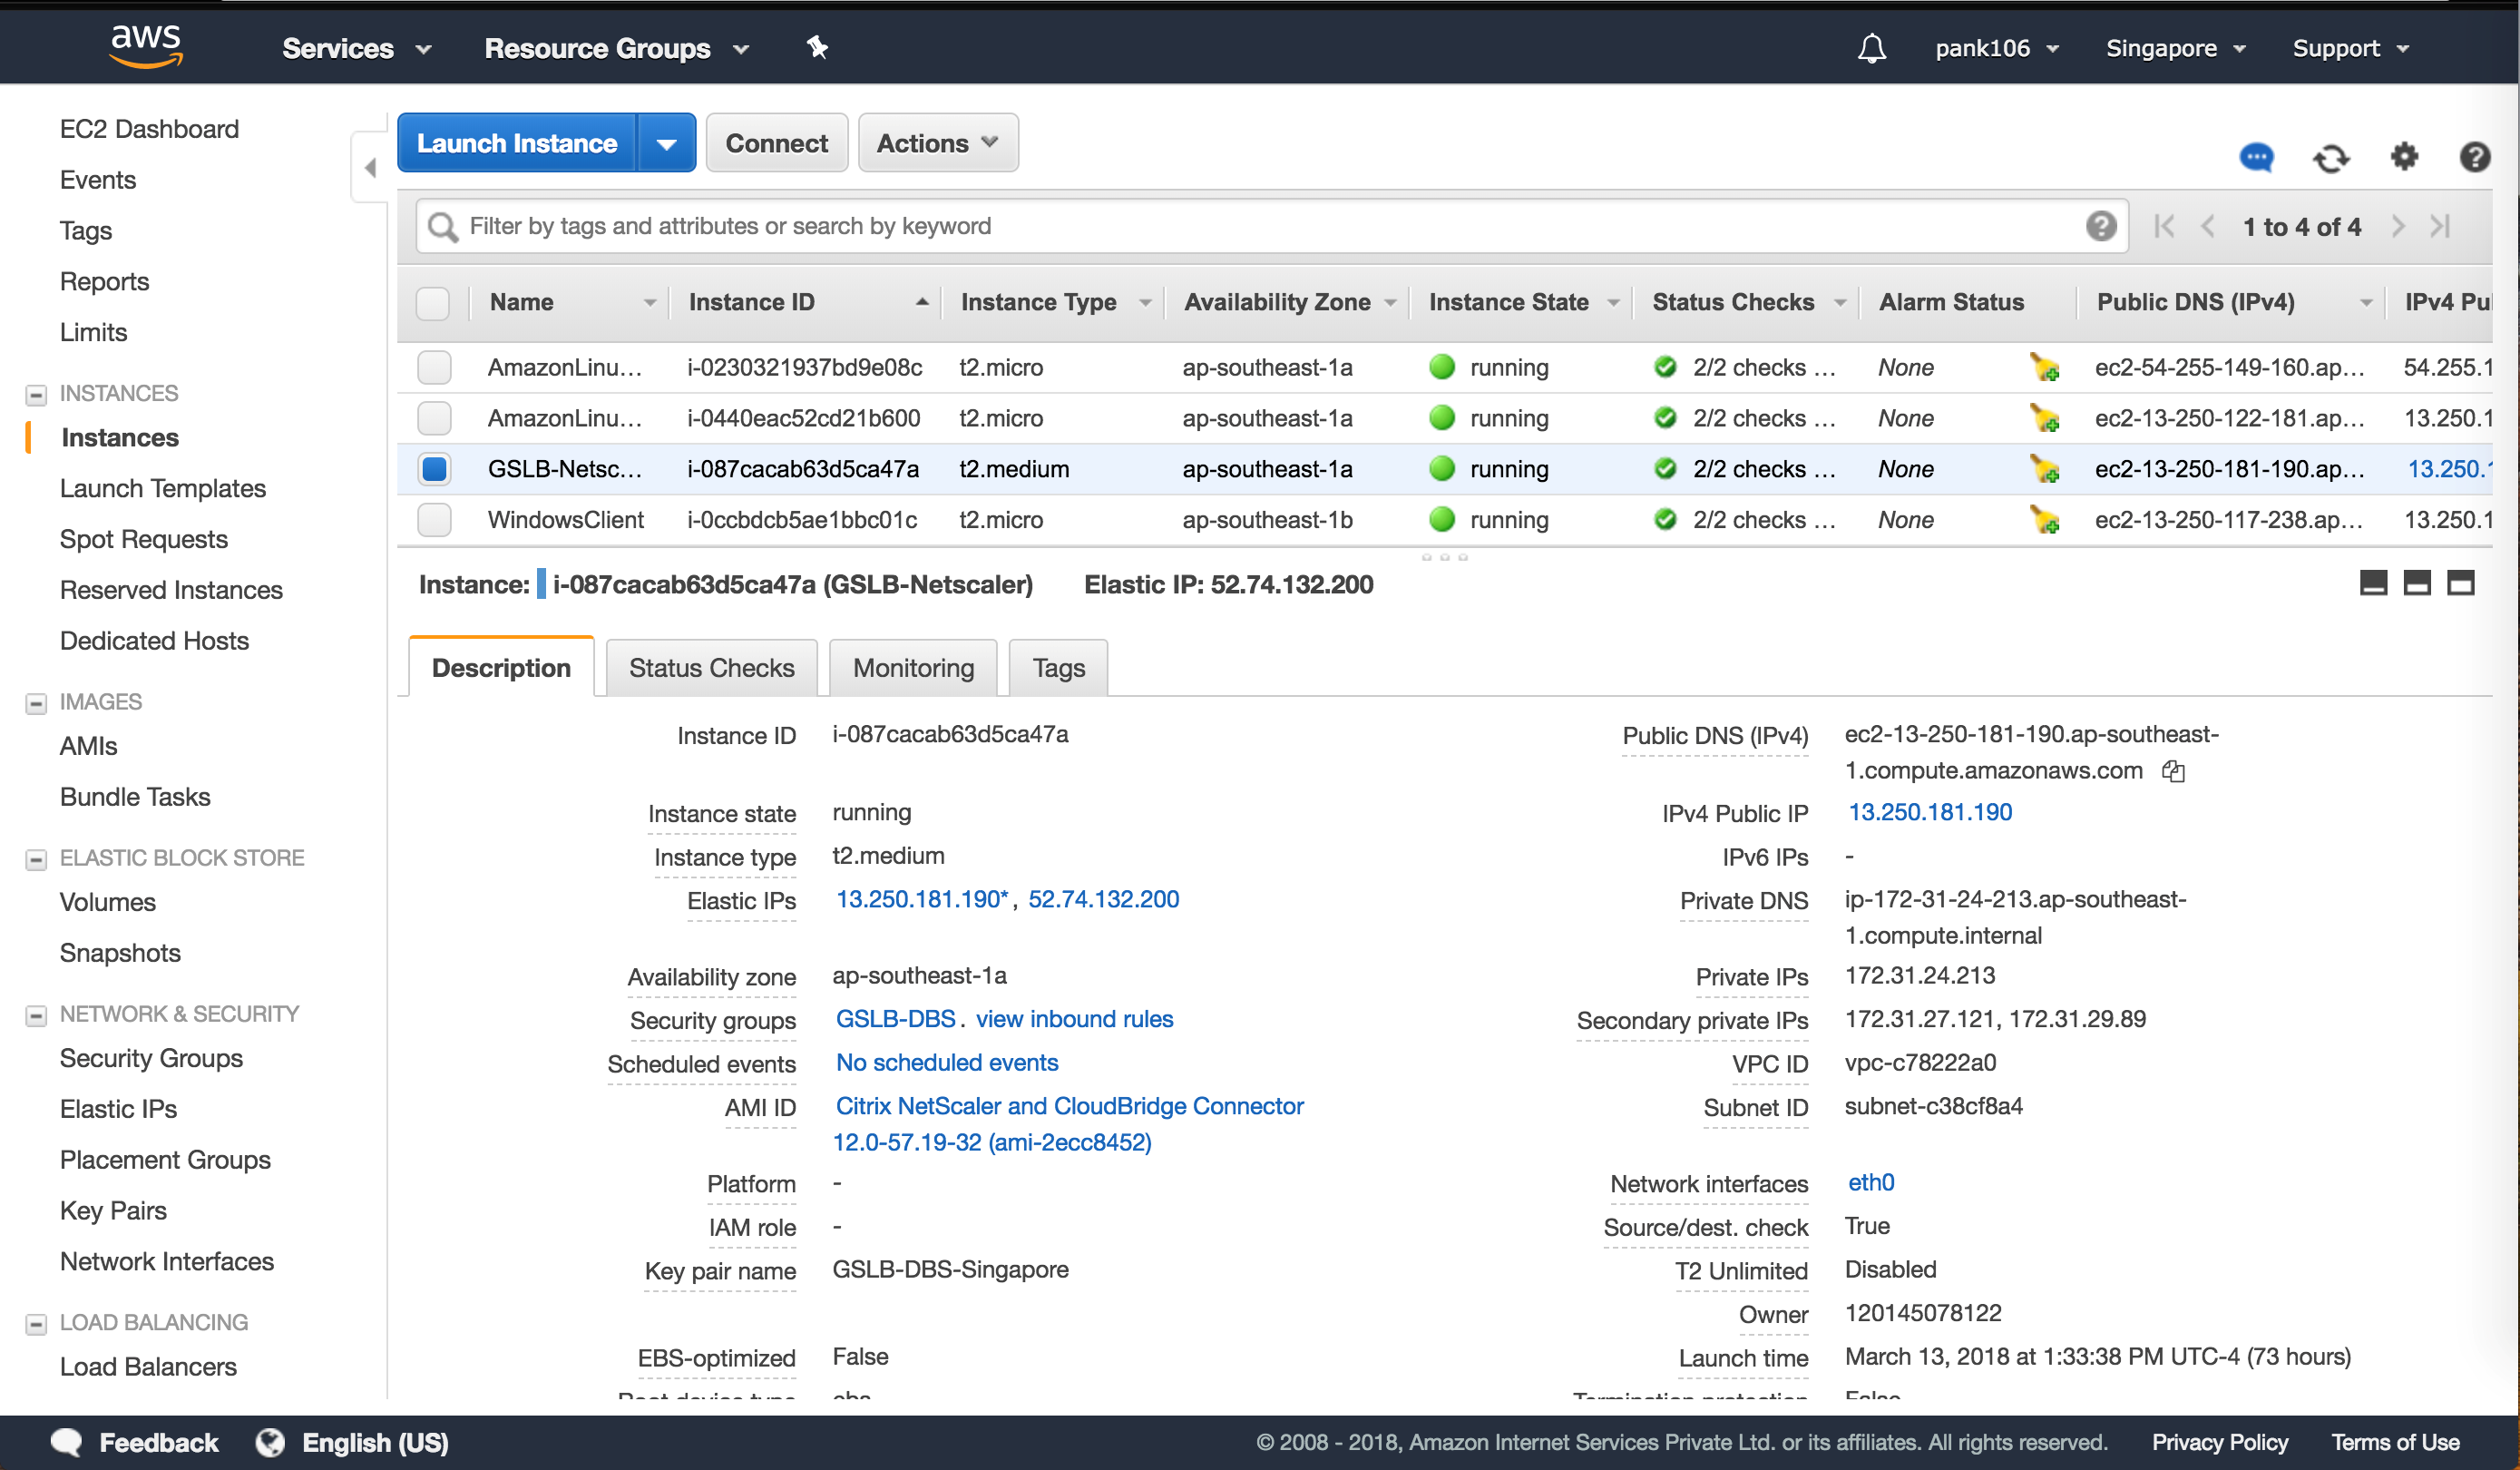
Step 7:
Click Launch Instance using the details below configure the Amazon AMI instance.
Elastic IP configuration
Note:
Citrix ADC can also be made to run with single elastic IP if required to reduce cost, by not having public IP for the NSIP. Instead attach elastic IP to SNIP which can cover for management access to the box, as well as GSLB site IP and ADNS IP.
Step 8:
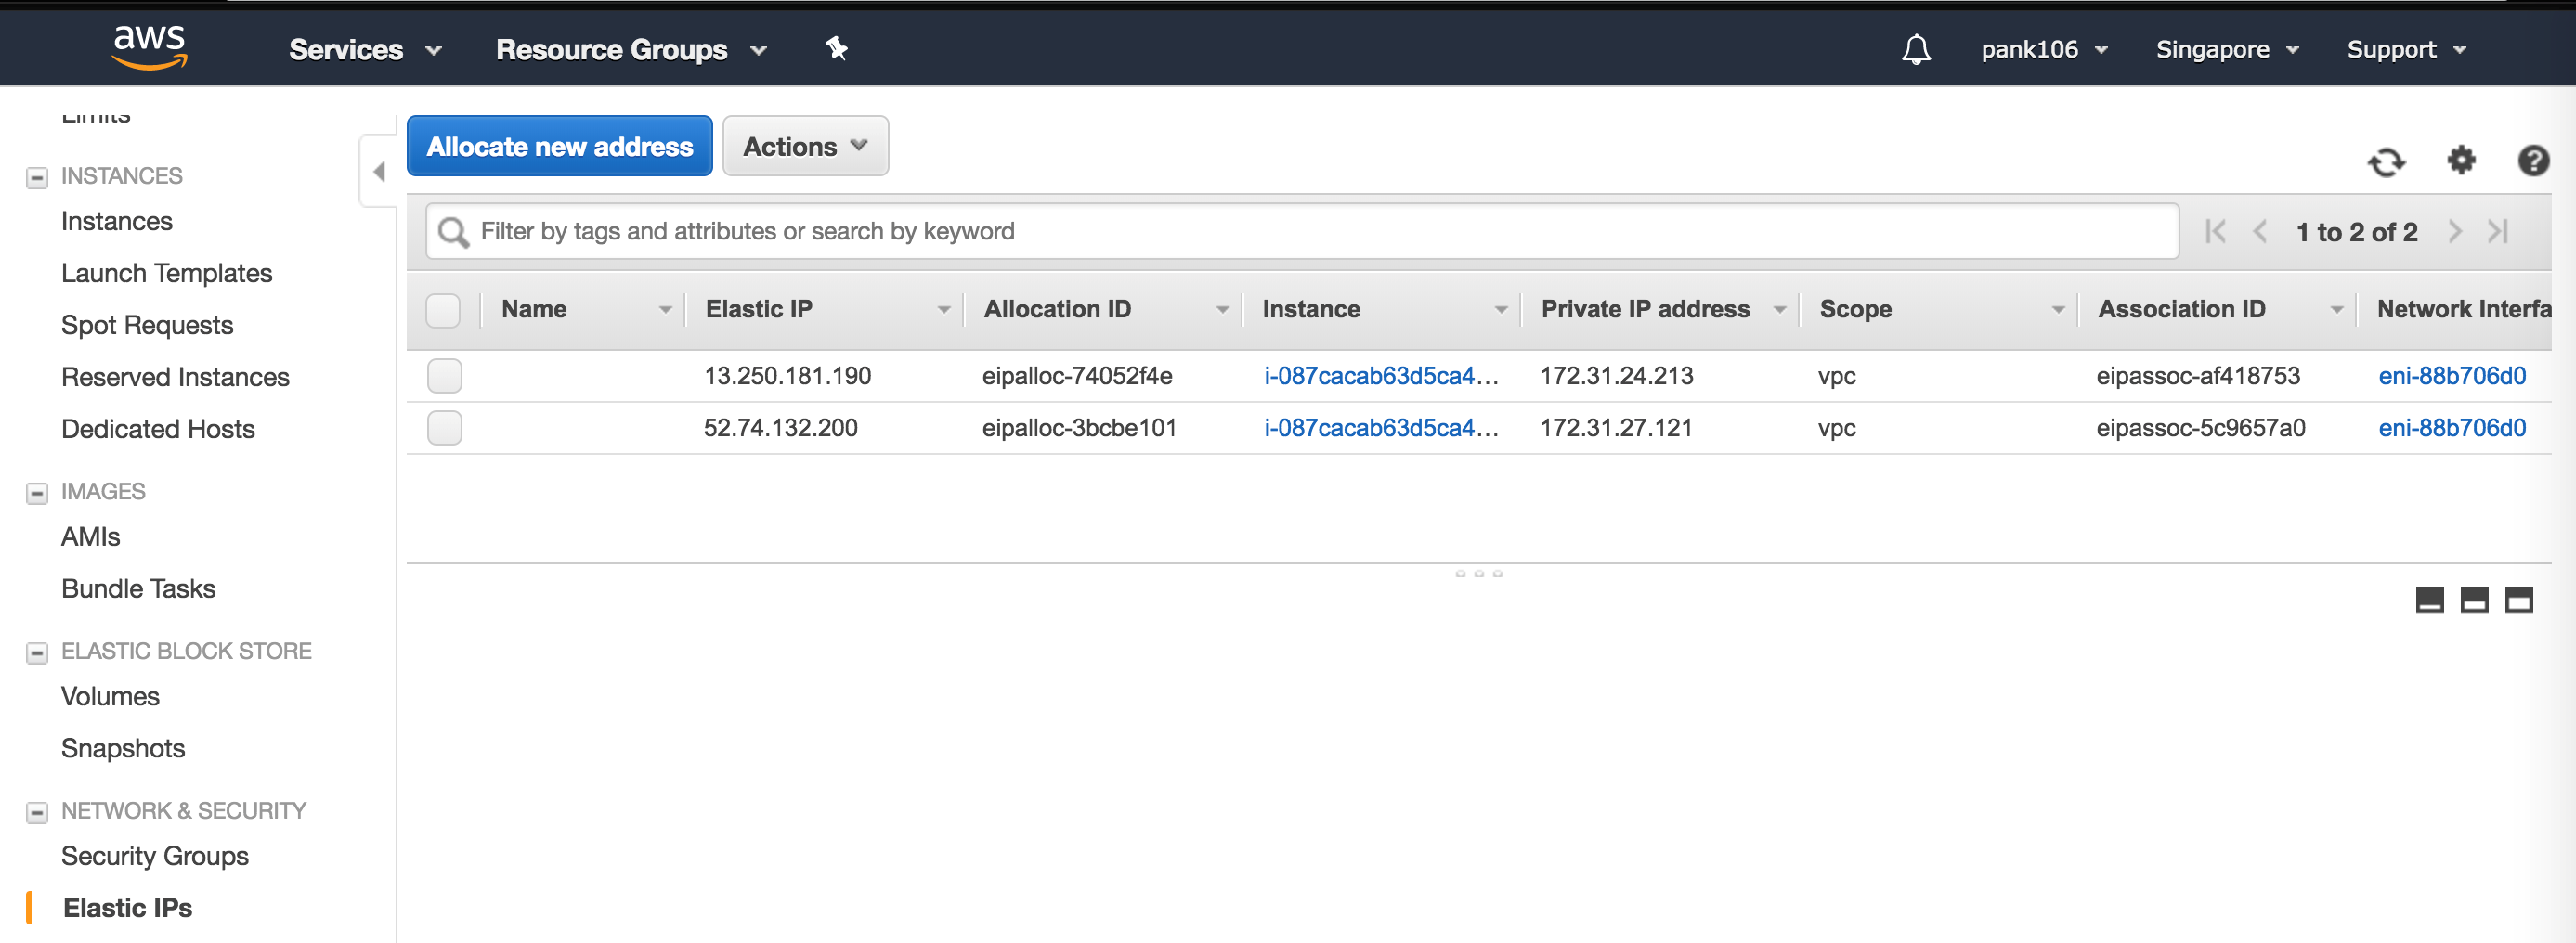
Log in to your AWS resource group and navigate to EC2. Within EC2 navigate to NETWORK & SECURITY and then configure Elastic IPs.
Click Allocate new address to create a new Elastic IP address.
Configure the Elastic IP to point to your running Citrix ADC instance within AWS.
Configure a second Elastic IP and again point it to your running Citrix ADC instance.
Elastic Load Balancer
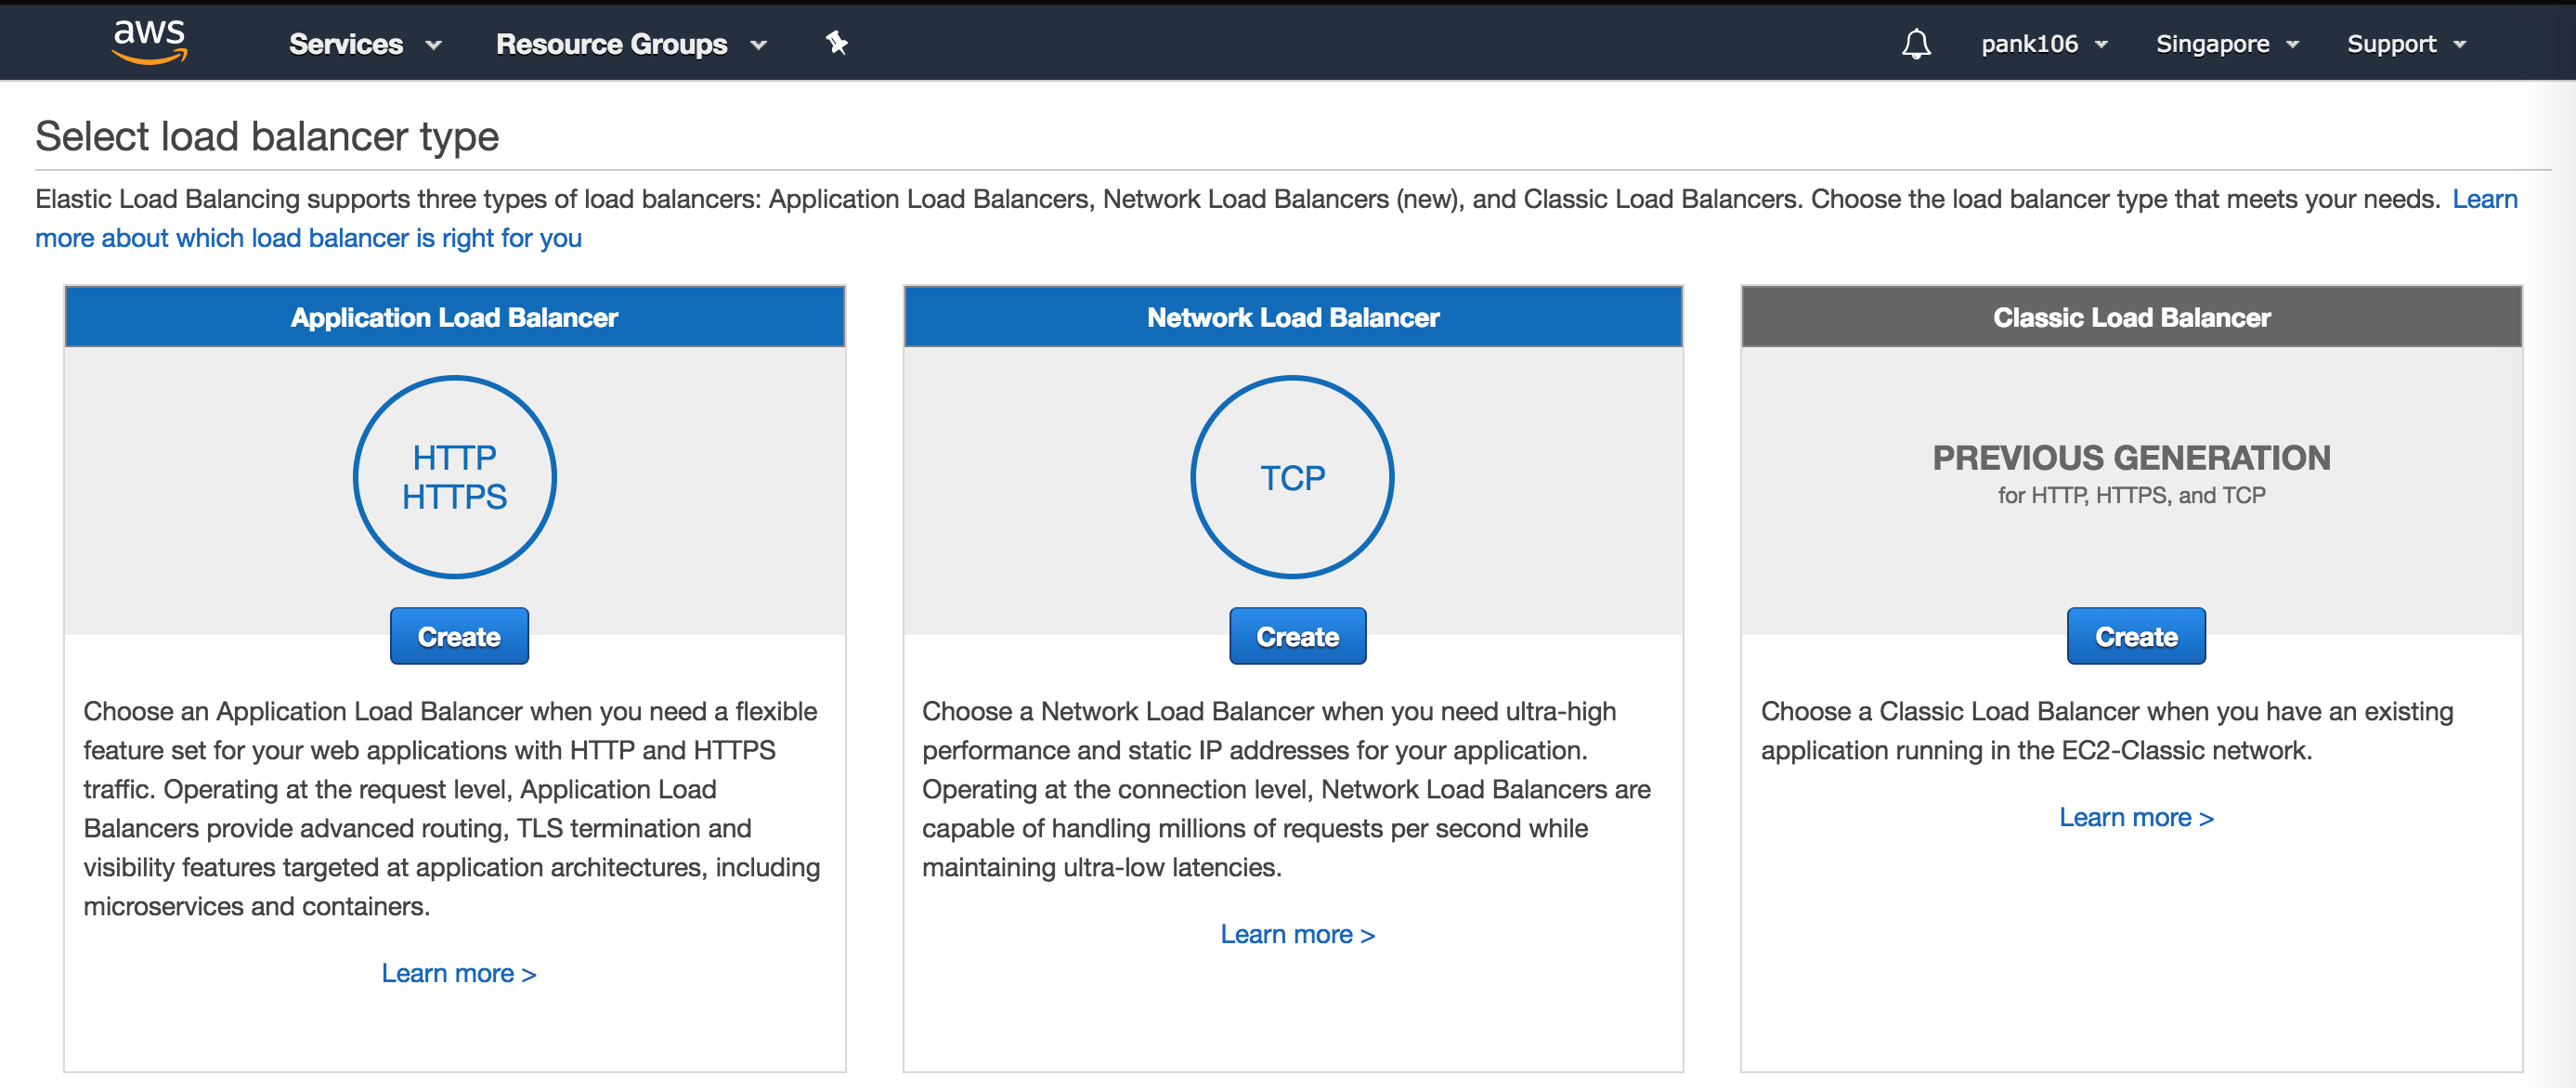
Step 9:
Log in to your AWS resource group and navigate to EC2. Within EC2 navigate to LOAD BALANCING and then Load Balancers.
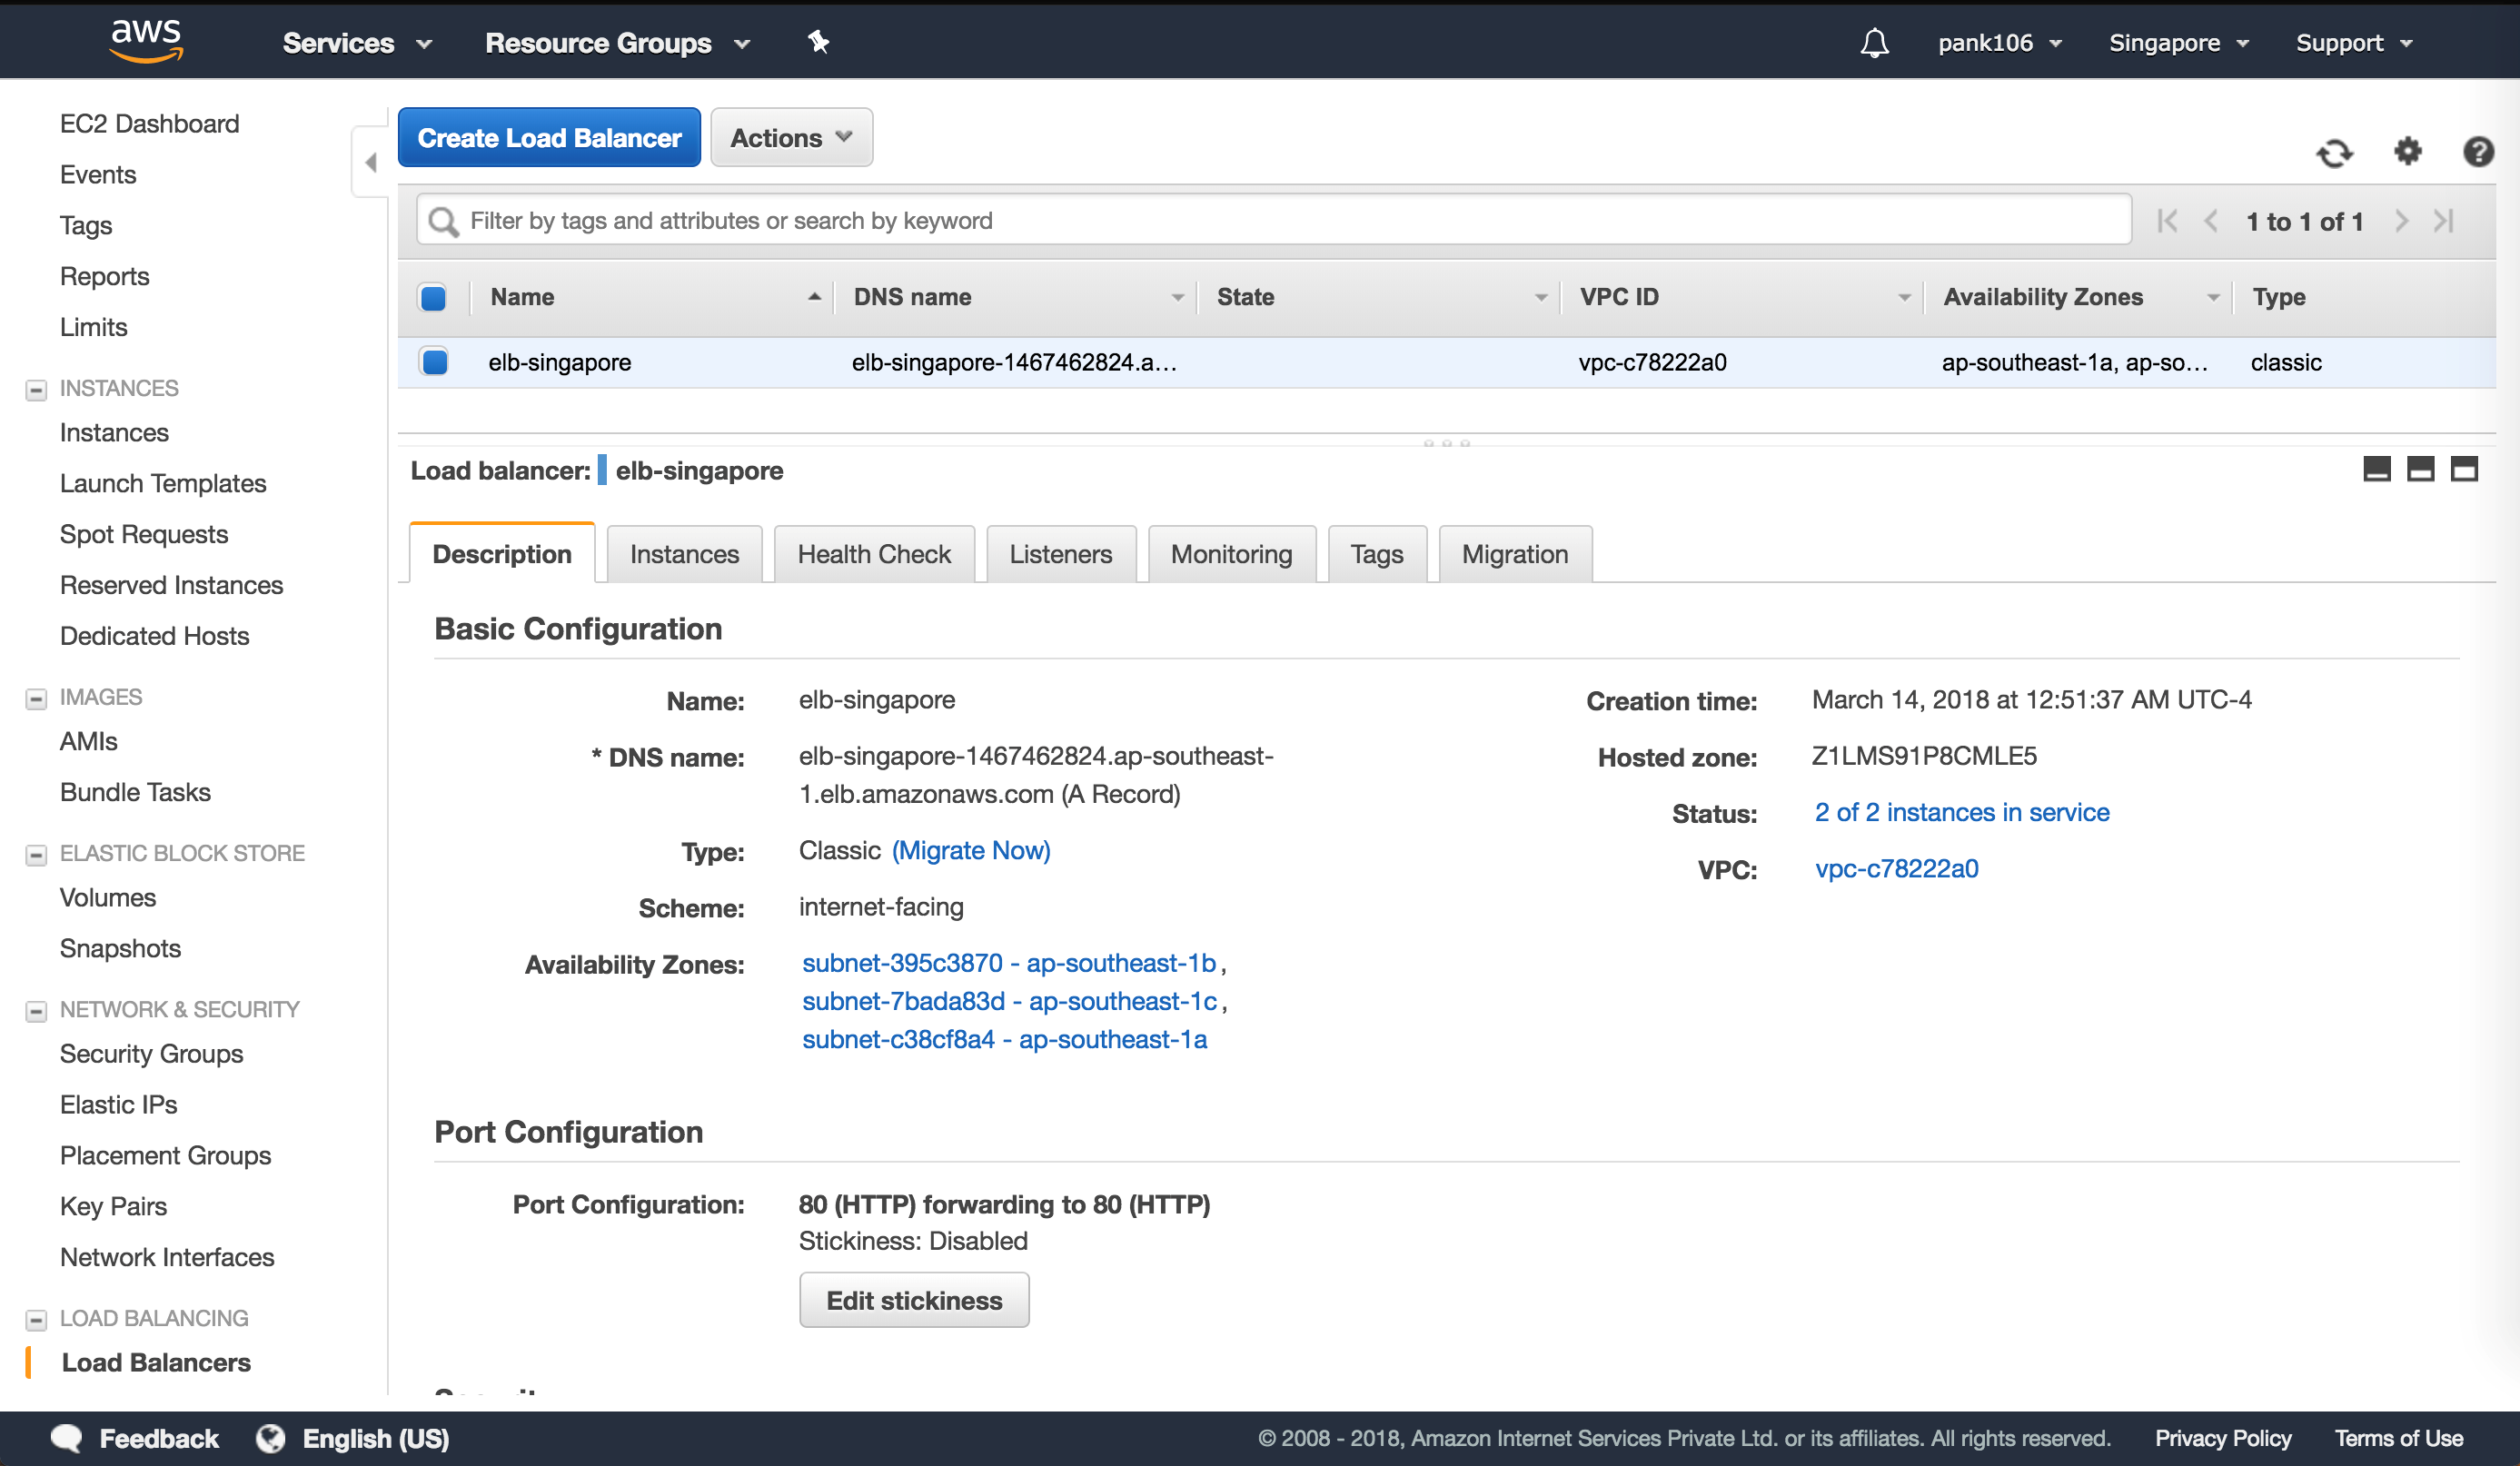
Step 10:
Click Create Load Balancer to configure a classic load balancer
Your Elastic Load Balancers allow you to load balance your back end Amazon Linux instances while also being able to Load Balance additional instances that are spun up based on demand.
Configuring Global Server Load Balancing domain-name based services
Traffic management configurations
Note:
It is required to configure the Citrix ADC with either a nameserver or a DNS virtual server through which the ELB/ALB Domains will be resolved for the DBS Service Groups.
Step 1:
Navigate to Traffic Management > Load Balancing > Servers.
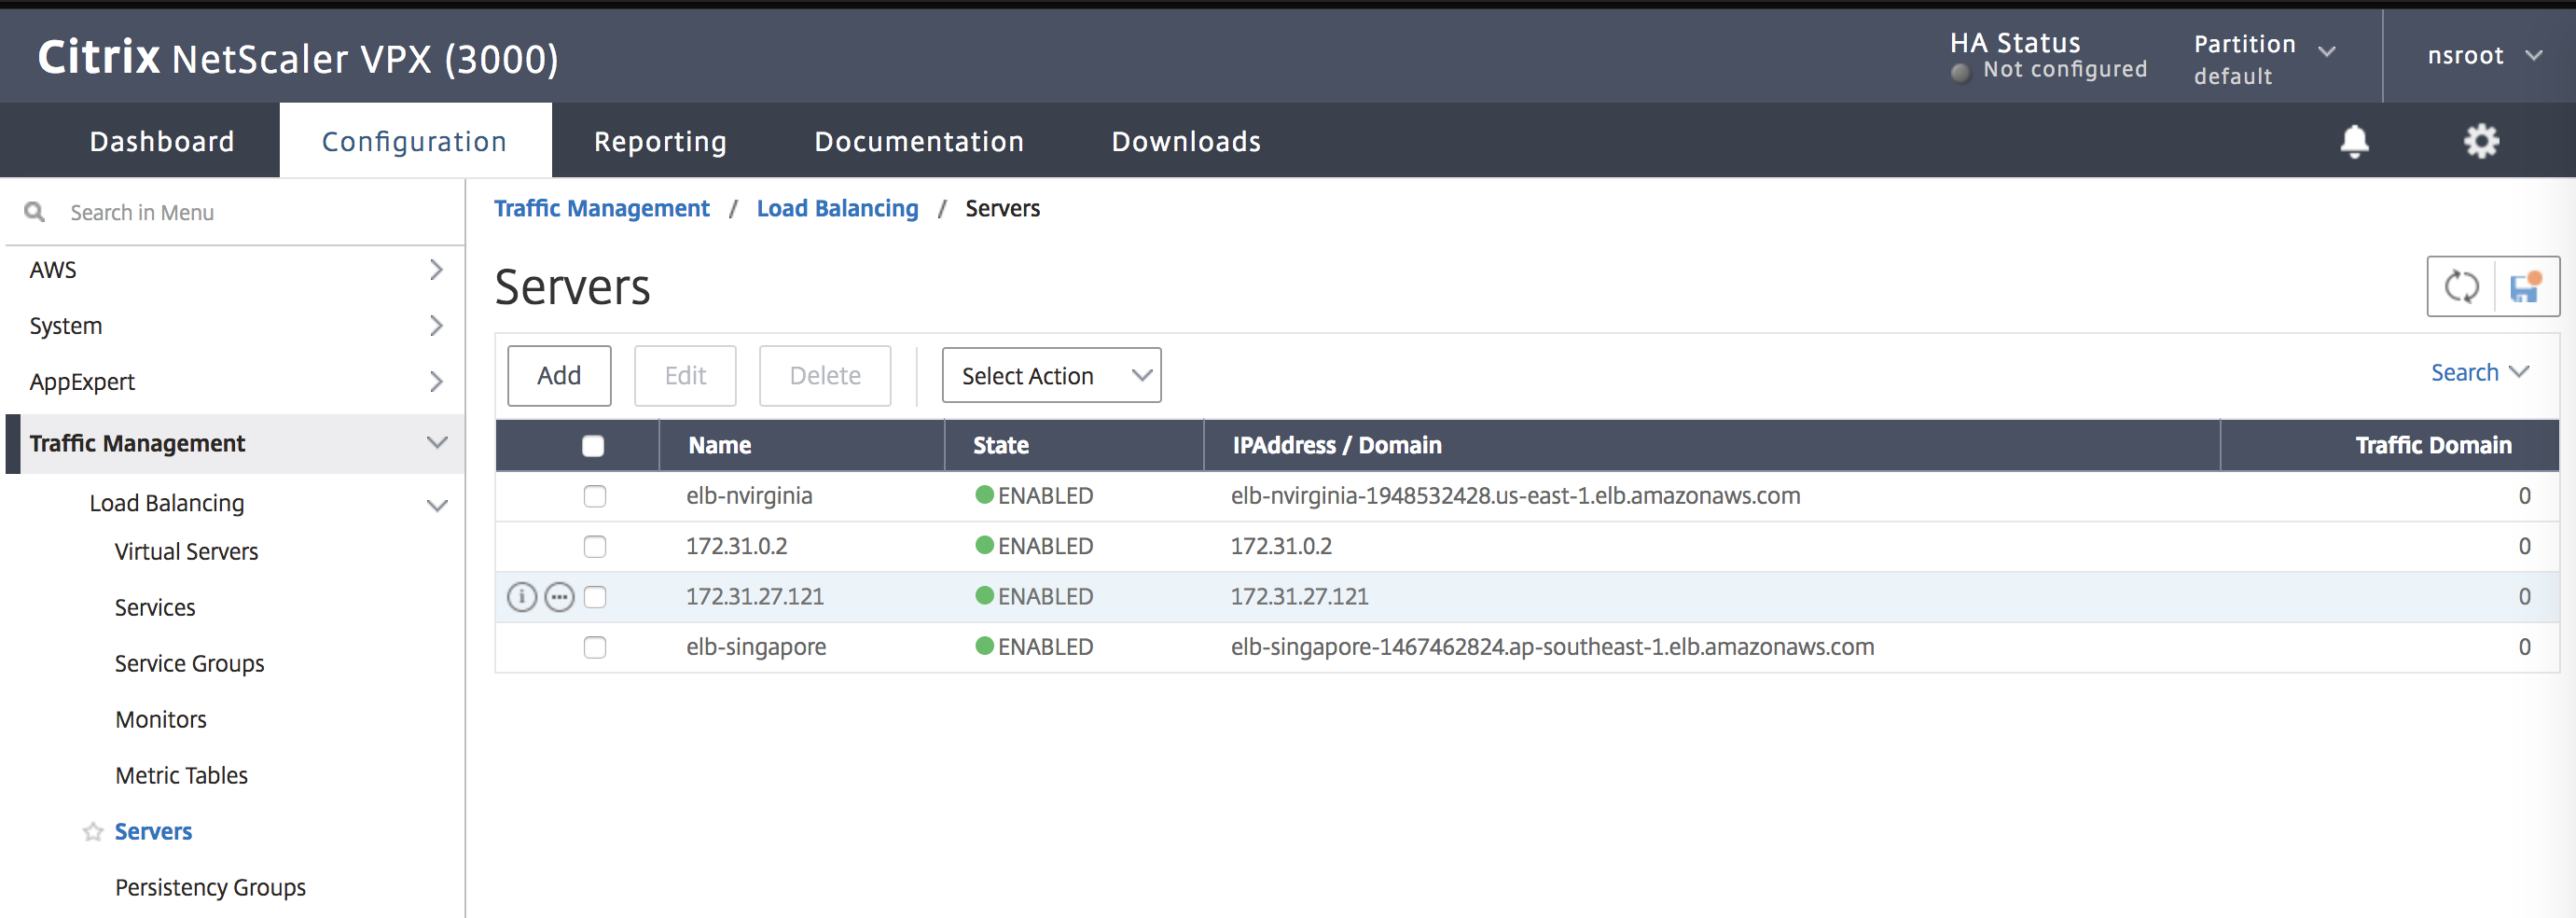
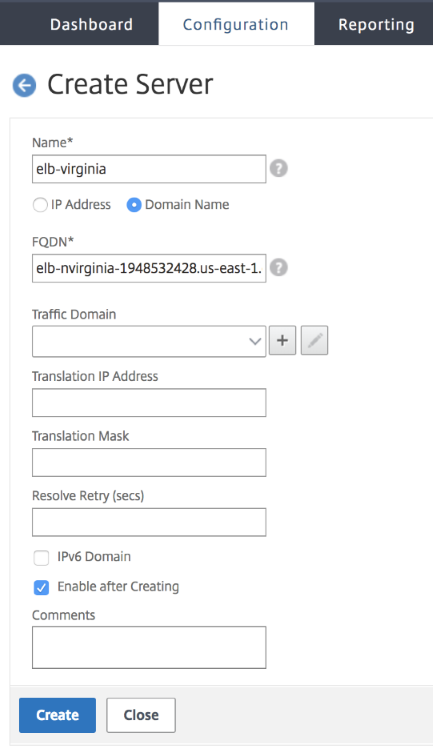
Step 2:
Click Add to create a server, provide a name and FQDN corresponding to the A record (domain name) in AWS for the Elastic Load Balancer (ELB).
Repeat step 2 to add the second ELB from the second resource location in AWS.
GSLB configurations
Step 1:
Navigate to Traffic Management > GSLB > Sites.

Step 3:
Click the Add button to configure a GSLB Site.
Name the Site. The Type is configured as Remote or Local based on which Citrix ADC you are configuring the site on. The Site IP Address is the IP address for the GSLB site. The GSLB site uses this IP address to communicate with the other GSLB sites. The Public IP address is required when using a cloud service where a particular IP is hosted on an external firewall or NAT device. The site should be configured as a Parent Site. Ensure the Trigger Monitors are set to ALWAYS and be sure to check off the three boxes at the bottom for Metric Exchange, Network Metric Exchange, and Persistence Session Entry Exchange.
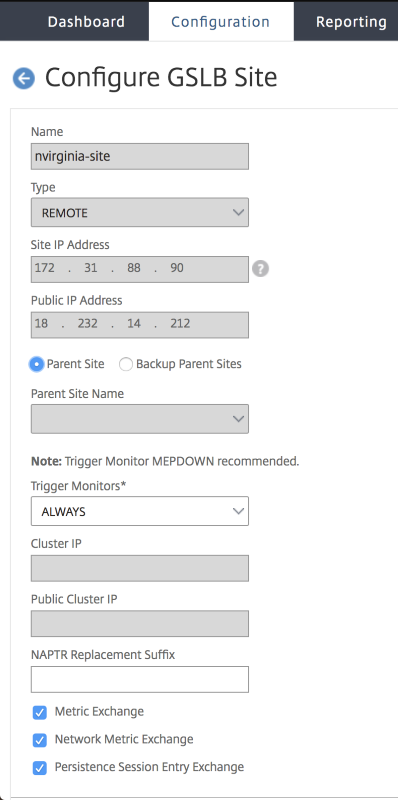
Recommendation is to set Trigger monitor setting to MEPDOWN. For more information, see Configure a GSLB service group.
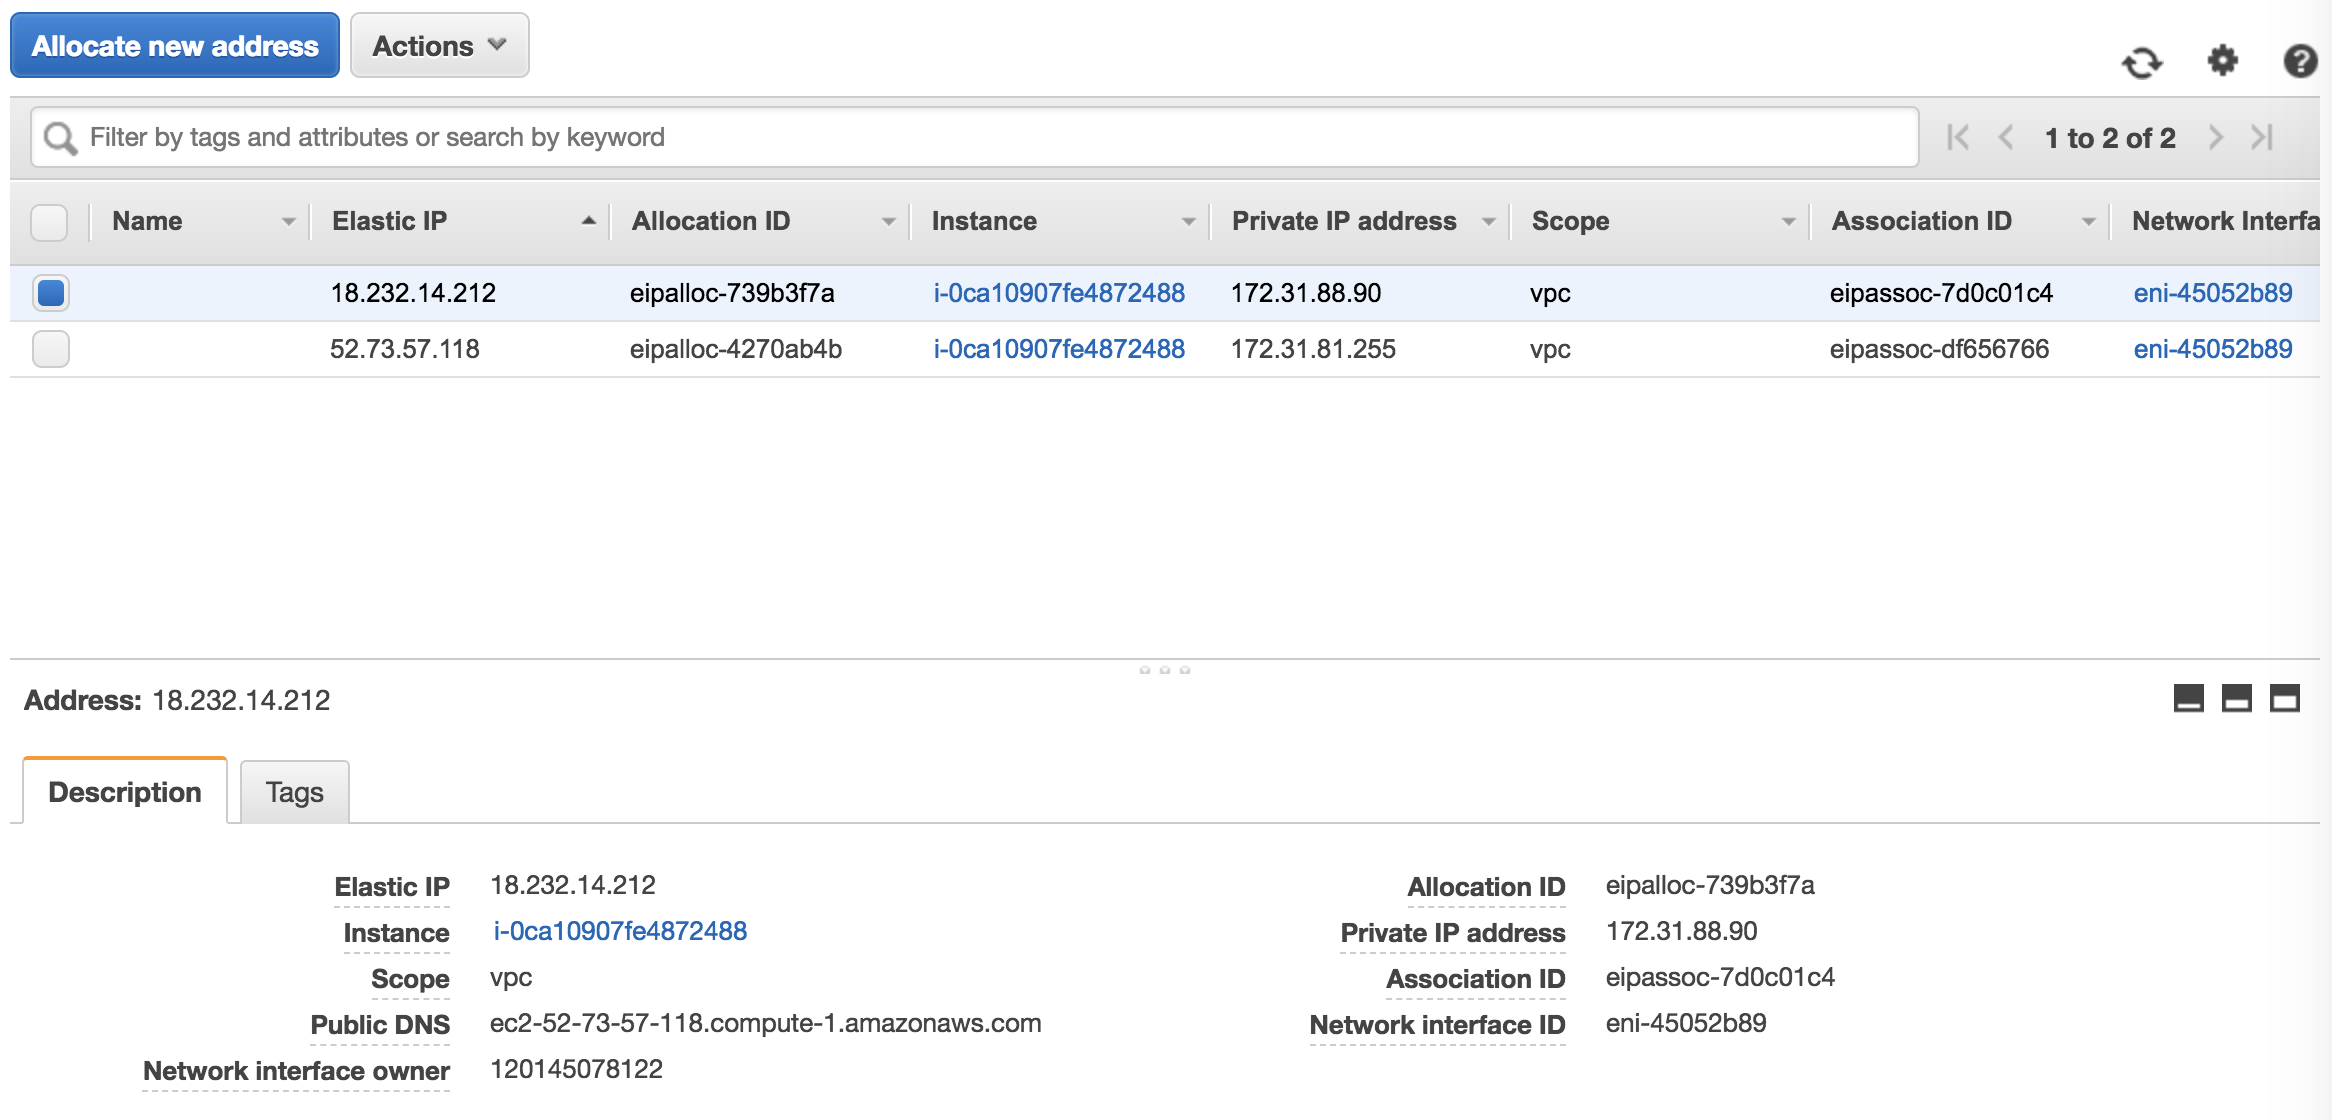
Step 4:
Below is a screenshot from our AWS configurations, showing where you can find the Site IP Address and Public IP Address. They are found under Network & Security > Elastic IPs.
Click Create, repeat steps 3 and 4 to configure the GSLB site for the other resource location in Azure (this can be configured on the same Citrix ADC)
Step 5:
Navigate to Traffic Management > GSLB > Service Groups.
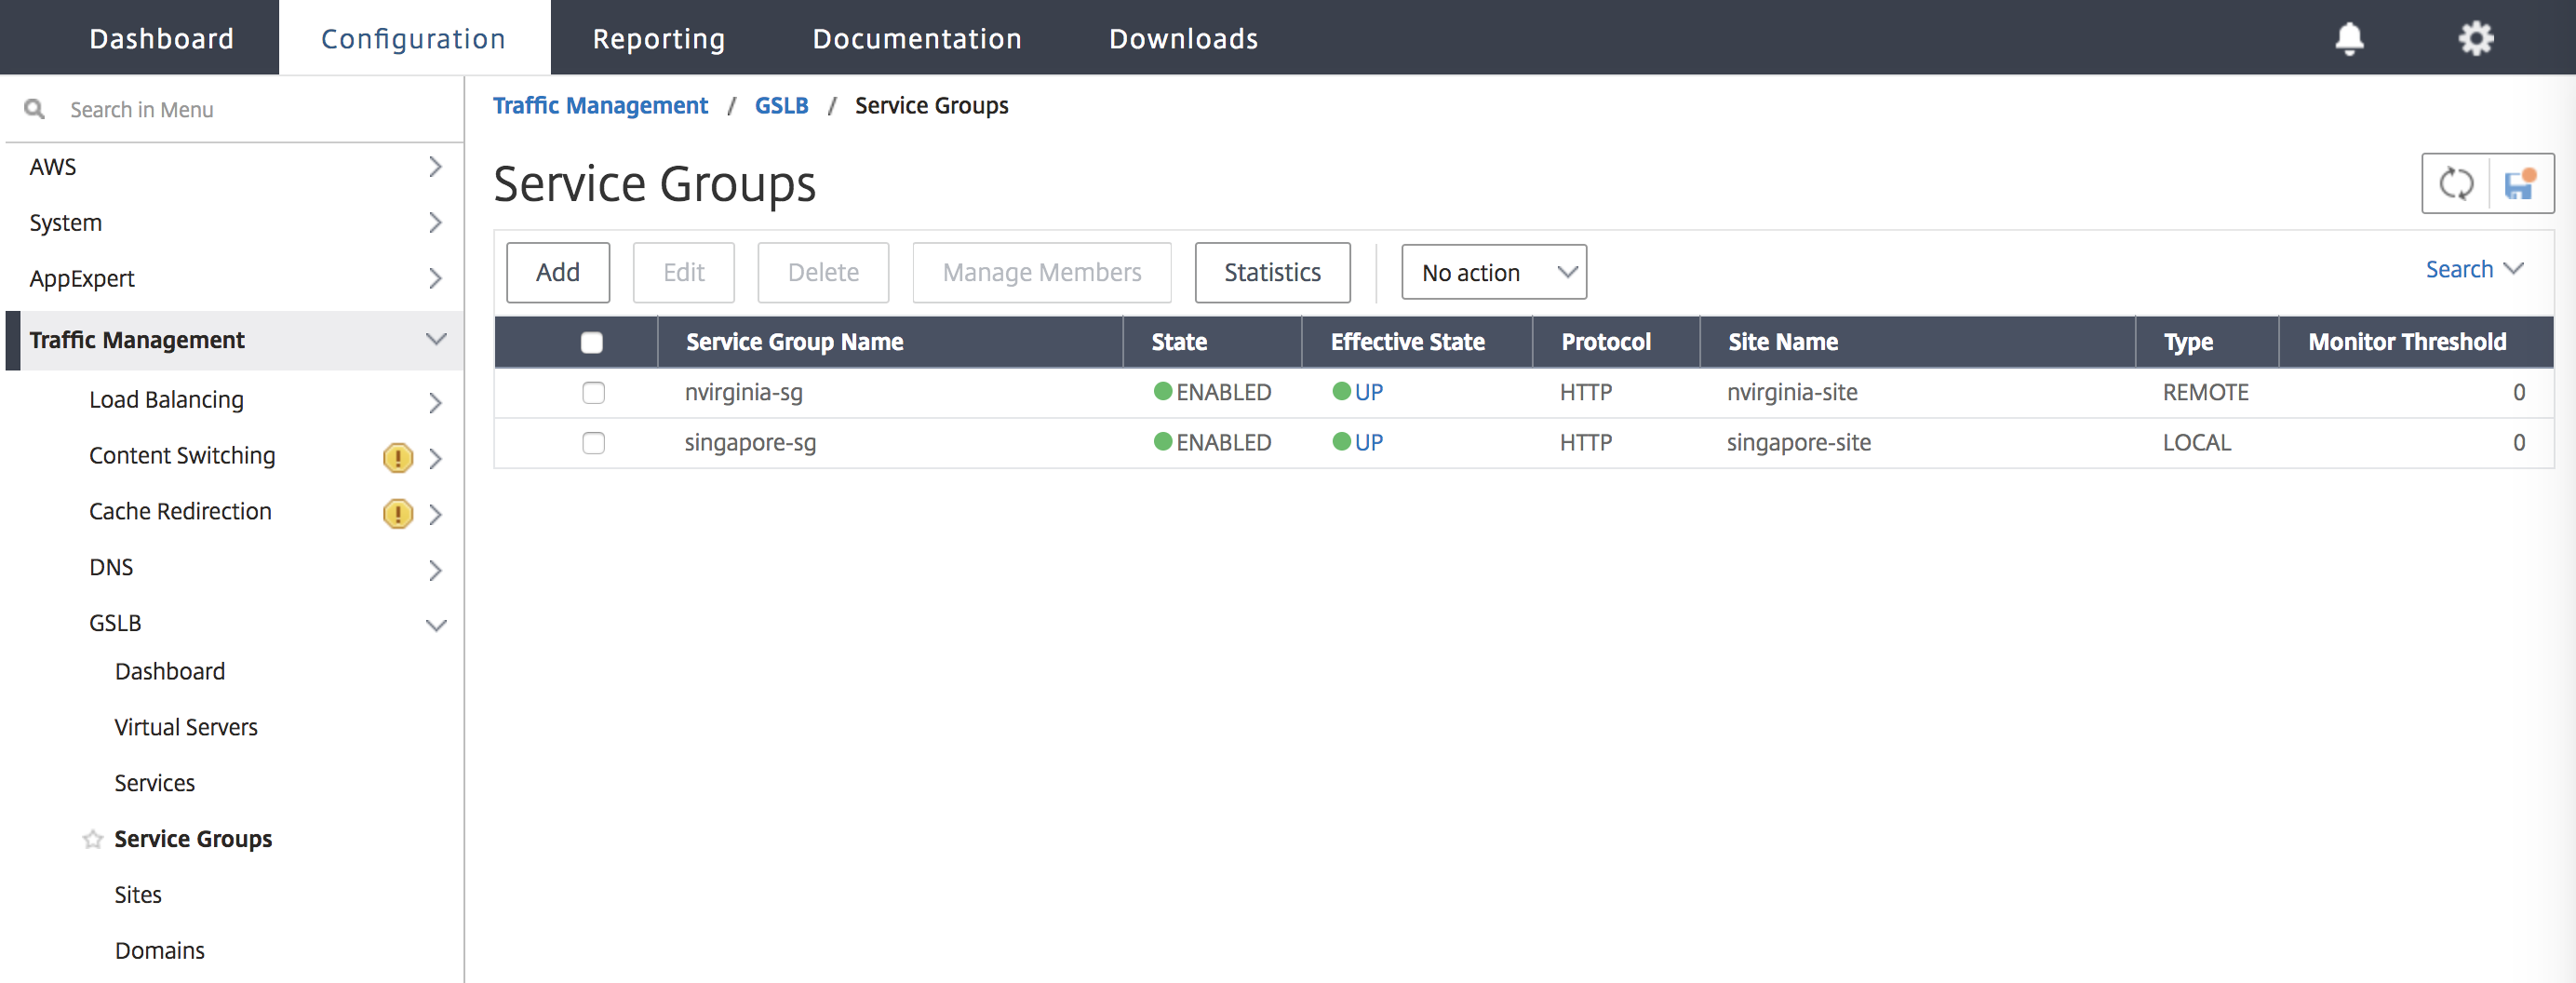
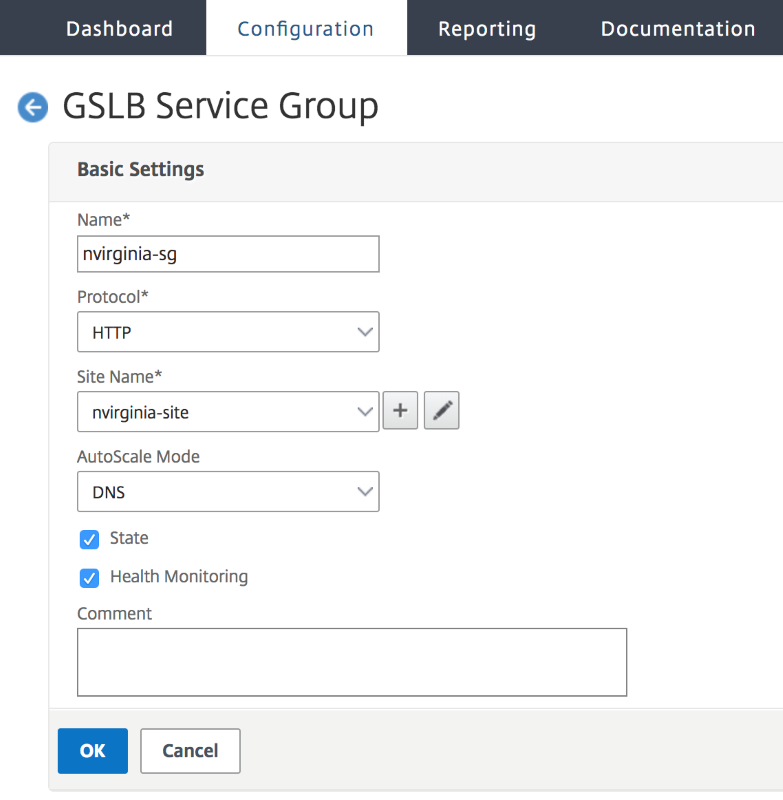
Step 6:
Click Add to add a new service group. Name the Service Group, use HTTP protocol, and then under Site Name choose the respective site that was created in the previous steps. Be sure to configure AutoScale Mode as DNS and check off the boxes for State and Health Monitoring.
Click OK to create the Service Group.
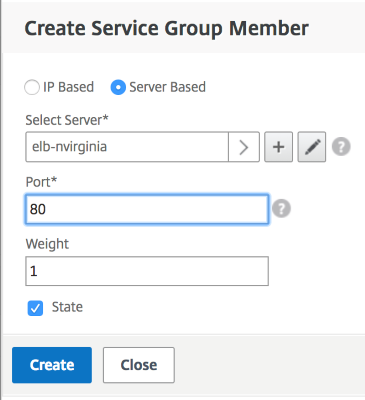
Step 7:
Click Service Group Members and select Server Based. Select the respective Elastic Load Balancing Server that was configured in the start of the run guide. Configure the traffic to go over port 80.
Click Create.
Step 8:
The Service group Member Binding should populate with two instances that it is receiving from the Elastic Load Balancer.
Repeat steps to configure the Service Group for the second resource location in AWS. (This can be done from the same location).

Step 9:
Navigate to Traffic Management > GSLB > Virtual Servers.
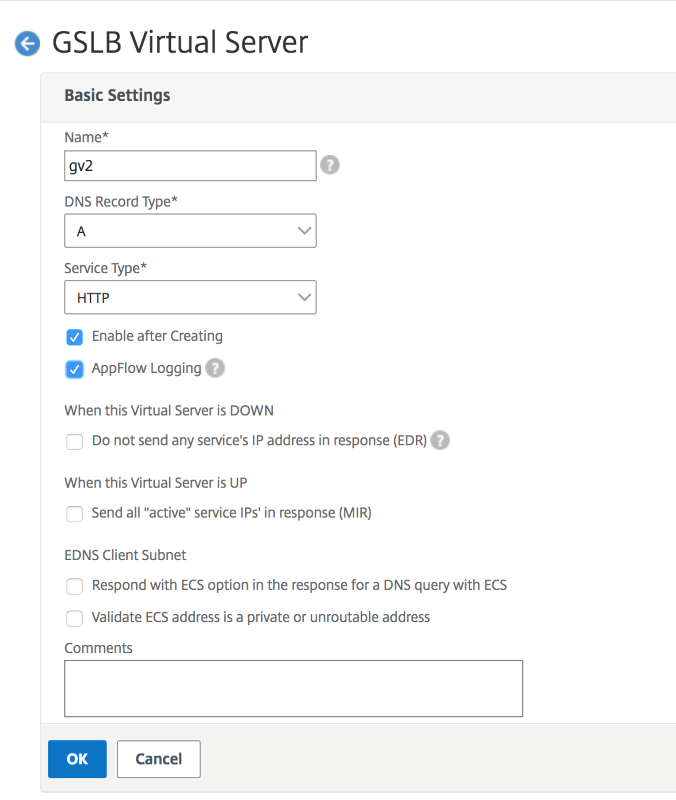
Click Add to create the virtual server. Name the server, DNS Record Type is set as A, Service Type is set as HTTP, and check the boxes for Enable after Creating and AppFlow Logging. Click OK to create the GSLB Virtual Server. (Citrix ADC GUI)
Step 10:
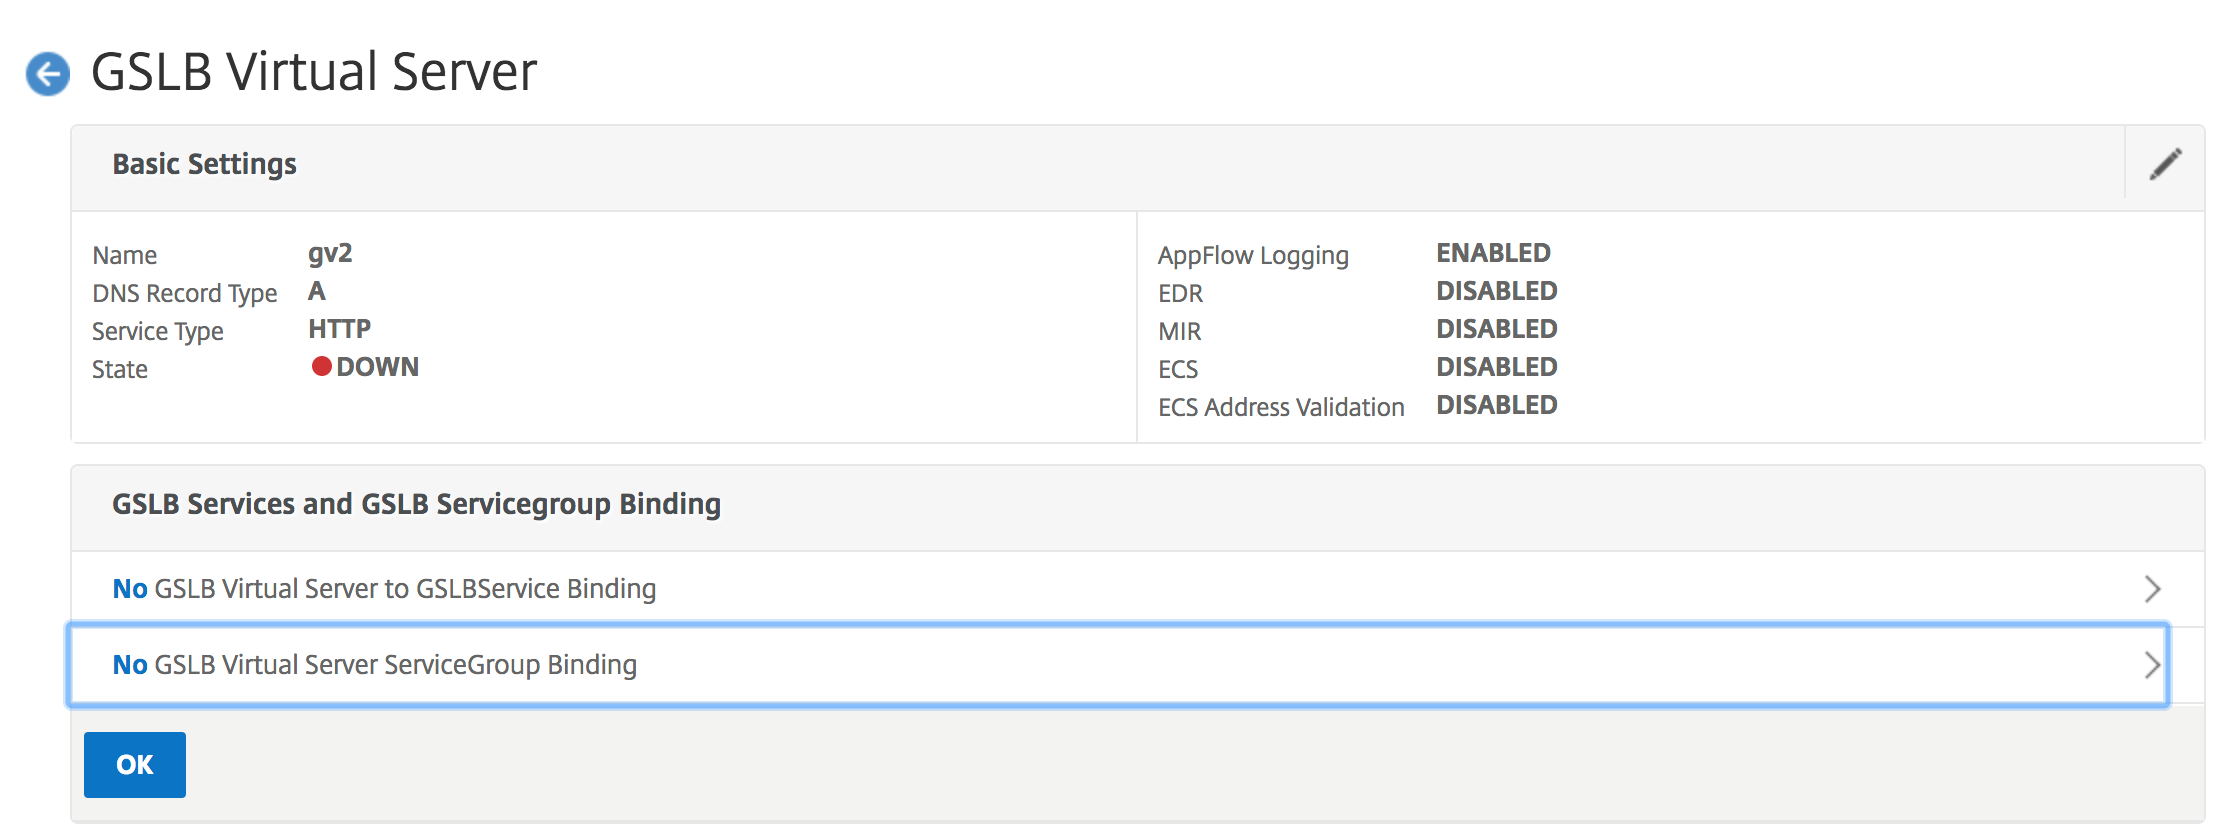
When the GSLB Virtual Server is created, click No GSLB Virtual Server ServiceGroup Binding.
Click Add to create the virtual server. Name the server, DNS Record Type is set as A, Service Type is set as HTTP, and check the boxes for Enable after Creating and AppFlow Logging. Click OK to create the GSLB Virtual Server. (Citrix ADC GUI)
Step 11:
Under ServiceGroup Binding use Select Service Group Name to select and add the Service Groups that were created in the previous steps.

Step 12:
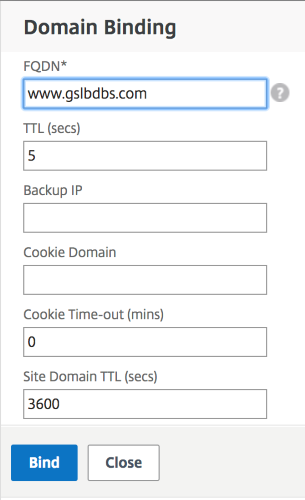
Next configure the GSLB Virtual Server Domain Binding by clicking No GSLB Virtual Server Domain Binding. Configure the FQDN and Bind, the rest of the settings can be left as the defaults.
Step 13:
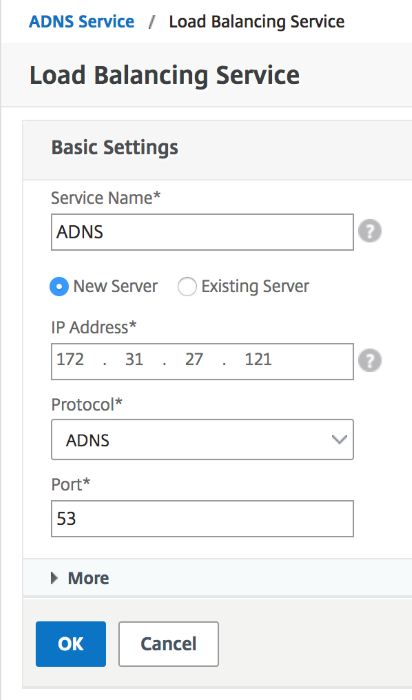
Configure the ADNS Service by clicking No Service. Add a Service Name, click New Server, and enter the IP Address of the ADNS server.
Also, if your ADNS is already configured you can select Existing Server and then choose your ADNS from the menu. Make sure the Protocol is ADNS and the traffic is over Port 53.
Configure the Method as LEASTCONNECTION and Backup Method as ROUNDROBIN
Citrix ADC back end auto scaling with AWS
AWS includes a feature called Auto Scaling that spins up additional instances running in AWS based on rules set by the administrator. These rules are defined by CPU utilization and revolve around creating and deleting instances on demand. Citrix ADC directly integrates with the AWS Auto Scaling solution making the Citrix ADC aware of all available back-end servers that it can load balance. The limitation of this feature is that it currently only functions within one AZ in AWS.
Configure AWS components
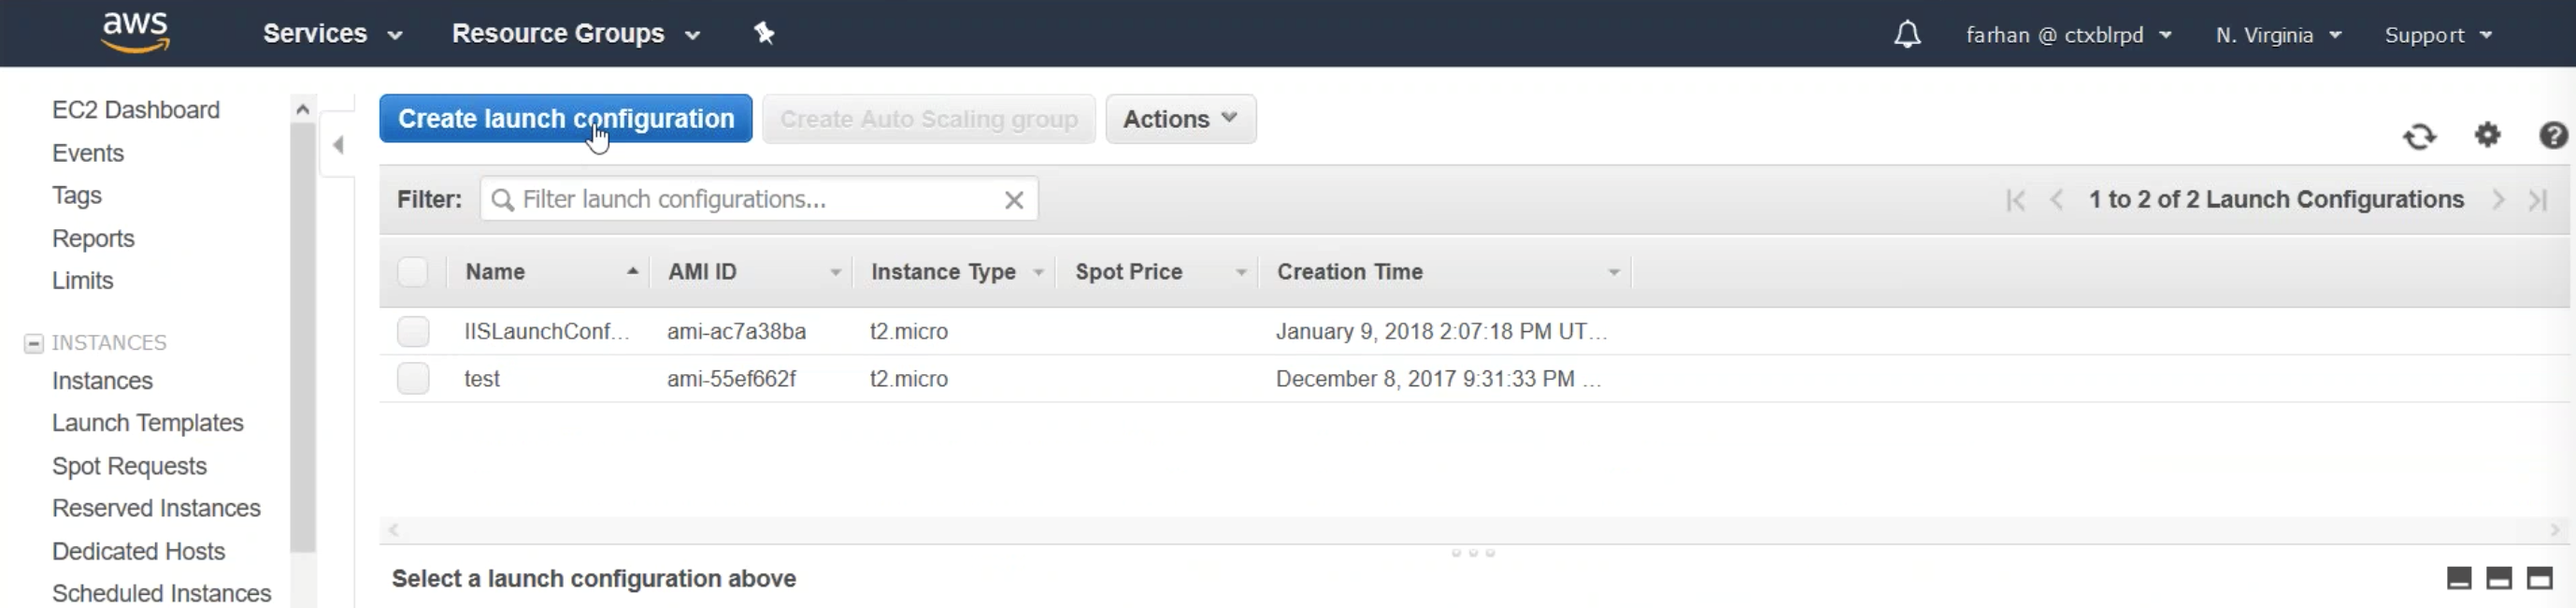
Step 1:
Sign in to your AWS resource group and navigate to EC2. Within EC2 navigate to AUTO SCALING > Launch Configuration. Click Create launch configuration.
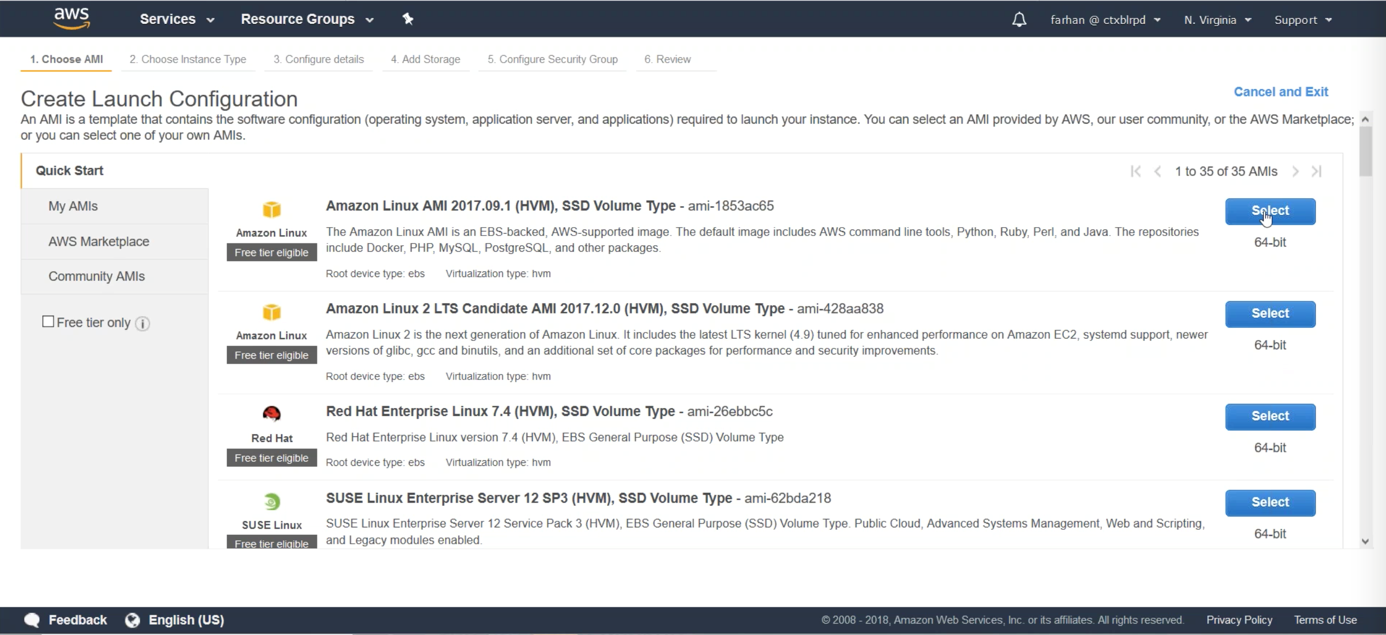
Step 2:
From this step, you can choose the server type of your choosing. This is where you configure what VMs you want to auto scale. For this example, we must choose Amazon Linux AMI.
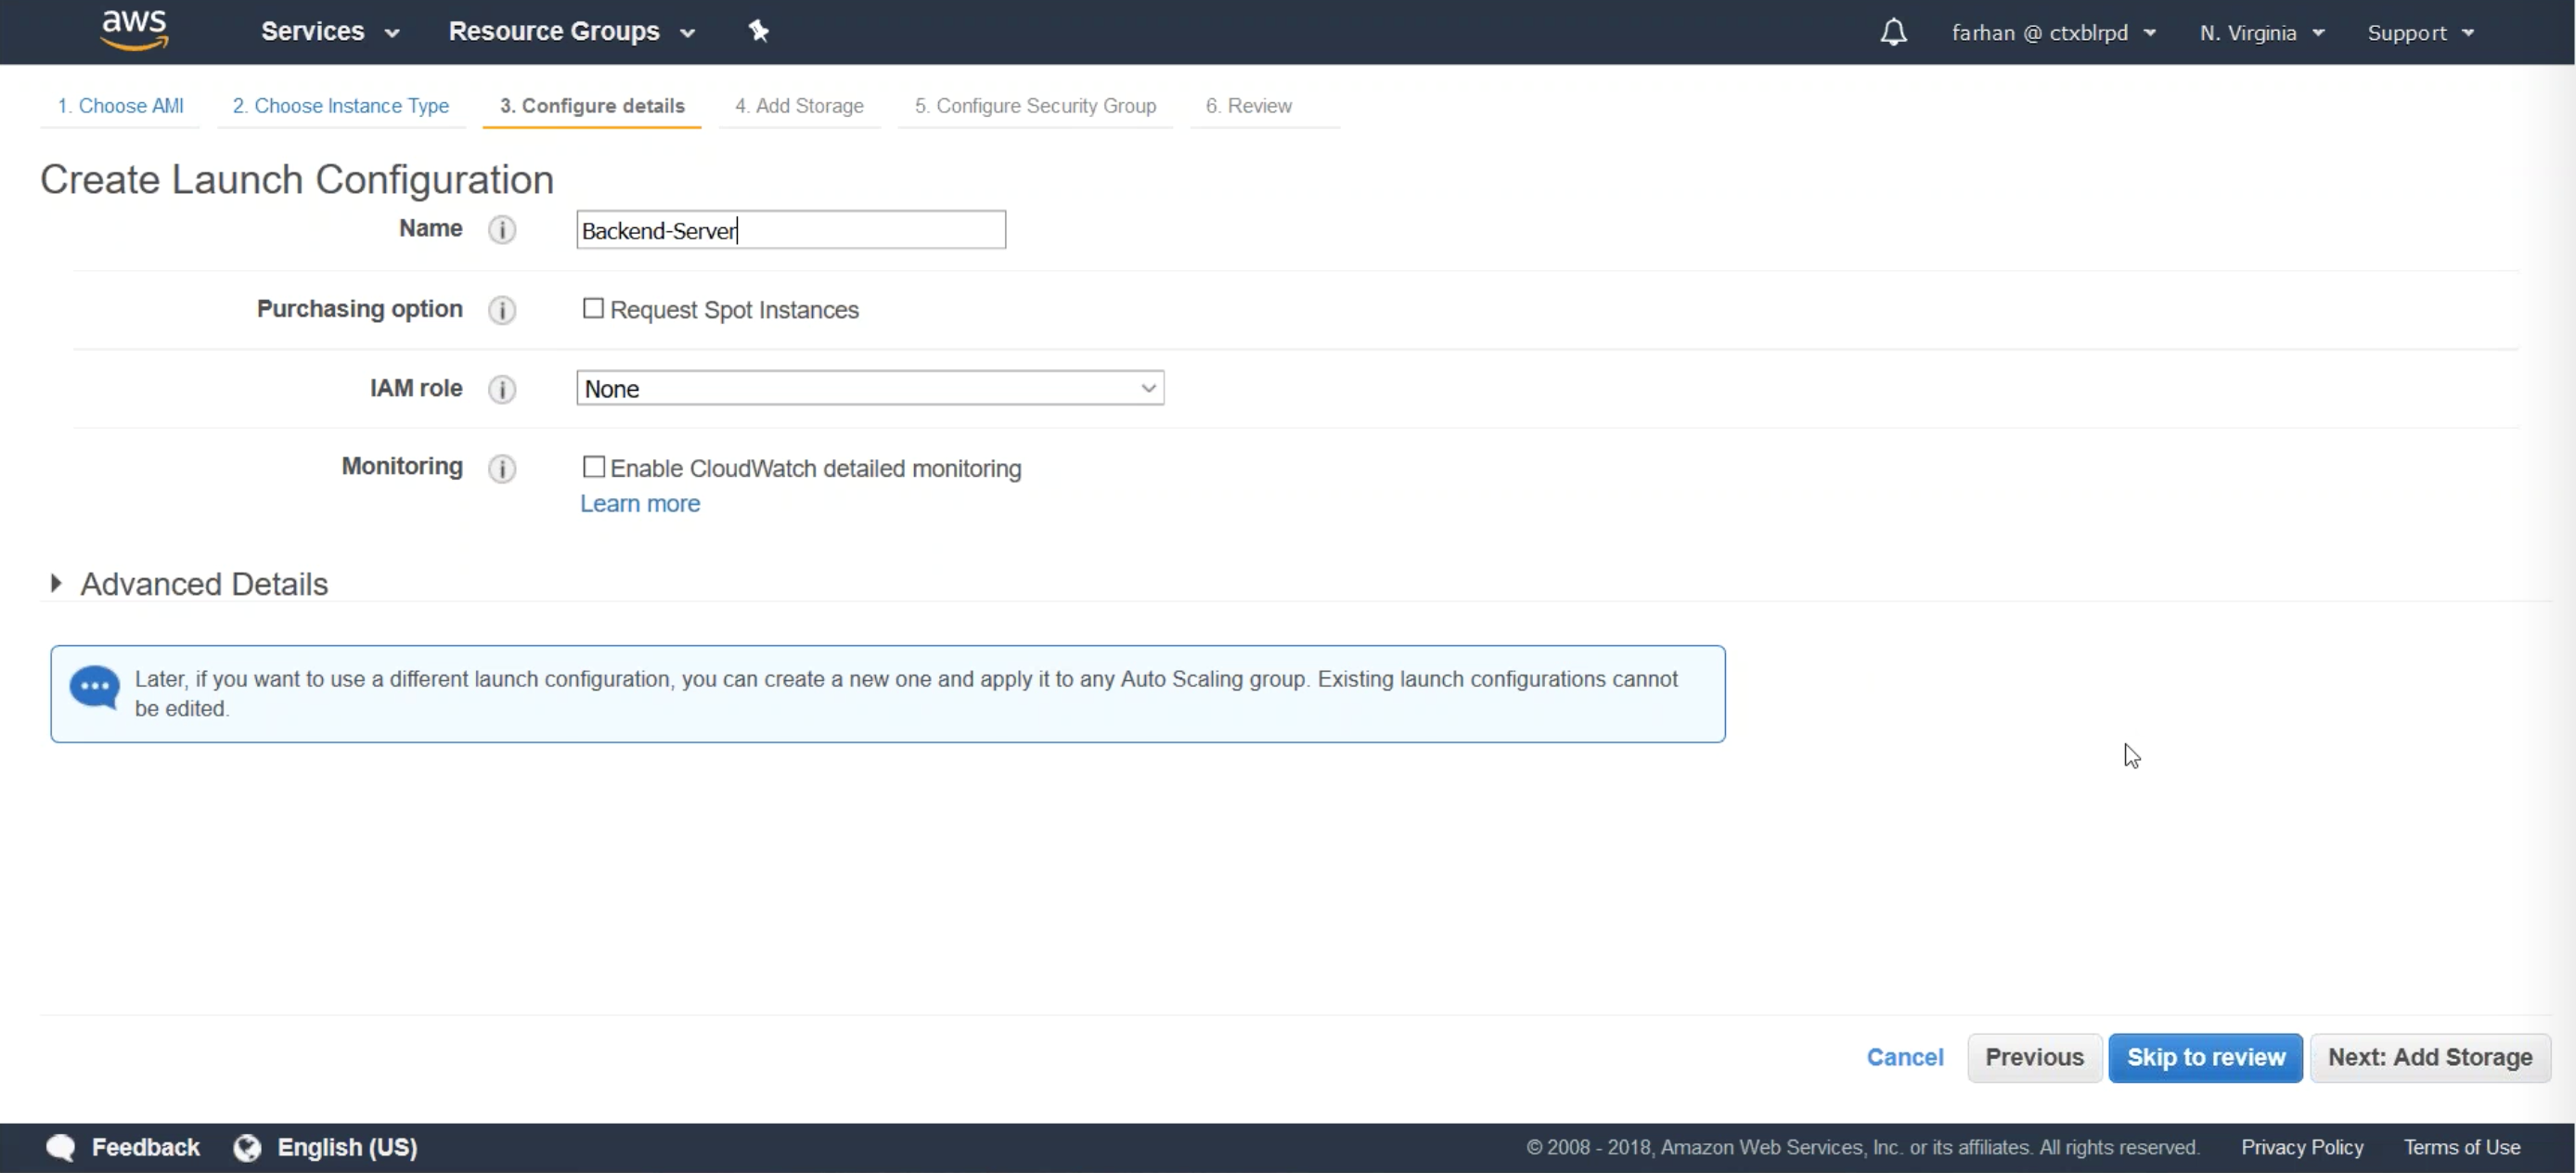
Step 3:
Choose which type of instance you need by selecting from potential variance for back end resources. Name your instance for the remainer of the runguide. The name of the instance is known as Backend-Server. Configure storage for the instance and add it to a security group, or create a new security group which encompasses all AWS components created in this run guide.
Step 4:
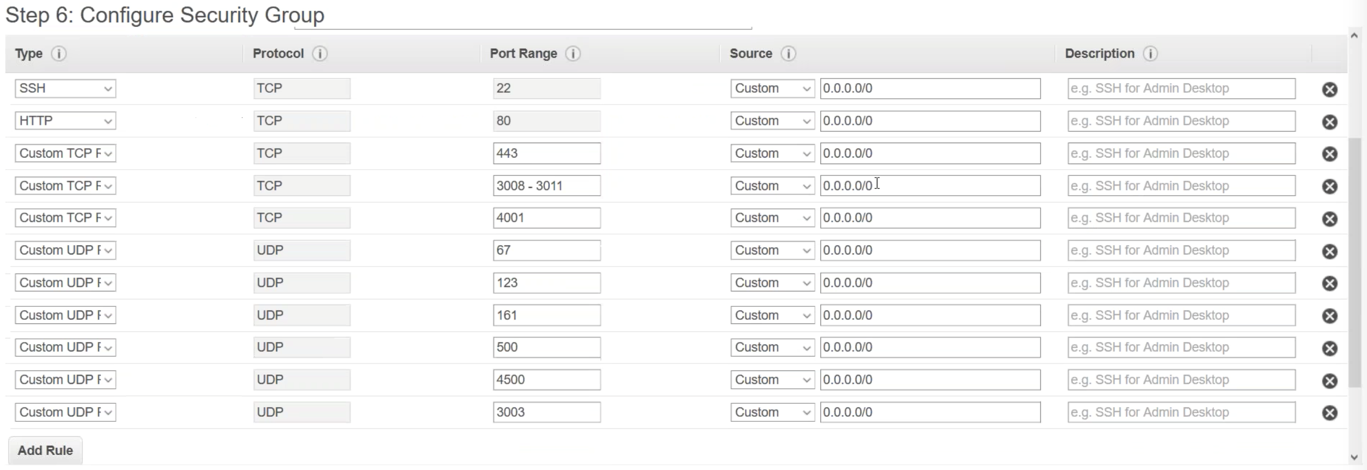
An additional note for your security group. For this runguide, the following the opened ports:

Citrix ADC back end auto scaling groups and policies
Configure Citrix ADC Front End Auto Scaling in AWS:
Step 1:
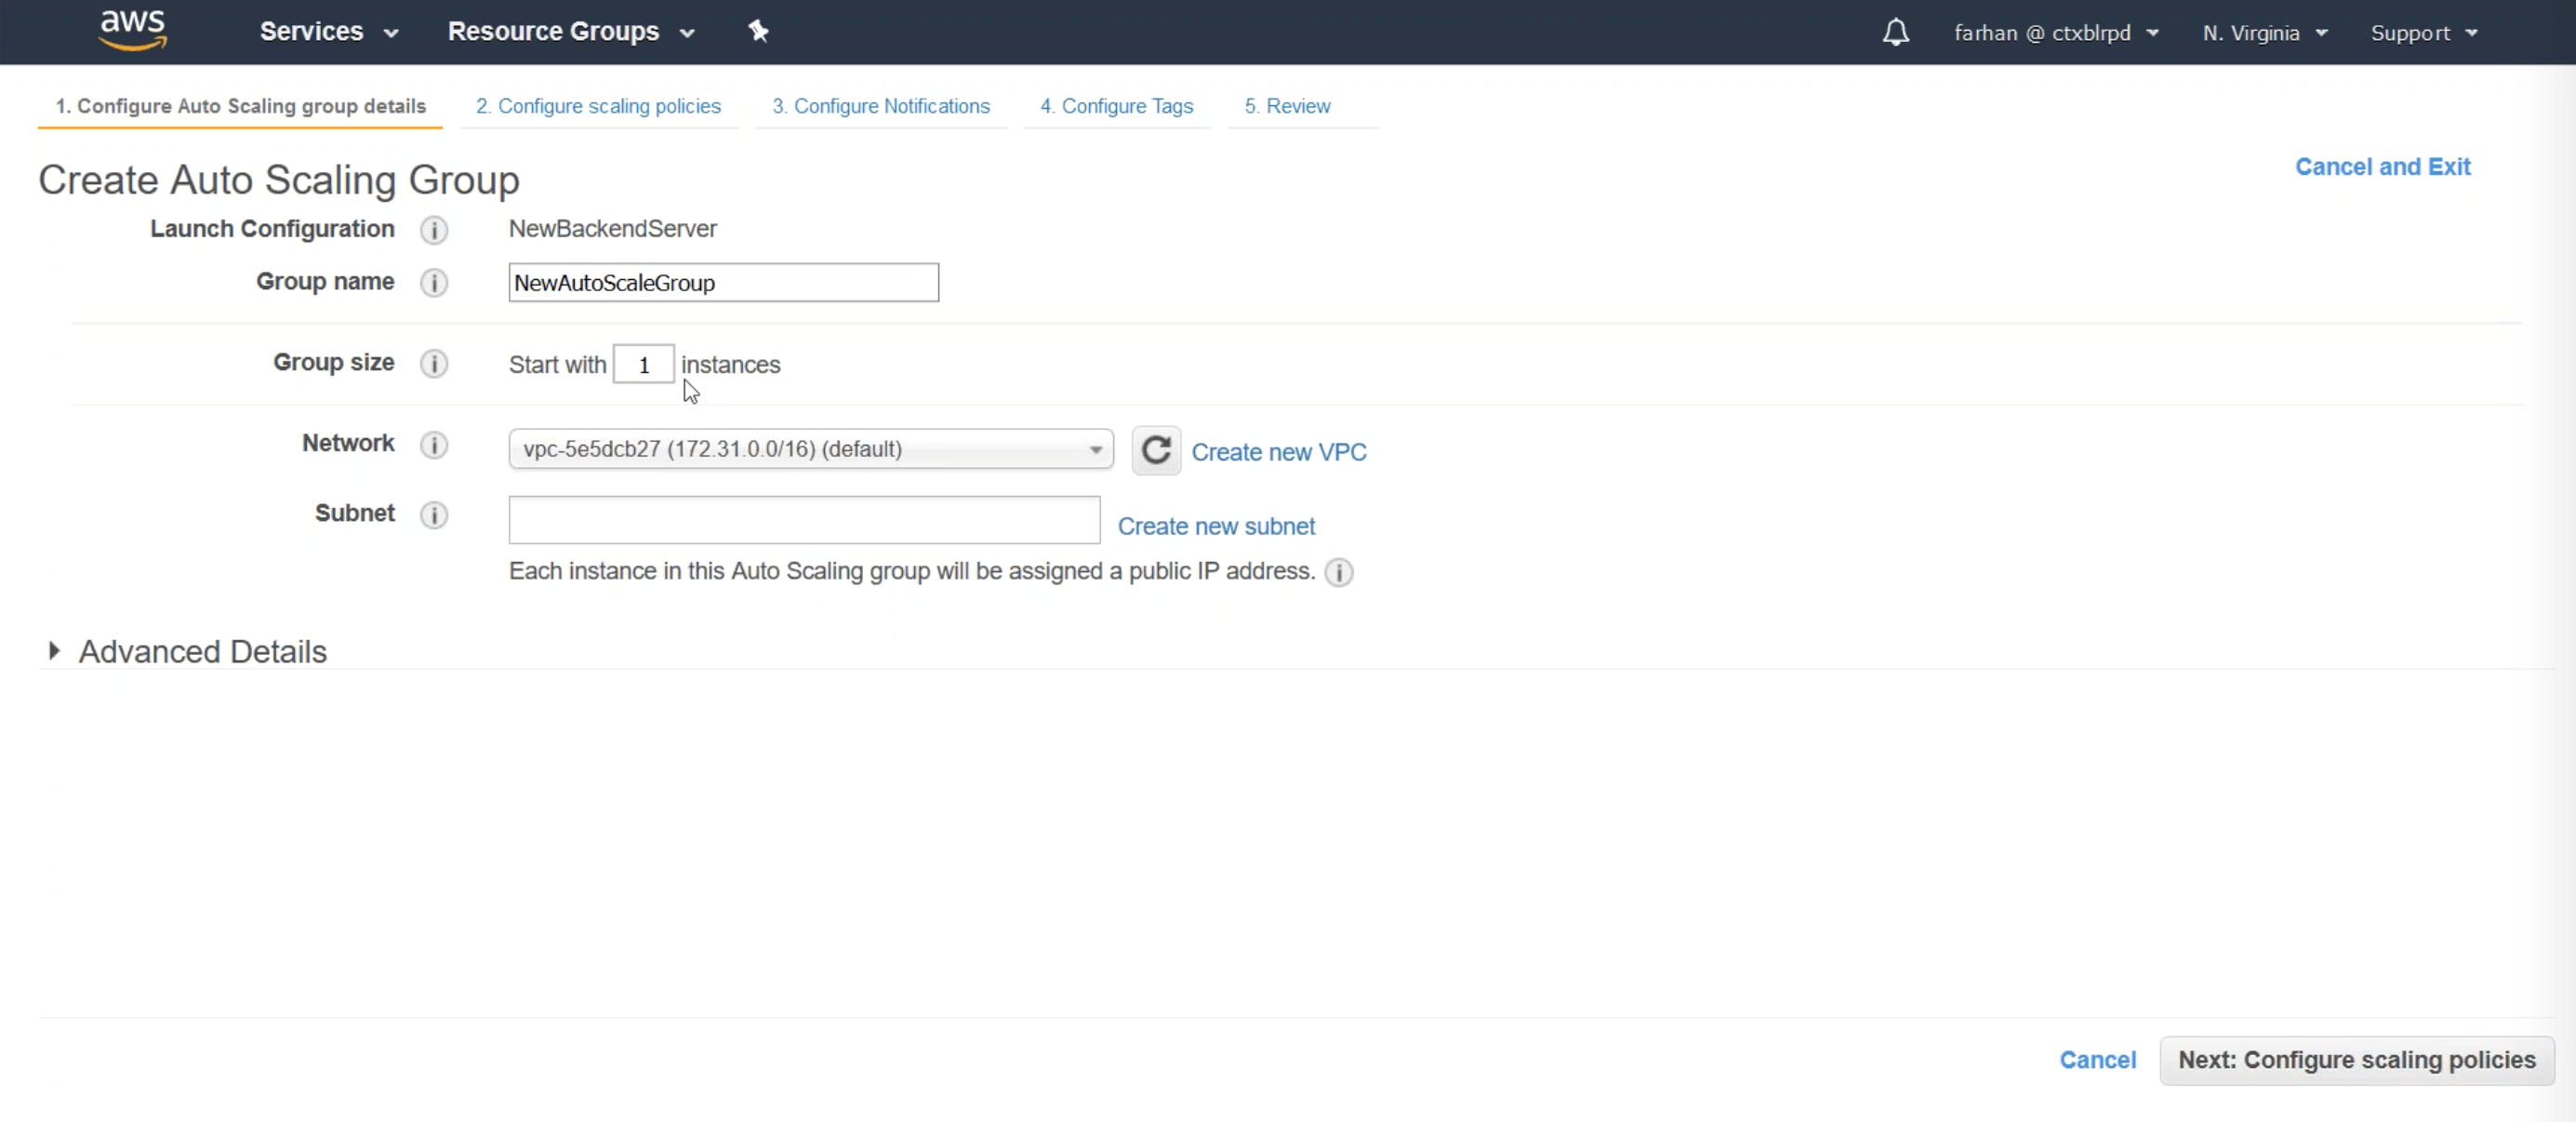
Sign in to your AWS resource group and navigate to EC2. Within EC2 navigate to AUTO SCALING > Auto Scaling Group.
Click the Radio button to create an Auto Scaling group from an existing launch configuration. Be sure to select the BackendServer that we created in the previous step of the lab guide.
Under Create Auto Scaling Group add the group name, choose the initial group size, choose the Network and Subnet, and then click Next.
Note:
The Subnet must be reachable from the subnet IP (SNIP) of the Citrix ADC.
Step 2:
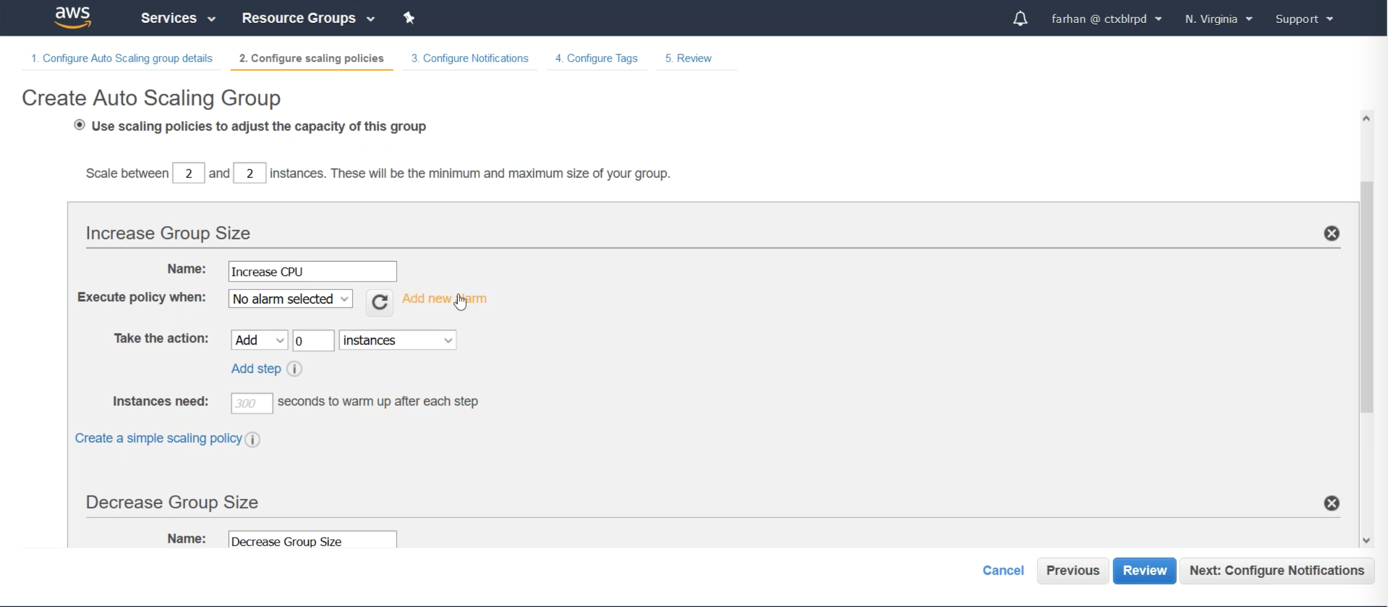
On the Create Auto Scaling Group configuration page, configure your scaling policies. You can accomplish this by clicking the radio button for use scaling policies to adjust the capacity of this group. Next, click Scale the Auto Scaling group using step or simple scaling policies.

Step 3:
Select Add new alarm.
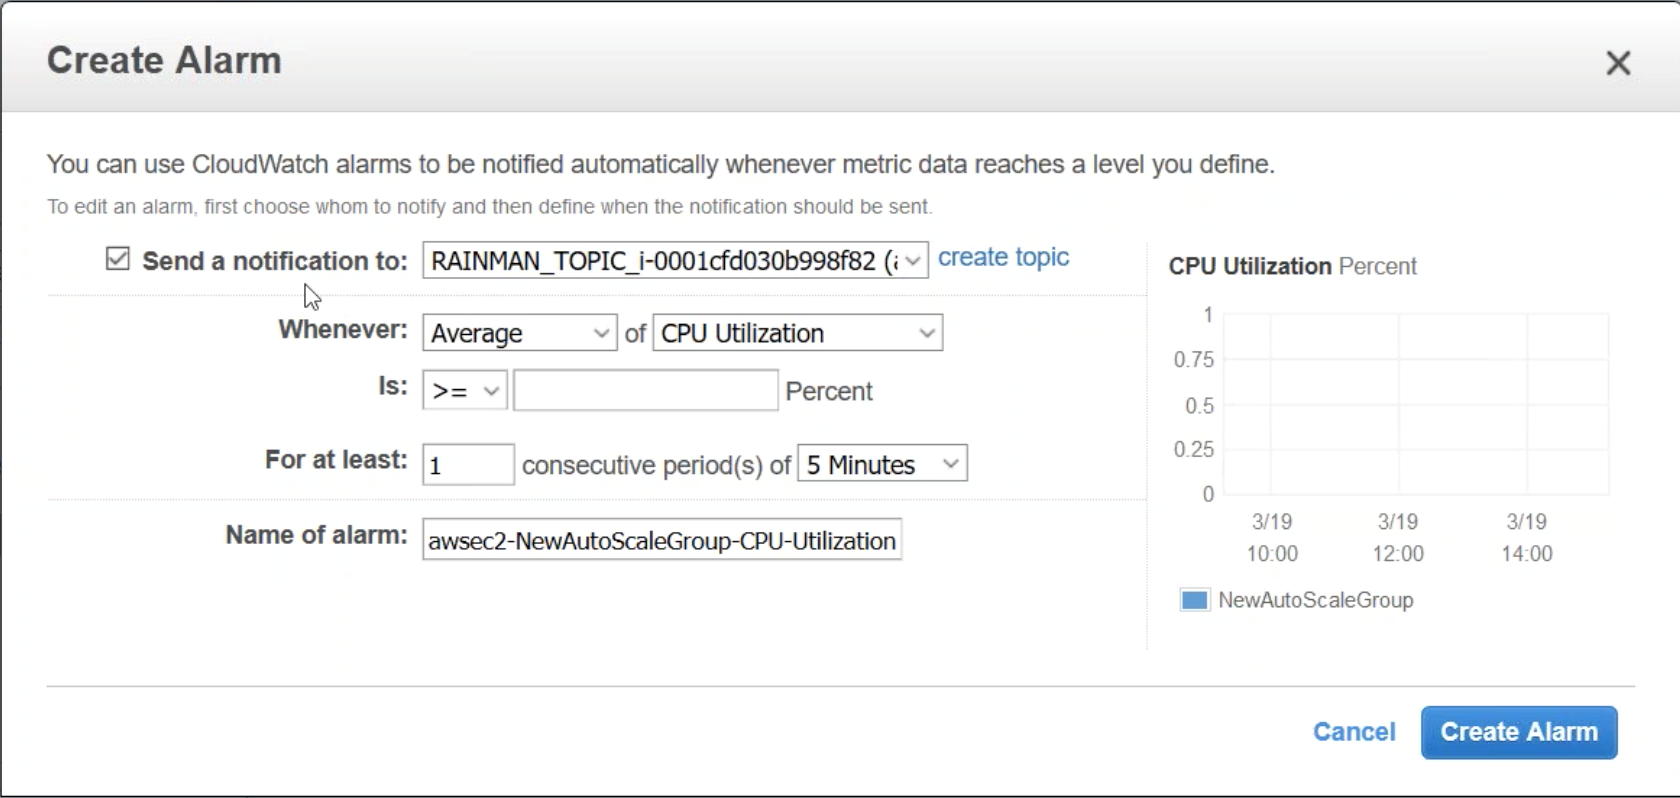
Step 4:
While you are creating the alarm, configure to send a notification to your Citrix ADC. Configure the alarm so that Average of CPU Utilization is >= 70 for at least one consecutive period of 5 minutes. Apply the policy.
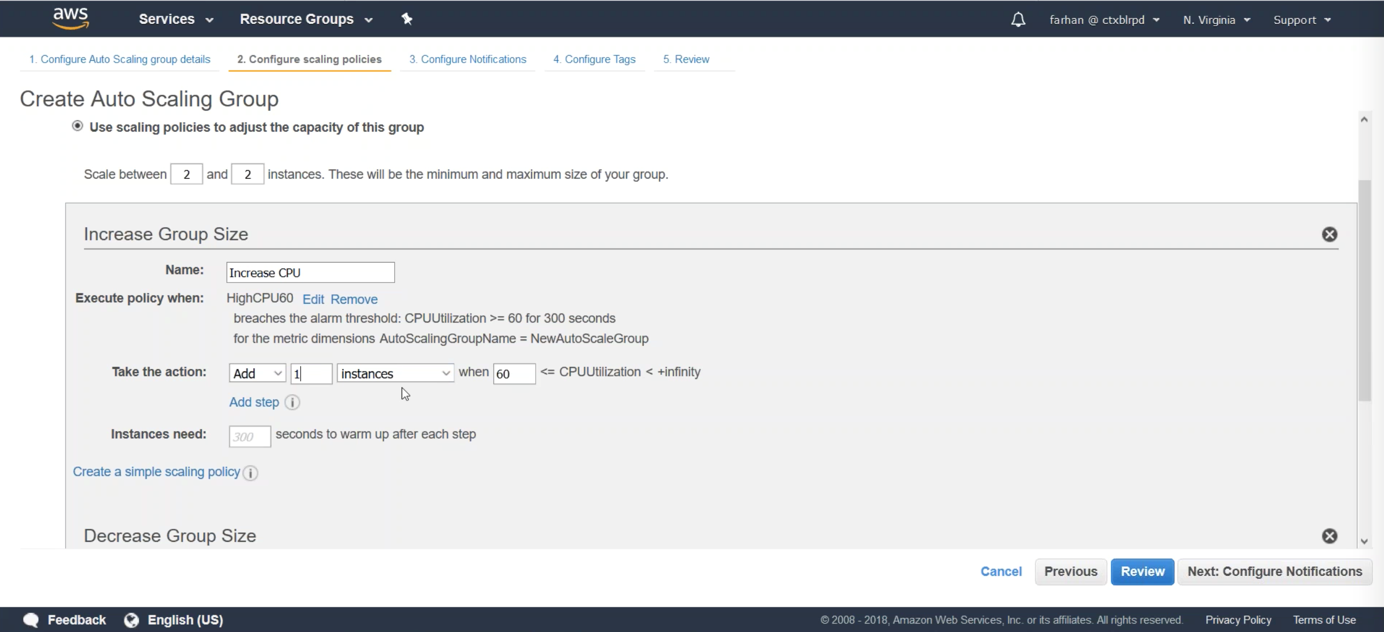
Step 5:
Configure in your Auto Scaling Group to add one instance when the policy is triggered.
Step 6:
Configure the same alarm and policy, but this time to remove a Backend-Server when the CPU averages <=30 for 5 minutes. Set the decrease group size to Remove 1 instance when the decrease policy is triggered.
Note:
For deletion of servers, we are notifying Citrix ADC to not send any traffic to a Backend-Server marked for deletion.
Click through Configure Notifications and Configure Tags to review and create Auto Scaling group.
Note:
The Min and Max variables can be configured to set the fewest and highest number of instances that will be created and running within the Auto Scaling Group. Currently AWS supports spinning up additional instances with only one network interface.
Create a Citrix ADC in AWS
Step 1:
Sign in to your AWS resource group and navigate to EC2. Within EC2 navigate to Instances > Instances.

Step 2:
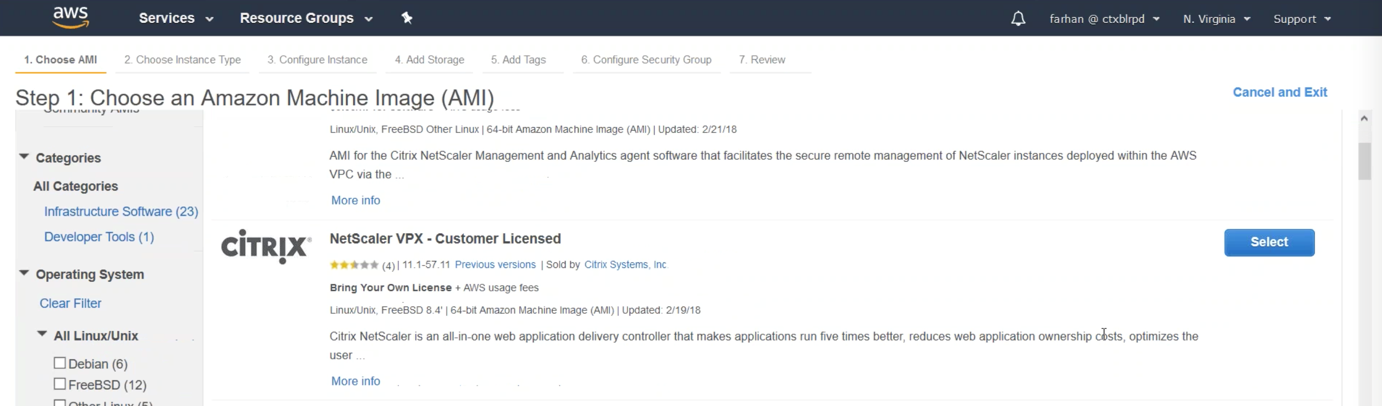
Navigate to AWS Marketplace on the left and then search for Citrix ADC. Choose Citrix Networking VPX – Customer Licensed. Make sure you version number is 12.0.51.x or later to use Auto Scaling. You can select previous versions to choose a version of Citrix ADC that supports Auto Scaling.
Step 3:
Navigate to AWS Marketplace on the left and then search for Citrix ADC. Choose Citrix Networking VPX – Customer Licensed. Make sure you version number is 12.0.51.x or later to use Auto Scaling. You can select previous versions to choose a version of Citrix ADC that supports Auto Scaling.
Choose the Instance Type, for example General Purpose m4.xlarge 4vCPU and 16gb RAM. Click Next.
Step 4:
On the Configure Instance Details tab, select the Subnet (three subnets eventually have to be configured for NSIP, SNIP, and VIP/Gateway). Also, you have to add an IAM role. Click to create a new IAM Role. Add the IAM Roles that are found in the following step. After this role is created, you need to add this to your Cloud Profile on your Citrix ADC.
Step 5:
Configurations for the Cloud Profile are as follows:
By default the CloudFormation Template creates and attaches the below IAM Role
"Version": "2012-10-17",
"Statement": [
    {
        "Action": [
            "ec2:DescribeAddresses",
            "ec2:AssociateAddress",
            "ec2:DisassociateAddress",
            "ec2:DescribeInstances",
            "ec2:DescribeNetworkInterfaces",
            "ec2:DetachNetworkInterface",
            "ec2:AttachNetworkInterface",
            "ec2:StopInstances",
            "ec2:StartInstances",
            "ec2:RebootInstances",
            "autoscaling:*",
            "sns:*",
            "sqs:*",
            "iam:GetRole",
            "iam:SimulatePrincipalPolicy"
        ]
        Resource: "*"
        Effect: Allow
    }
]
<!--NeedCopy-->
The IAM Role permissions can be further restricted as follows:
        "Action": [
            ec2:DescribeInstances,
            ec2:DescribeNetworkInterfaces,
            ec2:DetachNetworkInterface,
            ec2:AttachNetworkInterface,
            ec2:StartInstances,
            ec2:StopInstances,
            ec2:RebootInstances,
            ec2:DescribeAddresses,
            ec2:AssociateAddress,
            ec2:DisassociateAddress,
            ec2:AssignPrivateIpAddress,
            ec2:UnAssignPrivateIpAddress,
            autoscaling:*,
            sns:CreateTopic,
            sns:DeleteTopic,
            sns:ListTopics,
            sns:Subscribe,
            sqs:CreateQueue,
            sqs:ListQueues,
            sqs:DeleteMessage,
            sqs:GetQueueAttributes,
            sqs:SetQueueAttributes,
            iam:SimulatePrincipalPolicy,
            iam:GetRole
        ]
<!--NeedCopy-->
Step 6:
Click the Add Storage option. On the Add Tags tab, set the Key value as Name and the Value as Citrix ADC-Autoscale to tag these EC2 resources.
Step 7:
On the Configure Security Group tab, create a new security group with the following port requirements:
Review and launch the instance.
Step 8:
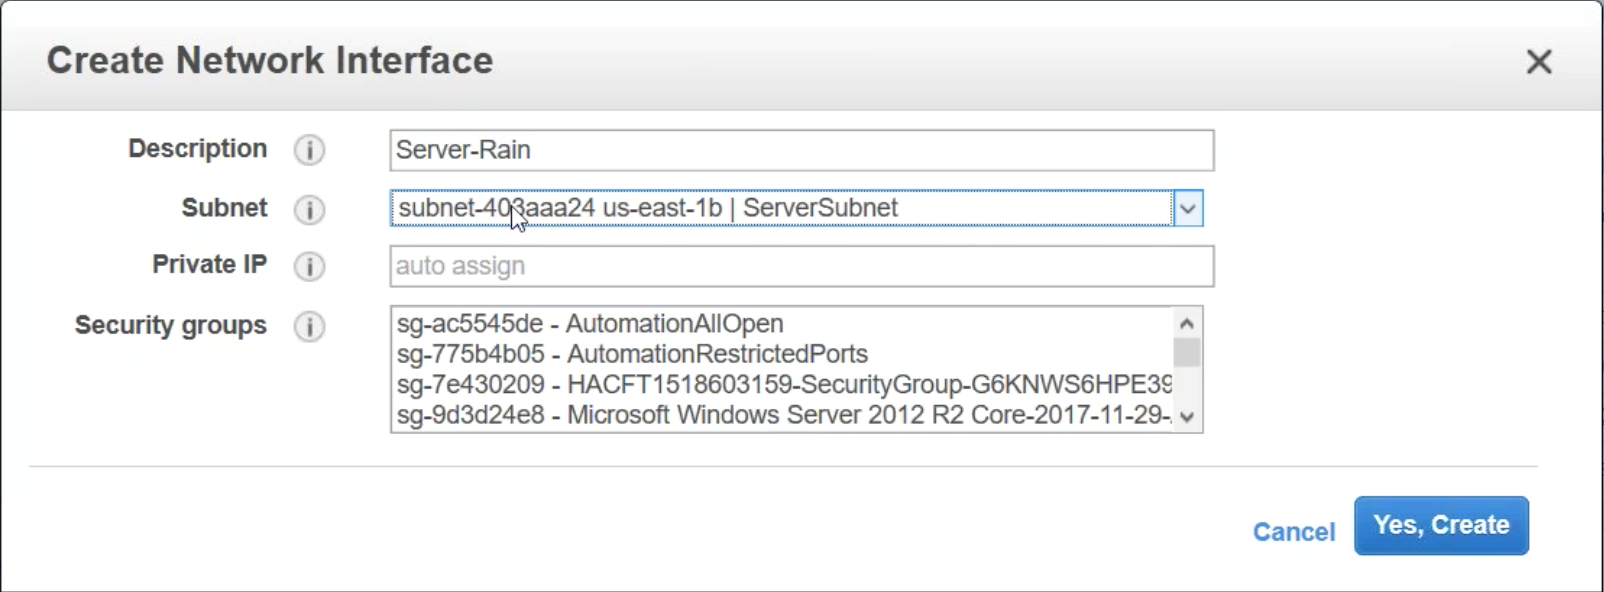
Navigate to NETWORK & SECURITY > Network Interfaces and click Create Network Interface.
Add a description and then select a subnet. This subnet is utilized for your SNIP so it should be placed on a subnet in the internal network. Also, choose the security group crated in the previous step. Click Yes, Create.
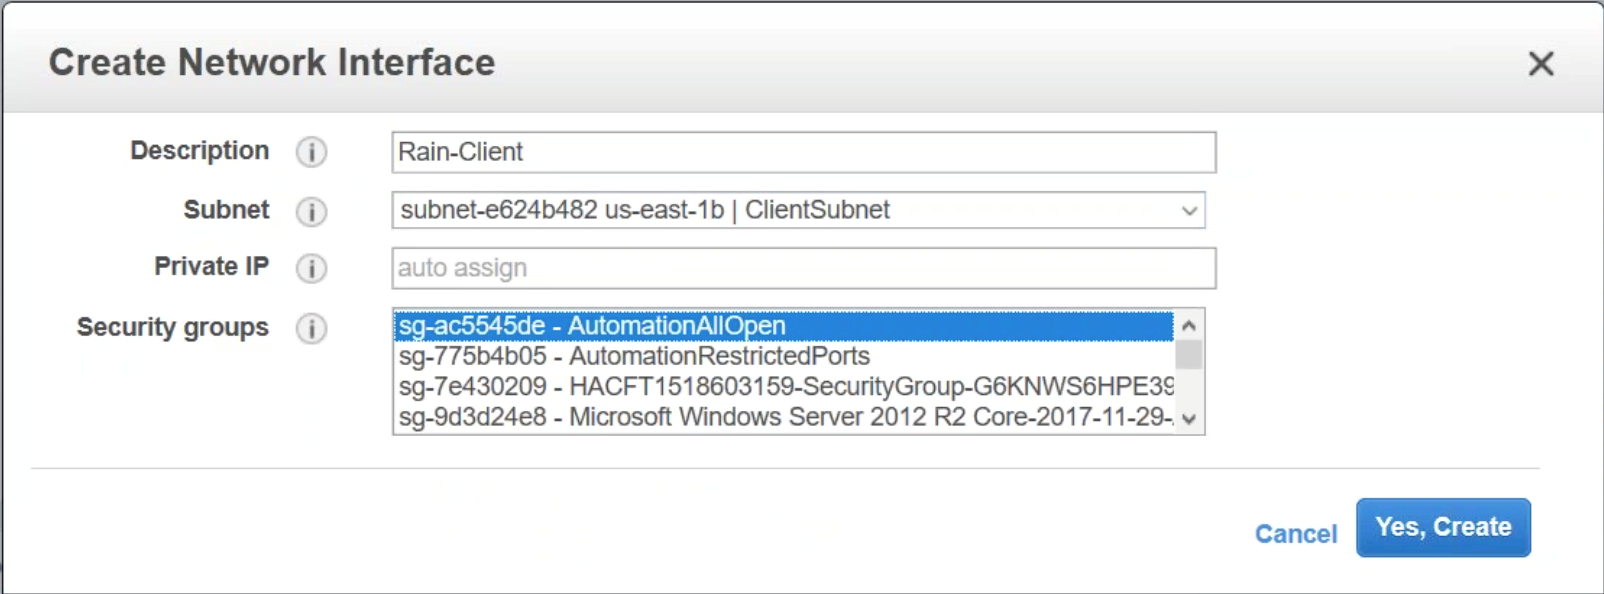
Add an additional Network Interface. This is a Public facing subnet for your Gateway/LB VIP. Create a description and choose the security group configured above.
Step 9:
Navigate back to Instances and select your Citrix ADC. To add the Network Interfaces to the Citrix ADC, the instance has to be stopped. In the Actions list, select Instance State and then click Stop.
Again click the Actions button and navigate down to Networking and Attach Networking Interface.
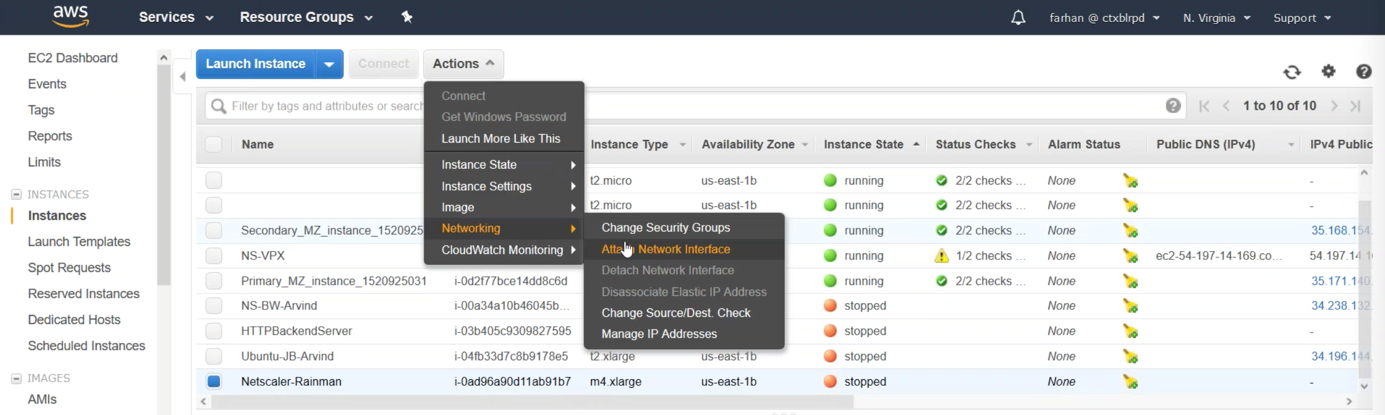
The NSIP interface is already attached to the VM, the next interface to be added should be the LB-VIP, followed by adding the server/internal interface for the SNIP. Once the Network Interfaces are attached, the instance can be Started.
Configure a new Elastic IP and associate it with your NSIP interface.
Configure Citrix ADC to integrate with AWS Auto Scaling
Step 1:
Navigate to the Elastic IP you associated with the NSIP in the previous step of this lab guide to access the Citrix ADC Management console.
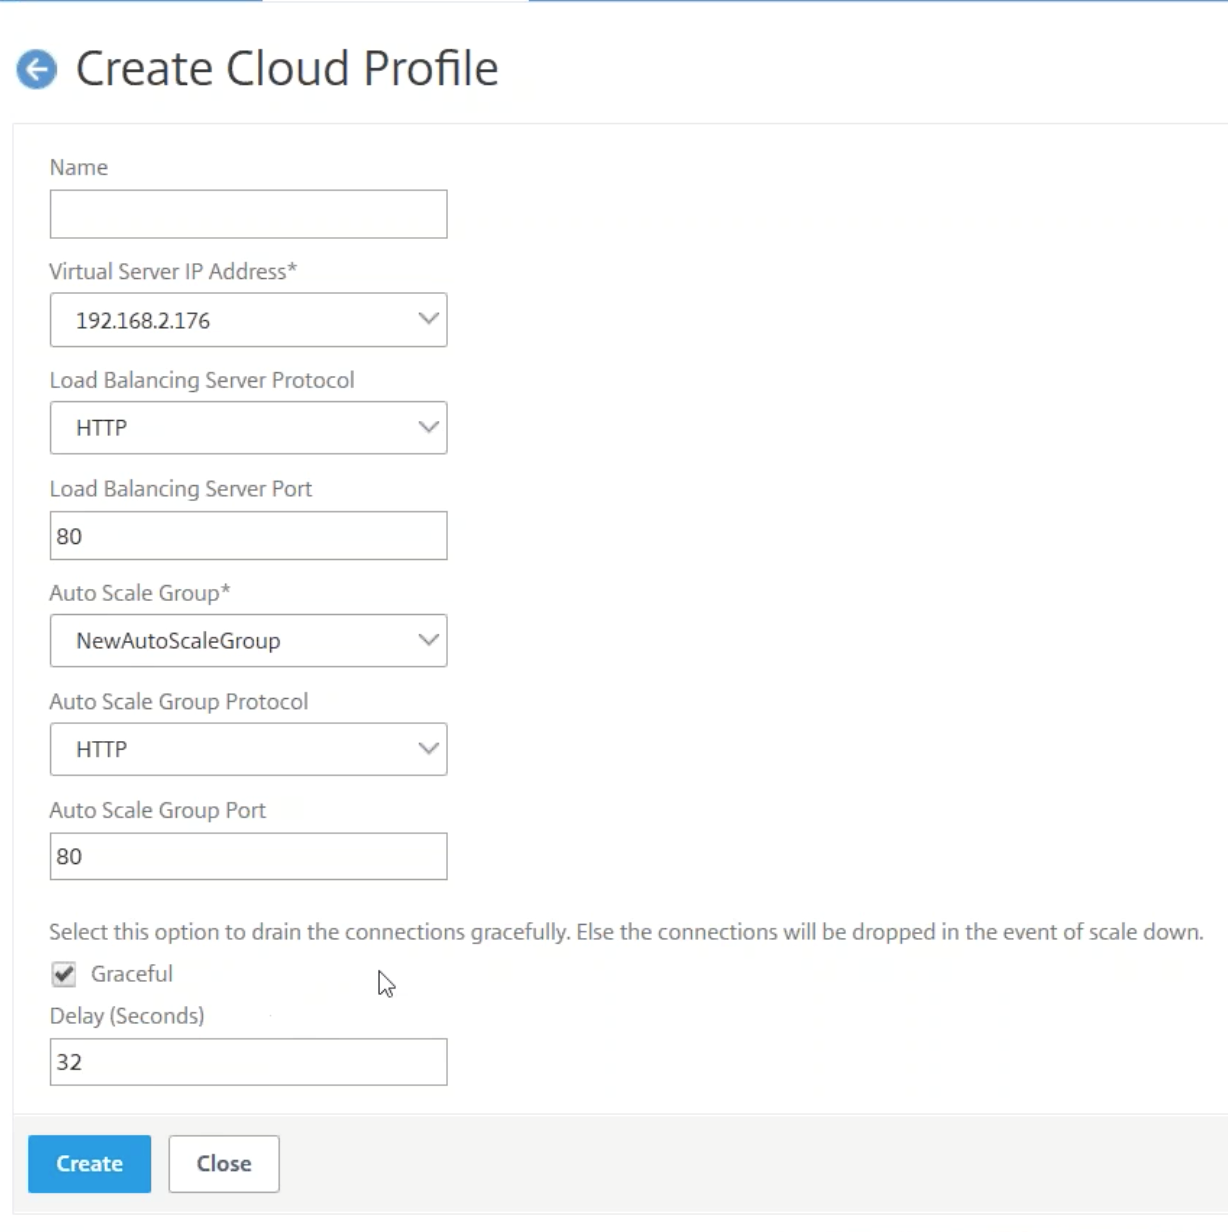
The first step to configuring the Citrix ADC is to attach a Cloud Profile. Click AWS and then Cloud Profile. Next click Add to create a Cloud Profile.
Provide a name for the cloud profile. The Virtual Server IP Address should populate and correlate with an internal IP on your Citrix ADC. The Auto Scale Group is the one that you created in previous steps of this lab guide. Select Graceful, this allows a time-out for back-end instances to be deleted, allowing any packet transfers to complete and sessions not to be terminated within the grace period. The time delay for the grace period can be adjusted.
Configure Citrix ADC front end Auto Scaling in AWS
-
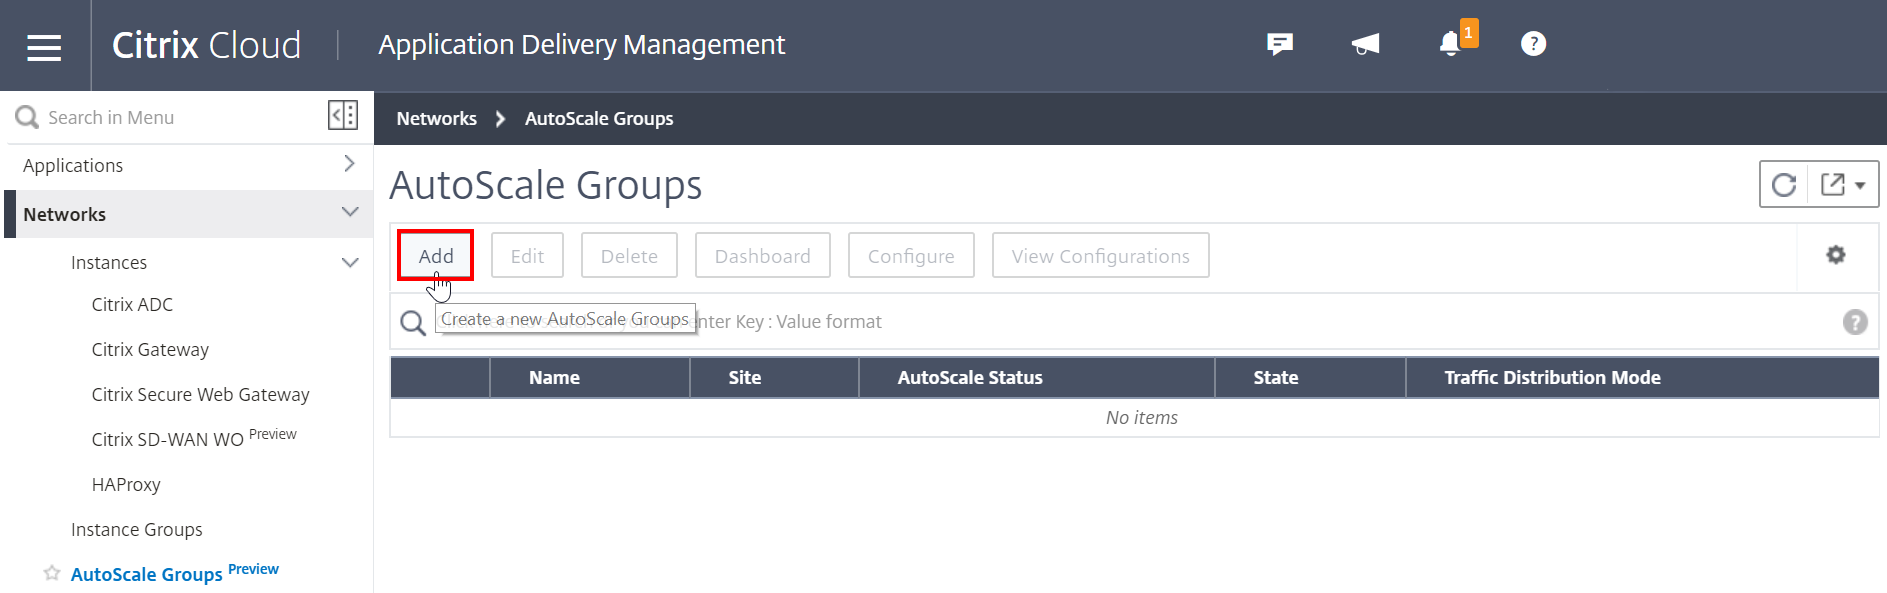
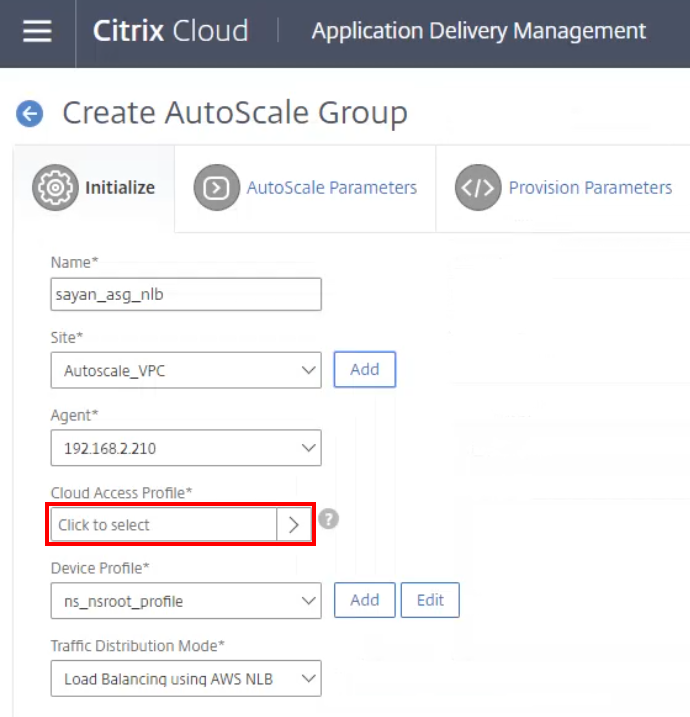
To create the Auto Scaling group, sign in to Citrix ADM.
-
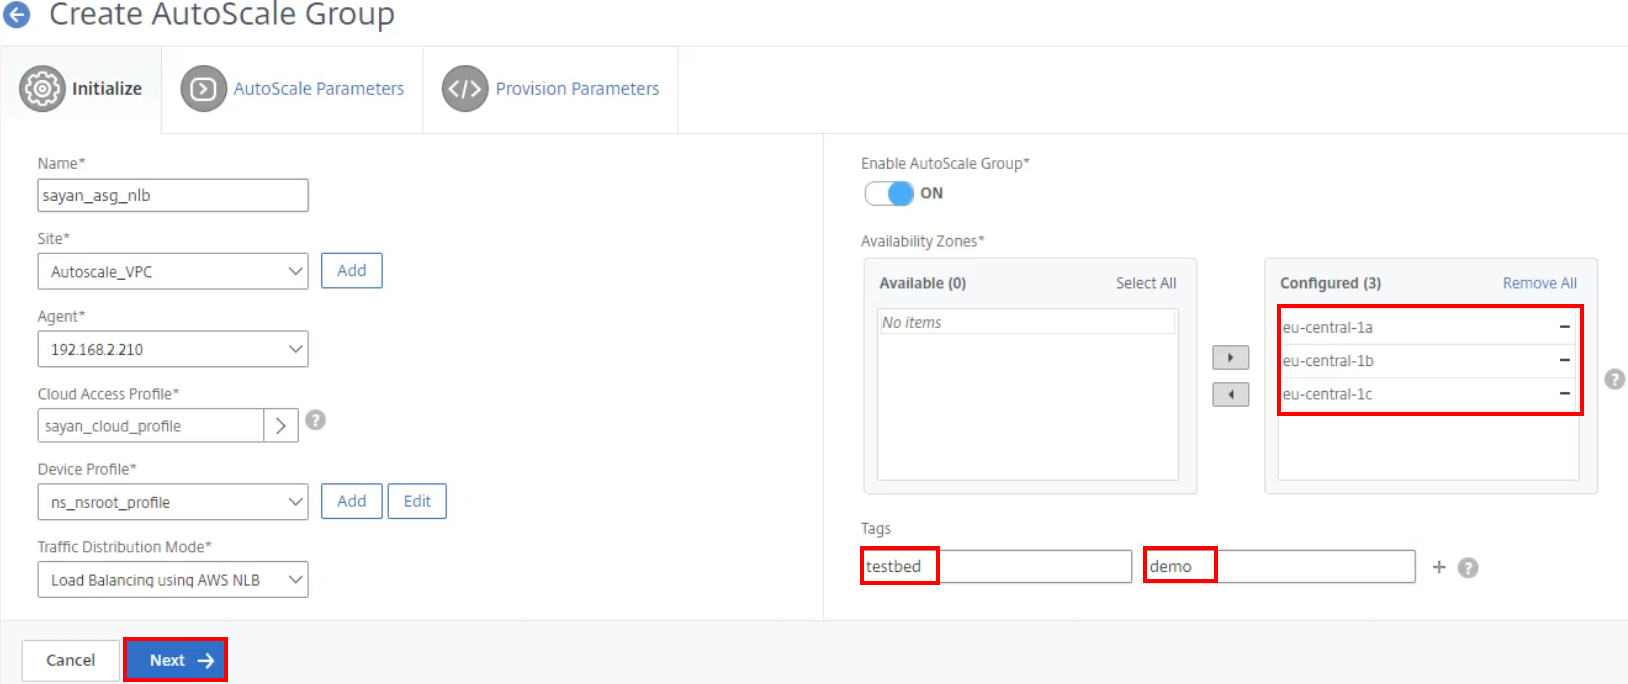
Navigate to Networks > AutoScale Groups, and click Add to create the group name.
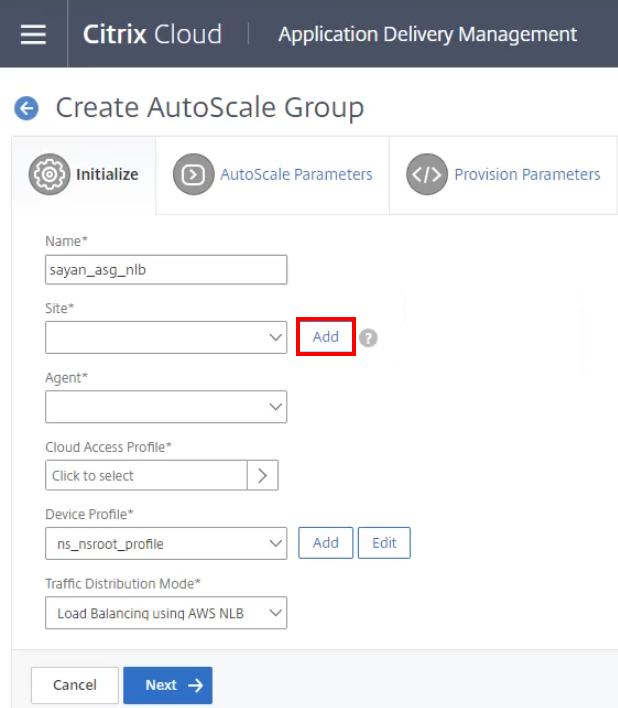
-
In the Site setting, click Add.
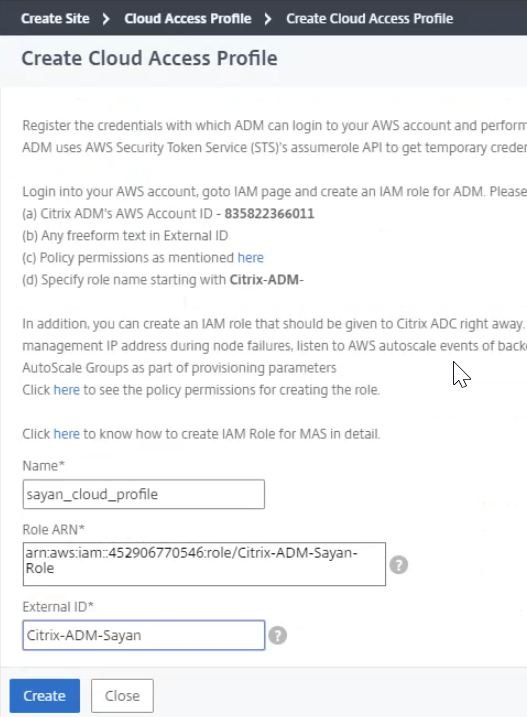
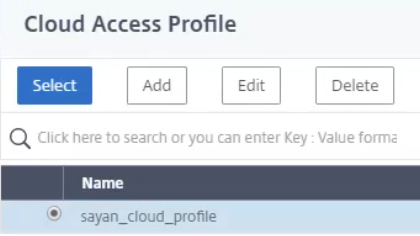
Create a cloud access profile
-
When creating a Site, in the Cloud Access Profile, add AWS.
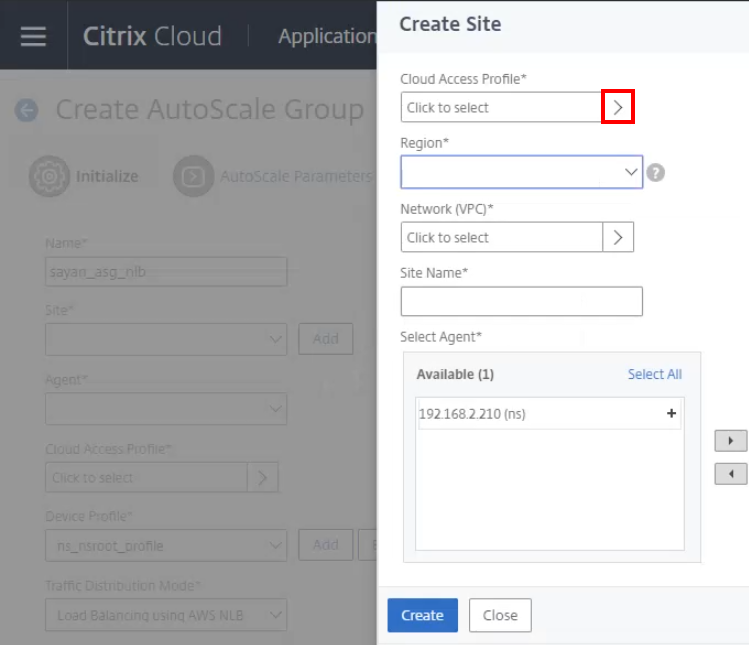
-
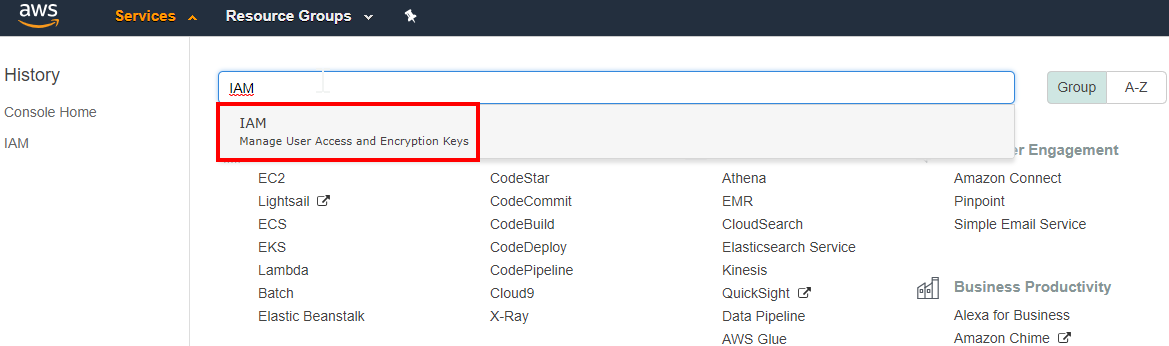
Name the profile and sign in to your AWS portal. Search for the Identity and Access Management (IAM) service to manage user access and encryption keys.
-
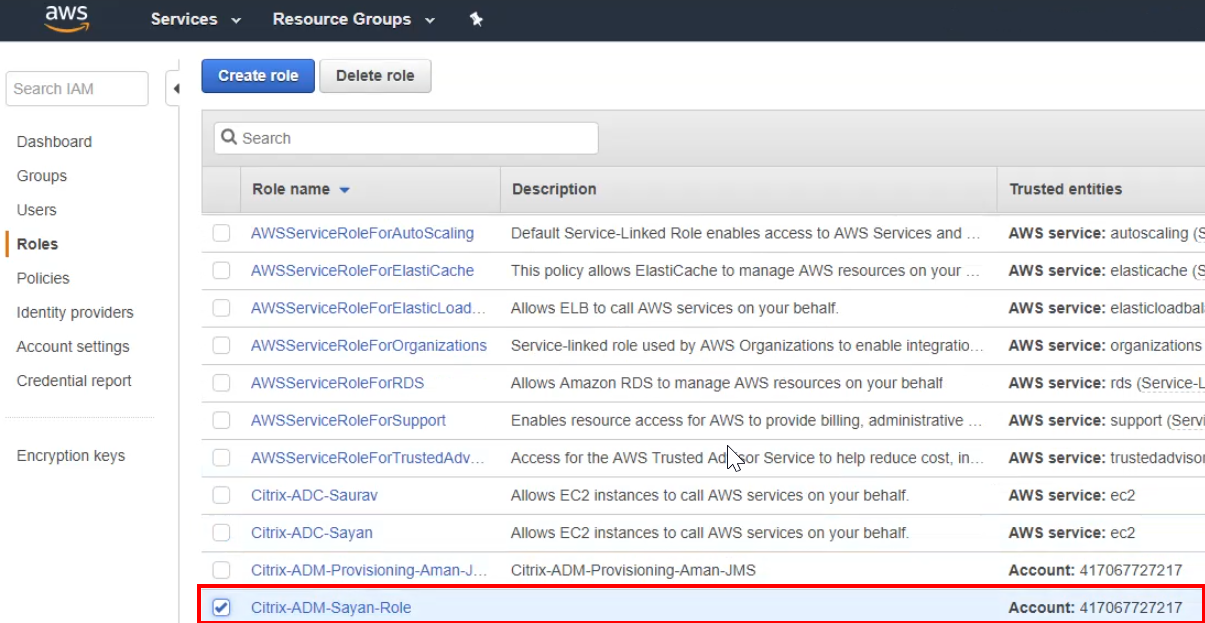
In the IAM dashboard, select Roles on the left panel and search for your corresponding Citrix ADM role.
-
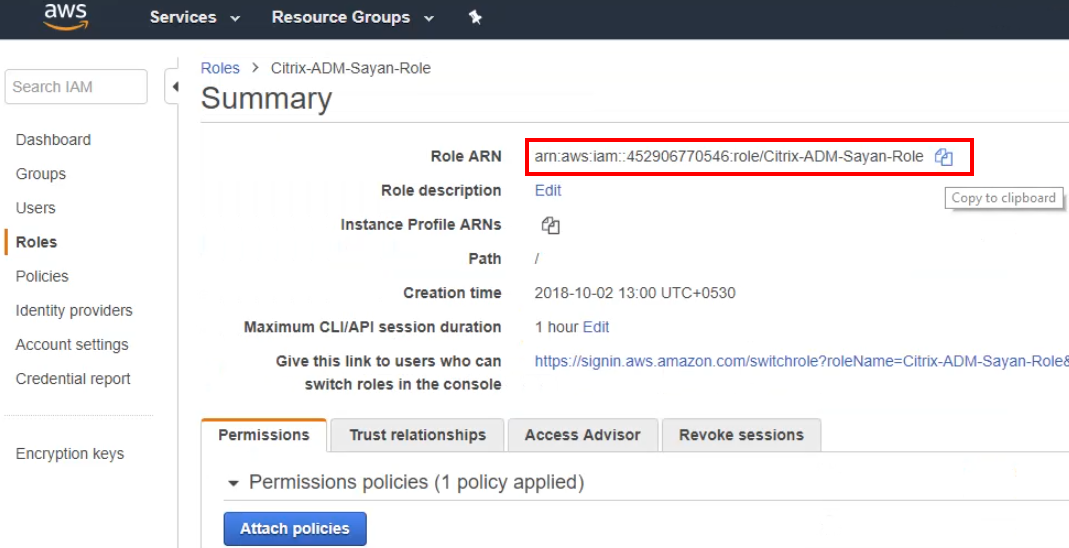
Copy the Role ARN to the clipboard.
-
After copying the name, go back to the Citrix ADM console and paste the name into the Role ARN text field.
-
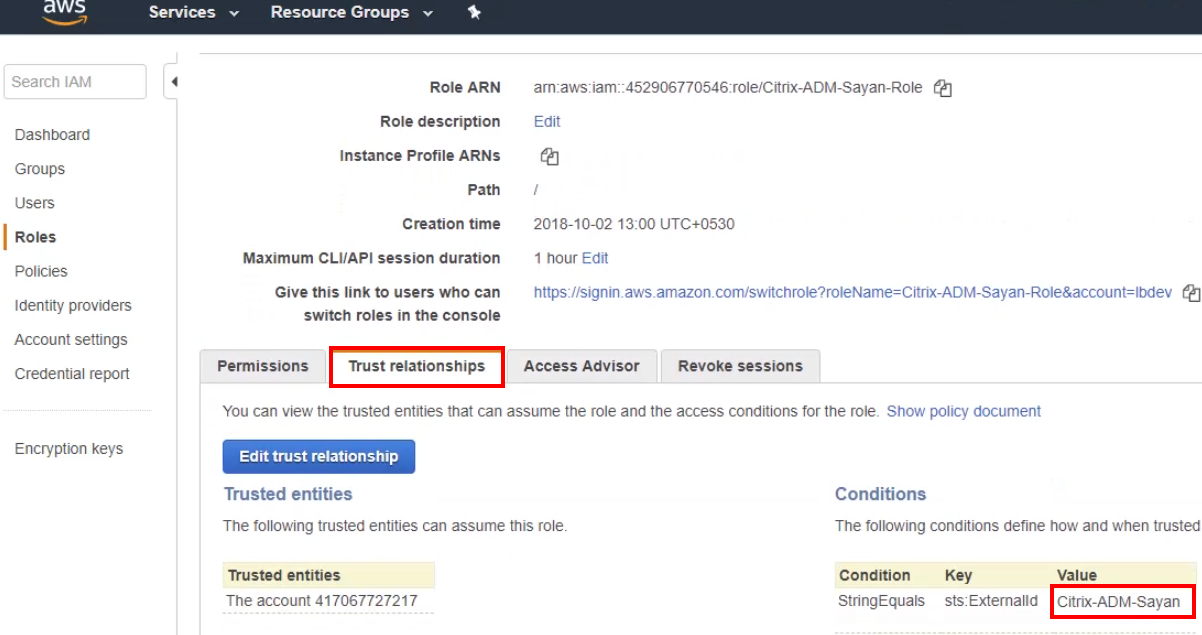
To get the external ID, return to the AWS Roles dashboard, navigate to the Trust relationships tab, and copy the value from the Conditions.
-
In the Citrix ADM console, paste the value into the External ID field and click Create.
-
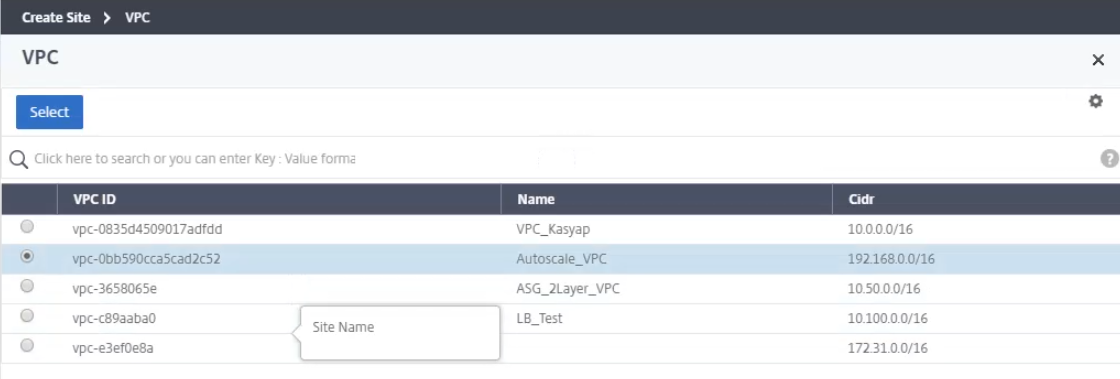
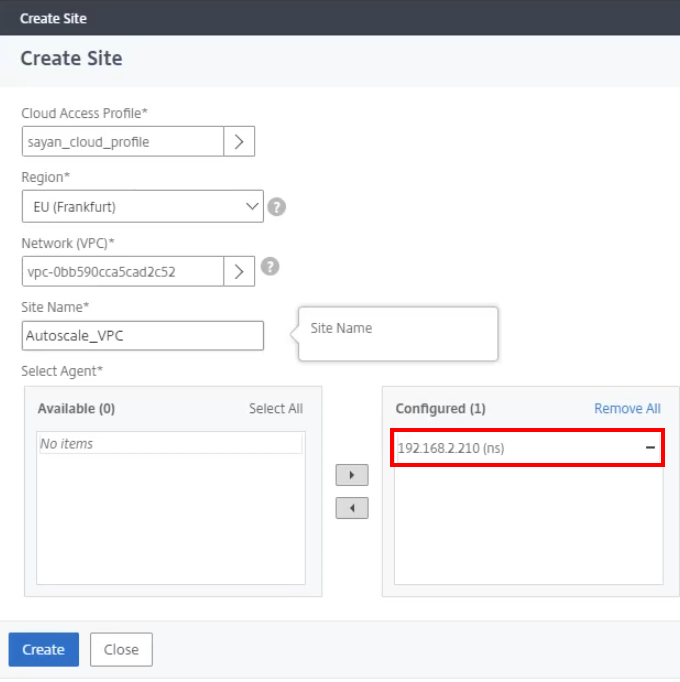
Select the region, and then choose the appropriate VPC network.
-
Move the agent from Available to Configured.
-
Select the corresponding Cloud Access Profile.
-
When loaded, move the availability zones from Available to Configured and add the corresponding tags to the AutoScale Group. Select Next to begin setting the AutoScale parameters.
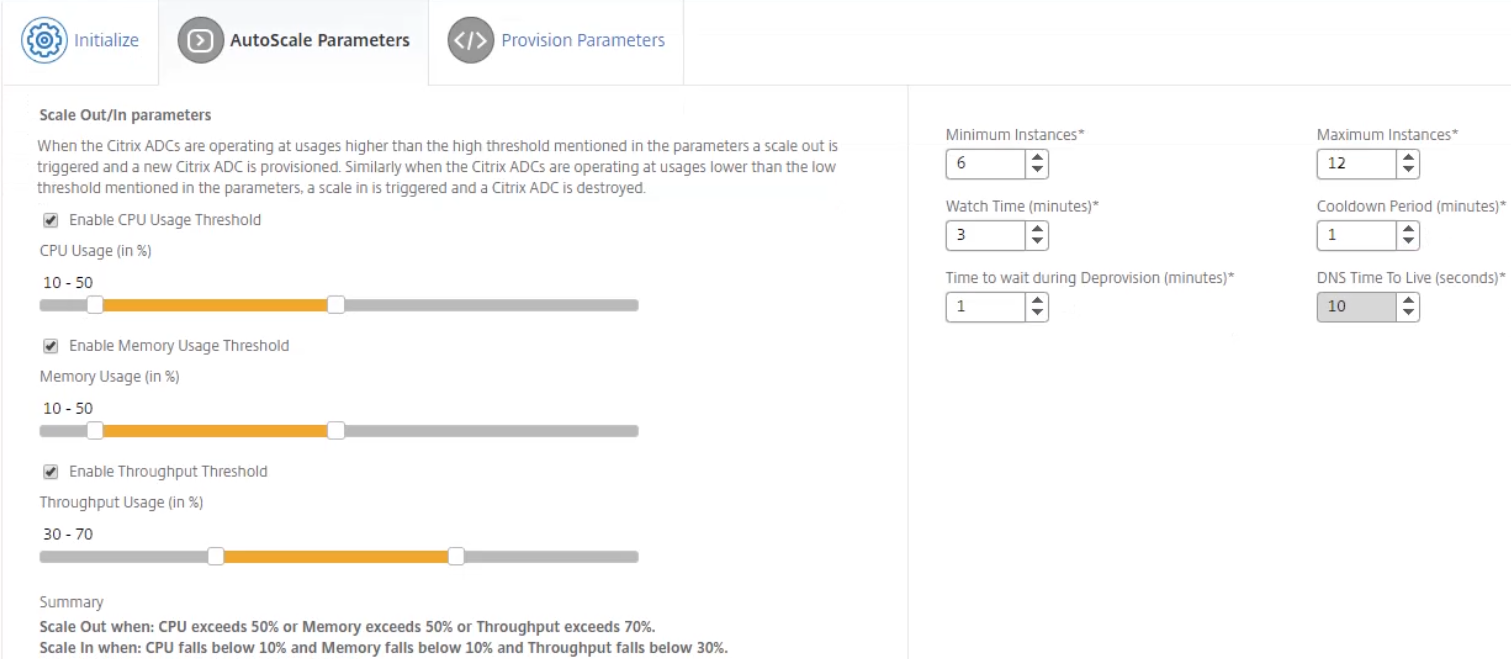
Set the AutoScale parameters
-
When setting the AutoScale parameters, adjust the Thresholds and Parameters to the desired settings. Then click Next to begin configuring the Provision Parameters settings.
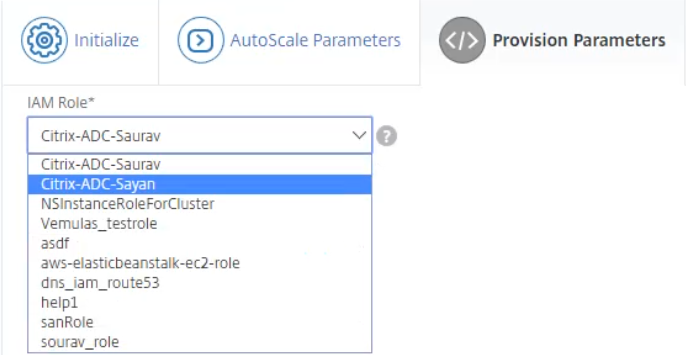
-
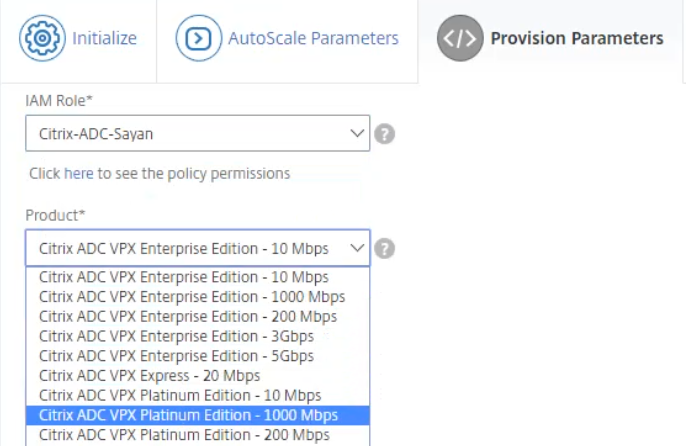
In the Provision Parameters section, select the role from the IAM Role field.
-
Select the appropriate Citrix ADC product and edition.
-
Gather the Amazon Machine Image (AMI) ID from the particular instances in AWS. Input that ID in the AWS AMI ID field.
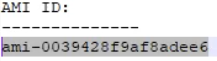
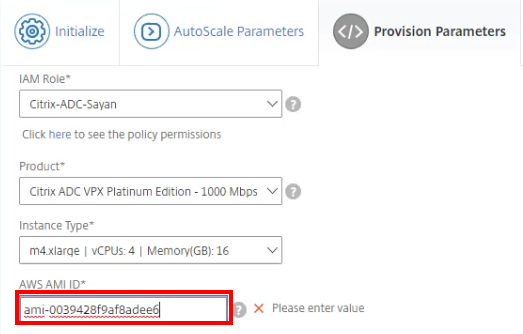
-
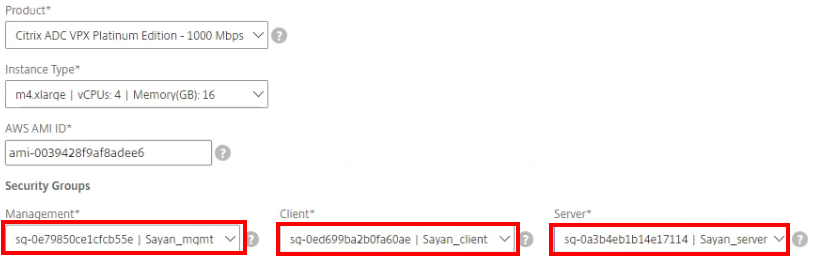
After adding the AMI ID, update the Security Groups with the appropriate groups.
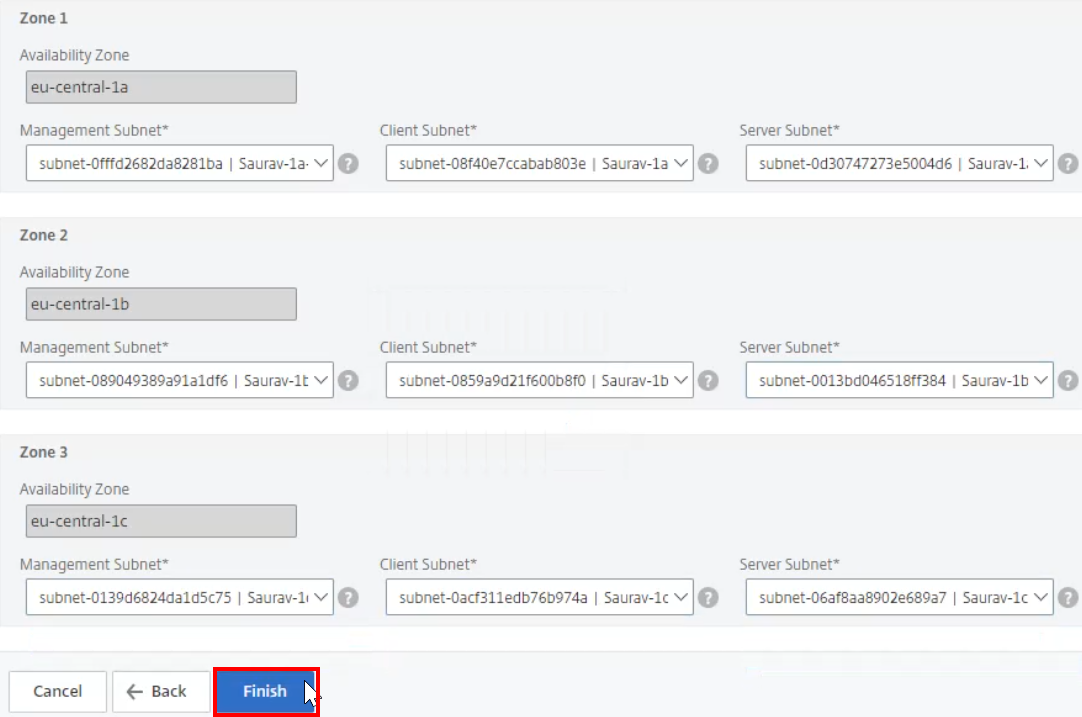
-
To start configurations of zones 1, 2, and 3, assign the corresponding management, client, and server subnets.

-
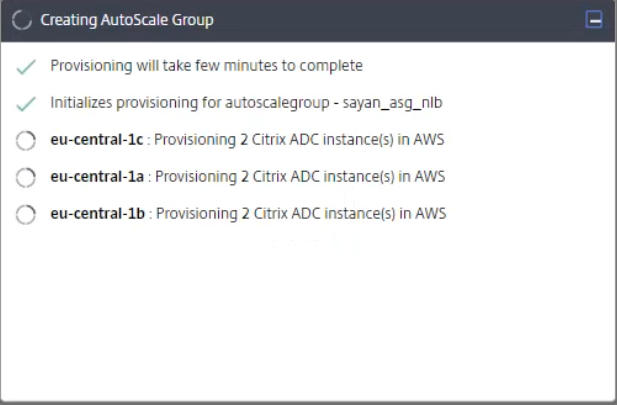
Click Finish to create the configuration of this Auto Scaling group. The creation process can take up to 10-20 minutes.
Initialize instances in AWS
-
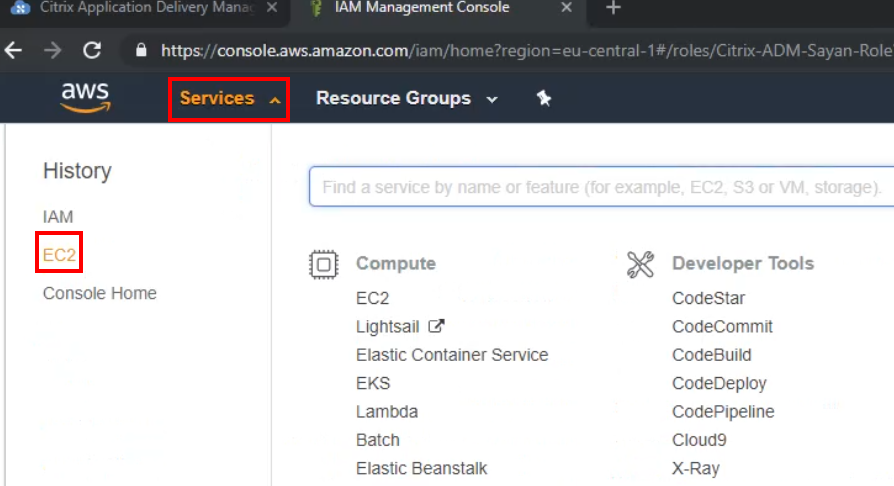
While the Auto Scaling group is being created, open your AWS console and navigate to the Services tab. Select the Amazon Elastic Compute Cloud (EC2) service.
-
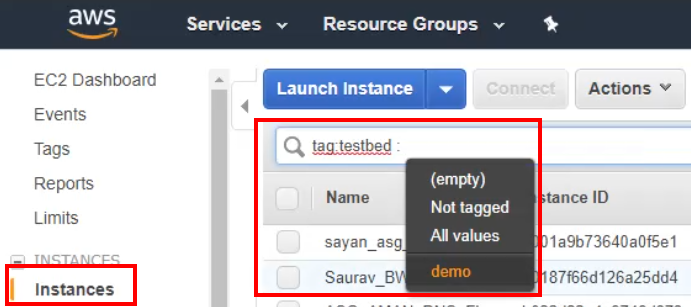
On the EC2 dashboard, select the Instances tab, and filter using the tags set within the AutoScale Group section.
-
When filtered, you can see the pending instance that is still being initialized.
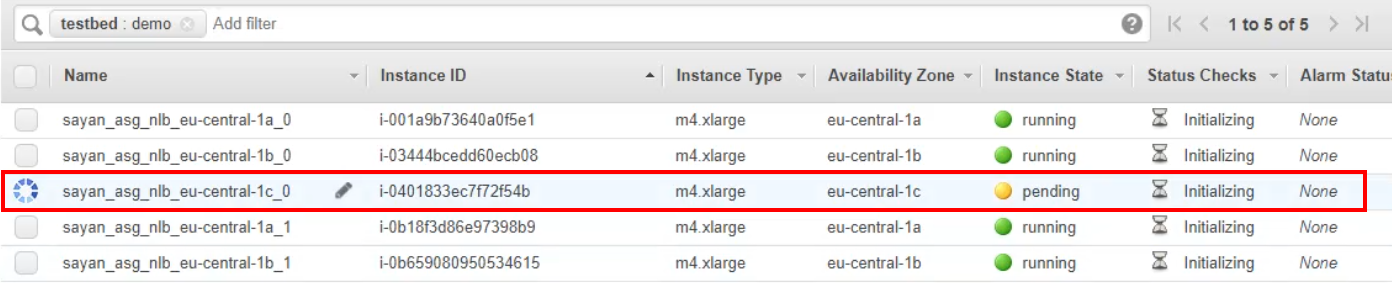
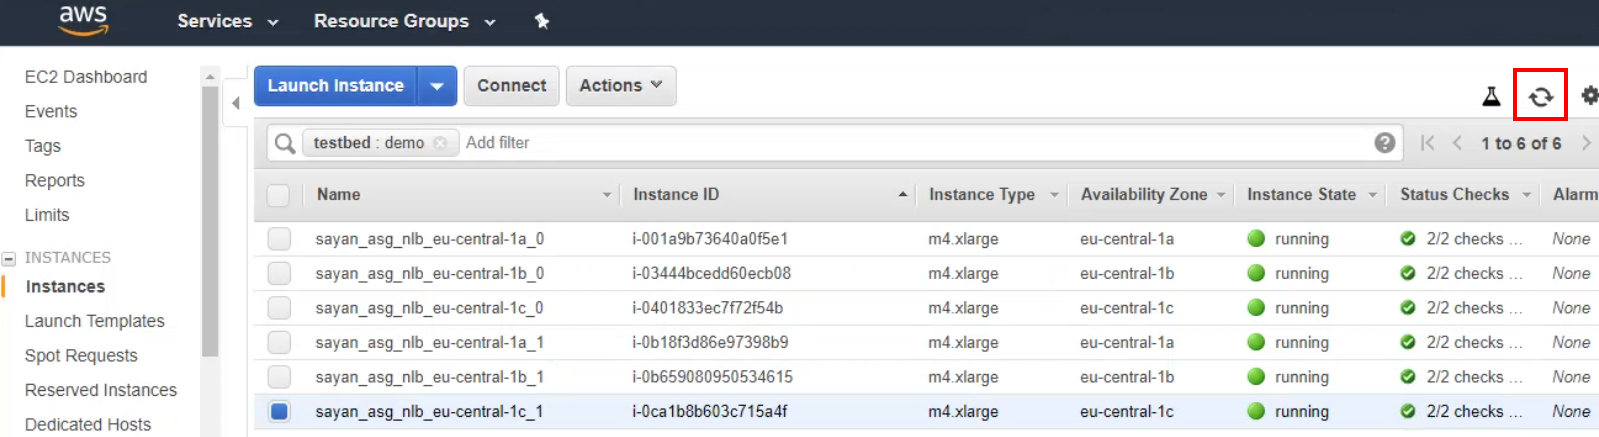
-
The instances should finish initializing after they are created.
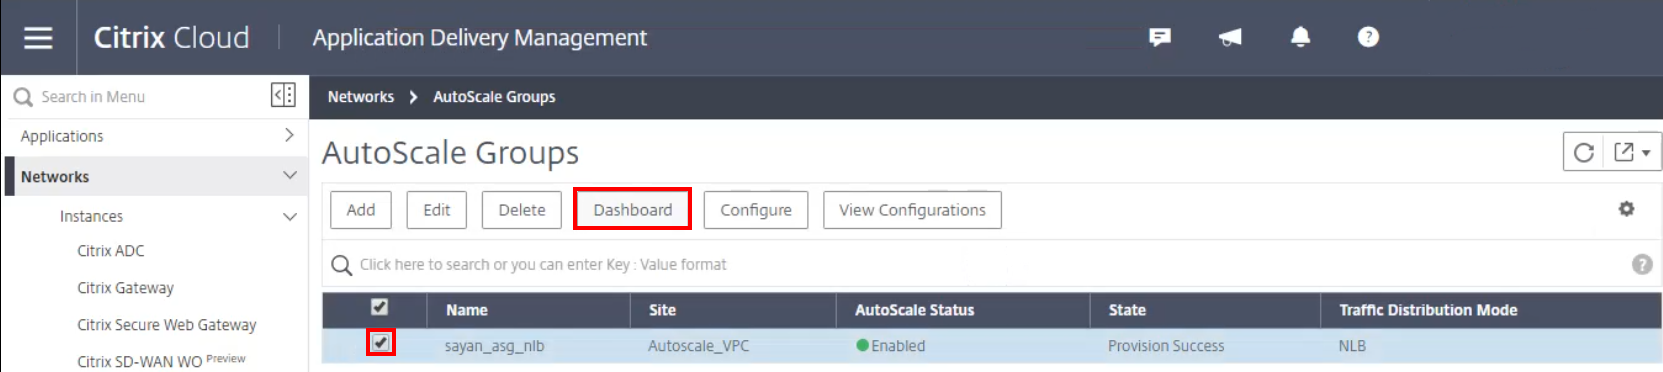
Monitor the Auto Scaling group events
-
After creating the Auto Scaling group, select your group and proceed to the AutoScale Group dashboard.
-
Filter out specific periods of time to monitor the Auto Scaling group. To gain real-time insight, change the monitoring period to Live.
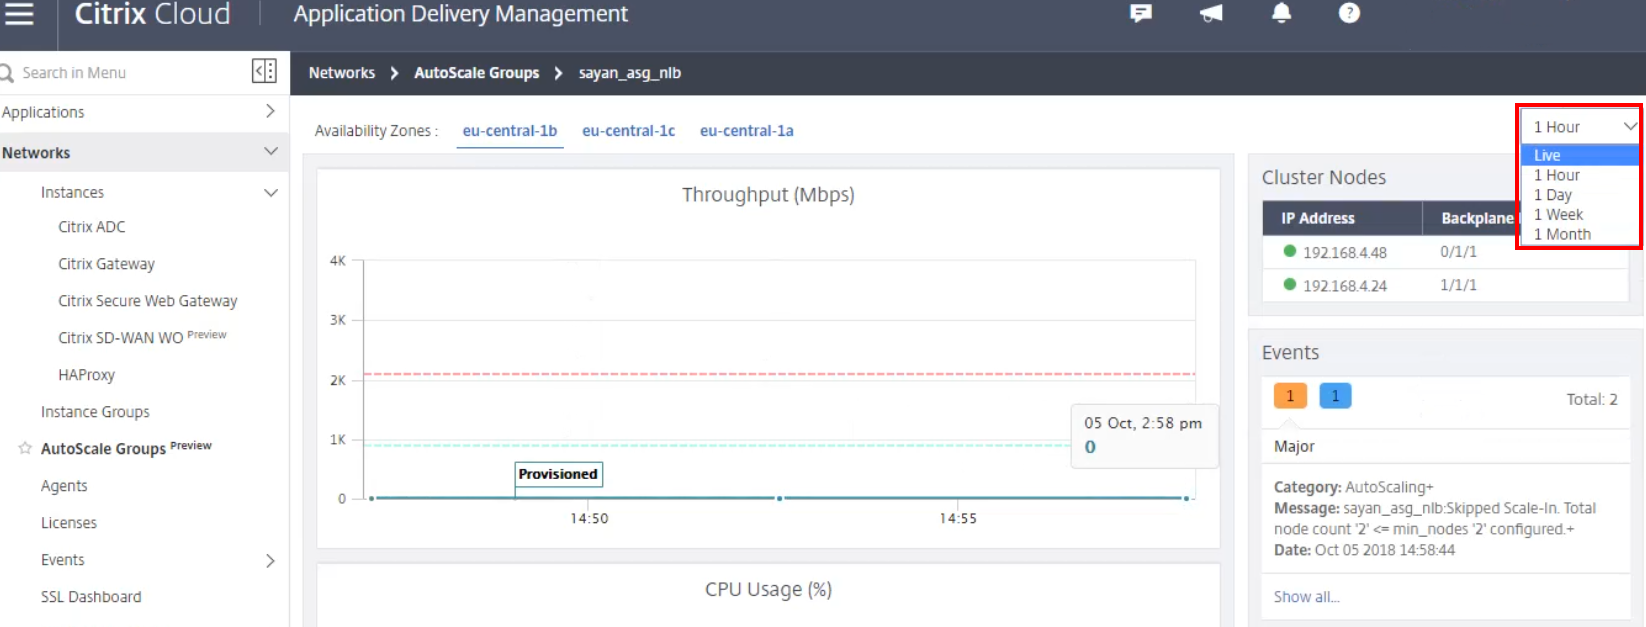
-
Click the following datapoint presented in the graph to see any group events.
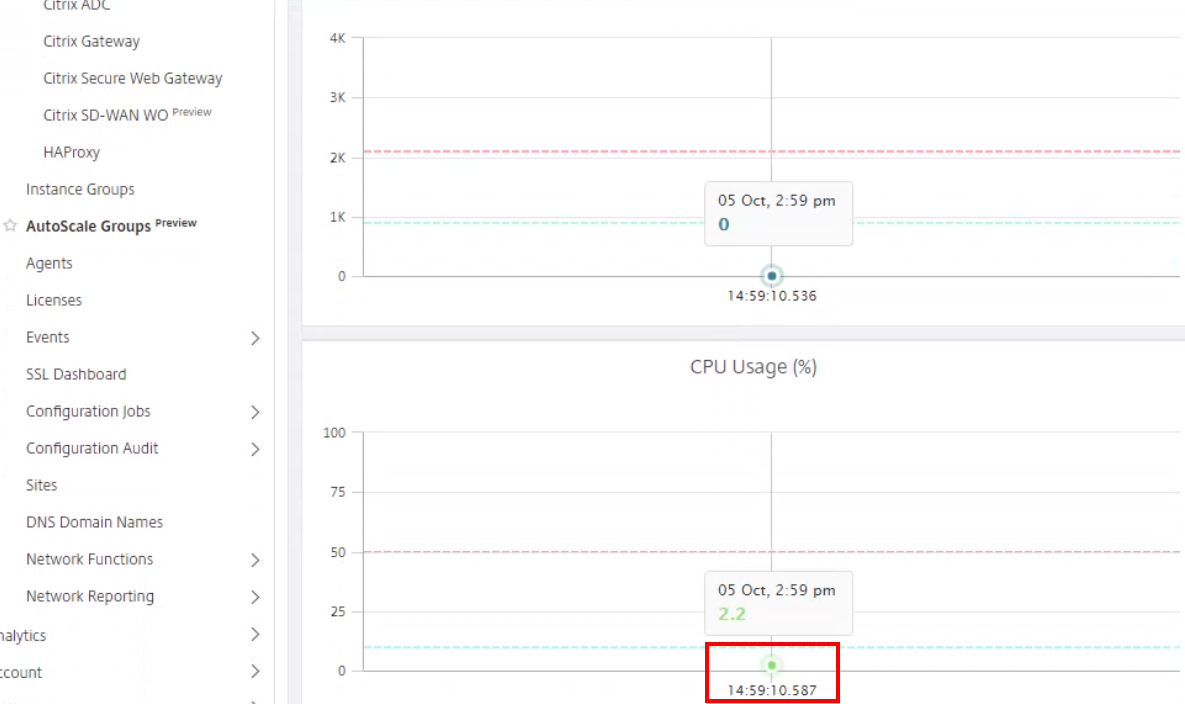
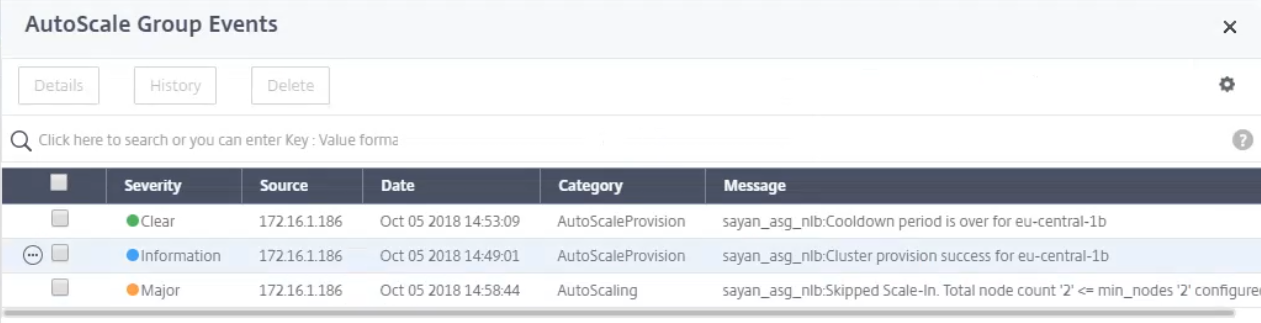
-
When viewing the specific live events, you can monitor the specific events of the corresponding Auto Scaling group.
Provision Citrix ADC VPX instances using Citrix ADM Service
The Citrix ADM Service is a cloud based solution that affords the ability to monitor Citrix ADC instances and gain visibility into the health, performance, and security of applications. Additionally, by leveraging the provisioning tool to auto create instances in public clouds, such as AWS, it also simplifies the management of ADC instances in multiple locations whether they are on premises or in the cloud.
Prerequisites
Provisioning Citrix ADC instances on AWS using the Citrix ADM Service requires some steps to be taken that are summarized in the prerequisite documentation. For more information, see Provisioning Citrix ADC VPX instances on AWS.
These steps include performing the following tasks on AWS before you provision Citrix ADC VPX instances in Citrix ADM:
- Create subnets
- Create security groups
- Create IAM role and define a policy
The IAM role must be configured with permissions that allow the Citrix ADM Service to access the AWS account. After setting everything up, you can leverage the Citrix ADM service to provision the VPX instances on AWS.
Provision Citrix ADC VPX instances using the Citrix ADM Service
Sign in to the Citrix Cloud ADM Service and navigate to Networks > Instances > Citrix ADC. Then under the Select Action tab, click Provision in Cloud.
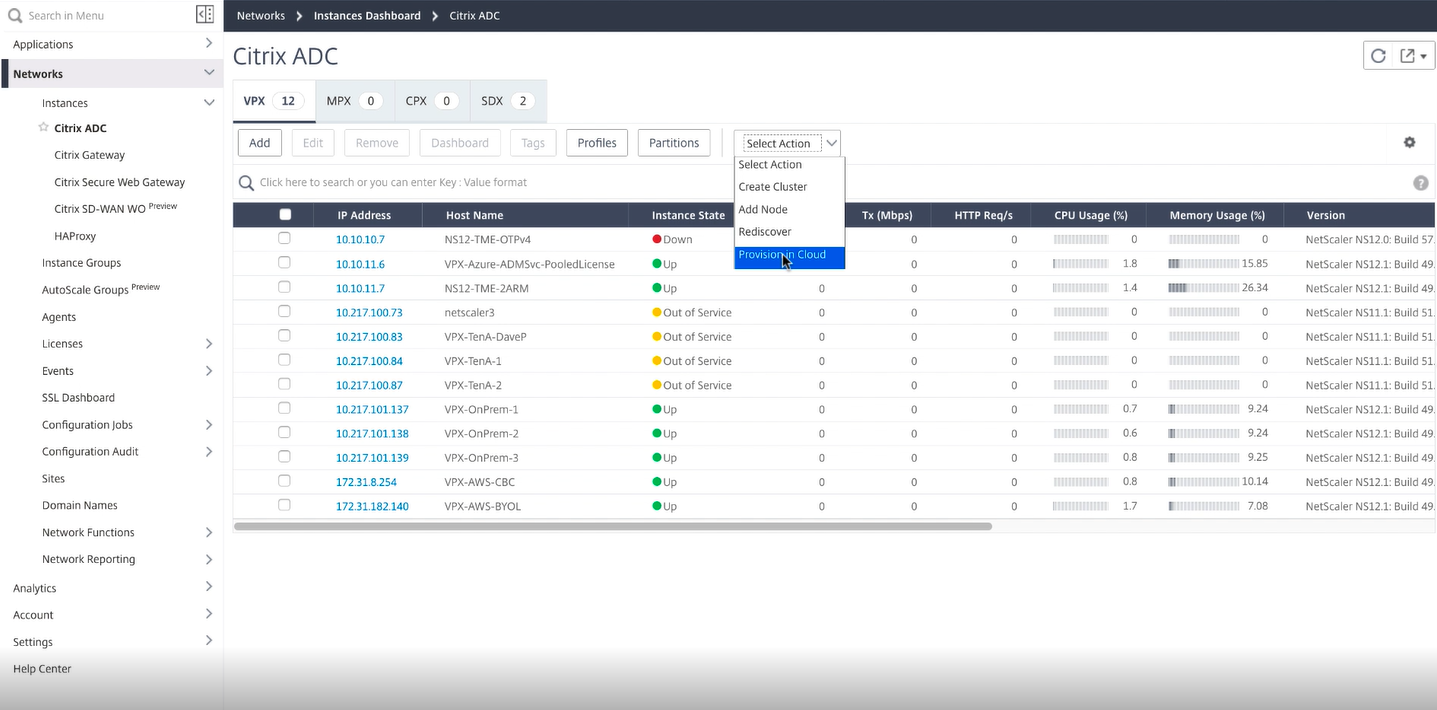
This prompts you to define information about the instance that you would like to provision.
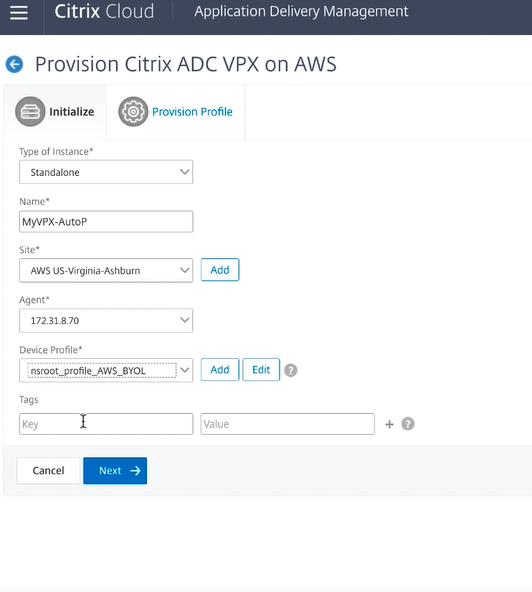
Specifically you have to define the following:
- Type of Instance: Standalone Instance is selected here.
- Name: A name you would like the instance to adopt when it is provisioned.
- Site: The site defines which area or region you will be doing the deployment in.
- Agent: The agent dictates which ADM agent will be available within the site. This will have to be set up prior to doing the auto-provisioning. You will need to create both a site and an agent belonging to that site prior to beginning this exercise.
- Device Profile: A device profile that has “nsroot” as the user name and a desired password. Once Citrix ADC is provisioned by Citrix ADM, the ADC’s nsroot user’s password will be set to the password mentioned in the profile. Further on, this profile will be used by Citrix ADM whenever it needs to login to the instance.
- Tags: Optional tag for the instances or group of instances.
Then select the Cloud Access Profile for your AWS account. This is the profile that Citrix ADM uses to sign in your AWS account to fetch entities and perform operations like provisioning and de-provisioning. Using that profile the Citrix ADM Service fills in the rest of the fields with objects related to your account.
In this scenario, there is an IAM role predefined that is used by the Citrix ADM service to provision the VPX instances, but you can create other roles.
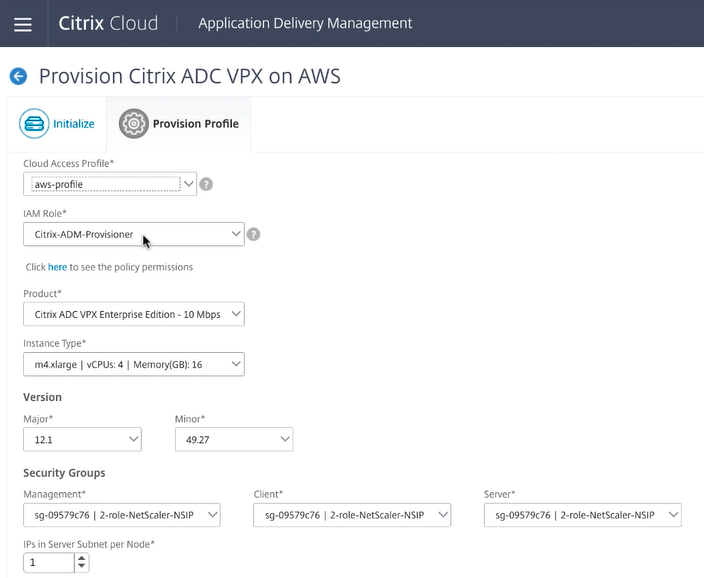
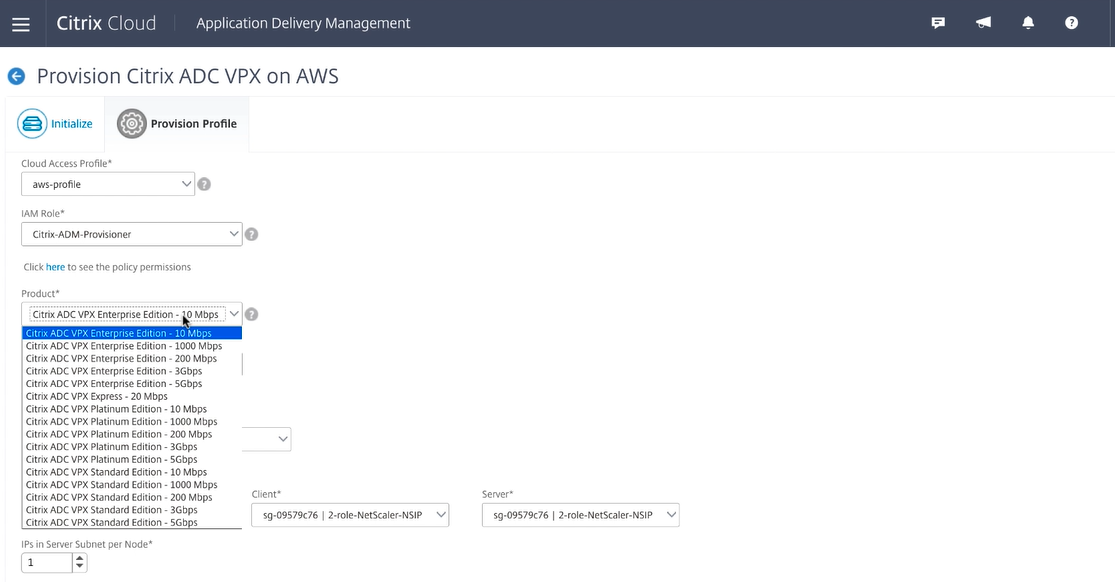
You must then select the product edition of the VPX instance you want to deploy based on the desired throughput.
Note:
VPX Express is included for you to deploy a VPX instance without a license.
Version
Determine which release of software you would like to run selecting the major and minor release.
Security groups
Security groups should have pre-defined permissions for accessing different Virtual Private Clouds (VPCs). Because each instance requires three network interfaces or vNICs, you need to apply three different security groups to the service that you deploy, including:
- One for remote management (role NSIP)
- One for client side access (role VIP)
- One for server side communication (role SNIP)
Also, you should be selecting the necessary number of IPs that are required for scalability of this solution.
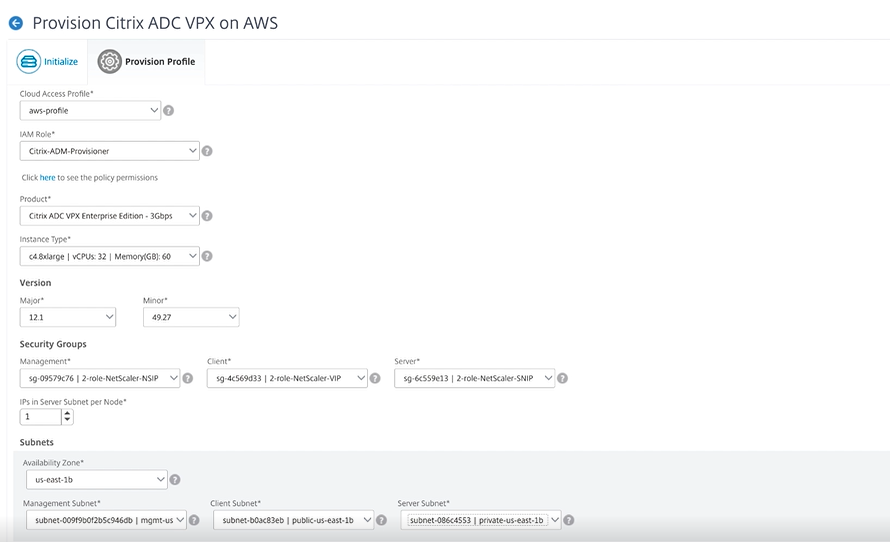
Finally, you must choose which availability zone you want the deployment to be in and define the coinciding VPC subnet information for each subnet:
- One for the management interface (NSIP)
- One for clients to access (VIP)
- One for SNIPs to access back end servers (SNIP)
After you click Finish, the deployment begins. When the deployment completes successfully, you receive a notification that your VPX is deployed.
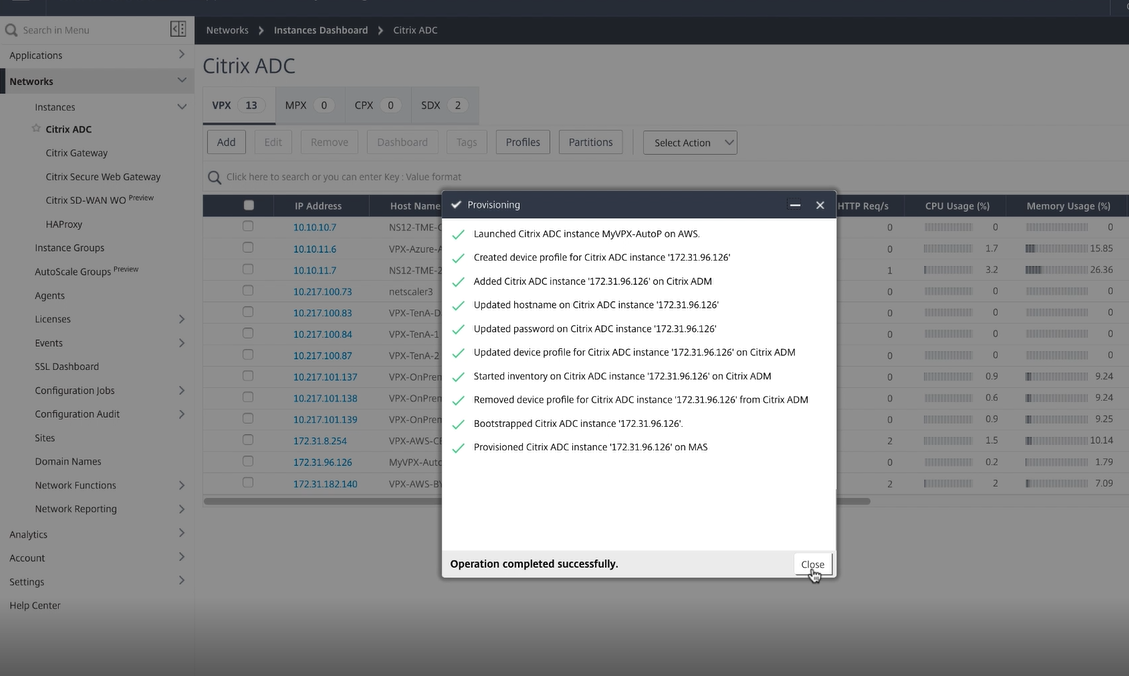
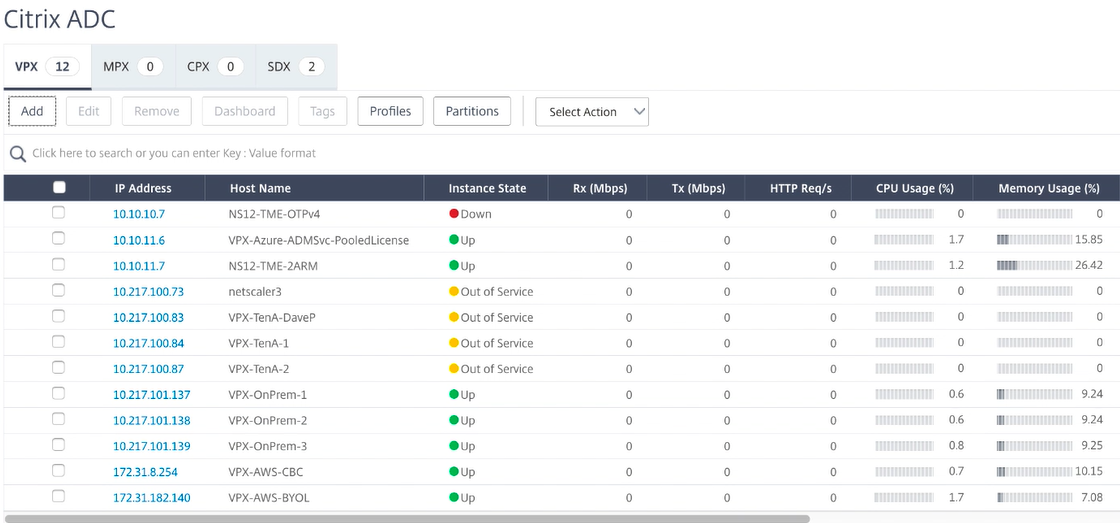
Once the deployment is complete, you can see the Citrix ADC VPX instances in Citrix ADM for all management and deployment purposes.
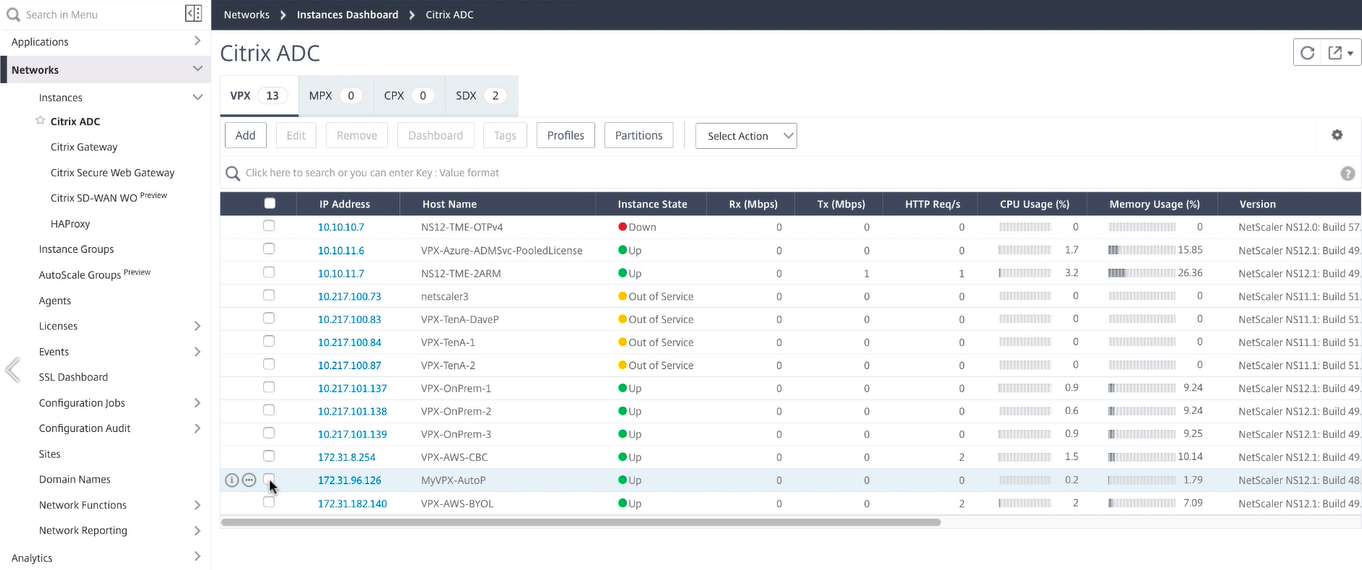
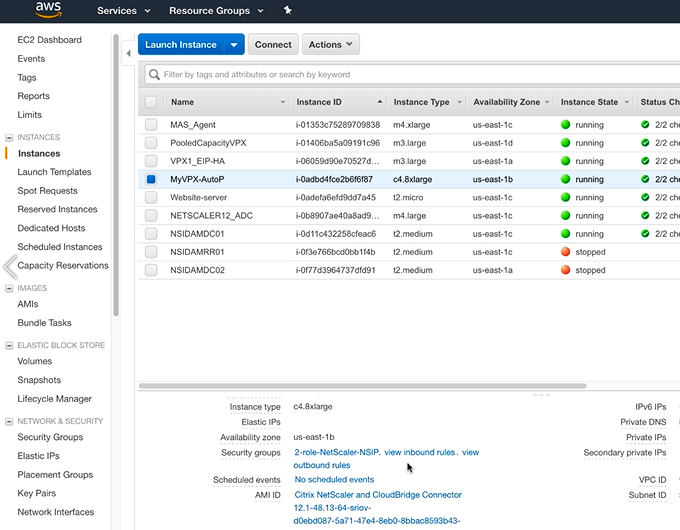
You can then navigate to the EC2 console to see the new instance that were created with the name we established in the Citrix ADM settings. It is all synchronized for management in Citrix ADM and ready for deployment of your applications to Citrix ADC.
AWS deployment
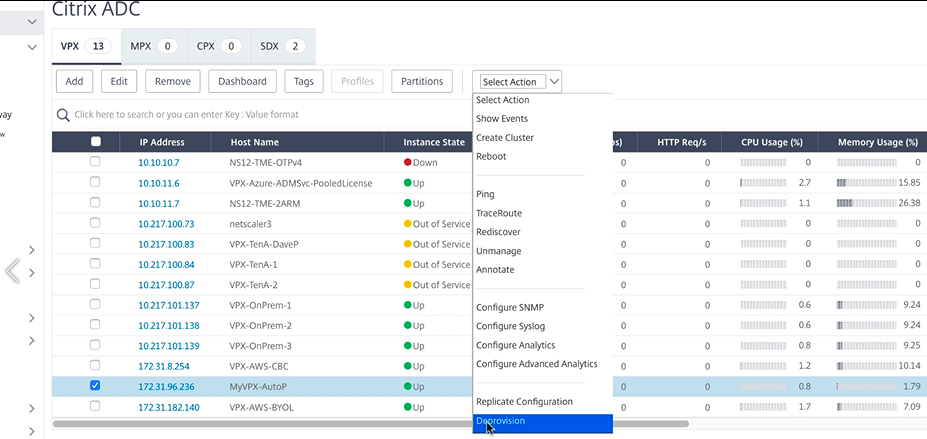
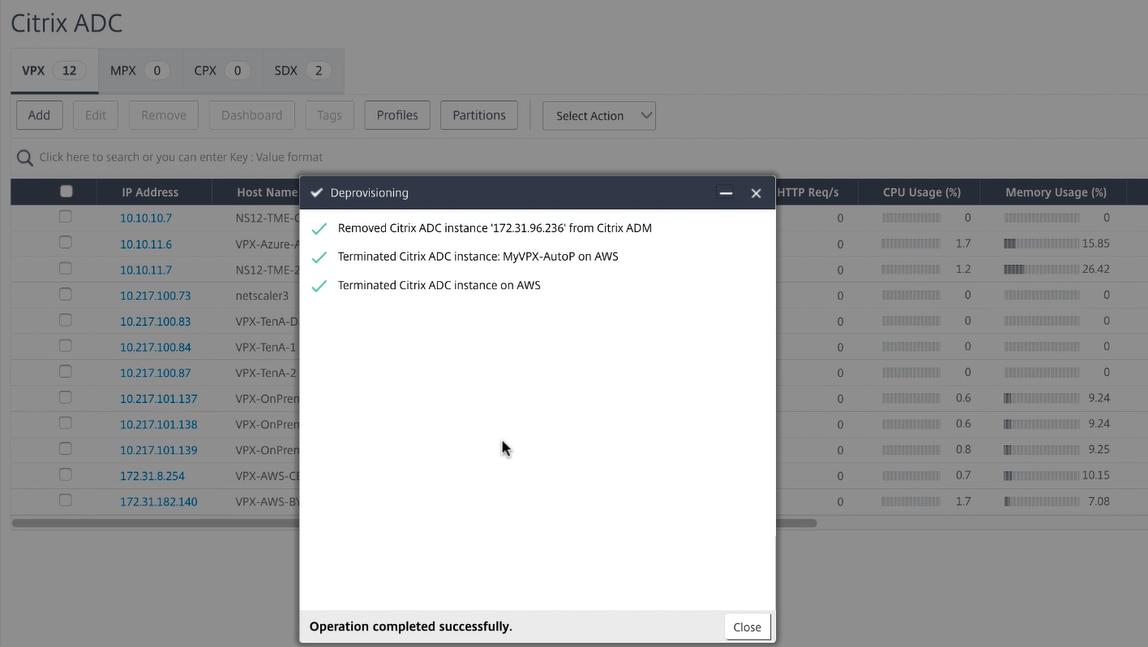
To deprovision these instances, navigate back to the Citrix Cloud ADM Service and go to Networks > Instances > Citrix ADC. Under the Select Action tab, click Deprovision.
AWS deprovisioning
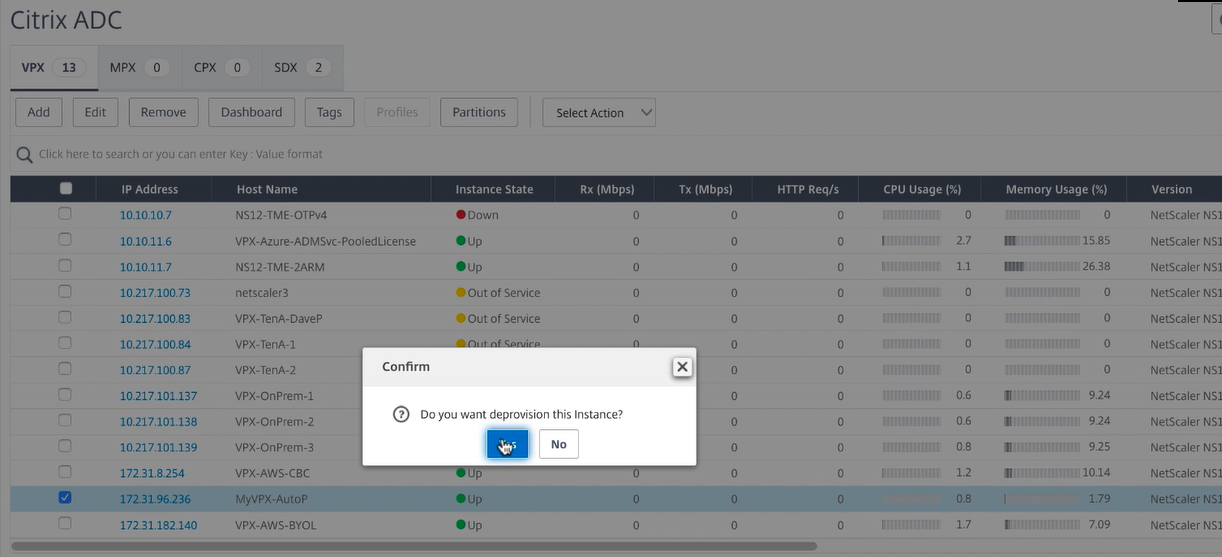
You are prompted to confirm your action. To continue, select Yes and then all provisioning is reversed.
After you receive a confirmation that the VPX instance was deprovisioned, you no longer see the device in the Citrix ADM console.
More information
- Implementation Guide: Citrix XenDesktop in AWS
- How do I Configure Unified Gateway for Common Enterprise Applications
- Accelerate your Business by Running Citrix solutions on Amazon Web Services (AWS)
- Cloud Networking and Desktop Virtualization Solutions for AWS
- Citrix ADC Quickstart Guide for deploying VPX in AWS
- Quickly Provision and Configure Citrix ADC High Availability(HA) across Availability Zones in AWS
- Citrix ADC HA pair deployment on AWS made effortless: using Cloud Formation Template
- Autoscaling Citrix ADC VPX in AWS using Citrix ADM
In this article
- Overview Citrix Networking VPX
- Overview Citrix ADC in Amazon Web Services
- Limitations and usage guidelines
- Supported EC2 instances, ENI, and IP address capacities
- Use cases
- AWS Network architecture – ENI and EIP
- Configure VPX on AWS
- Configure Unified Gateway for Citrix Virtual Apps and Desktops
- High availability load balancing for StoreFront
- Configure GSLB in two AWS locations
- Domain-Name based services (GSLB DBS) with Cloud load balancers
- Use Citrix ADC HA in AWS across multiple availability zones
- Configure AWS components
- Configuring Global Server Load Balancing domain-name based services
- Citrix ADC back end auto scaling with AWS
- Citrix ADC back end auto scaling groups and policies
- Configure Citrix ADC to integrate with AWS Auto Scaling
- Configure Citrix ADC front end Auto Scaling in AWS
- Provision Citrix ADC VPX instances using Citrix ADM Service
- More information