Service Migration to Citrix ADC using Routes in OpenShift Validated Reference Design
Static and Auto Routes in an OpenShift cluster
Static Routes (Default) - maps the OpenShift HostSubnet to the External ADC via a Static route
Static routes are common in legacy OpenShift deployments using HAProxy. The static routes can be used in parallel with Citrix node controller (CNC), Citrix ingress controller (CIC), and CPX when migrating services from one Service Proxy to another without disrupting the deployed namespaces in a functioning cluster.
Example static route configuration for Citrix ADC:
    oc get hostsubnet (Openshift Cluster) snippet
        oc311-master.example.com 10.x.x.x 10.128.0.0/23
        oc311-node1.example.com 10.x.x.x 10.130.0.0/23
        oc311-node2.example.com 10.x.x.x 10.129.0.0/23

    show route (external Citrix VPX) snippet
        10.128.0.0 255.255.254.0 10.x.x.x STATIC
        10.129.0.0 255.255.254.0 10.x.x.x STATIC
        10.130.0.0 255.255.254.0 10.x.x.x STATIC
<!--NeedCopy-->
Auto Routes - uses the CNC (Citrix Node Controller) to automate the external routes to the defined route shards
You can integrate Citrix ADC with OpenShift in two ways, both of which support OpenShift router sharding.
Route Types
- unsecured - external load balancer to CIC router, HTTP traffic is not encrypted.
- secured-edge - external load balancer to CIC router terminating TLS.
- secured-passthrough - external load balancer to destination terminating TLS
- secured reencrypt - external load balancer to CIC router terminating TLS. CIC router encrypting to destination using TLS.
See more about the different route types in Citrix ingress controller deployment solutions.
Deploy the Citrix Ingress Controller with OpenShift router sharding support
The Citrix Ingress Controller (CIC) acts as a Router and redirects the traffic to various pods to distribute incoming traffic among various available pods.
This migration process can also be part of a cluster upgrade process from legacy OpenShift topologies to automated deployments with Citrix CNC, CIC, and CPX components for cluster migration and upgrade procedures.
This solution can be achieved by two methods:
- CIC Router Plug-In (Pod)
- CPX Router inside OpenShift (Sidecar)
Both of the methods are described below along with migration examples.
OpenShift router sharding allows distributing a set of routes among multiple OpenShift routers. By default, an OpenShift router selects all routes from all namespaces. In router sharding, labels are added to routes or namespaces and label selectors to routers for filtering routes. Each router shard selects only routes with specific labels that match its label selection parameters.
To configure router sharding for a Citrix ADC deployment on OpenShift, a Citrix ingress controller instance is required per shard. The Citrix ingress controller instance is deployed with route or namespace labels or both as environment variables depending on the criteria required for sharding. When the Citrix ingress controller processes a route, it compares the route’s labels or route’s namespace labels with the selection criteria configured on it. If the route satisfies the criteria, the appropriate configuration is applied to Citrix ADC, otherwise it does not apply the configuration.
In router sharding, selecting a subset of routes from the entire pool of routes is based on selection expressions. Selection expressions are a combination of multiple values and operations. See more about the expressions, values, and operations in this Citrix blog.
Bookinfo deployment
The architecture for the Bookinfo application is seen in the figure below. A CIC is deployed as an OpenShift router plug-in in the first tier, configuring the Citrix ADC VPX to route North-South traffic to the Product Page. In the second tier, a Citrix ADC CPX is deployed as an OpenShift router, routing East-West traffic between the Details and Product Page microservice, whereas East-West traffic between the Product Page, Reviews, and Ratings microservices are being routed through the default HAProxy router.
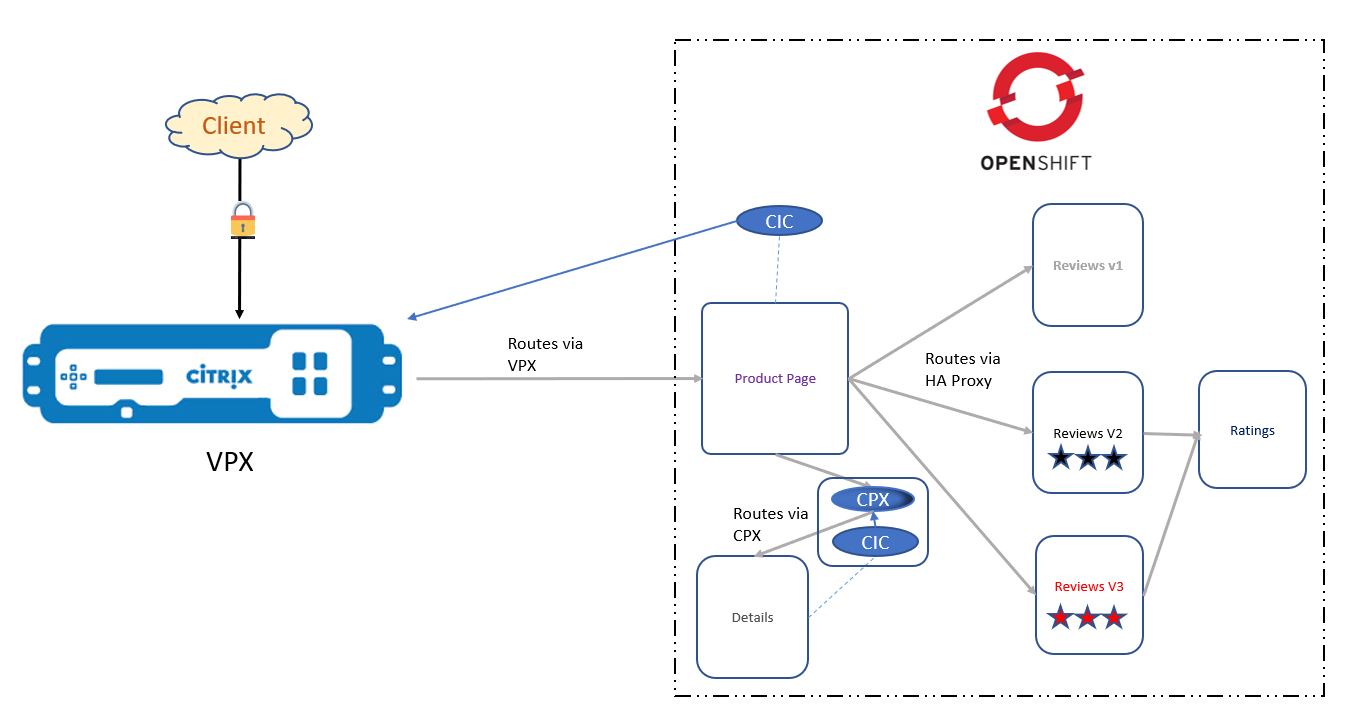
Citrix Components
- VPX - The Ingress ADC that is presenting the cluster services to DNS.
- CIC - provides the ROUTE_LABELS and NAMESPACE_LABELS to the external Citrix ADC via the CNC route.
- CPX - provides OpenShift routing within the OpenShift cluster.
Deployment Steps
- Create a namespace for the deployment.
oc create ns sml -
Deploy the Bookinfo application into the namespace.
oc apply -f bookinfo.yaml################################################################################################## # Details service ################################################################################################## apiVersion: v1 kind: Service metadata: name: details labels: app: details service: details spec: ports: - port: 9080 name: http selector: app: details --- apiVersion: extensions/v1beta1 kind: Deployment metadata: name: details-v1 labels: app: details version: v1 spec: replicas: 1 template: metadata: annotations: sidecar.istio.io/inject: "false" labels: app: details version: v1 spec: containers: "bookinfo.yaml" 224L, 5120C <!--NeedCopy--> -
Deploy the route file that maps to our product page service. Specify
frontend-ip(This is the content switching vip on the Tier 1 ADC)oc apply -f routes-productpage.yamlapiVersion: v1 kind: Route metadata: name: productpage-route namespace: sml annotations: ingress.citrix.com/frontend-ip: "X.X.X.X" labels: name: productpage spec: host: bookinfo.com path: / port: targetPort: 80 to: kind: Service name: productpage-service <!--NeedCopy--> -
Deploy the RBAC file for the sml namespace that gives the CIC the necessary permissions to run. The RBAC file is already namespaced.
oc apply -f rbac.yamlkind: ClusterRole apiVersion: rbac.authorization.k8s.io/v1beta1 metadata: name: cpx rules: - apiGroups: [""] resources: ["endpoints", "ingresses", "services", "pods", "secrets", "nodes", "routes", "namespaces","tokenreviews","subjectaccessreview"] verbs: ["get", "list", "watch"] # services/status is needed to update the loadbalancer IP in service status for integrating # service of type LoadBalancer with external-dns - apiGroups: [""] resources: ["services/status"] verbs: ["patch"] - apiGroups: ["extensions"] resources: ["ingresses", "ingresses/status"] verbs: ["get", "list", "watch"] - apiGroups: ["apiextensions.k8s.io"] resources: ["customresourcedefinitions"] verbs: ["get", "list", "watch"] - apiGroups: ["apps"] resources: ["deployments"] verbs: ["get", "list", "watch"] - apiGroups: ["citrix.com"] resources: ["rewritepolicies", "canarycrds", "authpolicies", "ratelimits"] verbs: ["get", "list", "watch"] - apiGroups: ["citrix.com"] resources: ["vips"] verbs: ["get", "list", "watch", "create", "delete"] - apiGroups: ["route.openshift.io"] resources: ["routes"] verbs: ["get", "list", "watch"] --- kind: ClusterRoleBinding apiVersion: rbac.authorization.k8s.io/v1beta1 metadata: name: cpx roleRef: apiGroup: rbac.authorization.k8s.io kind: ClusterRole name: cpx subjects: - kind: ServiceAccount name: cpx namespace: sml --- apiVersion: v1 kind: ServiceAccount metadata: "rbac.yaml" 51L, 1513C <!--NeedCopy--> -
Deploy your CIC to push the route configs to your VPX. Match the parameter ROUTE_LABELS to the label specified in the
route-productpage.yaml. For more information on syntax for ROUTE_LABELS, please see this blog.oc apply -f cic-productpage-v2.yamlapiVersion: v1 kind: Pod metadata: name: cic labels: app: cic spec: serviceAccount: cpx containers: - name: cic image: "quay.io/citrix/citrix-k8s-ingress-controller:1.7.6" securityContext: privileged: true env: - name: "EULA" value: "yes" # Set NetScaler NSIP/SNIP, SNIP in case of HA (mgmt has to be enabled) - name: "NS_IP" value: "X.X.X.X" # Set NetScaler VIP that receives the traffic # - name: "NS_VIP" # value: "X.X.X.X" - name: "NS_USER" value: "nsroot" - name: "NS_PASSWORD" value: "nsroot" - name: "NS_APPS_NAME_PREFIX" value: "BOOK" - name: "ROUTE_LABELS" value: "name in (productpage)" # - name: "NAMESPACE_LABELS" # value: "app=hellogalaxy" # Set username for Nitro # - name: "NS_USER" # valueFrom: # secretKeyRef: # name: nslogin # key: nsroot # # Set user password for Nitro # - name: "NS_PASSWORD" # valueFrom: # secretKeyRef: # name: nslogin # key: nsroot args: # - --default-ssl-certificate # default/default-cert imagePullPolicy: Always ~ "cic-productpage-v2.yaml" 48L, 1165C <!--NeedCopy--> -
Now we must create a headless service that points users looking for details to our CPX using the DNS pods in our cluster.
oc apply -f detailsheadless.yaml################################################################################################## # Details service ################################################################################################## apiVersion: v1 kind: Service metadata: name: details spec: ports: - port: 9080 name: http selector: app: cpx <!--NeedCopy--> -
Deploy a new service to expose the details container.
oc apply -f detailsservice.yaml################################################################################################## # Details service ################################################################################################## apiVersion: v1 kind: Service metadata: name: details-service labels: app: details-service service: details-service spec: clusterIP: None ports: - port: 9080 name: http selector: app: details <!--NeedCopy--> -
Deploy a new route definition that sits in front of the details service that we created. Notice the label is “name: details”.
oc apply -f detailsroutes.yamlapiVersion: v1 kind: Route metadata: name: details-route namespace: sml annotations: ingress.citrix.com/insecure-port: "9080" labels: name: details spec: host: details path: / port: targetPort: 9080 to: kind: Service name: details-service <!--NeedCopy--> -
Deploy CPX for E/W traffic. A CIC is deployed as a sidecar and is configured with a ROUTE_LABEL parameter to match the label in detailsroutes.yaml.
oc apply -f cpx.yamlapiVersion: extensions/v1beta1 kind: Deployment metadata: name: cpx labels: app: cpx service: cpx spec: replicas: 1 template: metadata: name: cpx labels: app: cpx service: cpx annotations: NETSCALER_AS_APP: "True" spec: serviceAccountName: cpx containers: - name: cpx image: "quay.io/citrix/citrix-k8s-cpx-ingress:13.0-36.28" securityContext: privileged: true env: - name: "EULA" value: "yes" - name: "KUBERNETES_TASK_ID" value: "" - name: "MGMT_HTTP_PORT" value: "9081" ports: - name: http containerPort: 9080 - name: https containerPort: 443 - name: nitro-http containerPort: 9081 - name: nitro-https containerPort: 9443 # readiness probe? imagePullPolicy: Always # Add cic as a sidecar - name: cic image: "quay.io/citrix/citrix-k8s-ingress-controller:1.7.6" env: - name: "EULA" value: "yes" - name: "NS_IP" "cpx.yaml" 75L, 1939C <!--NeedCopy-->
Continuous Delivery choices in a microservices environment
Continuous Integration (CI) is a development practice that requires developers to integrate code into a shared repository several times a day.
Continuous Delivery (CD) is the natural extension of Continuous Integration: an approach in which teams ensure that every change to the system is releasable, and that we can release any version at the push of a button.
The different CD choices, along with their pros and cons, are:
-
Recreate - Version 1 (V1) is terminated and then Version 2 (V2) is rolled out.
-
Pros
- Easy to set up.
- Application state is entirely renewed.
-
Cons
- High impact on the user. Expect downtime that depends on both shutdown and boot duration.
-
Pros
-
Ramped/Rolling Update - V2 is slowly rolled out and replaces V1.
-
Pros
- Easy to set up.
- Version is slowly released across instances.
- Convenient for stateful applications that can handle rebalancing of the data.
-
Cons
- Rollout/rollback can take time.
- Supporting multiple APIs is hard.
- Little control of traffic.
-
Pros
-
Blue Green - V2 is released alongside V1, then the traffic is switched to V2.
-
Pros
- Instant rollout/rollback.
- Avoid version issue since the entire application is changed at once.
-
Cons
- Expensive as it requires double the resources.
- Proper test of the entire platform should be done before releasing to production.
- Handling multiple stateful applications can be hard.
-
Pros
-
Canary - V2 is released to a subset of users and then proceeds to a full rollout.
-
Pros
- Version released for a subset of users.
- Convenient for error rate and performance monitoring.
- Fast rollback.
-
Cons
- Slow rollout.
- Handling multiple stateful applications can be hard.
-
Pros
-
A/B Testing - V2 is released to a subset of users under specific conditions.
-
Pros
- Several versions run in parallel.
- Full control over the traffic distribution.
-
Cons
- Requires intelligent load balancer.
- Hard to troubleshoot errors for a given session, so distributed tracing becomes mandatory.
-
Pros
-
Shadow - V2 receives real-world traffic alongside V11 and does not impact the response.
-
Pros
- Performance testing of the application with production traffic.
- No impact on the user.
- No rollout until the stability and performance of the application meet the requirements.
-
Cons
- Expensive as it requires double the resources.
- Not a true user test and can be misleading.
- Complex to set up.
- Requires mocking service for certain cases.
-
Pros
Reference Materials
Citrix GitHub: “OpenShift routes and ingress”
Citrix Developer Docs: “Deployment solutions”
Citrix Blog: “Enable OpenShift router sharding support with Citrix ADC”