
Introduction
In today's world, facing cyberattacks day by day, it is even more necessary to secure remote access to applications, documents, or whatever in a granular way. A Zero-Trust architecture makes it possible and allows you to narrow down application access based on context.
The term "context" here refers to:
- Users and groups (users and user groups)
- Devices (desktop or mobile devices)
- Location (geo-location or network location)
- Device posture (device posture check)
- Risk (user risk score)

Access to SaaS/web or TCP/UDP apps is possible from any location with any device at any time.
SaaS/web apps can be accessed through the native browser, Citrix Enterprise Browser (CEB), or Remote Browser Isolation service (RBI). Both CEB and RBI enable the use of enhanced security controls per browser tab.
TCP/UDP-based apps require the Secure Access Agent that creates a micro tunnel per app.
More information on "Adaptive access and security controls for Enterprise Web, TCP, and SaaS applications" can be found here.
Device posture checks require a small Endpoint Analyses agent (EPA) app on the user's device to assess the device information. The scan result is then used to allow, restrict, or deny access to applications.
Note
Device posture check can be done using the:
On Windows devices, the agent installation can be automated using Client App Management for Citrix Workspace app.
Use Case 1 – Access internal applications (Web/TCP/UDP) using a Zero-Trust approach without opening incoming traffic on the firewall
Citrix Secure Private Access helps to overcome remote access security challenges and reduce the attack surface on internal applications. It is important to note that the Zero-Trust approach focuses on authentication, authorization, and shrinking implicit trust zones while maintaining availability. Access is granted through a policy decision point (PDP) and corresponding policy enforcement point (PEP) that – for security reasons – should not resist within your network. (NIST SP 800-207)

Web applications
Web applications can be challenging to handle. Sometimes you need to grant access to internal web applications to your employees, 3rd party contractors, or anyone else. It means different authentication factors, access rights, and more. Single Sign On (SSO) for web-based apps should be considered for a better user experience.
Independent of your used Windows or macOS device, Citrix Enterprise Browser (CEB) can be the work browser of your choice.
"Work Browser", what does that mean?
Configuring CEB as your work browser allows you to open all configured SaaS/web app domains inside a secure and controlled environment. Different security controls per browser tab can be applied. For example, internal web links can be opened directly from an email or any document—no more need to copy and paste the link into the right browser.
All public websites open in your native browser.
The following animation shows how to set the Citrix Enterprise Browser as Work Browser and the difference between opening corporate webpages and internet browsing.

For example, employees using company-managed devices can access the web application using the Citrix Enterprise Browser (CEB) without restrictions or background watermarking.
3rd party contractors use unmanaged devices without Citrix Workspace app (CWA) and Citrix Enterprise Browser (CEB). The application can only be launched using Remote Browser Isolation (RBI), and their access has more restrictions.
Types of restrictions:
- Restrict printing
- Restrict clipboard access
- Restrict downloads and uploads
- Insert background watermarking
One important point to note
Unmanaged devices with CWA installed would not require using RBI. Instead, they can take advantage of CEB with the same security controls.
Example web application – app definition
Creating a SaaS/web app and subscribing to users/groups is done in a few simple steps. Let’s see it based on an example app:
- Log into Citrix Cloud and select Manage from the Secure Private Access tile.
- Within the Secure Private Access menu, select Applications.
- In the Application section, select Add an app.
Note
In this example, no template is used. In the Choose a template wizard, click Skip.
- First, in the App Details screen, specify the application location and complete the required fields marked with a red asterisk. Optional you can add a custom icon. Select Next.

- Second, in the Single Sign-On screen, select the SSO type and complete the required fields. Select Next.

Note: The Demo web application does not support SSO. Therefore SSO is set to "Don't use SSO".
- Third, in the App Connectivity screen, select the Type and Resource Location for the domains. Select Next and select Finish.

You have successfully created a demo web application.
Next, we must subscribe users/groups to this application and configure conditional access.
Example web application – access policy
The conditions and restrictions are configured using Access Policies.
Creating an Access Policy is done in four easy steps:
- Within the Secure Private Access menu, select Access Policies.
- In the Application section, select Create policy.
- Enter the Policy name and a brief Policy description
- In the Applications drop-down list, search for "Demo-Website" and select it
Note
You can create multiple access rules and configure different access conditions for different users or user groups within a single policy. These rules can be applied separately for both HTTP/HTTPS and TCP/UDP applications, all within a single policy. For more information on multiple access rules, see Configure an access policy with multiple rules.

- Select Create Rule to create rules for the policy
- Enter the rule name and a brief description of the rule, and select Next

- Add the appropriate users/groups who are authorized to launch the app, and select Next
Note
Click + to add multiple conditions based on the context.

- Specify if the HTTP/HTTPS app can be accessed with or without restrictions
The below screenshot has "Display wartermark" configured.
Please note that Anti Key-logging and Anti Screen-Capturing require Citrix Workspace desktop clients. - Specify the TCP/UDP apps action
The below screenshot denies access to TCP/UDP apps. - Select Next

- The Summary page displays the policy rule details
Verify the details and select Finish

- In the Create policy dialog, verify that Enable policy on save is checked, and select Save.

Example web application – Citrix Workspace app
After the demo web application and access policy have been created successfully, the new application appears in the Citrix Workspace app and Citrix Workspace web.
The Citrix Workspace app launches the EPA agent to check the user’s company-managed device.

Company-managed or Trusted device
On a company-managed device, the user gets a single-factor login screen presented when all checks are passed successfully.

The new Demo app appears like all DaaS apps.
Note: If you do not see the Demo app on your home screen, go to "View all applications".

When opening the Demo app, it launches my managed Citrix Enterprise Browser.

Bring Your Own or Untrusted device
On a BYO device, the user gets a multi-factor login screen presented because the checks are not passed successfully.

The new Demo app appears in the Workspace web like all DaaS apps that are allowed to start on a BYO device. When opening the Demo app – depending on the configuration, it shows enhanced security activated.
Note: If you do not see the Demo app on your home screen, go to "View all applications".

When opening the Demo app, a new browser tab is opened, and the Remote Browser Isolation (RBI) session starts.

Important
Remote Browser Isolation was used in this unmanaged device example because the 3rd party contractor didn’t want to install new software. If the contractor installs the Citrix Workspace app, Citrix Enterprise Browser delivers the same security controls and the ability of a managed Enterprise Browser.
TCP/UDP applications
These kinds of applications differ from the above-described web applications, and installing the Citrix Secure Access agent on the user's device is necessary. For TCP/UDP-based applications, access is defined using DNS names/IP addresses and ports.
Example TCP application
Creating a TCP app and subscribing to users/groups is done in a few simple steps. Let’s see it based on an example app:
- Log into Citrix Cloud and select Manage from the Secure Private Access tile.
- Within the Secure Private Access menu, select Applications.
- In the Application section, select Add an app.
Note
In this example, no template is used. In the Choose a template wizard, click Skip.
- First, in the App Details screen, specify the application location and complete the required fields marked with a red asterisk. Optional you can add a custom icon. Select Next.

Note
In this example, access is allowed via FQDN but denied using the IP address.
- Second, in the App Connectivity screen, select the Type and Resource Location for the domains. Select Next and select Finish.

You have successfully created a demo TCP application.
Next, we must subscribe users/groups to this application and configure conditional access.
Example TCP application – access policy
The conditions and restrictions are configured using Access Policies.
Creating an Access Policy is done in four easy steps:
- Within the Secure Private Access menu, select Access Policies.
- In the Application section, select Create policy.
- Enter the Policy name and a brief Policy description
- In the Applications drop-down list, search for "Demo RDP" and select it
Note
You can create multiple access rules and configure different access conditions for different users or user groups within a single policy. These rules can be applied separately for both HTTP/HTTPS and TCP/UDP applications, all within a single policy. For more information on multiple access rules, see Configure an access policy with multiple rules.

- Select Create Rule to create rules for the policy
- Enter the rule name and a brief description of the rule, and select Next

- Add the appropriate users/groups who are authorized to launch the app, and select Next
Note
Click + to add multiple conditions based on the context.

- Specify if the HTTP/HTTPS app can be accessed with or without restrictions
The below screenshot denies access to HTTP/HTTPS apps. - Specify the TCP/UDP apps action
The below screenshot allows access to TCP/UDP apps. - Select Next

- The Summary page displays the policy rule details
Verify the details and select Finish

- In the Create policy dialog, verify that Enable policy on save is checked, and select Save.

Example TCP application – Secure Access agent
After the demo TCP application and access policy have been created successfully, we can test the RDP server access using the Citrix Secure Access agent.

Note
If the endpoint analyses scan is not successful, login is denied.
Use Case 2 – Move to a Zero-Trust approach by discovering applications accessed by users
Suppose you are moving from a traditional VPN (Virtual Private Network) based access method to a Zero Trust Network Access (ZTNA) solution. What applications do your users use?
The Application Discovery feature helps reduce the user's access to the necessary applications at your own pace.
Note
Application Discovery only captures data if the "Unsanctioned Websites" feature is enabled or a dedicated application is created and subscribed to a user or group.
Enable the Unsanctioned Websites feature to gather all access requests
- Within the Secure Private Access menu, select Settings.
- Switch to the Unsanctioned Websites tab and click Edit.
- Activate Filter website lists and click Save.
Note
For more information, go to the Unsanctioned websites feature documentation.
Create an application to gather specific access request
- Within the Secure Private Access menu, select Applications.
- In the Application section, select Add an app.
Note
In this example, no template is used. In the Choose a template wizard, click Skip.
- First, in the App Details screen, select Inside my corporate network as the application location, select TCP/UDP as the app type, specify the app name, and set the destinations. Optional you can add a custom icon. Select Next.

Note
Be sure to specify each destination (Domain, IP/Port) to be captured.
It is also possible to create multiple applications.
- Second, in the App Connectivity screen, select Internal as the Type and specify the Resource Location. Select Next and select Finish.

- Within the Secure Private Access menu, select Access Policies.
- In the Application section, select Create policy.
- Enter the Policy name and a brief Policy description
- In the Applications drop-down list, search for "Application Discovery" and select it
Note
You can create multiple access rules and configure different access conditions for different users or user groups within a single policy. These rules can be applied separately for both HTTP/HTTPS and TCP/UDP applications, all within a single policy. For more information on multiple access rules, see Configure an access policy with multiple rules.

- Select Create Rule to create rules for the policy
- Enter the rule name and a brief description of the rule, and select Next

- Add the appropriate users/groups who are authorized to launch the app, and select Next
Note
Click + to add multiple conditions based on the context.

- Specify if the HTTP/HTTPS app can be accessed with or without restrictions
The below screenshot denies access to HTTP/HTTPS apps. - Specify the TCP/UDP apps action
The below screenshot allows access to TCP/UDP apps. - Select Next

- The Summary page displays the policy rule details
Verify the details and select Finish

- In the Create policy dialog, verify that Enable policy on save is checked, and select Save.

You have successfully created an Application Discovery application.
View the discovery applications
The Application Discovery tile, on the bottom left of the SPA Dashboard, makes life easier and gives you an overview of discovered domains, IP addresses, protocols, and ports. Based on the discovery results, Administrators can deploy apps and policies using a simple and easy workflow.

A detailed view of all discovered applications is available by clicking See more.

Within the detailed view, Filters can be created to narrow down results or to create an app with prefilled values.
Use Case 3 – Controlled access to SaaS applications
Many companies use Software as a Service (SaaS) applications because they don’t want to take care of application maintenance, security, availability, and more. But, Authentication and Authorization or Access Security is still the company’s responsibility and should be carefully considered.
SaaS applications are generally accessed directly by the user's device (company-managed or BYO), and authentication and authorization are handled from the company’s identity provider (IdP) solution.
Usually, company-owned devices are managed, and the Administrator controls the work browser allowed to access the SaaS application. On the other hand, only the owner of unmanaged devices controls and decides what browser is used to access SaaS apps. Security concerns can arise.
Restricting access to SaaS applications overcomes these security concerns and can be achieved through the following:
Use Case 3a – Restrict access to SaaS applications to Citrix Enterprise Browser
The most uncomplicated and user-friendliest restriction is based on the web browser itself.
Therefore the User-Agent header is verified during the authentication process, and logon is granted or denied.
The following two IdP examples are based on a web browser User-Agent header check.
Okta
Restricted access to Okta’s sign-in page can only be achieved when creating a custom domain.
Note: More information about Okta custom domains can be found here.
Create a custom domain
The following requirements must be considered before creating a custom domain:
- A subdomain of your root domain is required (for example, login.example.com)
- The TLS certificate must have a private key size of 2048-bit
- DNS records must be created
But now, let’s start the configuration process:
- Log into the Okta Admin dashboard as a Super Admin.
- In the Okta menu, switch to Customizations and select Domain.
- In the Custom URL Domain tile, select Edit and click Get Started.
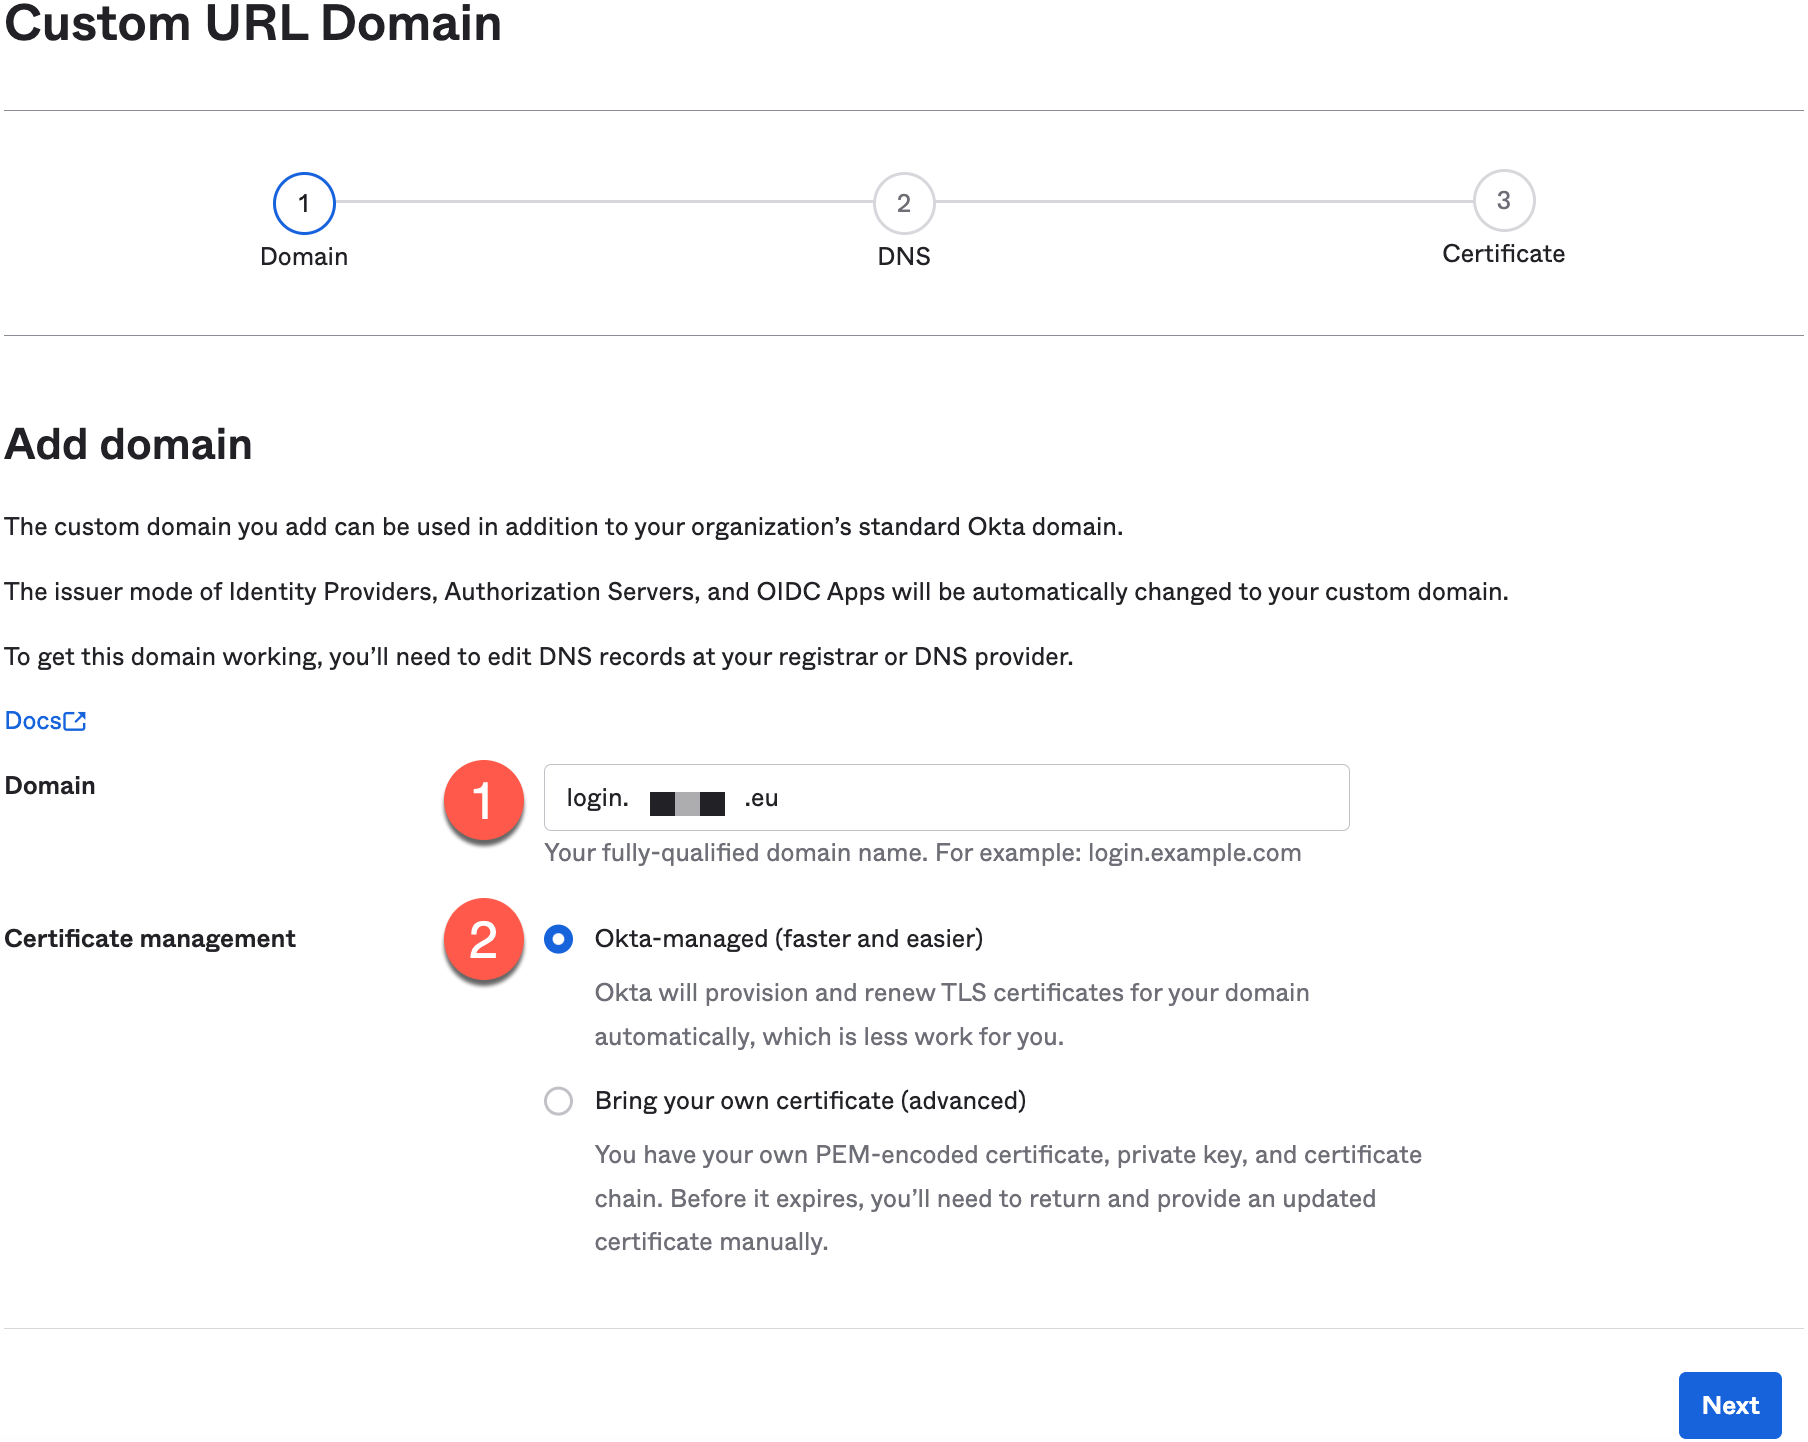
- Insert your custom domain into the Domain field (1), select your preferred certificate management (2) method, and click Next.
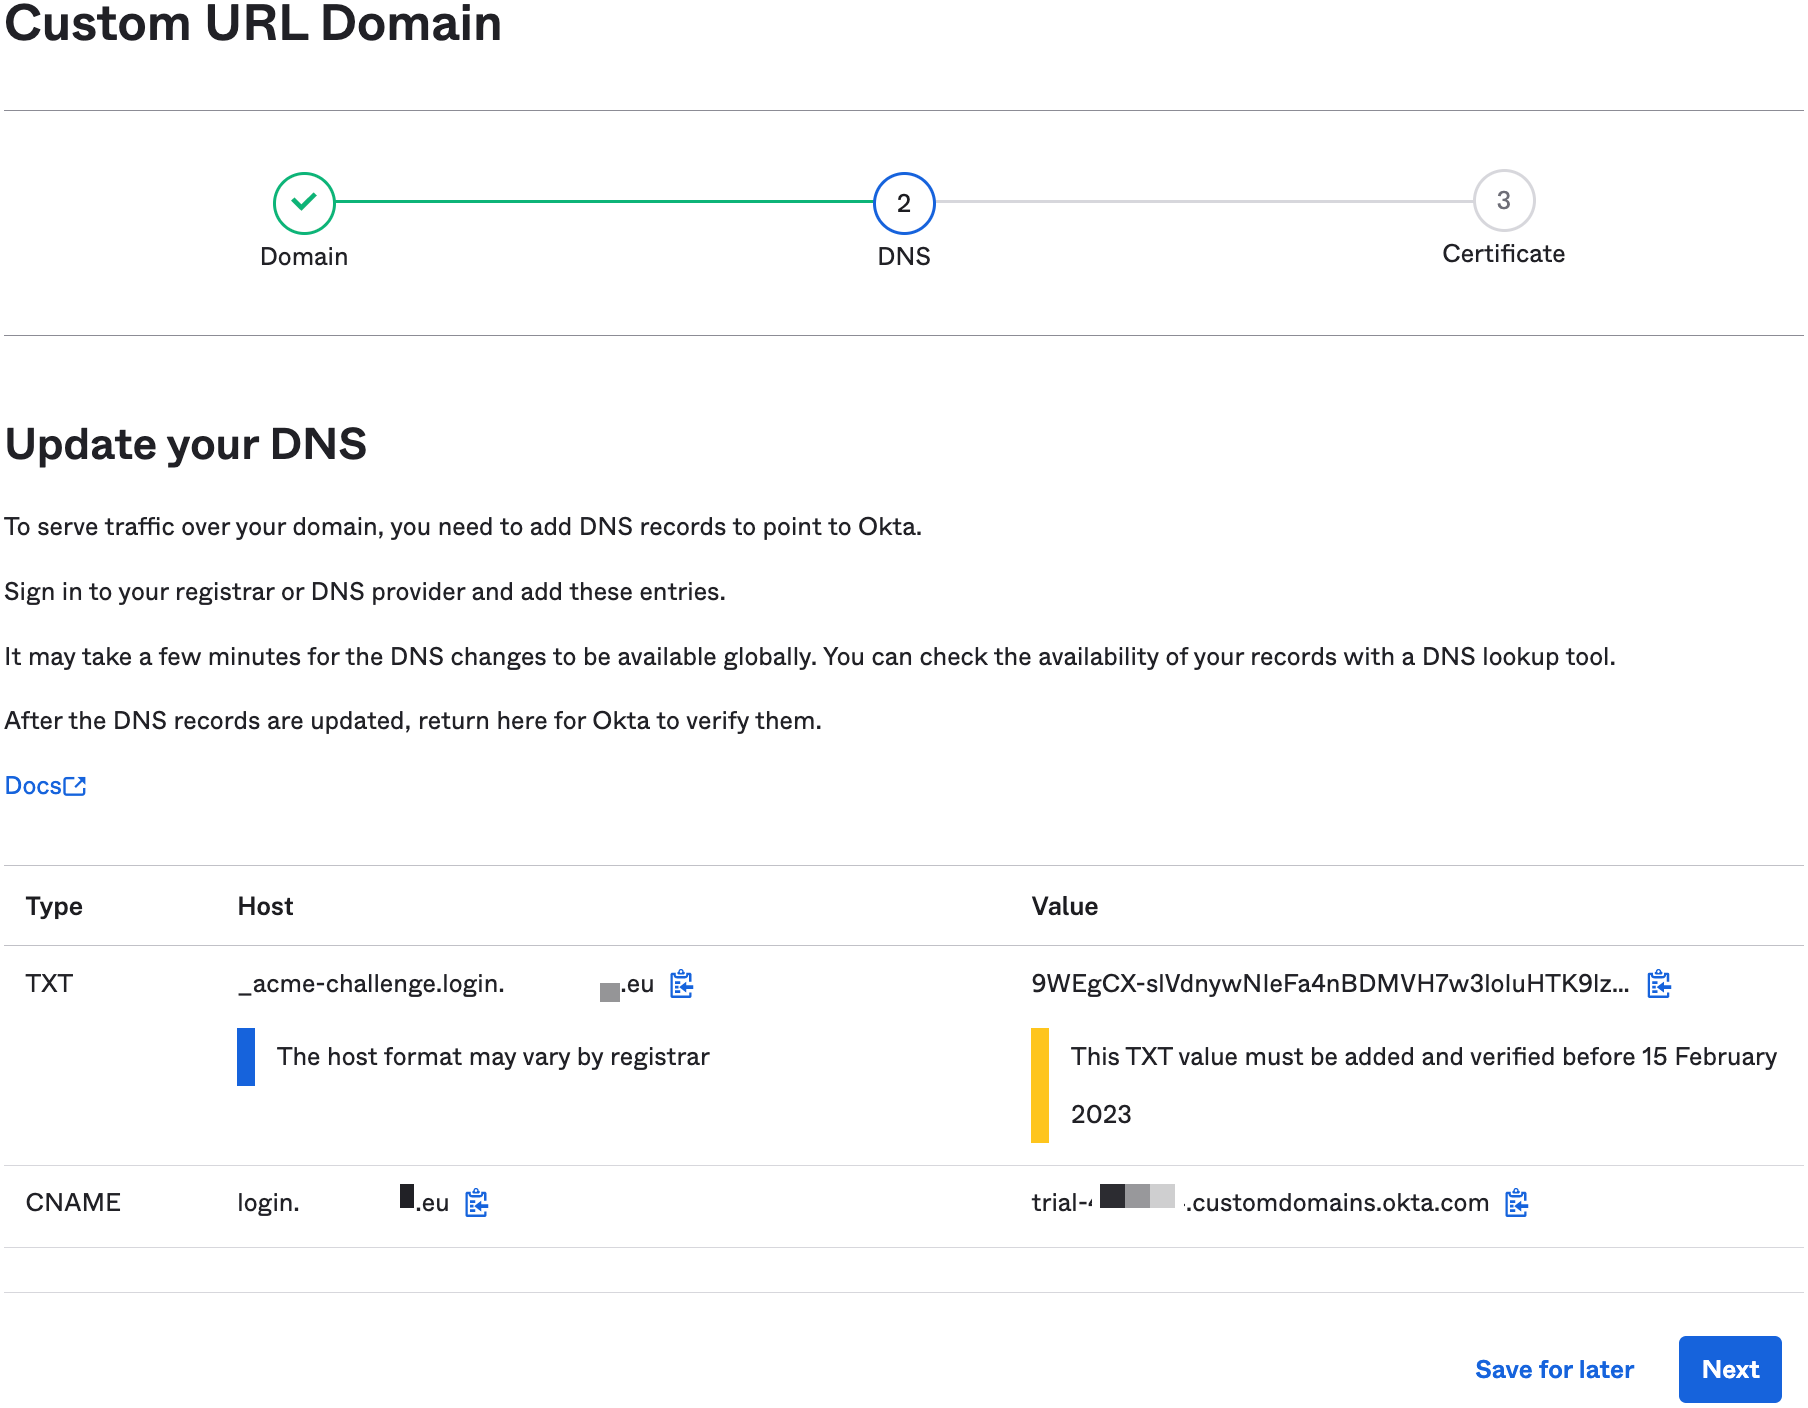
- Add DNS records to your domain that point to Okta, wait for the changes to become active, and click Next to start the verification process.
- Click Finish to complete the custom domain setup.
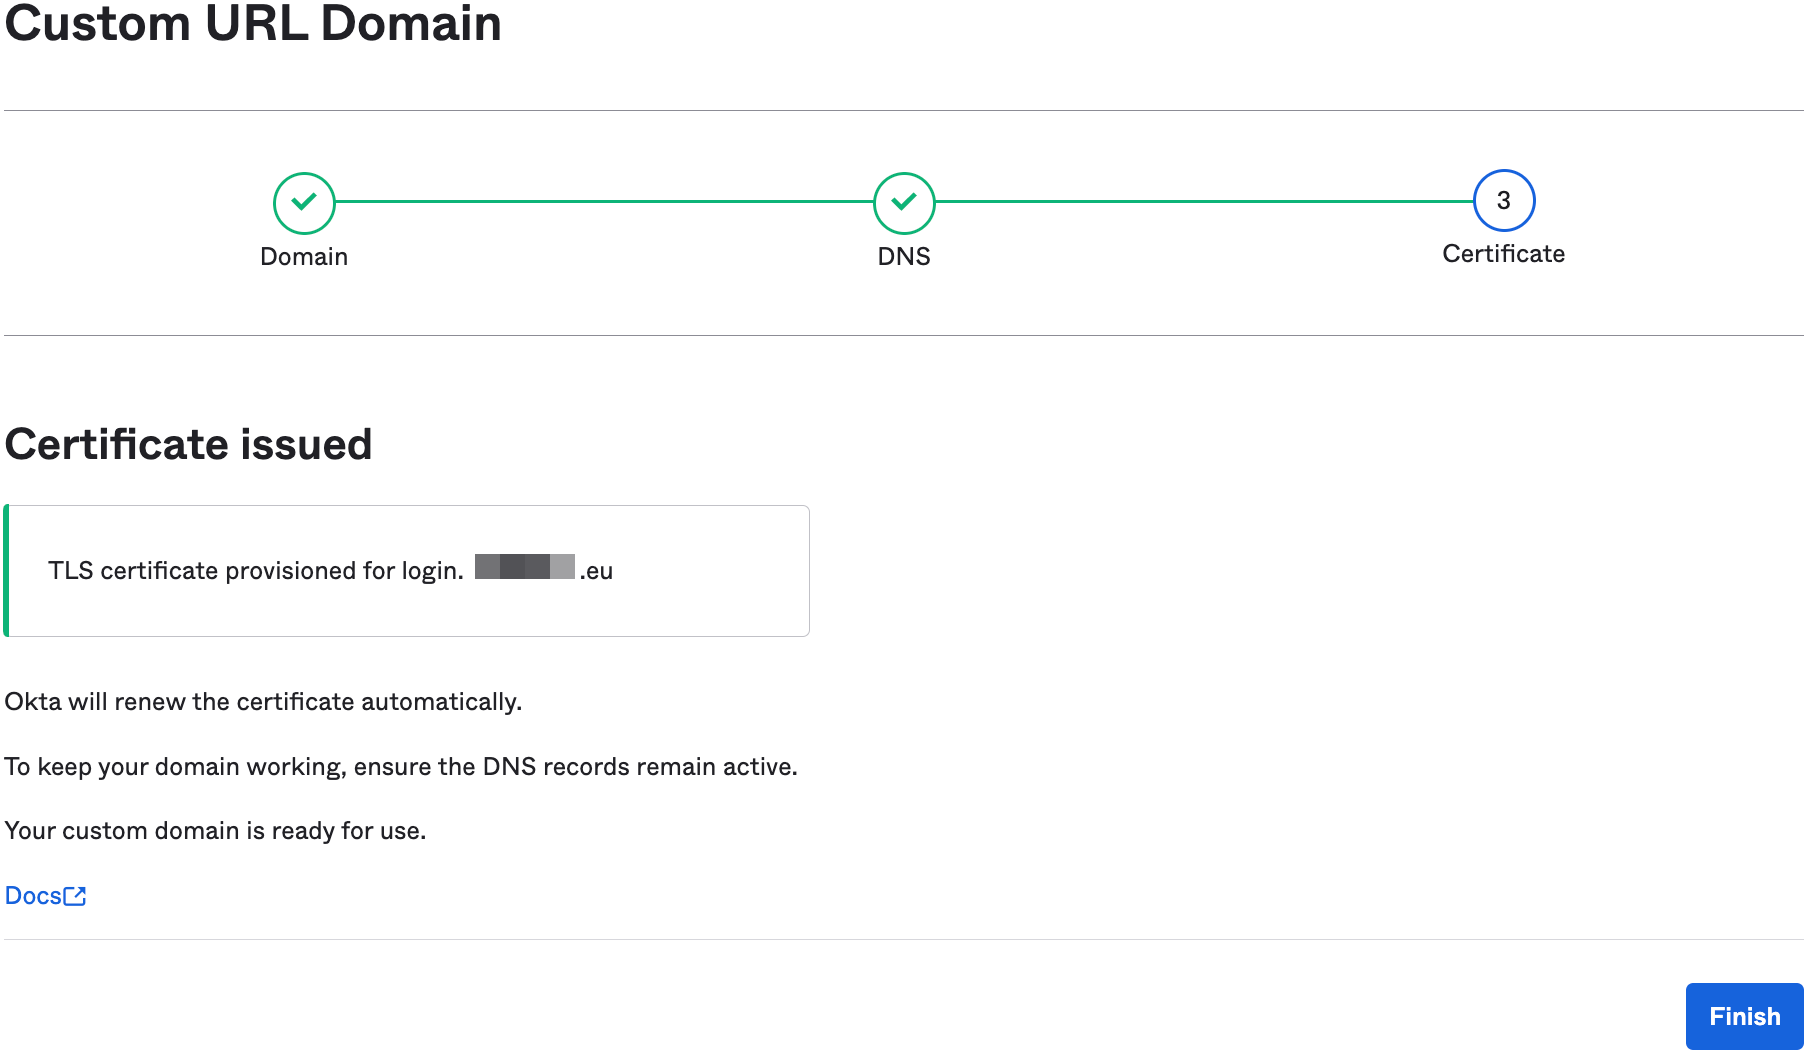
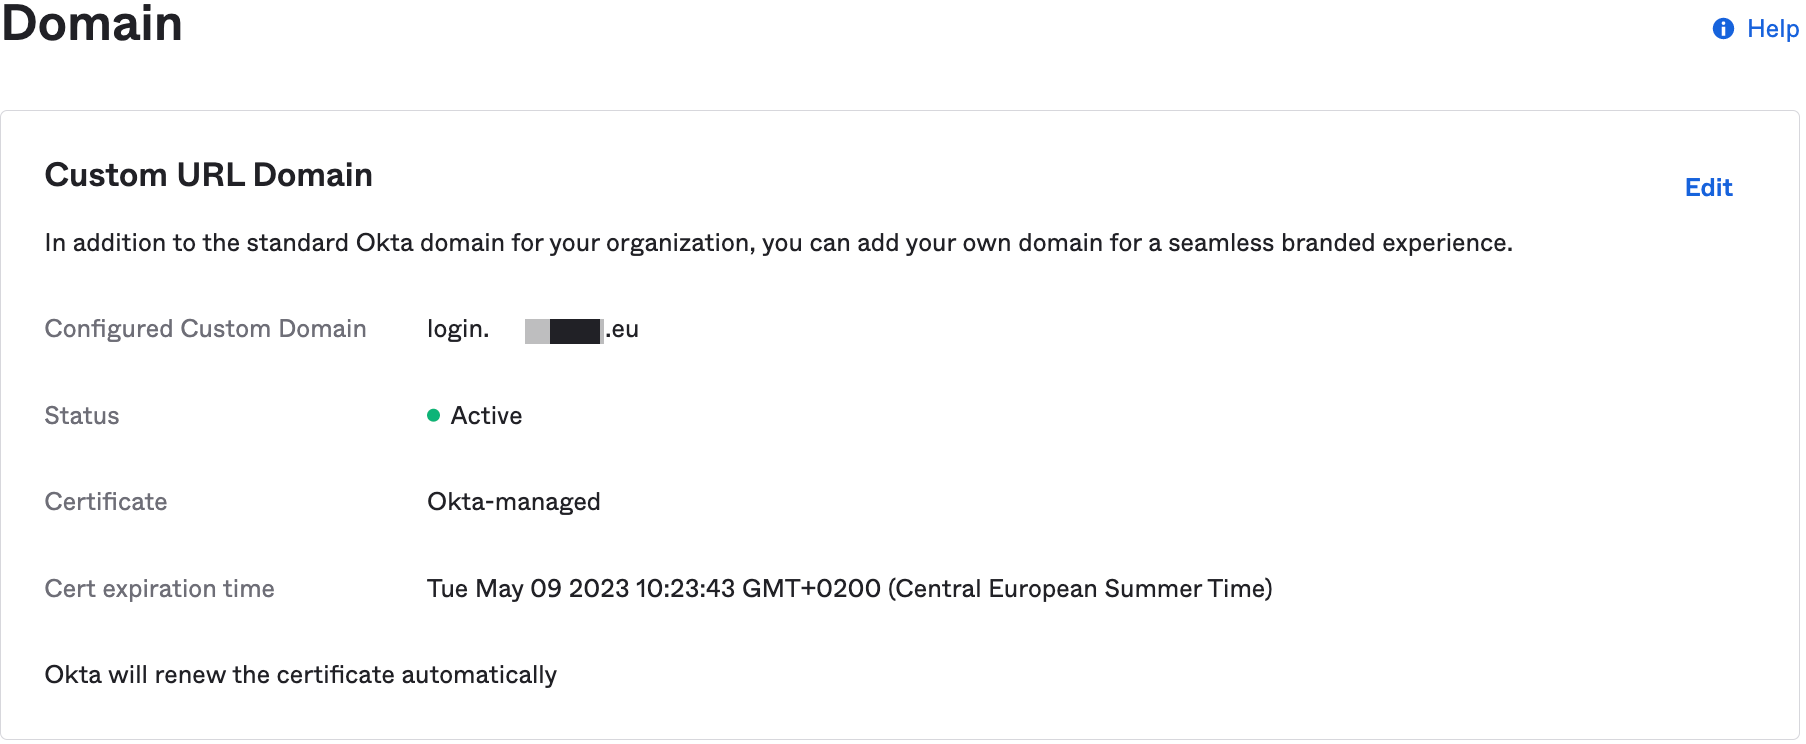
- Verify that your custom domain status is active before proceeding.
Modify the Sign-in page
After the custom domain is created and active, the next step is modifying the sign-in page code.
- In the Okta menu, switch to Customizations and select Sign-in page code editor.
- Insert the following code before the line
</script>.
// Functions
    function check_browser() {
        try {
            var browser_brands = window.navigator.userAgentData.brands;
            for (brand_version_pair of browser_brands) {
                if (brand_version_pair.brand == "Citrix Enterprise Browser") {
                    return "CEB";
                }
            }
        }
        catch(error) {
            // Non chromium based browser
            return "nonCEB";
        }
    }

    async function wait_on_element(task, timer) {
        // timer in milliseconds
        while(document.getElementById("okta-signin-submit") === null) {
            await new Promise(resolve => setTimeout(resolve, timer));
        }
        switch(task) {
            case "enable":
                document.getElementById("okta-signin-submit").disabled = false;
                break;
            case "disable":
                document.getElementById("okta-signin-submit").disabled = true;
                break;
            case "value":
                document.getElementById("okta-signin-submit").value = "Login Disallowed";
                break;
        }
    }

// BEGIN
    // Disable login by default
    wait_on_element("disable", 200);

    // Browser check
    if (check_browser() !== 'CEB') {
        wait_on_element("value", 200);
        var theDiv=document.getElementById("okta-login-container");

        theDiv.insertAdjacentHTML('afterend', "<center><a href='ctxwb://" + encodeURIComponent(window.location.href) + "'>Launch</a> in Citrix Enterprise Browser App</center>");
        theDiv.insertAdjacentHTML('afterend', "<center><a href='https://www.citrix.com/downloads/workspace-app'>Download</a> Citrix Enterprise Browser App</center>");
        theDiv.insertAdjacentHTML('afterend', "<center><b>Citrix Enterprise Browser is required for this site</b></center>");
        if (typeof variable !== 'undefined' && fromUri != null) {
            theDiv.insertAdjacentHTML('afterend', "<center>((fromURI=" + fromUri + "</center><br>");
        }
    } else {
        // Enable login when CEB is used
        wait_on_element("enable", 200);
    }
// END
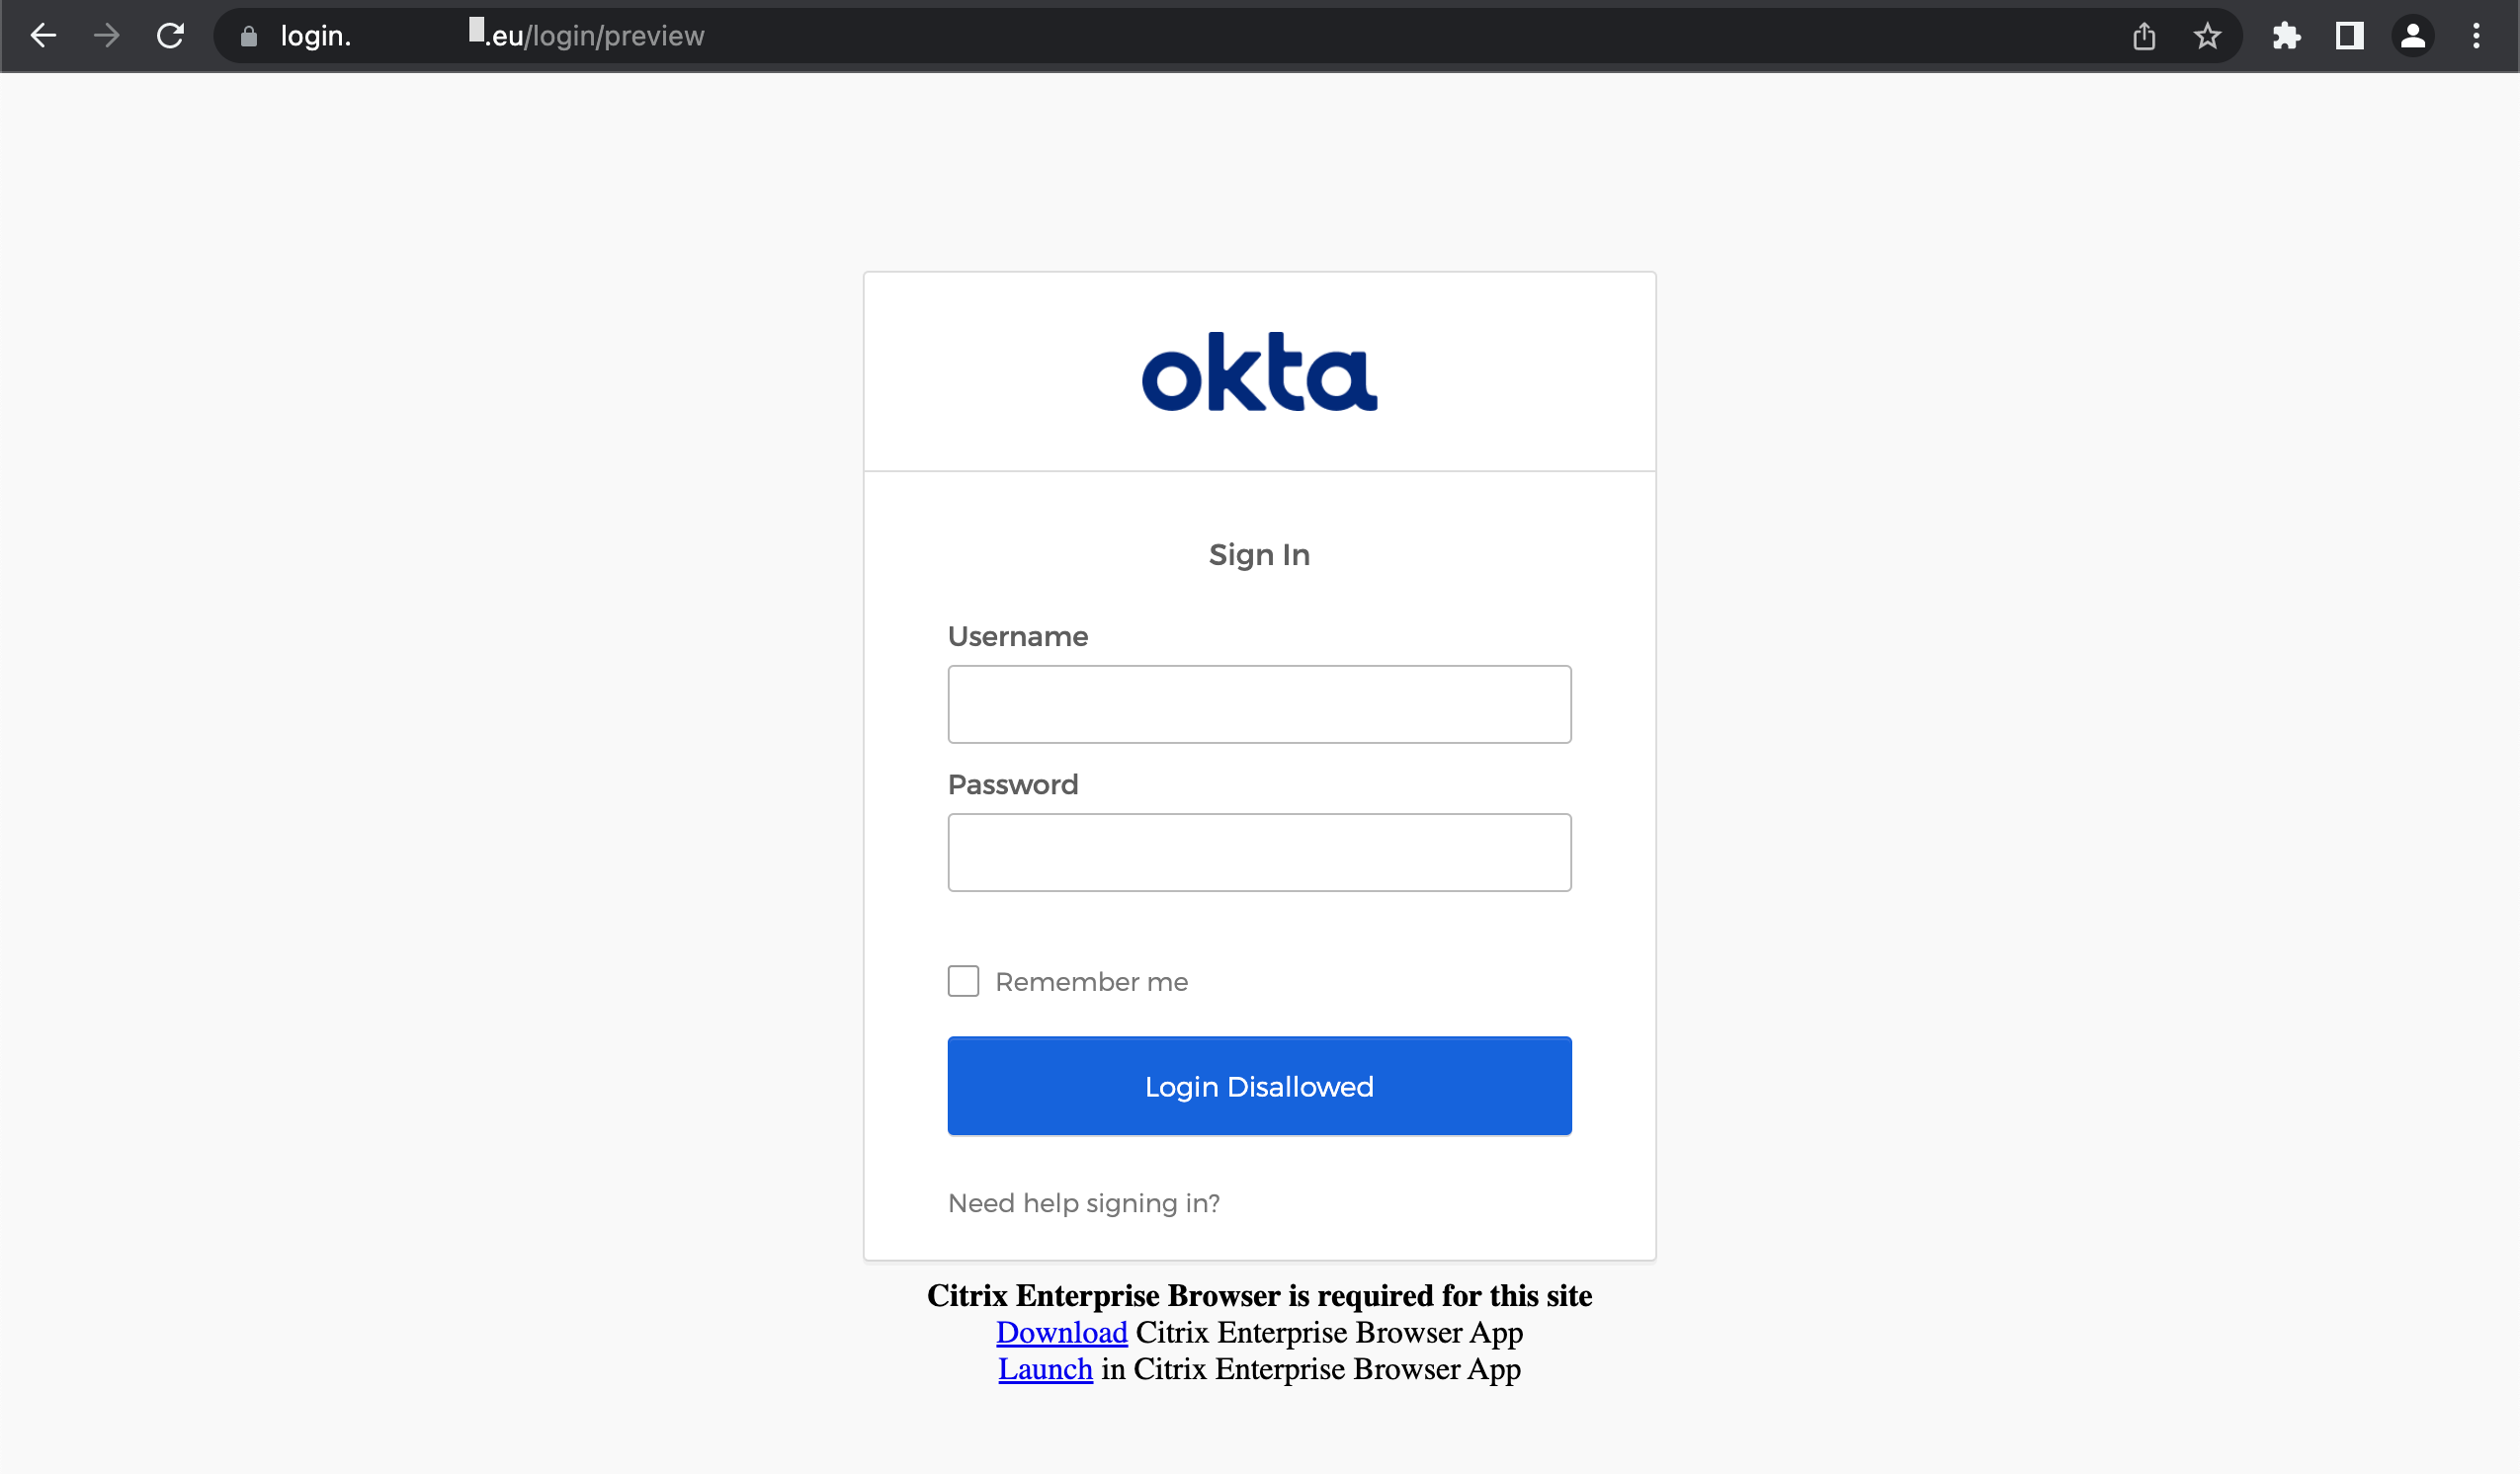
- The customization should look similar to the next screenshot.

- At the top of the HTML editor, click Preview.
Note: The modified Sign-in page is automatically saved, and a new tab opens.
The modification of the Okta Sign-in page is completed.
Access the Okta Sign-in page
A standard web browser shows the "Login Disallowed" button and information to download the Citrix Enterprise Browser:
Citrix Enterprise Browser shows the correct Okta sign-in page:

NetScaler (AAA)
Restricted access to the NetScaler sign-in page can only be done using a custom portal theme.
Within the custom portal theme, a "CustomAuthLabelHandler" checks the User-Agent header.
This configuration was tested on:
- NetScaler release 13.1.37.38
- Adaptive Authentication service
Create a custom Portal Theme
- Log into the NetScaler management GUI as a superuser.
- In the NetScaler menu, switch to Citrix Gateway and select Portal Themes.
- In the Portal Theme pane, click Add.
- In the Create Portal Theme dialog, add a Theme Name, select RfWebUI as the template theme, and click OK.

- On the next screen, the Look and Feel can be changed. Click OK to continue.
- In the Language section, click OK.
- Click Done to close the Portal Theme screen.
Modify the custom Portal Theme
- Connect via SSH to the NetScaler management IP.
- Enter the command
shell. - Navigate to
/var/netscaler/logon/themes/<custom_theme_name>/.
Note
In our case, the following command is used:
cd /var/netscaler/logon/themes/RfWebUI-CEB-restricted/
- Open the file
script.jsand append the following code snippet:
CTXS.ExtensionAPI.addCustomAuthLabelHandler({
  // Name of credential returned in form from server
  getLabelTypeName: function () { return "nsg-link-label"; },
  getLabelTypeMarkup: function (requirements) {
    var labelInfo = requirements.label;
    label = $('<center></center>').attr("for", requirements.credential.id)

    // Functions
    function check_browser() {
      try {
        var browser_brands = window.navigator.userAgentData.brands;
        for (brand_version_pair of browser_brands) {
          if (brand_version_pair.brand == "Citrix Enterprise Browser") {
            return "CEB";
          }
        }
      }
      catch {
        // Non chromium based browser
        return "nonCEB";
      }
    }

  function disableFormsButton($button) {
    // Disable the button and stop it from appearing clickable
    $button.addClass('disabled').removeAttr('href');
    // Change the button text based  on the localization file
    $button.text(_localize("CEB Button"));
  }

  // BEGIN
    if(labelInfo && check_browser() !== "CEB") {
    text = _localize(labelInfo.text);
      text = text.replace(/(\w+)===([\w]+:\/\/.*?)(\s)/ig, '<br/><a href="$2">$1$3</a>');
      lines = text.split(';;');
      note = $('<label class="label plain">' + lines[0] + '</label>').css("line-height", "24px");
      download = $('<label class="label plain">' + lines[1] + '</label>').css("line-height", "20px");
      launch = $('<label class="label plain">' + lines[2] + '</label>').css("line-height", "20px");
      label.css("line-height", "20px");
      note.css("font-weight", "bold");
      label.append(note, download, launch);
    }

    $(document).on('ctxsformsauthenticationdisplayform', function (e, data) {
      var $form = data.authenticationElement.find('.credentialform'),
      $loginButton = $form.find('#loginBtn');
      if (check_browser() !== "CEB") {
        // If Citrix Enterprise Browser is not used
        // Disable the Log On button
        disableFormsButton($loginButton);
      }
    });

    return label;
  //END
  },
  parseAsType: function () {
    return "plain";
  }
});
-
Save and Close the file.
-
Open the file
strings.en.jsonand append the following code snippet inside the curly brackets: ( { } )
"Citrix Enterprise Browser recommendation":"Citrix Enterprise Browser is recommended for this site;;Download===https://www.citrix.com/downloads/workspace-app Citrix Workspace app;;Launch===ctxwb://https%3A%2F%2Flogin.hasenzagl.eu%2F in Citrix Enterprise Browser","CEB Button":"Login Disallowed"
Important
The format in properly above text is important for the script to function. Text separated by
;;appears in a new line, and the URL name and link are separated by===.
-
Save and Close the file.
-
Repeat the above step similarly for other languages.
Note: The value (text) behind the following keys"Citrix Enterprise Browser recommendation":and"CEB Button":can be localized.
Create a custom Login Schema
- Connect via SSH to the NetScaler management IP.
- Enter the command
shell. - Navigate to
/nsconfig/loginschema/LoginSchema/. - Copy the login schema of your choice to
/nsconfig/loginschema/.
Note
In our case, the following command is used:
cp -p /nsconfig/loginschema/LoginSchema/SingleAuth.xml /nsconfig/loginschema/CustomSingleAuth.xml
- Navigate to
/nsconfig/loginschema/. - Open the file "CustomSingleAuth.xml".
- Search for
<ID>loginBtn<ID>. - Insert the following code snippet into the next line.
<Requirement><Credential><Type>none</Type></Credential><Label><Text>Citrix Enterprise Browser recommendation</Text><Type>nsg-link-label</Type></Label></Requirement>
- The customization should look similar to the following screenshot.

- Save and Close the file.
The required customization is completed.
Next, create a virtual authentication server and bind the necessary policies.
Create a virtual authentication server
The following pre-requirements must be considered before creating a virtual authentication server:
- Reserve one IP address used as a virtual IP address (VIP).
- Install an SSL certificate on the NetScaler for the virtual authentication server.
The certificate's common name must match the DNS record. (For example, login.example.org)
Link all intermediate certificates to the server certificate. - Create a DNS record for the certificate’s common name and point it to the VIP.
- Create an Advanced Authentication policy and LDAP action for user credential verification.
This part of the configuration is done in the NetScaler management CLI.
- Connect via SSH to the NetScaler management IP.
- Copy the following commands into a notepad and replace the placeholders marked with angle brackets. (< >)
add authentication loginSchema lschema_CustomSingleAuth -authenticationSchema "/nsconfig/loginschema/CustomSingleAuth.xml"
add authentication loginSchemaPolicy lschema_CustomSingleAuth -rule true -action lschema_CustomSingleAuth
add authentication vserver aaavs_CEB_only SSL <VIP> 443
bind authentication vserver aaavs_CEB_only -portaltheme RfWebUI-CEB-restricted
bind authentication vserver aaavs_CEB_only -policy lschema_CustomSingleAuth -priority 100 -gotoPriorityExpression END
bind authentication vserver aaavs_CEB_only -policy advauth_ldap -priority 100 -gotoPriorityExpression NEXT
bind ssl vserver aaavs_CEB_only -certkeyName <certificate-name>
- Copy the commands from the notepad into the NetScaler management CLI and run them.
For testing only
To disable caching of authentication pages, run the following command:
set aaa parameter -enableStaticPageCaching NO
- The modification of the NetScaler (AAA) Sign-in page is completed.
Access the NetScaler (AAA) Sign-in page
A standard web browser shows the "Login Disallowed" button and information to download the Citrix Enterprise Browser:

Citrix Enterprise Browser shows the correct NetScaler (AAA) sign-in page:

Use Case 3b – Restrict access to SaaS applications to company-owned public IP addresses
For security reasons, some SaaS applications can only be accessed from specified public IP addresses (for example, company’s data centers). This ensures that only employees connected with the corporate network have access and – for example – that the traffic gets inspected by the corporate firewall or any other network device.
Considering "connected to the corporate network", what does this mean for BYO devices?
In most cases, this is not allowed!
Zero Trust Network Access (ZTNA) using Citrix Secure Private Access (SPA) solves the problem. Using the same entry point for all applications with company-managed and BYO devices is a significant advantage in usability and user experience. Different authentication factors and restrictions based on the user device add value for companies.

Example SaaS application – app definition
In this use case, we define the SaaS application as "Inside my corporate network" with "App Connectivity" set to "Internal". This configuration allows the company to inspect the SaaS application traffic on its firewall or any transparent gateway device.
- Log into Citrix Cloud and select Manage from the Secure Private Access tile.
- Within the Secure Private Access menu, select Applications.
- In the Application section, select Add an app.
Note
In this example, no template is used. In the Choose a template wizard, click Skip.
- First, in the App Details screen, set the application location to Inside my corporate network and complete the required fields marked with a red asterisk. Optional you can add a custom icon. Select Next.

- Second, in the Single Sign-On screen, select Don't use SSO as SSO type. Select Next.

- Third, in the App Connectivity screen, select Internal as Type and select the Resource Location. Click Save and Finish.

When defining an app, the traffic routing to SaaS applications can be controlled through the "App Connectivity" section.
Possible "App Connectivity" traffic routing settings:
Direct:
External
The traffic flows directly from the user’s device to the SaaS application.Indirect:
Internal(or "External -via Connector")
The traffic flows from the user’s device to the SPA service. From the SPA service to the Connector Appliance deployed in the company’s data center (resource location) and finally to the SaaS application.There is no difference between "Internal" and "External -via Connector". Thus, we are recommending using "Internal".
You have successfully created the Workday example web application.
Next, we must subscribe users/groups to this application and configure conditional access.
Example SaaS application – access policy
The conditions and restrictions are configured using Access Policies. Creating an Access Policy is done in four easy steps:
- Within the Secure Private Access menu, select Access Policies.
- In the Access policies section, select Create policy.
- Enter the Policy name and a brief Policy description
- In the Applications drop-down list, search for "Workday" and select it
Note
You can create multiple access rules and configure different access conditions for different users or user groups within a single policy. These rules can be applied separately for both HTTP/HTTPS and TCP/UDP applications, all within a single policy. For more information on multiple access rules, see Configure an access policy with multiple rules.

- Select Create Rule to create rules for the policy
- Enter the rule name and a brief description of the rule, and select Next

- Add the appropriate users/groups who are authorized to launch the app, and select Next
Note
Click + to add multiple conditions based on the context.

- Specify if the HTTP/HTTPS app can be accessed with or without restrictions
The below screenshot has no restrictions configured. - Specify the TCP/UDP apps action
The below screenshot denies access to TCP/UDP apps. - Select Next

- The Summary page displays the policy rule details
Verify the details and select Finish

- In the Create policy dialog, verify that Enable policy on save is checked, and select Save.

There are no comments to display.
Create an account or sign in to comment
You need to be a member in order to leave a comment
Create an account
Sign up for a new account in our community. It's easy!
Register a new accountSign in
Already have an account? Sign in here.
Sign In Now