Federated Authentication Service certificate authority configuration
This article describes the advanced configuration of the Citrix Federated Authentication Service (FAS) to integrate with certificate authority (CA) servers that are not supported by the FAS administration console. The instructions use PowerShell APIs provided by FAS. You should have a basic knowledge of PowerShell before executing any instructions in this article.
Set up multiple CA servers for use in FAS
This section describes how to set up a single FAS server to use multiple CA servers to issue certificates. This allows load balancing and failover of the CA servers.
Step 1: Find out how many CA servers FAS is able to locate
Use the Get-FASMsCertificateAuthority cmdlet to determine which CA servers FAS can connect to. The following example shows that FAS can connect to three CA servers.
PS > Add-PSSnapin Citrix*
PS > Get-FasMsCertificateAuthority

Address                         IsDefault   PublishedTemplates
-------                         ---------   ------------------

DC1.bvt.local\bvt-DC1-CA        False       {Citrix_SmartcardLogon, Citrix_Regis...
ca1.bvt.local\CA1.bvt.local     False       {Citrix_SmartcardLogon, Citrix_Regis...
ca2.bvt.local\ca2.bvt.local     False       {Citrix_SmartcardLogon, Citrix_Regis...
Step 2: Modify the existing certificate definition
Citrix recommends that you create a role using the FAS administration console, rather than using PowerShell to create the role. This avoids the complication of having to add the SDL manually later. In the following example, a role named ‘default’ is created, with the access rule configured:
To add multiple CAs to the certificate authority field you must configure the certificate definition using PowerShell. (Adding multiple CAs is not supported from the FAS administration console in this release.)
First, you need the certificate definition name. The name cannot be determined from the administration console; use the Get-FASCertificateDefinition cmdlet.
PS > Get-FasCertificateDefinition

Name                        : default_Definition
CertificateAuthorities      : {DC1.bvt.local\bvt-DC1-CA}
MsTemplate                  : Citrix_SmartcardLogon
AuthorizationCertificate    : 86ce221c-7599-43a3-9dbd-8e6a3c2be7b7
PolicyOids                  : {}
InSession                   : True
The UI equivalent is:

After you have the certificate definition name, modify the certificate definition to have a list of CertificateAuthorities, rather than just one:

The Get-FASCertificateDefinition cmdlet now returns:
PS > Get-FasCertificateDefinition
Name                        : default_Definition
CertificateAuthorities      : {DC1.bvt.local\bvt-DC1-CA, ca1.bvt.local\CA1.bvt.local, ca2.bvt.local\ca2.bvt.local}
MsTemplate                  : Citrix_SmartcardLogon
AuthorizationCertificate    : 86ce221c-7599-43a3-9dbd-8e6a3c2be7b7
PolicyOids                  : {}
InSession                   : True
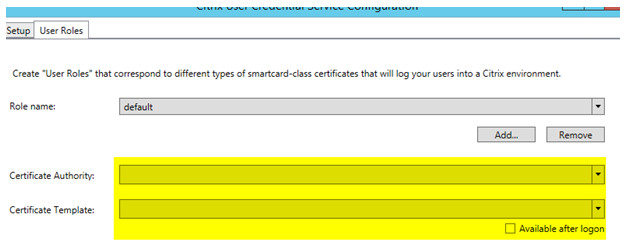
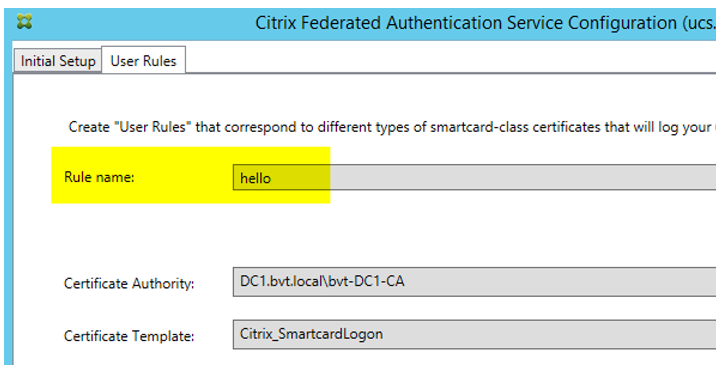
After you configure multiple CA servers, the FAS administration console cannot be used to configure FAS. The ‘Certificate Authority’ and ‘Certificate Template’ fields are empty, as shown here:
Note:
If do you use the console to modify the access rule, your multiple CA configuration is overwritten. Just repeat step 2 to reconfigure with all the certificate authorities.
If you want to reconfigure the access rule ACLs from powershell and are unsure what values to supply, we suggest the following:
- Create a second rule (e.g. named “testing”), with a single CA.
- Configure the ACLs as required on the “testing” rule.
- Use PowerShell to inspect the ACL (Get-FasRule –name “testing”).
- Use PowerShell to apply the ACL to the original rule (Set-FasRule).
- Delete the “testing” rule as it is no longer needed.
Expected behavior changes
After you configure the FAS server with multiple CA servers, user certificate generation is distributed among all the configured CA servers. Also, if one of the configured CA servers fails, the FAS server will switch to another available CA server.
Configure the Microsoft CA for TCP access
By default the Microsoft CA uses DCOM for access. This can result in complexities when implementing firewall security, so Microsoft has a provision to switch to a static TCP port. On the Microsoft CA, use Start>Run>dcomcnfg.exe to open the DCOM configuration panel, expand Computers>My computer>DCOM Config to show the CertSrv Request node, then edit the properties of the CertSrv Request DCOM application:
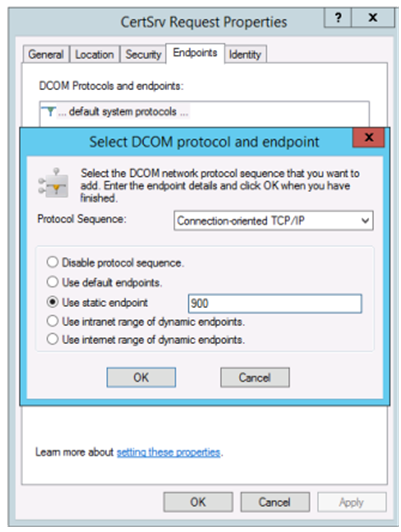
Change the “Endpoints” to select a static endpoint and specify a TCP port number (900 in the graphic above).
Restart the Microsoft CA and submit a certificate request. If you run “netstat –a –n –b” you should see that certsvr is now listening on port 900:

There is no need to configure the FAS server (or any other machines using the CA), because DCOM has a negotiation stage using the RPC port. When a client needs to use DCOM, it connects to the DCOM RPC Service on the certificate server and requests access to a particular DCOM server. This triggers port 900 to be opened, and the DCOM server instructs the FAS server how to connect.
Pre-generate user certificates
The logon time for users will significantly improve when user certificates are pre-generated within the FAS server. The following sections describe how it can be done, either for single or multiple FAS servers.
Get a list of Active Directory users
You can improve certificate generation by querying the AD and storing the list of users into a file (for example, a .csv file), as shown in the following example.
Import-Module ActiveDirectory

$searchbase = "cn=users,dc=bvt,dc=local" # AD User Base to Look for Users, leave it blank to search all
$filename = "user_list.csv" # Filename to save

if ($searchbase -ne ""){
    Get-ADUser -Filter {(UserPrincipalName -ne "null") -and (Enabled -eq "true")} -SearchBase $searchbase -Properties UserPrincipalName | Select UserPrincipalName | Export-Csv -NoTypeInformation -Encoding utf8 -delimiter "," $filename
} else {
    Get-ADUser -Filter {(UserPrincipalName -ne "null") -and (Enabled -eq "true")} -Properties UserPrincipalName | Select UserPrincipalName | Export-Csv -NoTypeInformation -Encoding utf8 -delimiter "," $filename
}
<!--NeedCopy-->
Get-ADUser is a standard cmdlet to query for a list of users. The example above contains a filter argument to list only users with a UserPrincipalName and an account status of ‘enabled.’
The SearchBase argument narrows which part of the AD to search for users. You can omit this if you want to include all users in AD. Note: This query might return a large number of users.
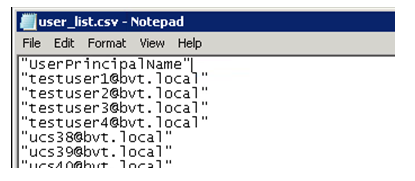
The CSV looks something like this:
FAS server
The following PowerShell script takes the previously-generated user list and creates a list of user certificates.
Add-PSSnapin Citrix.A*
$csv = "user_list.csv"
$rule = "default" # rule/role in your admin console
$users = Import-Csv -encoding utf8 $csv
foreach ( $user in $users )
{
    $server = Get-FasServerForUser -UserPrincipalNames $user.UserPrincipalName
    if( $server.Server -ne $NULL) {
        New-FasUserCertificate -Address $server.Server -UserPrincipalName $user.UserPrincipalName -CertificateDefinition $rule"_Definition" -Rule $rule
    }
    if( $server.Failover -ne $NULL) {
        New-FasUserCertificate -Address $server.Failover -UserPrincipalName $user.UserPrincipalName -CertificateDefinition $rule"_Definition" -Rule $rule
    }
}
<!--NeedCopy-->
If you have more than one FAS server, a particular user’s certificate will be generated twice: one in the main server, and the other in the failover server.
The script above is catered for a rule named ‘default’. If you have a different rule name (for example, ‘hello’), just change the $rule variable in the script.
Renew registration authority certificates
If more than one FAS server is in use, you can renew a FAS authorization certificate without affecting logged-on users. Note: Although you can also use the GUI to deauthorize and reauthorize FAS, that has the effect of resetting FAS configuration options.
Complete the following sequence:
-
Create a new authorization certificate:
New-FasAuthorizationCertificate -
Note the GUID of the new authorization certificate, as returned by:
Get-FasAuthorizationCertificate -
Place the FAS server into maintenance mode:
Set-FasServer –Address <FAS server> -MaintenanceMode $true -
Swap the new authorization certificate:
Set-FasCertificateDefinition –AuthorizationCertificate <GUID> -
Take the FAS server out of maintenance mode:
Set-FasServer –Address <FAS server> -MaintenanceMode $false -
Delete the old authorization certificate:
Remove-FasAuthorizationCertificate
Related information
- The Federated Authentication Service article is the primary reference for FAS installation and configuration.
- The common FAS deployments are summarized in the Federated Authentication Service architectures overview article.
- Other “how-to” articles are introduced in the Federated Authentication Service configuration and management article.