-
Exploring the XenCenter workspace
-
-
Connecting and Disconnecting Servers
-
Changing Server Properties
-
-
-
-
-
This content has been machine translated dynamically.
Dieser Inhalt ist eine maschinelle Übersetzung, die dynamisch erstellt wurde. (Haftungsausschluss)
Cet article a été traduit automatiquement de manière dynamique. (Clause de non responsabilité)
Este artículo lo ha traducido una máquina de forma dinámica. (Aviso legal)
此内容已经过机器动态翻译。 放弃
このコンテンツは動的に機械翻訳されています。免責事項
이 콘텐츠는 동적으로 기계 번역되었습니다. 책임 부인
Este texto foi traduzido automaticamente. (Aviso legal)
Questo contenuto è stato tradotto dinamicamente con traduzione automatica.(Esclusione di responsabilità))
This article has been machine translated.
Dieser Artikel wurde maschinell übersetzt. (Haftungsausschluss)
Ce article a été traduit automatiquement. (Clause de non responsabilité)
Este artículo ha sido traducido automáticamente. (Aviso legal)
この記事は機械翻訳されています.免責事項
이 기사는 기계 번역되었습니다.책임 부인
Este artigo foi traduzido automaticamente.(Aviso legal)
这篇文章已经过机器翻译.放弃
Questo articolo è stato tradotto automaticamente.(Esclusione di responsabilità))
Translation failed!
Changing Server Properties
Note:
XenCenter YYYY.x.x is not yet supported for use with Citrix Hypervisor 8.2 CU1 in production environments. To manage your Citrix Hypervisor 8.2 CU1 production environment, use XenCenter 8.2.7. For more information, see the XenCenter 8.2.7 documentation.
You can install XenCenter 8.2.7 and XenCenter YYYY.x.x on the same system. Installing XenCenter YYYY.x.x does not overwrite your XenCenter 8.2.7 installation.
Select any connected server in the Resources pane and select the General tab to see its properties and status. Click Properties to change the properties of a server.
 General properties - Name, Description, Folder, and Tags
You can change the name, description, folder, and tags for a server on the General Properties tab of the Properties dialog.
- To change the server’s name, enter a new name in the Name box.
- To change its description, enter new text in the Description box.
- To place the server in a folder or to move it to a different folder, select Change in the Folder box and select a folder. For more information, see Using folders.
- To tag and untag the server and to create and delete tags, see Using tags.
iSCSI IQN (General tab)
The server’s iSCSI IQN is used to uniquely identify it when connecting to iSCSI storage repositories (SRs). XenServer hosts support a single iSCSI initiator which is automatically created and configured with a random IQN during host installation. The single initiator can be used to connect to multiple iSCSI targets (SRs) concurrently. For more detailed information about XenServer support for iSCSI storage, see Storage.
Important:
You must set different IQNS for the iSCSI target (SR) and all servers in the pool. If a non-unique IQN identifier is used, data corruption can occur or access to the target might be denied.
To change the iSCSI IQN value for a managed server
Note:
Before you change a server’s iSCSI IQN value, all existing SRs must be detached. Changing the server IQN might make it impossible for the server to connect to new or existing SRs unless the storage target is updated appropriately.
- Select the server in the Resources pane, select the General tab, and then click Properties.
- On the General tab in the Properties dialog box, enter the new value in the iSCSI IQN box.
- Click OK to save your changes and close the dialog box.
 Custom Fields
Custom fields allow you to add information to managed resources to make it easier to search and organize them. For more information, see Using custom fields.
 Alerts
Use this tab to configure performance alerts for the server’s CPU, memory usage, and network activity. For more information, see Configuring performance alerts.
 Email Notifications (standalone servers)
Use this tab to configure the email notification for system alerts generated on a standalone server. This feature is configured at pool level for servers in a pool. For more information, see XenCenter Alerts.
 Multipathing
Dynamic storage multipathing support is available for Fibre Channel and iSCSI storage repositories. This feature can be enabled through the Multipathing tab on the server’s Properties dialog.
For more information, see Storage Multipathing.
 Power on (standalone servers)
Use this tab to configure your XenServer Host Power On feature, allowing managed servers to be powered on remotely. For more information about configuring this feature, see Configuring Host Power On. For servers in a pool, this feature is configured at pool level.
 Log Destination
XenServer system log messages are stored locally on the server itself. You can also choose to forward these logs to a remote server.
The remote server must be running a syslogd daemon to receive the logs and aggregate them correctly. The syslogd daemon is a standard part of all Linux and Unix installations. Third-party versions are available for Windows and other operating systems. Configure the remote server to allow remote connections from the hosts in the pool, and have its firewall configured appropriately.
To specify a remote XenServer log destination
- Select the server in the Resources pane, select the General tab, and click Properties.
- Select the Log Destination tab in the Properties dialog box.
- Select Also store the system logs on a remote server.
- In the Server field, enter an IP address or the host name of a server running the syslogd daemon.
- Click OK to save your changes and close the dialog box.
 GPU
GPU
The GPU tab allows you to:
- Set a GPU placement policy
- Enable Intel GPU pass-through for Windows VMs
Placement Policy
The GPU tab allows you to set a host-wide policy to assign VMs to available GPUs to achieve either maximum density or maximum performance. Select an option based on your requirements.
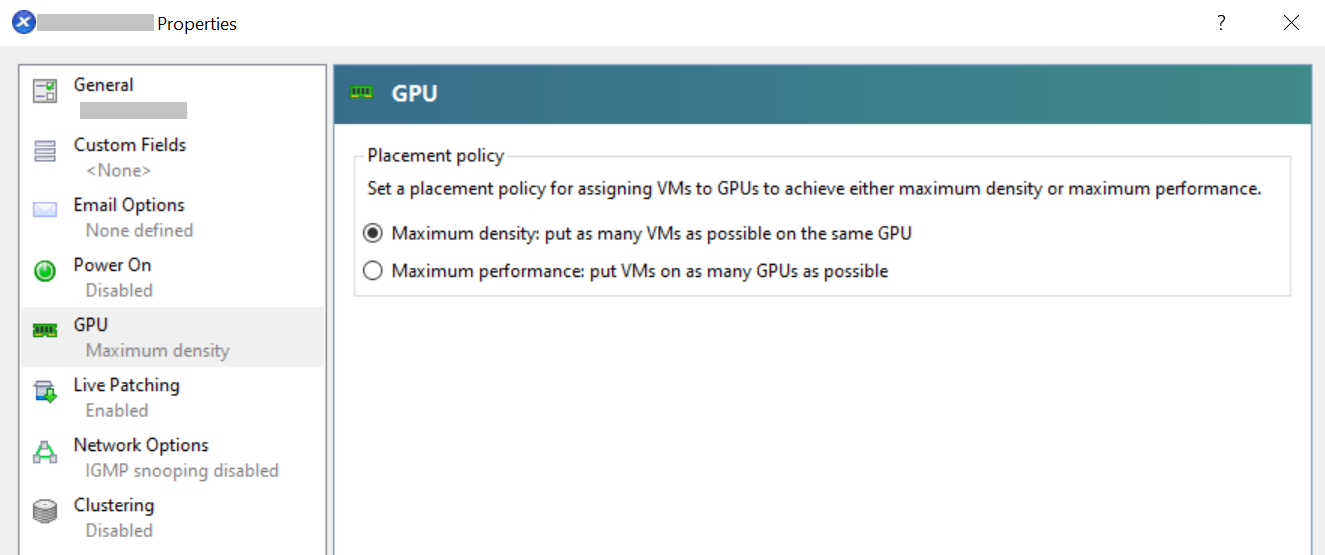
The GPU tab displays Mixed setting only when different settings are used for different GPU groups. For a Mixed setting, certain GPU groups are configured to achieve maximum density, and the rest are configured to achieve maximum performance.
It is not possible to set or edit the Mixed setting using XenCenter. Use the xe CLI if you want to use different settings for different GPU groups.
Note:
GPU Virtualization is available for XenServer Premium Edition customers. The GPU tab is visible when the server meets the license requirements and has GPUs that support various virtual GPU types. For more information, see About XenServer Licensing.
Integrated GPU pass-through
When your XenServer server is connected to an Intel GPU on an Intel server, the control domain of the server is connected to the integrated GPU device. In such cases, the GPU is not available for pass-through. Select This server will not use the Integrated GPU to disable the connection between dom0 and the GPU and reboot the host for the changes to take effect.
For more information, see GPU.
Note:
The XenServer server’s external console output (for example, VGA, HDMI, DP) is not available after disabling the connection between dom0 and the GPU.
 NRPE
NRPE
Note:
The NRPE feature is available for XenServer Premium or Trial Edition customers. For more information about XenServer licensing, see Licensing. To upgrade, or to buy a XenServer license, visit the XenServer website.
This tab allows you to configure the NRPE service for a standalone host that is not part of a pool.
Users with the Pool Admin role can use any third-party monitoring tool that supports the Nagios Remote Plugin Executor (NRPE) to monitor resources consumed by your XenServer host and dom0 - the control domain of your host. For information about the host and dom0 metrics that you can capture by using NRPE, see Monitor host and dom0 resources with NRPE.
Select the Enable NRPE check box to enable NRPE for your standalone host. To add more monitoring servers that are allowed to talk to the NRPE daemon, specify the hosts as a comma-delimited list of IP addresses or host names. You can also adjust the warning and critical thresholds of the plugin checks by modifying the values in the warning and critical thresholds table. For more information on how to configure the NRPE service, see Monitoring host and dom0 resources with NRPE.
Note:
The NRPE tab is only available to users with the Pool Admin role.
 SNMP
SNMP
Note:
The SNMP feature is available for XenServer Premium or Trial Edition customers. For more information about XenServer licensing, see Licensing. To upgrade, or to buy a XenServer license, visit the XenServer website.
This tab allows you to configure the SNMP service for a standalone host that is not part of a pool.
With the Pool Admin role, you can use SNMP to remotely monitor resources consumed by your XenServer host and dom0 - the control domain of your host.
Select the Enable SNMP check box to enable SNMP for your standalone host. You can add one trap receiver by clicking Add Trap Receiver. For more information on how to configure the SNMP service, see Monitoring host and dom0 resources with SNMP.
Note:
The SNMP tab is only available to users with the Pool Admin role.
If you cannot see the SNMP tab in XenCenter, it might be because the host is not running a version of XenServer that supports SNMP. Update the host to the latest version of XenServer.
Share
Share
This Preview product documentation is Cloud Software Group Confidential.
You agree to hold this documentation confidential pursuant to the terms of your Cloud Software Group Beta/Tech Preview Agreement.
The development, release and timing of any features or functionality described in the Preview documentation remains at our sole discretion and are subject to change without notice or consultation.
The documentation is for informational purposes only and is not a commitment, promise or legal obligation to deliver any material, code or functionality and should not be relied upon in making Cloud Software Group product purchase decisions.
If you do not agree, select I DO NOT AGREE to exit.