Linux VMs
When you want to create a Linux VM, create the VM using a template for the operating system you want to run on the VM. You can use a template that XenServer provides for your operating system, or one that you created previously. You can create the VM from either XenCenter or the CLI. This section focuses on using the CLI.
Note:
To create a VM of a newer minor update of a RHEL release than is supported for installation by XenServer, complete the following steps:
- Install from the latest supported media
- Use
yum updateto bring the VM up-to-dateThis process also applies to RHEL derivatives such as CentOS and Oracle Linux.
We recommend that you install the XenServer VM Tools for Linux immediately after installing the operating system. For more information, see Install XenServer VM Tools for Linux.
The overview for creating a Linux VM is as following:
-
Create the VM for your target operating system using XenCenter or the CLI.
-
Install the operating system using vendor installation media.
-
Install the XenServer VM Tools for Linux (recommended).
-
Configure the correct time and time zone on the VM and VNC as you would in a normal non-virtual environment.
XenServer supports the installation of many Linux distributions as VMs.
Warning:
The Other install media template is for advanced users who want to attempt to install VMs running unsupported operating systems. XenServer has been tested running only the supported distributions and specific versions covered by the standard supplied templates. Any VMs installed using the Other install media template are not supported.
For information regarding specific Linux distributions, see Installation notes for Linux distributions.
Supported Linux distributions
For a list of supported Linux distributions, see Guest operating system support.
Other Linux distributions are not supported. However, distributions that use the same installation mechanism as Red Hat Enterprise Linux (for example, Fedora Core) might be successfully installed using the same template.
Create a Linux VM
This section includes procedures for creating a Linux VM by installing the OS from a physical CD/DVD or from a network-accessible ISO.
Create a Linux VM by using the xe CLI
This section shows the CLI procedure for creating a Linux VM by installing the OS from a physical CD/DVD or from a network-accessible ISO.
-
Create a VM from the appropriate template. The UUID of the VM is returned:
xe vm-install template=template-name new-name-label=vm-name <!--NeedCopy--> -
(Optional) Change the boot mode of the VM.
xe vm-param-set uuid=<uuid> HVM-boot-params:firmware=<mode>
xe vm-param-set uuid=<UUID> platform:device-model=qemu-upstream-uefi
xe vm-param-set uuid=<uuid> platform:secureboot=<option>
<!--NeedCopy-->
Tha value of
modecan be eitherBIOSoruefiand defaults touefiif that option is supported for your VM operating system. Otherwise, the mode defaults toBIOS. The value ofoptioncan be set to eithertrueorfalse. If you do not specify the Secure Boot option, it defaults toauto.For more information, see Guest UEFI boot and Secure Boot.
-
Add a virtual CD-ROM to the new VM:
-
If you are installing from a CD or DVD, get the name of the physical CD drive on the XenServer host:
 xe cd-list
 <!--NeedCopy-->
The result of this command gives you something like SCSI 0:0:0:0 for the
name-labelfield.Use this value parameter as the
cd-nameparameter:xe vm-cd-add vm=vm_name cd-name="host_cd_drive_name_label" device=3 <!--NeedCopy--> -
If you are installing from a network-accessible ISO, use the name of the ISO from the ISO library-label as the value for the
cd-nameparameter:xe vm-cd-add vm=vm_name cd-name="iso_name.iso" device=3 <!--NeedCopy-->
-
-
Insert the operating system installation CD into the CD drive on the XenServer host.
-
Open a console to the VM with XenCenter or an SSH terminal and follow the steps to perform the OS installation.
-
Start the VM. It boots straight into the operating system installer:
xe vm-start uuid=UUID <!--NeedCopy--> -
Install the guest utilities and configure graphical display. For more information, see Install the XenServer VM Tools for Linux.
Create a Linux VM by using XenCenter
-
On the XenCenter toolbar, click the New VM button to open the New VM wizard.
The New VM wizard allows you to configure the new VM, adjusting various parameters for CPU, storage, and networking resources.
-
Select a VM template and click Next.
Each template contains the setup information that is required to create a VM with a specific guest operating system (OS), and with optimum storage. This list reflects the templates that XenServer currently supports.
Note:
If the OS that you are installing on your VM is compatible only with the original hardware, check the Copy host BIOS strings to VM box. For example, you might use this option for an OS installation CD that was packaged with a specific computer.
After you first start a VM, you cannot change its BIOS strings. Ensure that the BIOS strings are correct before starting the VM for the first time.
To copy BIOS strings using the CLI, see Install VMs from Reseller Option Kit (BIOS-locked) Media.
Advanced users can set user-defined BIOS strings. For more information, see User-defined BIOS strings.
-
Enter a name and an optional description for the new VM.
-
Choose the source of the OS media to install on the new VM.
Installing from a CD/DVD is the simplest option for getting started.
- Choose the default installation source option (DVD drive)
- Insert the disk into the DVD drive of the XenServer host
XenServer also allows you to pull OS installation media from a range of sources, including a pre-existing ISO library.
To attach a pre-existing ISO library, click New ISO library and indicate the location and type of the ISO library. You can then choose the specific operating system ISO media from the list.
-
In the Installation Media tab, you can choose a boot mode for the VM. By default, XenCenter selects the most secure boot mode available for the VM operating system version.
Notes:
- The UEFI Boot and UEFI Secure Boot options appear grayed out if the VM template you have chosen does not support UEFI boot.
- You cannot change the boot mode after you boot the VM for the first time.
For more information, see Guest UEFI boot and Secure Boot.
-
Select a home server for the VM.
A home server is the host which provides the resources for a VM in a pool. When you nominate a home server for a VM, XenServer attempts to start the VM on that host. If this action is not possible, an alternate host within the same pool is selected automatically. To choose a home server, click Place the VM on this server and select a host from the list.
Notes:
- In WLB-enabled pools, the nominated home server isn’t used for starting, restarting, resuming, or migrating the VM. Instead, Workload Balancing nominates the best host for the VM by analyzing XenServer resource pool metrics and by recommending optimizations.
- If a VM has one or more virtual GPUs assigned to it, the home server nomination doesn’t take effect. Instead, the host nomination is based on the virtual GPU placement policy set by the user.
- During rolling pool upgrade, the home server is not considered when migrating the VM. Instead, the VM is migrated back to the host it was on before the upgrade. If you do not want to nominate a home server, click Don’t assign this VM a home server. The VM is started on any host with the necessary resources.
Click Next to continue.
-
Allocate processor and memory resources for the VM. Click Next to continue.
-
Assign a virtual GPU.
If vGPU is supported, the New VM wizard prompts you to assign a dedicated GPU or one or more virtual GPUs to the VM. This option enables the VM to use the processing power of the GPU. With this feature, you have better support for high-end 3D professional graphics applications such as CAD/CAM, GIS, and Medical Imaging applications.
-
Allocate and configure storage for the new VM.
Click Next to select the default allocation (24 GB) and configuration, or you might want to do the following extra configuration:
- Change the name, description, or size of your virtual disk by clicking Edit.
- Add a new virtual disk by selecting Add.
-
Configure networking on the new VM.
Click Next to select the default NIC and configurations, including an automatically created unique MAC address for each NIC. Alternatively, you might want to do the following extra configuration:
- Change the physical network, MAC address, or Quality of Service (QoS) priority of the virtual disk by clicking Edit.
- Add a new virtual NIC by selecting Add.
-
Review settings, and then click Create Now to create the VM and return to the Search tab.
An icon for your new VM appears under the host in the Resources pane.
On the Resources pane, select the VM, and then click the Console tab to see the VM console.
-
Follow the OS installation screens and make your selections.
-
After the OS installation completes and the VM reboots, install the XenServer VM Tools for Linux.
Create a Linux VM by using PXE boot
You can use PXE boot to install the operating system of your Linux VM. This approach can be useful when you have to create many Linux VMs.
To install by using PXE boot, set up the following prerequisites in the network where your Linux VMs are located:
- DHCP server that is configured to direct any PXE boot installation requests to the TFTP server
- TFTP server that hosts the installation files for the Linux operating system
When creating the Linux VM, run the following commands:
-
Create a VM from the appropriate template. The UUID of the VM is returned:
xe vm-install template=template-name new-name-label=vm-name <!--NeedCopy--> -
Set the boot order to boot from the disk and then from the network:
xe vm-param-set uuid=<UUID> HVM-boot-params:order=cn <!--NeedCopy--> -
Start the VM to begin the PXE boot installation:
xe vm-start uuid=<UUID> <!--NeedCopy--> -
Install the guest utilities and configure graphical display. For more information, see Install the XenServer VM Tools for Linux.
For more information about using PXE boot to install Linux operating systems, see the operating system documentation:
- Debian: Installing Debian using network booting
- Red Hat: Starting a Kickstart installation automatically using PXE
- CentOS: PXE Setup
- SLES: Preparing Network Boot Environment
- Ubuntu: Netbooting the server installer on amd64
Install XenServer VM Tools for Linux
Although all supported Linux distributions are natively paravirtualized (and don’t need special drivers for full performance), XenServer VM Tools for Linux provide a guest agent. This guest agent provides extra information about the VM to the host. Install the guest agent on each Linux VM to benefit from the following features:
-
View VM performance data in XenCenter.
For example, the following memory performance values are visible in XenCenter only when the XenServer VM Tools are installed: “Used Memory”, “Disks”, Network” and “Address”.
-
In XenCenter, view the Linux guest operating system information.
-
In the XenCenter Networking tab, view the IP address of the VM.
-
Launch an SSH Console to the VM from XenCenter.
-
Adjust the number of vCPUs on a running Linux VM.
-
Enable Dynamic Memory Control (DMC).
Note:
You cannot use the Dynamic Memory Control (DMC) feature on Red Hat Enterprise Linux 8, Red Hat Enterprise Linux 9, Rocky Linux 8, Rocky Linux 9, or CentOS Stream 9 VMs as these operating systems do not support memory ballooning with the Xen hypervisor.
It is important to keep the Linux guest agent up-to-date as you upgrade your XenServer host. For more information, see Update Linux kernels and guest utilities.
Note:
Before installing the guest agent on a SUSE Linux Enterprise Desktop or Server 15 guest, ensure that
insserv-compat-0.1-2.15.noarch.rpmis installed on the guest.
To install the XenServer VM Tools for Linux:
-
Download the XenServer VM Tools for Linux file from the XenServer Downloads page.
-
Copy the
LinuxGuestTools-xxx.tar.gzfile to your Linux VM or to a shared drive that the Linux VM can access. -
Extract the contents of the tar file:
tar -xzf LinuxGuestTools-xxx.tar.gz -
Run the installation script as the root user:
/<extract-directory>/install.sh <!--NeedCopy--> -
If the kernel has been upgraded, or the VM was upgraded from a previous version, reboot the VM now.
Uninstall XenServer VM Tools for Linux
From version 8.4.0-1, you can use the install.sh script to uninstall XenServer VM Tools for Linux. To uninstall the tools, run the following command as the root user:
/<extract-directory>/install.sh -u
<!--NeedCopy-->
Install third-party drivers on your Secure Boot Linux VM
To install third-party drivers in a Linux VM that has UEFI Secure Boot enabled, you must create a signing key, add it to the VM as a machine owner key (MOK), and use that key to sign the driver. For example, if you use the XenServer graphics capabilities with your Linux VM, you might need to install the NVIDIA graphics driver on your VM.
Complete the following steps to create a key and use it to install a third-party driver:
- Generate a public key and private key pair.
- Enroll the public key in MOK.
- Set the keys you created as the module signing keys for the driver.
The following example shows this procedure in detail for an NVIDIA graphics driver on a secure-boot-enabled Ubuntu VM:
-
Download the NVIDIA driver to your VM.
-
Create a directory (for example,
/root/module-signing) to hold the keys:mkdir -p /root/module-signing -
Create a public and private key to use to sign the driver:
openssl req -new -x509 -newkey rsa:2048 -keyout /root/module-signing/Nvidia.key -outform DER -out /root/module-signing/Nvidia.der -nodes -days 36500 -subj "/CN=Graphics Drivers" -
Import the public key into MOK by using
mokutil:mokutil --import /root/module-signing/Nvidia.derYou are asked to create a password during this step. When you next boot, you are prompted to provide the password you create here.
-
Ensure that the VM boot target is set to graphical:
systemctl set-default graphical.target -
Reboot the VM.
-
During the boot, the Perform MOK manageement GUI is displayed.
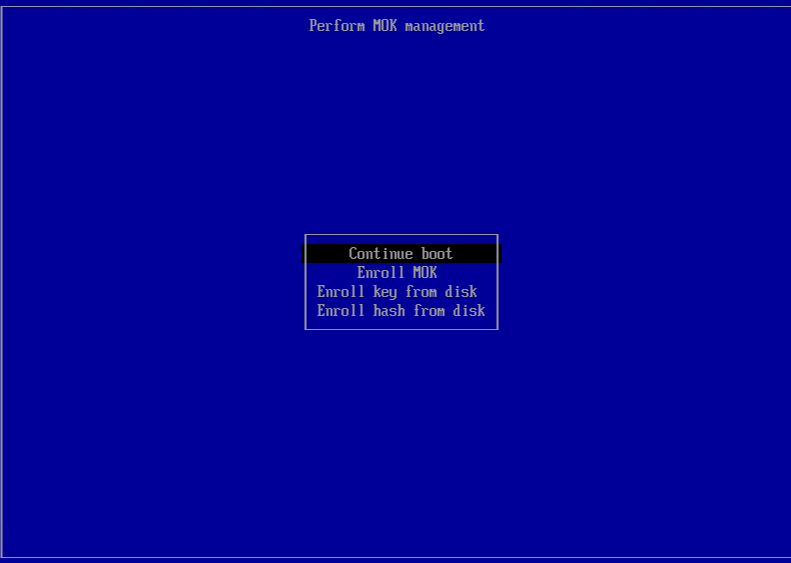
In this interface, complete the following steps:
- Select Enroll MOK > Continue.
- When asked whether to Enroll the key(s)?, select Yes.
- When prompted, provide the password you created when you imported the public key (Step 4).
-
Install the package
libglvnd-dev:apt install pkg-config libglvnd-dev -
Install the NVIDIA driver, specifying the keys you created as the module signing keys:
bash ./NVIDIA-Linux-x86_64-535.129.03-grid.run --module-signing-secret-key=/root/module-signing/Nvidia.key --module-signing-public-key=/root/module-signing/Nvidia.der
Installation notes for Linux distributions
This section lists vendor-specific, configuration information to consider before creating the specified Linux VMs.
For more detailed release notes on all distributions, see Linux VM Release Notes.
Red Hat Enterprise Linux* 7 (32-/64-bit)
The new template for these guests specifies 2 GB RAM. This amount of RAM is a requirement for a successful install of v7.4 and later. For v7.0 - v7.3, the template specifies 2 GB RAM, but as with previous versions of XenServer, 1 GB RAM is sufficient.
Note:
This information applies to both Red Hat and Red Hat derivatives.
Apt repositories (Debian)
For infrequent or one-off installations, it is reasonable to use a Debian mirror directly. However, if you intend to do several VM installations, we recommend that you use a caching proxy or local mirror. Either of the following tools can be installed into a VM.
-
Apt-cacher: An implementation of proxy server that keeps a local cache of packages -
debmirror: A tool that creates a partial or full mirror of a Debian repository
Prepare to clone a Linux VM
Typically, when cloning a VM or a computer, unless you generalize the cloned image, attributes unique to that machine are duplicated in your environments. Some of the unique attributes that are duplicated when cloning are the IP address, SID, or MAC address.
As a result, XenServer automatically changes some virtual hardware parameters when you clone a Linux VM. When you copy the VM using XenCenter, XenCenter automatically changes the MAC address and IP address for you. If these interfaces are configured dynamically in your environment, you might not need to modify the cloned VM. However, if the interfaces are statically configured, you might need to modify their network configurations.
The VM may need to be customized to be made aware of these changes. For instructions for specific supported Linux distributions, see Linux VM Release Notes.
Machine name
A cloned VM is another computer, and like any new computer in a network, it must have a unique name within the network domain.
IP address
A cloned VM must have a unique IP address within the network domain it is part of. Generally, this requirement is not a problem when DHCP is used to assign addresses. When the VM boots, the DHCP server assigns it an IP address. If the cloned VM had a static IP address, the clone must be given an unused IP address before being booted.
MAC address
There are two situations when we recommend disabling MAC address rules before cloning:
-
In some Linux distributions, the MAC address for the virtual network interface of a cloned VM is recorded in the network configuration files. However, when you clone a VM, XenCenter assigns the new cloned VM a different MAC address. As a result, when the new VM is started for the first time, the network does recognize the new VM and does not come up automatically.
-
Some Linux distributions use udev rules to remember the MAC address of each network interface, and persist a name for that interface. This behavior is intended so that the same physical NIC always maps to the same
ethn interface, which is useful with removable NICs (like laptops). However, this behavior is problematic in the context of VMs.For example, consider the behavior in the following case:
1.  Configure two virtual NICs when installing a VM
1.  Shut down the VM
1.  Remove the first NIC
When the VM reboots, XenCenter shows just one NIC, but calls it
eth0. Meanwhile the VM is deliberately forcing this NIC to beeth1. The result is that networking does not work.
For VMs that use persistent names, disable these rules before cloning. If you do not want to turn off persistent names, you must reconfigure networking inside the VM (in the usual way). However, the information shown in XenCenter does not match the addresses actually in your network.
Update Linux kernels and guest utilities
The Linux guest utilities can be updated by rerunning the install.sh script from the XenServer VM Tools for Linux (see Install the XenServer VM Tools for Linux).
For yum-enabled distributions, CentOS and RHEL, xe-guest-utilities installs a yum configuration file to enable subsequent updates to be done using yum in the standard manner.
For Debian, /etc/apt/sources.list is populated to enable updates using apt by default.
When upgrading, we recommend that you always rerun install.sh. This script automatically determines if your VM needs any updates and installs if necessary.
Linux VM release notes
Most modern Linux distributions support Xen paravirtualization directly, but have different installation mechanisms and some kernel limitations.
RHEL graphical install support
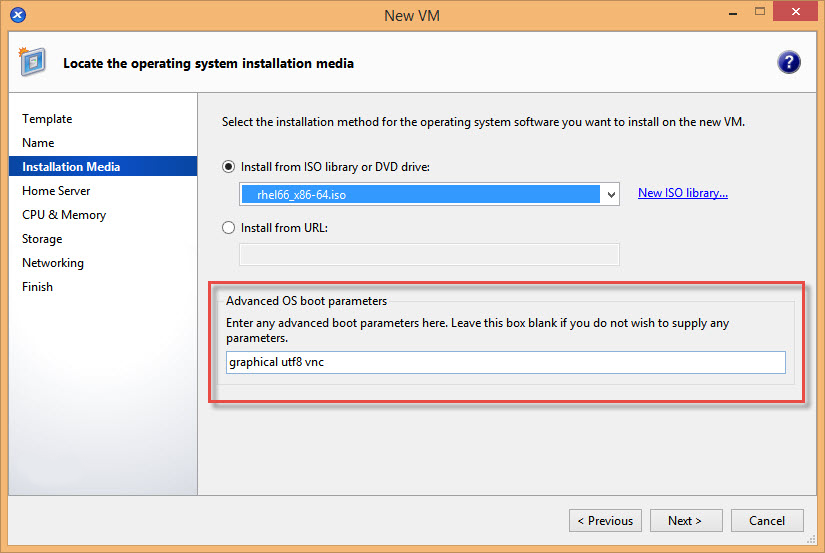
To use the graphical installer, in XenCenter step through the New VM wizard. In the Installation Media page, in the Advanced OS boot parameters section, add vnc to the list parameters:
graphical utf8 vnc
<!--NeedCopy-->
You are prompted to provide networking configuration for the new VM to enable VNC communication. Work through the remainder of the New VM wizard. When the wizard completes, in the Infrastructure view, select the VM, and click Console to view a console session of the VM. At this point, it uses the standard installer. The VM installation initially starts in text mode, and may request network configuration. Once provided, the Switch to Graphical Console button is displayed in the top right corner of the XenCenter window.
Red Hat Enterprise Linux 7
After migrating or suspending the VM, RHEL 7 guests might freeze during resume. For more information, see Red Hat issue 1141249.
Red Hat Enterprise Linux 8
You cannot use the Dynamic Memory Control (DMC) feature on Red Hat Enterprise Linux 8, Red Hat Enterprise Linux 9, Rocky Linux 8, Rocky Linux 9, or CentOS Stream 9 VMs as these operating systems do not support memory ballooning with the Xen hypervisor.
CentOS 7
For the list of CentOS 7 release notes, see Red Hat Enterprise Linux 7.
Oracle Linux 7
For the list of Oracle Linux 7 release notes, see Red Hat Enterprise Linux 7.
Scientific Linux 7
For the list of Scientific Linux 7 release notes, see Red Hat Enterprise Linux 7.
Debian 10
If you install Debian 10 (Buster) by using PXE network boot, do not add console=tty0 to the boot parameters. This parameter can cause issues with the installation process. Use only console=hvc0 in the boot parameters.
For more information, see Debian issues 944106 and 944125.
SUSE Linux Enterprise 12
Prepare a SLES guest for cloning
Note:
Before you prepare a SLES guest for cloning, ensure that you clear the udev configuration for network devices as follows:
cat< /dev/null > /etc/udev/rules.d/30-net_persistent_names.rules
To prepare an SLES guest for cloning:
- Open the file
/etc/sysconfig/network/config -
Edit the line that reads:
FORCE_PERSISTENT_NAMES=yes
<!--NeedCopy-->
To
FORCE_PERSISTENT_NAMES=no <!--NeedCopy--> - Save the changes and reboot the VM. For more information, see Prepare to Clone a Linux VM.
Ubuntu 18.04 (deprecated)
Ubuntu 18.04 offers the following types of kernel:
- The General Availability (GA) kernel, which is not updated at point releases
- The Hardware Enablement (HWE) kernel, which is updated at point releases
Some minor versions of Ubuntu 18.04 (for example 18.04.2 and 18.04.3) use a HWE kernel by default that can experience issues when running the graphical console. To work around these issues, you can choose to run these minor versions of Ubuntu 18.04 with the GA kernel or to change some of the graphics settings. For more information, see CTX265663 - Ubuntu 18.04.2 VMs can fail to boot on XenServer.