
簡単インストール
簡単インストールは、Linux VDAバージョン7.13以降で正式にサポートされています。簡単インストールを使用すると、必要なパッケージをインストールし、構成ファイルを自動的にカスタマイズすることで、Linux VDAの実行環境をセットアップできます。
サポートされているディストリビューション
| ウィンバインド | SSSD | セントリファイ | |
|---|---|---|---|
| RHEL 7.3 | はい | はい | はい |
| RHEL 6.9 | はい | はい | はい |
| RHEL 6.6 | はい | はい | はい |
| CentOS 7.3 | はい | はい | はい |
| ウブントゥ 16.04 | はい | はい | はい |
| SUSE 12.2 | はい | いいえ | はい |
簡単インストールの使用
この機能を使用するには、次の手順を実行します。
-
構成情報とLinuxマシンを準備します。
-
Linux VDA パッケージをインストールします。Citrix® の Web サイトにアクセスし、お使いの Linux ディストリビューションに基づいて適切な Linux VDA パッケージをダウンロードします。
-
Linux VDA のインストールを完了するために、ランタイム環境をセットアップします。
ステップ 1: 構成情報と Linux マシンを準備する
簡易インストールに必要な以下の構成情報を収集します。
-
ホスト名 - Linux VDA をインストールするマシンのホスト名
-
ドメインネームサーバーの IP アドレス
-
NTP サーバーの IP アドレスまたは文字列名
-
ドメイン名 - ドメインの NetBIOS 名
-
レルム名 - Kerberos レルム名
-
Active Domain の FQDN - 完全修飾ドメイン名
重要:
-
Linux VDA をインストールするには、リポジトリが Linux マシンに正しく追加されていることを確認します。
-
セッションを起動するには、X Window System とデスクトップ環境がインストールされていることを確認します。
ステップ 2: Linux VDA パッケージをインストールする
Linux VDA の環境をセットアップするには、次のコマンドを実行します。
RHEL および CentOS ディストリビューションの場合:
sudo yum -y localinstall <PATH>/<Linux VDA RPM>
Ubuntuディストリビューションの場合:
sudo dpkg -i <PATH>/<Linux VDA deb>
 sudo apt-get install -f
SUSEディストリビューションの場合:
zypper -i install <PATH>/<Linux VDA RPM>
ステップ3:インストールを完了するためのランタイム環境をセットアップする
Linux VDAパッケージをインストールした後、ctxinstall.shスクリプトを使用して実行環境を構成します。このスクリプトは、対話モードまたはサイレントモードで実行できます。
対話モード:
手動で構成するには、次のコマンドを実行し、各プロンプトで関連するパラメーターを入力します。
sudo /opt/Citrix/VDA/sbin/ctxinstall.sh
サイレントモード:
サイレントモードで簡易インストールを使用するには、ctxinstall.shを実行する前に、次の環境変数を設定します。
-
CTX\_EASYINSTALL\_HOSTNAME=host-name – Linux VDAサーバーのホスト名を示します。
-
CTX\_EASYINSTALL\_DNS=ip-address-of-dns – DNSのIPアドレス。
-
CTX\_EASYINSTALL\_NTPS=address-of-ntps – NTPサーバーのIPアドレスまたは文字列名。
-
CTX\_EASYINSTALL\_DOMAIN=domain-name – ドメインのNetBIOS名。
-
CTX\_EASYINSTALL\_REALM=realm-name – Kerberosレルム名。
-
CTX\_EASYINSTALL\_FQDN=ad-fqdn-name
-
CTX\_EASYINSTALL\_ADINTEGRATIONWAY=winbind \| sssd \| centrify – Active Directory統合方法を示します。
-
CTX\_EASYINSTALL\_USERNAME=domain-user-name – ドメインユーザーの名前を示します。ドメインへの参加に使用されます。
-
CTX\_EASYINSTALL\_PASSWORD=password – ドメインユーザーのパスワードを指定します。ドメインへの参加に使用されます。
ctxsetup.sh で使用される変数は次のとおりです。
-
CTX\_XDL\_SUPPORT\_DDC\_AS\_CNAME=Y \| N – Linux VDA は、DNS CNAME レコードを使用して Delivery Controller 名を指定することをサポートします。
-
CTX\_XDL\_DDC\_LIST=list-ddc-fqdns – Linux VDA は、Delivery Controller への登録に使用する Delivery Controller の完全修飾ドメイン名(FQDN)をスペースで区切ったリストを必要とします。少なくとも1つのFQDNまたはCNAMEを指定する必要があります。
-
CTX\_XDL\_VDA\_PORT=port-number – Linux VDA は、TCP/IP ポートを介して Delivery Controller と通信します。
-
CTX\_XDL\_REGISTER\_SERVICE=Y \| N – Linux Virtual Desktop サービスは、マシンの起動後に開始されます。
-
CTX\_XDL\_ADD\_FIREWALL\_RULES=Y \| N – Linux Virtual Desktop サービスでは、システムファイアウォールを介した受信ネットワーク接続が許可されている必要があります。Linux Virtual Desktop のシステムファイアウォールで、必要なポート(デフォルトではポート80と1494)を自動的に開くことができます。
-
CTX\_XDL\_HDX\_3D\_PRO=Y \| N – Linux VDA は、リッチグラフィックアプリケーションの仮想化を最適化するために設計された GPU アクセラレーションテクノロジーのセットである HDX 3D Pro をサポートします。HDX 3D Pro が選択されている場合、VDA は VDI デスクトップ(シングルセッション)モード(つまり、CTX\_XDL\_VDI\_MODE=Y)用に構成されます。
-
CTX\_XDL\_VDI\_MODE=Y \| N – マシンを専用デスクトップ配信モデル(VDI)として構成するか、ホスト型共有デスクトップ配信モデルとして構成するか。HDX 3D Pro 環境の場合は、値を Y に設定します。
-
CTX\_XDL\_SITE\_NAME=dns-name – Linux VDA は DNS を介して LDAP サーバーを検出します。DNS 検索結果をローカルサイトに制限するには、DNS サイト名を指定します。不要な場合は、\<none\> に設定できます。
-
CTX\_XDL\_LDAP\_LIST=list-ldap-servers – Linux VDA は DNS をクエリして LDAP サーバーを検出します。DNS が LDAP サービスレコードを提供できない場合は、LDAP ポートを含む LDAP FQDN のスペース区切りリストを指定できます。例:ad1.mycompany.com:389。不要な場合は、\<none\> に設定できます。
-
CTX\_XDL\_SEARCH\_BASE=search-base-set – Linux VDA は、Active Directory ドメインのルートに設定された検索ベース(例:DC=mycompany,DC=com)を介して LDAP をクエリします。検索パフォーマンスを向上させるには、検索ベース(例:OU=VDI,DC=mycompany,DC=com)を指定できます。不要な場合は、\<none\> に設定できます。
-
CTX\_XDL\_START\_SERVICE=Y \| N – 構成完了時に Linux VDA サービスを開始するかどうか。
いずれかのパラメーターが設定されていない場合、インストールは対話モードに戻り、ユーザー入力が求められます。すべてのパラメーターが環境変数によってすでに設定されている場合、ctxinstall.sh スクリプトは回答を求めません。
サイレントモードでは、環境変数を設定してからctxinstall.shスクリプトを実行するために、次のコマンドを実行する必要があります。
export CTX_EASYINSTALL_HOSTNAME=host-name

 export CTX_EASYINSTALL_DNS=ip-address-of-dns

 export CTX_EASYINSTALL_NTPS=address-of-ntps

 export CTX_EASYINSTALL_DOMAIN=domain-name

 export CTX_EASYINSTALL_REALM=realm-name

 export CTX_EASYINSTALL_FQDN=ad-fqdn-name

 export CTX_EASYINSTALL_ADINTEGRATIONWAY=winbind | sssd | centrify

 export CTX_EASYINSTALL_USERNAME=domain-user-name

 export CTX_EASYINSTALL_PASSWORD=password

 export CTX_XDL_SUPPORT_DDC_AS_CNAME=Y | N

 export CTX_XDL_DDC_LIST=list-ddc-fqdns

 export CTX_XDL_VDA_PORT=port-number

 export CTX_XDL_REGISTER_SERVICE=Y | N

 export CTX_XDL_ADD_FIREWALL_RULES=Y | N

 export CTX_XDL_HDX_3D_PRO=Y | N

 export CTX_XDL_VDI_MODE=Y | N

 export CTX_XDL_SITE_NAME=dns-site-name | '<none>'

 export CTX_XDL_LDAP_LIST=list-ldap-servers | '<none>'

 export CTX_XDL_SEARCH_BASE=search-base-set | '<none>'

 export CTX_XDL_START_SERVICE=Y | N

 sudo -E /opt/Citrix/VDA/sbin/ctxinstall.sh
sudoコマンドを実行するときは、-Eオプションを入力して、既存の環境変数を新しく作成されるシェルに渡します。Citrixでは、前のコマンドから**#\!/bin/bash**を最初の行としてシェルスクリプトファイルを作成することをお勧めします。
または、単一のコマンドを使用してすべてのパラメーターを指定することもできます。
sudo CTX_EASYINSTALL_HOSTNAME=host-name \

 CTX_EASYINSTALL_DNS=ip-address-of-dns \

 CTX_EASYINSTALL_NTPS=address-of-ntps \

 CTX_EASYINSTALL_DOMAIN=domain-name \

 CTX_EASYINSTALL_REALM=realm-name \

 ......

 CTX_XDL_SEARCH_BASE=search-base-set \

 CTX_XDL_START_SERVICE=Y \

 /opt/Citrix/VDA/sbin/ctxinstall.sh
考慮事項
-
ワークグループ名は、デフォルトでドメイン名です。環境内のワークグループをカスタマイズするには、次の手順を実行します。a. Linux VDA マシン上に /tmp/ctxinstall.conf ファイルを作成します。b. ファイルに workgroup=\<your workgroup\> の行を追加します。
-
Centrifyは純粋なIPv6 DNS構成をサポートしていません。
adclientがADサービスを適切に検出するには、/etc/resolv.confにIPv4を使用するDNSサーバーが少なくとも1つ必要です。 -
CentOS上のCentrifyの場合、簡易インストールはCentrify環境チェックツールである
adcheckで失敗し、次のエラーを報告する可能性があります。ログ:ADSITE : Check that this machine's subnet is in a site known by AD : Failed
: This machine's subnet is not known by AD.
: We guess you should be in the site Site1.この問題は、Centrifyの特殊な構成が原因で発生します。この問題を解決するには、次の手順を実行します。a. Delivery Controllerで管理ツールを開きます。b. Active Directoryサイトとサービスを選択します。 c. サブネットに正しいサブネットアドレスを追加します。 -
ドメインに参加する方法としてCentrifyを選択した場合、ctxinstall.shスクリプトにはCentrifyパッケージが必要です。ctxinstall.shがCentrifyパッケージを取得する方法は2つあります。
-
簡易インストールは、インターネットからCentrifyパッケージを自動的にダウンロードするのに役立ちます。各ディストリビューションのURLは次のとおりです。RHELの場合: wget
<http://edge.centrify.com/products/centrify-suite/2016-update-1/installers/centrify-suite-2016.1-rhel4-x86_64.tgz?_ga=1.178323680.558673738.1478847956>CentOSの場合: wget<http://edge.centrify.com/products/centrify-suite/2016-update-1/installers/centrify-suite-2016.1-rhel4-x86_64.tgz?_ga=1.186648044.558673738.1478847956>スース:wget<http://edge.centrify.com/products/centrify-suite/2016-update-1/installers/centrify-suite-2016.1-suse10-x86_64.tgz?_ga=1.10831088.558673738.1478847956>ウブントゥ: wget<http://edge.centrify.com/products/centrify-suite/2016-update-1/installers/centrify-suite-2016.1-deb7-x86_64.tgz?_ga=1.178323680.558673738.1478847956> -
Centrifyパッケージをローカルディレクトリからフェッチします。Centrifyパッケージのディレクトリを指定するには、次の手順を実行します。a. Linux VDA サーバー上に /tmp/ctxinstall.conf ファイルが存在しない場合は作成します。b. ファイルに「centrifypkgpath=\<path name\>」の行を追加します。例:
cat /tmp/ctxinstall.conf
 set “centrifypkgpath=/home/mydir”
 ls  -ls  /home/mydir
                  9548 -r-xr-xr-x. 1 root root  9776688 May 13  2016 adcheck-rhel4-x86_64
                  4140 -r--r--r--. 1 root root  4236714 Apr 21  2016 centrifyda-3.3.1-rhel4-x86_64.rpm
                  33492 -r--r--r--. 1 root root 34292673 May 13  2016 centrifydc-5.3.1-rhel4-x86_64.rpm
                  4 -rw-rw-r--. 1 root root     1168 Dec  1  2015 centrifydc-install.cfg
                  756 -r--r--r--. 1 root root   770991 May 13  2016 centrifydc-ldapproxy-5.3.1-rhel4-x86_64.rpm
                  268 -r--r--r--. 1 root root   271296 May 13  2016 centrifydc-nis-5.3.1-rhel4-x86_64.rpm
                  1888 -r--r--r--. 1 root root  1930084 Apr 12  2016 centrifydc-openssh-7.2p2-5.3.1-rhel4-x86_64.rpm
                  124 -rw-rw-r--. 1 root root   124543 Apr 19  2016 centrify-suite.cfg
                  0 lrwxrwxrwx. 1 root root       10 Jul  9  2012 install-express.sh -> install.sh
                   332 -r-xr-xr--. 1 root root   338292 Apr 10  2016 install.sh
                  12 -r--r--r--. 1 root root    11166 Apr  9  2015 release-notes-agent-rhel4-x86_64.txt
                  4 -r--r--r--. 1 root root     3732 Aug 24  2015 release-notes-da-rhel4-x86_64.txt
                  4 -r--r--r--. 1 root root     2749 Apr  7  2015 release-notes-nis-rhel4-x86_64.txt
                  12 -r--r--r--. 1 root root     9133 Mar 21  2016 release-notes-openssh-rhel4-x86_64.txt
-
トラブルシューティング
このセクションの情報を使用して、この機能の使用によって発生する可能性のある問題をトラブルシューティングします。
SSSDを使用したドメインへの参加に失敗する
ドメインに参加しようとするとエラーが発生し、出力は次のようになります(画面出力についてはログを確認してください)。
Step 6: join Domain!Enter ctxadmin's password:Failed to join domain: failed to lookup DC info for domain 'CITRIXLAB.LOCAL' over rpc: The network name cannot be found
/var/log/xdl/vda.log:
2016-11-04 02:11:52.317 [INFO ] - The Citrix Desktop Service successfully obtained the following list of 1 delivery controller(s) with which to register: 'CTXDDC.citrixlab.local (10.158.139.214)'.
 2016-11-04 02:11:52.362 [ERROR] - RegistrationManager.AttemptRegistrationWithSingleDdc: Failed to register with http://CTXDDC.citrixlab.local:80/Citrix/CdsController/IRegistrar. Error: General security error (An error occurred in trying to obtain a TGT: Client not found in Kerberos database (6))
 2016-11-04 02:11:52.362 [ERROR] - The Citrix Desktop Service cannot connect to the delivery controller 'http://CTXDDC.citrixlab.local:80/Citrix/CdsController/IRegistrar' (IP Address '10.158.139.214')
 Check the following:- The system clock is in sync between this machine and the delivery controller.
 -  The Active Directory provider (e.g. winbind daemon) service is running and correctly configured.
 -  Kerberos is correctly configured on this machine.
 If the problem persists, please refer to Citrix Knowledge Base article CTX117248 for further information.
 Error Details:
 Exception 'General security error (An error occurred in trying to obtain a TGT: Client not found in Kerberos database (6))' of type 'class javax.xml.ws.soap.SOAPFaultException'.
 2016-11-04 02:11:52.362 [INFO ] - RegistrationManager.AttemptRegistrationWithSingleDdc: The current time for this VDA is Fri Nov 04 02:11:52 EDT 2016.
 Ensure that the system clock is in sync between this machine and the delivery controller.
 Verify the NTP daemon is running on this machine and is correctly configured.
 2016-11-04 02:11:52.364 [ERROR] - Could not register with any controllers. Waiting to try again in 120000 ms. Multi-forest - false
 2016-11-04 02:11:52.365 [INFO ] - The Citrix Desktop Service failed to register with any controllers in the last 470 minutes.
/var/log/messages:
Nov 4 02:15:27 RH-WS-68 [sssd[ldap_child[14867]]]: Failed to initialize credentials using keytab [MEMORY:/etc/krb5.keytab]: Client 'RH-WS-68$@CITRIXLAB.LOCAL' not found in Kerberos database. Unable to create GSSAPI-encrypted LDAP connection.Nov 4 02:15:27 RH-WS-68 [sssd[ldap_child[14867]]]: Client 'RH-WS-68$@CITRIXLAB.LOCAL' not found in Kerberos database
この問題を解決するには:
-
rm -f /etc/krb5.keytabコマンドを実行します。 -
net ads leave $REALM -U $domain-administratorコマンドを実行します。 -
Delivery Controllerでマシンカタログとデリバリーグループを削除します。
-
/opt/Citrix/VDA/sbin/ctxinstall.shを実行します。
-
Delivery Controllerでマシンカタログとデリバリーグループを作成します。
Ubuntuデスクトップセッションでグレースクリーンが表示される
この問題は、セッションを起動すると、空白のデスクトップでブロックされる場合に発生します。さらに、ローカルユーザーアカウントを使用してログオンすると、サーバーOSマシンのコンソールもグレースクリーンを表示します。
この問題を解決するには:
-
sudo apt-get updateコマンドを実行します。 -
sudo apt-get install unity lightdmコマンドを実行します。 -
/etc/lightdm/lightdm.conf に次の行を追加します:greeter-show-manual-login=true
ホームディレクトリがないためUbuntuデスクトップセッションの起動に失敗する
/var/log/xdl/hdx.log:
2016-11-02 13:21:19.015 <P22492:S1> citrix-ctxlogin: StartUserSession: failed to change to directory(/home/CITRIXLAB/ctxadmin) errno(2)

 2016-11-02 13:21:19.017 <P22227> citrix-ctxhdx: logSessionEvent: Session started for user ctxadmin.

 2016-11-02 13:21:19.023 <P22492:S1> citrix-ctxlogin: ChildPipeCallback: Login Process died: normal.

 2016-11-02 13:21:59.217 <P22449:S1> citrix-ctxgfx: main: Exiting normally.
ヒント:
この問題の根本原因は、ドメイン管理者用のホームディレクトリが作成されていないことです。
この問題を解決するには:
-
コマンドラインから、「pam-auth-update」と入力します。
-
表示されるポップアップウィンドウで、「Create home directory login」が選択されていることを確認します。
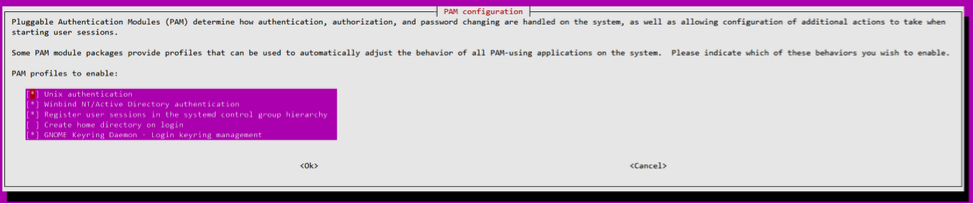
dbusエラーによりセッションが起動できない、またはすぐに終了する
/var/log/messages (RHELまたはCentOSの場合):
Oct 27 04:17:16 CentOS7 citrix-ctxhdx[8978]: Session started for user CITRIXLAB\ctxadmin.

 Oct 27 04:17:18 CentOS7 kernel: traps: gnome-session[19146] trap int3 ip:7f89b3bde8d3 sp:7fff8c3409d0 error:0

 Oct 27 04:17:18 CentOS7 gnome-session[19146]: ERROR: Failed to connect to system bus: Exhausted all available authentication mechanisms (tried: EXTERNAL, DBUS_COOKIE_SHA1, ANONYMOUS) (available: EXTERNAL, DBUS_COOKIE_SHA1, ANONYMOUS)#012aborting...

 Oct 27 04:17:18 CentOS7 gnome-session: gnome-session[19146]: ERROR: Failed to connect to system bus: Exhausted all available authentication mechanisms (tried: EXTERNAL, DBUS_COOKIE_SHA1, ANONYMOUS) (available: EXTERNAL, DBUS_COOKIE_SHA1, ANONYMOUS)

 Oct 27 04:17:18 CentOS7 gnome-session: aborting...

 Oct 27 04:17:18 CentOS7 citrix-ctxgfx[18981]: Exiting normally.

 Oct 27 04:17:18 CentOS7 citrix-ctxhdx[8978]: Session stopped for user CITRIXLAB\ctxadmin.
または、Ubuntuディストリビューションの場合は、ログ /var/log/syslog を使用します:
Nov  3 11:03:52 user01-HVM-domU pulseaudio[25326]: [pulseaudio] pid.c: Stale PID file, overwriting.

 Nov  3 11:03:52 user01-HVM-domU pulseaudio[25326]: [pulseaudio] bluez5-util.c: Failed to get D-Bus connection: Did not receive a reply. Possible causes include: the remote application did not send a reply, the message bus security policy blocked the reply, the reply timeout expired, or the network connection was broken.

 Nov  3 11:03:52 user01-HVM-domU pulseaudio[25326]: [pulseaudio] hashmap.c: Assertion 'h' failed at pulsecore/hashmap.c:116, function pa_hashmap_free(). Aborting.

 Nov  3 11:03:52 user01-HVM-domU pulseaudio[25352]: [pulseaudio] core-util.c: Failed to connect to system bus: Did not receive a reply. Possible causes include: the remote application did not send a reply, the message bus security policy blocked the reply, the reply timeout expired, or the network connection was broken.

 Nov  3 11:03:52 user01-HVM-domU pulseaudio[25352]: message repeated 10 times: [ [pulseaudio] core-util.c: Failed to connect to system bus: Did not receive a reply. Possible causes include: the remote application did not send a reply, the message bus security policy blocked the reply, the reply timeout expired, or the network connection was broken.]

 Nov  3 11:03:52 user01-HVM-domU pulseaudio[25352]: [pulseaudio] pid.c: Daemon already running.Nov  3 11:03:58 user01-HVM-domU citrix-ctxgfx[24693]: Exiting normally
一部のグループまたはモジュールは、再起動するまで有効になりません。ログに dbus エラーメッセージが表示される場合は、Citrix はシステムを再起動して再試行することをお勧めします。
SELinux により SSHD がホームディレクトリにアクセスできない
ユーザーはセッションを起動できますが、ログオンできません。
/var/log/ctxinstall.log:
Jan 25 23:30:31 yz-rhel72-1 setroubleshoot[3945]: SELinux is preventing /usr/sbin/sshd from setattr access on the directory /root. For complete SELinux messages. run sealert -l 32f52c1f-8ff9-4566-a698-963a79f16b81

 Jan 25 23:30:31 yz-rhel72-1 python[3945]: SELinux is preventing /usr/sbin/sshd from setattr access on the directory /root.

 *****  Plugin catchall_boolean (89.3 confidence) suggests   ******************

 If you want to allow polyinstantiation to enabled

    Then you must tell SELinux about this by enabling the 'polyinstantiation_enabled' boolean.

 You can read 'None' man page for more details.

     Do

        setsebool -P polyinstantiation_enabled 1

 *****  Plugin catchall (11.6 confidence) suggests   **************************

 If you believe that sshd should be allowed setattr access on the root directory by default.

 Then you should report this as a bug.

 You can generate a local policy module to allow this access.

       Do

        allow this access for now by executing:

        # grep sshd /var/log/audit/audit.log | audit2allow -M mypol

 # semodule -i mypol.pp
この問題を解決するには:
-
/etc/selinux/config に次の変更を加えて SELinux を無効にします。SELINUX=無効
-
VDA を再起動します。