配置 PIV 智能卡身份验证
本文列出了在 Director 服务器上和 Active Directory 中启用智能卡身份验证功能所需的配置。
注意:
智能卡身份验证仅支持来自相同 Active Directory 域的用户。
Director 服务器配置
请在 Director 服务器上执行以下配置步骤:
-
安装和启用客户端证书映射身份验证。请按照 Microsoft 文档 Client Certificate Mapping Authentication(客户端证书映射身份验证)中的 Client Certificate Mapping authentication using Active Directory(使用 Active Directory 的客户端证书映射身份验证)。
-
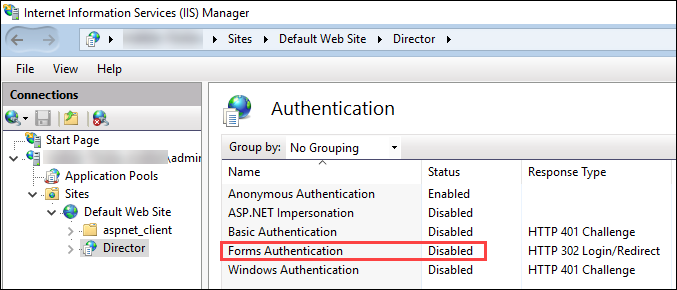
在 Director 站点上禁用表单身份验证。
启动 IIS 管理器。
转至站点 > 默认 Web 站点 > Director。
选择身份验证。
右键单击表单身份验证,然后选择禁用。
-
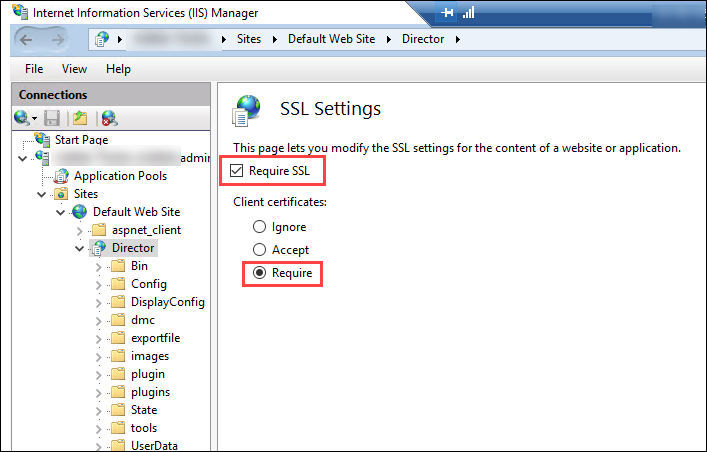
将 Director URL 配置为使用更安全的 https 协议(而非 HTTP)进行客户端证书身份验证。
-
启动 IIS 管理器。
-
转至站点 > 默认 Web 站点 > Director。
-
选择 SSL 设置。
-
选择需要 SSL 和客户端证书 > 需要。
-
-
更新 web.config。使用文本编辑器打开 web.config 文件(在 c:\inetpub\wwwroot\Director 中提供)。
在 <system.webServer> 父元素下,添加以下代码段作为第一个子元素:
<defaultDocument>
   <files>
       <add value="LogOn.aspx"/>
   </files>
</defaultDocument>
Active Directory 配置
默认情况下,Director 应用程序使用应用程序池标识属性运行。智能卡身份验证要求 Director 应用程序标识必须在服务主机上具有可信计算基 (TCB) 权限的委派。
Citrix 建议您为应用程序池标识创建一个单独的服务帐户。根据 Microsoft MSDN 文章 Protocol Transition with Constrained Delegation Technical Supplement(通过约束委派技术进行的协议转换增补)中的说明创建服务帐户并分配 TCB 权限。
将新创建的服务帐户分配给 Director 应用程序池。下图显示了示例服务帐户 Domain Pool 的属性对话框。
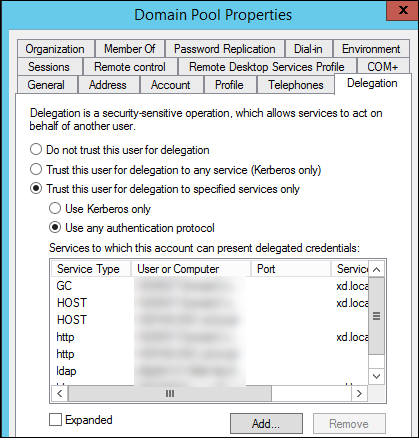
请为此帐户配置以下服务:
- Delivery Controller:HOST、HTTP
- Director:HOST、HTTP
- Active Directory:GC、LDAP
要进行配置,请
-
在用户帐户属性对话框中,单击添加。
-
在添加服务对话框中,单击“用户或计算机”。
-
选择 Delivery Controller 主机名。
-
从可用服务列表中,选择“HOST”和 HTTP 服务类型。

同样,请为 Director 和 Active Directory 主机添加服务类型。
创建服务主体名称记录
必须为每台 Director 服务器和用于访问 Director 服务器池的负载平衡虚拟 IP (VIP) 创建服务帐户。必须创建服务主体名称 (SPN) 记录才能配置对新创建的服务帐户的委派。
-
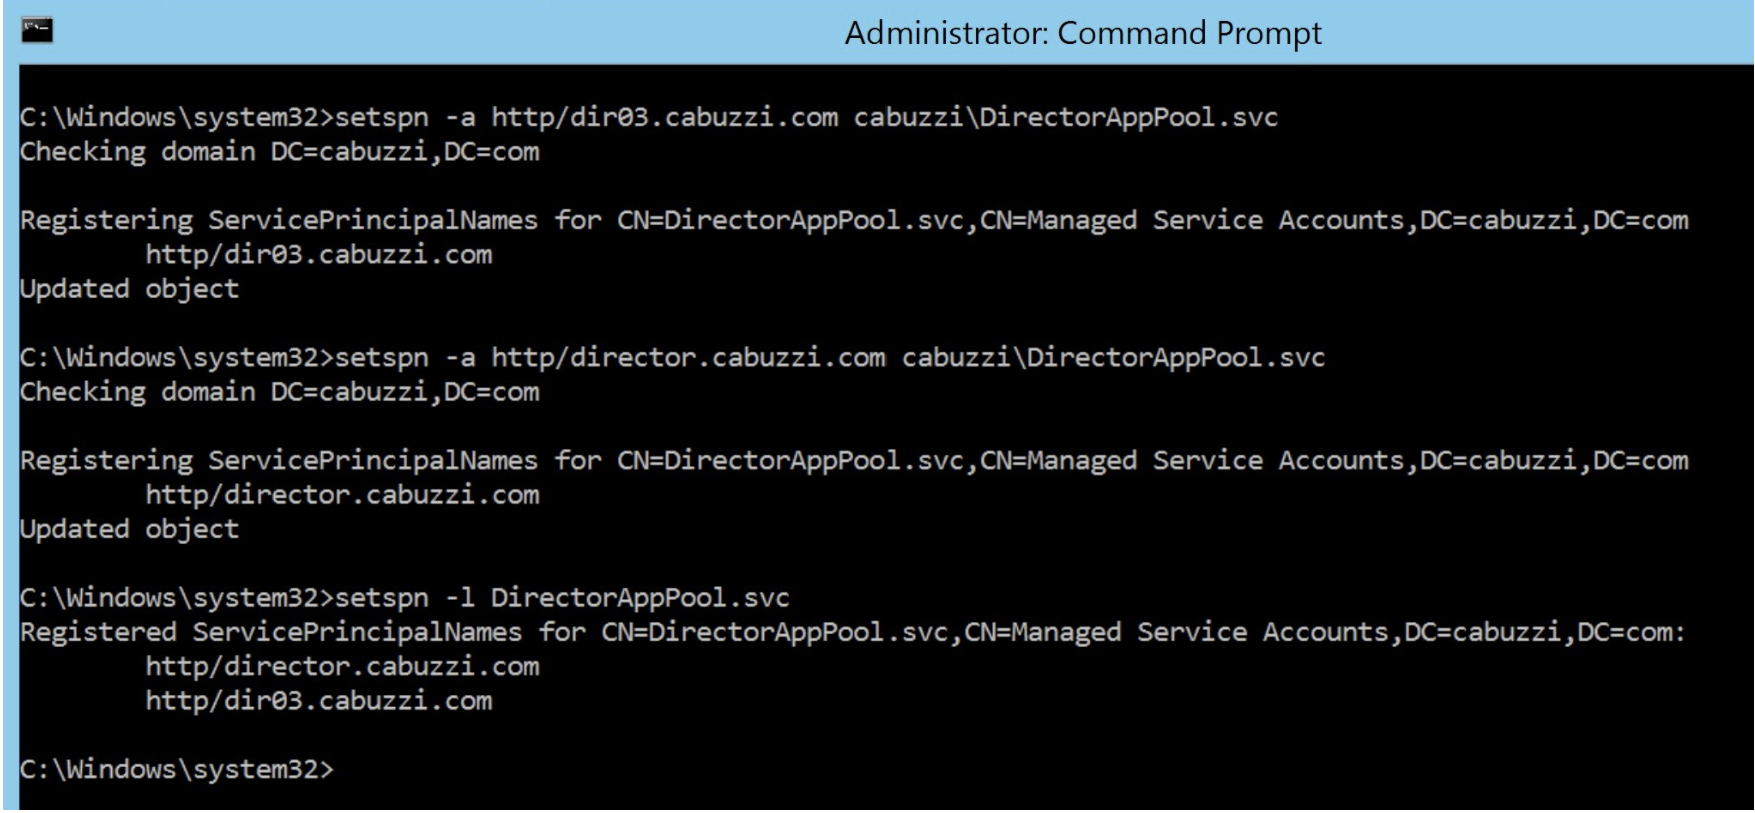
请使用以下命令为 Director 服务器创建 SPN 记录:
setspn -a http/<directorServer>.<domain_fqdn> <domain><DirectorAppPoolServiceAcct> <!--NeedCopy--> -
Use the following command to create an SPN record for a load-balanced VIP:
setspn -S http/<DirectorFQDN> <domain>\<DirectorAppPoolServiceAcct> <!--NeedCopy--> -
请使用以下命令查看或测试创建的 SPN:
 setspn –l <DirectorAppPoolServiceAcct>

 <!--NeedCopy-->
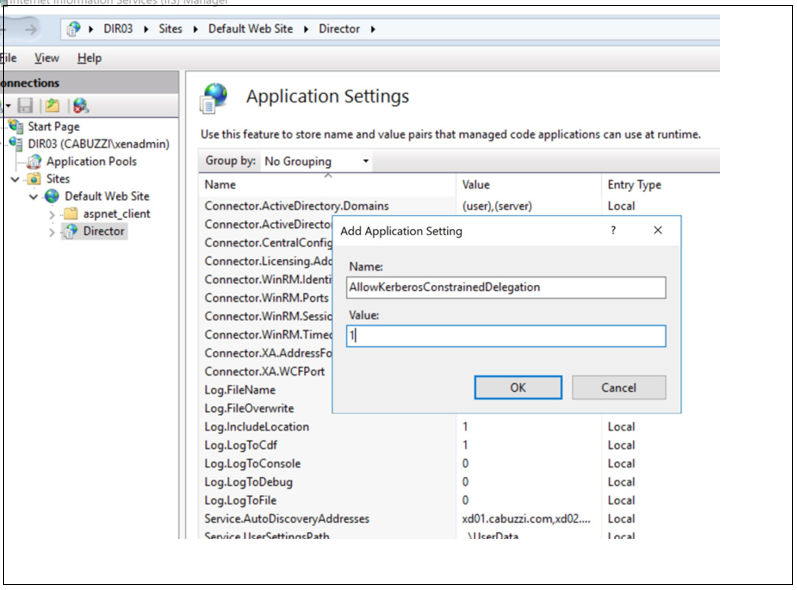
- Select the Director virtual directory in the left pane and double click Application Settings. Inside the Application Settings window, click Add and ensure AllowKerberosConstrainedDelegation is set to 1.
-
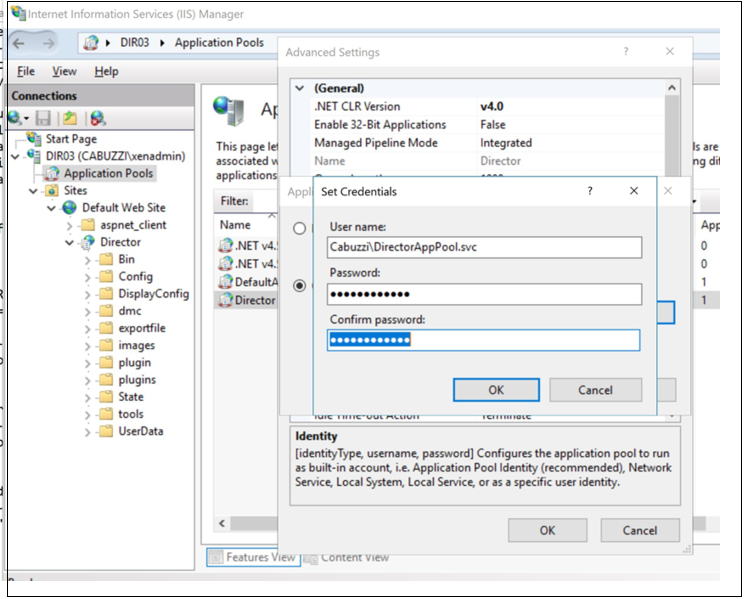
Select Application Pools in the left-hand pane, then right-click the Director application pool and select Advanced Settings.
-
Select Identity, click the ellipses (“…”) to enter the service account domain\logon and password credentials. Close the IIS console.
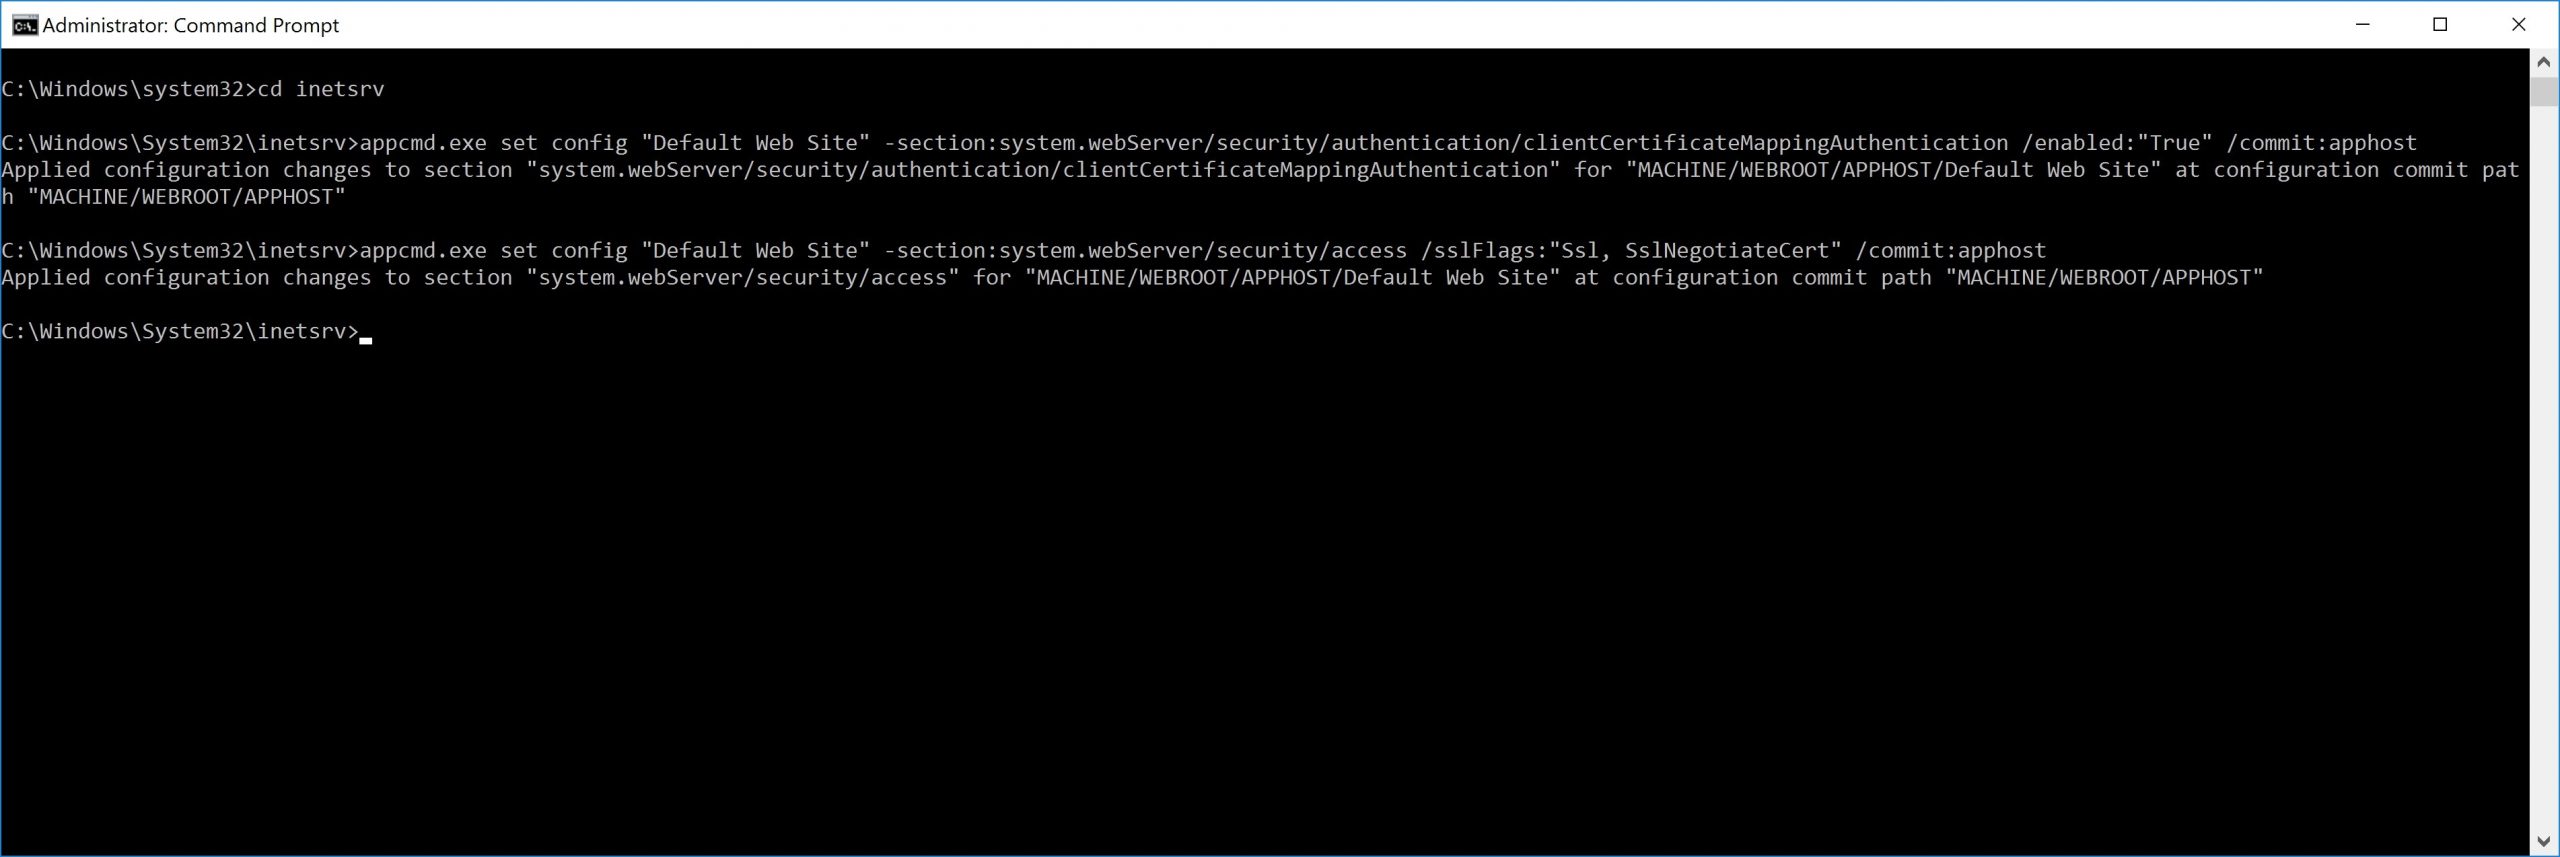
- From an elevated command prompt, change the directory to C:\Windows\System32\inetsrv and enter the following commands:
   appcmd.exe set config “Default Web Site” -section:system.webServer/security/authentication/clientCertificateMappingAuthentication /enabled:”True” /commit:apphost

<!--NeedCopy-->
appcmd.exe set config “Default Web Site” -section:system.webServer/security/access /sslFlags:”Ssl, SslNegotiateCert” /commit:apphost
\`\`\`
## Firefox 浏览器配置
要使用 Firefox 浏览器,请安装 [OpenSC 0.17.0](https://github.com/OpenSC/OpenSC/releases/tag/0.17.0) 中提供的 PIV 驱动程序。有关安装和配置说明,请参阅 [Installing OpenSC PKCS#11 Module in Firefox, Step by Step](https://github.com/OpenSC/OpenSC/wiki/Installing-OpenSC-PKCS%2311-Module-in-Firefox,-Step-by-Step)(在 Firefox 中逐步安装 OpenSC PKCS#11 模块)。
有关在 Director 中使用智能卡身份验证功能的信息,请参阅“Director”一文中的[在 Director 中使用基于 PIV 的智能卡身份验证](/zh-cn/citrix-virtual-apps-desktops/2311/director.html#use-director-with-piv-smart-card-authentication)部分。<!--NeedCopy-->