-
Getting Started with NetScaler
-
Deploy a NetScaler VPX instance
-
Optimize NetScaler VPX performance on VMware ESX, Linux KVM, and Citrix Hypervisors
-
Apply NetScaler VPX configurations at the first boot of the NetScaler appliance in cloud
-
Configure simultaneous multithreading for NetScaler VPX on public clouds
-
Install a NetScaler VPX instance on Microsoft Hyper-V servers
-
Install a NetScaler VPX instance on Linux-KVM platform
-
Prerequisites for installing NetScaler VPX virtual appliances on Linux-KVM platform
-
Provisioning the NetScaler virtual appliance by using OpenStack
-
Provisioning the NetScaler virtual appliance by using the Virtual Machine Manager
-
Configuring NetScaler virtual appliances to use SR-IOV network interface
-
Configure a NetScaler VPX on KVM hypervisor to use Intel QAT for SSL acceleration in SR-IOV mode
-
Configuring NetScaler virtual appliances to use PCI Passthrough network interface
-
Provisioning the NetScaler virtual appliance by using the virsh Program
-
Provisioning the NetScaler virtual appliance with SR-IOV on OpenStack
-
Configuring a NetScaler VPX instance on KVM to use OVS DPDK-Based host interfaces
-
-
Deploy a NetScaler VPX instance on AWS
-
Deploy a VPX high-availability pair with elastic IP addresses across different AWS zones
-
Deploy a VPX high-availability pair with private IP addresses across different AWS zones
-
Protect AWS API Gateway using the NetScaler Web Application Firewall
-
Configure a NetScaler VPX instance to use SR-IOV network interface
-
Configure a NetScaler VPX instance to use Enhanced Networking with AWS ENA
-
Deploy a NetScaler VPX instance on Microsoft Azure
-
Network architecture for NetScaler VPX instances on Microsoft Azure
-
Configure multiple IP addresses for a NetScaler VPX standalone instance
-
Configure a high-availability setup with multiple IP addresses and NICs
-
Configure a high-availability setup with multiple IP addresses and NICs by using PowerShell commands
-
Deploy a NetScaler high-availability pair on Azure with ALB in the floating IP-disabled mode
-
Configure a NetScaler VPX instance to use Azure accelerated networking
-
Configure HA-INC nodes by using the NetScaler high availability template with Azure ILB
-
Configure a high-availability setup with Azure external and internal load balancers simultaneously
-
Configure a NetScaler VPX standalone instance on Azure VMware solution
-
Configure a NetScaler VPX high availability setup on Azure VMware solution
-
Configure address pools (IIP) for a NetScaler Gateway appliance
-
Deploy a NetScaler VPX instance on Google Cloud Platform
-
Deploy a VPX high-availability pair on Google Cloud Platform
-
Deploy a VPX high-availability pair with external static IP address on Google Cloud Platform
-
Deploy a single NIC VPX high-availability pair with private IP address on Google Cloud Platform
-
Deploy a VPX high-availability pair with private IP addresses on Google Cloud Platform
-
Install a NetScaler VPX instance on Google Cloud VMware Engine
-
-
Solutions for Telecom Service Providers
-
Load Balance Control-Plane Traffic that is based on Diameter, SIP, and SMPP Protocols
-
Provide Subscriber Load Distribution Using GSLB Across Core-Networks of a Telecom Service Provider
-
Authentication, authorization, and auditing application traffic
-
Basic components of authentication, authorization, and auditing configuration
-
Web Application Firewall protection for VPN virtual servers and authentication virtual servers
-
On-premises NetScaler Gateway as an identity provider to Citrix Cloud
-
Authentication, authorization, and auditing configuration for commonly used protocols
-
Troubleshoot authentication and authorization related issues
-
-
-
Bot detection
-
-
-
-
-
-
Configure DNS resource records
-
Configure NetScaler as a non-validating security aware stub-resolver
-
Jumbo frames support for DNS to handle responses of large sizes
-
Caching of EDNS0 client subnet data when the NetScaler appliance is in proxy mode
-
Use case - configure the automatic DNSSEC key management feature
-
Use Case - configure the automatic DNSSEC key management on GSLB deployment
-
-
-
Persistence and persistent connections
-
Advanced load balancing settings
-
Gradually stepping up the load on a new service with virtual server–level slow start
-
Protect applications on protected servers against traffic surges
-
Retrieve location details from user IP address using geolocation database
-
Use source IP address of the client when connecting to the server
-
Use client source IP address for backend communication in a v4-v6 load balancing configuration
-
Set a limit on number of requests per connection to the server
-
Configure automatic state transition based on percentage health of bound services
-
-
Use case 2: Configure rule based persistence based on a name-value pair in a TCP byte stream
-
Use case 3: Configure load balancing in direct server return mode
-
Use case 6: Configure load balancing in DSR mode for IPv6 networks by using the TOS field
-
Use case 7: Configure load balancing in DSR mode by using IP Over IP
-
Use case 10: Load balancing of intrusion detection system servers
-
Use case 11: Isolating network traffic using listen policies
-
Use case 12: Configure Citrix Virtual Desktops for load balancing
-
Use case 13: Configure Citrix Virtual Apps and Desktops for load balancing
-
Use case 14: ShareFile wizard for load balancing Citrix ShareFile
-
Use case 15: Configure layer 4 load balancing on the NetScaler appliance
-
-
-
-
-
Authentication and authorization for System Users
-
-
-
Configuring a CloudBridge Connector Tunnel between two Datacenters
-
Configuring CloudBridge Connector between Datacenter and AWS Cloud
-
Configuring a CloudBridge Connector Tunnel Between a Datacenter and Azure Cloud
-
Configuring CloudBridge Connector Tunnel between Datacenter and SoftLayer Enterprise Cloud
-
Configuring a CloudBridge Connector Tunnel Between a NetScaler Appliance and Cisco IOS Device
-
CloudBridge Connector Tunnel Diagnostics and Troubleshooting
This content has been machine translated dynamically.
Dieser Inhalt ist eine maschinelle Übersetzung, die dynamisch erstellt wurde. (Haftungsausschluss)
Cet article a été traduit automatiquement de manière dynamique. (Clause de non responsabilité)
Este artículo lo ha traducido una máquina de forma dinámica. (Aviso legal)
此内容已经过机器动态翻译。 放弃
このコンテンツは動的に機械翻訳されています。免責事項
이 콘텐츠는 동적으로 기계 번역되었습니다. 책임 부인
Este texto foi traduzido automaticamente. (Aviso legal)
Questo contenuto è stato tradotto dinamicamente con traduzione automatica.(Esclusione di responsabilità))
This article has been machine translated.
Dieser Artikel wurde maschinell übersetzt. (Haftungsausschluss)
Ce article a été traduit automatiquement. (Clause de non responsabilité)
Este artículo ha sido traducido automáticamente. (Aviso legal)
この記事は機械翻訳されています.免責事項
이 기사는 기계 번역되었습니다.책임 부인
Este artigo foi traduzido automaticamente.(Aviso legal)
这篇文章已经过机器翻译.放弃
Questo articolo è stato tradotto automaticamente.(Esclusione di responsabilità))
Translation failed!
Bot Detection
The NetScaler bot management system uses various techniques to detect the incoming bot traffic. The techniques are used as detection rules to detect the bot type. The techniques are as follows:
Note:
Bot management supports a maximum of 32 configuration entities for block list, allow list, and rate limiting techniques.
Bot Allowed list - A customized list of IP addresses (IPv4 and IPv6), subnets (IPv4 and IPv6), and policy expressions that can be bypassed as an allowed list.
Bot Blocked list - A customized list of IP addresses (IPv4 and IPv6), subnets (IPv4 and IPv6), and policy expressions that have to be blocked from accessing your web applications.
IP reputation - This rule detects if the incoming bot traffic is from a malicious IP address.
Device fingerprint - This rule detects if the incoming bot traffic has the device fingerprint ID in the incoming request header and browser attributes of an incoming client bot traffic.
Limitation:
- Java Script must be enabled in the client browser.
- Does not work for XML responses.
Bot log expression - The detection technique enables you to capture additional information as log messages. The data can be the name of the user who requested the URL, the source IP address, and the source port from which the user sent the request or data generated from an expression.
Rate limit - This rule rate limits multiple requests coming from the same client.
Bot trap - Detects and blocks automated bots by advertising a trap URL in the client response. The URL appears invisible and not accessible if the client is a human user. The detection technique is effective in blocking attacks from automated bots.
TPS - Detects incoming traffic as bots if the maximum number of requests and percentage increase in requests exceeds the configured time interval.
CAPTCHA - This rule uses a CAPTCHA for mitigating bot attacks. A CAPTCHA is a challenge-response validation to determine if the incoming traffic is from a human user or an automated bot. The validation helps block automated bots that cause security violations to web applications. You can configure CAPTCHA as a bot action in IP reputation and device fingerprint detection techniques.
Now, let us see how you can configure each technique to detect and manage your bot traffic.
How to upgrade your appliance to NetScaler CLI-based bot management configuration
If you are upgrading your appliance from an older version (NetScaler release 13.0 build 58.32 or earlier), you must first manually convert the existing bot management configuration to the NetScaler CLI based bot management configuration only once. Complete the following steps to manually convert your bot management configuration.
-
After upgrading to the latest version connect to the upgrade tool “upgrade_bot_config.py” by using the following command
At the command prompt, type:
shell "/var/python/bin/python /netscaler/upgrade_bot_config.py > /var/bot_upgrade_commands.txt" -
Run the configuration using the following command.
At the command prompt, type:
batch -f /var/bot_upgrade_commands.txt -
Save the upgraded configuration.
save ns config
Configure NetScaler CLI-based bot management
The bot management configuration enables you to bind one or more bot detection techniques to a specific bot profile. You must complete the following steps to configure NetScaler-based bot management:
- Enable bot management
- Import bot signature
- Add bot profile
- Bind bot profile
- Add bot policy
- Bind bot policy
- Configure bot settings
Note:
If you are upgrading your appliance from an older version, you must first manually convert the existing bot management configuration. For more information, see How to upgrade to NetScaler CLI-based bot management configuration section.
Enable bot management
Before you can begin, ensure that the Bot Management feature is enabled on the appliance. If you have a new NetScaler or VPX, you must enable the feature before you configure it. If you are upgrading a NetScaler appliance from an earlier version to the current version, you must need to enable the feature before you configure it. At the command prompt, type:
enable ns feature Bot
Import bot signature
You can import the default signature bot file and bind it to the bot profile. At the command prompt, type:
import bot signature [<src>] <name> [-comment <string>] [-overwrite]
Where:
src - Local path name, or URL (protocol, host, path, and file name). Maximum Length: 2047.
> Note:
>
> The import fails if the object to be imported is on an HTTPS server that requires client certificate authentication for access.
name - Name of the bot signature file object. This is a mandatory argument. Maximum Length: 31.
comment - Description about the signature file object. Maximum Length: 255.
overwrite - Action that overwrites the existing file.
> Note:
>
> Use the overwrite option to update the content in the signature file. Alternately, use the update bot signature <name> command to update the signature file on the NetScaler appliance.
Example
import bot signature http://www.example.com/signature.json signaturefile -comment commentsforbot –overwrite
Note:
You can use the overwrite option to update the content in the signature file. Also, you can use the
update bot signature <name>command to update the signature file in the NetScaler appliance.
Add bot profile
A bot profile is a collection of profile settings to configure bot management on the appliance. You can configure the settings to perform bot detection.
Note:
Starting from release 14.1 build 29.x, a new parameter
addCookieFlagsis added to theadd bot profileandset bot profilecommands.
At the command prompt, type:
add bot profile <name> [-signature <string>] [-errorURL <string>] [-trapURL <string>] [-whiteList ( ON | OFF )] [-blackList ( ON | OFF )] [-rateLimit ( ON | OFF )] [-deviceFingerprint ( ON | OFF )] [-deviceFingerprintAction ( none | log | drop | redirect | reset | mitigation )] [-ipReputation ( ON | OFF )] [-trap ( ON | OFF )] [-addCookieFlags ([**none**] | [**httpOnly**] | [**secure**] | [**all**])]
Where:
addCookieFlags - Add flags to cookies during transformation. Specify any one of the following:
- None - Do not add flags to cookies.
- HTTP only - Add the HttpOnly flag to all cookies. With this flag set, browsers that support the HttpOnly flag prevent scripts from accessing cookies. The default.
- Secure - Add the Secure flag to cookies that are to be sent only over an SSL connection. Browsers that support the secure flag do not send the flagged cookies over an insecure connection.
- All - Add the HttpOnly flag to all cookies, and the Secure flag to cookies that are to be sent only over an SSL connection.
Example:
add bot profile profile1 -signature signature -errorURL http://www.example.com/error.html -trapURL /trap.html -whitelist ON -blacklist ON -ratelimit ON -deviceFingerprint ON -deviceFingerprintAction drop -ipReputation ON -trap ON -addCookieFlags secure
Bind bot profile
After you create a bot profile, you must bind the bot detection mechanism to the profile.
At the command prompt, type:
bind bot profile <name> | (-ipReputation [-category <ipReputationCategory>] [-enabled ( ON | OFF )] [-action ( none | log | drop | redirect | reset | mitigation )] [-logMessage <string>]
Example:
The following example is for binding the IP reputation detection technique to a specific bot profile.
bind bot profile profile5 -ipReputation -category BOTNET -enabled ON -action drop -logMessage message
Add bot policy
You must add the bot policy for evaluating bot traffic.
At the command prompt, type:
add bot policy <name> -rule <expression> -profileName <string> [-undefAction <string>] [-comment <string>] [-logAction <string>]
Where,
Name- Name for the bot policy. Must begin with a letter, number, or the underscore character (_), and must contain only letters, numbers, and the hyphen (-), period (.) pound (#), space ( ), at (@), equals (=), colon (:), and underscore characters. Can be changed after the bot policy is added.
Rule- An expression that the policy uses to determine whether to apply the bot profile on the specified request. This is a mandatory argument. Maximum Length: 1499
profileName- Name of the bot profile to apply if the request matches this bot policy. This is a mandatory argument. Maximum Length: 127
undefAction- Action to perform if the result of policy evaluation is undefined (UNDEF). An UNDEF event indicates an internal error condition. Maximum Length: 127
Comment- Description about this bot policy. Maximum Length: 255
logAction - Name of the log action to use for requests that match this policy. Maximum Length: 127
Example:
add bot policy pol1 –rule "HTTP.REQ.HEADER(\"header\").CONTAINS(\"custom\")" - profileName profile1 -undefAction drop –comment commentforbotpolicy –logAction log1
Bind bot policy global
At the command prompt, type:
bind bot global -policyName <string> -priority <positive_integer> [-gotoPriorityExpression <expression>][-type ( REQ_OVERRIDE | REQ_DEFAULT )] [-invoke (-labelType ( vserver | policylabel ) -labelName <string>) ]
Example:
bind bot global –policyName pol1 –priority 100 –gotoPriorityExpression NEXT -type REQ_OVERRIDE
Bind bot policy to a virtual server
At the command prompt, type:
bind lb vserver <name>@ ((<serviceName>@ [-weight <positive_integer>] ) | <serviceGroupName>@ | (-policyName <string>@ [-priority <positive_integer>] [-gotoPriorityExpression <expression>]
Example:
bind lb vserver lb-server1 –policyName pol1 –priority 100 –gotoPriorityExpression NEXT -type REQ_OVERRIDE
Configure bot settings
You can customize the default settings if necessary. At the command prompt, type:
set bot settings [-defaultProfile <string>] [-javaScriptName <string>] [-sessionTimeout <positive_integer>] [-sessionCookieName <string>] [-dfpRequestLimit <positive_integer>] [-signatureAutoUpdate ( ON | OFF )] [-signatureUrl <URL>] [-proxyServer <ip_addr|ipv6_addr|*>] [-proxyPort <port|*>]
Where,
defaultProfile - Profile to use when a connection does not match any policy. Default setting is “ “, which sends unmatched connections back to the NetScaler without attempting to filter them further. Maximum Length: 31
javaScriptName - Name of the JavaScript that the BotNet feature uses in response. Must begin with a letter or number, and can consist of from 1 to 31 letters, numbers, and the hyphen (-) and underscore (_) symbols. The following requirement applies only to the NetScaler CLI: If the name includes one or more spaces, enclose the name in double or single quotation marks (for example, “my cookie name” or ‘my cookie name’). Maximum Length: 31
sessionTimeout - Session times out, in seconds, after which a user session is terminated.
Minimum value - 1, Maximum value: 65535
sessionCookieName - Name of the SessionCookie that the BotNet feature uses it for tracking. Must begin with a letter or number, and can consist of from 1 to 31 letters, numbers, and the hyphen (-) and underscore (_) symbols. The following requirement applies only to the NetScaler CLI: If the name includes one or more spaces, enclose the name in double or single quotation marks (for example, “my cookie name” or ‘my cookie name’). Maximum Length: 31
dfpRequestLimit - Number of requests to allow without bot session cookie if device fingerprint is enabled. Minimum value: 1, Maximum Value: 4294967295
signatureAutoUpdate - Flag used to enable/disable bot auto update signatures. Possible values: ON, OFF.
Default value: OFF
signatureUrl - URL to download the bot signature mapping file from the server. Default value: https://nsbotsignatures.s3.amazonaws.com/BotSignatureMapping.json. Maximum Length: 2047
proxyServer - Proxy Server IP to get updated signatures from AWS.
proxyPort - Proxy Server Port to get updated signatures from AWS. Default value: 8080
proxyUsername - User name to authenticate to the proxy server for downloading signature updates.
proxyPassword – Password to authenticate to the proxy server for downloading signature updates.
Example:
set bot settings –defaultProfile profile1 –javaScriptName json.js –sessionTimeout 1000 –sessionCookieName session -proxyServer 10.102.30.112 -proxyPort 3128 -proxyUsername defaultuser -proxyPassword defaultPassword
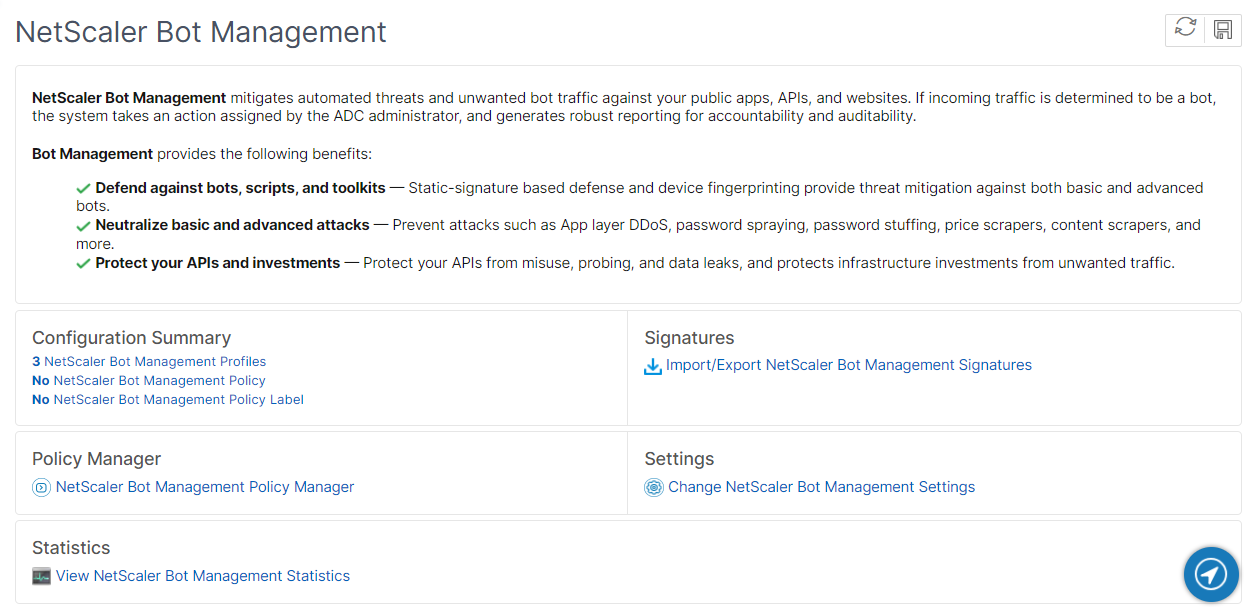
Configuring bot management by using NetScaler GUI
You can configure NetScaler bot management by first enabling the feature on the appliance. Once you enable, you can create a bot policy to evaluate the incoming traffic as bot and send the traffic to the bot profile. Then, you create a bot profile and then bind the profile to a bot signature. As an alternative, you can also clone the default bot signature file and use the signature file to configure the detection techniques. After creating the signature file, you can import it into the bot profile.
- Enable bot management feature
- Configure bot management settings
- Clone NetScaler bot default signature
- Import NetScaler bot signature
- Configure bot profile and signature settings
- Create bot profile
- Create bot policy
Enable bot management feature
Complete the following steps to enable bot management:
- On the navigation pane, expand System and then click Settings > Configure Advanced Features.
- On the Configure Advanced Features page, select the NetScaler Bot Management checkbox.
- Click OK.
Configure bot management settings
Complete the following step to configure the device fingerprint technique:
- Navigate to Security > NetScaler bot Management.
- In the details pane, under Settings click Change NetScaler bot Management Settings.
-
In the Configure NetScaler bot Management Settings, set the following parameters.
- Default Profile. Select a bot profile.
- JavaScript Name. Name of the JavaScript file that bot management uses in its response to the client.
- Session Timeout. Timeout in seconds after which the user session is terminated.
- Session Cookie. Name of the session cookie that the bot management system uses for tracking.
- Device Fingerprint Request Limit. Number of requests to allow without a bot session cookie, if device fingerprint is enabled.
- Proxy Server - Proxy server IP address from where the latest signatures are uploaded.
- Proxy Port – Port number of machine from where the latest signatures are uploaded.
- Proxy Username – User name for the authentication of the proxy server
- Proxy Password - Password for the authentication of the proxy server.
Note:
Proxy User name and the Proxy Password fields are enabled if the Proxy Server and the Proxy Port fields are configured.
- Click OK.
Clone bot signature file
Complete the following step to clone the bot signature file:
- Navigate to Security > NetScaler Bot Management and Signatures.
- In the NetScaler Bot Management Signatures page, select the default bot signatures record and click Clone.
- In the Clone Bot Signature page, enter a name and edit the signature data.
- Click Create.
Import bot signature file
If you have your own signature file, then you can import it as a file, text, or URL. Perform the following steps to import the bot signature file:
- Navigate to Security > NetScaler Bot Management and Signatures.
- On the NetScaler Bot Management Signatures page, import the file as URL, File, or text.
- Click Continue.
- On the Import NetScaler Bot Management Signature page, set the following parameters.
- Name - Name of the bot signature file.
- Comment - Brief description about the imported file.
- Overwrite - Select the checkbox to allow overwriting of data during file update.
- Signature Data - Modify signature parameters
- Click Done.
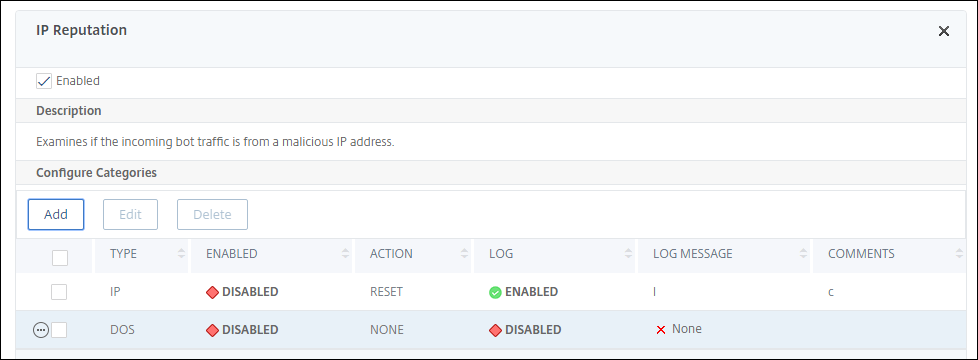
Configure IP reputation
The IP reputation bot technique uses Webroot’s IP reputation database and cloud service provider database to verify if a client request is a malicious IP address or a public cloud IP address. As part of the bot categories is configured and then a bot action is associated to it. Complete the following steps to configure Webroot IP reputation and cloud service provider database categories.
- Navigate to Security > NetScaler bot Management and Profiles.
- On the NetScaler bot Management Profiles page, select a profile and click Edit.
- On the NetScaler bot Management Profile page, go to the Profile Settings section and click IP Reputation.
- On the IP Reputation section, set the following parameters:
- Enabled. Select the checkbox to validate incoming bot traffic as part of the detection process.
- Configure Categories. You can use the IP reputation technique for incoming bot traffic under different categories. Based on the configured category, you can drop or redirect the bot traffic. Click Add to configure a malicious bot category.
-
In the Configure NetScaler bot Management Profile IP Reputation Binding page, set the following parameters:
-
Category. Select a Webroot IP reputation bot category to validate a client request as a malicious IP address.
- IP_BASED - This category checks whether the client IP address (IPv4 and IPv6) is malicious or not.
- BOTNET - This category includes Botnet C&C channels, and infected zombie machines controlled by Bot master.
- SPAM_SOURCES - This category includes tunneling spam messages through a proxy, anomalous SMTP activities, and forum spam activities.
- SCANNERS - This category includes all reconnaissance such as probes, host scan, domain scan, and password brute force attack.
- DOS - This category includes DOS, DDOS, anomalous sync flood, and anomalous traffic detection.
- REPUTATION - This category denies access from IP addresses (IPv4 and IPv6) currently known to be infected with malware. This category also includes IP addresses with average low Webroot Reputation Index score. Enabling this category prevents access from sources identified to contact malware distribution points.
- PHISHING - This category includes IP addresses (IPv4 and IPv6) hosting phishing sites and other kinds of fraud activities such as ad click fraud or gaming fraud.
- PROXY - This category includes IP addresses (IPv4 and IPv6) providing proxy services.
- NETWORK - IPs providing proxy and anonymization services including The Onion Router aka TOR or dark net.
- MOBILE_THREATS - This category checks the client IP address (IPv4 and IPv6) with the list of addresses harmful for mobile devices.
-
Category. Select a Webroot public cloud service provider category to validate a client request is a public cloud IP address.
- AWS - This category checks client IP address with list of public cloud addresses from AWS.
- GCP - This category checks client IP address with list of public cloud addresses from the Google Cloud Platform.
- AZURE - This category checks client address with list of public cloud addresses from Azure.
- ORACLE - This category checks client IP address with list of public cloud addresses from Oracle
- IBM - This category checks client IP address with list of public cloud addresses from IBM.
- SALESFORCE - This category checks client IP address with list of public cloud addresses from Salesforce.
Possible values for Webroot IP reputation bot category: IP, BOTNETS, SPAM_SOURCES, SCANNERS, DOS, REPUTATION, PHISHING, PROXY, NETWORK, MOBILE_THREATS.
Possible values for Webroot public cloud service provider category: AWS, GCP, AZURE, ORACLE, IBM, SALESFORCE.
- Enabled. Select the checkbox to validate the IP reputation signature detection.
- Bot action. Based on the configured category, you can assign no action, drop, redirect, or mitigation action.
- Log. Select the checkbox to store log entries.
- Log Message. Brief description of the log.
- Comments. Brief description about the bot category.
-
- Click OK.
- Click Update.
-
Click Done.
Note
If you disable IP reputation, ensure to stop its downloads. Complete the following steps to stop the IP reputation downloads:
- Navigate to Security > NetScaler bot Management > Change NetScaler bot Management Settings
- Change the Default Nonintrusive Profile to BOT_BYPASS.
For more information on profile settings, see Configure bot profile setting
Configure bot static signatures
This detection technique enables you to identify the user agent info from the browser details. Based on user agent information, the bot is identified as a bad or a good bot and then you assign a bot action to it.
Perform the following the steps to configure the static signature technique:
- On the navigation pane, expand Security > NetScaler Bot Management > Signatures.
- On the NetScaler Bot Management Signatures page, select a signature file and click Edit.
- On the NetScaler Bot Management Signature page, go to the Signature Settings section and click Bot Signatures.
- In the Bot Signatures section, set the following parameters:
- Configure Static Signatures. This section has a list of bot static signature records. You can select a record and click Edit to assign a bot action to it.
- Click OK.
- Click Update Signature.
- Click Done.

Bot static signature delineation
NetScaler bot management protects your web application against bots. Bot static signatures help in identifying good and bad bots based on request parameters such as user-agent in the incoming request.
The list of signatures in the file is huge and also new rules get added and stale ones are removed periodically. As an administrator, you might want to search for a specific signature or list of signatures under a category. To filter signatures easily, the bot signature page provides an enhanced search capability. The search function enables you to find signature rules and configure its property based on one or more signature parameters like action, signature ID, developer, and signature name.
Action - Select a bot action that you prefer to configure for a specific category of signature rules. Following are the available action types:
- Enable Selected - Enable all the selected signature rules.
- Disable Selected - Disable all the selected signatures rules.
- Drop Selected - Select the “Drop” action to all the selected signature rules.
- Redirect Selected - Apply the “Redirect” action to all the selected signature rules.
- Reset Selected - Apply the “Reset” action to all the selected signature rules.
- Log Selected - Apply the “Log” action to all the selected signature rules.
- Remove Drop Selected - Unset the drop action to all the selected signature rules.
- Remove Redirect Selected - Unset the redirect action to all the selected signature rules.
- Remove Reset Selected - Unset the reset action to all the selected signature rules.
- Remove Log Selected - Unset the log action to all the selected signature rules.
Category - Select a category to filter signature rules accordingly. Following is the list of categories that are available for sorting signature rules.
- Action - Sort based on bot action.
- Category - Sort based on bot category.
- Developer - Sort based on the host company publisher.
- Enabled - Sort based on signature rules that are enabled.
- Id - Sort based on signature rule ID.
- Log - Sort based on signature rules that have logging enabled.
- Name - Sort based on signature rule name.
- Type - Sort based on signature type.
- Version - Sort based on signature rule version.
Search bot static signature rules based on action and category types by using the NetScaler GUI
- Navigate to Security > NetScaler Bot Management > Signature.
- In the details page, click Add.
- In the NetScaler Bot Management Signatures page, click edit in the Static Signature section.
- In the Configure Static Signature section, select a signature action from the drop-down list.
- Use the search function to select a category and filter the rules accordingly.
- Click Update.
Edit the bot static signature rule property by using the NetScaler GUI
- Navigate to Security > NetScaler Bot Management > Signature.
- In the details page, click Add.
- In the NetScaler Bot Management Signatures page, click edit in the Static Signature section.
- In the Configure Static Signature section, select an action from the drop-down list.
- Use the search function to select a category and filter the rules accordingly.
- From the static signature list, select a signature to modify its property.
- Click OK to confirm.
For more information on profile settings, see Configure bot signature setting
Create bot management profile
A bot profile is a collection of bot management settings that are used for detecting the bot type. In a profile, you determine how the Web App Firewall applies each of its filters (or checks) to bot traffic to your websites, and responses from them.
Complete the following steps to configure the bot profile:
- Navigate to Security > NetScaler Bot Management > Profiles.
- In the details pane, click Add.
-
In the Create NetScaler Bot Management Profile page, set the following parameters.
- Name. Bot profile name.
- Signature. Name of the bot signature file.
- Error URL. URL for redirects.
- Comment. Brief description about the profile.
- Click Create and Close.
Create bot policy
The bot policy controls the traffic going to the bot management system and also to control the bot logs sent to the auditlog server. Follow the procedure to configure the bot policy.
- Navigate to Security > NetScaler Bot Management > Bot Policies.
- In the details pane, click Add.
- In the Create NetScaler Bot Management Policy page, set the following parameters.
- Name. Name of the Bot policy.
- Expression. Type the policy expression or rule directly in the text area.
- Bot Profile. Bot profile to apply the bot policy.
- Undefined Action. Select an action that you prefer to assign.
- Comment. Brief description about the policy.
- Log Action. Audit log message action for logging bot traffic. For more information about audit log action, see Audit logging topic.
- Click Create and Close.
Request headers dropped by the NetScaler bot Management
Many of the request headers related to caching is dropped to view every request within the context of a session. Similarly, if the request includes an encoding header to allow the web server to send compressed responses, the bot management deletes this header so that the contents in the uncompressed server response is inspected by the bot management to insert the JavaScript.
The bot management drops the following request headers:
Range - Used to recover from a failed or partial file transfers.
If-Range - Allows a client to retrieve a partial object when it contains a part of that object in its cache already (conditional GET).
If-Modified-Since - If the requested object is not modified since the time specified in this field, an entity is not returned from the server. You get an HTTP 304 not modified error.
If-None-Match - Allows efficient updates of cached information with a minimum amount of overhead.
Accept-Encoding - What encoding methods are allowed for a particular object, such as gzip.
This Preview product documentation is Cloud Software Group Confidential.
You agree to hold this documentation confidential pursuant to the terms of your Cloud Software Group Beta/Tech Preview Agreement.
The development, release and timing of any features or functionality described in the Preview documentation remains at our sole discretion and are subject to change without notice or consultation.
The documentation is for informational purposes only and is not a commitment, promise or legal obligation to deliver any material, code or functionality and should not be relied upon in making Cloud Software Group product purchase decisions.
If you do not agree, select I DO NOT AGREE to exit.