Citrix Virtual Apps and Desktops™ data source
This article describes the steps to connect your on-premises Citrix Virtual Apps and Desktops sites to Citrix Analytics using StoreFront. The onboarding steps mentioned in this article are applicable for both the offerings: Citrix Analytics for Performance (Performance Analytics) and Citrix Analytics for Security (Security Analytics).
For the onboarding steps specific to each offering, see the following articles:
-
Configuring on-premises Citrix Virtual Apps and Desktops sites with Citrix Analytics for Performance
Onboard Citrix Virtual Apps and Desktops on-premises sites using StoreFront
If your organization uses an on-premises StoreFront™ deployment, you must configure your StoreFront servers to enable Citrix Workspace™ app to send events to Citrix Analytics. Citrix Analytics processes events to provide actionable insights into the performance of your Citrix IT infrastructure and user behavior.
For more information on how to configure a StoreFront deployment for Citrix Analytics, see the Citrix Analytics service article in the StoreFront documentation.
Earlier, customers using the Citrix Apps and Desktops on-premises sites were enforced to use the site aggregation to onboard the on-premises sites for Citrix Analytics for Security™ and Performance.
You can now onboard Citrix Apps and Desktops on-premises sites without depending on the site aggregation.
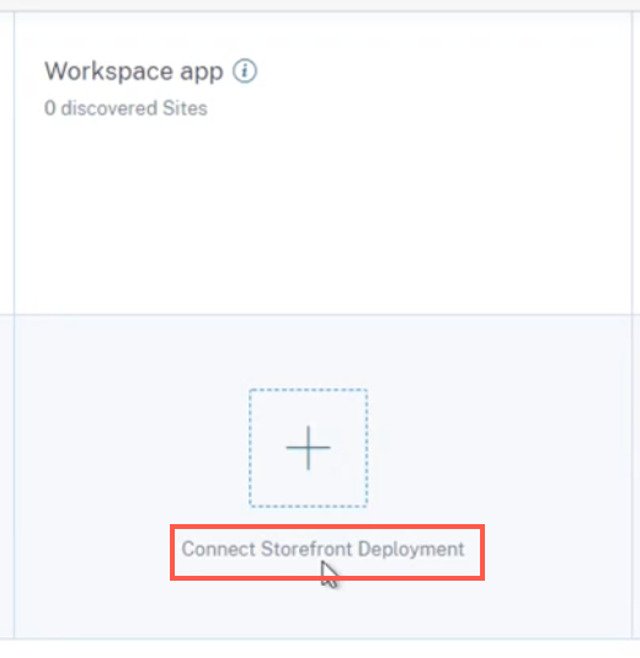
You can see the Connect Storefront Deployment option on your workspace application, even if you do not have any site added to the site aggregation.
Prerequisites
Before you begin, ensure the following:
-
Your StoreFront version must be 1906 or later.
-
The StoreFront deployment must be able to connect to the following addresses:
-
The StoreFront deployment must have port 443 open for outbound Internet connections. Any proxy servers on the network must allow this communication with Citrix Analytics.
-
If the StoreFront deployment is hosted on a webserver that uses a web proxy to connect to the Internet, the proxy for each store must be manually configured to allow outbound traffic. StoreFront does not automatically use the proxy setting of the host webserver. For more information, see Configure a StoreFront deployment hosted on a webserver that uses HTTP proxy.
-
The StoreFront deployment must be accessed using one of the following clients:
-
Citrix Receiver™ for websites in HTML5-compatible browsers.
Note
If you are an HTML5 user, Citrix Virtual Apps and Desktops can launch events when certain configurations are enabled on StoreFront. For information about the configuration steps, see the Install article in the Citrix Workspace app for HTML5 documentation. For print-related events, extra policies must be configured on StoreFront. For more information, see the PDF Printing article in the Citrix Workspace app for HTML5 documentation.
-
Citrix Workspace app 1907 for Windows or later.
-
Citrix Workspace app 2006 for Linux or later.
-
Citrix Workspace app 2006 for Mac or later
-
-
If you are using Citrix Virtual Apps and Desktops 7 1912 LTSR, the supported StoreFront version is 1912.
Connect to a StoreFront deployment
You can connect to a StoreFront deployment in the following ways –
-
Using the Apps and Desktops – Workspace app site card and the Apps and Desktops – Monitoring site card
-
Using the Recommendations panel
Connect using Apps and Desktops – Workspace app site card and the Apps and Desktops – Monitoring site card
-
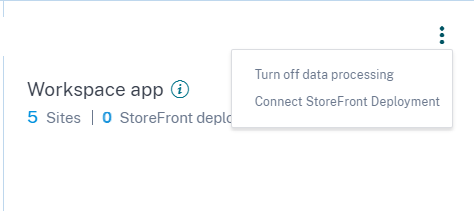
Navigate to Settings > Data Sources > Security. On the Apps and Desktops- Workspace app site card, click the vertical ellipsis (⋮) and then select Connect StoreFront deployment.
-
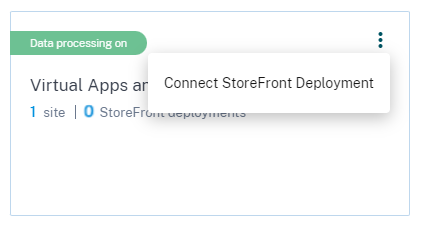
Navigate to Settings > Data Sources > Performance. On the Apps and Desktops- Monitoring site card, click the vertical ellipsis (⋮) and then select Connect StoreFront deployment.
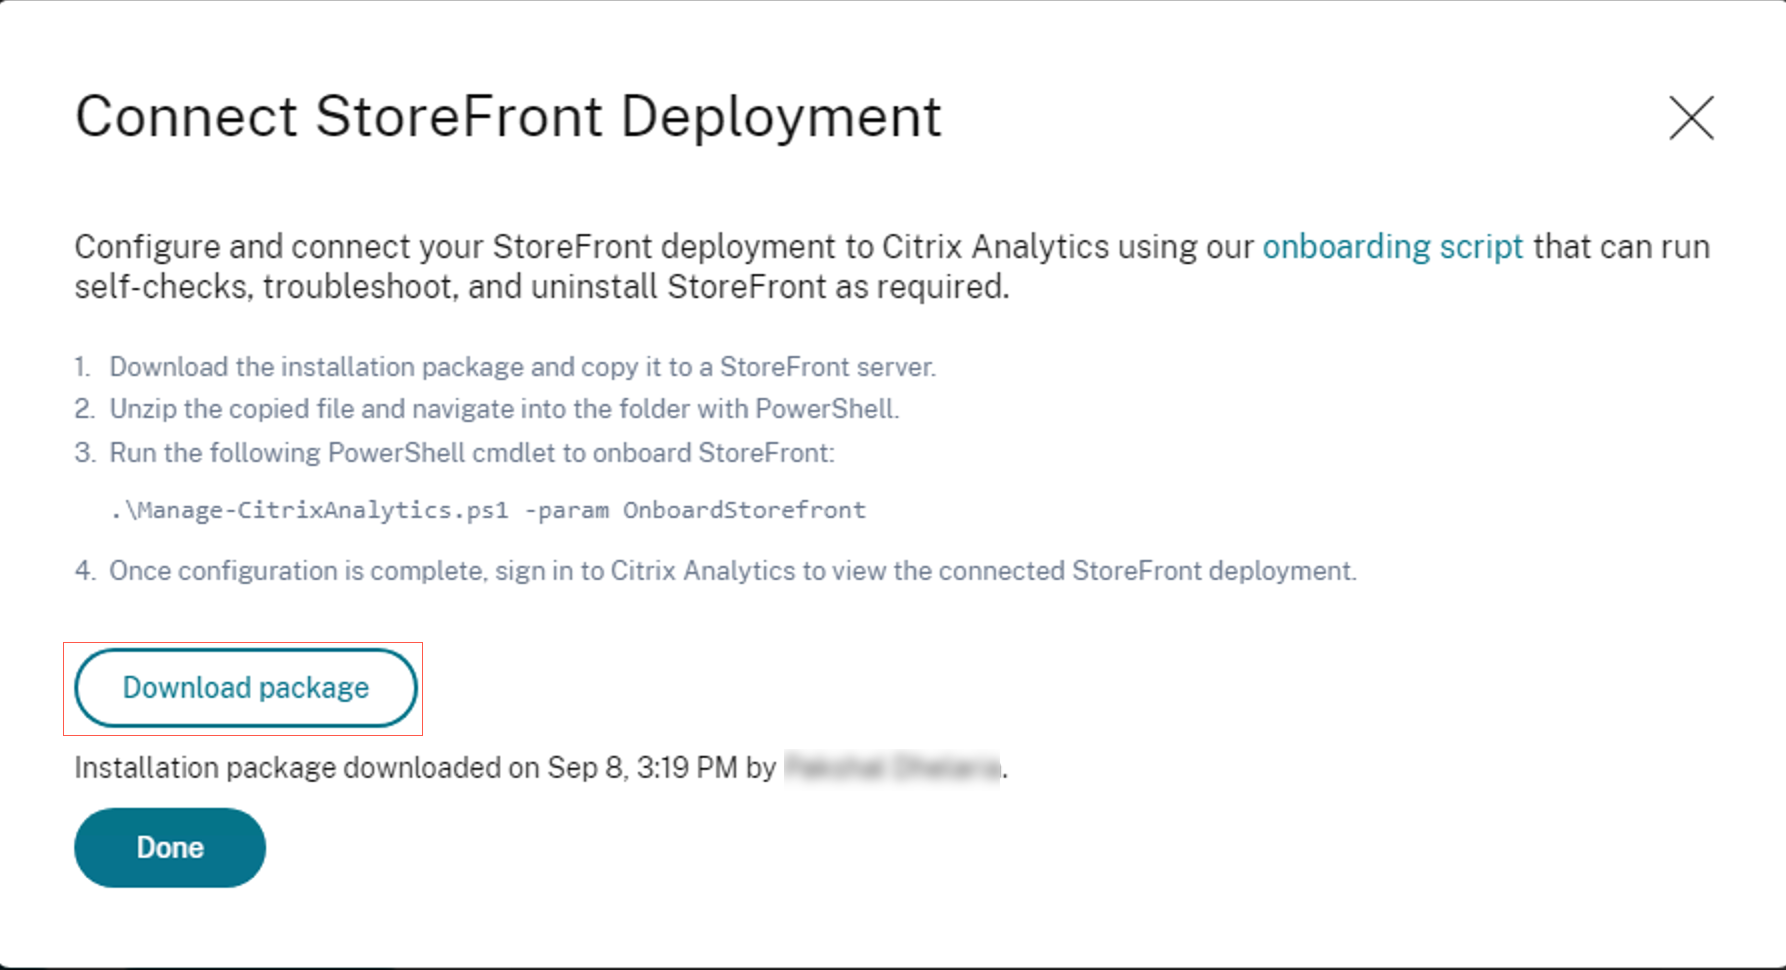
The StoreFront Onboarding wizard or the Connect StoreFront Deployment popup appears.
-
Click Download package.
Note
The file contains sensitive information. Keep the file in a safe and secure location.
-
To configure the StoreFront deployment,
-
Copy the installation package to the StoreFront server.
-
Unzip the copied file and navigate into the folder within PowerShell.
-
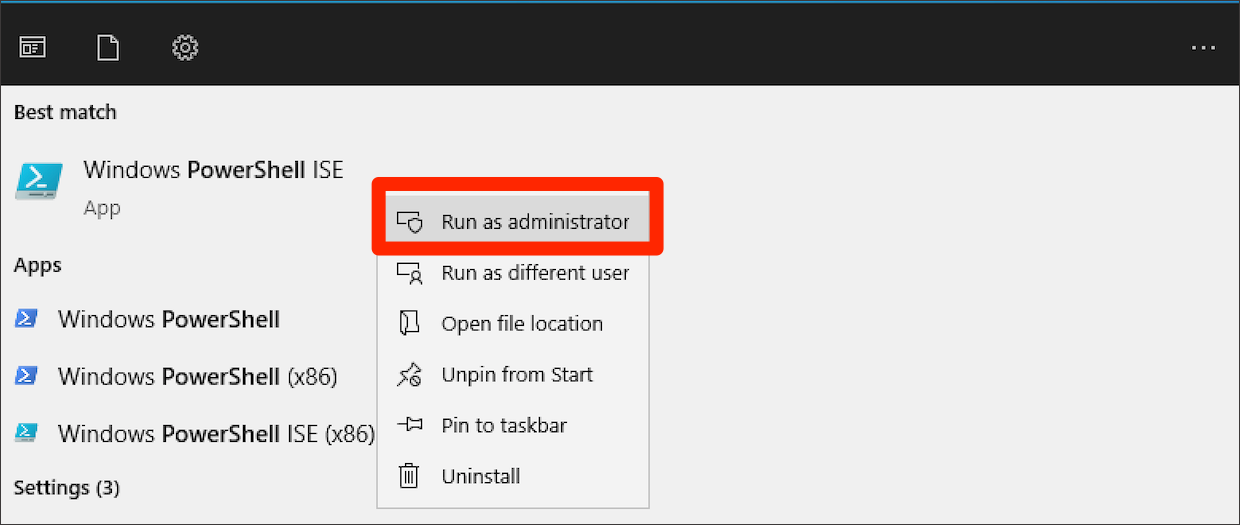
You must run the following command as an administrator to onboard the StoreFront:
.\Manage-CitrixAnalytics.ps1 –param OnboardStorefront
For more options or parameters, refer to the PowerShell Script section.
-
Open the StoreFront server and execute the PowerShell script.
-
If the StoreFront site does not appear in the Citrix Analytics Service GUI even after running OnboardStorefront, run the iisreset command.
-
Log in to Citrix Analytics Service GUI and validate if the Cluster ID matches to the one logged in the console by the script.
-
Once the configuration is done, log in to Citrix Analytics to view the connected StoreFront Deployment.
-
-
After the configuration is successful, click Done.
-
Click Turn On Data Processing to allow Citrix Analytics to process the data.
PowerShell Script
A new PowerShell script has been introduced to simplify the StoreFront onboarding process to Citrix Analytics Service. This PowerShell script automates the process of pre-requisites check, installing, and configuring StoreFront. The PowerShell script needs to run in administrator mode.
Customers can execute this PowerShell script on the StoreFront to onboard, deboard, perform self-checks, troubleshoot, and verify if the onboarding to Citrix Analytics Service GUI is successful. When a customer executes the script for the first time, a security warning message appears to confirm on the publisher. Select the Always run option if the publisher is trusted.

The PowerShell script is available on the Connect StoreFront Deployment page inside a zip file along with the StoreFrontConfiguration.json file, a few CCAuth, and dll files. The PowerShell script logs are saved in the cas-logs file under the Downloads folder.
The PowerShell script supports the following parameters:
-
SelfCheck: The SelfCheck parameter is used to validate that the prerequisites for StoreFront onboarding have been met. It performs a check for StoreFront installation, required version, outbound connection, cURL Analytics server network connectivity, internet connectivity, server group configuration, and any existing Citrix Analytics Service configuration. Use the following command to run the selfcheck:
.\Manage-CitrixAnalytics.ps1 –param SelfCheck -
OnboardStorefront: The OnboardStoreFront parameter quickly performs a self-check to verify setup readiness for Citrix Analytics Service configuration. If the setup is ready, it imports the Citrix Analytics Service configuration, and publishes the changes to other servers in the server group. For a server group, the PublishConfiguration command automatically runs from the script to publish the StoreFront configuration to all the servers within that StoreFront. You can see a pop-up to confirm
PublishConfigurationaction. Select the Yes to All button.
Once the configuration publishing is successfully completed, the script makes a call to Citrix Analytics Service API to check if the StoreFront is onboarded to the Citrix Analytics Service GUI. To invoke this API, a private key is required for authentication. To generate this private key, you need the CCAuth and dll files, and the credential that is available in your downloaded JSON file.
Note
Once the StoreFront onboarding process is complete, it might take two to five minutes for the StoreFront to appear in the Citrix Analytics Service GUI. If the StoreFront site does not appear in the Citrix Analytics Service GUI, you must perform an IISRESET to reset the internet information services.
Use the following command to run the OnboardStoreFront:
.\Manage-CitrixAnalytics.ps1 –param OnboardStorefront -
IsOnboarded: The IsOnboarded parameter is used to verify if the StoreFront is onboarded to Citrix Analytics Service GUI. The script waits for a minute before exiting, however, the StoreFront can take up to five minutes to appear in the GUI after successful onboarding. You must run this command to verify it. This command also has the CCAuth and dll files dependency. Use the following command to run the IsOnboarded:
.\Manage-CitrixAnalytics.ps1 –param IsOnboarded -
Troubleshoot: After waiting for five minutes, if the StoreFront site does not appear in the Citrix Analytics Service GUI, you must perform an IISRESET to reset the internet information services. If the StoreFront site still does not appear in the GUI, use the Troubleshoot parameter. It helps you to troubleshoot any connectivity issues and collect logs. Use the following command to run the Troubleshoot:
.\Manage-CitrixAnalytics.ps1 –param TroubleShootThe troubleshooting parameter is useful for the following two use cases:
-
Use case 1: As a part of self-check if the curlAnalytics failed, then a firewall rule gets created. This firewall rule opens a 443 port and verifies its connectivity to Analytics. If not, that means the Analytics server is not reachable and the script exits from here. Rerun the script once the connectivity to Citrix Analytics Service is restored.
-
Use case 2: If the cURL went through fine and yet the StoreFront site is not getting reflected in the GUI, then the administrator must download the DebugView tool zip file from Download DebugView, unzip, and place it under the Downloads folder. The PowerShell script first uninstalls Citrix Analytics Service if it is already configured. It enables Verbose logging. Then, it starts the DebugView tool and reinstalls Citrix Analytics Service. Finally, it stops DebugView and disables Verbose logging.
The debug view logs can be captured and shared with Citrix Support. The Citrix administrator further debugs and tries to find out the issue and resolve it. The logs are generated and saved as a log file inside the DebugView folder.
You need to share the following three log files with the Citrix administrator:
- The DebugView log file (Downloads\DebugView\log)
- The StoreFront log file (C:\Program Files\Citrix\Receiver StoreFront\Admin\trace)
- The CAS logs file. These logs are generated as a part of the execution of the script and get saved under the Downloads > cas-logs folder.
For a server group, the
PublishConfigurationcommand automatically runs when the script is trying to deboard or onboard StoreFront. The PublishConfiguration command helps to publish the StoreFront configuration to all the servers within that StoreFront. You can see a pop-up to confirm this action. Select the Yes to All button. -
-
DeboardStoreFront: The DeboardStoreFront parameter is used for deboarding the StoreFront server from Citrix Analytics Service. Use the following command to run the DeboardStoreFront:
.\Manage-CitrixAnalytics.ps1 –param DeboardStoreFrontThe PowerShell script first removes all Citrix Analytics Service configurations from StoreFront and verify that the removal is successful. Then, it checks if the ServerGroup is present then publish the configuration so that the removed configurations are published to all the StoreFront. Finally, it invokes DeleteSiteOnboarded. If the site is not deleted from Citrix Analytics Service GUI then you need to manually delete the StoreFront site with StoreFront Deployment and from the Workspace Application site card under the StoreFront Deployment.
For a server group, the PublishConfiguration command automatically runs from the script to publish the StoreFront configuration to all the servers within that StoreFront. You can see a pop-up to confirm this action. Select the Yes to All button.
Connect using Recommendations panel
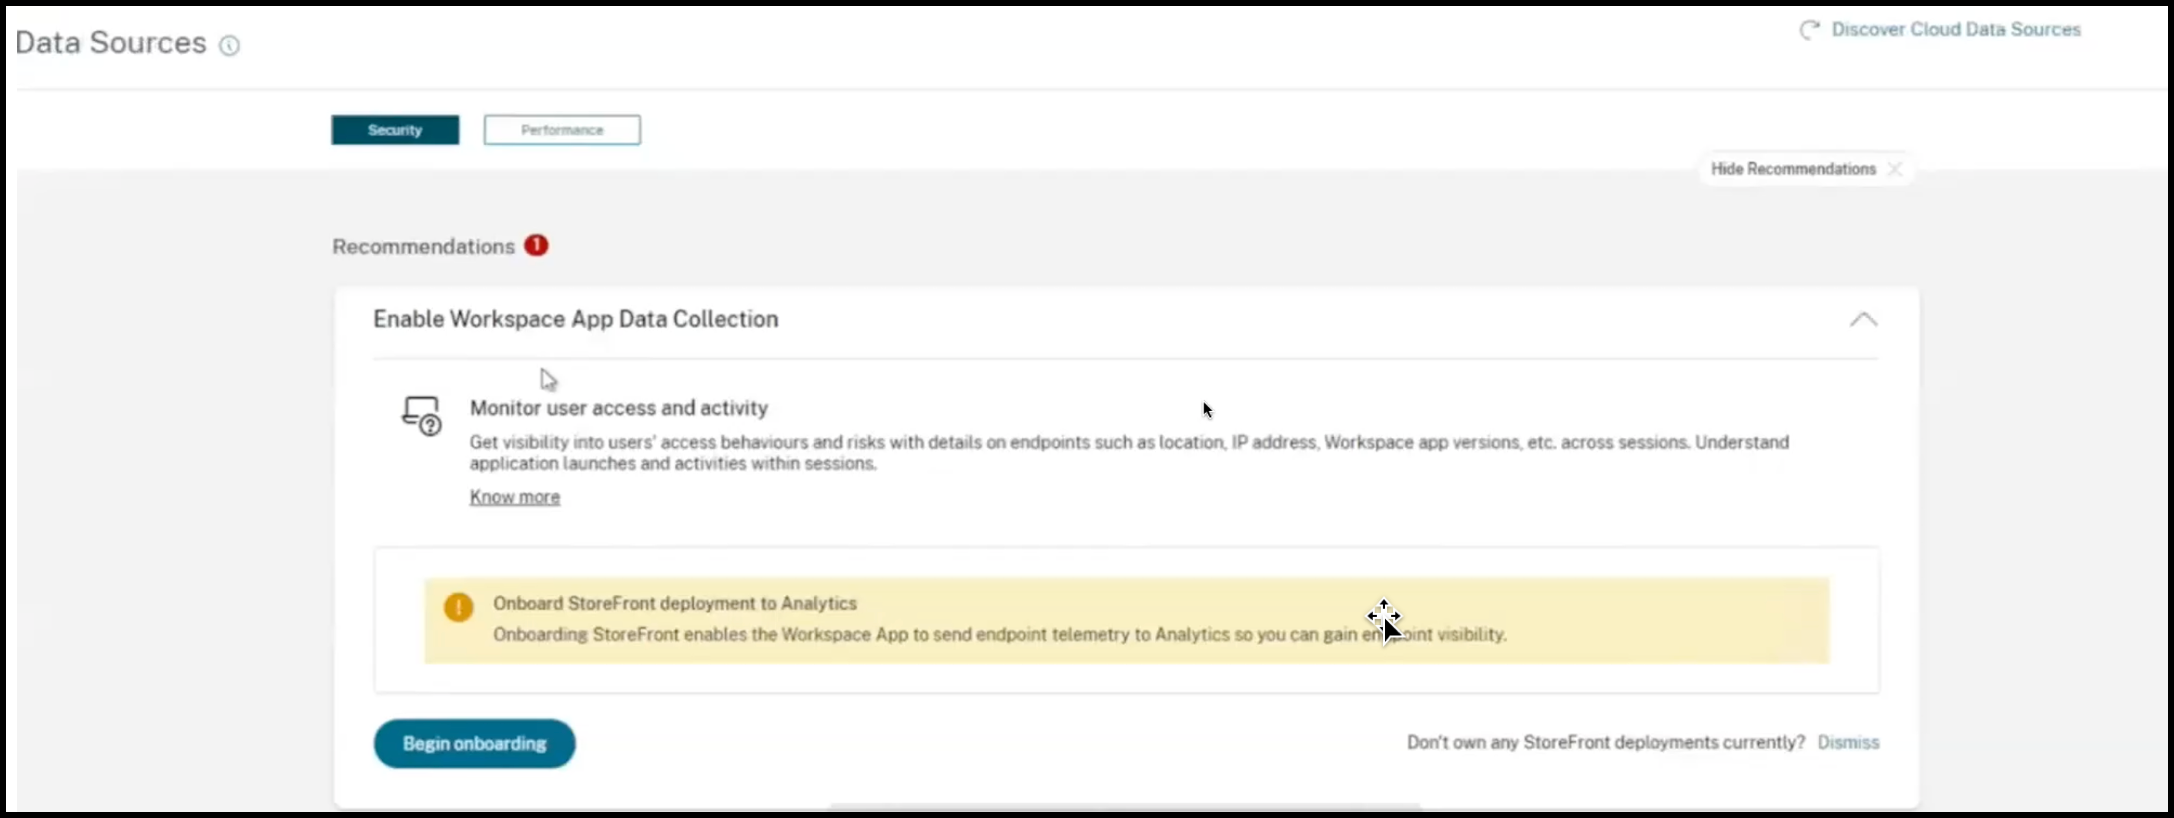
The Recommendations panel on the Data Sources page educates the user on the importance of onboarding data sources. It helps the user onboard the data sources easily and also provides an option to the user to review and ensure that he has onboarded all the available data sources.
-
If you are using the Security Analytics offering, select Settings > Data Sources > Security.
-
If you are using the Performance Analytics offering, navigate to Settings > Data Sources > Performance.
-
On the Data Sources page, review the information and recommendations on the Recommendations panel to onboard Storefront deployment.
Note
Onboarding a StoreFront data source enables the Workspace app to send telemetry data on endpoint visibility to Analytics.
-
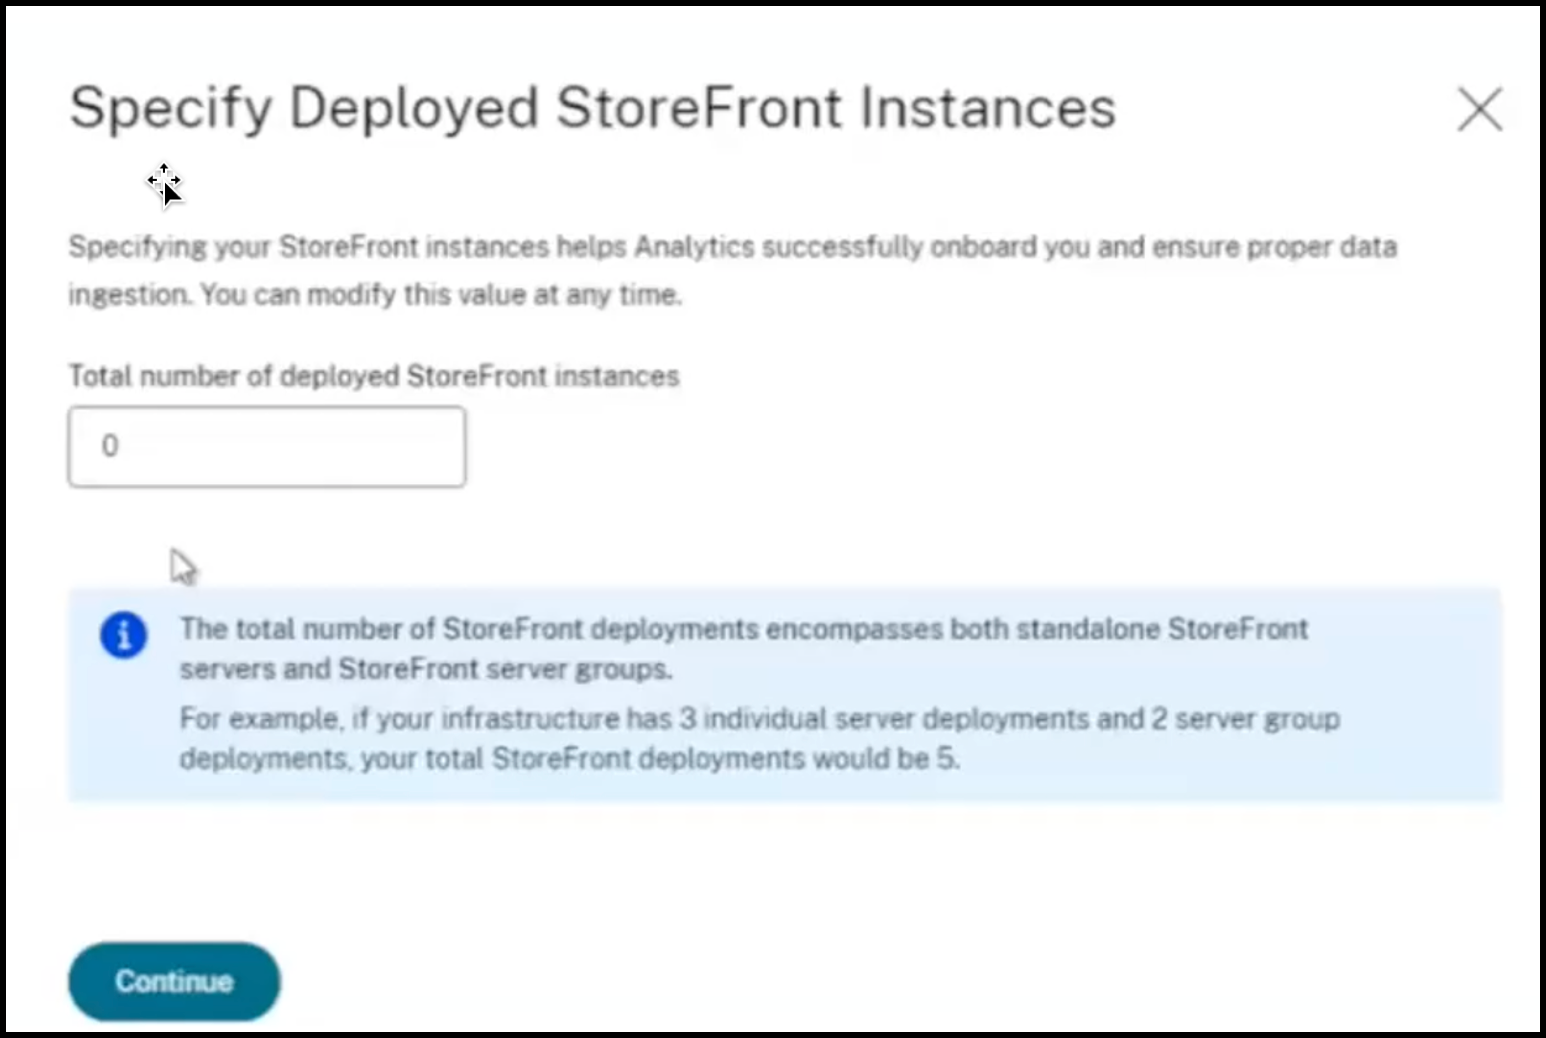
Click Begin onboarding. The Specify Deployed Storefront Instances page appears.
-
To ensure that Analytics successfully onboards the data source, specify the Total number of deployed StoreFront instances.
Note:
The Total number of deployed StoreFront instances is the total number of StoreFront groups and it isn’t the number of individual StoreFront servers.
-
Click Continue. The StoreFront Onboarding wizard or the Connect StoreFront Deployment popup appears.
-
On the Connect StoreFront Deployment page, click Download package to download the installation package.
Notes
The file contains sensitive information. Keep the file in a safe and secure location.
You can download one package and use it to onboard one StoreFront group only. If you have multiple StoreFront groups, you must download the package separately for each StoreFront group. After one StoreFront group onboarding is finished using one package, download the package again and continue onboarding for the next StoreFront group.
If the StoreFront onboarding isn’t completed correctly within two days using one package due to some issue, you must re-download a new package after two days. Because the key within the package will be expired if not onboarded successfully within two days.
-
To configure the StoreFront deployment,
-
Copy the installation package to the StoreFront server.
-
Unzip the copied file and navigate into the folder within PowerShell.
-
Run the following command to onboard the StoreFront:
.\Manage-CitrixAnalytics.ps1 –param OnboardStorefront -
Open the StoreFront server and execute the PowerShell script.
-
If the StoreFront site does not appear in the Citrix Analytics Service GUI, run the following command:
Execute iisreset -
Log and verify the Cluster ID that is available in the PowerShell script.
-
Once the configuration is done, log in to Citrix Analytics to view the connected StoreFront Deployment.
-
-
After the configuration is successful, click Done.
If you are onboarding through the Recommendations panel, the system fetches the number of StoreFront deployments that you have onboarded to Citrix Analytics service. The Recommendations panel appears and you can review the onboarded StoreFront deployments. You can review the message in the Recommendations panel and click Mark as complete.
Note
The Recommendations panel and the messages disappear only when all the declared Storefront deployments are onboarded.
- Click Turn On Data Processing to allow Citrix Analytics to process the data.
Review the Recommendations panel
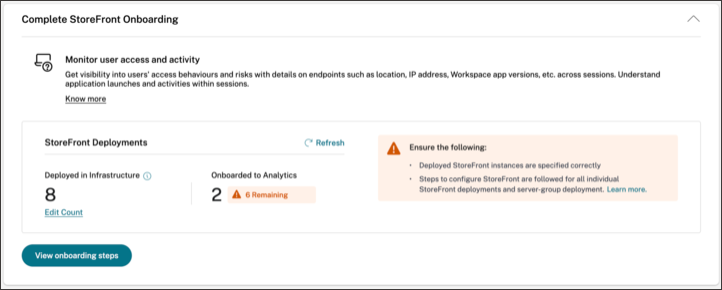
You can compare the number of StoreFront deployments declared against the number of StoreFront deployments onboarded in the Recommendations panel.
If the number of StoreFront deployments declared is the same as the number of StoreFront deployments onboarded, a All Onboarded message appears indicating that all the StoreFront deployments are onboarded. You can review the message in the Recommendations panel and click Mark as complete.
Note
If you want to onboard more StoreFront deployments, click View onboarding steps and the StoreFront Onboarding wizard or the Connect StoreFront Deployment popup appears again.

If the number of StoreFront deployments declared is less than the number of StoreFront deployments onboarded, click Edit Count, and the Specify Deployed Storefront Instances page appears. You can then enter the Total number of deployed StoreFront instances, and click Continue. The StoreFront Onboarding wizard or the Connect StoreFront Deployment popup appears again. Follow the steps to onboard more StoreFront deployments.
Note:
The Total number of deployed StoreFront instances is the total number of StoreFront groups and it isn’t the number of individual StoreFront servers.
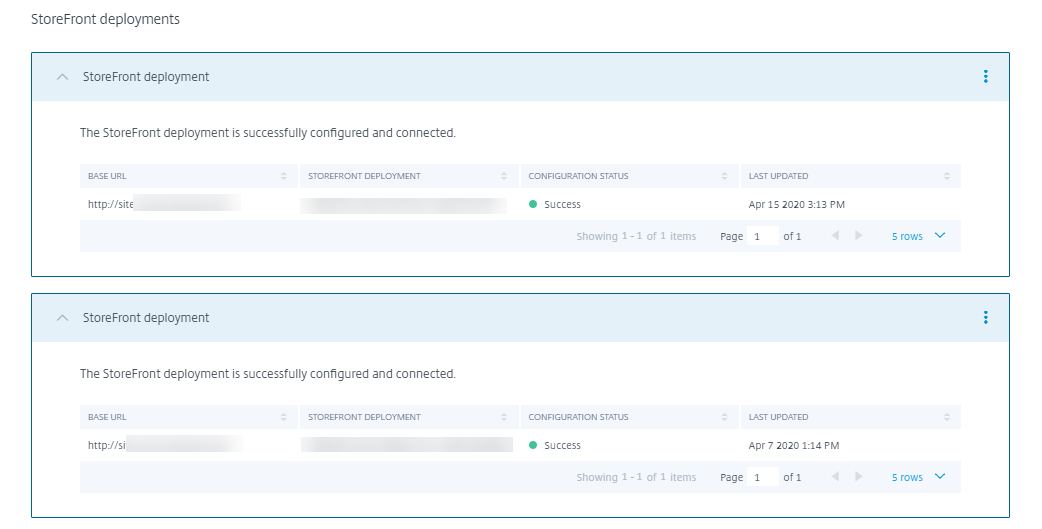
View connected StoreFront deployments
The StoreFront deployments appear on the site card only if the configuration is successful. The site card shows how many StoreFront deployments have established connections with Citrix Analytics.
-
If you are using the Performance Analytics offering, you see the following information on the Apps and Desktops- Monitoring site card:
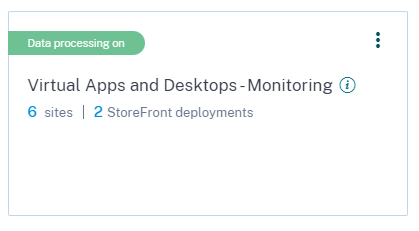
-
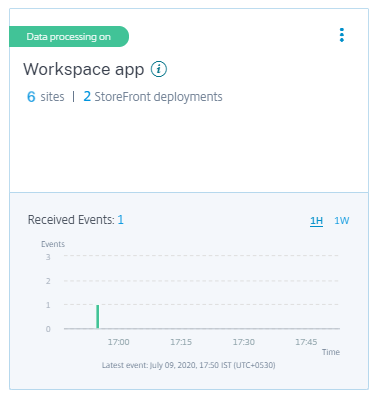
If you are using the Security Analytics offering, you see the following information on the Workspace app site card:
Click the number of StoreFront deployments on the site card to view the server groups.
Each StoreFront deployment is represented by a base URL and a ServerGroupID.
If you are using the Security Analytics offering, the site card also displays the following information about the received events:
-
The events received from the StoreFront deployments for the last one hour, which is the default time selection. You can also select 1 week (1 W) and view the data. Click the number of received events to view the events on the self-service search page.
-
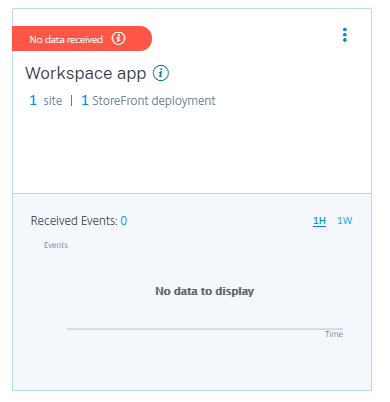
After you have enabled data processing, the site card might display the No data received status. This status appears for two reasons:
-
If you have turned on data processing for the first time, the events take some time to reach the event hub in Citrix Analytics. When Citrix Analytics receives the events, the status changes to Data processing on. If the status does not change after some time, refresh the Data Sources page.
-
Citrix Analytics has not received any events from the data source in the last one hour.
-
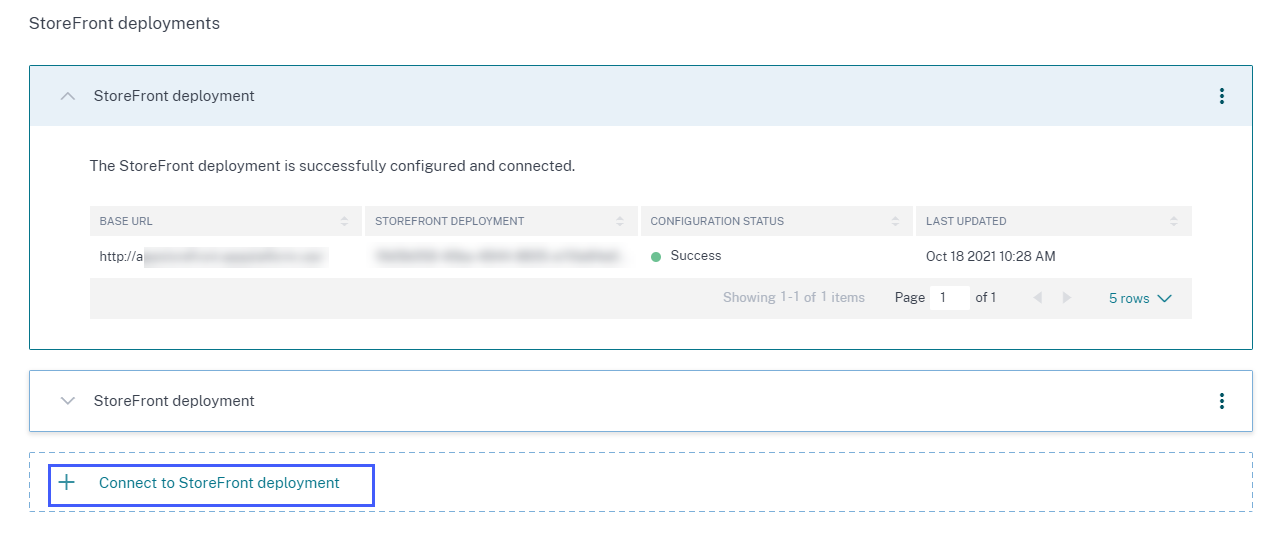
Add or remove StoreFront deployments
To add a StoreFront deployment, click Connect to StoreFront Deployments on the StoreFront deployments section. Download the configuration file and follow the steps to configure a StoreFront deployment.
To stop the event transmission from a configured StoreFront deployment and remove it from Citrix Analytics:
-
Go to the StoreFront deployment that you want to remove from Citrix Analytics. Run the following command to remove the configuration settings from your StoreFront server:
Remove-STFCasConfiguration -
If you are using multiserver deployment, run the following command to propagate the changes and remove the configuration settings from all the servers in the StoreFront server group:
Publish-STFServerGroupConfiguration -
Run the following command to verify that the configuration settings have been successfully removed. The command returns nothing if the settings have been successfully removed.
Get-STFCasConfiguration -
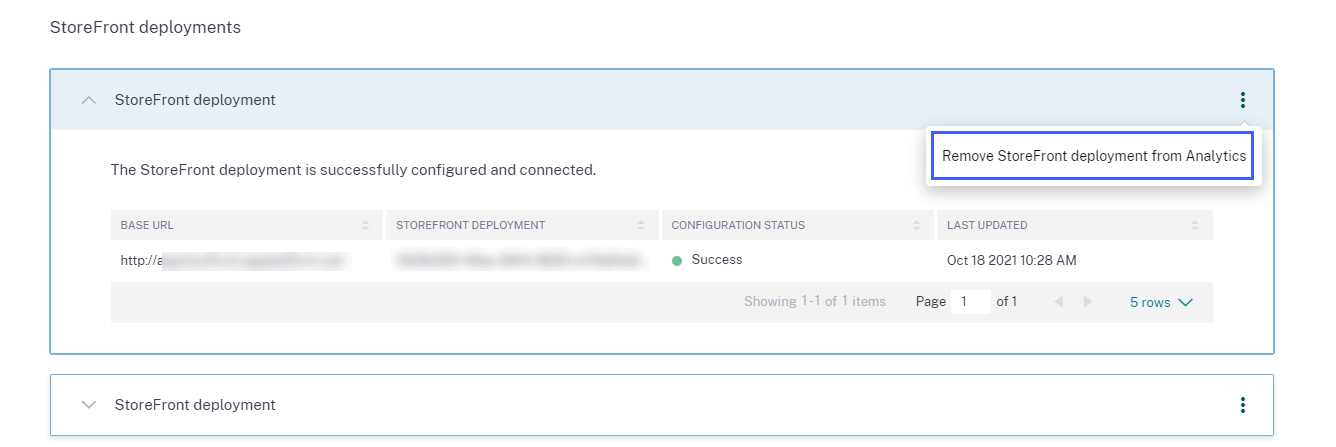
Log back to Citrix Analytics and choose the StoreFront deployment on the StoreFront deployments section. Click the vertical ellipsis (⋮) and select Remove StoreFront deployments from Analytics.
Note
Run the specified commands on the StoreFront deployment before removing it from Citrix Analytics. If you fail to run the commands, Citrix Analytics continues to receive the events and the StoreFront deployment is added again at the next event pooling cycle.
Configure a StoreFront deployment hosted on a webserver that uses HTTP proxy
If a StoreFront is hosted on a webserver that uses a web proxy to connect to the Internet, the store must be manually configured to register with Citrix Analytics. This configuration requires you to add a <system.net> section to the store web.config file. You must configure every store on the StoreFront deployment that sends events to Citrix Analytics.
There are two methods by which you can add the <system.net> section to the store web.config file:
-
Set the store proxy configuration via PowerShell for one or more stores (recommended method).
-
Manually add a
<system.net>section to the store web.config file.
For more information on these methods, see the Configure StoreFront to use a web proxy to contact Citrix Cloud and register with Citrix Analytics article in the StoreFront documentation.
In this article
- Onboard Citrix Virtual Apps and Desktops on-premises sites using StoreFront
- Prerequisites
- Connect to a StoreFront deployment
- Review the Recommendations panel
- View connected StoreFront deployments
- Add or remove StoreFront deployments
- Configure a StoreFront deployment hosted on a webserver that uses HTTP proxy