Configure
Content Collaboration Service integration
We introduce integration of Citrix Content Collaboration Service with Citrix Workspace app. Citrix Content Collaboration enables you to easily and securely exchange documents, send large documents by email, securely handle document transfers to third parties, and access a collaboration space. Citrix Content Collaboration provides many ways to work, including a web-based interface, mobile clients, desktop apps, and integration with Microsoft Outlook and Gmail.
You can access Citrix Content Collaboration functionality from the Citrix Workspace app using the Files tab displayed within Citrix Workspace app. You can view the Files tab only if Content Collaboration Service is enabled in the Workspace configuration in the Citrix Cloud console.
Note:
Citrix Workspace app does not support Citrix Content Collaboration integration on Windows Server 2012 and Windows Server 2016. This setting is because of a security option set in the operating system.
The following image displays example contents of the Files tab of the new Citrix Workspace app:
Limitations:
- Resetting Citrix Workspace app does not cause Citrix Content Collaboration to log off.
- Switching stores in Citrix Workspace app does not cause Citrix Content Collaboration to log off.
Citrix Virtual Apps and Desktops or Citrix DaaS (formerly Citrix Virtual Apps and Desktops service) host resources. To enable users to access these resources in their browsers, you must create a StoreFront store and enable Citrix Workspace app for HTML5. You must also enable WebSocket connections on:
- Citrix Gateway
- Citrix Virtual Apps
- Citrix Virtual Apps and Desktops or Citrix DaaS
Also, you can enhance the user experience by installing optional components on the machines that provide the desktops and applications.
Multi-monitor display
Multi-monitor display lets you create a secondary window of the desktop or application session to which you’are connected. You can then drag the secondary window to the secondary monitor.
Multi-monitor display is available for both desktop and application sessions.
To switch to multimonitor mode, click Multimonitor in the toolbar. Doing so creates a secondary window with a 1024x768 resolution. It also updates the server with the dual monitor information. You can drag and resize the secondary window and even go to full-screen mode on one or both monitors. Every time you resize the window, the secondary window resolution is updated on the server. To exit multi-monitor mode, close the secondary window.
Even though the resolution details of the secondary monitor are unknown to Citrix Workspace, multi-monitor mode gives you the flexibility of resizing to adjust to the resolution.
For the session to take focus, click Multimonitor in the toolbar.
This feature is enabled by default.
To disable the feature, edit the configuration.js file and set the value of the multiMonitor property to false.
'ui' : {
'toolbar' : {
'multiMonitor' : true
},
<!--NeedCopy-->
Using Citrix Virtual Desktops on dual monitors:
- Click Multimonitor in the toolbar.
-
An extended window is created. Drag the window to the extended monitor.
The screen is now extended to both the monitors.
Multi-monitor performance
Citrix Workspace app for HTML5 improves the overall performance and stability of sessions in multi-monitor scenarios. In earlier versions, when a session was running on many monitors, you experienced sluggish performance.
Limitations:
-
This feature is supported on desktop browsers except for Internet Explorer and Edge.
-
On a Mac machine, the secondary window opens as a new tab in Chrome. When you drag this secondary window to the secondary monitor and resize it, the window might become invisible with an entry that is shown in the Chrome taskbar.
Workaround: Drag the window to the primary monitor and then back to the secondary monitor.
Multi-monitor support
Previously, the multi-monitor display feature allowed you to open an extra browser tab of the desktop or app session that you were connected to. You could then drag the additional browser tab to the external monitor.
Now, Citrix Workspace app supports multiple monitors with one click without manual intervention. If there are no external monitors attached to the device, the multi-monitor icon on the in-session toolbar is hidden. When you connect an external monitor with the required permissions, the multi-monitor icon is visible. After you click the icon, you can see the window span across all the connected monitors.
This feature is enabled by default. To disable the feature, edit the configuration.js file and set the value of the trueMMSupportForHTML5 property to false. When you disable the feature, you continue to see the old behavior where an extra browser tab of the desktop or the app session appears when you click the multi-monitor icon.
For example,
```
var HTML5_CONFIG = {
'features': {
'graphics': {
'multiMonitor': true,
'trueMMSupportForHTML5': false
}
};
<!--NeedCopy--> ```
Multi-monitor feature supports the following:
- You can use up to 2 external monitors.
- You can use different display layouts of the multi-monitor.
- This feature is only supported on Google Chrome and Microsoft Edge Chromium browsers on Windows and macOS.
-
You can use your virtual desktop in full-screen mode across a subset of available monitors. You can drag your virtual desktop to span to two monitors (out of more than two) and then select multi-monitor mode. A typical use case for this scenario is:
- when you choose to run a video conferencing app on your native device monitor and want to view your virtual desktop contents in full-screen across your other two monitors during the call.
To use the feature
-
As a first-time user, when you start a session, the following pop-up appears seeking your permission to use the multi-monitor setup.
-
Click Yes.
The pop-up appears from the browser to seek permission to use multiple monitors. If you click Block, you can’t use multiple monitors.
-
Click Allow.
The pop-up appears to let you know about the pop-up blockers.
-
Click Okay. Navigate to the browser settings and select Always allow pop-ups.
-
Click Done.
Note:
Ensure to restart the session for the changes to take effect.
-
On your primary monitor, click the multi-monitor icon
.
You can see the window span across all the connected monitors.
Important:
If you deny multi-monitor permissions, the multi-monitor icon do not appear. Instead, the full-screen icon appears in the toolbar, which takes you to the older behaviour. To manually re-enable the multi-monitor permissions, go to the browser Settings > Privacy and security > Site Settings > Permissions > Additional permissions, and allow Window placement.
Notes
- On the external monitor, resource windows aren’t in full-screen mode. Instead, it is in windowed mode with a size equal to the external monitor size. We recommend manually switching to full-screen using the F11 key for a better user experience on each of the external monitor windows.
- Multi-monitor state isn’t remembered across sessions on different devices. So, you must manually click the multi-monitor icon on the toolbar for every session.
Feature Limitations
- Multi-monitor mode isn’t supported on macOS.
- In a multi-monitor setup, the session gets restored to the single monitor mode when:
- you use Microsoft Teams to share the screen on the primary monitor.
- you select the Logging or the Upload option in the toolbar. Click the multi-monitor icon to continue using multiple monitors.
Known issues in the feature
- Optimized Microsoft Teams video calls or screen sharing on an external monitor might not work as expected. As a workaround, minimize and restore the Microsoft Teams window. [RFHTMCRM-7185]
Feature flag management
Note:
- Once we’ve applied feature flags, you’ll see the feature flag updates after the next launch of your Citrix Workspace app. When you’re in the Incognito mode also, you’ll see the updates after the next launch.
If an issue occurs with Citrix Workspace app in production, we can disable an affected feature dynamically in Citrix Workspace app even after the feature is shipped. To do so, we use feature flags and a third-party service called LaunchDarkly. You do not need to make any configurations to enable traffic to LaunchDarkly, except when you have a firewall or proxy blocking outbound traffic. In that case, you enable traffic to LaunchDarkly through specific URLs or IP addresses, depending on your policy requirements.
To date, for cloud customers, there’s no access to StoreFront to customize Citrix Workspace app for HTML5. In the interim, LaunchDarkly can be used to turn on or off a feature for a specific customer based on their store URLs.
You can enable traffic and communication to LaunchDarkly in the following ways:
Enable traffic to the following URLs
- events.launchdarkly.com
- app.launchdarkly.com
List IP addresses in an allow list
If you must list IP addresses in an allow list, for a list of all current IP address ranges, see LaunchDarkly public IP list. You can use this list to verify that your firewall configurations are updated automatically in keeping with the infrastructure updates. For details about the status of the infrastructure changes, see the LaunchDarkly Status page.
Provision to disable LaunchDarkly service
You can disable LaunchDarkly service on both on-premises and cloud stores.
On the cloud setup, administrators can disable the LaunchDarkly service by setting the enableLaunchDarkly attribute to false in the Global App Configuration Service.
For more information, see Global App Configuration Service documentation.
On the on-premises deployment, to disable the LaunchDarkly service, do the following:
- Navigate to the configuration.js file in the HTML5Client folder.
-
Add the enableLaunchDarkly attribute and set the attribute to false.
'thirdPartyServices' : { 'enableLaunchDarkly' : false }, <!--NeedCopy-->
- Click Save.
Notes:
- The provision to disable the LaunchDarkly service is applicable for Citrix Workspace app for HTML5 version 2208 and later.
- By default, the LaunchDarkly service is enabled if the enableLaunchDarkly attribute is not present.
Keyboard shortcuts
The default settings for Microsoft Windows logo key and other keyboard shortcuts are as follows:
HTML5_CONFIG > features > keyboard > captureAllKeys
The captureAllKeys attribute defaults to true. To change the default settings, open the configuration.js file and set the attribute to false.
Support for Microsoft Windows logo key and other keyboard shortcuts
This release adds support for the following key combinations with the Microsoft Windows logo key in your sessions that runs on Microsoft Windows.
- Windows + R
- Windows + D
- Windows + E
- Windows + M
- Windows + S
- Windows + CTRL + S
- Windows + T
- Windows + U
- Windows + Number
- Windows + X
- Windows + K
We’re now also supporting the following, additional keyboard shortcuts in your sessions that run on Microsoft Windows:
- Alt + Tab
- Esc key
- Ctrl + N
- Ctrl + T
- Ctrl + W
In sessions running on macOS, we now also support the following, additional keyboard shortcuts:
- Esc Key
- Command + N
- Command + T
- Command + W
- Ctrl + N
- Ctrl + T
- Ctrl + W
We don’t support Alt + Tab and Microsoft Windows logo key shortcuts in sessions running on macOS.
Note:
The shortcut keys work only in full-screen mode selected through the toolbar. For more information, see Keyboard shortcuts.
USB device redirection
Generic USB device redirection is supported on Chrome browsers (Version 61 and later) running on Chrome, Mac, and Linux operating systems. This feature is supported on sessions launched over secure HTTPS connections. This feature supports redirection of two USB devices simultaneously.
-
Redirecting a USB device As a prerequisite, enable the USB redirection policy on the server. For more information, see Enabling USB redirection on the server.
-
Connect the USB device to the machine.
-
Click the USB Devices icon available on the in-session toolbar.
-
In the USB Devices dialog box, click Add.
This action opens a Chrome dialog box that displays a list of devices.
Note:
The Chrome dialog box displays USB devices that might not always be redirected through Citrix Workspace app for HTML5. The USB devices that can be redirected through Citrix Workspace app for HTML5 are displayed in the USB devices dialog box within the app.
-
Select devices to be redirected and then click Connect. After successful redirection, you’re returned to the USB Devices dialog box, and the device appears as Connected.
-
When you try to redirect a USB device that is not supported by Citrix Workspace app, the following error message appears.
-
Click Release to release a device from the remote session.
-
If you launch more than one session, USB devices that are connected inside a different session show as Already in use. Click Transfer here to transfer the devices to the current session.
-
When you redirect more than one USB device to a session, click Release all devices to remove the devices from the session.
-
When you disconnect a redirected USB device from the machine without clicking Release, the following error message appears.
The USB device redirection feature is applicable only to USB devices, where the client operating systems such as, macOS and Chrome do not load the device drivers by default. For example, the feature is relevant to the Brother QL-580N Label Printer.
In case you’re unable to redirect USB devices on a Linux operating system, try setting up the user accounts and provide permissions to open the USB devices. For more information, see Google developers’ document.
Enabling USB redirection on the server
Do the following to enable the USB device redirection on the server:
-
Enable the policy for USB device redirection on the Domain Controller.
Configuring USB redirection for Citrix HTML5 client
By default, the USB device redirection feature is enabled on the client if the USB device redirection policy is enabled on the server.
To disable it, edit the configuration.js file and set the value of usb under toolbar to false. This setting is applicable to the StoreFront. The configuration.js file is in C:\program Files\Citrix actual path\HTML5Client.
'ui' : {
'toolbar' : {
'usb' : false
},
}
<!--NeedCopy-->
Behavior of Chrome browser
-
When you click the padlock icon, the browser tab shows the Secure Connection dialog box. You can see the USB devices for which the browser tab has received user permission. Although there are multiple USB devices, only the devices that the Citrix HTML5 client can redirect appear in the Citrix USB Devices dialog box. Those devices can be used inside a remote session.
-
If you want to revoke access permissions granted to the browser tab, click the
x
icon next to the USB device. As a result, the Reload button appears. If you click Reload, the session closes. Relaunch the session for the changes to take effect.
Limitations:
-
The USB device redirection feature is not applicable to some USB devices for which the client operating system such as, Windows, loads the device drivers by default.
-
Only USB Type A devices can be redirected to the session. But, you can connect Type A devices through a Type C connector.
-
Releasing a USB hub device might not result in releasing connected USB Type A devices.
-
HID devices, Mass Storage devices, and Web camera redirection might not work.
-
This feature has been tested and is supported on VDAs running on Windows 10.
-
This feature has been tested for up to two USB devices simultaneously.
Specifying the duration of overlay sessions
As an administrator, you can specify the duration of overlay sessions by using the resizeOverlayDuration value in the configuration.js file. The value defaults to 3,500 milliseconds. You can set it in a range of 0 through 3,500. The onResize events are generated when you resize a session. This feature is applicable only for sessions launched through the HDX SDK for HTML5.
'ui' : {
'resizeOverlayDuration': 3500
}
<!--NeedCopy-->
DPI scaling
Citrix Workspace app for HTML5 supports DPI scaling for app and desktop sessions on a single monitor.
Citrix Workspace app for HTML5 lets you set the VDA resolution on the monitors that have a high pixel ratio. The DPI scaling feature is disabled by default for app and desktop sessions.
For Citrix Workspace app 1908 for HTML5 and earlier, go to the session toolbar and then select Toolbar > More > Preferences > Display Resolution to set the resolution for app and desktop sessions. The correct resolution is set on the VDA.
For Citrix Workspace app 1909 for HTML5 and later, go to the session toolbar and then select Toolbar > More > Display Resolution > Device Pixel Ratio Scaling to set the resolution for app and desktop sessions. The correct resolution is set on the VDA.
When you set the resolution correctly on the VDA, the blurry text becomes crisper.
Limitations:
- The High DPI scaling feature is disabled on touch screen devices.
Custom Cursor
Citrix Workspace app for HTML5 now supports custom cursors on the Microsoft Internet Explorer. This enhancement ensures that you have a consistent browsing experience across browsers. By default, the custom cursor is enabled.
To disable the custom cursor in Microsoft Internet Explorer or Edge using configuration.js
The configuration.js file is in the HTML5Client folder. Edit this file to configure Citrix Workspace app for HTML5 by doing the following step:
Open the configuration.js file and set the value of ‘handleMouseCursorUsingDivForIE’ under ui to false.
For example,
‘ui’: {
'handleMouseCursorUsingDivForIE' : false
}
<!--NeedCopy-->
Customer Experience Improvement Program (CEIP)
Data Collected | Description | What we Use it for |
---|---|---|
Configuration and usage data | The Citrix Customer Experience Improvement Program (CEIP) gathers configuration and usage data from Citrix Workspace app for HTML5 and automatically sends the data to Citrix and Google Analytics. | This data helps Citrix improve the quality, reliability, and performance of Citrix Workspace app. |
Additional Information
Citrix handles your data following the terms of your contract with Citrix, and protects it as specified in the Citrix Services Security Exhibit available on the Citrix Trust Center.
Citrix also uses Google Analytics to collect certain data from Citrix Workspace app as part of CEIP. See how Google handles data collected for Google Analytics.
Note:
No data is collected for the users in European Union (EU), European Economic Area (EEA), Switzerland, and United Kingdom (UK).
For other region users, you can turn off sending CEIP data to Citrix and Google Analytics. To do that, use one of the following methods:
- Disable CEIP using configuration.js
- Disable using Global App Configuration Service
Note:
- If you disable CEIP for version 2006 and earlier, minimal information about the installed Citrix Workspace app version is uploaded. This minimal information is valuable to Citrix because it provides the distribution of different versions used by customers.
To disable CEIP using GUI
Note:
You can modify the CEIP settings using the GUI only when the administrator has enabled it using configuration.js.
- Launch Citrix Workspace app for HTML5.
- From the toolbar, select Preferences.
- Clear Help improve Citrix Workspace by sending anonymous usage statistics.
Note:
Relaunch the session for the changes to take effect.
To disable CEIP using configuration.js
In Citrix Workspace app for HTML5, the configuration.js file is in the HTML5Client folder. Edit this file to configure Citrix Workspace app for HTML5.
Note:
- Citrix recommends that you back up the configuration.js file before modifying it.
- Administrator-level credentials are required to edit the configuration.js file.
For Version 1905 and earlier, set the enabled attribute under ceip to false in the configuration.js file.
'ceip':{
'enabled':false,
}
<!--NeedCopy-->
For Version 1906 and later, set the enabled attribute under analytics to false in the configuration.js file.
'analytics':{
'enabled':false,
}
<!--NeedCopy-->
Blocking CEIP
For Version 2007 and later, administrators are allowed to block CEIP through the following:
- Block CEIP using GUI
- configuration.js file
To block CEIP using GUI
Note:
You can modify the CEIP settings using the GUI only when the administrator has enabled it using configuration.js.
- Launch Citrix Workspace app for HTML5.
- From the toolbar, select Preferences.
- Clear Help improve Citrix Workspace by sending anonymous usage statistics.
Note:
Relaunch the session for the changes to take effect.
This configuration takes precedence over the configuration made through the GUI and CEIP data isn’t sent to Citrix.
-
Open the configuration.js file, add the connectionEnabled attribute, and set the attribute to false:
'analytics':{ 'connectionEnabled':false, } <!--NeedCopy-->
Specific CEIP data
The specific CEIP data elements collected by Google Analytics are:
Workspace app version | Session mode (Kiosk, Public/General) | Session type (desktop/application) | XenDesktop information (Delivery Controller and VDA versions) |
Launch type (SDK/ICAFile/FTA/Store and so on) | Time zone of the session | Language of the session | Client keyboard layout |
Network socket type (HTTPS/HTTP) | Feature usage (clipboard, file transfer, app switcher, printing, USB, smart card, and so on) | Device pixel ratio | Secure ICA (used / not used) |
Reconnection timeout (if != 180) | Multi-Monitor | Global App Configuration Service |
Selective H.264
Configuring selective H.264 using the configuration.js file
Note:
- Citrix recommends that you back up the configuration.js file before modifying it.
- Citrix recommends using this method only if Citrix Workspace app for HTML5 is repackaged for users.
- Administrator-level credentials are required to edit the configuration.js file; after editing the file, repackage the app for the changes to take effect.
By default, selectiveH264 is set to true.
The configuration.js file is located under C:\program Files\Citrix<actual path>\HTML5Client. Edit this file and change selectiveH264 to false as follows:
PDF printing
To configure PDF printing
The Citrix PDF Universal Printer driver enables users to print documents opened with hosted applications or applications that run on virtual desktops delivered by XenApp and XenDesktop Version 7.6. When a user selects the Citrix PDF Printer option, the driver converts the file to PDF and transfers the PDF to the local device. The PDF is then opened in a new browser tab for viewing and printing from a locally attached printer.
If you want to enable users to print documents that are opened with hosted applications or applications that run on virtual desktops delivered by XenDesktop 7.6 and XenApp 7.6, complete the following:
- Download the Citrix PDF Printing Feature Pack and install the Citrix PDF Universal Printer driver on each machine-providing desktop or applications for Citrix Workspace app for HTML5 users. After installing the printer driver, restart the machine.
- In Citrix Studio, select the Policy node in the left pane and either create a new policy or edit an existing policy. For more information about configuring Citrix Virtual Apps and Desktops policies, see Policies.
- Set the Auto-create PDF Universal Printer policy setting to Enabled.
Note:
When you use Citrix PDF printer in a session launched from Citrix Workspace app for HTML5, set the Client printer names setting as default or select Standard printer names. Select Legacy printer names to use old-style client printer names and to preserve backward compatibility with legacy printers names as present in the XenApp and XenDesktop versions of the product. You can use this option with the current Citrix Virtual Apps and Desktops and Citrix DaaS versions of the product.
To configure with CSP header added
PDF printing works, unless a Content-Security-Policy (CSP) header is added for users.
The CSP response header is a combination of policies that a browser uses to avoid Cross-site scripting attacks.
If the CSP header is added to Citrix Gateway Rewrite Policies, PDF printing doesn’t work.
Configure as follows:
img-src \'self\' data: blob:
(blob: This parameter allows print preview to load and continue with printing functionality)
Enhanced PDF printing experience
In earlier releases, when you try to print a PDF, a Continue print dialog appeared, prompting your confirmation to print.
Now, the Print window appears within your Citrix Workspace session. You can directly print the document from the Print window.
This enhancement is fully supported and enabled by default in Chrome and Firefox. To disable it in Chrome and Firefox, set the value of supportedBrowsers to false in the configuration.js file. The configuration.js file is located under C:\program Files\Citrix<actual path>\HTML5Client.
This enhancement is partially supported in Internet Explorer 11 with some known limitations, and disabled by default. To enable this feature in Internet Explorer, set the value of IE to true in the configuraton.js file. The configuration.js file is located under C:\program Files\Citrix<actual path>\HTML5Client.
'pdfPrinting' : {
'directPrint' : {
'supportedBrowsers':true,
'IE':false
}
}
<!--NeedCopy-->
Optimized resolution
In earlier releases, content in a document appeared blurry when you attempted to print the document using the Citrix PDF printer.
Now, we introduce optimizations to improve the user experience. The printResolution
value defaults to 150. Also, for crisper content, you can change the value in the configuration.js
file to 300 or 600 depending on your requirement:
'pdfPrinting' : {
'directPrint' :
{'printResolution' :150 }
<!--NeedCopy-->
Limitations:
- In Internet Explorer, the content of a printed PDF is scaled down and does not fit the page.
- In Internet Explorer, when you print a large file or a file with many pages, the browser might stop responding or the print operation might fail intermittently.
- This enhancement isn’t supported for sessions that are launched through the HTML5 HDX SDK.
To suppress the Continue print dialog
When the enhanced printing experience feature is disabled, you can print a PDF by suppressing the appearance of the Continue print dialog.
By default, the printDialog property of the hide object is set to false.
The configuration.js file is located under C:\program Files\Citrix<actual path>\HTML5Client.
To print, set the printDialog property of the hide object to true.
Note:
- Citrix recommends that you back up the configuration.js file before modifying it.
- Citrix recommends using this method only if Citrix Workspace app for HTML5 is repackaged for users.
- Administrator-level credentials are required to edit the configuration.js file; after editing the file, repackage the app for the changes to take effect.
{
'ui' : {
"hide":{
'printDialog': true
}
}
}
<!--NeedCopy-->
Blocking PDF printing
As an administrator, you can now block PDF printing on the following browsers across platforms: Internet Explorer, Google Chrome, Firefox, Safari, and Microsoft Edge (including Microsoft Edge Chromium).
By default, PDF printing is allowed across all browsers. To prohibit PDF printing, follow these steps:
- Navigate to the configuration.js file, available at C:\Program Files\Citrix\Receiver StoreFront\HTML5Client.
-
Edit that file and set the value of disableForBrowsers to ‘ALL’.
- To disable PDF printing on specific browsers, set the value of disableForBrowsers to ‘MSIE’, ‘Chrome’, ‘FIREFOX’, ‘SAFARI’, ‘CHROMIUMEDGE’, or ‘MSEDGE’.
'pdfPrinting' : {
'disableForBrowsers' : ['All']
or
'disableForBrowsers' : ['MSIE', 'Chrome', ‘CHROMIUMEDGE’, 'MSEDGE']
}
<!--NeedCopy-->
The following describes each of the values in detail:
- ‘MSIE’: All the versions of Internet Explorer
- ‘MSEDGE’: All the versions of Microsoft Edge
- ‘CHROMIUMEDGE’: All the versions of Microsoft Edge Chromium
- ‘Chrome’: All the versions of Google Chrome
- ‘FIREFOX: All the versions of Firefox
- ‘SAFARI’: All the versions of Safari
Session reliability
With session reliability, the session remains active on the server. To indicate that connectivity is lost, the user’s display becomes unresponsive until connectivity resumes on the other side of the tunnel. The user can continue to access the display during the interruption. However, after the network connection is restored, the user can resume interacting with the application. Session reliability reconnects users without reauthentication prompts.
Note:
Citrix Workspace app for HTML5 users can’t override the server setting.
You can use session reliability with Transport Layer Security (TLS).
Note:
TLS encrypts only the data sent between the user device and Citrix Gateway.
For more information on configuring session reliability, see Session reliability policy settings in the Citrix Virtual Apps and Desktops documentation.
Mobility support
To enable the auto-soft keyboard popup
To enable this feature, configure the automatic keyboard policy to display the soft keyboard when clicking any editable area:
- Open Citrix Studio on DDC.
- Select Policies.
- Click Create Policy.
- Search for Automatic Keyboard Display and select Allowed.
File Transfer
By default, users can:
- Upload files from a local download folder or attached peripheral and seamlessly access the data from a Citrix Virtual Apps and Desktops or Citrix DaaS sessions.
- Download files from a Citrix Virtual Apps and Desktops or Citrix DaaS session to a folder or peripheral on their user device.
Administrators can selectively enable or disable file transfer, uploads, or downloads through policies in Citrix Studio.
Citrix Workspace app for HTML5 supports downloading files on a MacBook using the Safari browser.
Requirements
- XenApp and XenDesktop 7.6 or later, with:
- Hotfix ICATS760WX64022.msp on server OS VDAs (Windows 2008 R2 or Windows 2012 R2)
- Hotfix ICAWS760WX86022.msp or ICAWS760WX64022.msp on client OS VDAs (Windows 7 or Windows 8.1)
- To change file transfer policies: Group Policy Management (GPM) hotfix GPMx240WX64002.msi or GPMx240WX86002.msi on machines running Citrix Studio
Limitations:
- A user can upload or download a maximum of 10 files at a time.
- Maximum file size:
- For uploads: 2147483647 bytes (2 GB)
- For downloads: 262144000 bytes (250 MB)
File Transfer policies
By default, file transfer is enabled. Use Citrix Studio to change these policies, located under User Setting > ICA\File Redirection. Consider the following when using file transfer policies:
-
File transfer for Citrix Workspace app for ChromeOS/HTML5: Allows or prevents end users to transfer files between Citrix Virtual Apps and Desktops session and end user’s device.
Allows or prevents end users to transfer files between Citrix DaaS session and end user’s device.
-
Upload file for Citrix Workspace app for ChromeOS/HTML5: Allows or prevents users from uploading files. It can be from the user’s device to a Citrix Virtual Apps and Desktops session or Citrix DaaS session.
-
Download file for Citrix Workspace app for ChromeOS/HTML5: Allows or prevents users from downloading files. It can be from a Citrix Virtual Apps and Desktops session or Citrix DaaS session to the user’s device.
Clipboard
Before introducing this feature, Citrix Workspace did not support copying and pasting HTML-formatted text from a local application to another application using the Paste Special feature. As a result, the targeted app (in this case, Microsoft Excel) would not retain its HTML formatting characteristics.
Citrix Workspace app for HTML5 supports HTML format in addition to plain text between client and a session. This support is useful for Office apps and browsers. Enhanced clipboard support is available on Chrome and Safari browsers only. You can copy HTML content and retain formatting. When copying a link in Chrome, a <img> tag is added in HTML format, which effectively allows you to copy images and text. This HTML formatting feature is richer than plain text but does not work in all applications.
For more information, see Client clipboard redirection in the Citrix Virtual Apps and Desktops documentation.
Enhanced clipboard experience
You can copy and paste text between the session and the end user’s device. You can do it when you launch multiple Virtual Desktops hosted applications or desktops on Windows, Mac, or Chrome operating systems using the browser based Citrix Workspace app for HTML5.
With this feature, you can use the Ctrl C and Ctrl V hotkeys (for Windows or Chrome operating systems) and CMD C and CMD V hotkeys (for Mac operating system) to copy and paste.
This feature is enabled by default.
On Firefox and Edge browsers, to copy the text from a remote session to a local device, press Ctrl C and then click Confirm.
Disable the copy confirmation dialog by selecting the Disable Copy Confirmation check box in Preferences on the toolbar. Clear the check box to enable the option again.
To disable the enhanced clipboard experience
To disable this feature, edit the configuration.js file located inside the HTML5Client folder (C:\Program Files\Citrix\Receiver StoreFront\HTML5Client) and set the value of directClipboard to false.
Limitations:
- You can copy and paste only plain text, images, but not files.
- Does not support large data.
- The Ctrl key might remain stuck in the down position. This issue occurs when you press the right Ctrl key for a long time and then press C to copy the text. As a workaround, click the right Ctrl key multiple times.
- Occasionally, copying text requires an extra click through the Copy confirmation dialog when you use Google Chrome, Safari, Edge, and Firefox browsers.
- Use the Ctrl c or CMD C and Ctrl V or CMD V keys to copy and paste. Occasionally, using the Edit menu or right-click option to copy the text might require an extra click using the Confirm dialog.
Toolbar
By default, the enhanced toolbar feature is enabled.
To hide the toolbar:
- While logged in as an administrator, access the configuration.js file in C:\ProgramFiles\Citrix<actual path>\HTML5Client.
- Search the configuration.js file to locate ‘menubar key.’
- In the configuration.js file, set “menubar”:false.
You can also hide an individual icon to prevent it from showing up in the toolbar. For example, to hide the ctrl+alt+del button in the toolbar:
- While logged in as an administrator, access the configuration.js file in C:\ProgramFiles\Citrix<actual path>\HTML5Client.
- Search the configuration.js file to locate ‘lock.’
- In the configuration.js file, set lock:false.
Session sharing
For session sharing to occur, the applications must be hosted on the same machine and must be configured in seamless window mode. Use the same settings for parameters such as window size, color depth, and encryption. Session sharing is enabled by default when a hosted application is made available.
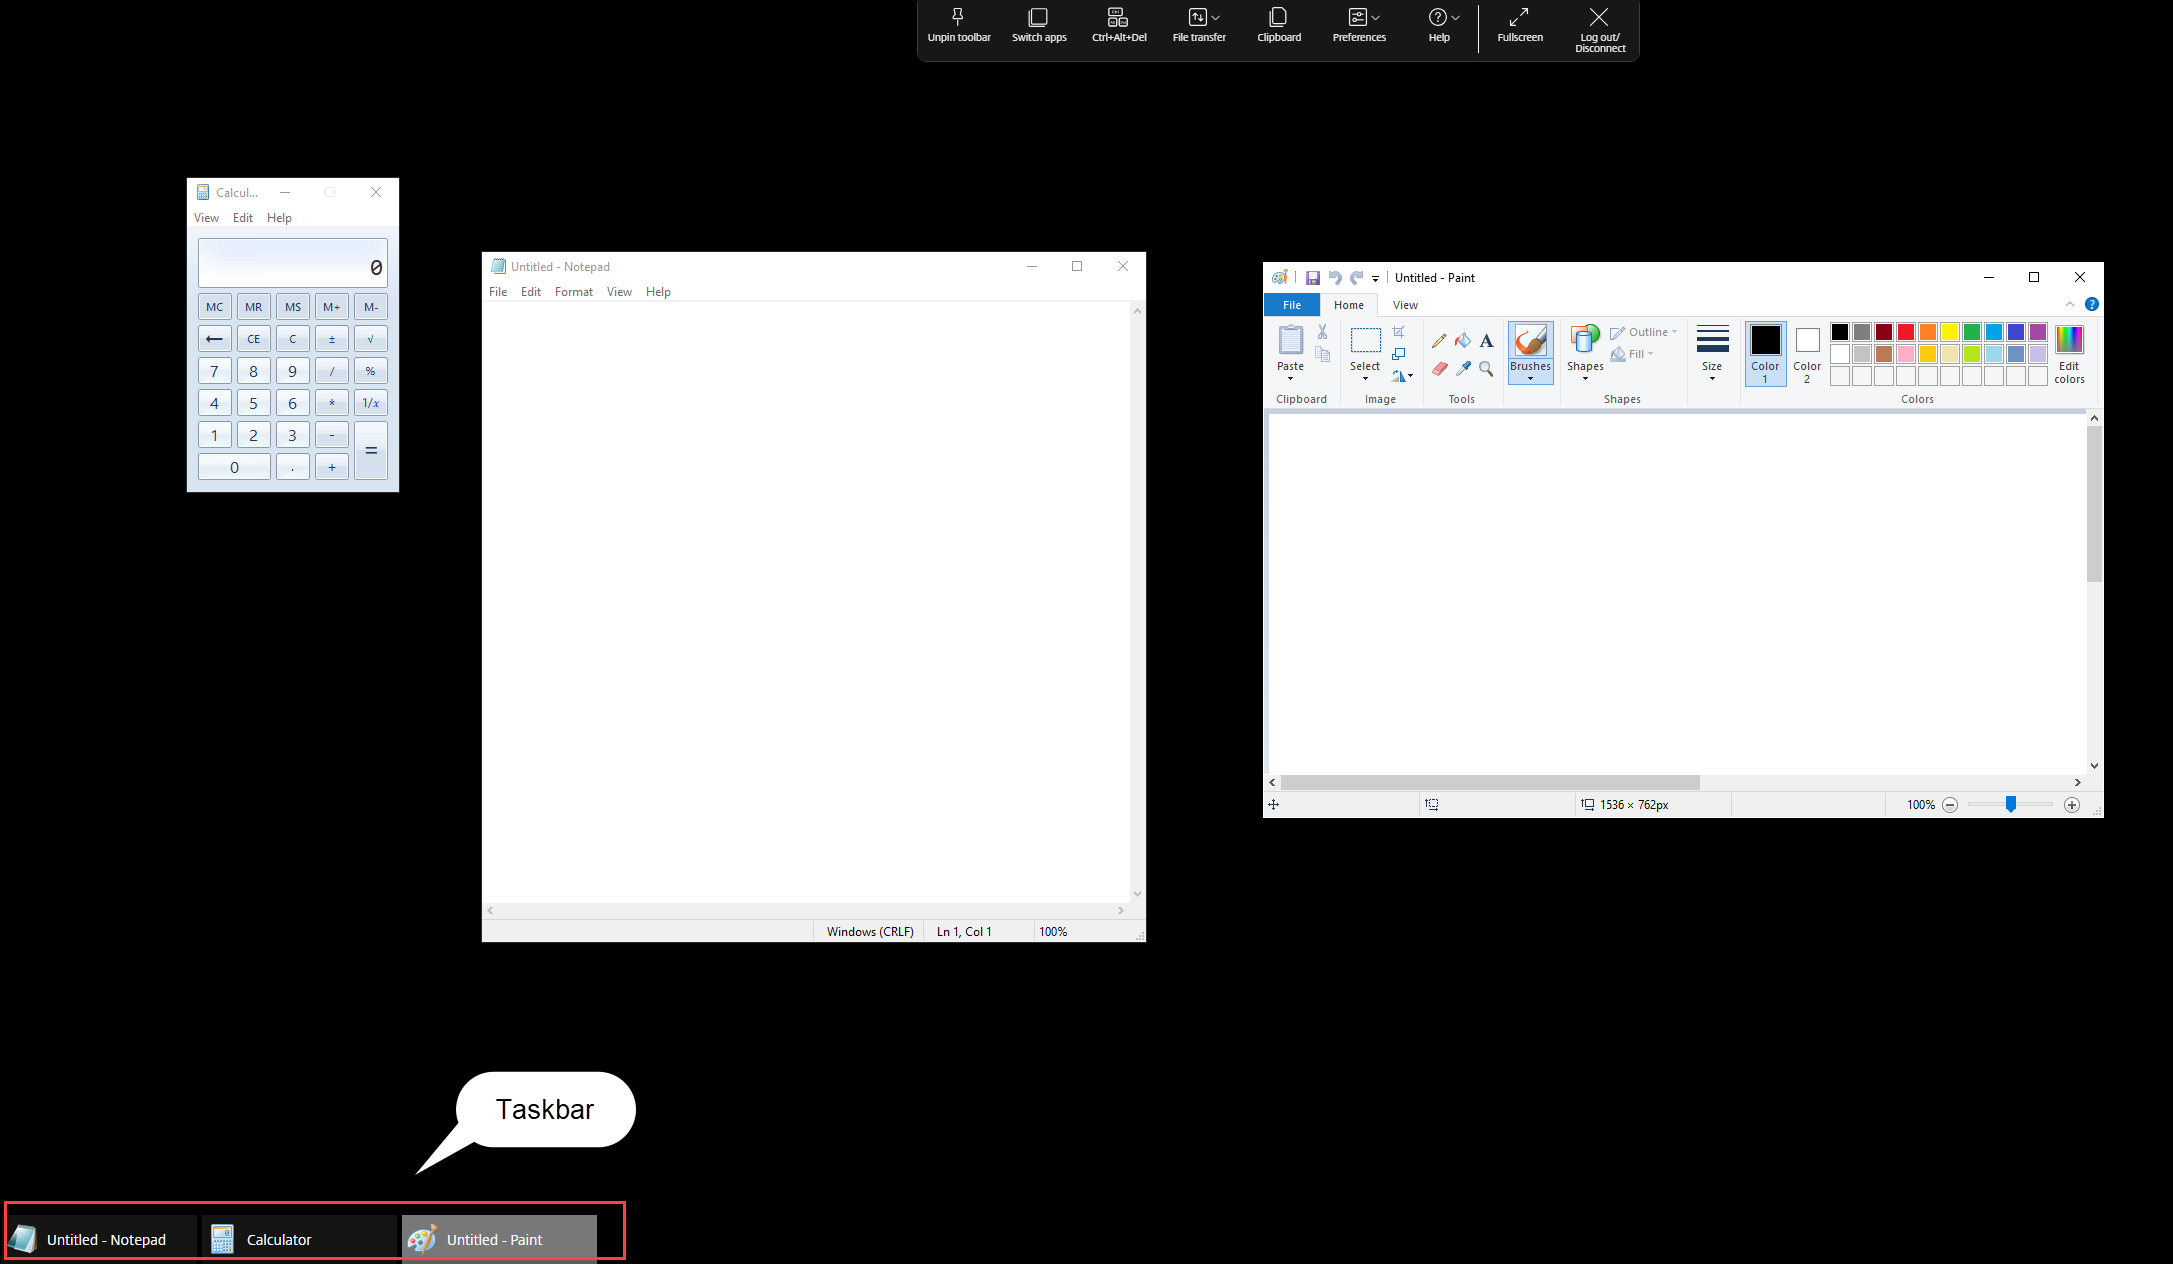
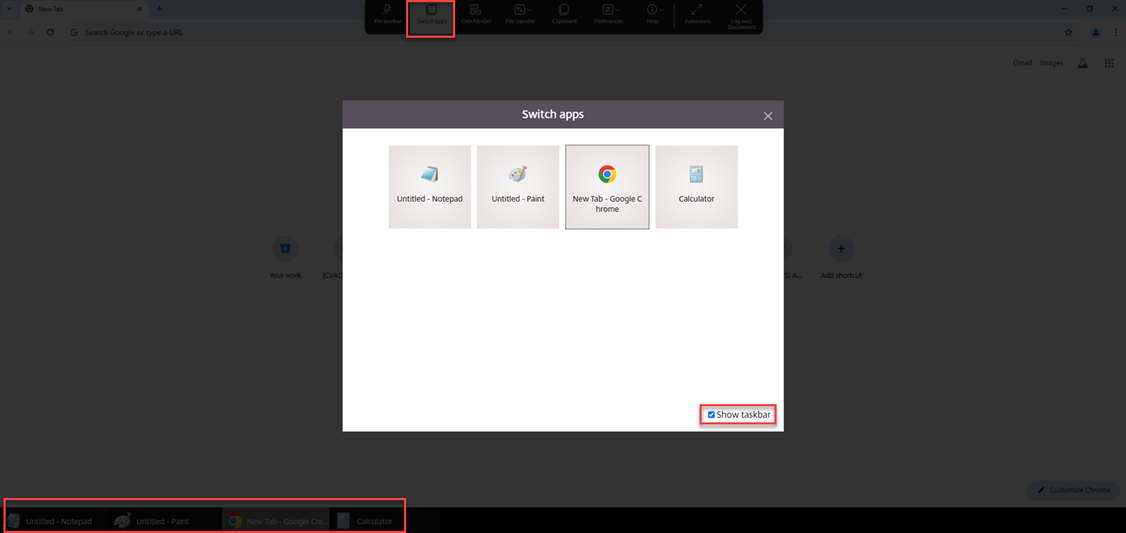
If App Switcher is installed on the machine providing the applications, a taskbar appears at the bottom of the window. The taskbar displays all the applications currently running in the session, enabling users to switch between those applications. Users can configure the taskbar to auto-hide and switch to small icons to minimize the amount of space taken up by the taskbar.
A floating toolbar containing controls for Citrix Workspace app for HTML5 is displayed in the browser tab, as shown in the following figure. The clipboard button enables users to copy and paste Unicode plain text between the local clipboard on the device and the resource that run in the browser. Users can use standard Windows shortcuts to copy data. It includes text, tables, and images. You can copy between hosted applications, within the same session and between different sessions. Users can also send the CTRL+ALT+DELETE key combination to their desktops and applications using a button on the toolbar.
When printing a document opened with a hosted application or an application that run on a virtual desktop, the user is given the option to print the document to PDF. The PDF is then transferred to the local device for viewing and printing from a locally attached printer. The file is removed from the device when the user closes the PDF.
A user who clicks a link in a document opened using a hosted application is given the choice of whether to open the URL in a hosted browser application within the session or to use the browser on the local device.
Enhanced app switcher support
Starting with this release, when you launch a published application session in full-screen or kiosk mode, the session does not overlap with the desktop taskbar. The app switcher no longer hides the session. This enhancement is supported only in single-monitor mode.
Audio
-
For audio to work in VDA versions 2008 and earlier, configure as follows for a temporary workaround:
Add the following to the end of the chrome.exe launch parameters:
–disable-features=AudioServiceSandbox
-
You can’t play an audio file within a session on Safari macOS.
Adaptive audio
With Adaptive audio, you don’t need to configure the audio quality policies on the VDA. Adaptive audio optimizes settings for your environment. It replaces legacy audio compression formats to provide an excellent user experience.
For more information, see Adaptive Audio.
Feature attributes
There are two feature attributes:
-
EnableAdaptiveAudio: Set the value to true to enable the adaptive audio feature. Set the value to false to disable the feature.
-
EnableStereoRecording: Stereo recording is an optional feature. By default, this feature is disabled. Set the value to true to enable stereo recording for the Google Chrome browser or set the value to false to disable the feature. This feature can be supported only when the adaptive audio feature is enabled. When the EnableStereoRecording attribute is set to true, the stereo recording is supported with the Google Chrome browser with echo cancellation disabled. The Apple Safari and Mozilla Firefox browsers can’t support stereo recording.
How to Configure
You can configure the adaptive audio feature as follows:
Configuration.js
In Citrix Workspace app for HTML5, the configuration.js file is located under C:\program Files\Citrix\HTML5Client folder. Edit this file to configure adaptive audio.
Notes:
- Citrix recommends that you back up the configuration.js file before modifying it.
- Administrator-level credentials are required to edit the configuration.js file.
To configure adaptive audio:
- Navigate to the configuration.js file in the HTML5Client folder.
- Add the EnableAdaptiveAudio attribute and set the attribute to true. Add the EnableStereoRecording and set the attribute to false. For example,
'features' : {
'audio' : {
'EnableAdaptiveAudio': true
}
}
'features' : {
'audio' : {
'EnableStereoRecording': false
}
}
<!--NeedCopy-->
- Click Save.
Note:
- To disable the feature, set the EnableAdaptiveAudio attribute to false.
Known Limitations
-
The Mozilla Firefox browser does not support resampling for recording. In some abnormal cases, recording on Mozilla Firefox might fail.
In this release, the adaptive audio support for recording is disabled when the Mozilla Firefox browser is used.
-
The Apple Safari and Mozilla Firefox browsers do not support stereo recording because of a limitation in the browser.
Plug and Play audio device support
Previously, only a single audio playback and recording device was supported and displayed as Citrix HDX Audio irrespective of the real device name.
We support multiple audio devices and redirect them to VDA. Now, when you redirect USB audio devices, you can view the real name of the audio device under the Sound settings > Playback and Sound settings > Recording on the VDA. The list of devices on the VDA is dynamically updated whenever an audio device is plugged in or removed.
Note:
- By default, this feature is enabled.
Configuration
You can use configuration.js to configure this feature as follows:
Notes:
- Citrix recommends that you back up the configuration.js file before making changes.
- Administrator-level credentials are required to edit the configuration.js file.
To disable the feature:
-
Navigate to the configuration.js file.
Note:
The configuration.js file is located under C:\Program Files\Citrix\HTMLClient folder.
-
Edit the file and locate the AudioRedirectionV4 attribute. Set the attribute to false.
For example,
'features' : { 'audio' : { AudioRedirectionV4: false } } <!--NeedCopy-->
-
Save the changes.
Known Limitations
- On the VDA, the name of the built-in audio device is in English only. The issue occurs when you use ChromeOS-based devices. [RFHTMCRM-8667]
- This feature is supported on Microsoft Chromium Edge and Google Chrome browsers only.
Webcam
Citrix Workspace app supports webcam optimizations for both 32-bit and 64-bit applications with built-in webcams.
Webcam redirection
To configure webcam redirection:
- Open the configuration.js file.
-
Navigate to HTML5_CONFIG > features > video > config > codecType.
Note:
- The Google Chrome and Microsoft Edge Chromium browsers use both hardware and software codecs. The Mozilla Firefox and Apple Safari browsers use only software codec.
- Select the codecType value:
- 1 - HARDWARE_CODEC with SOFTWARE_CODEC fallback (default)
- 2 - Only SOFTWARE_CODEC
- 3 - Only HARDWARE_CODEC
Host to client redirection
Content redirection allows you to control whether users access information by using:
- applications published on servers or
- applications that run on user devices
Host to client redirection is one type of content redirection. It’s supported only on Server OS VDAs (not Desktop OS VDAs). When host to client redirection is enabled, URLs are intercepted on the server VDA and sent to the user device. Citrix Workspace app for HTML5 displays a dialog prompting the user to select whether to open the URL within the session or on the local device. The dialog appears for every URL. When host to client redirection is disabled, users open the URLs with web browsers or multimedia players on the server VDA. When host to client redirection is enabled, users can’t disable it.
Host to client redirection was previously known as server to client redirection.
For more information, see General content redirection.
Generic client IME for East Asian languages
The Generic Client Input Method Editor (IME) feature enhances the input and display experience with Chinese, Japanese, and Korean (CJK) language characters. This feature allows you to compose CJK characters at the cursor position when you are in a session. The feature is available for the Windows VDA and Linux VDA environments.
Generally, IME displays user interface (UI) components such as a candidate window and a composition window. The composition window includes the composition characters and composition UI elements. For example, underline and background color. The candidate window displays the candidate list.
The composition window enables you to choose between the confirmed characters and the composing characters. The composition window and the candidate window move with the input cursor. As a result, the feature gives an enhanced input of characters at the cursor location in the composition window. In addition, it gives an improved display in the composition and the candidate window.
Prerequisites:
- For Linux VDA, enable Client keyboard layout sync and IME improvement policy.
- For Windows VDA, enable Unicode Keyboard Layout Mapping, Client Keyboard Layout Sync, and IME Improvement policies.
- Use Citrix Linux VDA version 2012 and later. For Citrix Windows VDA, all the currently available Windows VDA versions support the generic client IME feature.
- The browser language must be Japanese, Chinese (Simplified), Chinese (Traditional), or Korean.
- Use Google Chrome, Mozilla Firefox, Apple Safari 13 or later, or Microsoft Edge.
Note:
- For macOS, iOS, and Android platforms, modify the system language of devices to either of CJK languages, and the browser language gets updated automatically.
- For Windows, Linux and ChromeOS platforms, modify browser language to either of CJK languages.
Configuration:
Starting with version 2105, the Generic Client IME feature is enabled by default. As an administrator, you can enable or disable the feature using the configuration.js file on the StoreFront server (%ProgramFiles%\Citrix\Receiver StoreFront\HTML5Client).
To disable this feature for a browser language, edit the configuration.js file and set features.ime.mode.<languageID>
to seamlessIme
. If seamlessIme is set, the Generic Client IME feature is disabled.
configuration.js:
var HTML5_CONFIG = {
'features': {
ime: {
mode: {
"ja": "seamlessIme",
"zh": "seamlessIme",
"ko": "seamlessIme"
}
}
}
}
<!--NeedCopy-->
To enable this feature for a browser language, edit the configuration.js file and set features.ime.mode.<languageID>
to ctxIme
, or leave the mode property empty ({}), which is the default behavior.
configuration.js:
var HTML5_CONFIG = {
'features': {
ime: {
mode: {
"ja": "ctxIme",
"zh": "ctxIme",
"ko": "ctxIme"
}
}
}
}
<!--NeedCopy-->
Feature Limitation:
-
Multi-monitor sessions don’t support the Generic client IME feature. Instead, use Server IME. To enable the Server IME:
- Change the VDA or the server keyboard language to Chinese, Japanese or Korean (CJK) as desired.
- Change the client or the Chromebook keyboard language to English.
Security settings
Citrix recommends using stores that are secure. Besides, it’s a good practice to have HTTP strict transport security (HSTS) setting enabled for secure stores.
Do the following steps to enable the HSTS setting:
- In Citrix StoreFront, under Stores, click the link of the particular store to enable the security settings.
- The Manage Receiver for Web Sites dialog box appears.
- Click Configure.
- The Edit Receiver for Web site dialog box appears.
- Click the Advanced Settings tab and select Enable strict transport security.
Global App Configuration Service
Administrators can customize user settings for sessions that are launched in Citrix Workspace app by using the Global App Configuration Service. Previously, administrators could only use the configuration.js for this purpose, and it was applicable only for StoreFront users.
Configure
The Global App Configuration Service for Citrix Workspace allows a Citrix administrator to deliver Workspace service URLs and Workspace App settings through a centrally managed service.
For more information, see Global App Configuration Service documentation.
Notes:
- This feature is available for workspace and HTTPS‑based stores only.
- For the Global App Configuration Service to work, ensure that your users can access the URL discovery.cem.cloud.us.
End user experience
Language support
Citrix Workspace app for HTML5 is available in the Brazilian Portuguese and Italian languages.
Support for file downloads using the Safari browser
Citrix Workspace app for HTML5 supports downloading files on a MacBook using the Safari browser.
Improved network throughput for graphics over high latency connections
The default number of ICA output buffers that are used to send and receive data has been raised. This change provides improved network throughput performance even on high latency connections.
Microsoft Teams optimization
Microsoft Teams optimization supports audio call, video call, and screen sharing functionalities on the Google Chrome browser only. The minimum Google Chrome version required is m97 and later.
Note:
- The Microsoft Teams optimization applies to the Microsoft Teams desktop version and not the web version on the VDA.
- The screen sharing functionality is enabled by default.
Feature limitation:
- When you use Microsoft Teams optimization and share the screen, a red border that indicates the screen sharing is unavailable. [RFHTMCRM-6360]
- When you use Microsoft Teams optimization, the screen sharing functionality is disabled by default. After you enable it, you can share the local device contents. [RFHTMCRM-6156]
Known issues in the feature:
- Microsoft Teams optimization is supported on the Google Chrome browser only. [RFHTMCRM-6194] [RFHTMCRM-4724]
For troubleshooting on the shim library version, see Microsoft Teams optimization logs section.
Screen sharing
Starting with version 2209, by default, the screen sharing is enabled. The end users can now share apps and tabs that are opened through Citrix Workspace app. During screen sharing, the blue border appears around the shared window.
To share the entire screen, administrators can edit the configuration.js file located under C:\program Files\Citrix\HTML5Client and change the shareAllContent attribute to true. When this feature is on, the end users can share the entire screen including the resources that aren’t opened from Citrix Workspace app.
For example,
'msTeamsOptimization':{
'screenSharing' : true,
'shareAllContent' : true
'seamlessApps' : true,
'webcamSupportInMM' : true,
'originTrialToken' : {
'chrome': "",
},
}
<!--NeedCopy-->
Support for dynamic e911
Citrix Workspace app supports dynamic emergency calling. When used in Microsoft Calling Plans, Operator Connect, and Direct Routing, it provides the capability to:
- configure and route emergency calls
- notify security personnel
The notification is provided based on the current location of the Citrix Workspace app that runs on the endpoint, instead of the Microsoft Teams client that runs on the VDA.
Ray Baum’s law requires the 911 caller’s dispatchable location to be transmitted to the appropriate Public Safety Answering Point (PSAP). Starting from Citrix Workspace app 2202 for HTML5, Microsoft Teams Optimization with HDX is compliant with Ray Baum’s law.
For Microsoft Teams optimization e911 calling, enable Location access as shown:
Background blurring and effects in Microsoft Teams optimization
Starting with the 2303 release, Citrix Workspace app for HTML5 supports background blurring and effects in Microsoft Teams optimization for video calls. You can either blur or replace the background effects provided by Microsoft Teams to avoid unexpected distractions by helping the conversation stay focused on the silhouette (body and face). This feature can be used with P2P and conference calls.
Notes:
- By default, this feature is disabled.
- This feature is now integrated with the Microsoft Teams UI. Multi-window support is a prerequisite that requires a VDA update to 2112 or higher. For more information, see Multi-window meetings and chat.
Limitations
- Administrator and user-defined background replacement aren’t supported.
- When you enable this feature, you might observe performance issues.
- After the ICA session is reconnected, the effect is off. However, the Microsoft Teams UI shows that the previous effect is still On by a tick mark. Citrix and Microsoft are working together to resolve this issue.
How to configure
You can configure the background effect feature in one of the following ways:
- Configuration.js
- Global App Configuration service
Configuration.js
In Citrix Workspace app for HTML5, the configuration.js file is located under C:\Program Files\Citrix\HTML5Client folder. Edit this file to configure the background effect feature.
NOTES:
- Citrix recommends that you back up the configuration.js file before modifying it.
- Administrator-level credentials are required to edit the configuration.js file.
To enable background effect:
- Navigate to the configuration.js file in the HTML5Client folder.
-
Add the backgroundEffects attribute and set the attribute to true. For example,
'features' : { 'msTeamsOptimization' : { 'backgroundEffects' : true } } <!--NeedCopy-->
- Save the changes.
Global App Configuration service
On the cloud setup, administrators can enable the background effect feature by setting the backgroundEffects attribute to False in the Global App Configuration service.
For more information, see Global App Configuration service documentation.
Multi‑window chat and meetings for Microsoft Teams
Starting with the 2301 version, you can use multiple windows for chat and meetings in Microsoft Teams. You can pop out the conversations or meetings in various ways.
For details about the pop‑out window feature, see Pop out a chat in Microsoft Teams. For troubleshooting see, CTX253754.
Microsoft will deprecate the single‑window support in the future. If you’re running an older version of Citrix Workspace app or Virtual Delivery Agent (VDA), you can upgrade to:
- Citrix Workspace app 2301 or later and
- VDA - 2203 or later
Virtual Channel SDK support
With this release, the Citrix VC SDK supports writing server-side applications and client-side drivers using the ICA protocol. The server-side virtual channel applications are on the Citrix Virtual Apps and Desktops server.
VC SDK supports writing new virtual channels and Citrix Workspace app for HTML5 can support up to 20 custom-virtual channels.
Feature limitations
- If the configuration of the virtual channels is incorrect, you can observe a delay of 30 seconds.
- When you create a custom VC, start the ‘streamName’ with anything other than ‘CTX’.
For more information, see Citrix Virtual Channel SDK for Citrix Workspace app for HTML5.
Client Drive Mapping
Starting with the 2303 version, the Client Drive Mapping (CDM) feature supports folder mapping on the local machine so they’re accessible from within a session. You can map any folder from the local machine, provided that the folder doesn’t contain system files.
The end user can do the following operations:
- Copy files and folders from the local machine to the mapped drive in the session.
- View the list of files and folders in the mapped drive.
- Open and read file contents in the mapped drive.
- View the file properties (modified time and file size only) in the mapped drive.
This feature provides the advantage of accessing both virtual desktop drives as well as local machine drives together in the file explorer within the HDX session. This feature is supported on desktop platforms, Google Chrome, and Microsoft Edge Chromium browsers only.
Note:
- By default, this feature is enabled.
- Cloud based drives, for example, OneDrive and GDrive can be mapped provided it is supported by the cloud provider.
Known limitations
- You won’t be able to rename files and folders inside the mapped drive.
- Mappings will only have the name of the folder and not the full path.
- If your local folder has hidden files, and you mapped the same folder, the hidden files are visible inside the session in the mapped drive.
- You can’t change the file property to read-only access in the mapped drive.
- When you map a folder from the removable device and if you remove the device during an active session, you can’t use the mapped drive inside the session. You need to remove the mapping manually.
Know issues in the feature
- When you use the CDM feature on mobile platforms, the dialog box gets truncated from the top.
Configuration
You can configure the CDM feature in the following way:
- Configuration.js
Note:
As a prerequisite, an administrator must enable the Client drive redirection policy on the Delivery Controller (DDC). For more information, see Client Drive Redirection in the Citrix Virtual Apps and Desktops documentation.
Configuration.js
The configuration.js file is located in the C:\Program Files\Citrix\HTML5Client folder. Edit this file to configure the CDM feature.
Notes:
- Citrix recommends that you back up the configuration.js file before modifying it.
- Administrator-level credentials are required to edit the configuration.js file.
To disable the feature:
- Locate and edit the configuration.js file in the HTML5Client folder.
-
Add the clientDriveMapping attribute and set the attribute enabled to false. For example,
`features': { 'clientDriveMapping' : { 'enabled' : false, 'availableAccessLevels': [1, 2, 3], // 1 - Read-Write Access, 2 - Read-Only Access, 3 - No-Access //drop-down options 'accessLevel': 1 // 1 - Read-Write Access, 2 - Read-Only Access, 3 - No-Access //admin sets these values } } <!--NeedCopy-->
- Save the changes.
Access level
When you enable the feature, you can set the folder or drive access levels. For example, if an administrator sets availableAccessLevels as [2, 3], the end user can view the Read-Only Access and No-Access options in the drop-down list.
How to use the feature
-
Navigate to the Toolbar > more (…) > Map a drive.
-
Select the Access level for the folder or the drive. The drop-down option you see depends upon on the access level set by your organization’s IT administrator for your profile.
-
Select a Drive letter and click Browse to navigate to your folder or drive in your local machine.
- Click Add.
-
Disconnect and reconnect the session.
The session displays the drive letter that is mapped inside the session.
Combo box support on mobile platforms
Starting with the 2303 version, selecting UI elements within a combo box on small screens is smoother. An administrator can enable the policy Remote the combo box to make the user experience of selecting check boxes, drop-down list options, radio buttons, and more a smooth experience on iOS and Android mobiles.
For more information, see Remote the combo box in the Citrix Virtual Apps and Desktops documentation.
Note:
This feature is enabled by default.
Configuration
You can configure the enhanced touch experience in one of the following ways:
- Configuration.js
- Global App Configuration service
Configuration.js
In Citrix Workspace app for HTML5, the configuration.js file is located under C:\Program Files\Citrix\Receiver StoreFront\HTML5Client folder. Edit this file to configure the enhanced touch experience feature.
Notes:
- Citrix recommends that you back up the configuration.js file before modifying it.
- Administrator-level credentials are required to edit the configuration.js file.
To disable the enhanced touch experience feature:
- Navigate to the configuration.js file in the HTML5Client folder.
-
Add the enablePointerForTouchEvents attribute and set the attribute to false.
For example,
'ui': { 'touch': { 'enableMobileComboBoxRedirection': false } } <!--NeedCopy-->
- Save the changes.
Global App Configuration service
On the cloud setup, administrators can disable the feature by setting the enablePointerForTouchEvents attribute to False in the Global App Configuration service.
For more information, see Global App Configuration service documentation.
Gesture enhancements on touch devices
Starting with the 2304 release, Citrix Workspace app enhances end user experience for:
- gestures, multi-touch, and soft keyboard functionality on mobile devices.
- soft keyboard functionality on Tablet mode.
In your Citrix Workspace app sessions, you can use all the familiar multi-touch gestures, including the tap, swipe, drag, pinch and zoom.
Following is the gesture guide:
To do this: | On Citrix Workspace app, do this: |
---|---|
Single click | One-finger tap |
Right click | Touch-hold-release |
Open the on-screen keyboard | Three-finger tap (or from the toolbar, tap Keyboard icon) |
Zoom | Pinch in and out |
Drag | Touch, hold, and slide |
Enable cursor | Two-finger tap |
Automatic display of virtual keyboard
Starting from this release, a virtual keyboard automatically appears when you place the cursor on an editable field. This feature enhances the user experience on touchscreen devices, unlike the previous behavior where you had to click the keyboard icon to view the virtual keyboard.
In this article
- Content Collaboration Service integration
- Multi-monitor display
- Multi-monitor support
- Feature flag management
- Keyboard shortcuts
- USB device redirection
- Specifying the duration of overlay sessions
- DPI scaling
- Custom Cursor
- Customer Experience Improvement Program (CEIP)
- Selective H.264
- PDF printing
- Blocking PDF printing
- Session reliability
- Mobility support
- File Transfer
- Clipboard
- Toolbar
- Session sharing
- Audio
- Adaptive audio
- Plug and Play audio device support
- Webcam
- Host to client redirection
- Generic client IME for East Asian languages
- Security settings
- Global App Configuration Service
- End user experience
- Microsoft Teams optimization
- Virtual Channel SDK support
- Client Drive Mapping
- Combo box support on mobile platforms
- Gesture enhancements on touch devices
- Automatic display of virtual keyboard