Google Cloud
A connector configuration contains the credentials that the appliance uses to access a specific project on Google Cloud. You need a connector configuration for each Google Cloud project that you want to access with the appliance.
Creating layers on Google Cloud requires a Google Cloud connector configuration. This article describes the values required for the connector. See Connector configurations for more about configurations and how to create them.
Note:
The Google Cloud connector is currently not compatible with the Image Portability Service feature.
Before you start
Google Cloud requirements
This section explains:
- The Google Cloud account information required to create this connector configuration.
- The Google Cloud storage you need for App Layering.
Required Google Cloud Service Account and Service Account Key
The Google Cloud connector configuration requires the following information.
- Project - The Project Id of a Google Cloud project.
- Service Account Key File - For making API calls as the service account on behalf of the connector configuration.
- Storage Bucket: A storage location in Google Cloud for storing virtual disks uploaded by the connector.
- Instance Template: A Google Cloud VM template with the desired settings for creating a virtual machine.
- Disk Type: The type of Google Cloud storage.
- Zone: The Google Cloud Zone where you plan to create layers or publish images using the connector configuration.
Required Google Cloud storage bucket
Any account you use for App Layering must meet the following requirements:
- Must be separate from the storage bucket used for the appliance.
- Must be in the Google Cloud location where you plan to deploy virtual machines.
App Layering considerations
OS layer
If you plan to use an OS image created on another platform, be sure to prepare to:
- Export the OS layer from the App Layering appliance running on another platform.
- Import the OS layer using the App Layering appliance running on the Google Cloud.
- Add a version to the imported OS layer, to prepare it to run on the Google Cloud.
Platform layer
To create layers or publish layered images on Google Cloud, you only need a platform layer when you are publishing images to a provisioning service, such as Citrix® machine creation.
When you create a platform layer, there is no need to install Google Cloud tools on it. When Google Cloud tools aren’t present, Google Cloud installs them onto the packaging machine when the machine is started.
When you do create a platform layer, any software installers you need (for example, Provisioning Service software) must be accessible from the packaging machine.
Notes:
- If you plan to publish images to Google Cloud, use the Machine Creation for Google Cloud Connector, which can also be set up with the steps below.
- Both the Google Cloud Connector and Machine Creation for Google Cloud Connector are not compatible with the Image Portability Service feature.
Create a Google Service Account and Service Account Key File
Use the following procedures for each Google Cloud project that you want to connect with the App Layering appliance.
-
Log into console.cloud.google.com.
-
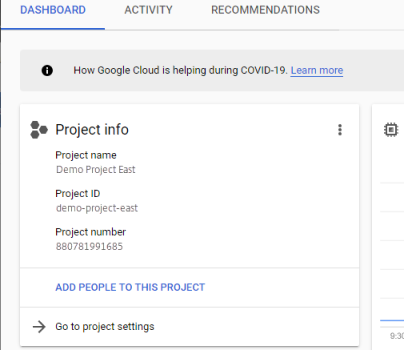
Select the project, and click Go To Project Settings.

-
On the left pane, click Service Accounts.
-
At the top of the page, click + CREATE SERVICE ACCOUNT.
-
Add the details for your service account
- Name for this service account: Descriptive name. For example, TestEast1
- Service Account Id: filled in with what you put in the name field, use that value.
-
Click the Create button.
Add the roles for your service account
In the Select Role box, select the roles required:
- Storage Admin
- Compute Admin
- Service Account User
-
Click the Continue button.
-
Click the Done button. User access to the role is not necessary.
Create a Service Account Key File
-
From the project, select the Service Account tab on the left.
-
Click the three vertical dots to the right of the service account you want to create the key file for.
-
Select Create key.
-
On the popup, select the JSON radio button and click the CREATE button.
-
When you are prompted to save the key to a file, enter the name of your choice or keep the default name. You are returned to the Service Accounts screen.
-
Click your service account to verify that the key is there.
Edit Service Account Roles
To edit the roles:
-
Navigate to the project UI screen as you did when creating the service account.
-
From the hamburger menu on the top left, expand the IAM & ADMIN and select Manage Resources.
-
Select your project, and on the right side type the Service Account you want to edit into the Filter Tree. The service account name is displayed.
-
Edit each of the roles to include or to remove from the roles and save the results.
Note:
If you remove all the privilege from the service account, it will no longer show on the IAM page (because IAM page only lists those account with at least one roles attached). But it will show up on Service Account screen. You would need to go to IAM page to add privileges back.
-
Click the ADD button.
-
On the Add members, roles to “current” project panel, in the New members field, type the name of the member to whom you want to give privileges.
-
Select the roles you want to give the member, and click the SAVE button.