Deploy user layers
User layers persist each user’s:
- Profile settings
- Data
- Locally installed applications in non-persistent VDI environments
When you enable user layers on an image template, systems provisioned using the resulting layered images provide every user with a user layer.
When a user logs in to a desktop that is user layer-enabled, a new Search index database is created. The index incorporates search information from the user layer and any elastic layers. The Search feature is only available when the indexing is complete.
This topic explains how to enable user layers on an image template, and the resulting layered images. Systems that you provision using the images provide every user with a user layer.
Types of user layers
You can enable the following types of user layers:
- Full: All of a user’s data, settings, and locally installed apps are stored on their user layer.
- Office 365: (Desktop systems) Only the user’s Outlook data and settings are stored on their user layer.
- Session Office 365: (Session hosts) Only the user’s Outlook data and settings are stored on their user layer.
You can enable a Full user layer, an Office 365 user layer, or a Session Office 365 user layer. The full user layer includes everything that the Office 365/Session Office 365 user layer saves, along with the settings and data for other applications.
Note:
Office 365 and Session Office 365 are deprecated.
Requirements
Before enabling user layers, be sure to meet the requirements that apply to the following types of user layers:
- All types of user layers
- Full user layers
- Office 365 and Session Office 365 user layers
All user layers
To enable user layers you need:
- Adequate network bandwidth. Bandwidth and latency have a significant effect on the user layer. Every write goes across the network.
- Enough storage space allocated for users’ data, configuration settings, and their locally installed apps. (The appliance uses the main storage location for packaging layers, publishing layered images, and serving up Elastic layers.)
Full user layers
-
When using Profile Management with a Full user layer you must clear the deletion of the user’s information on logoff. Depending on how you are deploying the settings, you can clear deletion using either:
- A Group Policy Object.
- The policy on the Delivery Controller™ (DDC).
Office 365 and Session Office 365 user layers
- Use a profile manager, such as the Citrix Profile Manager. Otherwise, Outlook assumes that every user who logs in is new and creates OS files for them.
- The Office layer must be included in the image template and deployed in the layered image. However, you can use other Elastic layers with an Office 365 user layer.
- Microsoft Office is supported as an app layer in a published image only, not as an elastic layer.
- Any change to the default location of the search index files is not preserved in the Office 365 layer.
- This feature has been tested for one desktop per user at a time (Single sign-on).
Note:
Office 365 and Session Office 365 are deprecated.
Compatibility
Full user layers are supported on the following platforms:
-
Operating systems:
All operating systems must be configured in single-user mode to work with user layers. Servers cannot be used in multi-user mode. User layers on session hosts are not supported.
- Windows 10, 64-bit
- Windows 11, 64-bit (only if deployed to a platform enabled for offload compositing)
- Windows Server 2016, single-user mode only
- Windows Server 2019, single-user mode only
-
Publishing platforms:
User layers are supported on the following publishing platforms.
- Citrix Virtual Desktops™
Applications that are not supported on a user layer
The following applications are not supported on the user layer. Do not install these applications locally:
- Enterprise applications: Enterprise applications, such as MS Office and Visual Studio, must be installed in app layers. User layers are based on the same technology as elastic layers. As with elastic layers, never use user layers for these enterprise applications!
-
Applications with drivers that use the driver store. Example: a printer driver.
Note:
You can make printers available using Group Policies. See GPO-installed printers in the following section.
- Applications that modify the network stack or hardware. Example: a VPN client.
- Applications that have boot-level drivers. Example: a virus scanner.
- Applications that require you to add a local user or group. Local users and groups that you add as part of installing an application only persist in the OS layer. Consider installing an application on a layer that will be included in the base image, with the required user or administrator added to the OS layer.
Windows updates
Windows updates must be disabled on the user layer.
Outlook store add-ins
Citrix Profile Management disables Store add-ins.
The first time Outlook starts, the Store/Add-ins icon on the ribbon displays a window with a long list of add-ins. During the initial login, if you install add-ins, they appear on the ribbon on subsequent logins. If you do not install the add-ins, the Store/Add-ins icon displays a blank white window.
GPO-installed printers
For users on non-persistent desktops running Windows 10, you can install printers using a Group Policy. With a policy in place, the printers are listed in users’ Devices and Printers, application printer settings, and device manager.
To set up GPO-installed printers:
- Enable user layers in the image template.
- Ensure that the desktop is joined to the domain (on the Platform layer).
- Create a group policy to deploy each network printer, and then assign it to the machine.
- When logged in as a domain user, verify that the printer is listed in Devices and Printers, Notepad, and device manager.
User layer format
User layer virtual disks are created using the VHDX format. You can still use the existing user layer VHD files without converting or recreating them. However, when both the VHD and VHDX files exist in the same folder, the VHDX file takes precedence.
How to override VHDX format for user layer virtual disk creation
You can change the behavior to force the user layers that are created to use the VHD format. To override this behavior, use the following system registry parameter:
-
Path:
HKEY_LOCAL_MACHINE\SYSTEM\CurrentControlSet\Services\ulayer -
Name:
DefaultUserLayerVHDXDisabled -
Type:
DWORD -
Data:
1
User Layer/UPL space reclamation
You can use User Layer/UPL space reclamation to automatically optimizes the VHDX files every time the user logs off.
How to enable User Layer/UPL space reclamation
Before enabling User Layer/UPL space reclamation:
- Optimize drives service
defragsvcmust be enabled and running This service is disabled for existing OS layers. - Citrix recommends creating a new OS layer version before enabling the feature.
You can enable User Layer/UPL space reclamation in either of the following ways:
- Using Citrix Studio
-
Using Windows registry editor
- Path:
HKLM\SOFTWARE\Policies\Citrix\UserPersonalizationLayerConfig - Name:
UserLayerCompactionEnabled - Type:
DWORD - Data:
1(Default value:0)
- Path:
This feature is disabled by default.
Enable user layers on a layered image
To deploy user layers, you enable the layers using the settings in an image template. For detailed steps, see Create or clone an image template. The rest of this article supplies details about sizing, storing, configuring security on, moving, and repairing user layers. It also covers the steps for customizing notifications for end users.
User layer location
When an image template has user layers enabled, the images you publish persist users’ data, settings, and locally installed apps.
When user layers are enabled, you must add storage locations for the layers.
Important:
Do not allow user layers to be saved on the appliance’s main file share. Otherwise, space can be depleted for:
- Upgrading the software.
- Serving up elastic layers to users.
- Saving files that you are moving to a hypervisor for which there is no supported connector.
The first storage location added to the appliance becomes the default location for user layers that are not associated with any other storage location. When you add more storage locations, they are listed in priority order.
You can assign groups of users to each storage location that you add.
Where a user layer is stored when the user belongs to more than one group
If a user belongs to more than one group and those groups are assigned to different storage locations, the person’s user layer is stored in the highest priority storage location.
If you change the priority order of the storage locations that the user is assigned to after the person’s user layer was saved to the highest priority location, the data saved up until that point remains in the original location. To preserve the person’s user layer, you must copy their user layer to the new highest priority location.
How to specify the user layer file share location on a specific image
You can support a user who needs to access two separate images at the same time, where both images:
- Need the persistence of user layers.
- Were created using the same OS layer.
To configure user layer file share assignments:
-
Add the following Registry key in one or more of your published images before any user logs in:
[HKLM\Software\Unidesk\ULayer] “UserLayerSharePath”
You can add the preceding key to the platform layer, to an app layer, or as a machine group policy.
If you add the UserLayerSharePath key to the image before a user logs in, the appliance ignores the user layer share assignments. Instead, all users on the machine use the specified share for user layer VHDX or VHDs. The \Users subtree is appended to this key to locate the actual layers.
How to specify a custom user layer path
You can set a custom path by creating a REG_SZ value called CustomUserLayerPath in the HKLM\Software\Unidesk\Ulayer key. The HKLM\Software\Unidesk\Ulayer key can include environment variables and Active Directory (AD) attributes.
In the CustomUserLayerPath value, all system variables can be expanded, but the only user variables that can be expanded are %USERNAME% and %USERDOMAIN%. The full path is:
<CustomUserLayerPath>\<OSID_OSNAME>
If you set the custom user layer path using GPO, use %<USERNAME>% and %<USERDOMAIN>% to prevent the GPO from expanding the paths.
- If
CustomUserLayerPathis defined, it is used instead of any other path. - If
CustomUserLayerPathis undefined,UserLayerSharePath, which is inside the same key, is used. - If
UserLayerSharePathis undefined, theStorageLocationlisted in the JSON for the App Layering appliance is used. You can edit theUserLayerSharePathin the management console, in the System > User Layer Storage Location setting. - If there is no
StorageLocationlisted in the JSON from the App Layering appliance, thenRepositoryPathis used. You can edit theRepositoryPathat the same registry location asCustomUserLayerPathandUserLayerSharePath. - When
CustomUserLayerPathis defined, the path where user layers are created is the expanded path, plus\<OSID_OSNAME>. All other paths are share paths, and they are appended to\Users\<Domain_UserName>\<OSID_OSNAME>.
If you use AD attributes, the attributes must be enclosed in hashes (for example, #aAMAccountName#). Custom AD attributes can be used to define organizational variables, such as locations or users. Attributes are case-sensitive.
Examples:
-
\\server\share\#sAMAccountName#stores the user settings in the UNC path -
\\server\share\JohnSmith(if#sAMAccountName#resolves to JohnSmith for the current user)
Where user layers are created on the appliance
On the appliance’s network file share, user layers are created in the Users folder. For example:
\MyServer\\*MyShare*\Users
<!--NeedCopy-->
Each user has their directory within the Users directory. A user’s directory is named as follows:
Users\\*DomainName_username*\\*OS-Layer-ID-in-hex*_*OS-Layer-name*\\*username*.vhd
<!--NeedCopy-->
For example:
- User’s login name:
jdoe - User’s Domain:
testdomain1 - OS layer: MyOSLayer (ID is in hexadecimal format: 123456)
- User layer is created in:
\MyServer\MyShare\Users\testdomain1_jdoe\123456_MyOSLayer\jdoe.vhd
<!--NeedCopy-->
Where users can access their user layer
When Full user layers are created, users can access the entire C:\ (subject to Windows rights and company security on the directories).
When Office 365 layers are created, the user layers directory is redirected to the Office 365 layer:
C:\user\\<username\>\Appdata\local\Microsoft\Outlook
<!--NeedCopy-->
Add a storage location
To add a storage location for an image’s user layers:
-
Log in to the management console.
-
Select System > User Layer Storage Locations. A list of file shares is displayed, except for the appliance’s main file share.
-
Select Add Storage Location, and enter a Name and Network Path for the new location.
-
Under Assignments, click Add Groups.
-
Expand the directory, select the desired users, and click Save.
-
Click Confirm and Complete to add the storage location.
Once the storage locations are added, you must set security on the user layer folders.
Configure security settings on user layer folders
You can specify more than one storage location for your user layers. For each storage location (including the default location) you need to create a \Users subfolder and secure that location.
A domain administrator must set the security on each user layer folder to the following values:
| Setting name | Value | Apply to |
|---|---|---|
| Creator Owner | Modify/Delete subfolders and files* | Subfolders and Files only |
| Owner Rights | Modify | Subfolders and Files only |
| Users or group | Create Folder/Append Data; Traverse Folder/Execute File; List Folder/Read Data; Read Attributes | Selected Folder Only |
| System | Full Control | Selected Folder, Subfolders, and Files |
| Domain Admins, and selected Admin group | Full Control | Selected Folder, Subfolders, and Files |
*On some servers, Creator Owner requires Delete subfolders and files (an advanced permission), so that App Layering can clean up after user layer repairs.
To configure security on user layer folders:
-
Log in to the management console.
- Click System > User Layer Storage Locations. The file shares displayed are the storage locations defined for user layers. Say you’ve defined three storage locations so that you can manage storage for Group1 and Group2 separately from everyone else in the organization:
`
-
Default location -
\\MyDefaultShare\UserLayerFolder\ -
Group1 -
\\MyGroup1\Share\UserLayerFolder\ -
Group2 -
\\MyGroup2\Share\UserLayerFolder\
Note: The appliance’s main file share, which is used for storing OS, app, and platform layers, is not listed as a user layer storage location. For more about the App Layering file share, see Setting up a file share.
-
Default location -
- Create a
\Userssubdirectory under each file share:
    \\MyDefaultShare\UserLayerFolder\Users\

    \\MyGroup1Share\UserLayerFolder\Users\

    \\MyGroup2Share\UserLayerFolder\Users\
<!--NeedCopy-->
- Apply the preceding list of security settings to each subdirectory under \Users.
Apply User personalization layer Studio policies to user layers
When user layers are enabled on a layered image, you can override the default repository path and layer size for the user layers by configuring the corresponding Citrix Studio Policies:
- User Layer Repository Path: Defines where on the network to access the user layers.
- User Layer Size GB: Defines how large to permit the user layer disks to grow.
If the published image is running a supported version of the VDA, and these policies have been defined, the path and size defined in the policies are given the highest priority.
An increase to the assigned user layer size takes effect the next time the user logs in. A decrease in assigned user layer size does not affect existing user layers.
Define the Studio policies for an image’s user layers
To configure the Citrix Studio policies for a layered image’s user layers:
-
In Citrix Studio, select Policies in the navigation pane:
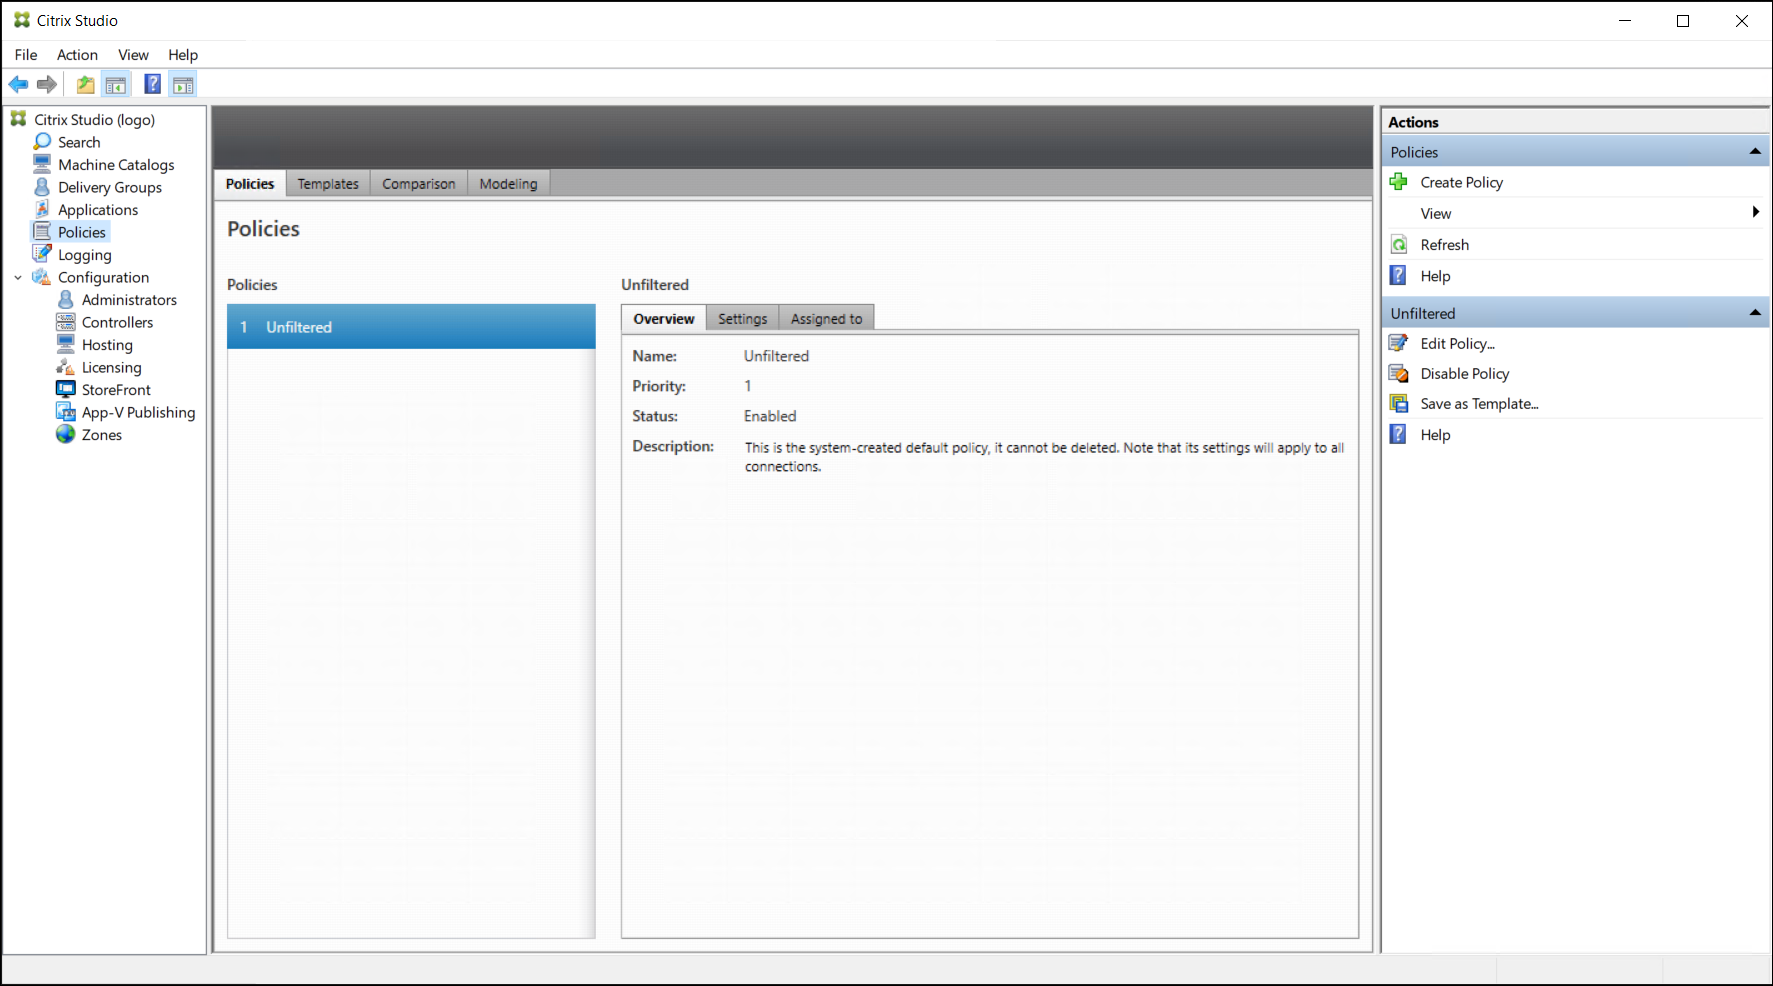
-
Select Create Policy in the Actions pane. The Create Policy window appears.
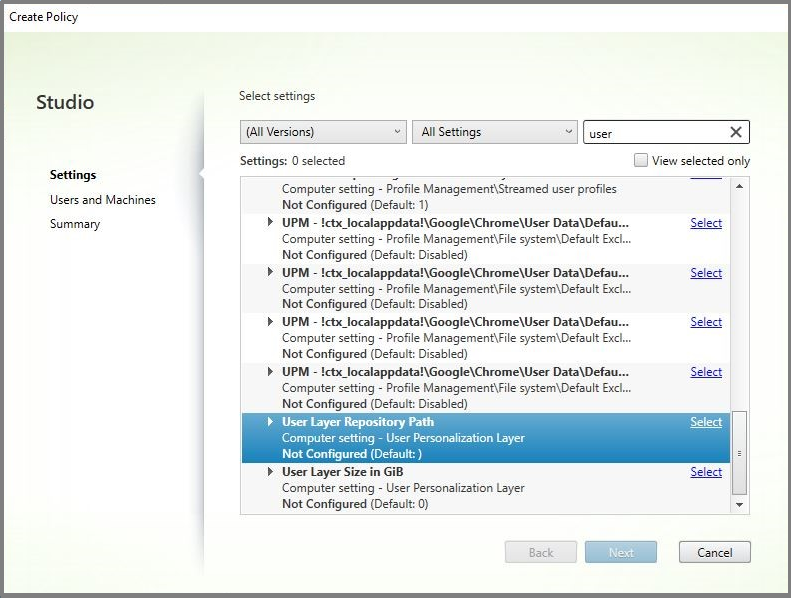
- Type ‘user layer’ into the search field. The following two policies appear in the list of available policies:
- User Layer Repository Path
-
User Layer Size GB
Note:
An increase to the assigned user layer size takes effect the next time the user logs in. A decrease to assigned user layer size does not affect existing user layers.
-
Click Select next to User Layer Repository Path. The Edit Setting window appears.
-
Enter a path in the format
\\server name or address\folder namein the Value field, Click OK: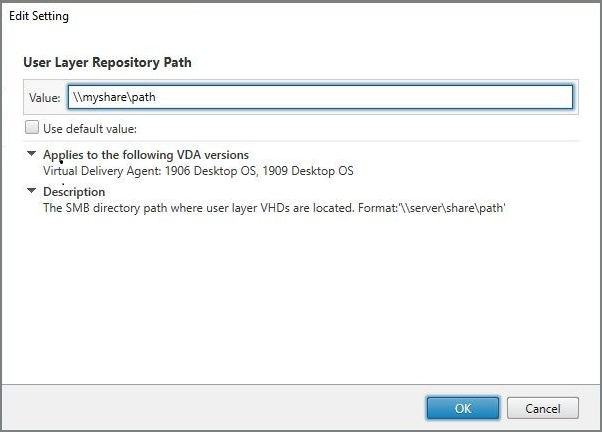
-
Optional: Click Select next to User Layer Size in GB:
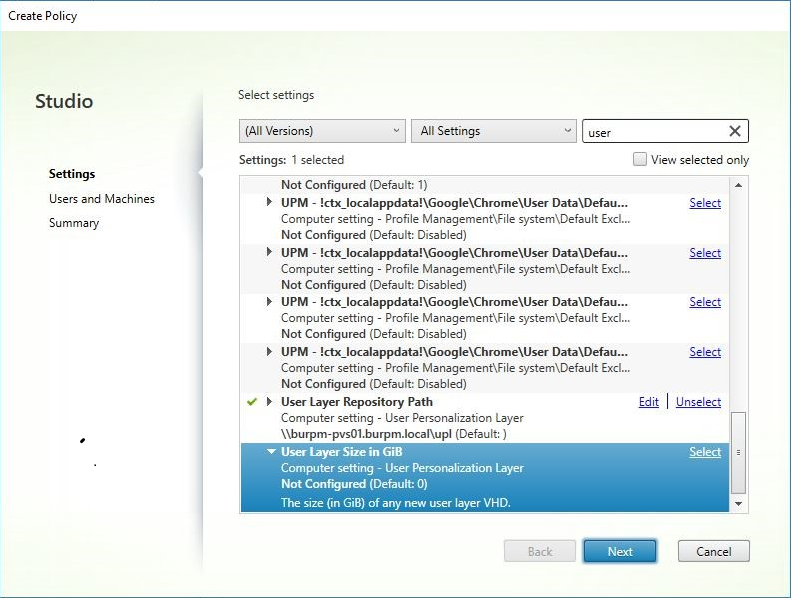
-
The Edit Settings window appears.
-
Optional: Change the default value of ‘0’ to the maximum size (in GB) that the user layer can grow. Click OK.
Note:
If you keep the default value, the maximum user layer size is 10 GB.
-
Click Next to configure Users and Machines. Click the Delivery Group Assign link highlighted in this image:
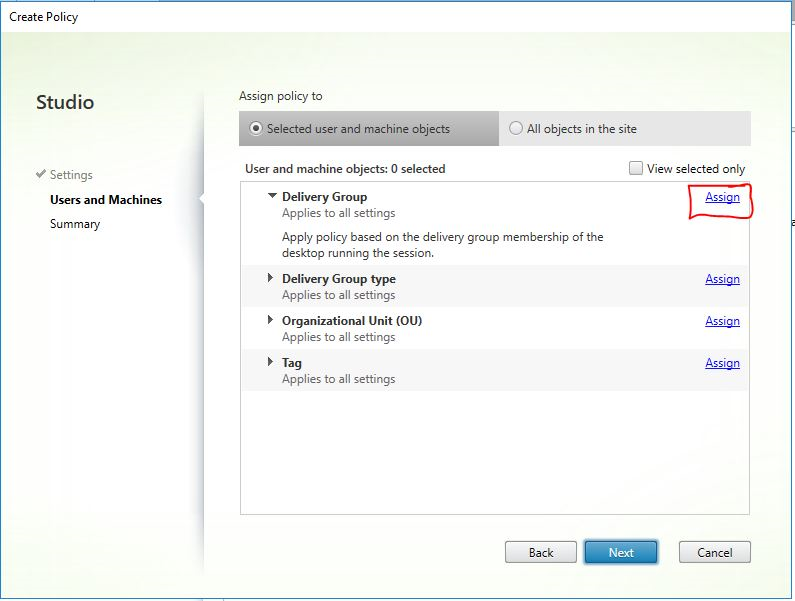
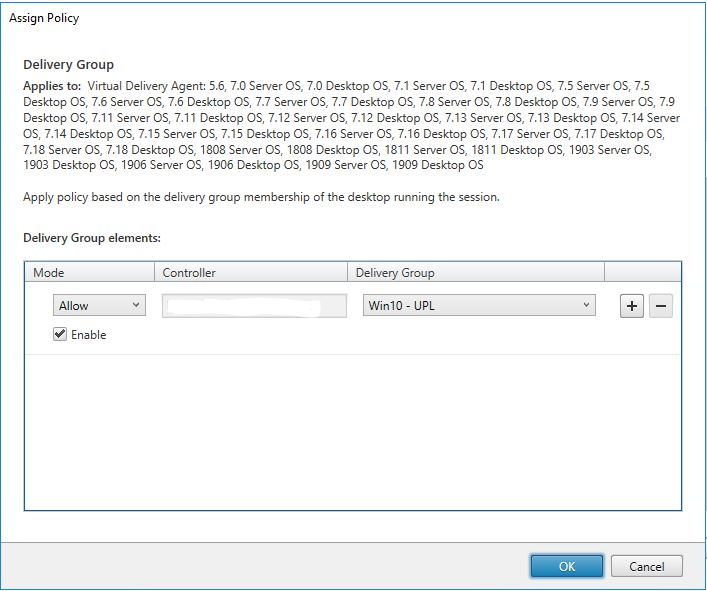
-
In the Delivery Group menu, select the delivery group created in the previous section. Click OK.
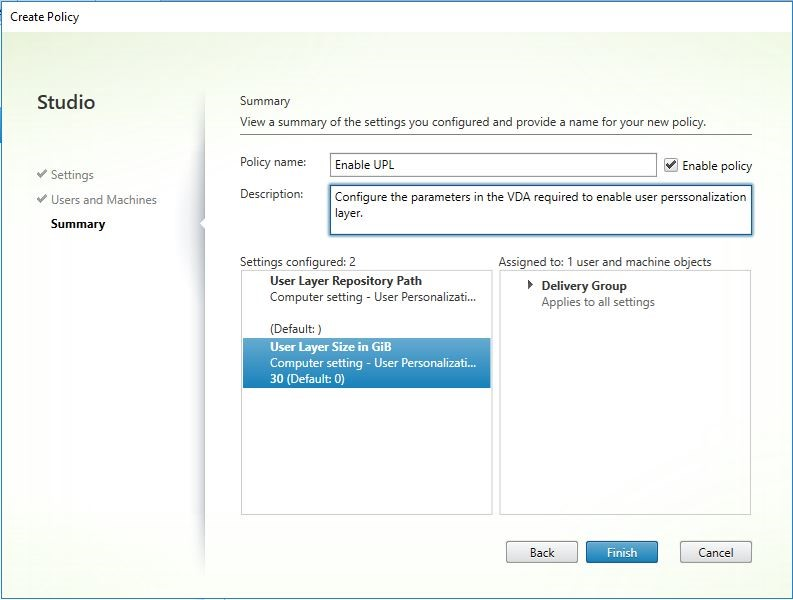
-
Enter a name for the policy. Click the checkbox to enable the policy, and click Finish.
Move existing user layers to a new storage location
Copy each user layer storage location to its new location:
-
Ensure that the user layer is not in use.
If a user logs in before you move their user layer, a new user layer is created. No data is lost, but if it happens, be sure to:
- Move the newly created user layer to the new directory.
- Preserve the user’s ACLs.
-
Browse to the directory containing the user layer VHDX or VHD file.
-
Using the following command, copy each of the user layer VHDX or VHD files from the previous location to the new one.
    xcopy Domain1\User1 Domain1_User1\ /O /X /E /H /K
<!--NeedCopy-->
- Verify that all permissions are correct on the following directories, and files within them:
    \\\Root\Engineering\Users

    \\\Root\Engineering\Users\Domain1_User1\\...

    \\\Root\Engineering\Users\Domain2_User2\\...
<!--NeedCopy-->
If you let users create user layers
If you choose to let users create user layers, you must manually clean up the original directories and files from your share.
User layer size
By default, the disk space allowed for an image’s user layers is 10 GB per layer.
You can change the default user layer size by:
- Defining a quota for the user layer share
- Setting a Registry override
When using Office 365 user layers, the Outlook layer defaults to 10 GB, but Outlook sets the volume size based on the amount of free disk space. Outlook uses more or less space based on what is available on the layered image. The size reported is based on the layered image.
Order of precedence
When deploying user layers, the appliance uses the following order of precedence to determine the user layer size:
- Disk quota on user layer size set using either:
- Microsoft File Server Resource Manager (FSRM)
- Microsoft Quota Manager
- A Registry override for user layer disks: (HKLM\SOFTWARE\Unidesk\ULayer\DefaultUserLayerSizeInGb)
- Default user layer size (10 GB)
Change the user layer size
Increasing to assigned user layer size will take effect the next time the user logs in. Decreasing to assigned user layer size does not affect existing user layers.
Define a disk quota for user layer disks
You can set a hard quota on the user layer disk size using either of Microsoft’s quota tools:
- File Server Resource Manager (FSRM)
- Quota Manager
The quota must be set on the user layer directory, named Users.
Note:
Changing the quota (increasing or decreasing) only impacts new user layers. The maximum size of existing user layers was previously set and remain unchanged when the quota is updated.
Set maximum size registry overrides
You can override the default user layer max size using the registry on managed machines. The following registry keys are optional. You do not have to configure these keys for normal operation. If you need one of these keys, add it manually using a layer or a GPO/GPP.
Registry Root: HKLM\Software\Unidesk\Ulayer
| Key | Type | Default Value | Description |
|---|---|---|---|
| UseQuotaIfAvailable | String | True; False | True to enable discovery and use of quotas. False to disable. |
| DefaultUserLayerSizeInGb | DWord | User defined | The size of the user layer in GB (for example 5, 10, 23, …) When not specified the default is 10. |
| QuotaQuerySleepMS | DWord | User defined | The number of milliseconds to wait after creating the directory for the user layer before checking to see if it has a quota. Some quota systems take time to apply the quota to the new directory, for example, FSRM. The default quota is 1000. |
Repair a user layer
The user layer repair feature lets you remove an app and its files from a person’s user layer. You can use this feature after delivering an app to users who have already installed the app locally on their user layer. The repair feature removes conflicting files whether you deliver the new app layer as part of the base image or as an elastic layer.
-
Example 1: You create an app layer that includes the file, you.txt, and provide the app layer elastically to users. When a user changes the file, the changes are stored in their user layer. If their changes break the app, or the file was corrupted, the user layer repair feature lets you clean up the problem file by removing it from the user layer. The user then sees the file that is provided elastically as part of the app layer.
-
Example 2: A user deletes an app that is assigned to them elastically. Because the user layer takes precedence, once the user’s local copy of the app is deleted, the user no longer sees that version of the app. The user sees the app layer that is assigned as an elastic layer.
-
Example 3: A user installs an application locally, and sometime later the administrator creates an app layer for the same application. The user layer repair feature removes any conflicting files installed by the app from the user layer so that the user then sees the version supplied in the app layer.
How user layer repair works
The appliance generates user layer repair JSON files that you can use to clean up or restore the user layer. You manually copy the JSON files to the user layers that need the repair.
If the repair upload folders do not exist on the network share they are created automatically. The appliance writes the repair JSON files to the following directories on the File share:
<StorageLocationShare>\Unidesk\Layers\App\Repair\
<StorageLocationShare>\Unidesk\Layers\App\PackageAppRules
<!--NeedCopy-->
The Repair directory contains the JSON files for each version of each layer that the appliance knows about. Whenever you finalize a new app layer or a version of it, the appliance generates and uploads the repair files.
The repair files for each layer include:
UserLayerRepair_LayerIdInDecimal_RevisionIdInDecimal.json
UserLayerRepair_<layer id>_<layer version>.json
<!--NeedCopy-->
To see the layer ID in the console, click the Layer tab, select the layer, and click the i icon. The layer ID is displayed along with other layer details.
The PackageAppRules directory contains the package app rules for each version of a user layer.
How long does it take to repair a layer?
The repair process time varies based on how large the layer is and how many objects need to be deleted.
A repair of a layer that needs to be mounted but has no actual operations to perform adds about 5 seconds to the login process. Login time is reduced to 2 seconds when the app layer is included in the image.
The time varies depending on the operations. For a typical app layer, it is less than 10 seconds, so 12–15 in total.
Repair a user layer
To repair the user layer for a user:
-
Identify the version of an app layer that must be repaired.
-
Locate the pre-generated UserLayerRepair files. If the files have not been generated, contact App Layering Support. Your Support engineer can generate the repair files manually for you.
-
Copy the user layer repair files directly to the user’s VHDX or VHD location. The next time the user logs in, a repair operation occurs.
If the user layer repair task is completed, the
UserLayerRepair.JSONfile is removed.Note:
If a JSON Rules file exists on the share and has been modified by the user, it is not overwritten. This allows users to modify those files as desired.
Log files for user layer repairs
The log file, ulayersvc.log, contains the output of the user layer repair executable.
C:\ProgramData\Unidesk\Logs\ulayersvc.log
<!--NeedCopy-->
Any changes made during the cleanup are logged there, along with any other changes that the service logs.
What happens if a repair fails?
In the event of a failure, the user receives a message that the repair has failed and that they must contact their admin. You can configure the message in the same place as the other storage location messages.
A repair failure can occur in the following cases:
- Bad UserLayerRepair.json formatting (unlikely, since the JSON files are generated).
- Cannot find a specified app layer’s .VHD or in-image package_app_rules file.
- Failure to attach an app layer’s VHD file.
- Unexpected (random) exceptions interrupting the repair process.
If any of these issues occur, the UserLayerRepair.JSON file is NOT removed, and processing of remaining JSON files stops.
To identify the exact reasons for the failure, review the user’s ulayersvc.log file. You can then allow the repair to run again on subsequent logons. Assuming the cause of the failure is resolved, the repair eventually succeeds, and the UserLayerRepair.JSON files are removed.
In this article
- Types of user layers
- Requirements
- Compatibility
- Enable user layers on a layered image
- User layer location
- Add a storage location
- Configure security settings on user layer folders
- Apply User personalization layer Studio policies to user layers
- Move existing user layers to a new storage location
- User layer size
- Repair a user layer