Manage Citrix Enterprise Browser™ through Global App Configuration service
Administrators can manage the following features using Global App Configuration service (GACS).
Note:
We recommend you to restart Citrix Workspace™ app when you modify the Citrix Enterprise Browser settings in GACS. However, you can also wait for the automatic refresh to complete. For more information on the sync duration of policies fetched from GACS, refer Frequency of settings update.
Use GACS to manage Citrix Enterprise Browser
The administrator can use Global App Configuration service (GACS) for Citrix Workspace to deliver the Citrix Enterprise Browser settings through a centrally managed service. GACS is designed for administrators to easily configure Citrix Workspace and manage the Citrix Workspace app settings. This feature allows admins to use the GACS to apply various settings or system policies to the Citrix Enterprise Browser on a particular store. The administrator can now configure and manage the following Citrix Enterprise Browser settings using APIs or the GACS Admin UI:
- Enable Citrix Enterprise Browser for all apps - Makes the Citrix Enterprise Browser the default browser for opening web and SaaS apps from the Citrix Workspace app.
- Enable save passwords - Allow or deny end users the ability to save passwords.
- Enable incognito mode - Enable or disable incognito mode.
- Managed Bookmarks - Allow an administrator to push bookmarks to the Citrix Enterprise Browser.
- Enable developer tools - Enable or disable developer tools within the Enterprise Browser.
- Delete browsing data on exit - Allow the administrator to configure what data the Citrix Enterprise Browser deletes on exit.
- Extension Install Force list - Allow the administrator to install extensions in the Citrix Enterprise Browser.
- Extension Install Allow list - Allow the administrator to configure an allowed list of extensions that users can add to the Citrix Enterprise Browser. This list uses the Chrome Web Store.
- Enable autofill address - Allows administrators to enable or disable the autofill suggestions for addresses.
- Enable autofill credit card - Allows administrators to enable or disable the autofill suggestions for credit card information.
- Auto launch protocols from origins - Allows administrators to specify a list of protocols that can launch an external app from the listed origins without prompting the user.
- Enable command-line flag security warnings - Allows administrators to display or hide security warnings, which appear when potentially dangerous command-line flags try to launch the Enterprise Browser.
- Manage default cookies setting - Allows administrators to manage cookies for a website.
- Manage default pop-ups setting - Allows administrators to manage pop-ups from a website.
- Extension install sources - Allows administrators to specify valid sources for users to install extensions, apps, and themes.
- Disable lookalike warning pages - Allows administrators to specify the preferred domains where lookalike warning pages don’t display when the user visits pages on that domain.
- Enable payment method query - Allows administrators to enable websites to check whether the users have saved payment methods.
- Manage saving browser history - Allows administrators to manage the saving of Enterprise browser history.
- Manage search suggestion - Allows administrators to enable or disable search suggestions in the Enterprise browser’s address bar.
- Enable export bookmark - Allows administrators to enable an option to export the bookmarks in the Enterprise Browser.
- Force ephemeral profiles - Allows administrators to clear or persist user profile data when users close the Enterprise Browser.
- Disable the address bar of the Enterprise browser - Allows administrators to disable the address bar of the Enterprise Browser, restricting users to open only the pre-approved web and SaaS apps.
- Change user agent for Enterprise Browser - Allows administrators to modify the Enterprise Browser’s user-agent for any internal web or SaaS apps.
Notes:
- The name and value pair are case-sensitive.
- All the browser settings in GACS are under the following categories:
         {
              "category": "browser",
              "userOverride": false,
              "assignedTo": [
                "AllUsersNoAuthentication"
              ]
        }
<!--NeedCopy-->
The administrator can apply the settings to unmanaged devices as well. For more information, see the Global App Configuration service documentation.
User interface
To configure Citrix Enterprise Browser through the GACS Admin UI, do the following:
Note:
The minimum version that is required is:
- Citrix Workspace app for Mac 2305, and the corresponding Citrix Enterprise Browser version is 112.1.1.23.
- Citrix Workspace app for Windows 2305, and the corresponding Citrix Enterprise Browser version is 112.1.1.24.
-
Sign in to citrix.cloud.com with your credentials.
Note:
- Refer to the Sign Up for Citrix Cloud article for step-by-step instructions to create a Citrix Cloud account.
-
Upon authentication, click the menu button in the top left corner and select Workspace Configuration.
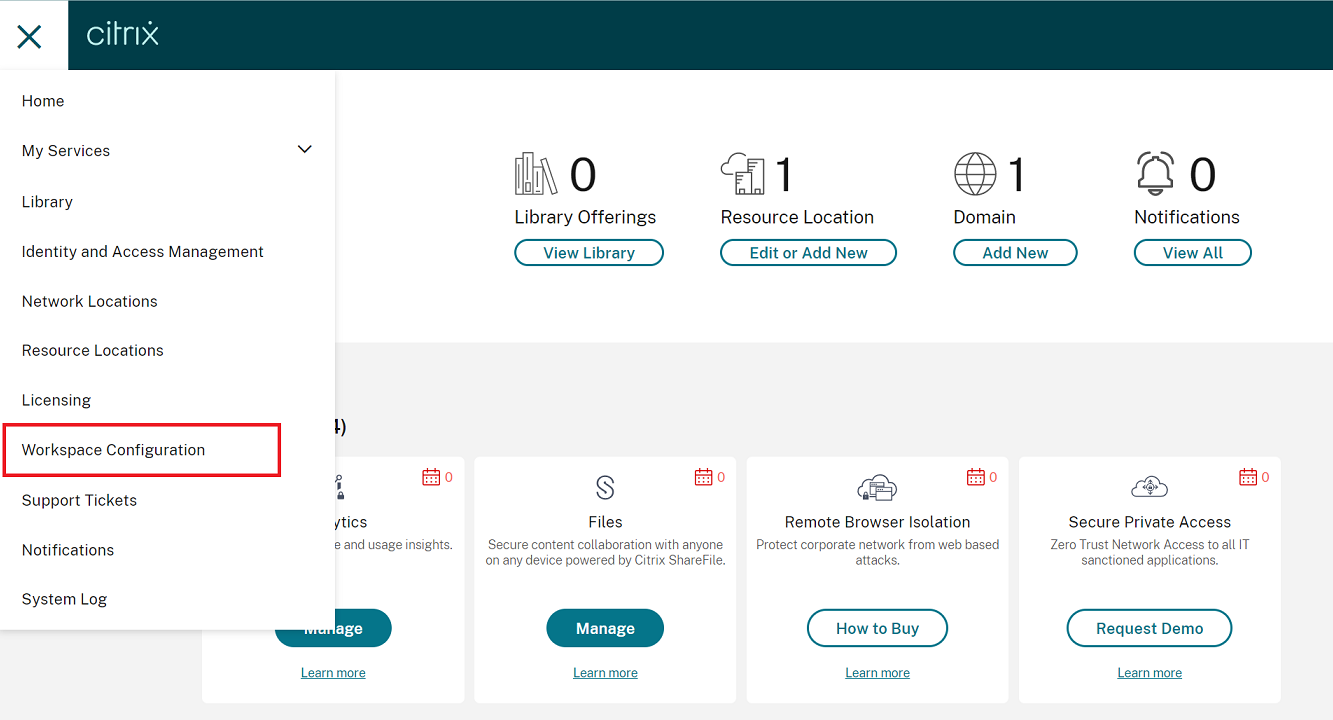
The Workspace Configuration screen appears.
-
Click App Configuration > Citrix Enterprise Browser.
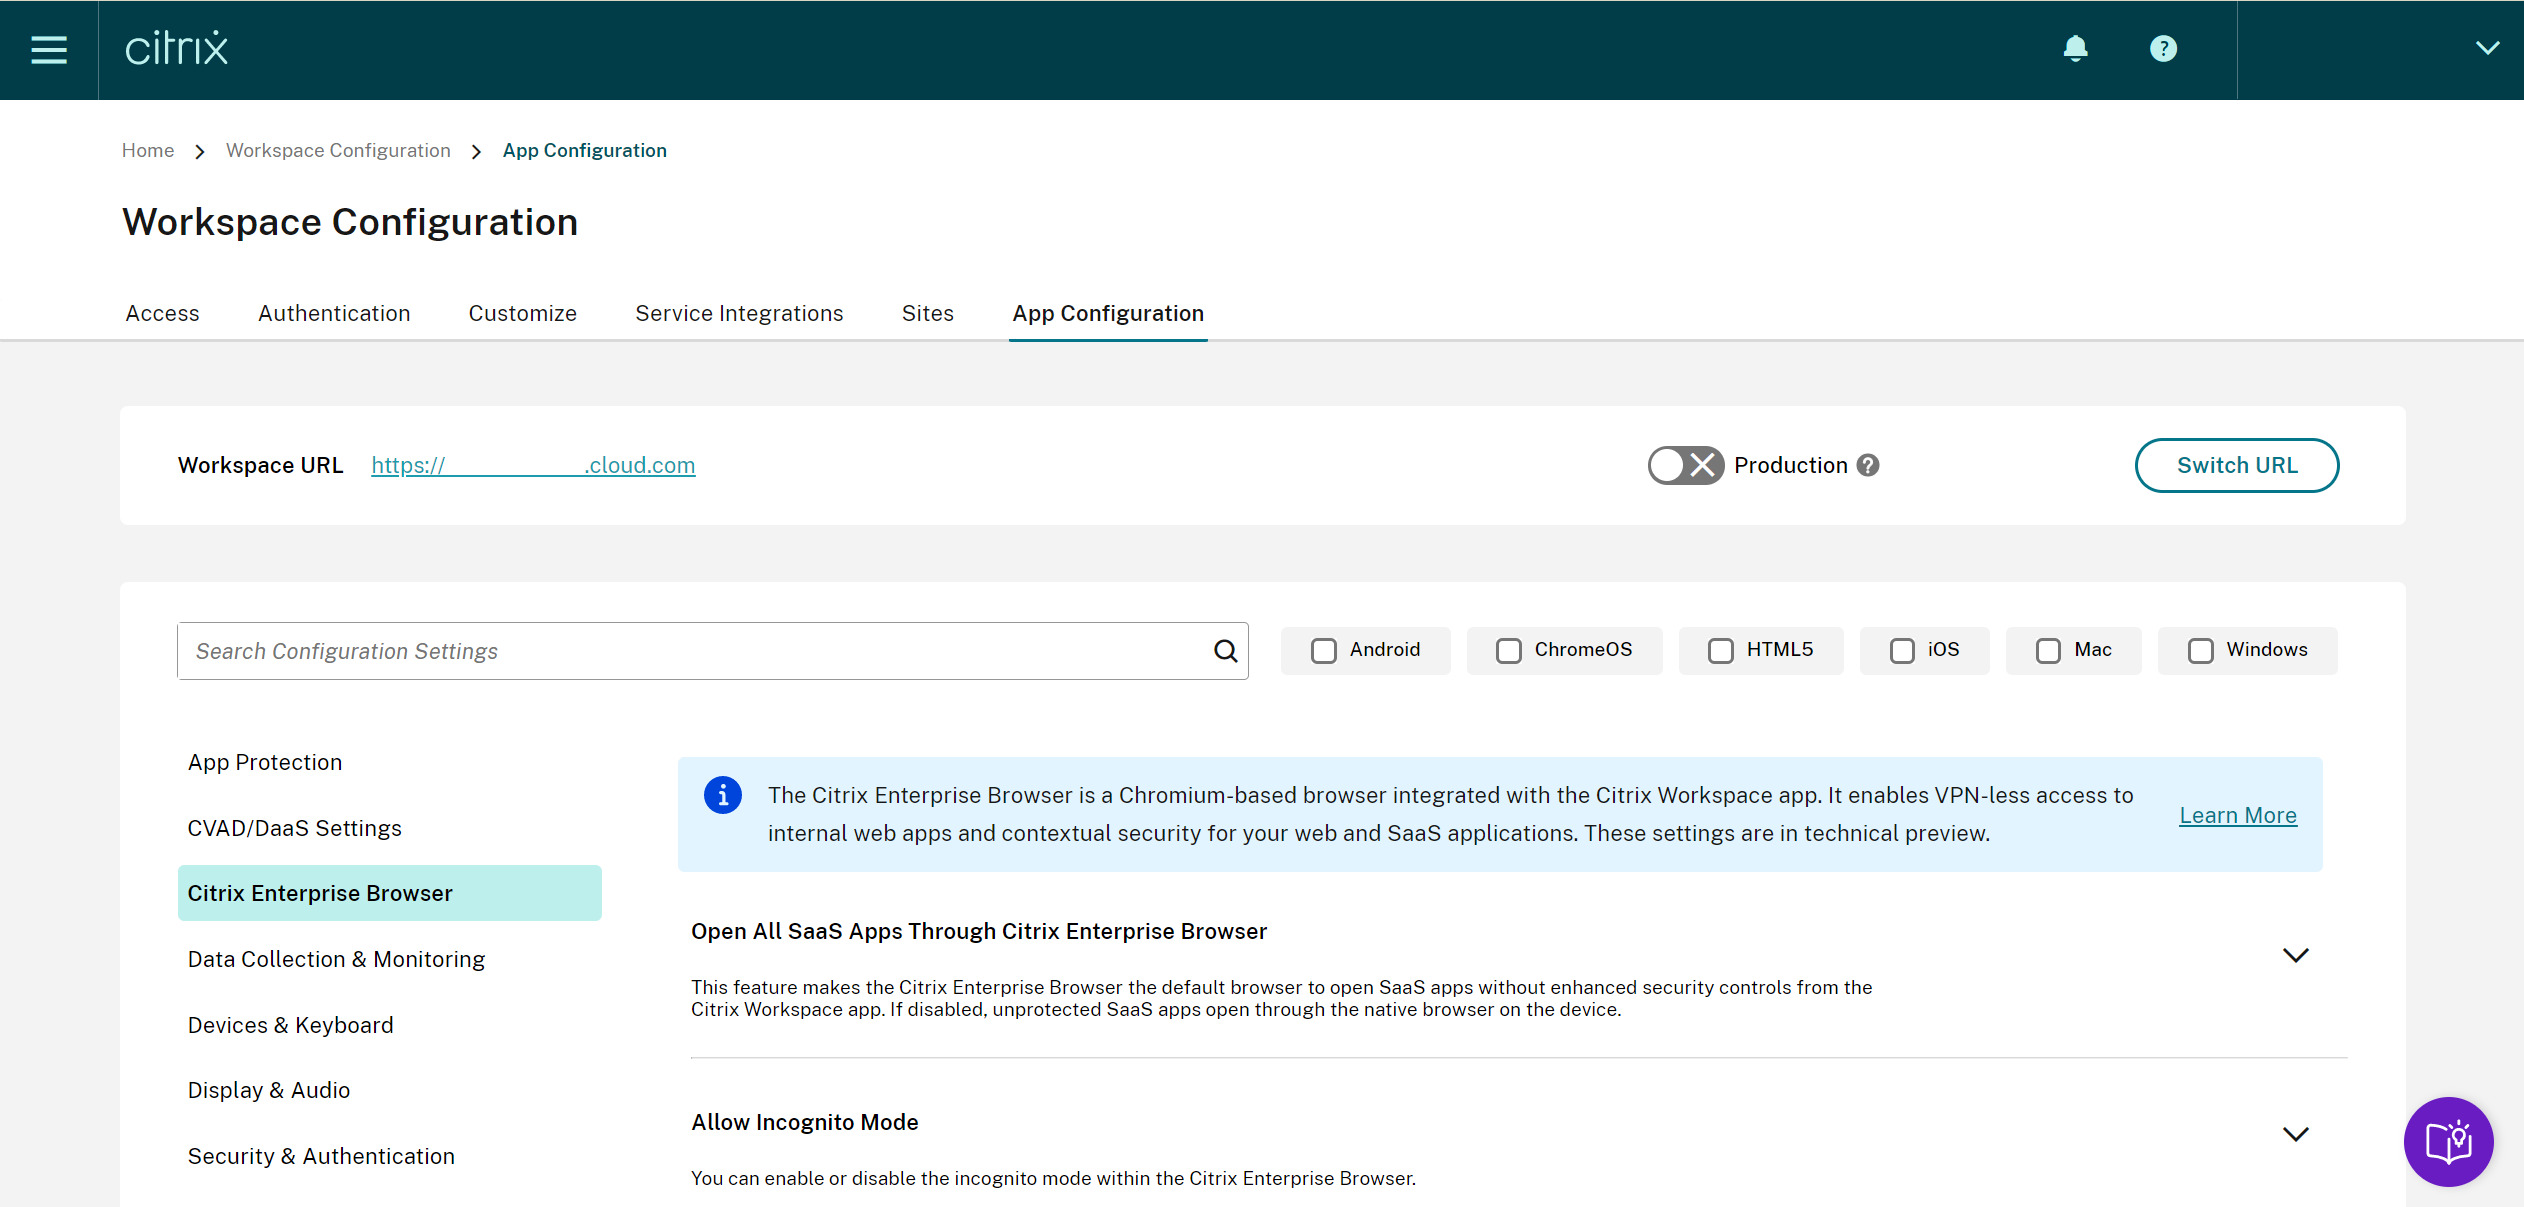
You can now configure, modify, and publish Citrix Enterprise Browser feature settings.
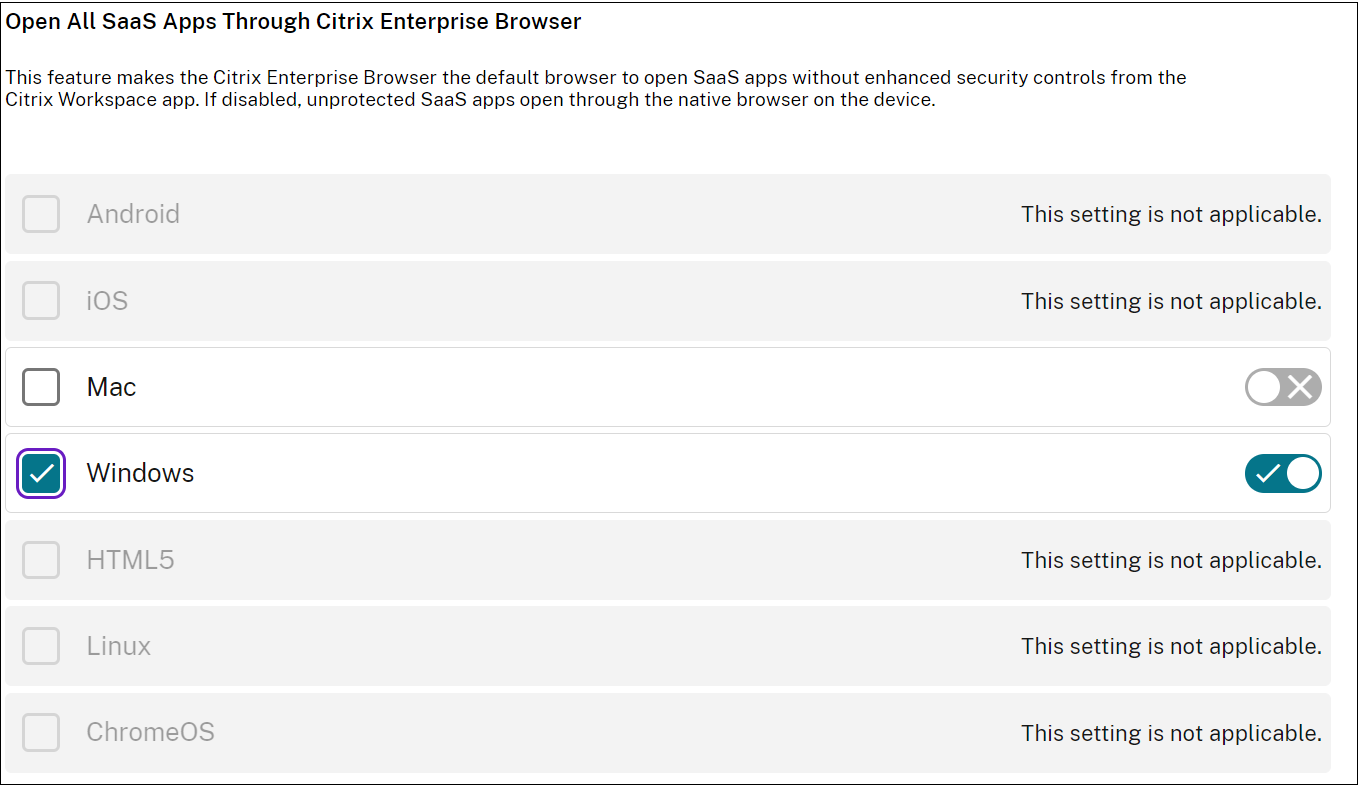
Enable Citrix Enterprise Browser for all apps
Administrators can configure Citrix Enterprise Browser as the default browser to start web and SaaS apps from the Citrix Workspace app.
Configuration through API
To configure, here is an example JSON file for Citrix Enterprise Browser for all apps as default:
 "settings": [
                  {
                     "name": "open all apps in ceb",
                     "value": "true"
                  }
                  ]
<!--NeedCopy-->
Note:
- The default value is true.
Configuration through UI
Select the appropriate checkbox from the UI:
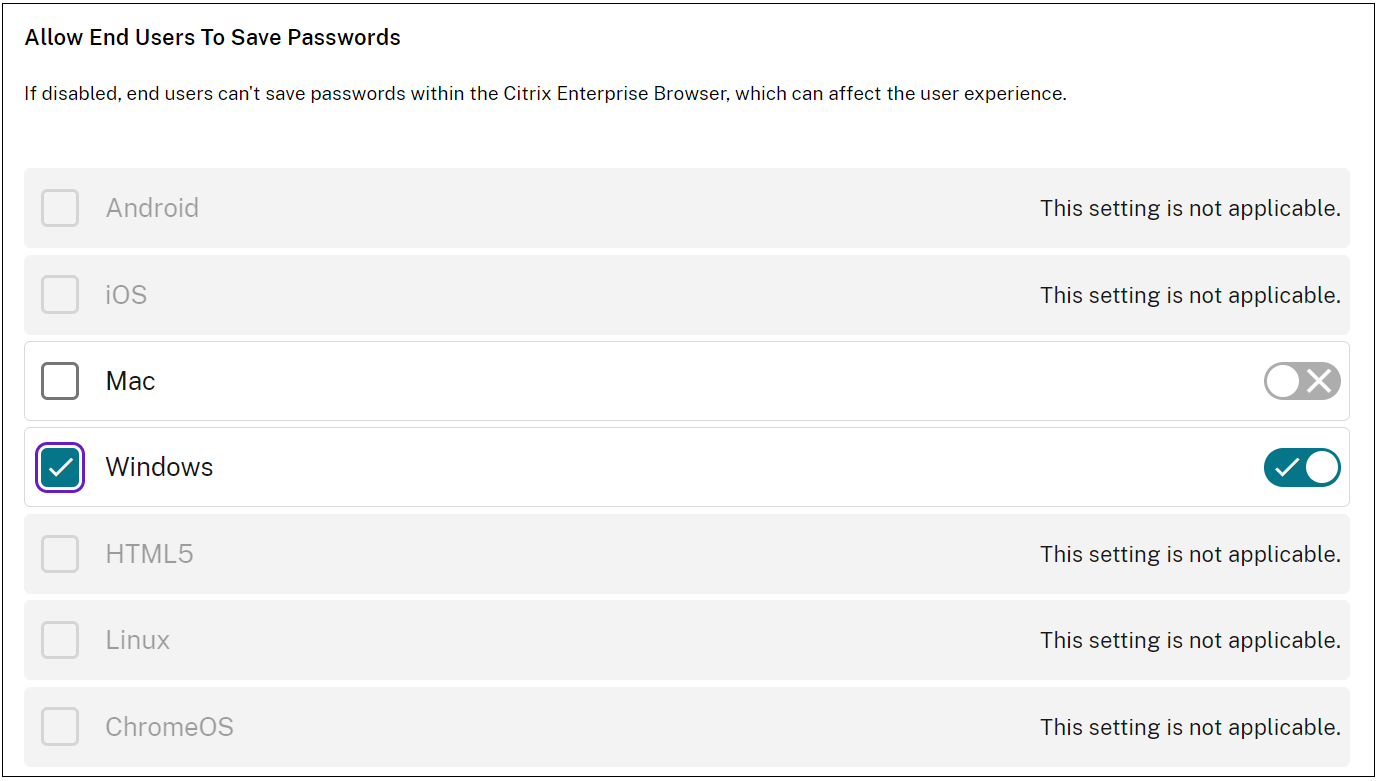
Enable save passwords
Administrators can allow or deny the saving of user passwords.
Configuration through API
To configure, here is an example JSON file to save passwords:
"settings": [
                 {
                    "name": "enable password save",
                    "value": "true"
                  }
                 ]

<!--NeedCopy-->
Note:
- The default value is true.
Configuration through UI
Select the appropriate checkbox from the UI:
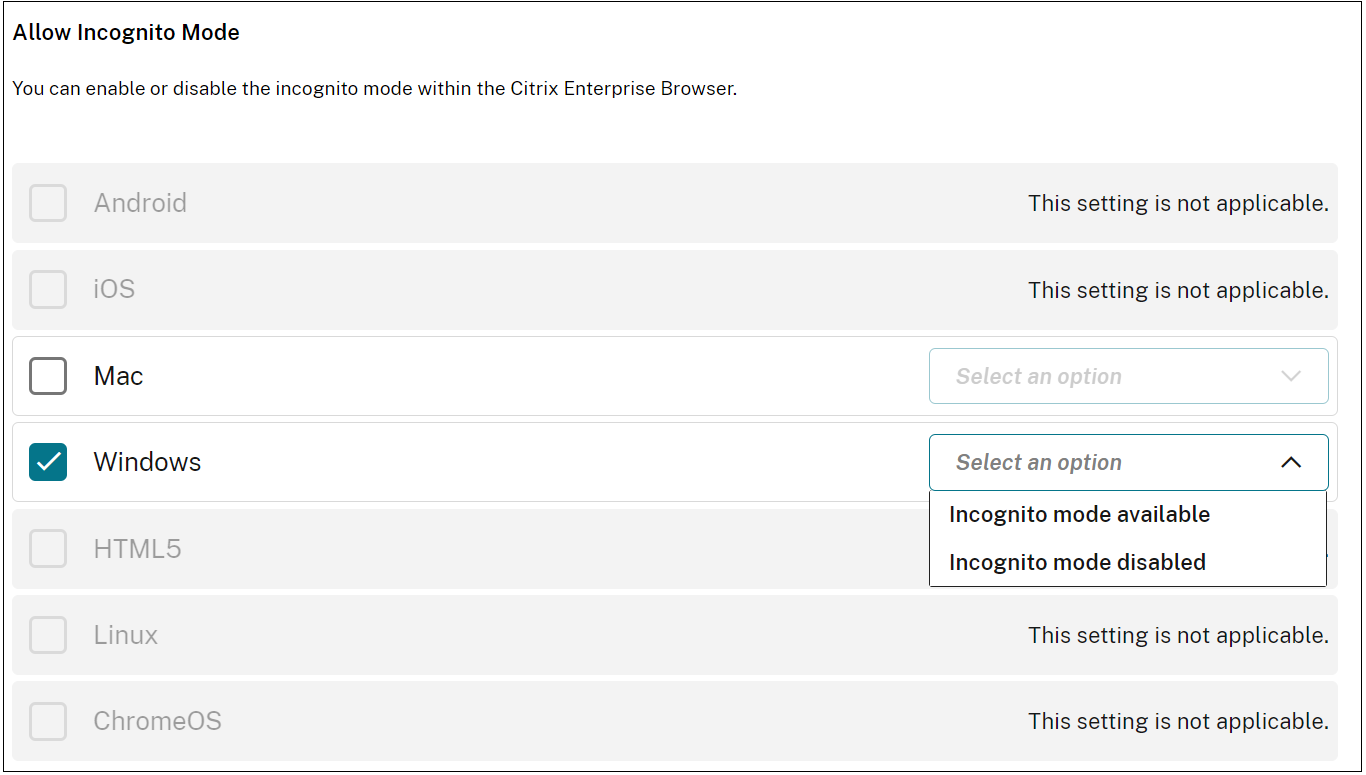
Enable incognito mode
Administrators can enable or disable incognito mode.
Configuration through API
To configure, here is an example JSON file to enable incognito mode:
"settings": [
                 {
                  "name": "Incognito mode availability",
                  "value": "Incognito mode available"
                 }
                 ]
<!--NeedCopy-->
The other possible values are:
- Incognito mode available
- Incognito mode disabled
Note:
- The default value is false.
Configuration through UI
Select the appropriate checkbox from the UI, and then select an option from the drop-down list:
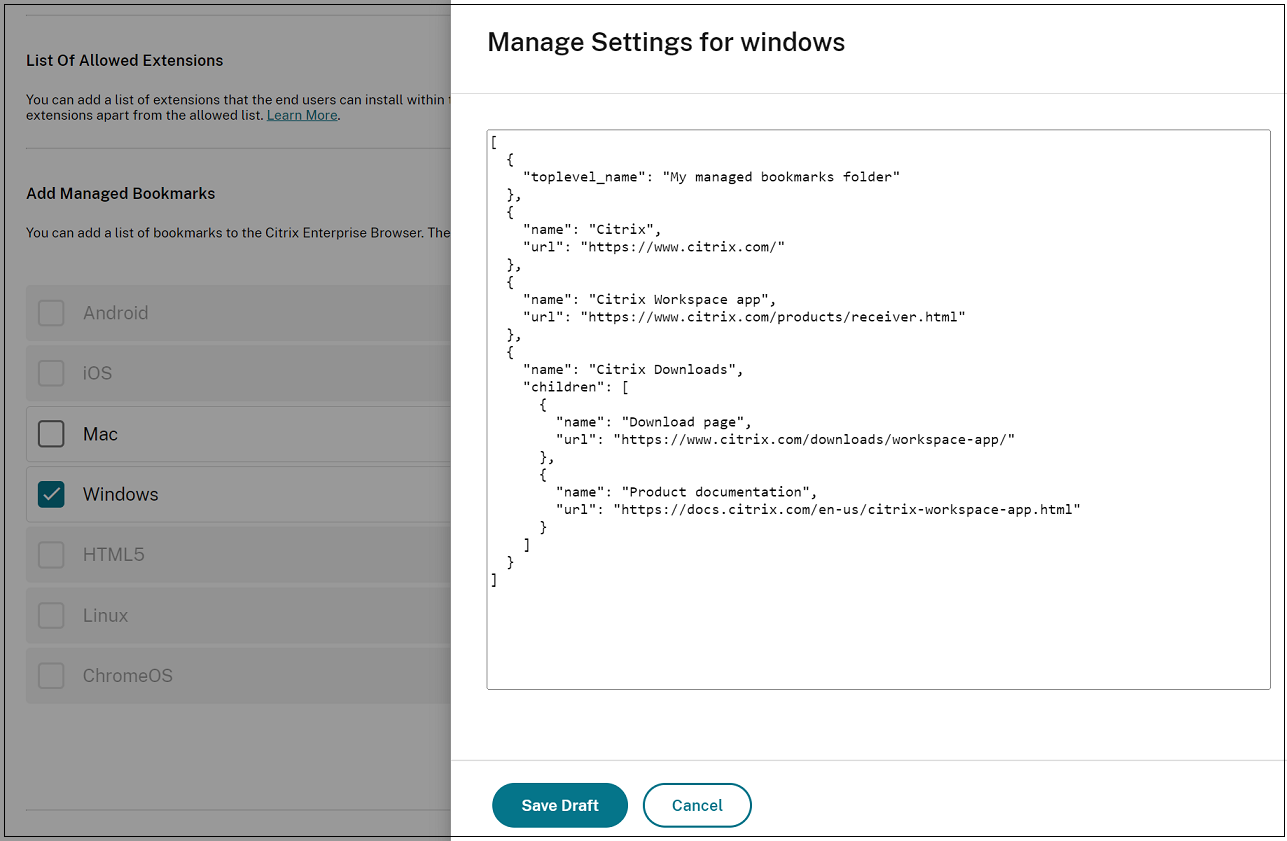
Manage bookmarks
Administrators can configure a list of bookmarks with a nested folder structure. The end user can access the preloaded bookmarks but can’t modify them. For more settings, see the Global App Configuration service.
Note:
- By default, the Bookmarks bar isn’t enabled in Citrix Enterprise Browser. The end user has to navigate to citrixbrowser://settings/appearance and enable the Show bookmarks bar option.
Configuration through API
To configure, here is an example JSON file to manage bookmarks:
       {
       "name": "Managed bookmarks",
       "value": [
            {
               "toplevel_name": "My managed bookmarks folder"
           },
           {
               "name": "Citrix",
               "url": "https://www.citrix.com/"
           },
           {
               "name": "Citrix Workspace app",
               "url": "https://www.citrix.com/products/receiver.html"
           },
           {
               "name": "Citrix Downloads",
               "children": [{
                       "name": "Download page",
                       "url": "https://www.citrix.com/downloads/workspace-app/"
                   },
                   {
                       "name": "Product documentation",
                       "url": "https://docs.citrix.com/en-us/citrix-workspace-app.html"
                   }
               ]
           }
       ]
   }
<!--NeedCopy-->
Note:
- The default value is an empty list.
Configuration through UI
Select the appropriate checkbox, and click Manage Settings. You can configure using the JSON data and save the changes.
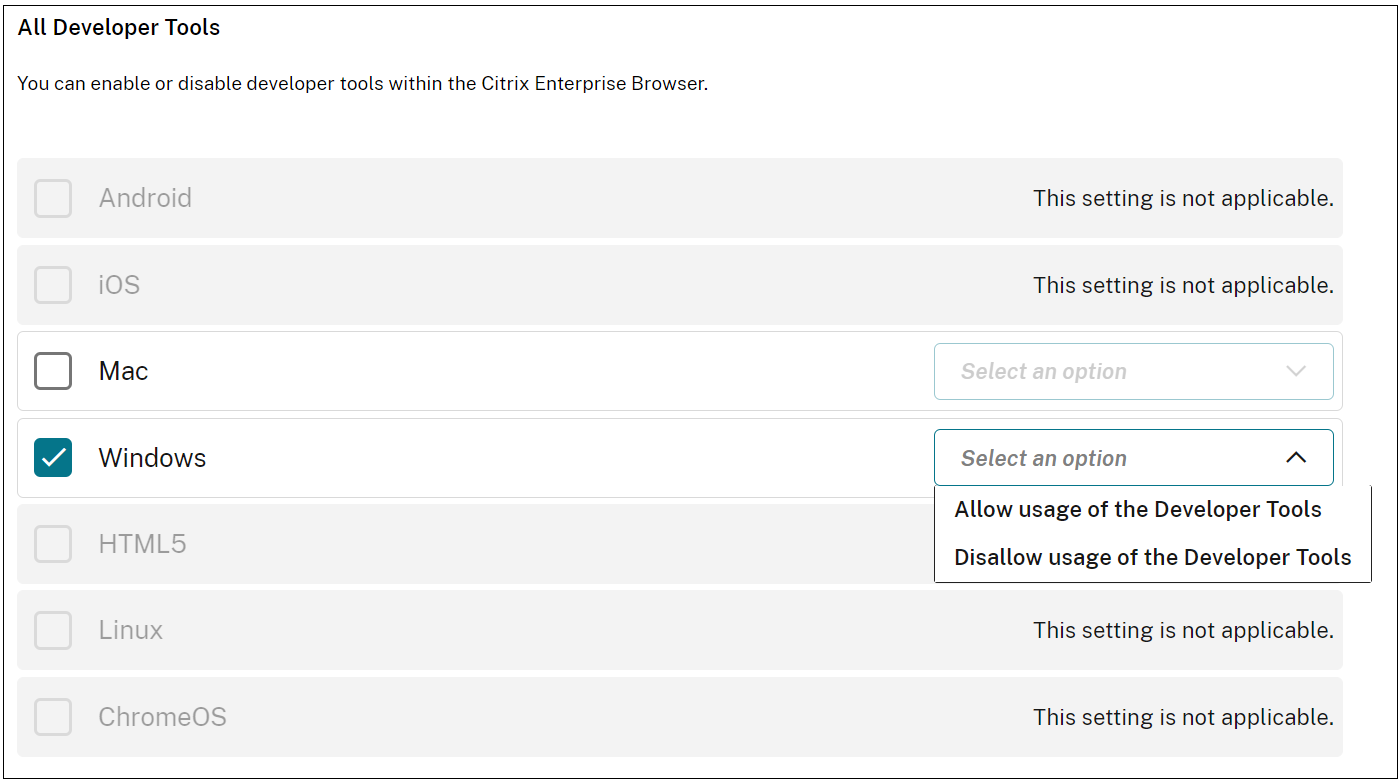
Enable developer tools
Administrators can enable or disable developer mode.
Warning:
If the Developer Tools option is enabled for end users, they can bypass all restriction policies applied to Citrix Enterprise Browser.
Therefore, we recommend that administrators enable Developer Tools for selected users only if they need it for debugging purposes.
Configuration through API
To configure, here is an example JSON file to enable developer tools:
 "settings": [
                  {
        "name": "developer tools availability",
        "value": "Allow usage of the Developer Tools"
                 }
                 ]
<!--NeedCopy-->
Other possible values:
- Disallow usage of the Developer Tools on extensions installed by enterprise policy
- Disallow usage of the Developer Tools
Note:
- The default value is Disallow usage of the Developer Tools.
Configuration through UI
Select the appropriate checkbox from the UI, and then select an option from the drop-down list:
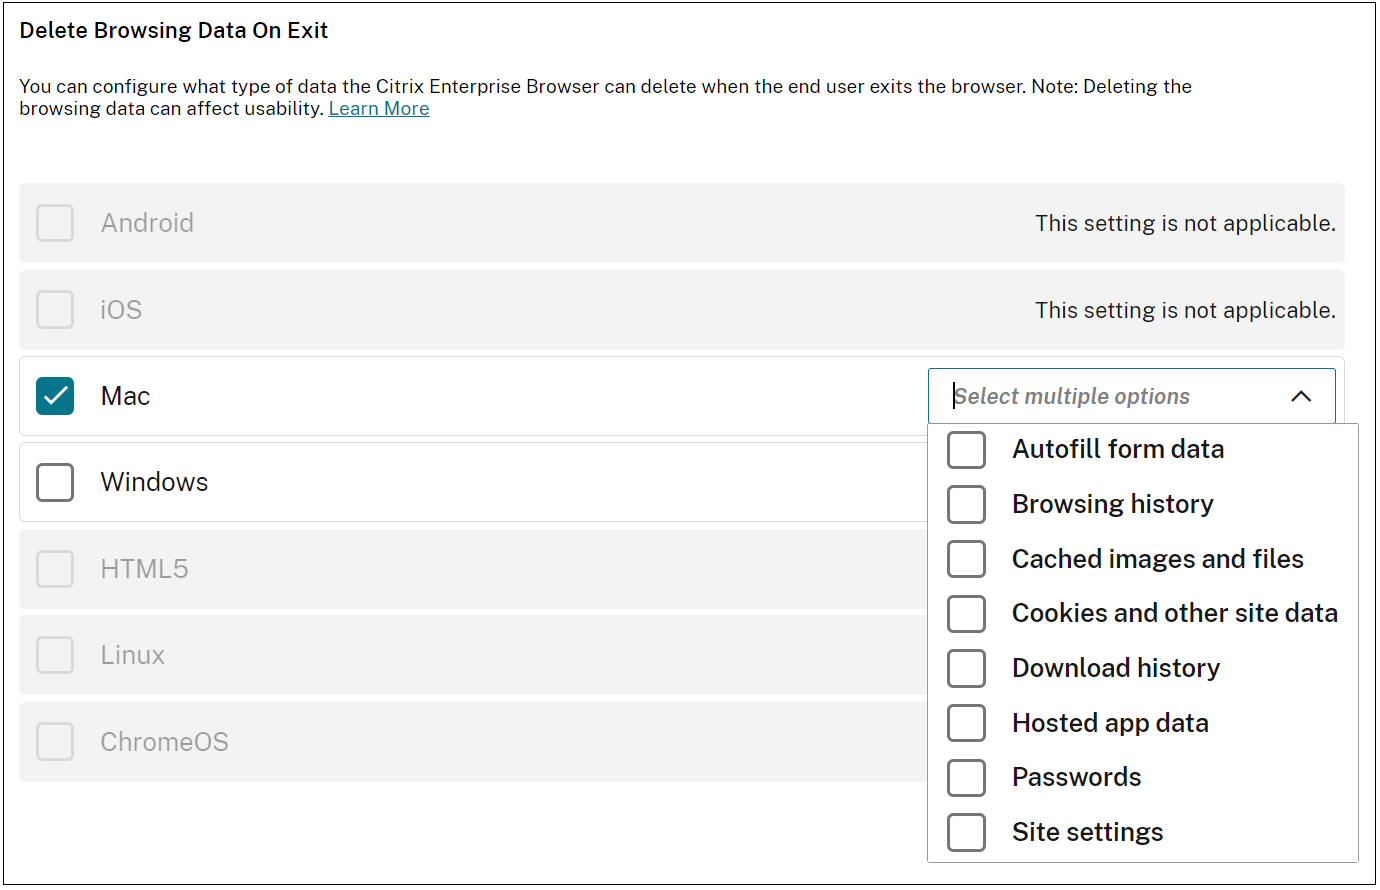
Delete browsing data on exit
Administrators can configure what data the Citrix Enterprise Browser deletes on exit.
Configuration through API
To configure, here is an example JSON file to delete browsing data upon exit:
 "settings": [{
        "name": "Delete browsing data on exit",
        "value": [
            "browsing_history",
            "download_history",
            "cookies_and_other_site_data",
            "cached_images_and_files",
            "password_signin",
            "autofill",
            "site_settings",
            "hosted_app_data"
        ]
       }]
<!--NeedCopy-->
Notes:
- You can exclude a value to avoid being deleted.
- The default value is an empty list.
Configuration through UI
Select the appropriate checkbox from the UI, and then select an option from the drop-down list:
Support for browser extensions
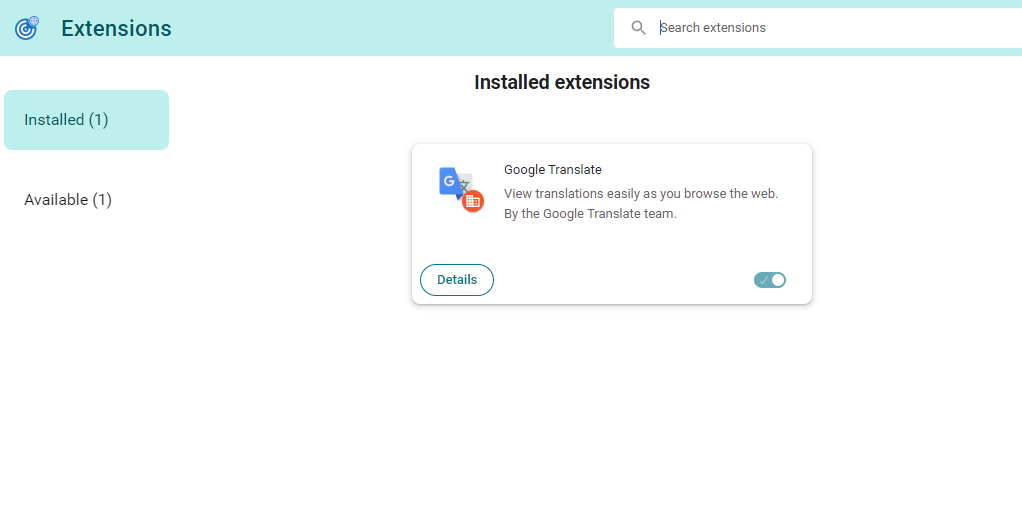
You can add extensions that are provided by your administrator to the Citrix Enterprise Browser in a secure way. An administrator can deploy, manage, and control the extensions. End users can view and use the extension under citrixbrowser://extensions as required. For more settings, see the Global App Configuration service.
For more information on how to identify an extension ID, see the How to identify an extension ID article.
How to configure
There are two categories of extensions:
-
ExtensionInstallForcelist: The administrator can configure a list of extensions that are mandatorily added to the end user’s browser profile. End users can view these extensions under the Installed section in the UI. The user can’t uninstall any of the extensions.
-
ExtensionInstallAllowlist: The administrator can configure a list of extensions as part of the allowed list. End users can view these extensions under the Available section in the UI. Users can decide if they want to add a particular extension or not. Users can uninstall an extension if necessary.
Note:
- In case the administrator has no extensions configured under the Installed and Available sections, the end user might not view the extension manager icon in the address bar.
Mandatory extension
The administrator can configure the list of mandatory extensions in one of the following ways:
Configuration through API
To configure, here is an example JSON file for ExtensionInstallForcelist:
{
   "category": "browser",
    "userOverride": false,
    "assignedTo": [
     "AllUsersNoAuthentication"
                  ],
    "settings": [
                     {
        "name": "Extension Install Force list",
        "value": [
            "extension_id1",
            "extension_id2"
                     ]
                     }
                     ]
}
<!--NeedCopy-->
Note:
- The default value is an empty list.
Configuration through UI
Select the appropriate checkbox from the UI, and then click Manage settings. You can configure using the JSON data and save the changes.

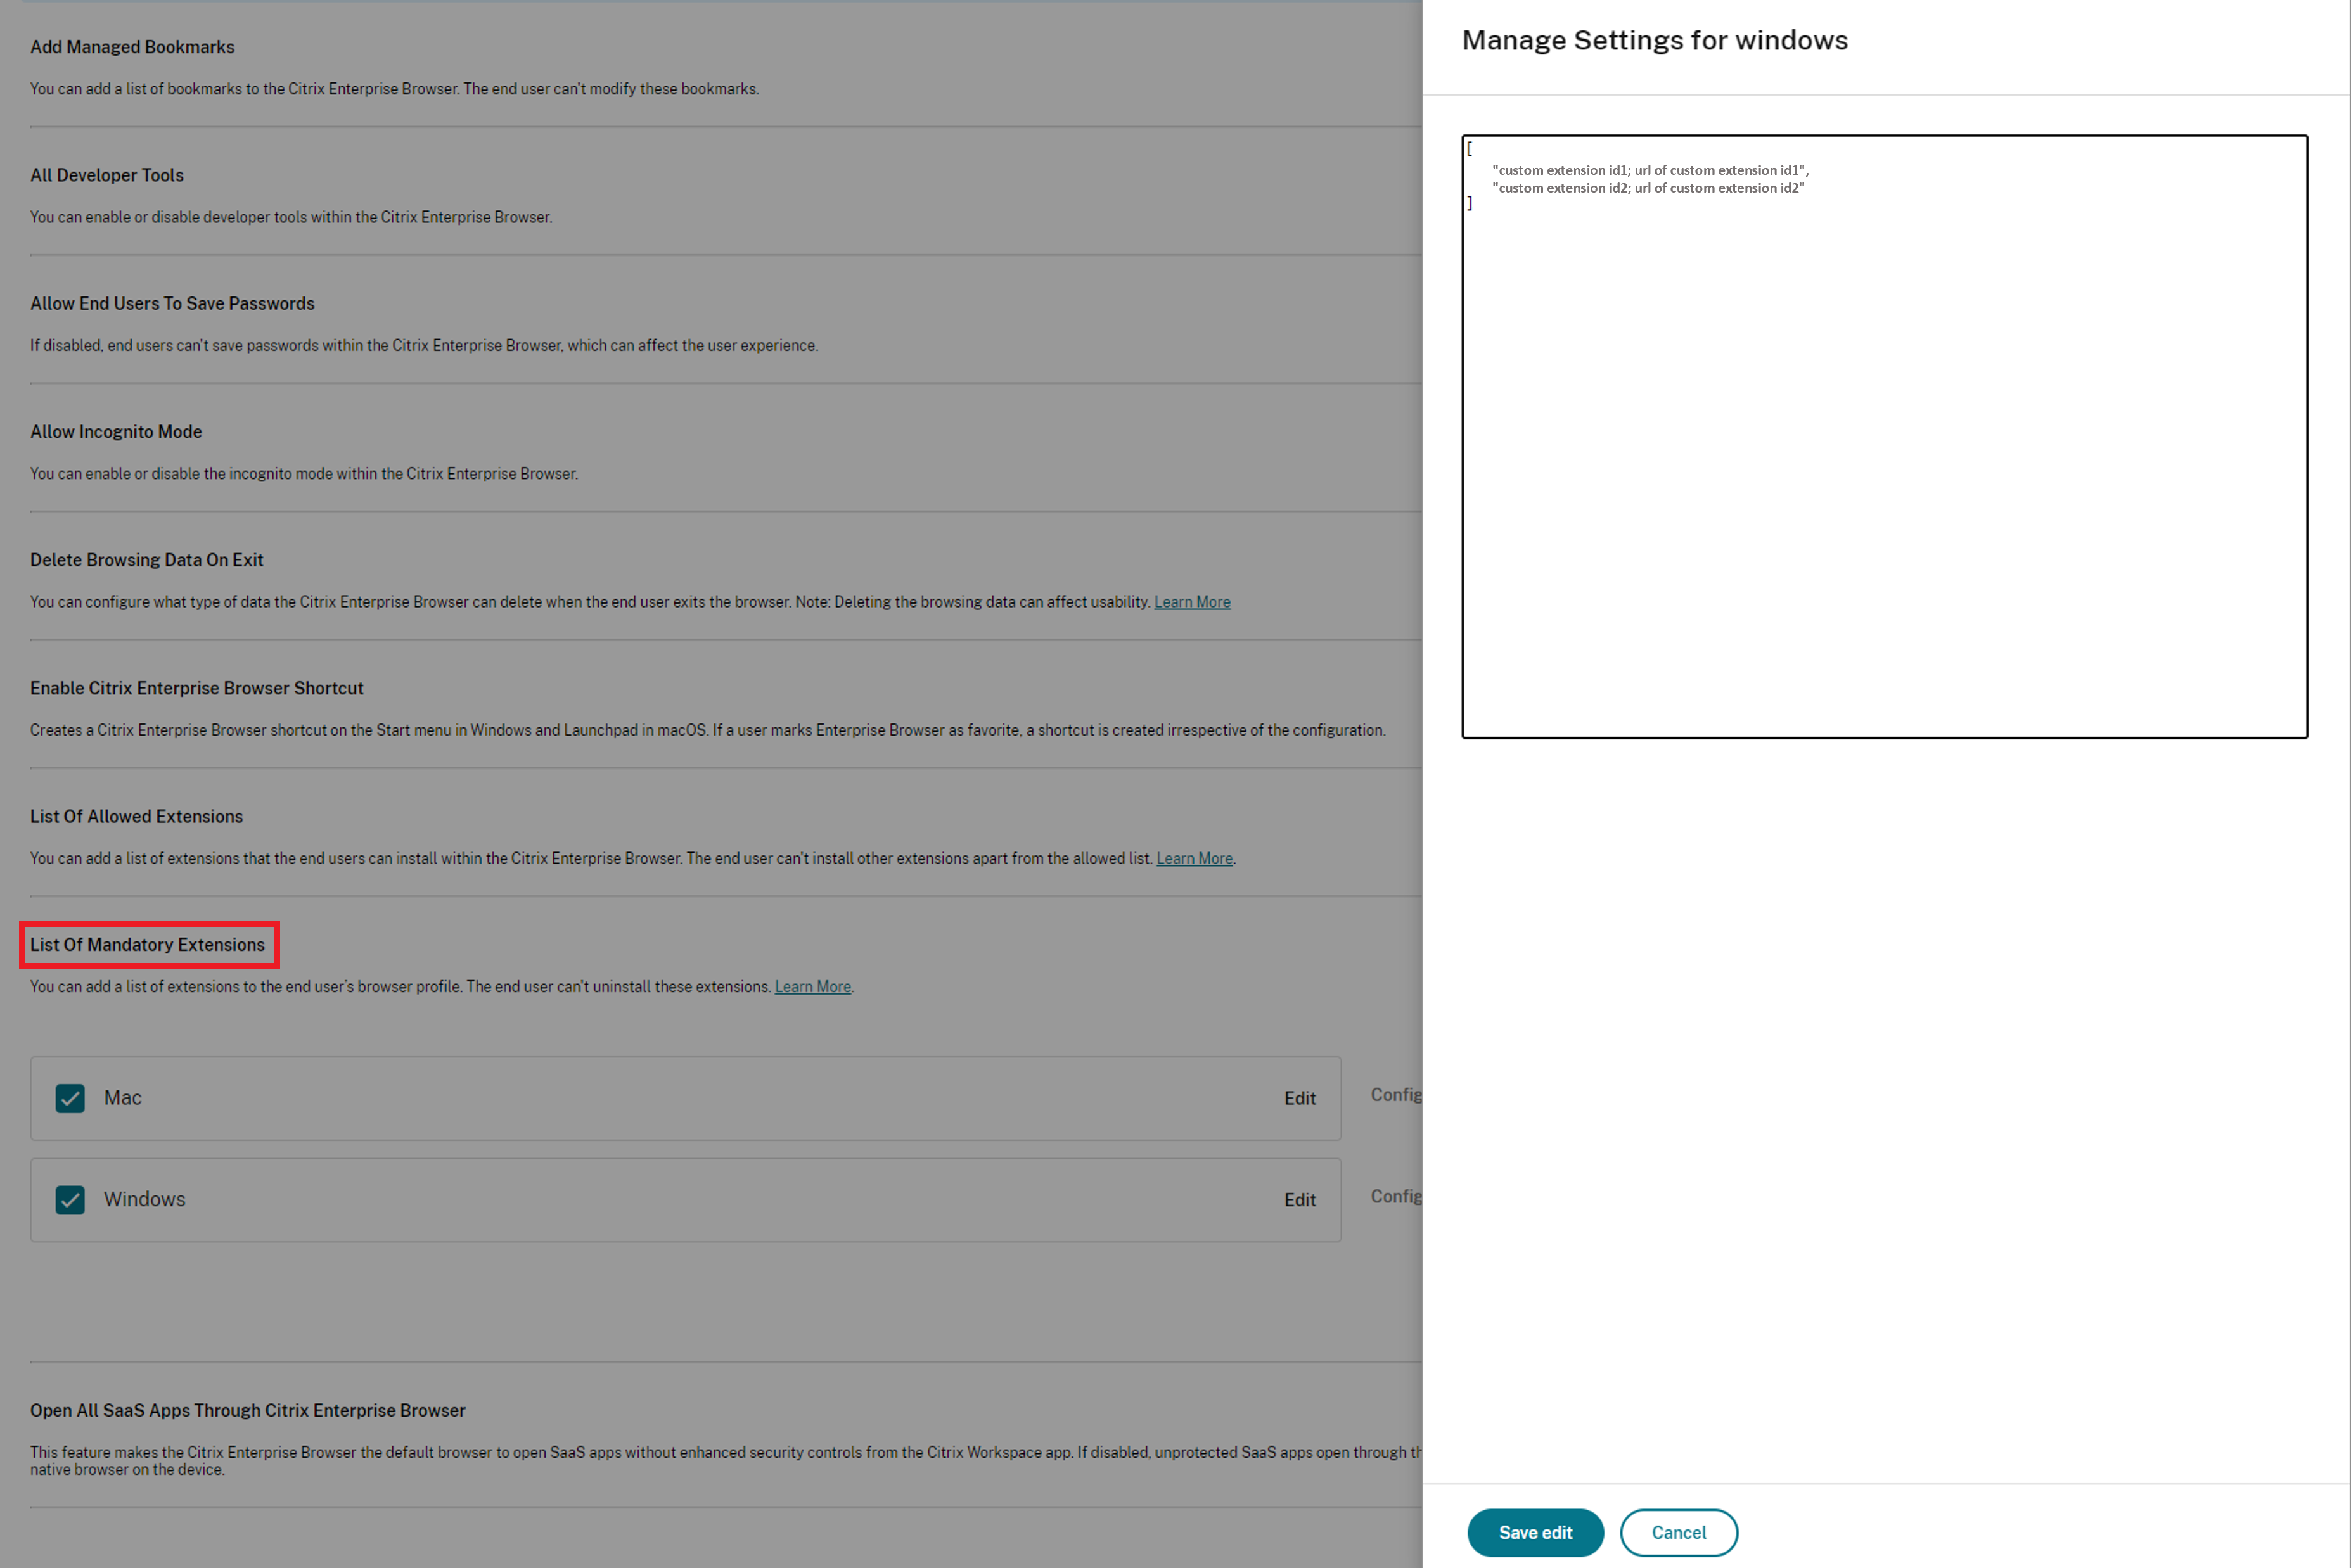
Mandatory custom extension
The administrator can configure the custom extensions as part of the mandatory list in one of the following ways:
Configuration through API
To configure, here is an example JSON file for ExtensionInstallForcelist:
{
"category": "browser",
"userOverride": false,
"assignedTo": [
"AllUsersNoAuthentication"
              ],
"settings": [
                   {
     "name": "Extension Install Force list",
     "value": [
            "custom extension id1; url of custom extension id1",
            "custom extension id2; url of custom extension id2"
                        ]
                        }
                        ]
}
<!--NeedCopy-->
Note:
The default value is an empty list.
Configuration through UI
Select the appropriate checkbox from the UI, and then click Manage settings. You can configure using the JSON data and save the changes.
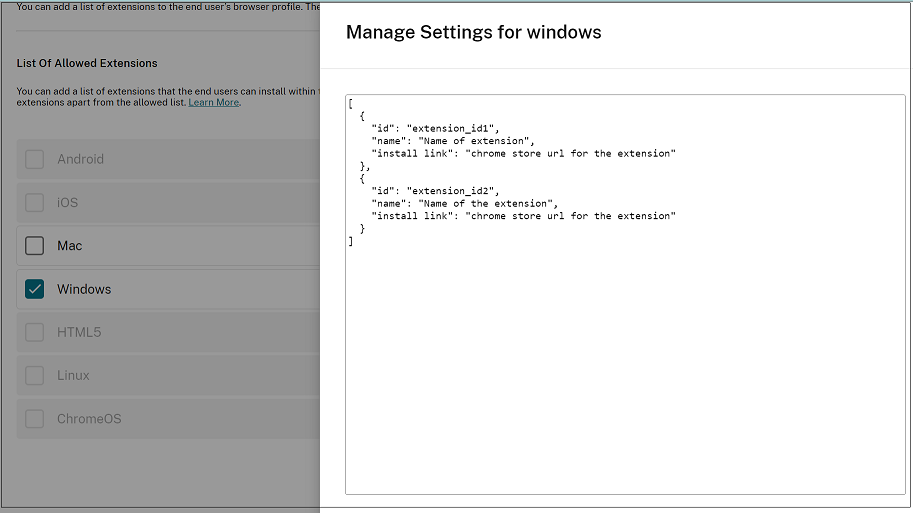
Allowed extensions
The administrator can configure the list of allowed extensions in one of the following ways:
Configuration through API
To configure, here is an example JSON file for ExtensionInstallAllowlist:
{
   "category": "browser",
    "userOverride": false,
    "assignedTo": [
     "AllUsersNoAuthentication"
              ],
    "settings": [
                     {
        "name": "Extension Install Allow list",
        "value": [
            {
              "id" : "extension_id1",
              "name" : "Name of extension",
               "install link" : "chrome store url for the extension"
            },
            {
              "id" : "extension_id2",
              "name" : "Name of the extension",
               "install link" : "chrome store url for the extension"
            }
        ]
    }
   ]
}
<!--NeedCopy-->
Note:
- The default value is an empty list.
Configuration through UI
Select the appropriate checkbox from the UI, and then click Manage settings. You can configure using the JSON data and save the changes.
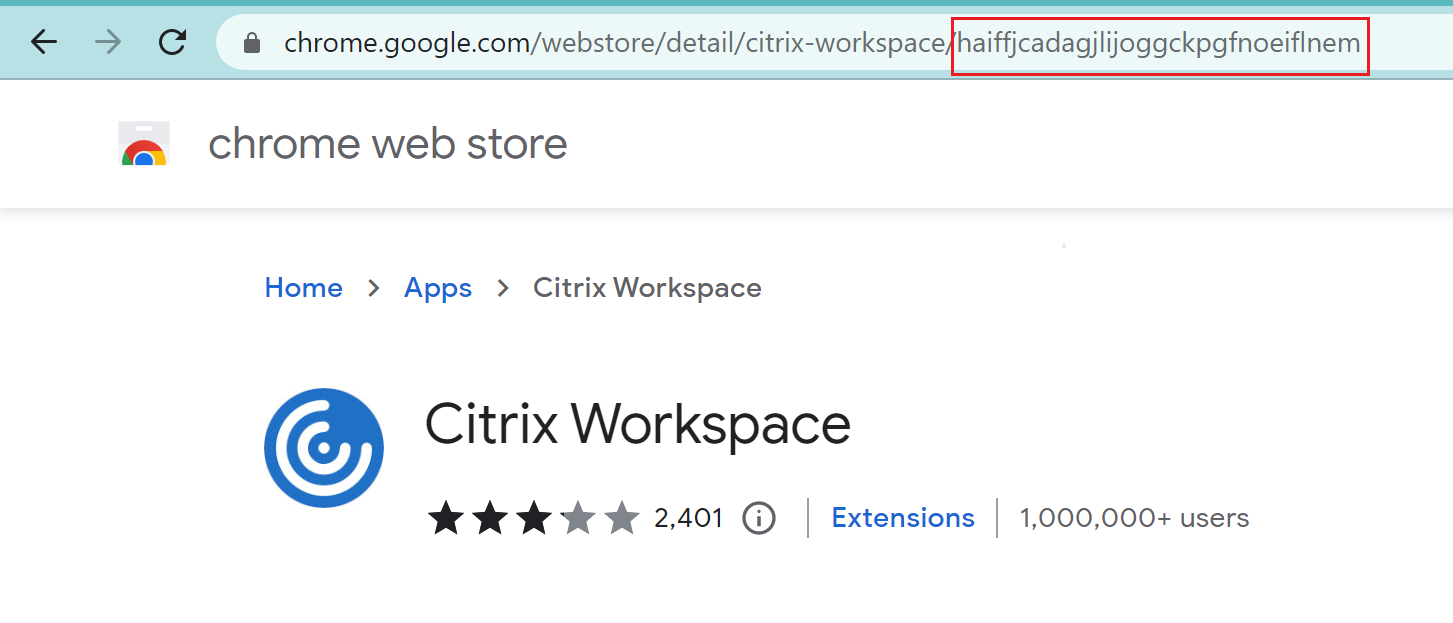
How to identify an extension ID
- Go to the Chrome Web Store.
- Search for an app and click to open. The app page appears.
-
Observe the URL. The ID is the long string of characters at the end of the URL.
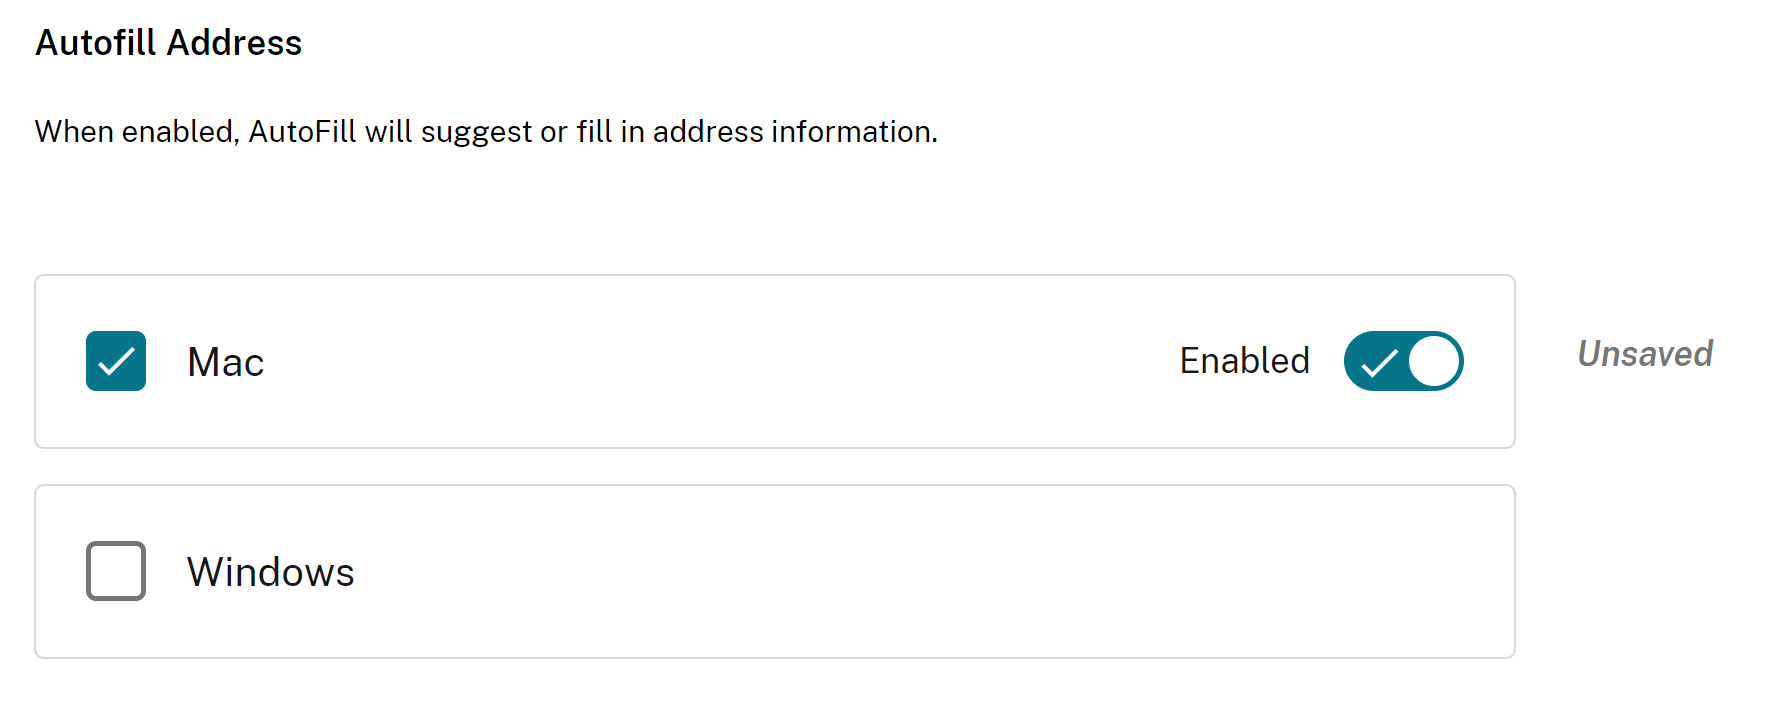
Enable autofill address
When you enable the autofill address setting, Autofill suggests or fills in address information.
Configuration through API
To configure, here’s an example JSON file to enable autofill address. Setting the value to ‘true’ autofills the address, whereas ‘false’ disables it.
  "settings": [{
        "name": "auto fill address enabled",
        "value": true
    }]
<!--NeedCopy-->
Note:
The default value is true.
Configuration through UI
- Select the appropriate operating system.
- Enable or disable the toggle button as per your requirement.
- Click Publish Drafts.
- Click Yes to save the changes for your end users.
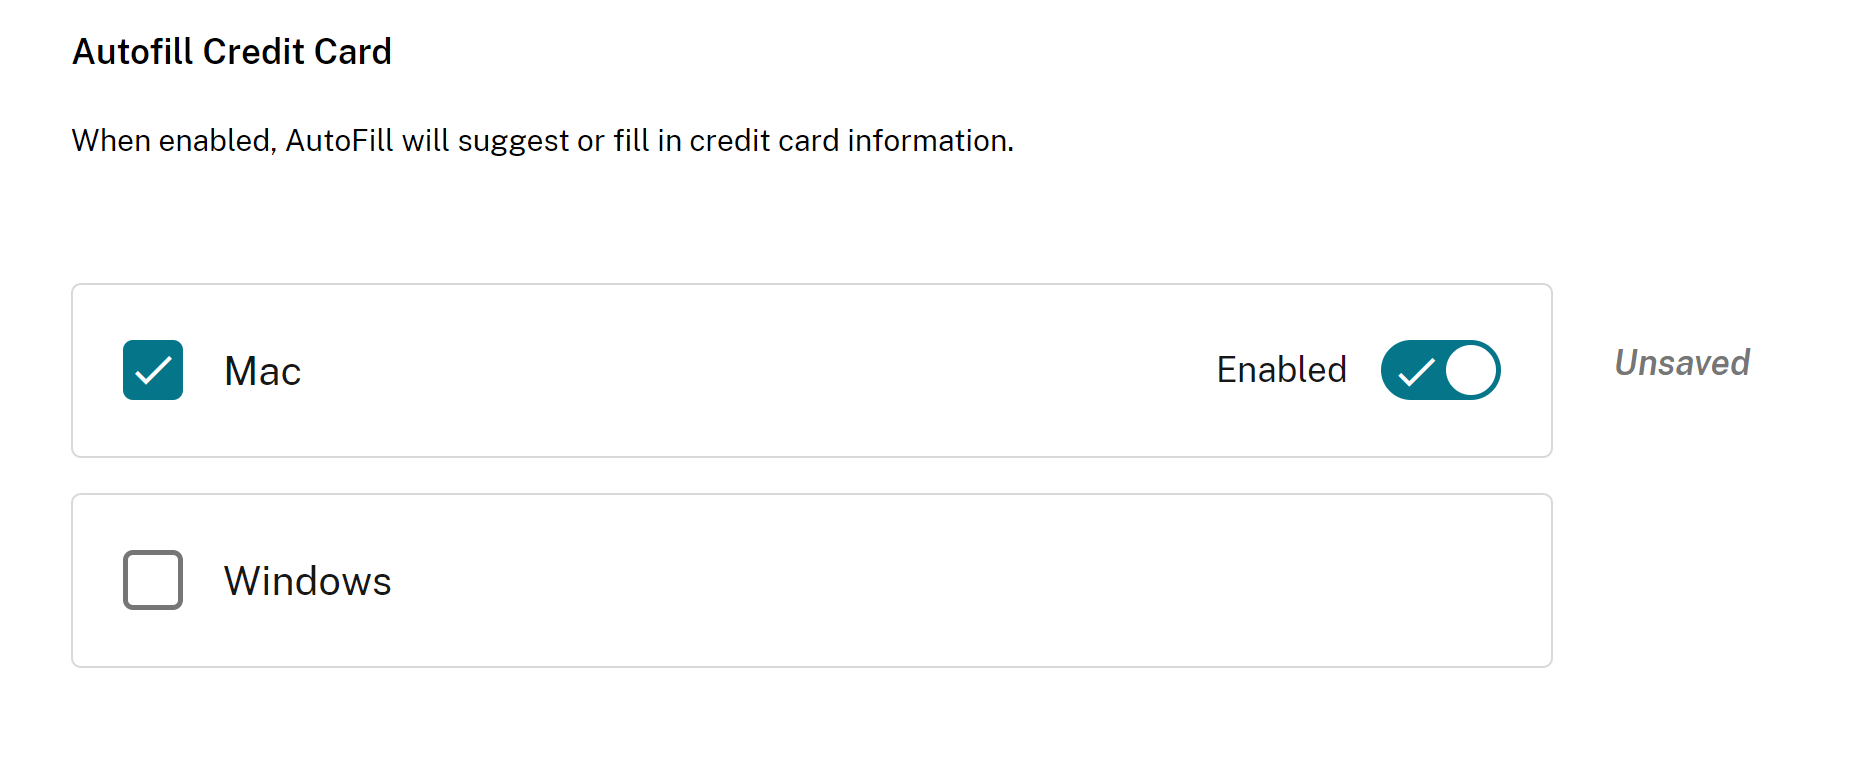
Enable autofill credit card
When you enable the autofill credit card setting, autofill suggests or fills in credit card information.
Configuration through API
To configure, here’s an example JSON file to enable autofill credit card. Setting the value to ‘true’ autofills the credit card details, whereas ‘false’ disables it.
  "settings": [{
       "name": "auto fill credit card enabled",
       "value": true
   }]
<!--NeedCopy-->
Note:
The default value is true.
Configuration through UI
- Select the appropriate operating system.
- Enable or disable the toggle button as per your requirement.
- Click *Publish Drafts.
- Click Yes to save the changes for your end users.
Auto launch protocols from origins
This setting allows you to launch an external app without prompting the user for authentication. For that, add a protocol that can launch an external app and list the URLs of external apps.
Configuration through API
To configure, here’s an example JSON file to enable this setting:
  "settings": [{
       "name": "auto launch protocols from origins",
       "value": [
         {
           "protocol": "teams",
           "allowed_origins": [
             "example.com",
             "http://www.example.com:8080"
           ]
         }
       ]
     }
   ]
<!--NeedCopy-->
Note:
There’s no default value.
Configuration through UI
- Select the appropriate operating system under the Auto Launch Protocols From Origins section.
- Click Edit.
- On the Manage setting screen, enter the protocol name and allowed origins.
- Click Save draft.
- On the Save Settings window, click Yes to save the settings.

Enable command-line flag security warnings
You can enable this setting to display security warnings when potentially dangerous command-line flags are used to launch the browser.
Configuration through API
To configure, here’s an example JSON file to enable command-line flag security warnings. Setting the value to ‘true’ enables the setting, whereas ‘false’ disables it.
"settings": [{
       "name": "command line flag security warnings enabled",
       "value": true
  }]
<!--NeedCopy-->
Configuration through UI
- Select the appropriate operating system.
- Enable or disable the toggle button as per your requirement.
- Click Publish Drafts.
- Click Yes to save the changes for your end users.

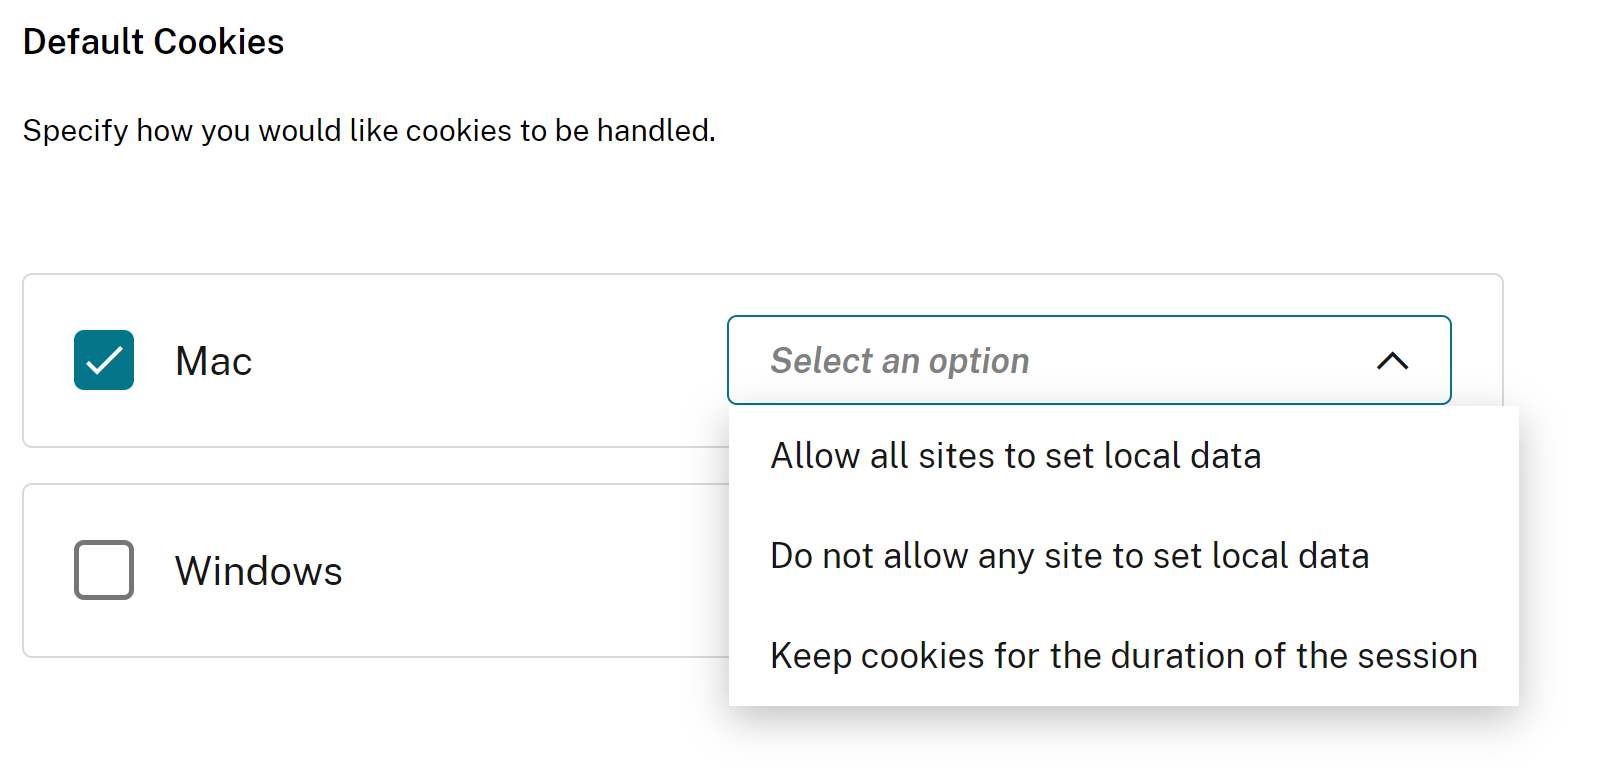
Manage default cookies setting
You can enable the default cookies setting to manage how websites can store local data and cookies. Depending on your preference, you can set any of the following options:
- Allow all sites to set local data: This is the default setting and allows any website to store cookies and other data on your device without restriction.
- Do not allow any site to set local data: This setting blocks all websites from storing any cookies and local data on your device.
- Keep cookies for the duration of the session: This setting allows websites to store cookies while you’re browsing, but deletes them once you close your browser.
Configuration through API
To configure, here’s an example JSON file to enable Default Cookies.
"settings": [{
       "name": "default cookies setting",
       "value": "Allow all sites to set local data"
  }]
<!--NeedCopy-->
Configuration through UI
- Select the appropriate operating system.
- Select an option from the drop-down list.
- Click Publish Drafts.
- Click Yes to save the changes for your end users.
Manage default pop-ups setting
You can enable the default pop-up setting to manage pop-ups from a website. Depending on your preference, you can set any of the following options:
- Allow all sites to show pop-ups: This is the default setting where all websites can display pop-ups.
- BlockPopups applies, but users can change this setting: No websites can display pop-ups. However, users can manage this setting as per their preference.
- Do not allow any site to show pop-ups: This setting blocks pop up from all websites.
Configuration through API
To configure, here’s an example JSON file to manage the default pop-up settings.
"settings": [{
      "name": "default popups setting",
      "value": "Allow all sites to show pop-ups"
   }]
<!--NeedCopy-->
Configuration through UI
- Select the appropriate operating system.
- Select an option from the drop-down list.
- Click Publish Drafts.
- Click Yes to save the changes for your end users.

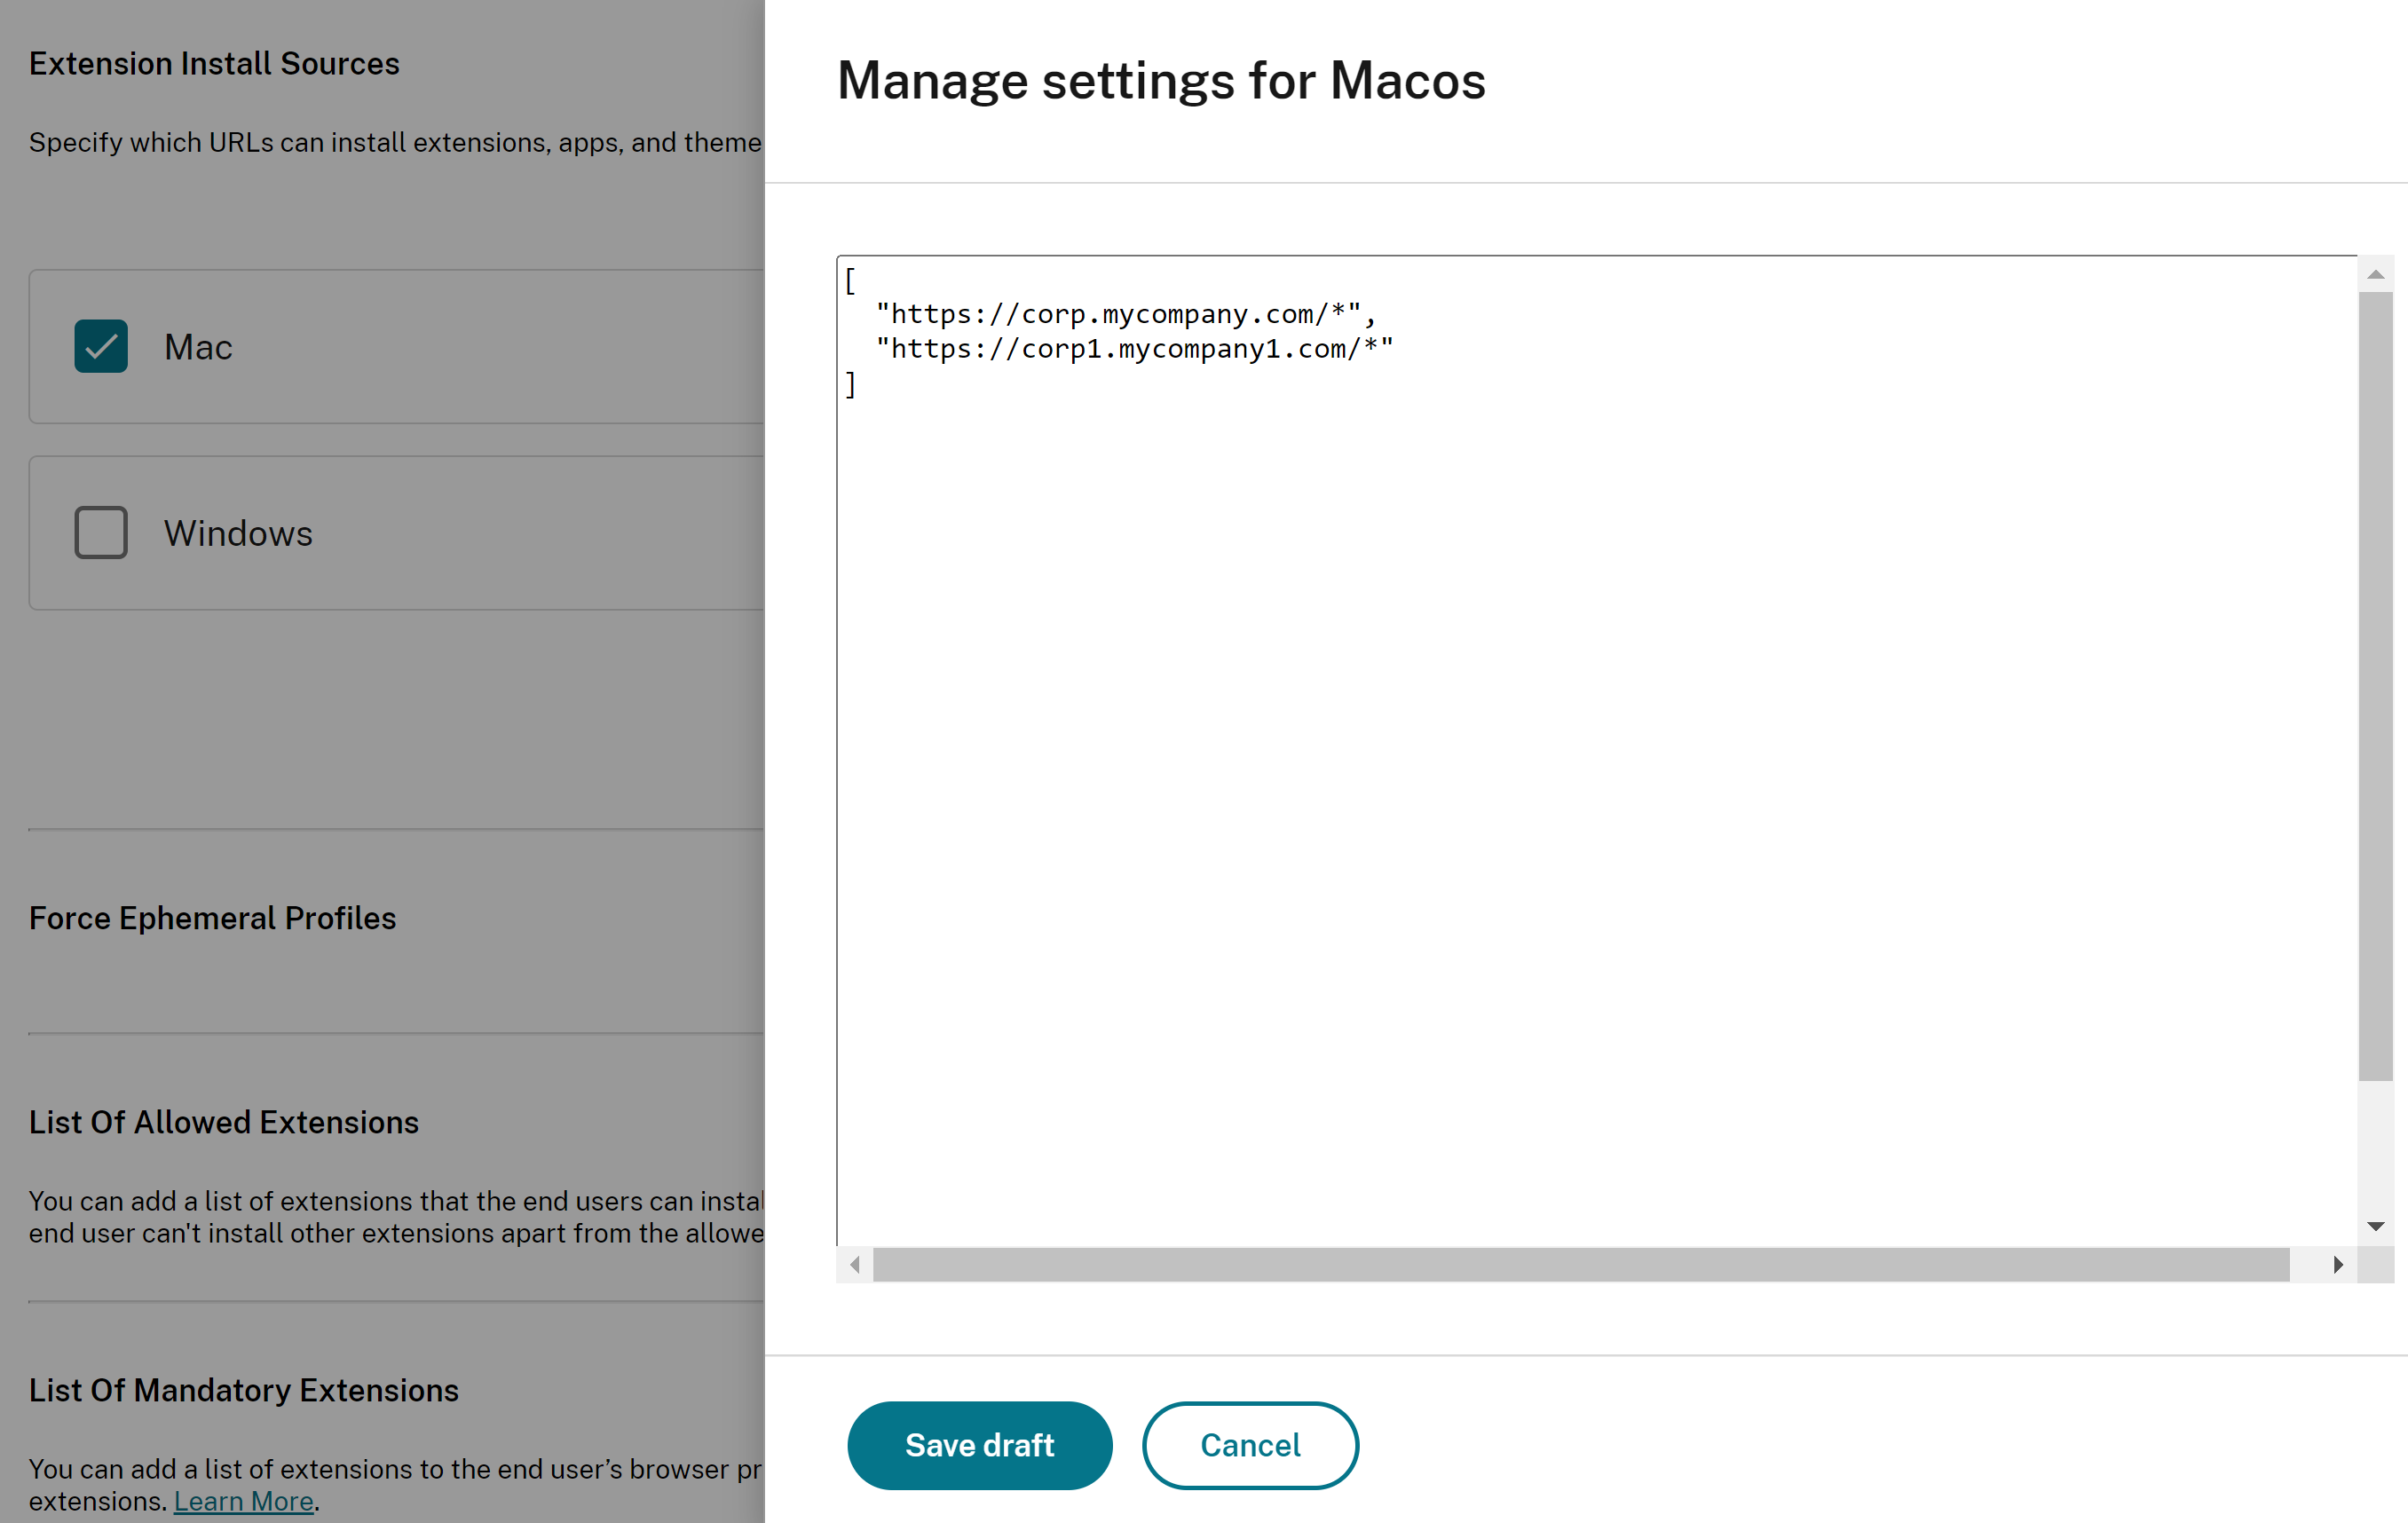
Extension install sources
You can specify the source URLs from which users can install extensions, apps, and themes to the browser.
Configuration through API
To configure, here’s an example JSON file to manage this setting.
"settings": [{
      "name": "extension install sources",
      "value": [
          "https://corp.mycompany.com/*"
          "https://corp1.mycompany1.com/*"
        ]
  }]
<!--NeedCopy-->
Configuration through UI
- Select the appropriate operating system under the Extension Install Sources section.
- Click Edit.
- On the Manage setting screen, enter the list of source URLs.
- Click Save draft.
- On the Save Settings window, click Yes to save the settings.
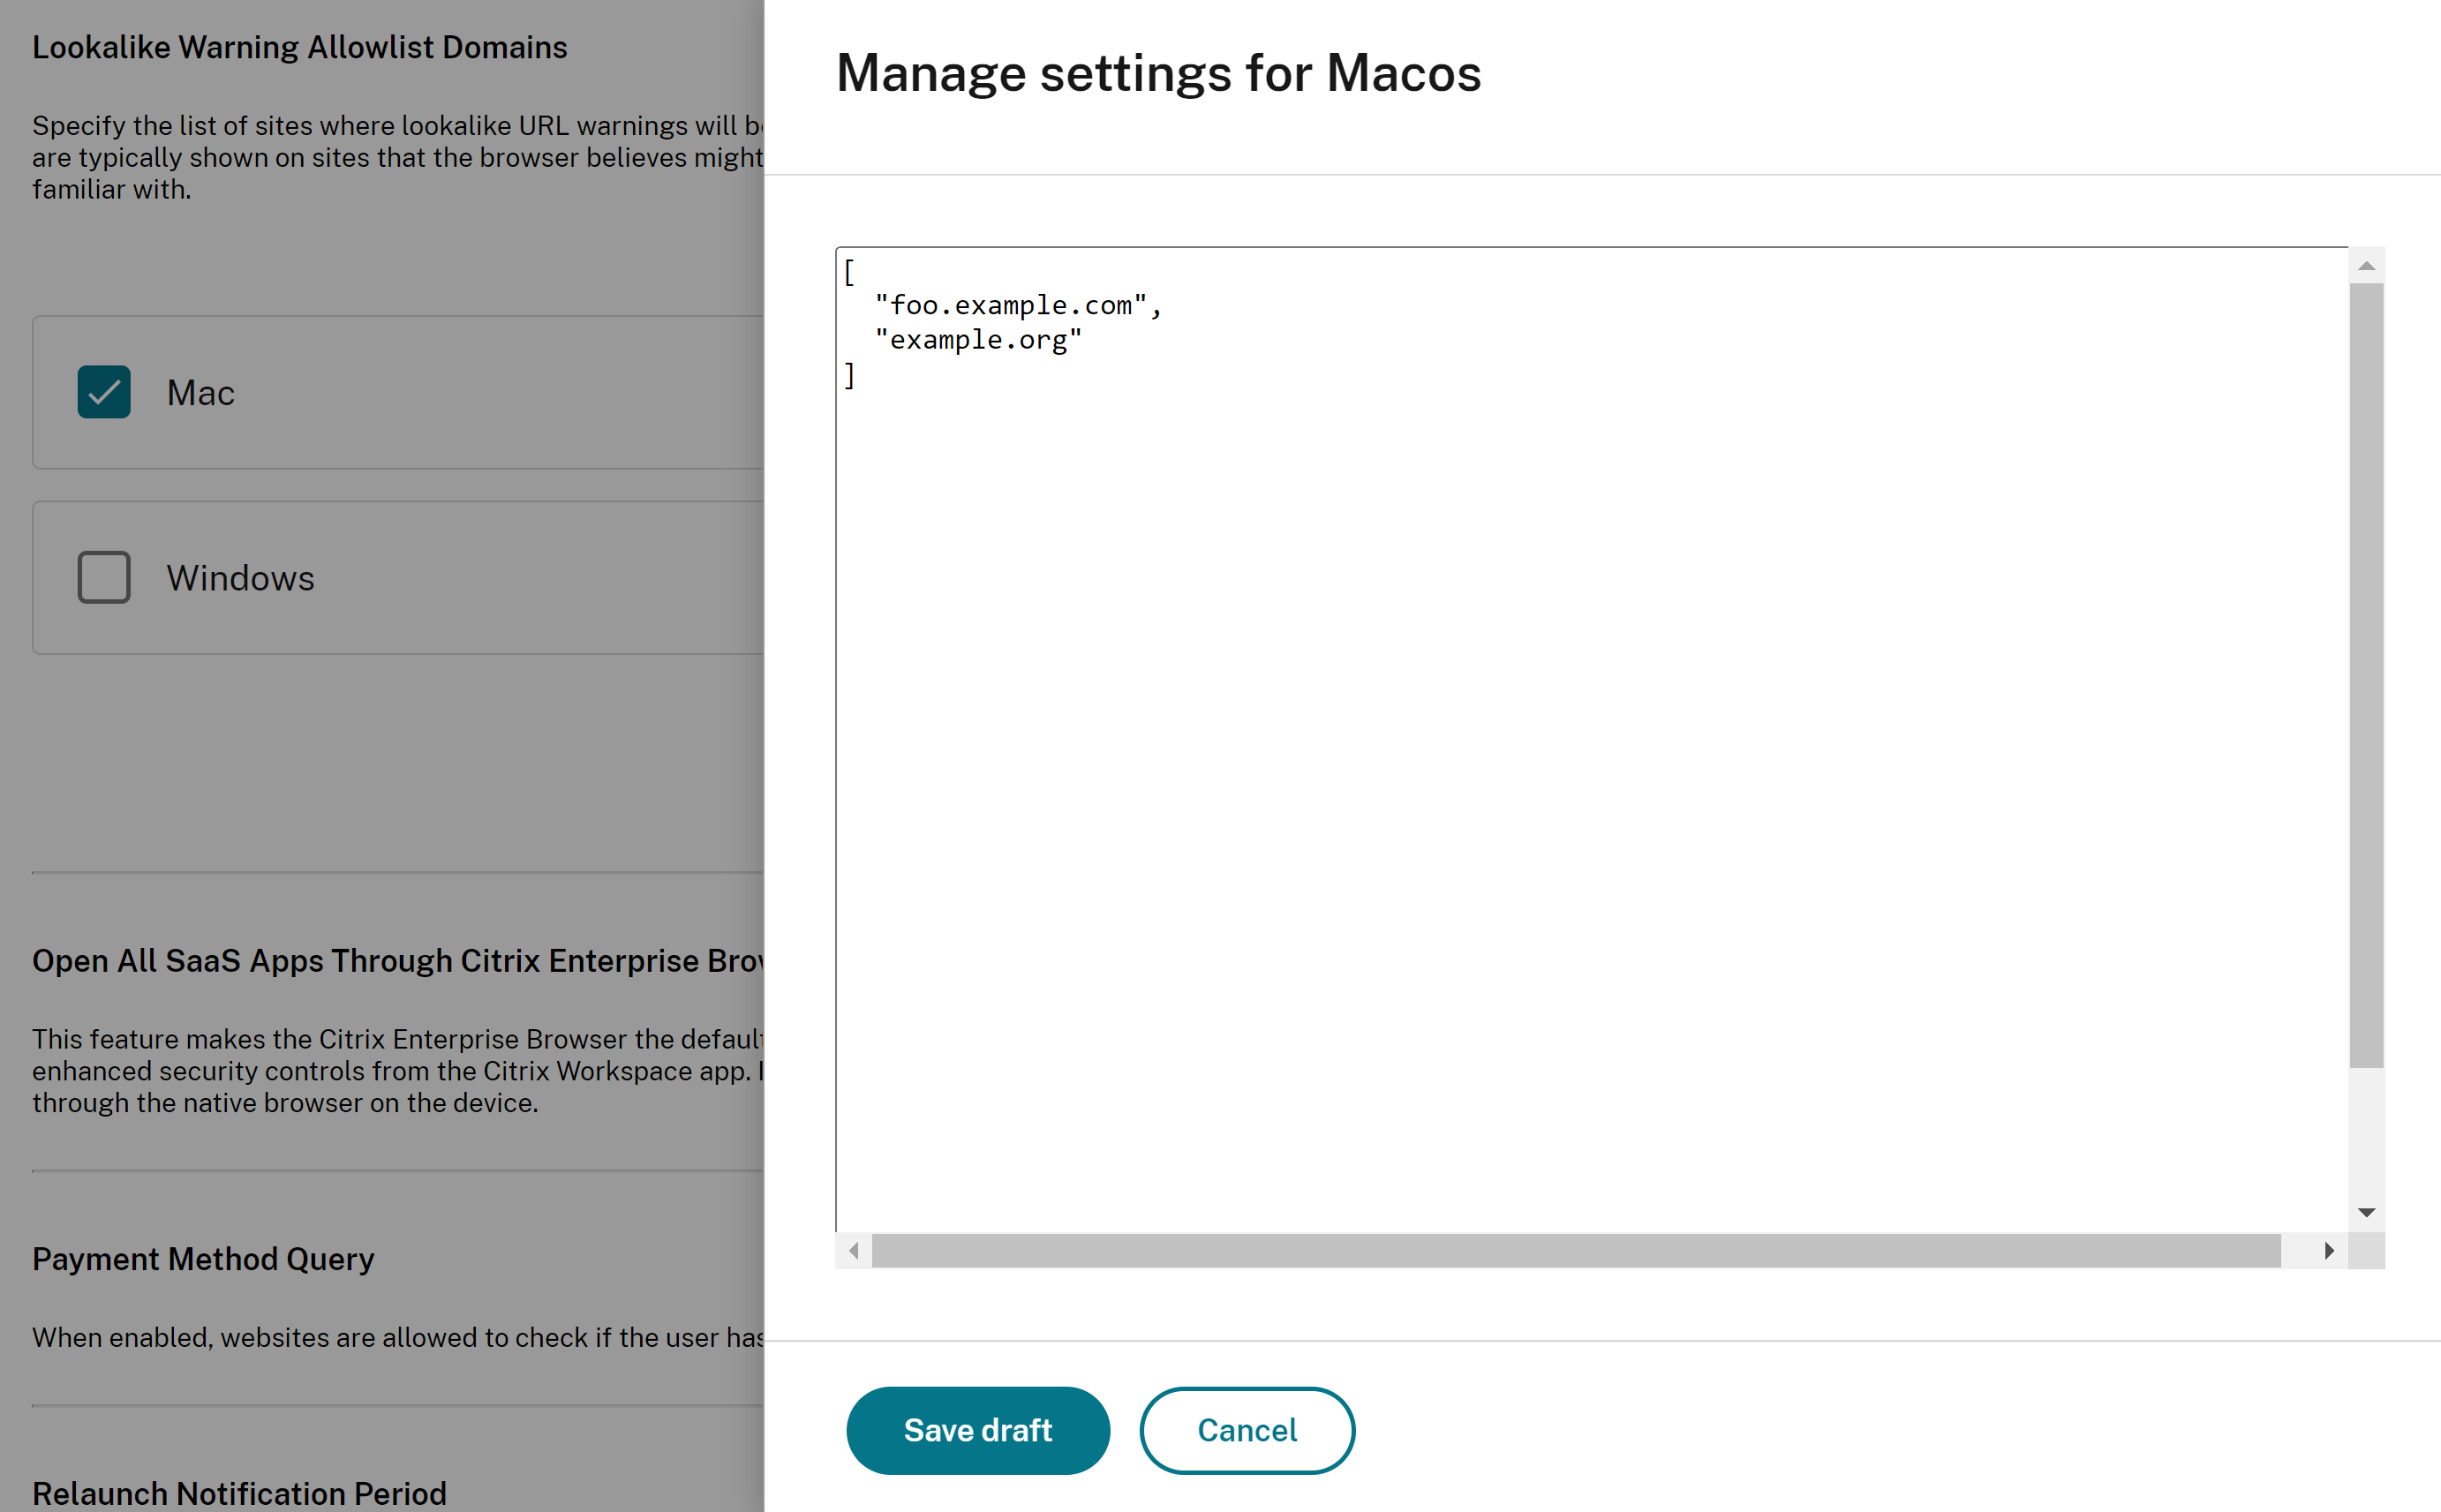
Disable lookalike warning pages
This setting allows you to prevent the display of lookalike URL warnings. If you enable the setting and specify one or more domains, no lookalike warning pages show when a user visits pages on that domain.
Configuration through API
To configure, here’s an example JSON file to enable this setting.
"settings": [{
      "name": "look alike warning allowlist domains",
      "value": [
          "foo.example.com",
          "example.org"
          ]
     }]
<!--NeedCopy-->
Configuration through UI
- Select the appropriate operating system under the Lookalike Warning Allowlist Domains section.
- Click Edit.
- On the Manage setting screen, enter the list of domains.
- Click Save draft.
- On the Save Settings window, click Yes to save the settings.
Enable payment method query
When you enable this setting, it allows websites to check if users have saved payment methods.
Configuration through API
To configure, here’s an example JSON file to enable payment method query. Setting the value to ‘true’ enables this setting whereas ‘false’ disables it.
"settings": [{
      "name": "payment method query enabled",
      "value": true
  }]
<!--NeedCopy-->
Configuration through UI
- Select the appropriate operating system.
- Enable or disable the toggle button as per your requirement.
- Click Publish Drafts.
- Click Yes to save the changes for your end users.

Manage saving browser history
You can use this setting if you want to manage the saving of the browsing history.
Configuration through API
To configure, here’s an example JSON file to manage the saving of browser history. Setting the value to ‘true’ doesn’t save the browsing history. The value ‘false’ saves the browsing history.
"settings": [{
      "name": "saving browser history disabled",
      "value": true
  }]
<!--NeedCopy-->
Configuration through UI
- Select the appropriate operating system.
- Enable or disable the toggle button as per your requirement.
- Click Publish Drafts.
- Click Yes to save the changes for your end users.

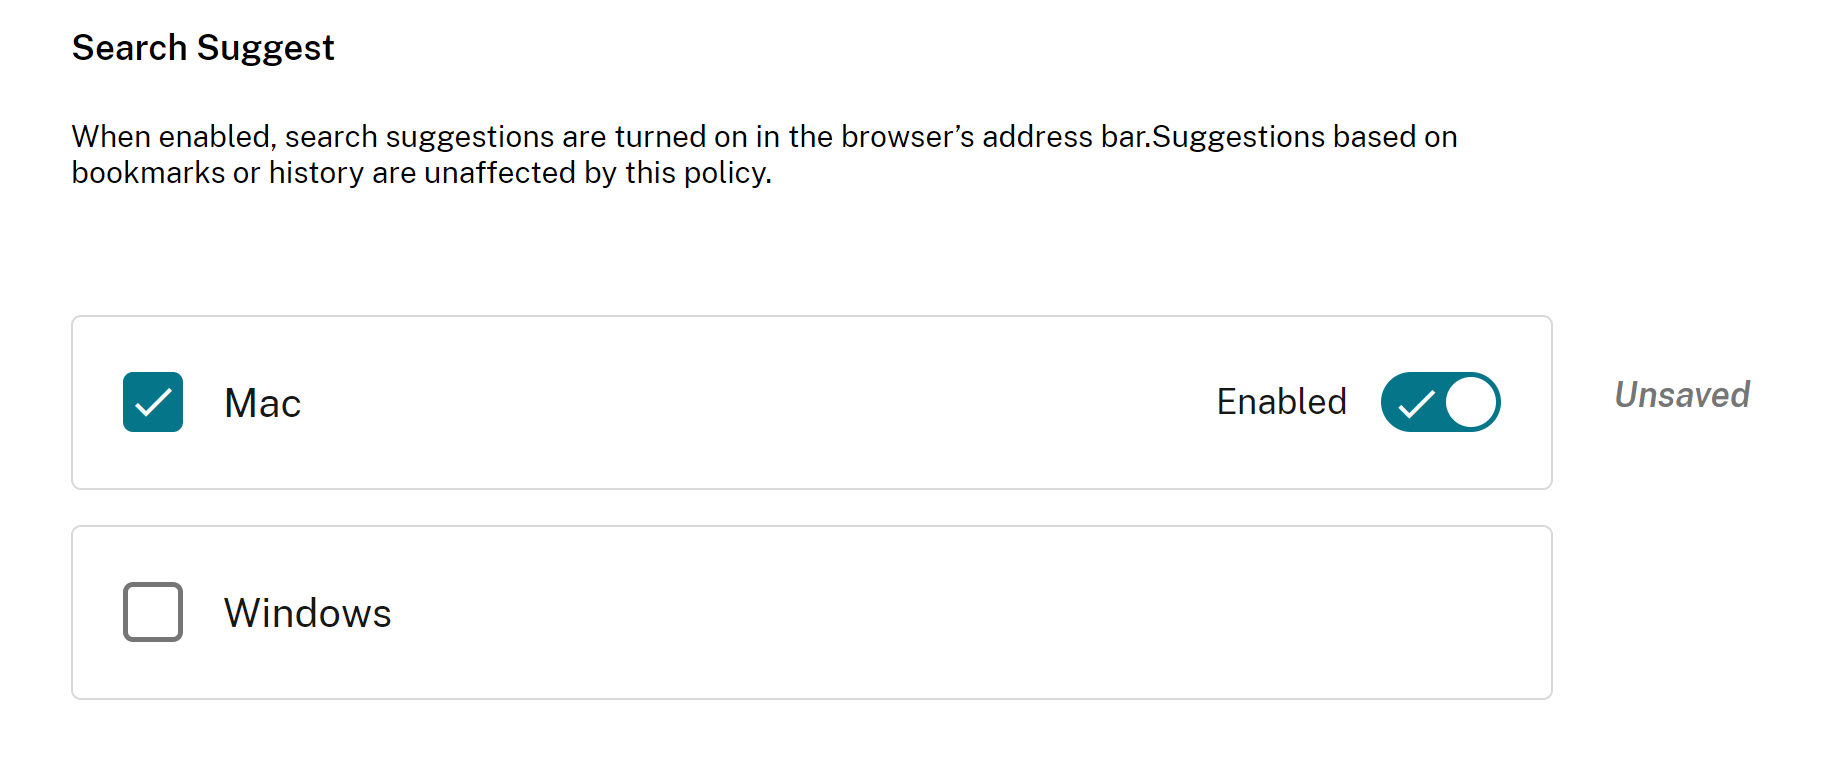
Manage search suggestion
You can enable this setting if you want to turn on search suggestions in the browser’s address bar.
The suggestions based on the bookmarks and browser history are unaffected by this setting.
Configuration through API
To configure, here’s an example JSON file to enable the search suggestions. Set the value to ‘true’ to turn on the search suggestions. The value ‘false’ turns off the search suggestions.
"settings": [{
      "name": "search suggest enabled",
      "value": true
  }]
<!--NeedCopy-->
Configuration through UI
- Select the appropriate operating system.
- Enable or disable the toggle button as per your requirement.
- Click Publish Drafts.
- Click Yes to save the changes for your end users.
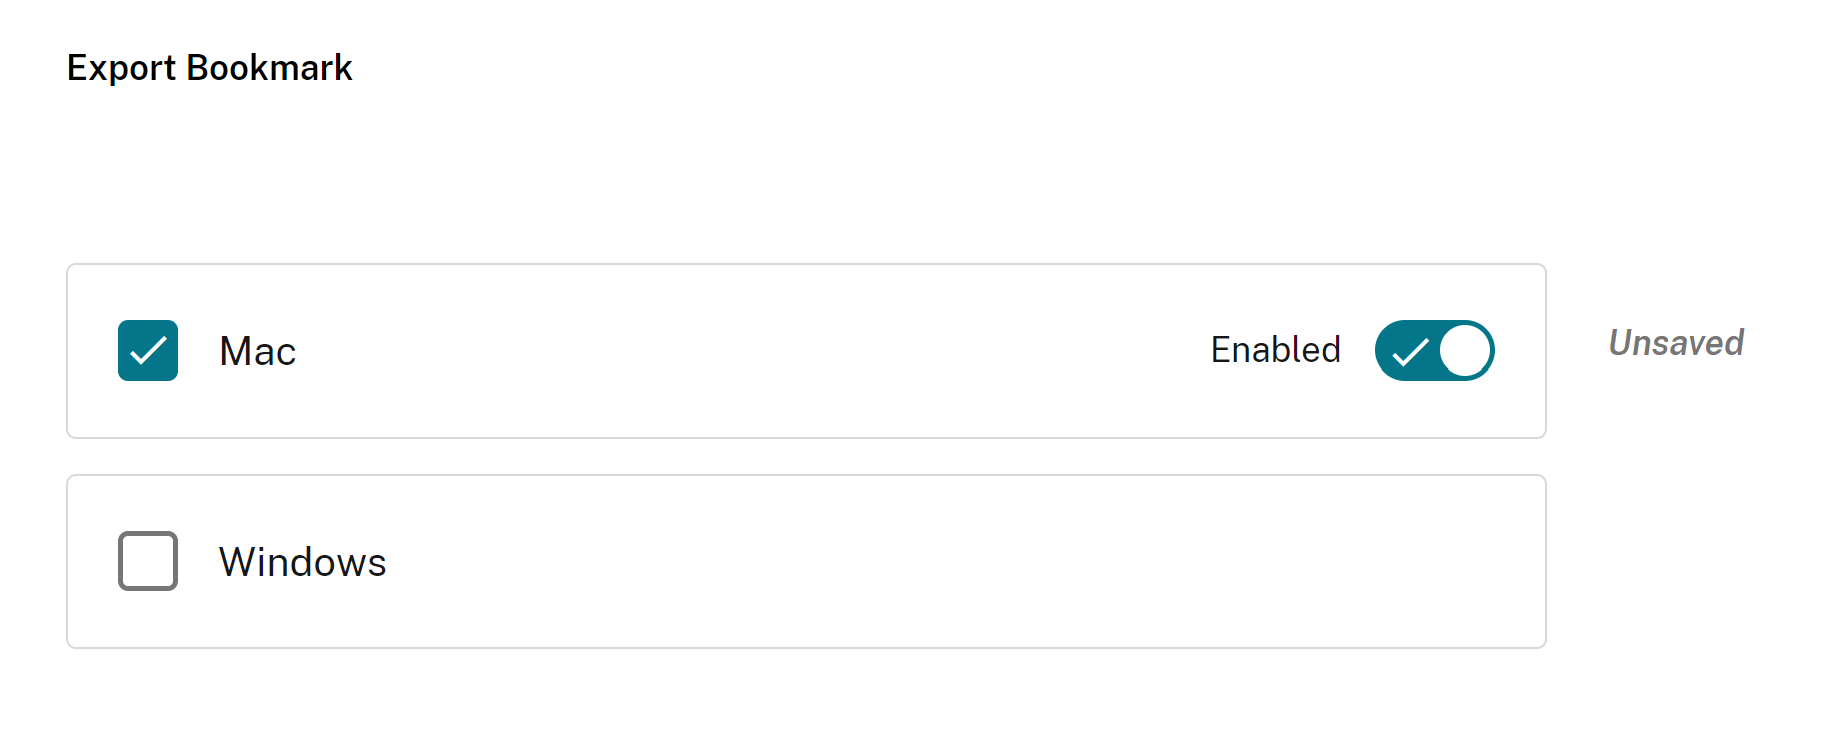
Enable export bookmark
When you enable this setting, users can see the option to export the browser’s bookmark.
Configuration through API
To configure, here’s an example JSON file to manage the exporting of browser bookmarks. Set the value to ‘true’ to enable the option to export the browser’s bookmark. The value ‘false’ disables the option.
"settings": [{
      "name": "export bookmark allowed",
      "value": true
  }]
<!--NeedCopy-->
Configuration through UI
- Select the appropriate operating system.
- Enable or disable the toggle button as per your requirement.
- Click Publish Drafts.
- Click Yes to save the changes for your end users.
Force ephemeral profiles
When you enable this setting, it creates an ephemeral profile when users sign in to the Enterprise Browser. Ephemeral profile erases user profile data on disk when a user ends the browsing session. Users can still download files, save pages, or print them.
Configuration through API
To configure, here’s an example JSON file to enable or disable the creation of ephemeral profiles. Set the value to ‘true’ to enable the setting that creates an ephemeral profile, which erases the profile data on disk when the user closes the browser. When you set the value to ‘false’, the profile data remains on the disk even after users end the browsing session.
"settings": [{
      "name": "force ephemeral profiles",
      "value": true
  }]
<!--NeedCopy-->
Configuration through UI
- Select the appropriate operating system.
- Enable or disable the toggle button as per your requirement.
- Click Publish Drafts.
- Click Yes to save the changes for your end users.

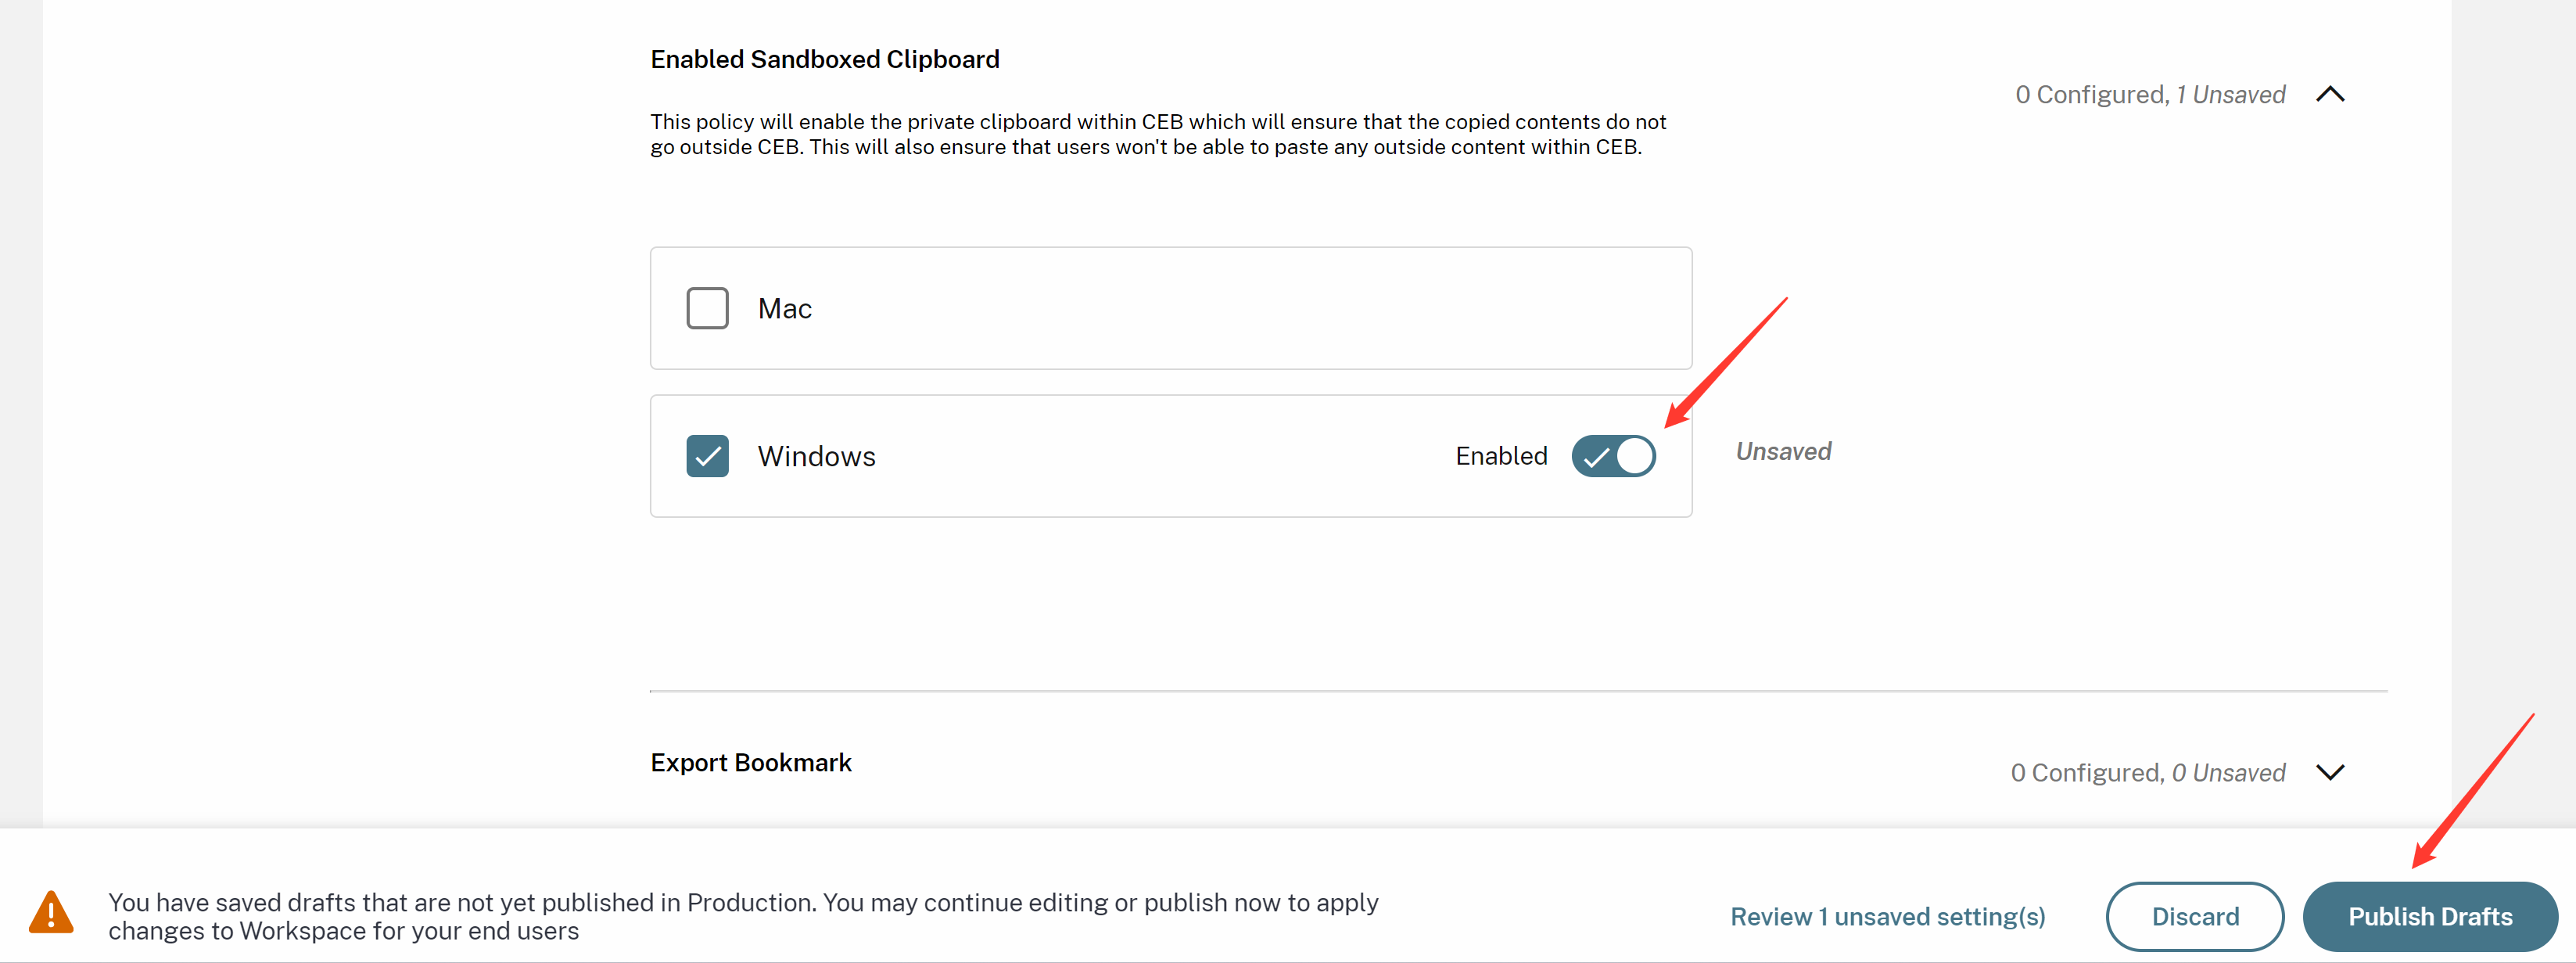
Clipboard restriction
When you manage clipboard restriction through GACS, it applies to all web pages accessed via the Citrix Enterprise Browser. Once you enable the setting, end users are unable to copy and paste contents from any web page displayed within the Citrix Enterprise Browser to any other native apps present within their system, and vice versa.
To manage the clipboard restriction, perform the following steps:
- Navigate to Workspace Configuration > App Configuration > Enterprise Browser > Security and Privacy.
- Select the appropriate operating system under the Enabled Sandboxed Clipboard section.
- Enable or disable the toggle button as per your requirement.
- Click Publish Drafts.
- Click Save to save the changes for your end users.
Audio Capture Allowed
Administrators can use this setting to enable or disable audio capture access. When an administrator enables this setting, or leaves it unset, users are prompted to allow audio capture access. When an administrator disables this setting, these prompts are turned off, and audio capture is blocked.
You can manage audio capture access using the following options:
Enable audio input: Prompt users to allow audio capture access.
Disable audio input: Prompt is turned off, and audio capture is blocked.
Unset audio input: Prompt users to allow audio capture access.
The default value is Unset audio input.
Configuration through API
To configure, here’s an example JSON file to manage the audio capture access.
"settings": [{
      "name": "audio capture allowed",
      "value": "Enable audio input"
  }]
<!--NeedCopy-->
Configuration through UI
- Select the appropriate operating system.
- Select an option from the drop-down list.
- Click Publish Drafts.
- Click Yes to save the changes for your end users.

Note:
This setting applies to the built-in microphone as well as all other audio input devices.
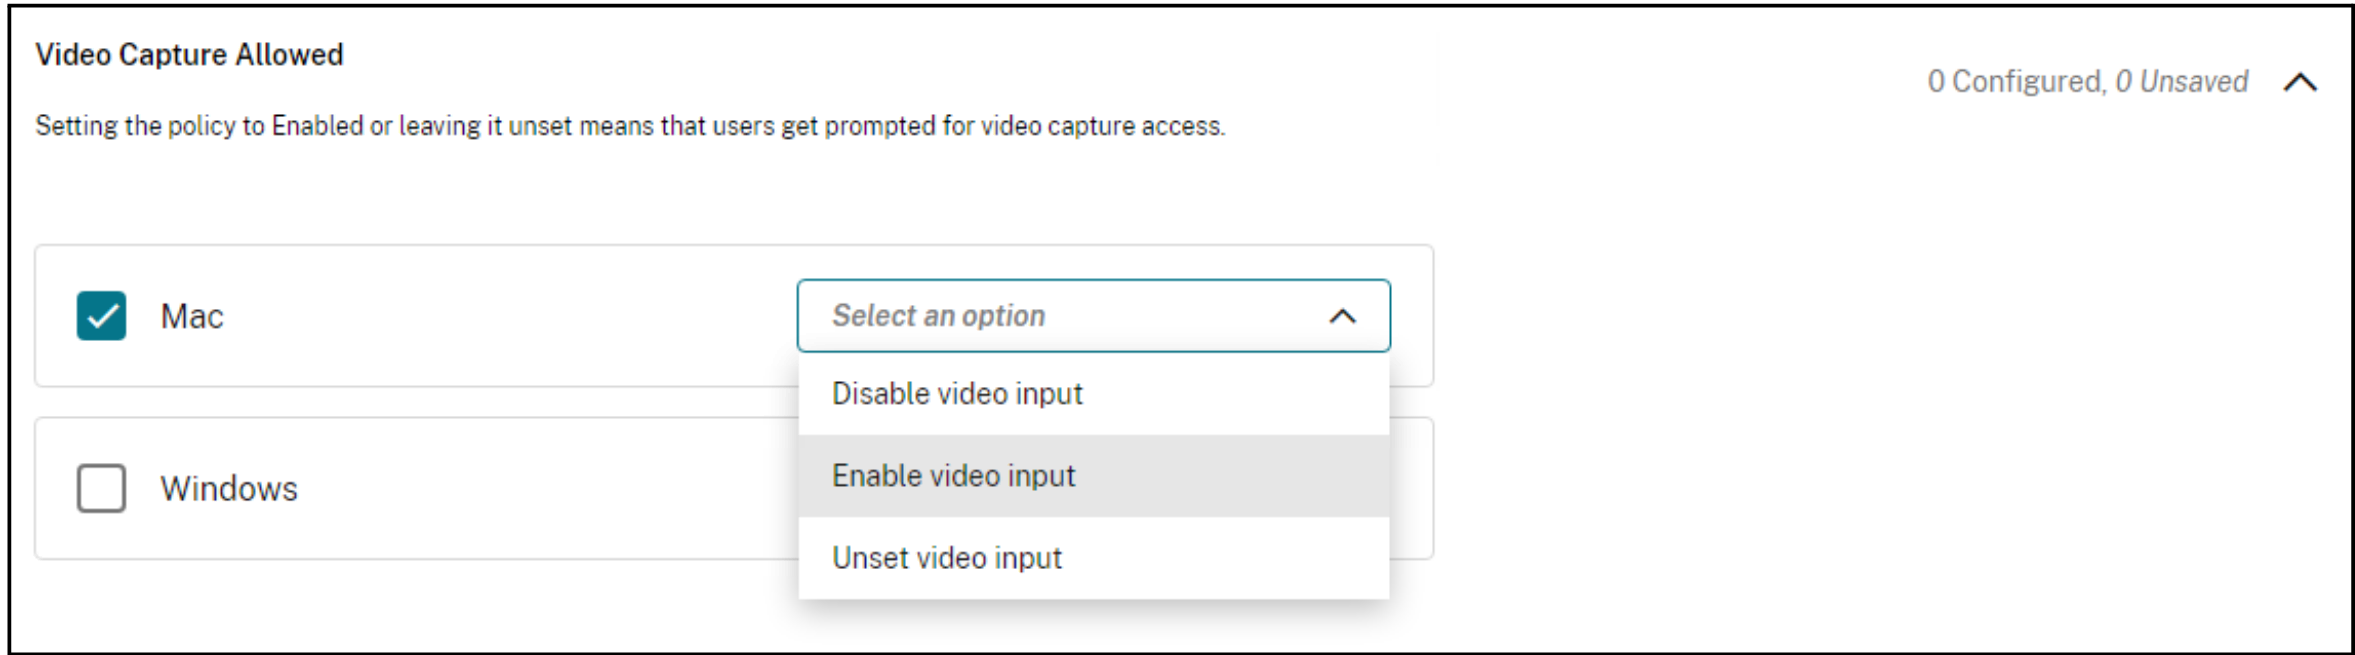
Video Capture Allowed
Administrators can use this setting to enable or disable video capture access. When an administrator enables this setting, or leaves it unset, users are prompted to allow video capture access. When an administrator disables this setting, these prompts are turned off, and video capture is blocked.
You can manage video capture access using the following options:
Enable video input: Prompt users to allow video capture access.
Disable video input: Prompt is turned off, and video capture is blocked.
Unset video input: Prompt users to allow video capture access.
The default value is Unset video input.
Configuration through API
To configure, here’s an example JSON file to manage the video capture access.
"settings": [{
      "name": "video capture allowed",
      "value": "Enable video input"
  }]
<!--NeedCopy-->
Configuration through UI
- Select the appropriate operating system.
- Select an option from the drop-down list.
- Click Publish Drafts.
- Click Yes to save the changes for your end users.
Note:
This setting applies to the built-in camera as well as all other video input devices.
Address bar
Administrators can disable the address bar of the Enterprise Browser through Global App Configuration service (GACS). The feature can be managed using one of the following ways:
Configuration through API
Here is an example JSON file for the configuration:
"settings": [{
      "name": "address bar",
      "value": "true"
  }]
<!--NeedCopy-->
Set the value to true, which enables the address bar and makes it editable.
Set the value to false, which disables the address bar and keeps it read-only.
Note:
This policy is unset by default, which indicates that the address bar is enabled and editable.
Configuration through UI
- Navigate to Workspace Configuration > App Configuration in Citrix Cloud.
- Select the desired store from the given store list and click Configure.
- Select Citrix Enterprise Browser.
- Select Security and Privacy.
-
Under the Address Bar setting, select the appropriate operating system and toggle the button to enable or disable the feature.
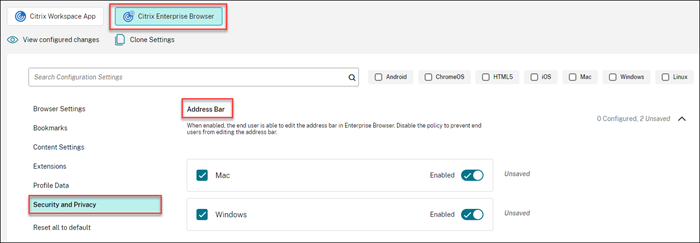
- Click Publish Drafts, and then click Save to save the changes.
Note:
The address bar is enabled by default on user devices, allowing users to access and edit it.
Change user agent for Enterprise Browser
- Navigate to Workspace Configuration > App Configuration > Enterprise Browser > Security and Privacy.
- Select the appropriate operating system under Change user agent For Enterprise Browser section.
-
Click Edit.
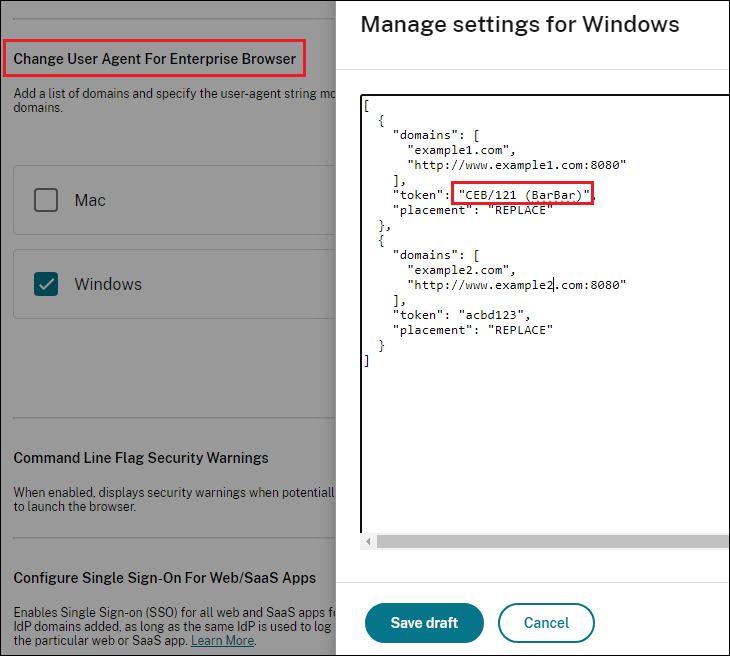
-
On the Manage settings page, add the list of domains and the user-agent string using the provided JSON file example.
Note:
- We recommend that you follow the user-agent format documented in User-Agent.
- The placement option REPLACE completely replaces the user-agent with the security token.
- Click Save draft.
- On the Save Settings window, click Yes to save the settings.
Example JSON data
The following is an example JSON file:
{
  "serviceURL": {
    "url": "https://example.cloudburrito.com:443"
  },
  "settings": {
    "name": "example name",
    "description": "example description",
    "useForAppConfig": true,
    "appSettings": {
      "macos": [
        {
          "category": "browser",
          "userOverride": false,
          "assignedTo": [
            "AllUsersNoAuthentication"
          ],
          "settings": [
            {
              "name": "open all apps in cwb",
              "value": true
            },
            {
              "name": "incognito mode availability",
              "value": "Incognito mode available"
            },
            {
              "name": "developer tools availability",
              "value": "Allow usage of the Developer Tools"
            },
            {
              "name": "enable password save",
              "value": true
            },
            {
              "name": "Delete browsing data on exit",
              "value": [
                "browsing_history",
                "download_history"
              ]
            },
            {
              "name": "Managed bookmarks",
              "value": [
                {
                  "toplevel_name": "My managed bookmarks folder"
                },
                {
                  "name": "Google",
                  "url": "google.com"
                },
                {
                  "name": "Youtube",
                  "url": "youtube.com"
                },
                {
                  "children": [
                    {
                      "name": "Chromium",
                      "url": "chromium.org"
                    },
                    {
                      "name": "Chromium Developers",
                      "url": "dev.chromium.org"
                    }
                  ],
                  "name": "Chrome links"
                }
              ]
            },
            {
              "name": "Extension Install Allow list",
              "value": [
                {
                  "name": "test1",
                  "install link": "https://chrome.google.com/webstore/detail/stayfocusd/laankejkbhbdhmipfmgcngdelahlfoji?utm_term=chrome%20web%20store&utm_campaign&utm_source=adwords&utm_medium=ppc&hsa_acc=2427782021&hsa_cam=17624934708&hsa_grp=142148219190&hsa_ad=607700050316&hsa_src=g&hsa_tgt=kwd-308053041493&hsa_kw=chrome%20web%20store&hsa_mt=b&hsa_net=adwords&hsa_ver=3&gclid=Cj0KCQjw852XBhC6ARIsAJsFPN2YQhvZivtPKvAX5IbRF7i4y_cEhWOSzZwxAfw1cNjNOq_qErFjYqQaAvmAEALw_wcB",
                  "id": "laankejkbhbdhmipfmgcngdelahlfoji"
                },
                {
                  "name": "test2",
                  "install link": "https://chrome.google.com/webstore/detail/vimium/dbepggeogbaibhgnhhndojpepiihcmeb?utm_term=chrome%20web%20store&utm_campaign&utm_source=adwords&utm_medium=ppc&hsa_acc=2427782021&hsa_cam=17624934708&hsa_grp=142148219190&hsa_ad=607700050316&hsa_src=g&hsa_tgt=kwd-308053041493&hsa_kw=chrome%20web%20store&hsa_mt=b&hsa_net=adwords&hsa_ver=3&gclid=Cj0KCQjw852XBhC6ARIsAJsFPN2YQhvZivtPKvAX5IbRF7i4y_cEhWOSzZwxAfw1cNjNOq_qErFjYqQaAvmAEALw_wcB",
                  "id": "dbepggeogbaibhgnhhndojpepiihcmeb"
                }
              ]
            },
            {
              "name": "Extension Install Force list",
              "value": [
                "ohlencieiipommannpdfcmfdpjjmeolj",
                "dipiagiiohfljcicegpgffpbnjmgjcnf"
              ]
            },
            {
              "name": "auto fill address enabled",
              "value": true
            },
            {
              "name": "auto fill credit card enabled",
              "value": true
            },
            {
              "name": "command line flag security warnings enabled",
              "value": true
            },
            {
              "name": "payment method query enabled",
              "value": true
            },
            {
              "name": "saving browser history disabled",
              "value": true
            },
            {
              "name": "search suggest enabled",
              "value": true
            },
            {
              "name": "export bookmark allowed",
              "value": true
            },
            {
              "name": "force ephemeral profiles",
              "value": true
            },
            {
              "name": "default cookies setting",
              "value": "Do not allow any site to set local data"
            },
            {
              "name": "default popups setting",
              "value": "BlockPopups applies, but users can change this setting"
            },
            {
              "name": "look alike warning allowlist domains",
              "value": [
                "foo.example.com",
                "example.org"
              ]
            },
            {
              "name": "extension install sources",
              "value": [
                "https://corp.mycompany.com/*",
                "https://corp1.mycompany1.com/*"
              ]
            },
            {
              "name": "auto launch protocols from origins",
              "value": [
                {
                  "protocol": "sportifys",
                  "allowed_origins": [
                    "example.com",
                    "http://www.example.com:8080"
                  ]
                },
                {
                  "protocol": "teams",
                  "allowed_origins": [
                    "example1.com",
                    "http://www.example1.com:8080"
                  ]
                }
              ]
            }
          ]
        }
      ],
      "windows": [
        {
          "category": "browser",
          "userOverride": false,
          "assignedTo": [
            "AllUsersNoAuthentication"
          ],
          "settings": [
            {
              "name": "open all apps in cwb",
              "value": true
            },
            {
              "name": "incognito mode availability",
              "value": "Incognito mode available"
            },
            {
              "name": "developer tools availability",
              "value": "Allow usage of the Developer Tools"
            },
            {
              "name": "enable password save",
              "value": true
            },
            {
              "name": "Managed bookmarks",
              "value": [
                {
                  "toplevel_name": "My managed bookmarks folder"
                },
                {
                  "name": "Google",
                  "url": "google.com"
                },
                {
                  "name": "Youtube",
                  "url": "youtube.com"
                },
                {
                  "children": [
                    {
                      "name": "Chromium",
                      "url": "chromium.org"
                    },
                    {
                      "name": "Chromium Developers",
                      "url": "dev.chromium.org"
                    }
                  ],
                  "name": "Chrome links"
                }
              ]
            },
            {
              "name": "Extension Install Allow list",
              "value": [
                {
                  "name": "test1",
                  "install link": "https://chrome.google.com/webstore/detail/stayfocusd/laankejkbhbdhmipfmgcngdelahlfoji?utm_term=chrome%20web%20store&utm_campaign&utm_source=adwords&utm_medium=ppc&hsa_acc=2427782021&hsa_cam=17624934708&hsa_grp=142148219190&hsa_ad=607700050316&hsa_src=g&hsa_tgt=kwd-308053041493&hsa_kw=chrome%20web%20store&hsa_mt=b&hsa_net=adwords&hsa_ver=3&gclid=Cj0KCQjw852XBhC6ARIsAJsFPN2YQhvZivtPKvAX5IbRF7i4y_cEhWOSzZwxAfw1cNjNOq_qErFjYqQaAvmAEALw_wcB",
                  "id": "laankejkbhbdhmipfmgcngdelahlfoji"
                },
                {
                  "name": "test2",
                  "install link": "https://chrome.google.com/webstore/detail/vimium/dbepggeogbaibhgnhhndojpepiihcmeb?utm_term=chrome%20web%20store&utm_campaign&utm_source=adwords&utm_medium=ppc&hsa_acc=2427782021&hsa_cam=17624934708&hsa_grp=142148219190&hsa_ad=607700050316&hsa_src=g&hsa_tgt=kwd-308053041493&hsa_kw=chrome%20web%20store&hsa_mt=b&hsa_net=adwords&hsa_ver=3&gclid=Cj0KCQjw852XBhC6ARIsAJsFPN2YQhvZivtPKvAX5IbRF7i4y_cEhWOSzZwxAfw1cNjNOq_qErFjYqQaAvmAEALw_wcB",
                  "id": "dbepggeogbaibhgnhhndojpepiihcmeb"
                }
              ]
            },
            {
              "name": "Extension Install Force list",
              "value": [
                "ohlencieiipommannpdfcmfdpjjmeolj",
                "dipiagiiohfljcicegpgffpbnjmgjcnf"
              ]
            },
            {
              "name": "Delete browsing data on exit",
              "value": [
                "browsing_history"
              ]
            },
            {
              "name": "auto fill address enabled",
              "value": true
            },
            {
              "name": "auto fill credit card enabled",
              "value": true
            },
            {
              "name": "command line flag security warnings enabled",
              "value": true
            },
            {
              "name": "payment method query enabled",
              "value": true
            },
            {
              "name": "saving browser history disabled",
              "value": true
            },
            {
              "name": "search suggest enabled",
              "value": true
            },
            {
              "name": "export bookmark allowed",
              "value": true
            },
            {
              "name": "force ephemeral profiles",
              "value": true
            },
            {
              "name": "default cookies setting",
              "value": "Do not allow any site to set local data"
            },
            {
              "name": "default popups setting",
              "value": "BlockPopups applies, but users can change this setting"
            },
            {
              "name": "look alike warning allowlist domains",
              "value": [
                "foo.example.com",
                "example.org"
              ]
            },
            {
              "name": "extension install sources",
              "value": [
                "https://corp.mycompany.com/*",
                "https://corp1.mycompany1.com/*"
              ]
            },
            {
              "name": "auto launch protocols from origins",
              "value": [
                {
                  "protocol": "sportifys",
                  "allowed_origins": [
                    "example.com",
                    "http://www.example.com:8080"
                  ]
                },
                {
                  "protocol": "teams",
                  "allowed_origins": [
                    "example1.com",
                    "http://www.example1.com:8080"
                  ]
                }
              ]
            }
          ]
        }
      ]
    }
  }
}
<!--NeedCopy-->
In this article
- Use GACS to manage Citrix Enterprise Browser
- Enable Citrix Enterprise Browser for all apps
- Enable save passwords
- Enable incognito mode
- Manage bookmarks
- Enable developer tools
- Delete browsing data on exit
- Support for browser extensions
- Enable autofill address
- Enable autofill credit card
- Auto launch protocols from origins
- Enable command-line flag security warnings
- Manage default cookies setting
- Manage default pop-ups setting
- Extension install sources
- Disable lookalike warning pages
- Enable payment method query
- Manage saving browser history
- Manage search suggestion
- Enable export bookmark
- Force ephemeral profiles
- Clipboard restriction
- Audio Capture Allowed
- Video Capture Allowed
- Address bar
- Change user agent for Enterprise Browser
- Example JSON data