Support for on-premises Citrix Virtual Apps and Desktops
The Citrix Gateway service can be used with on-premises deployments of StoreFront and Citrix Virtual Apps and Desktops. You can continue to use your on-premises NetScaler Gateway and StoreFront for authentication, authorization, and enumeration. Citrix Gateway service is used to launch virtual apps and desktops for all or some regions. This approach maximizes the value of existing remote access infrastructure and minimizes administrative effort. This is particularly useful for providing remote access to workloads in satellite locations where you do not have a StoreFront server, thereby completely removing the need for a NetScaler Gateway in that location.
Key benefits
The integration of Citrix Gateway service with on-premises sites offers the following benefits:
-
Customization retention: NetScaler Gateway and StoreFront™ customizations can be retained, ensuring a consistent user experience.
-
Minimized maintenance: HDX proxy performance and scale requirements are now managed by Citrix Gateway service, eliminating the need for customer management.
-
Existing URL: DaaS customers can continue using their familiar on-premises NetScaler® Gateway URL.
-
Leveraging LHC for enhanced resiliency: Local Host Cache (LHC) supports resiliency needs by allowing the connector to function as a local Secure Ticket Authority (STA) during outages.
-
Better user experience: Ability to use geographically closer PoPs reduces latency and improves performance.
-
High resiliency: Ensures high resiliency because of the multi-cloud and multi-geo architecture of Citrix Gateway service.
Prerequisites
-
You must have a functional on-premises working environment where NetScaler Gateway is used for authentication and authorization and StoreFront is used for enumeration.
-
Upgrade StoreFront to version 2503 or higher. For more information, see Upgrade StoreFront.
Create a resource location on Citrix Cloud™
-
Onboard to Citrix Cloud. For more information, see Create a Citrix Cloud account and Connect to Citrix Cloud.
-
On Citrix Cloud, install Cloud Connectors and associate them with the resource location. For more information, see Cloud Connector Installation.
Note:
To make your existing apps and desktops available to subscribers, add your site (Citrix Virtual Apps and Desktops deployment) to Citrix Workspace. For more information, see Aggregate Virtual Apps and Desktops in workspaces.
Configure the resource location and policies on the on-premises Delivery Controller™
-
Run the following command on the Windows Active Directory (AD) or Domain Controller (DC) server, to retrieve the Security Identifiers (SIDs) of connector machines in a Windows AD or DC environment. Note the SIDs of the connector machines.
Get-ADComputer -Filter * | Select-Object Name, SID <!--NeedCopy--> -
In the on-premises Delivery Controller, create a zone and map it to the resource location created in Citrix Cloud.
-
In on-premises Delivery Controller, run the following command in the PowerShell and note the Uid generated for the required resource location:
Get-ConfigZone <!--NeedCopy--> -
Run the following commands for all the Citrix Cloud Connectors:
Set-ConfigZone -Uid <Uid from above command output> -ExternalUid <RL ID noted at step 1>

new-configedgeserver  <User friendly name> -MachineAddress "<Connector FQDN"> -Sid <Connector respective SID from step 2> -uuid <Respective Edge server UUID from step 1> -ZoneUid <Uid from Get-ConfigZone output>
<!--NeedCopy-->
-
-
To use Rendezvous v1, enable Rendezvous within the Delivery Controller policies and ensure that the on-premises Delivery Controller is configured with the connector details to accept Rendezvous requests. For more information, see Rendezvous v1.
-
To use HDX adaptive transport with EDT, enable adaptive transport protocol within the Delivery Controller policies on your on-premises Delivery Controller. For more information, see HDX Adaptive transport with EDT support for Citrix Gateway service.
Configure StoreFront to use Citrix Gateway service for HDX routing
For remote access to StoreFront, you must continue to use your existing NetScaler gateway. You can also use your NetScaler gateway for remote access to some resources, e.g. those in the same data center as the NetScaler gateway. For more information on configuring a NetScaler gateway for authentication in StoreFront, see Configure Citrix Gateways.
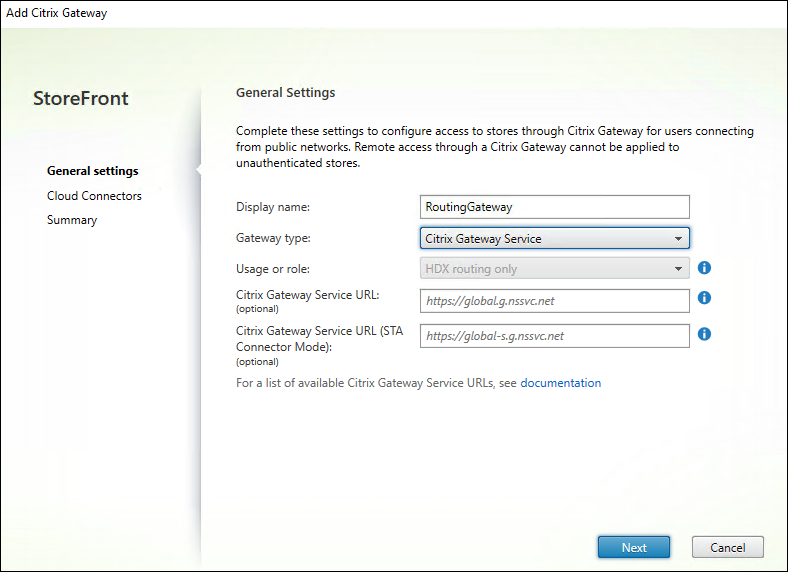
To configure Citrix Gateway service for HDX routing for some or all of your resources, create a gateway in StoreFront, and then use the Optimal Gateway Routing functionality of StoreFront to configure when it needs to be used:
-
Configure a gateway of type Citrix Gateway Service within StoreFront. Normally a single gateway is sufficient. However if you wish to use different geo-location rules for different sites or zones then you can configure multiple gateways with different gateway service URLs. For more information, see Add Citrix Gateway Service.
-
Choose for which sites or zones you wish HDX connections to be routed via those gateways. For more information, see Optimal HDX routing.
