NetScaler Gateway configuration for earlier versions
NetScaler Gateway configuration is supported for both Web/SaaS and TCP/UDP applications. You can create a NetScaler Gateway or update an existing NetScaler Gateway configuration for Secure Private Access. It is recommended that you create NetScaler snapshots or save the NetScaler configuration before applying these changes.
Important:
- Support for TCP/UDP apps in addition to Web/SaaS apps is available starting from NetScaler Gateway version 14.1–25.56. However, Secure Private Access for TCP/UDP apps in hybrid deployments is supported from version 14.1–34.42 and this version significantly streamlines the configuration process.
- Support for Web/SaaS apps is available from NetScaler Gateway versions 13.1, 14.1 and later.
- For details about the NetScaler Gateway configuration, see Configure NetScaler Gateway.
Support for smart access tags
Note:
- The information provided in this section is applicable only if your NetScaler Gateway version is before 14.1-25.56.
- If your NetScaler Gateway version is 14.1–25.56 and later, then you can enable the Secure Private Access provider on NetScaler Gateway by using the CLI or GUI. For details, see Enable Secure Private Access provider on NetScaler Gateway.
In the following versions, NetScaler Gateway sends the tags automatically. You do not have to use the gateway callback address to retrieve the smart access tags.
- 13.1–48.47 and later
- 14.1–4.42 and later
The smart access tags are added as a header in the Secure Private Access provider request.
Configure Secure Private Access toggles
The following table lists the toggles that must be used to support smart access tags for hybrid deployments.
| Toggle name | Description |
|---|---|
nsapimgr_wr.sh -ys call=ns_vpn_enable_spa_onprem |
Enable Secure Private Access for hybrid deployments |
nsapimgr_wr.sh -ys call=ns_vpn_disable_spa_onprem |
Disable Secure Private Access for hybrid deployments |
nsapimgr_wr.sh -ys ns_vpn_enable_spa_tcp_udp_apps=3 |
Enable TCP/UDP apps |
nsapimgr_wr.sh -ys ns_vpn_enable_spa_tcp_udp_apps=0 |
Disable TCP/UDP apps |
nsapimgr_wr.sh -ys call=toggle_vpn_enable_securebrowse_client_mode |
Enable SecureBrowse client mode for HTTP callout config |
nsapimgr -ys call=toggle_vpn_redirect_to_access_restricted_page_on_deny |
Enable redirection to the “Access restricted” page if access is denied. |
nsapimgr -ys call=toggle_vpn_use_cdn_for_access_restricted_page |
Use the “Access restricted” page hosted on CDN. |
Note:
- To disable the toggles that do not have separate disable commands, run the same command again. This is applicable only for commands that have “toggle” in the command.
- To verify whether the toggle is on or off, run the
nsconmsgcommand.- To configure smart access tags on NetScaler Gateway, see Configure contextual tags.
Persist Secure Private Access provider settings on NetScaler
To persist the Secure Private Access provider settings on NetScaler, do the following:
- Create or update the file /nsconfig/rc.netscaler.
-
Add the following commands to the /nsconfig/rc.netscaler file.
nsapimgr -ys call=ns_vpn_enable_spa_onpremnsapimgr -ys call=toggle_vpn_enable_securebrowse_client_modensapimgr -ys call=toggle_vpn_redirect_to_access_restricted_page_on_denynsapimgr -ys call=toggle_vpn_use_cdn_for_access_restricted_page - Save the file.
The Secure Private Access provider settings are automatically applied when NetScaler is restarted.
Enable Secure Private Access provider on NetScaler Gateway
Starting from NetScaler Gateway 14.1–25.56 and later, you can enable the Secure Private Access provider on NetScaler Gateway by using the NetScaler Gateway CLI or the GUI.
CLI:
At the command prompt, type the following command:
set vpn parameter -securePrivateAccess ENABLED
GUI:
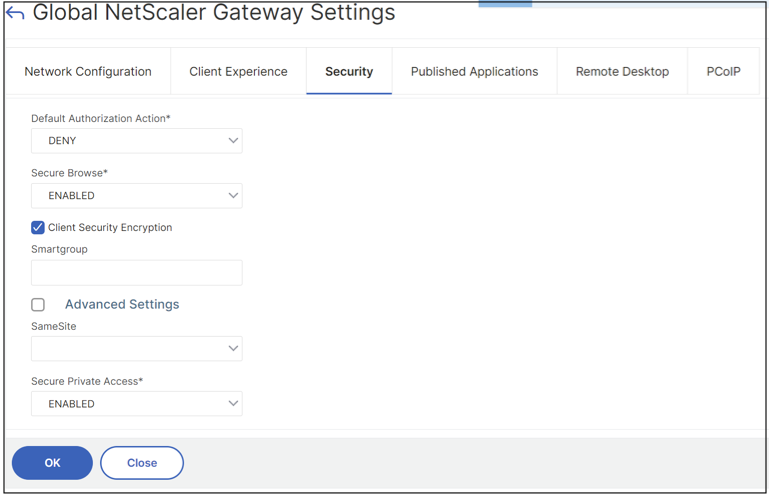
- Navigate to NetScaler Gateway > Global Settings > Change Global NetScaler Gateway Settings.
- Click the Security tab.
- In Secure Private Access, select ENABLED.

Compatibility with the ICA® apps
NetScaler Gateway created or updated to support the Secure Private Access provider can also be used to enumerate and launch ICA apps. In this case, you must configure Secure Ticket Authority (STA) and bind it to the NetScaler Gateway.
Note:
STA server is usually a part of Citrix Virtual Apps and Desktops™ deployment.
For details, see the following topics:
- Configuring the Secure Ticket Authority on NetScaler Gateway
- FAQ: Citrix Secure Gateway/ NetScaler Gateway Secure Ticket Authority
Known limitations
- Existing NetScaler Gateway can be updated with script but there can be a significant number of possible NetScaler configurations that can’t be covered by a single script.
- We recommend that you set ICA Proxy to OFF in the Secure Private Access enabled VPN virtual server.
- If you use NetScaler deployed in the cloud, you must make changes in the network. For example, allow communications between NetScaler and other components on certain ports. For details on the ports, see Communication ports.
- If you enable SSO on NetScaler Gateway, make sure that NetScaler communicates to StoreFront™ using a private IP address. You might have to add a StoreFront DNS record to NetScaler with a StoreFront private IP address.