Get started with profiles
To get started with this feature, administrators need to review the following support matrix:
Workspace
| Citrix Workspace app platform | Minimum supported version | User group rules | Device Posture rules | Network Location rules |
|---|---|---|---|---|
| Windows | 2405 | Yes | Yes | Yes |
| macOS | 2405.11 | Yes | Yes | Yes |
StoreFront
To learn about the prerequisites and how administrators can configure profiles for StoreFront stores, check Setup profiles for StoreFront stores.
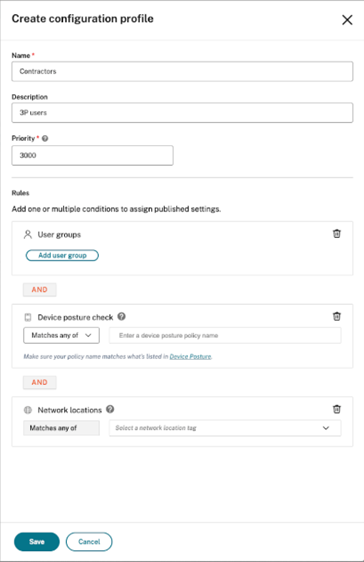
Create a profile
- Sign in to your Citrix Cloud account and navigate to Client app management.
- Under Stores section, click Create profile to create a configuration profile.
- Enter the name, description, and priority of the profile in the Name, Description, and Priority fields respectively. To learn more about priority, check Set Priority.
-
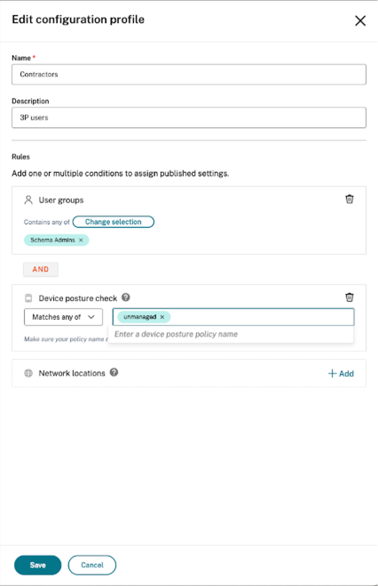
In the Rules section, you can search for and add User Groups, Device Posture tags, and Network Location tags.
These entities are combined with a logical AND condition, meaning a user must match all selected criteria to be part of the profile. You can create a profile with a single criteria (for example, only a device posture tag) or a combination of them as required. You can add the desired entities by clicking them from the search list.
-
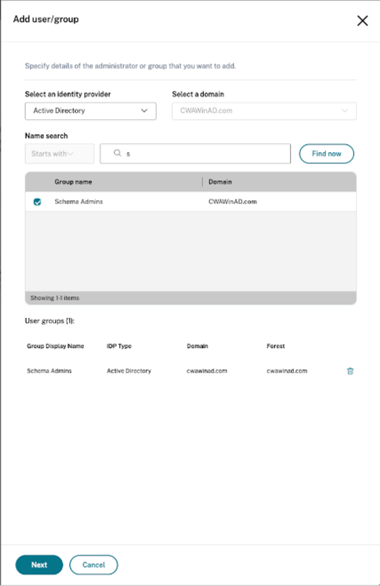
To configure user groups, click Add option next to User groups. In the Add user/group workflow, Select an identity provider and a domain name. In the Name search field, enter a keyword and search the user groups that you want to add into this profile. Click Save.
-
When configuring device posture, the tag must exactly match the policy name created in the device posture section and must be entered as is. If you are adding only the result (for example,
COMPLIANT,NON-COMPLIANT,DENY), make sure to enter these tags in uppercase.There are three match types used to evaluate device posture when selecting a configuration profile:
- MATCHES_ALL: Device must meet all specified posture requirements.
- MATCHES_ANY: Device must meet at least one specified posture requirement.
- DOES_NOT_MATCH: Device must not meet any of the specified posture requirements.
-
When configuring network locations, select the existing tags from the drop-down menu.
- Click Save.
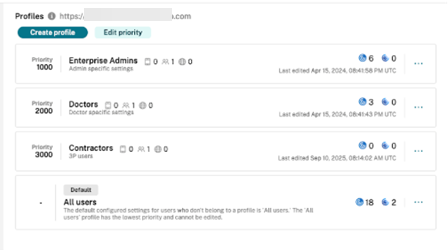
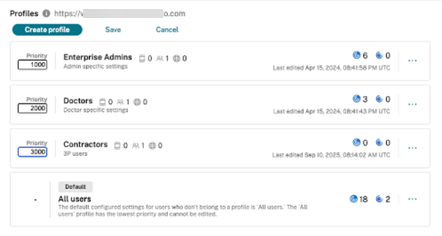
Edit priority
When a user is associated with more than one profile, the system reviews all available profiles against the user’s group, device status, and network context. The profile that most closely aligns and has the highest precedence is chosen. The lower the value, the higher the priority.
To modify a priority for an existing profile:
-
Select a store URL and click Edit priority
-
Edit the number in the Priority field. Click Save.
Note:
We recommend leaving sufficient gaps between the priority of configuration profiles, such as 1000, 2000, 3000, and so. This makes it easier to insert new priority values later during the creation of other configuration profiles without needing to edit the existing values.
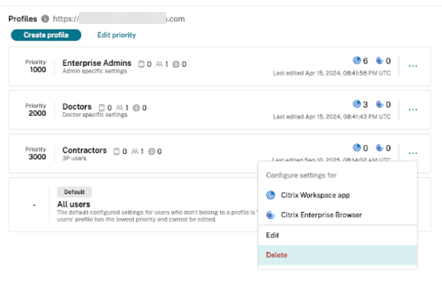
Delete a profile
To delete a configuration profile, you must reset all configured settings within the configuration profile. The detailed steps are as follows:
- Navigate to Client app management > Stores.
- Select the relevant stores under the Workspace or Storefront tab.
- Click the three dots next to the profile that has to be reset for a store URL.
- Select the relevant app name to go to the settings for that store and profile combination.
-
Go to the three dots as shown after this and click Reset all. Provide a confirmation in the follow-up dialog. This deletes all the settings for that profile.

-
Now go to Stores and select the same profile. Click Delete.
This removes the profile completely for the store URL.