Use Machine Creation Services™ (MCS) to create Linux VMs
Supported distributions
| Winbind | SSSD | Centrify | PBIS | |
|---|---|---|---|---|
| Debian 11.3, Debian 10.9 | Yes | Yes | No | Yes |
| RHEL 8.6, RHEL 8.4 | Yes | No | Yes | Yes |
| Rocky Linux 8.6 | Yes | No | No | No |
| RHEL 7.9, CentOS 7.9 | Yes | Yes | Yes | Yes |
| SUSE 15.3 | Yes | Yes | No | Yes |
| Ubuntu 22.04, Ubuntu 20.04, Ubuntu 18.04 | Yes | Yes | No | Yes |
Supported hypervisors
- AWS
- Citrix Hypervisor™
- GCP
- Microsoft Azure
- Nutanix AHV
- VMware vSphere
Unexpected results can occur if you try to prepare a master image on hypervisors other than the supported ones.
Use MCS to create Linux VMs
Note:
From Citrix Virtual Apps and Desktops 7 2003 through Citrix Virtual Apps and Desktops 7 2112, hosting the Linux VDA on Microsoft Azure, AWS, and GCP was supported only for Citrix DaaS (formerly Citrix Virtual Apps and Desktops service). Starting with the 2203 release, you can host the Linux VDA on these public clouds for both Citrix DaaS and Citrix Virtual Apps and Desktops. To add these public cloud host connections to your Citrix Virtual Apps and Desktops deployment, you need Hybrid Rights License. For information about Hybrid Rights License, see Transition and Trade-Up (TTU) with Hybrid Rights.
Bare metal servers are not supported for use with MCS to create virtual machines.
If you are using PBIS or Centrify for joining MCS-created machines to Windows domains, complete the following tasks:
- On the template machine, configure the PBIS or Centrify package download path in the
/etc/xdl/mcs/mcs.conffile or install the PBIS or Centrify package directly.- Before you run
/opt/Citrix/VDA/sbin/deploymcs.sh, create an Organizational Unit (OU) that has write and password reset permissions to all its subordinate, MCS-created machines.- Before you restart MCS-created machines after
/opt/Citrix/VDA/sbin/deploymcs.shfinishes running, runklist -li 0x3e4 purgeon your Delivery Controller or on your Citrix Cloud Connector based on your deployment.
(For Nutanix only) Step 1: Install and register the Nutanix AHV plug-in
Obtain the Nutanix AHV plug-in package from Nutanix. Install and register the plug-in in your Citrix Virtual Apps and Desktops environment. For more information, see the Nutanix Acropolis MCS plug-in installation guide, available at the Nutanix Support Portal.
Step 1a: Install and register the Nutanix AHV plug-in for on-premises Delivery Controllers
After you install Citrix Virtual Apps and Desktops™, select and install the XD MCS AHV Plugin on your Delivery Controllers.
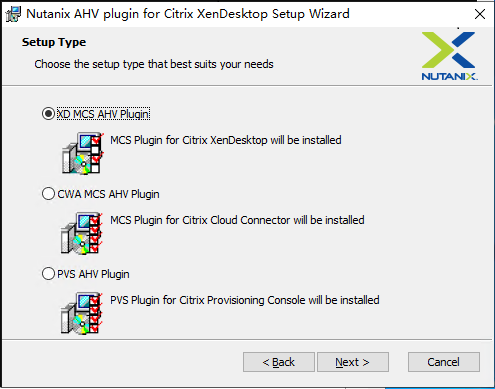
Step 1b: Install and register the Nutanix AHV plug-in for cloud Delivery Controllers
Select and install the CWA MCS AHV Plugin for Citrix Cloud™ Connectors. Install the plug-in on all Citrix Cloud Connectors that are registered with the Citrix Cloud tenant. You must register Citrix Cloud Connectors even when they serve a resource location without the AHV.
Step 1c: Complete the following steps after installing the plug-in
- Verify that a Nutanix Acropolis folder has been created in
C:\Program Files\Common Files\Citrix\HCLPlugins\CitrixMachineCreation\v1.0.0.0. - Run the
"C:\Program Files\Common Files\Citrix\HCLPlugins\RegisterPlugins.exe" -PluginsRoot "C:\Program Files\Common Files\Citrix\HCLPlugins\CitrixMachineCreation\v1.0.0.0"command. -
Restart the Citrix Host, Citrix Broker, and Citrix Machine Creation Services on your on-premises Delivery Controllers or restart the Citrix RemoteHCLServer Service on Citrix Cloud Connectors.
Tip:
We recommend that you stop and then restart the Citrix Host, Citrix Broker, and Machine Creation Services when you install or update the Nutanix AHV plug-in.
Step 2: Create a hosting connection
This section walks you through creating a hosting connection to Azure, AWS, GCP, Nutanix AHV, and VMware vSphere:
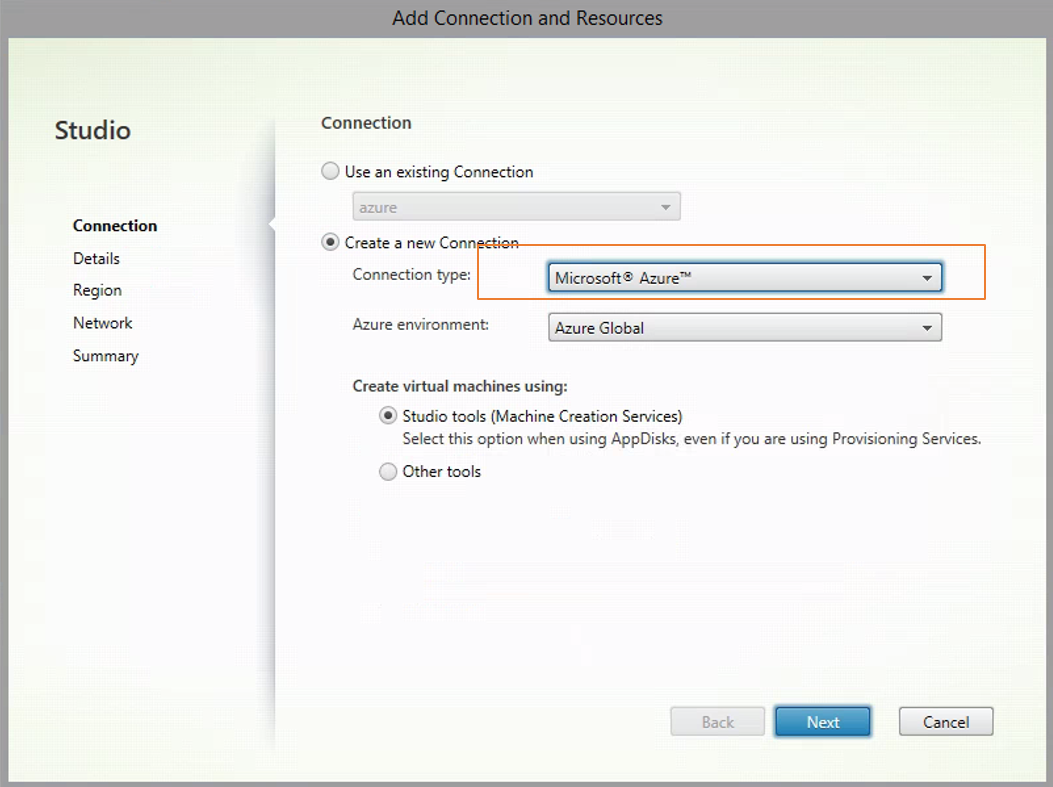
Create a hosting connection to Azure in Citrix Studio
-
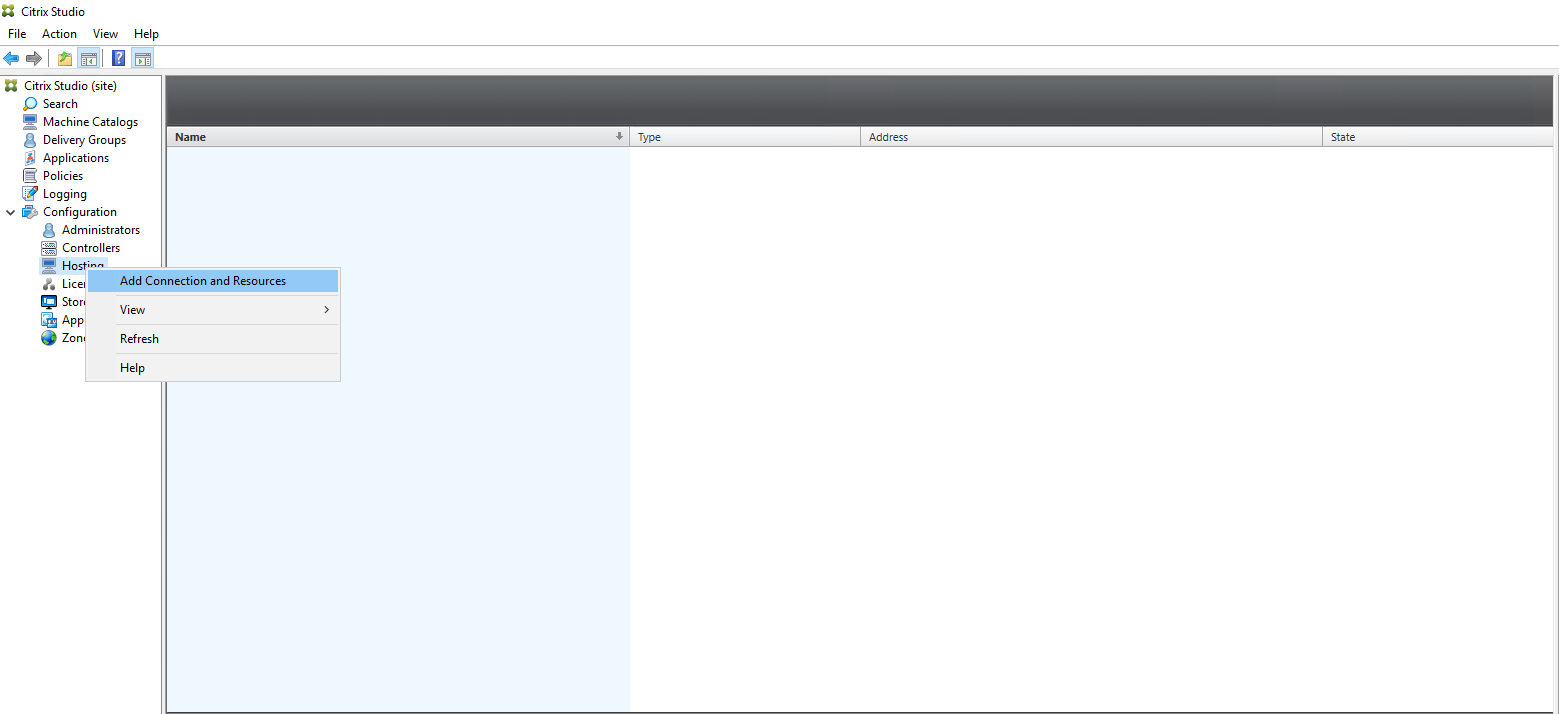
In Citrix Studio on Citrix Cloud, choose Configuration > Hosting > Add Connection and Resources to create a connection to Azure.

-
Choose Microsoft Azure as the connection type.
-
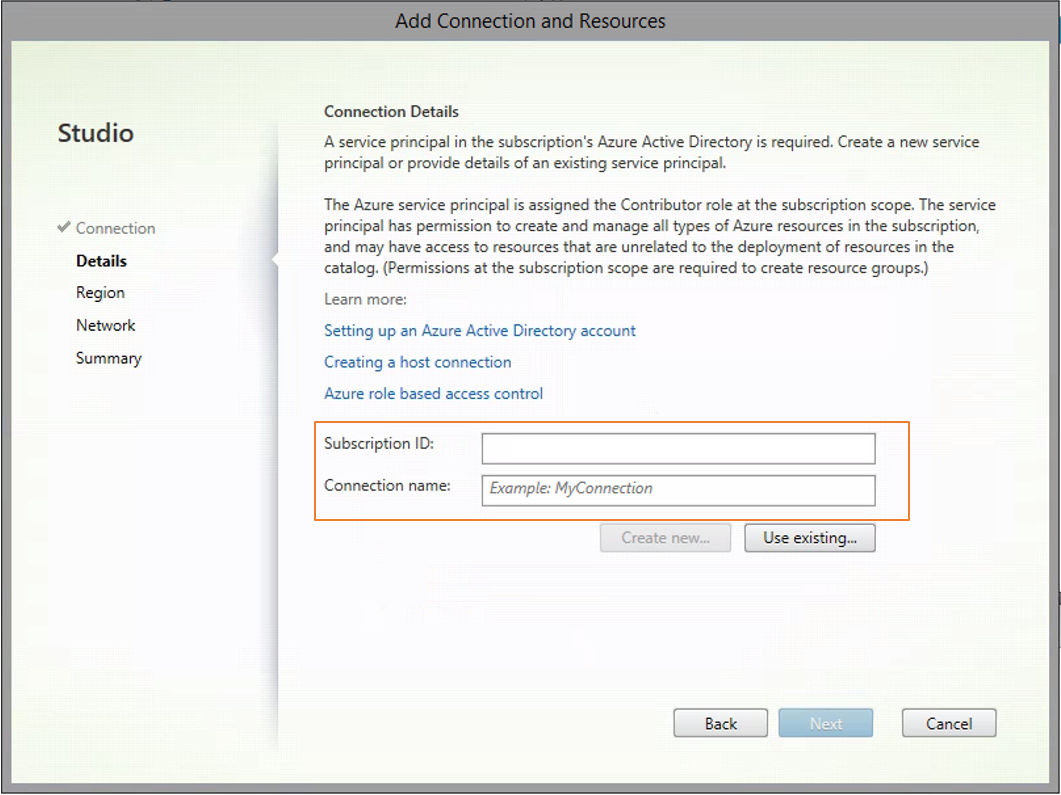
Type the subscription ID of your Azure account and your connection name.
A new connection appears in the hosting pane.
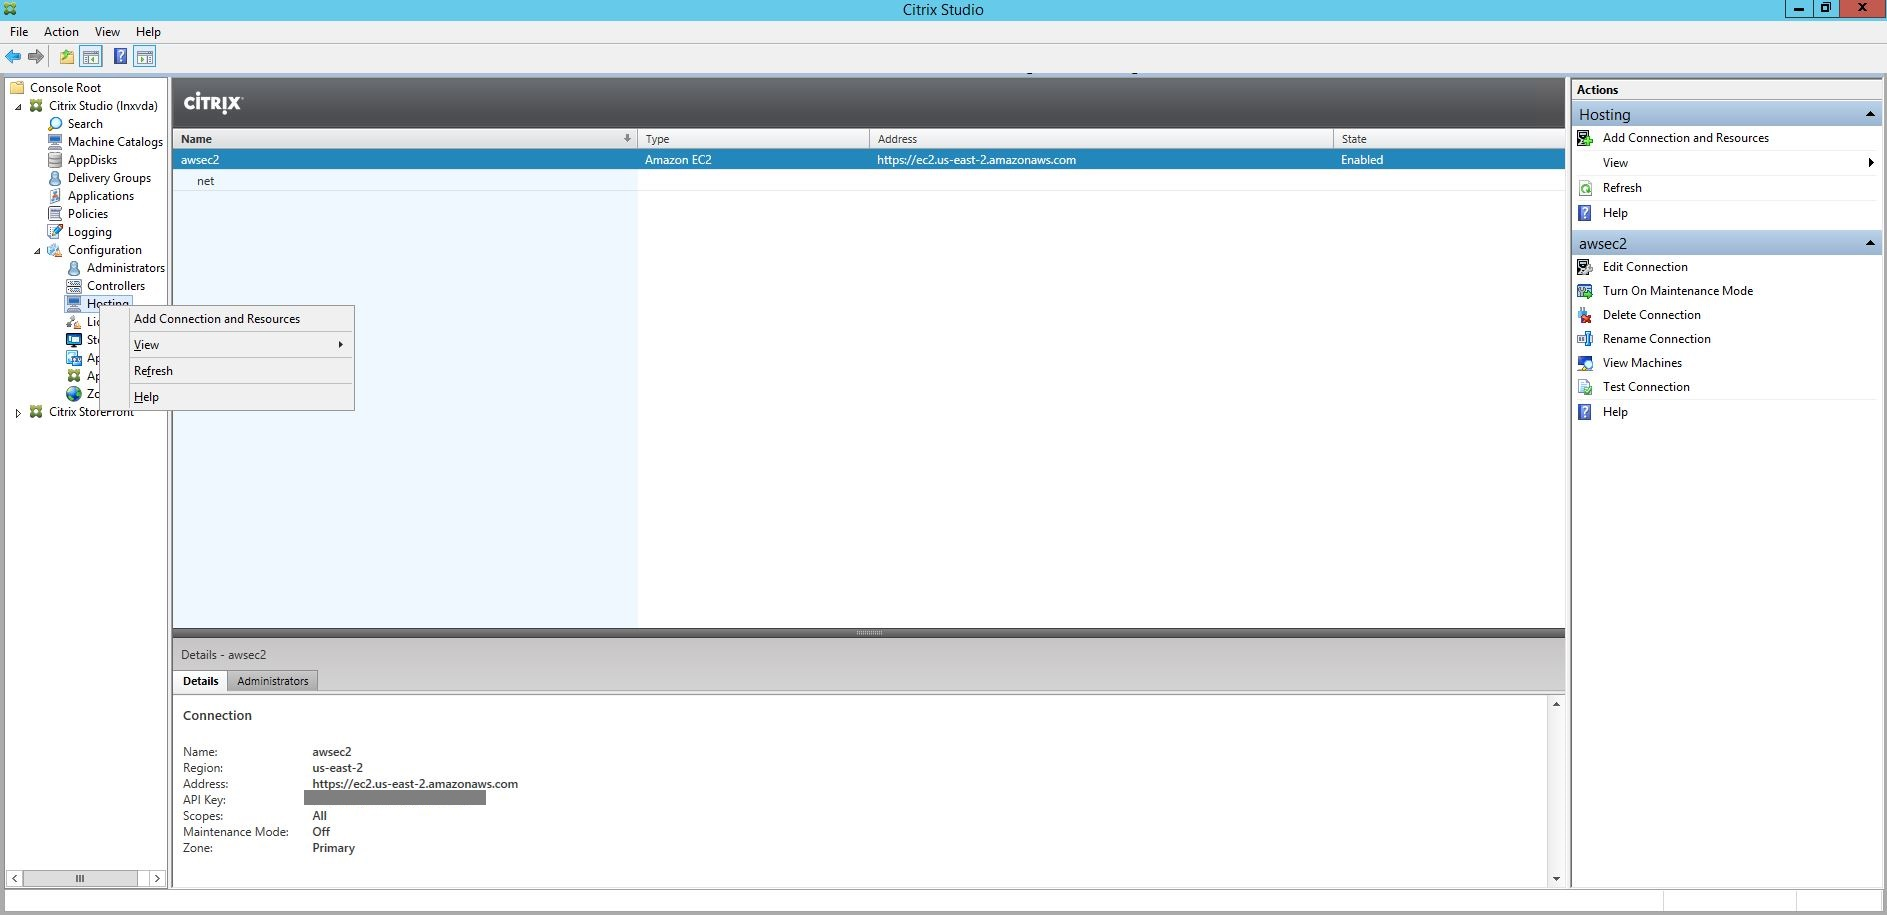
Create a hosting connection to AWS in Citrix Studio
-
In Citrix Studio on Citrix Cloud, choose Configuration > Hosting > Add Connection and Resources to create a connection to AWS.
-
Choose Amazon EC2 as the connection type.

-
Type the API key and secret key of your AWS account and type your connection name.
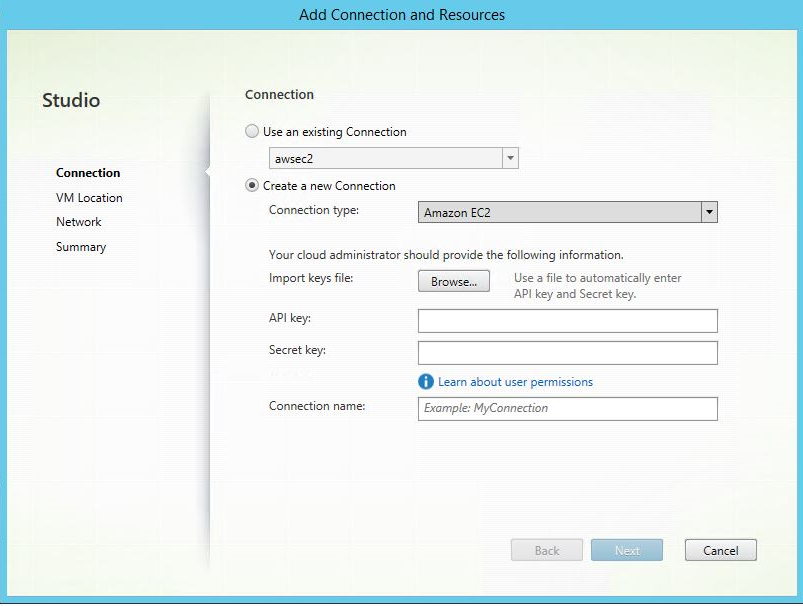
The API key is your access key ID and the Secret key is your secret access key. They are considered as an access key pair. If you lose your secret access key, you can delete the access key and create another one. To create an access key, do the following:
- Sign in to the AWS services.
- Navigate to the Identity and Access Management (IAM) console.
- On the left navigation pane, choose Users.
- Select the target user and scroll down to select the Security credentials tab.
- Scroll down and click Create access key. A new window appears.
- Click Download .csv file and save the access key to a secure location.
A new connection appears in the hosting pane.
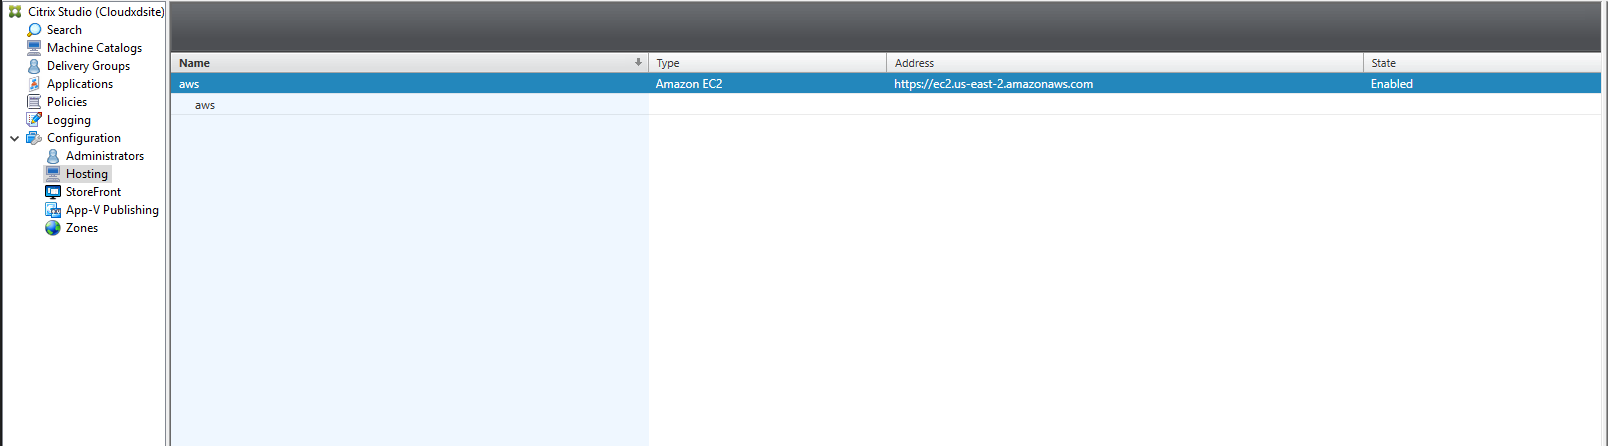
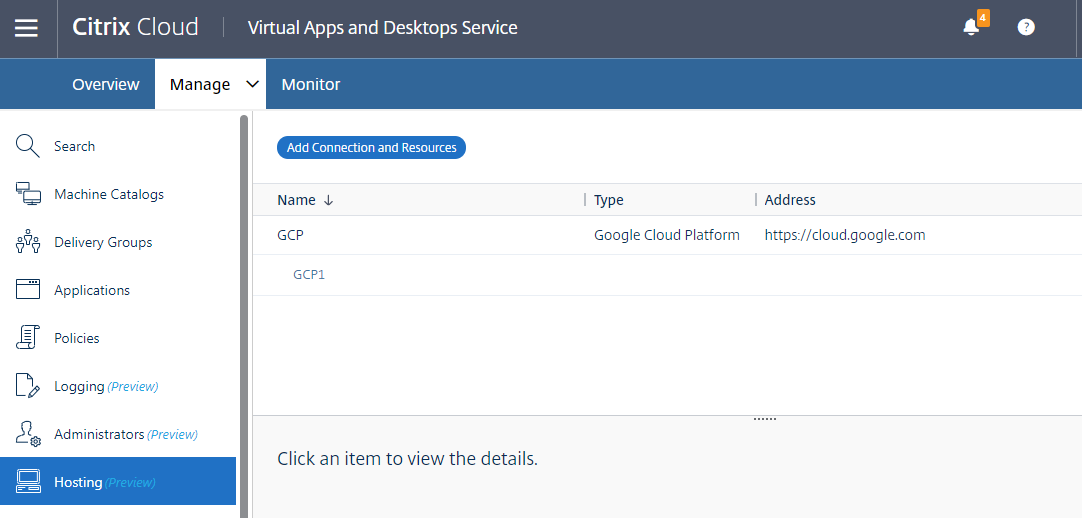
Create a hosting connection to GCP in Citrix Studio
Set up your GCP environment according to Google Cloud Platform virtualization environments and then complete the following steps to create a hosting connection to GCP.
-
In Citrix Studio on Citrix Cloud, choose Configuration > Hosting > Add Connection and Resources to create a connection to GCP.
-
Choose Google Cloud Platform as the connection type.
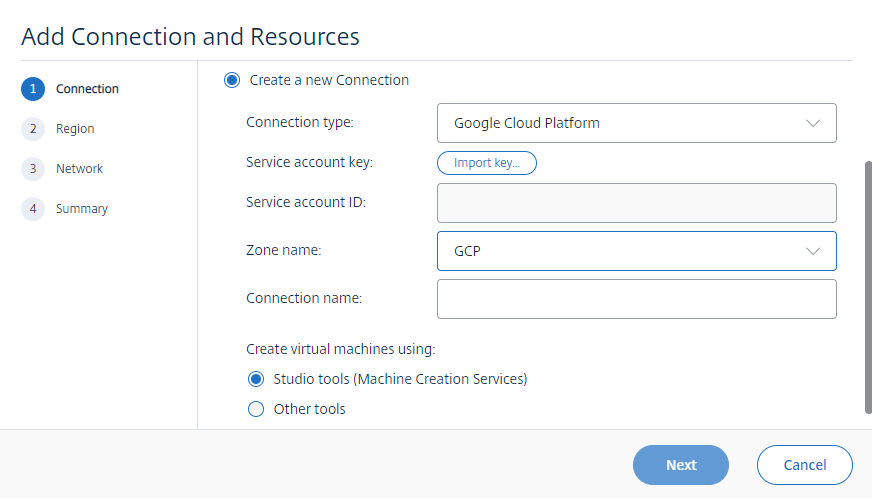
-
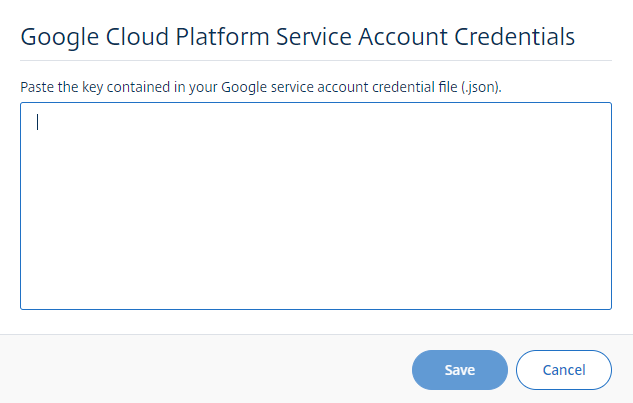
Import the service account key of your GCP account and type your connection name.
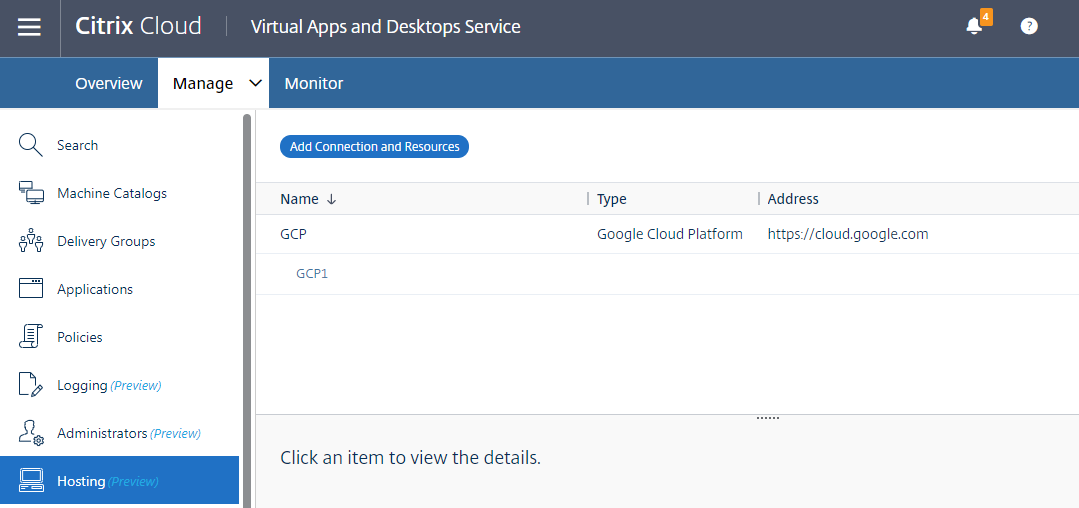
A new connection appears in the hosting pane.
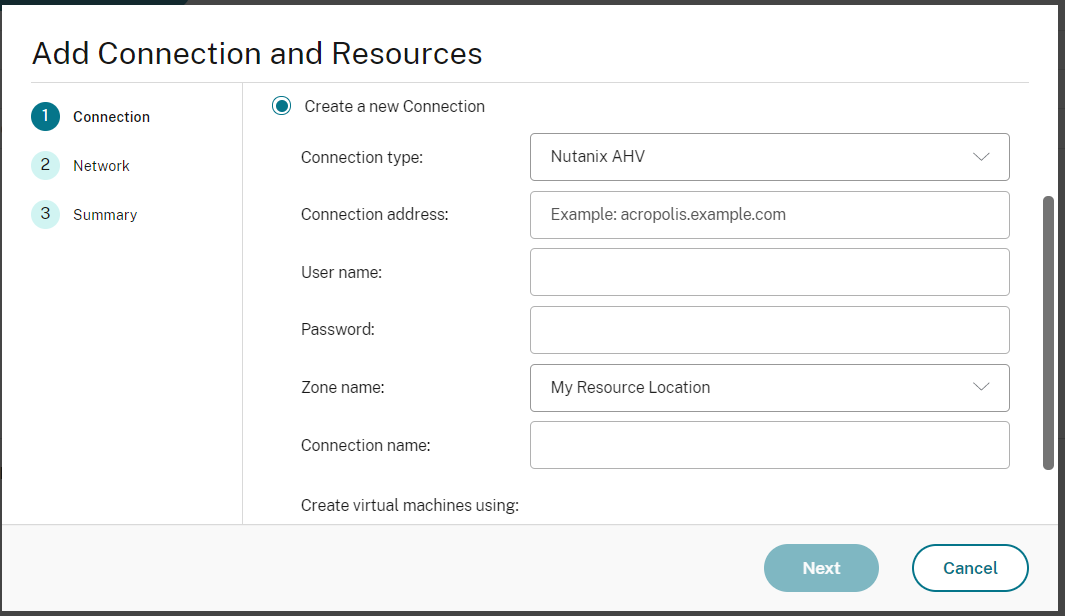
Create a hosting connection to Nutanix in Citrix Studio
- For on-premises Delivery Controllers, choose Configuration > Hosting > Add Connection and Resources in the on-premises Citrix Studio. For cloud Delivery Controllers, choose Manage > Hosting > Add Connection and Resources in the web-based Studio console on Citrix Cloud to create a connection to the Nutanix hypervisor.
-
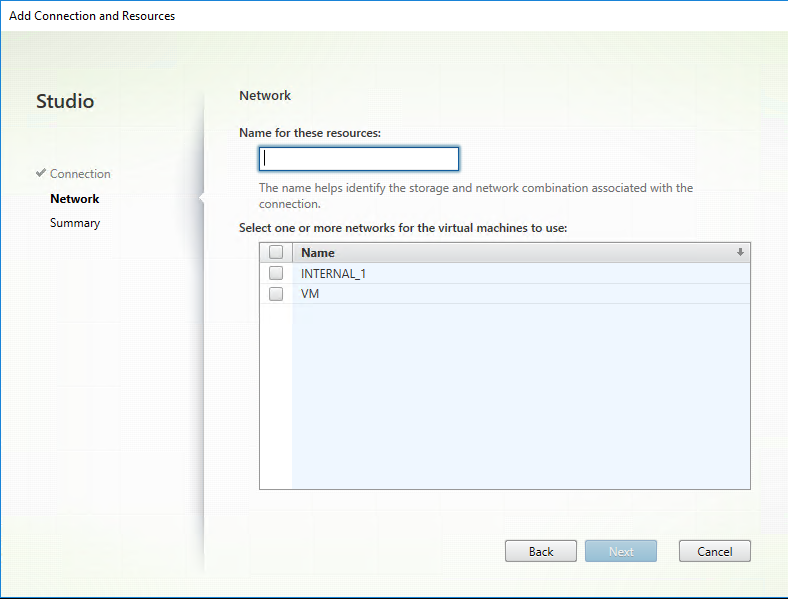
In the Add Connection and Resources wizard, select Nutanix AHV as the connection type on the Connection page, and then specify the hypervisor address, credentials, and your connection name. On the Network page, select a network for the hosting unit.
For example, in the on-premises Citrix Studio:
For example, in the web-based Studio console on Citrix Cloud:
- On the Network page, select a network for the hosting unit.
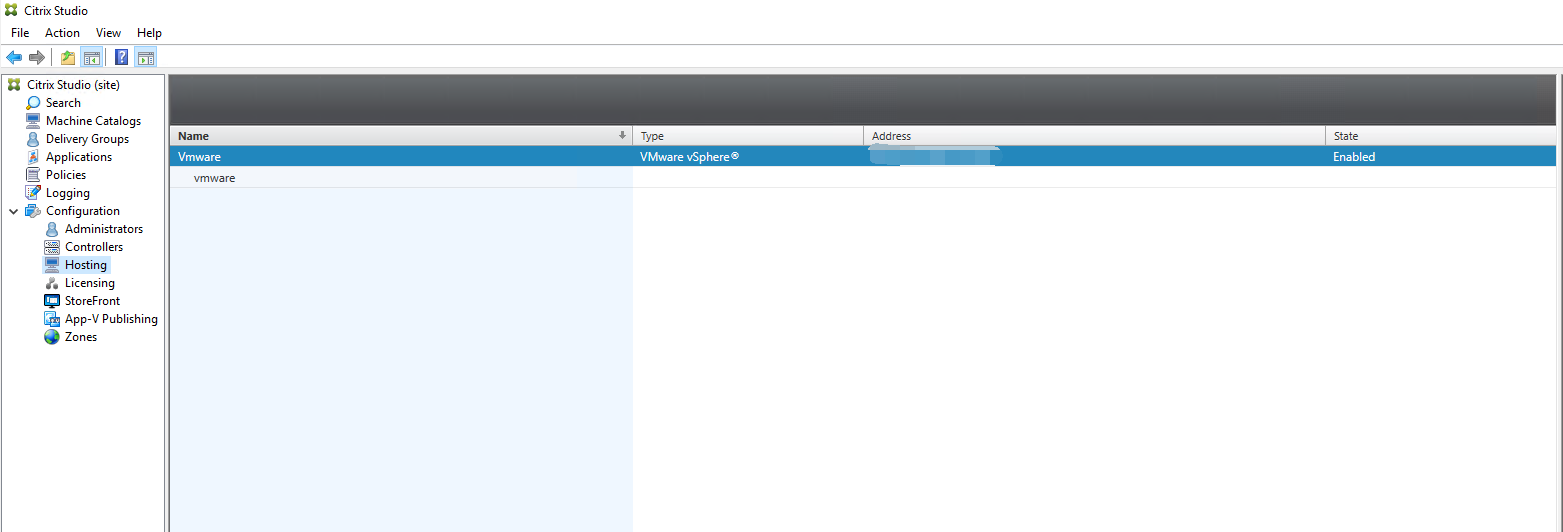
Create a hosting connection to VMware in Citrix Studio
-
Install vCenter Server in the vSphere environment. For more information, see VMware vSphere.
-
In Citrix Studio, choose Configuration > Hosting > Add Connection and Resources to create a connection to VMware vSphere.
-
Choose VMware vSphere as the connection type.
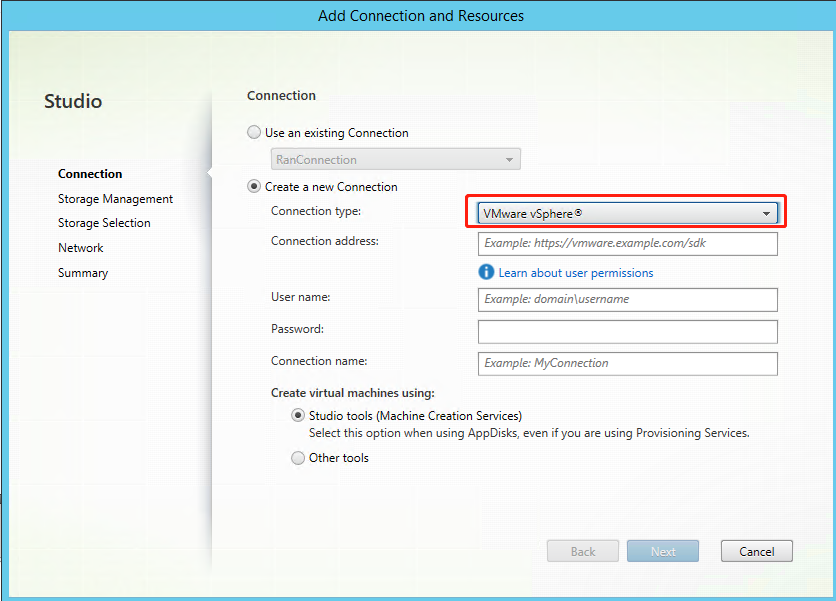
-
Type the connection address (the vCenter Server URL) of your VMware account, your user name and password, and your connection name.
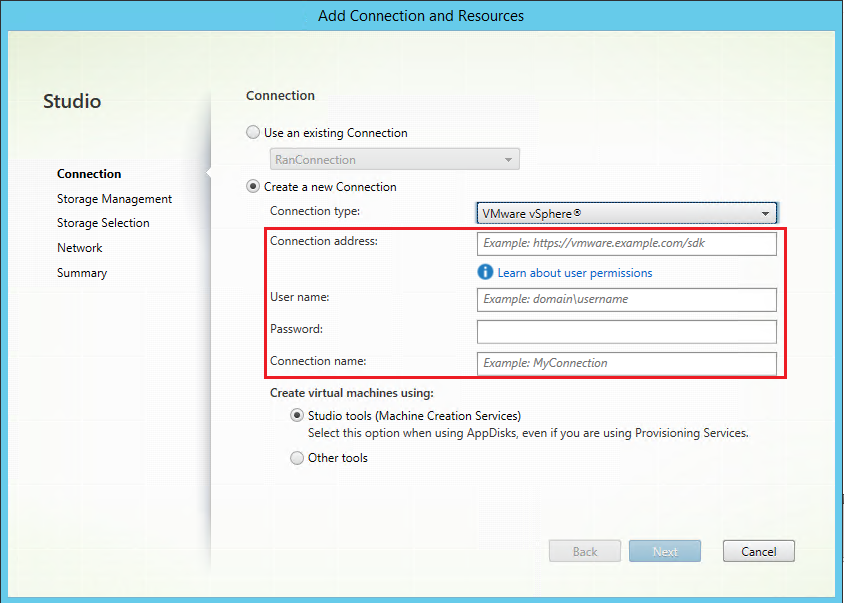
A new connection appears in the hosting pane.
Step 3: Prepare a master image
(For Citrix Hypervisor only) Step 3a: Install Citrix VM Tools
Install Citrix VM Tools on the template VM for each VM to use the xe CLI or XenCenter. VM performance can be slow unless you install the tools. Without the tools, you can’t do any of the following:
- Cleanly shut down, restart, or suspend a VM.
- View the VM performance data in XenCenter.
- Migrate a running VM (through
XenMotion). - Create snapshots or snapshots with memory (checkpoints), and revert to snapshots.
- Adjust the number of vCPUs on a running Linux VM.
-
Run the following command to mount Citrix VM Tools named guest-tools.iso.
sudo mount /dev/cdrom /mnt <!--NeedCopy--> -
Run the following command to install the
xe-guest-utilitiespackage based on your Linux distribution.For RHEL/CentOS/Rocky Linux:
sudo rpm -i /mnt/Linux/xe-guest-utilities_{package-version}_all.rpm
<!--NeedCopy-->
For Ubuntu/Debian:
sudo dpkg -i /mnt/Linux/xe-guest-utilities_{package-version}_all.deb
<!--NeedCopy-->
For SUSE:
sudo rpm -i /mnt/Linux/xe-guest-utilities_{package-version}_all.rpm <!--NeedCopy--> -
Check the virtualization state of the template VM on the General tab in XenCenter. If Citrix VM Tools are installed correctly, the virtualization state is Optimized.
(For Azure, AWS, and GCP) Step 3b: Configure cloud-init for Ubuntu 18.04
-
To ensure that a VDA host name persists when a VM is restarted or stopped, run the following command:
echo "preserve_hostname: true" > /etc/cloud/cloud.cfg.d/99_hostname.cfg
<!--NeedCopy-->
Verify that the following lines are present under the system_info section in the /etc/cloud/cloud.cfg file:
system_info: network: renderers: ['netplan', 'eni', 'sysconfig'] <!--NeedCopy--> -
To use SSH for remotely accessing MCS-created VMs on AWS, enable password authentication because no key name is attached to those VMs. Do the following as needed.
-
Edit the
cloud-initconfiguration file, /etc/cloud/cloud.cfg. Ensure that the ssh_pwauth: true line is present. Remove or comment the set-password line and the following lines if they exist.users: - default <!--NeedCopy--> - If you plan to use the default user
ec2-userorubuntucreated bycloud-init, you can change the user password by using thepasswdcommand. Keep the new password in mind for later use to log in to the MCS-created VMs. -
Edit the
/etc/ssh/sshd_configfile to ensure that the following line is present:PasswordAuthentication yes <!--NeedCopy-->Save the file and run the
sudo service sshd restartcommand.
-
Step 3c: Install the Linux VDA package on the template VM
Note:
To use a currently running VDA as the template VM, skip this step.
Before installing the Linux VDA package on the template VM, install .NET Runtime 6.0.
Based on your Linux distribution, run the following command to set up the environment for the Linux VDA:
For RHEL/CentOS/Rocky Linux:
sudo yum –y localinstall <PATH>/<Linux VDA RPM>
<!--NeedCopy-->
Note:
For RHEL and CentOS, install the EPEL repository before you can install the Linux VDA and run
deploymcs.shsuccessfully. For information on how to install EPEL, see the instructions at https://docs.fedoraproject.org/en-US/epel/.
For Ubuntu/Debian:
sudo dpkg –i  <PATH>/<Linux VDA DEB>

apt-get install -f
<!--NeedCopy-->
For SUSE:
sudo zypper –i install <PATH>/<Linux VDA RPM>
<!--NeedCopy-->
Step 3d: Enable repositories to install the tdb-tools package
For RHEL 7 server:
subscription-manager repos --enable=rhel-7-server-optional-rpms
<!--NeedCopy-->
For RHEL 7 workstation:
subscription-manager repos --enable=rhel-7-workstation-optional-rpms
<!--NeedCopy-->
Step 3e: (On SUSE) Manually install ntfs-3g
On the SUSE platform, no repository provides ntfs-3g. Download the source code, compile, and install ntfs-3g manually:
-
Install the GNU Compiler Collection (GCC) compiler system and the make package:
sudo zypper install gcc sudo zypper install make <!--NeedCopy--> -
Download the ntfs-3g package.
-
Decompress the ntfs-3g package:
sudo tar -xvzf ntfs-3g_ntfsprogs-<package version>.tgz <!--NeedCopy--> -
Enter the path to the ntfs-3g package:
sudo cd ntfs-3g_ntfsprogs-<package version> <!--NeedCopy--> -
Install ntfs-3g:
./configure
make
make install
<!--NeedCopy-->
Step 3f: Edit the MCS configuration files
-
Change variables in
/etc/xdl/mcs/mcs.conf.-
For non-domain-joined scenarios
For non-domain-joined scenarios, you can leave variables in
/etc/xdl/mcs/mcs.confunspecified or change the following variables as required:DOTNET_RUNTIME_PATH=path-to-install-dotnet-runtime \
DESKTOP_ENVIRONMENT= **gnome | mate \**
VDA_PORT=port-number
REGISTER_SERVICE=**Y | N**
ADD_FIREWALL_RULES=**Y | N**
HDX_3D_PRO=**Y | N**
VDI_MODE=**Y | N**
SITE_NAME=**dns-site-name | ‘<none>’**
SEARCH_BASE=**search-base-set | ‘<none>’**
START_SERVICE=**Y | N**
TELEMETRY_SOCKET_PORT=port-number
TELEMETRY_PORT=port-number -
For domain-joined scenarios
Change variables in
/etc/xdl/mcs/mcs.conf. Themcs.confconfiguration file provides variables for setting MCS and the Linux VDA. The following are variables that you can set as required:-
Use_Existing_Configurations_Of_Current_VDA: Determines whether to use the existing AD-related configuration files (/etc/krb5.conf, /etc/sssd.conf, and /etc/samba/smb.conf) of the currently running VDA. If set to Y, the configuration files on MCS-created machines are the same as the equivalents on the currently running VDA. However, you still must configure thednsandAD_INTEGRATIONvariables. The default value is N, which means the configuration templates on the master image determine the configuration files on MCS-created machines. -
dns: Sets the IP address for each DNS server. You can set up to four DNS servers. -
NTP_SERVER: Sets the IP address for your NTP server. Unless otherwise specified, it’s the IP address of your domain controller. -
WORKGROUP: Sets the workgroup name to the NetBIOS name (case-sensitive) that you configured in AD. Otherwise, MCS uses the part of the domain name that immediately follows the machine hostname as the workgroup name. For example, if the machine account is user1.lvda.citrix.com, MCS uses lvda as the workgroup name while citrix is the correct choice. Ensure that you set the workgroup name correctly. -
AD_INTEGRATION: Sets Winbind, SSSD, PBIS, or Centrify. For a matrix of the Linux distributions and domain joining methods that MSC supports, see Supported distributions in this article. -
CENTRIFY_DOWNLOAD_PATH: Sets the path for downloading the Server Suite Free (formerly Centrify Express) package. The value takes effect only when you set theAD_INTEGRATIONvariable to Centrify. -
CENTRIFY_SAMBA_DOWNLOAD_PATH: Sets the path for downloading the Centrify Samba package. The value takes effect only when you set theAD_INTEGRATIONvariable to Centrify. -
PBIS_DOWNLOAD_PATH: Sets the path for downloading the PBIS package. The value takes effect only when you set theAD_INTEGRATIONvariable to PBIS. -
UPDATE_MACHINE_PW: Enables or disables automating machine account password updates. For more information, see Automate machine account password updates. -
The following Linux VDA configuration variables:
DOTNET_RUNTIME_PATH=path-to-install-dotnet-runtime \
DESKTOP_ENVIRONMENT= **gnome | mate \**
SUPPORT_DDC_AS_CNAME=**Y | N**
VDA_PORT=port-number
REGISTER_SERVICE=**Y | N**
ADD_FIREWALL_RULES=**Y | N**
HDX_3D_PRO=**Y | N**
VDI_MODE=**Y | N**
SITE_NAME=**dns-site-name | ‘<none>’**
LDAP_LIST=**‘list-ldap-servers’ | ‘<none>’**
SEARCH_BASE=**search-base-set | ‘<none>’**
FAS_LIST=**‘list-fas-servers’ | ‘<none>’**
START_SERVICE=**Y | N**
TELEMETRY_SOCKET_PORT=port-number
TELEMETRY_PORT=port-number
For an example of
mcs.conf, see the following screen capture: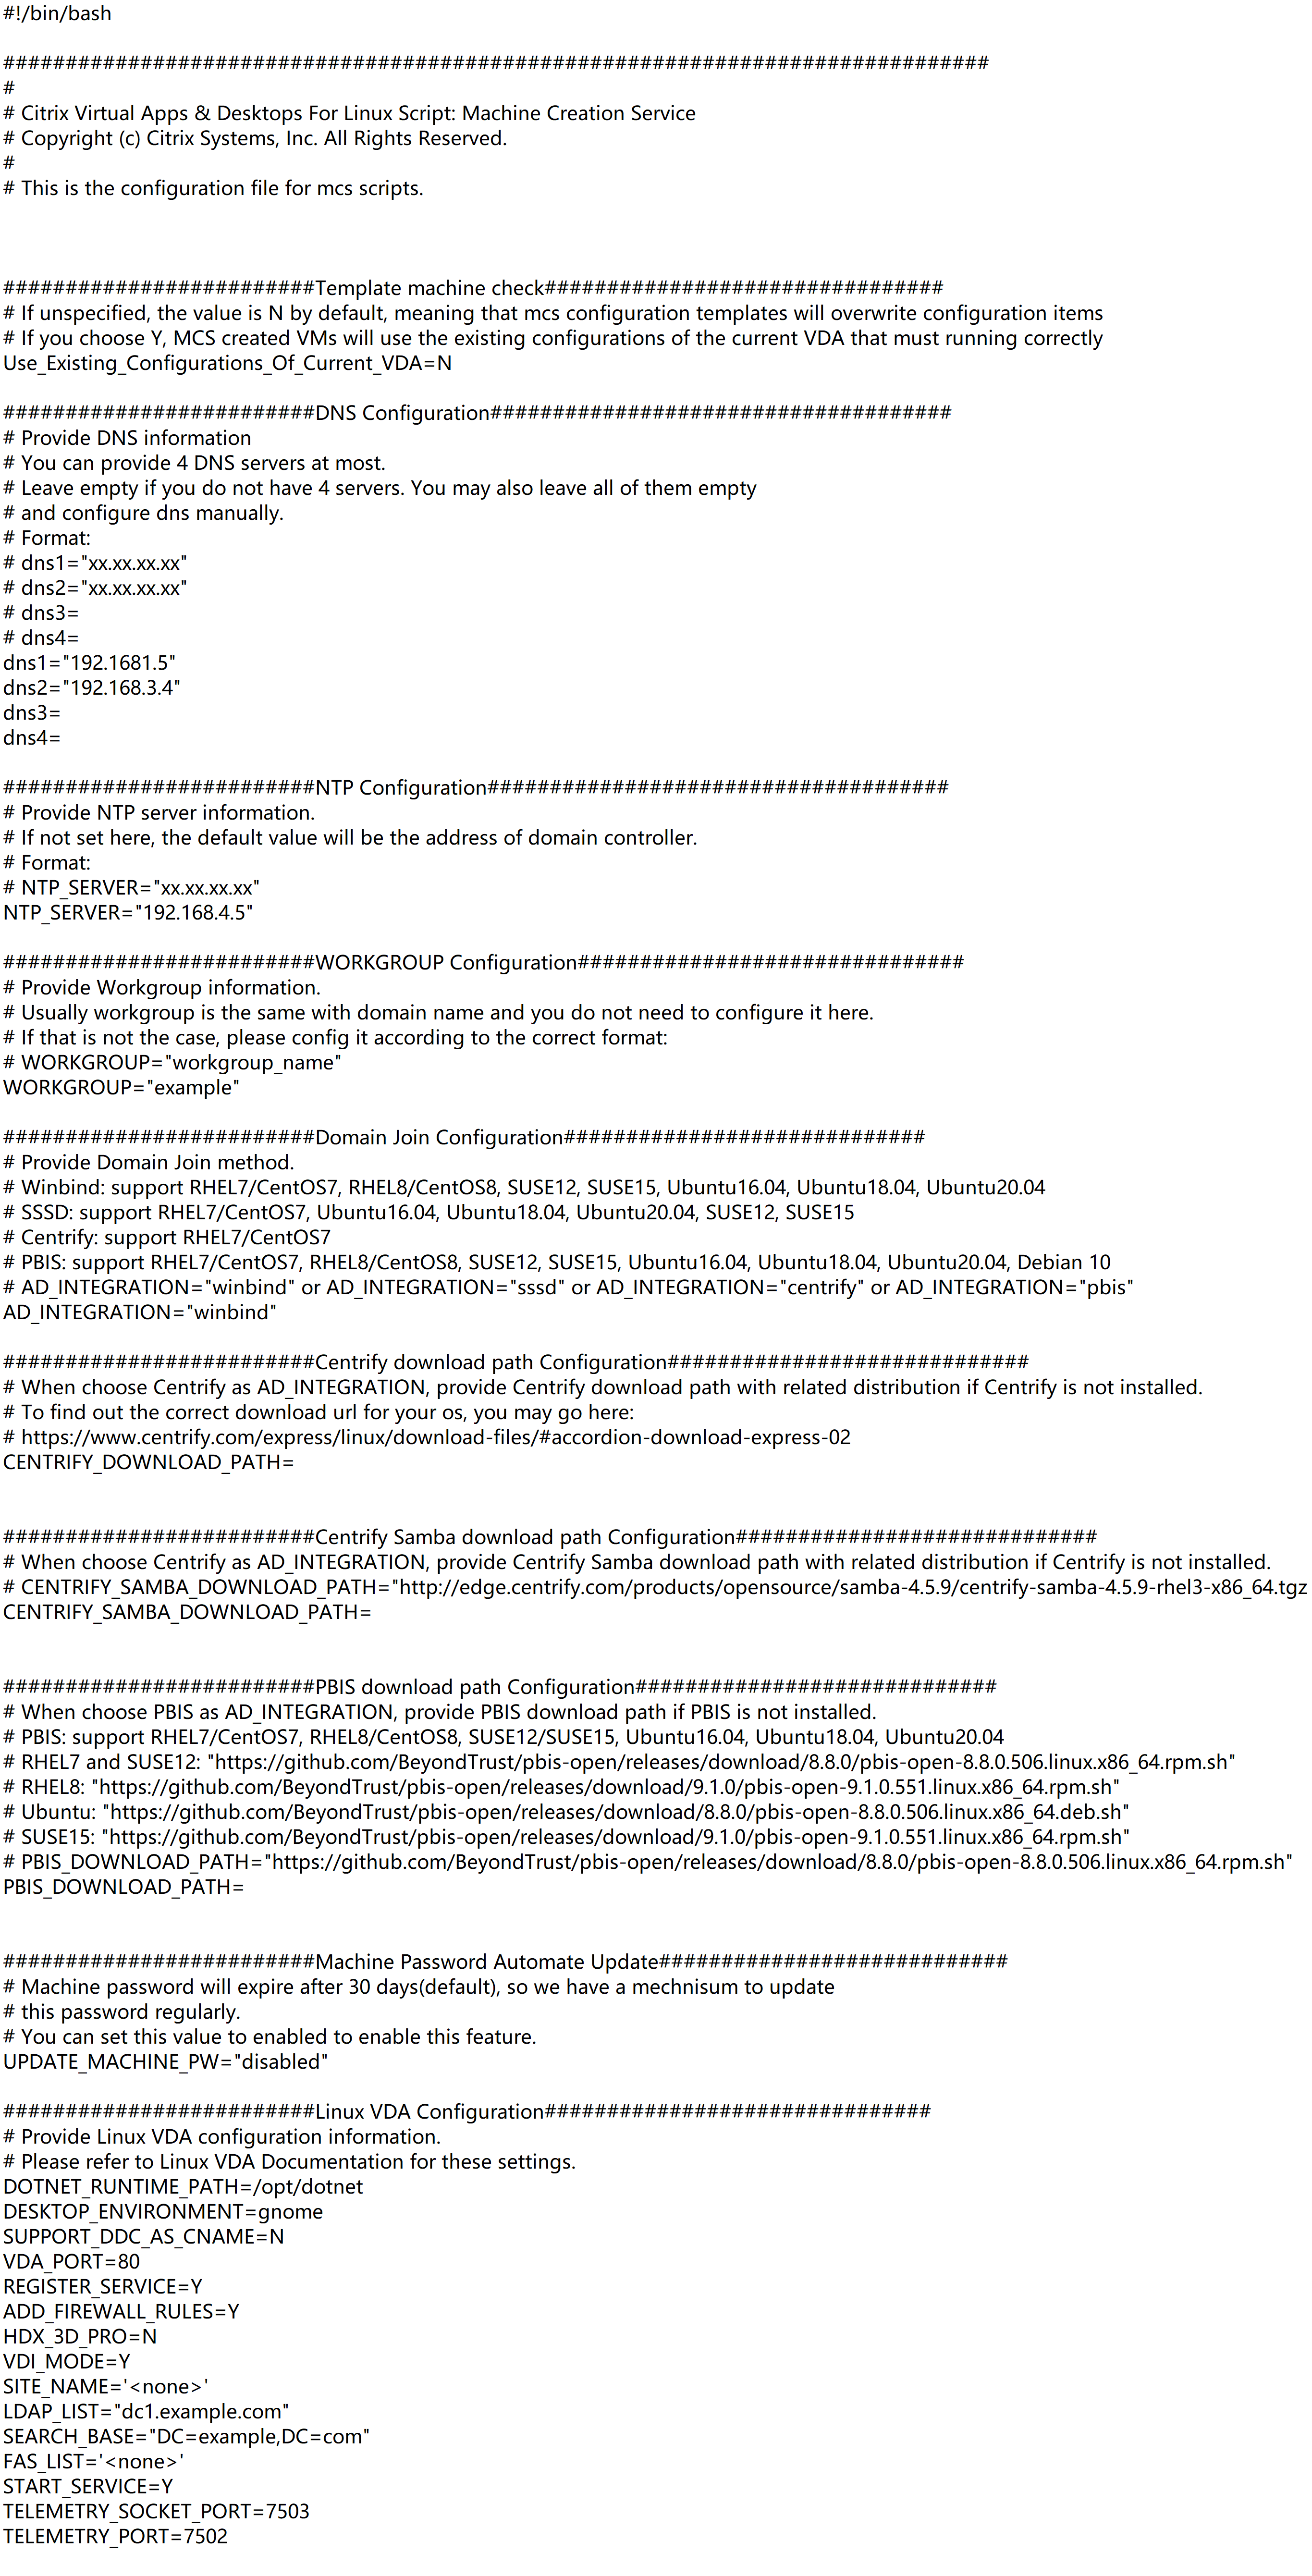
-
-
-
On the template machine, add command lines to the
/etc/xdl/mcs/mcs_local_setting.regfile for writing or updating registry values as required. This action prevents the loss of data and settings every time an MCS-provisioned machine restarts.Each line in the
/etc/xdl/mcs/mcs_local_setting.regfile is a command for setting or updating a registry value.For example, you can add the following command lines to the
/etc/xdl/mcs/mcs_local_setting.regfile to write or update a registry value respectively:create -k "HKLM\System\CurrentControlSet\Control\Citrix\VirtualChannels\Clipboard\ClipboardSelection" -t "REG_DWORD" -v "Flags" -d "0x00000003" --force <!--NeedCopy-->update -k "HKLM\System\CurrentControlSet\Control\Citrix\VirtualChannels\Clipboard\ClipboardSelection" -v "Flags" -d "0x00000003" <!--NeedCopy-->
Step 3g: Create a master image
- Run
/opt/Citrix/VDA/sbin/deploymcs.sh. -
(If you are using a currently running VDA as the template VM, skip this step.) On the template VM, update the configuration templates to customize the relevant
/etc/krb5.conf,/etc/samba/smb.conf, and/etc/sssd/sssd.conffiles on all created VMs.For Winbind users, update the
/etc/xdl/mcs/winbind_krb5.conf.tmpland/etc/xdl/mcs/winbind_smb.conf.tmpltemplates.For SSSD users, update the
/etc/xdl/mcs/sssd.conf.tmpl,/etc/xdl/mcs/sssd_krb5.conf.tmpl, and/etc/xdl/mcs/sssd_smb.conf.tmpltemplates.For Centrify users, update the
/etc/xdl/mcs/centrify_krb5.conf.tmpland/etc/xdl/mcs/centrify_smb.conf.tmpltemplates.Note:
Keep the existing format used in the template files and use variables such as $WORKGROUP, $REALM, $realm, ${new_hostname}, and $AD_FQDN.
-
Create and name a snapshot of your master image based on the public cloud you use.
-
(For Citrix Hypervisor, GCP, and VMware vSphere) Install applications on the template VM and shut down the template VM. Create and name a snapshot of your master image.
-
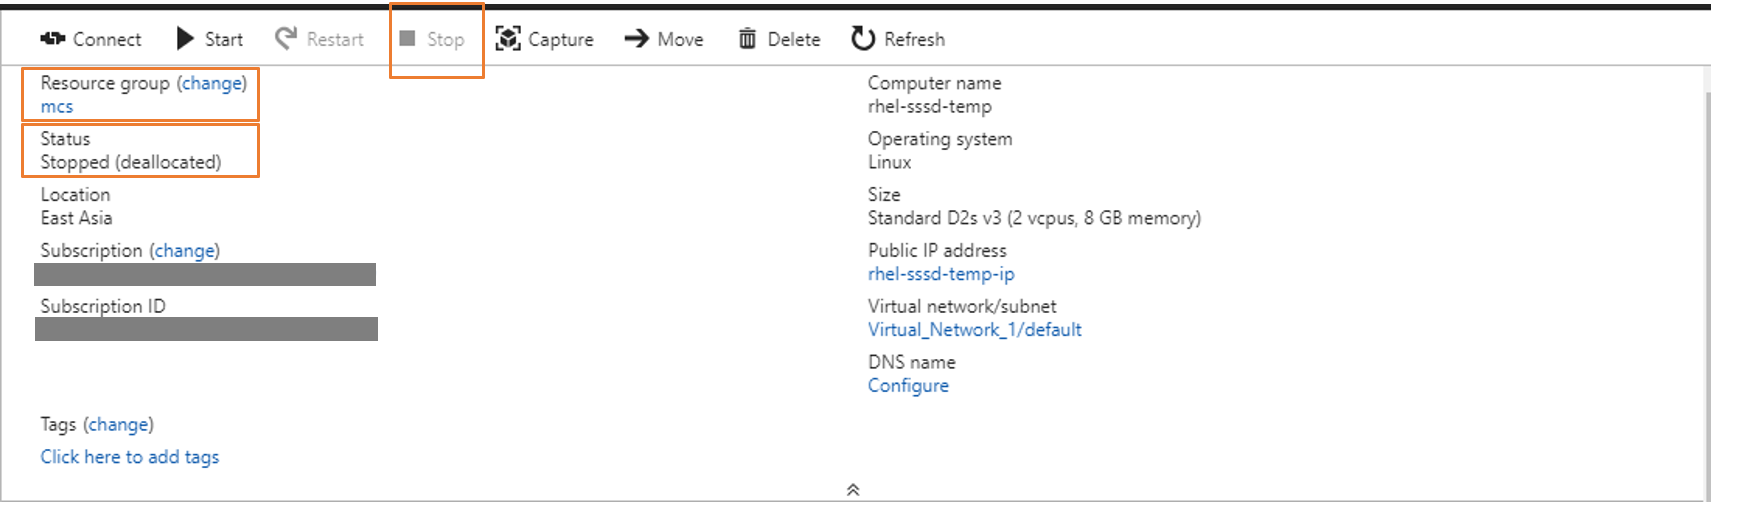
(For Azure) Install applications on the template VM and shut down the template VM from the Azure portal. Ensure that the power status of the template VM is Stopped (deallocated). Remember the name of the resource group here. You need the name to locate your master image on Azure.
-
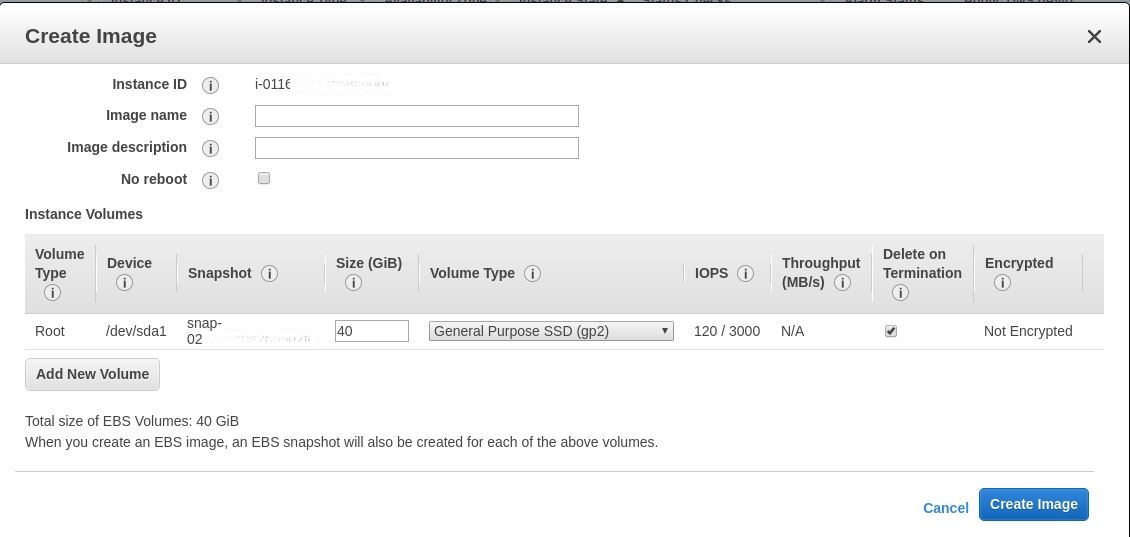
(For AWS) Install applications on the template VM and shut down the template VM from the AWS EC2 portal. Ensure that the instance state of the template VM is Stopped. Right-click the template VM and select Image > Create Image. Type information and make settings as needed. Click Create Image.
-
(For Nutanix) On Nutanix AHV, shut down the template VM. Create and name a snapshot of your master image.
Note:
You must prefix Acropolis snapshot names with
XD_for use in Citrix Virtual Apps™ and Desktops. Use the Acropolis console to rename your snapshots when needed. After you rename a snapshot, restart the Create Catalog wizard to obtain a refreshed list.
-
Step 4: Create a machine catalog
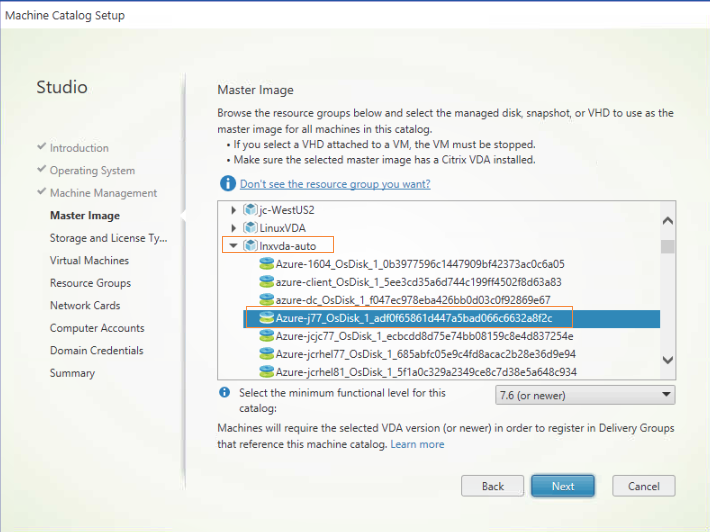
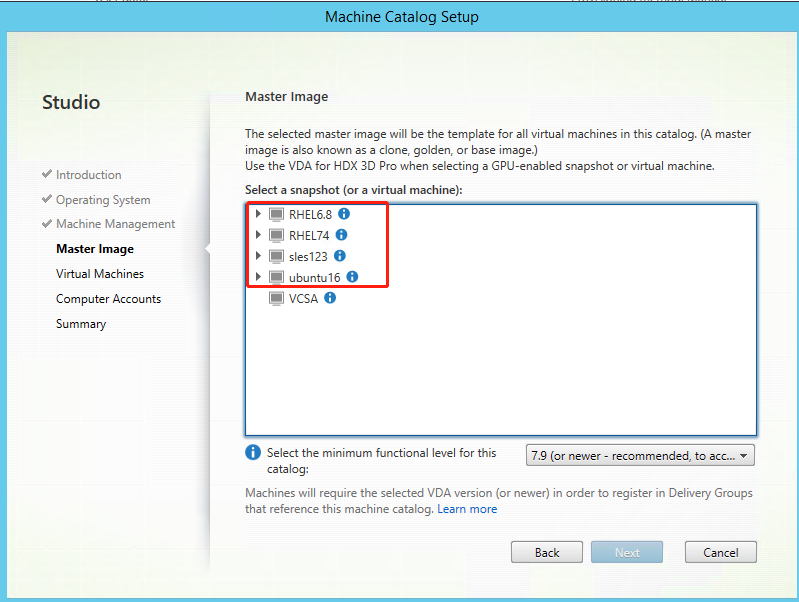
In Citrix Studio, create a machine catalog and specify the number of VMs to create in the catalog. When creating the machine catalog, choose your master image. The following are examples:
On the Container page that is unique to Nutanix, select the container that you specified for the template VM earlier. On the Master Image page, select the image snapshot. On the Virtual Machines page, check for the number of virtual CPUs and the number of cores per vCPU.
Note:
If your machine catalog creation process on the Delivery Controller™ takes a significant amount of time, go to Nutanix Prism and power on the machine prefixed with Preparation manually. This approach helps to continue the creation process.
Do other configuration tasks as needed. For more information, see Create a machine catalog using Studio.
Step 5: Create a delivery group
A delivery group is a collection of machines selected from one or more machine catalogs. It specifies which users can use those machines, and the applications and desktops available to those users. For more information, see Create delivery groups.
Use MCS to update your Linux VDA
To use MCS to update your Linux VDA, do the following:
-
Ensure that you installed .NET Runtime 6.0 before you update your Linux VDA to the current release.
-
update your Linux VDA on the template machine:
Note:
You can also use the Linux VDA self-update feature to schedule automatic software updates. To achieve this goal, add command lines to the etc/xdl/mcs/mcs_local_setting.reg file on the template machine. For example, you can add the following command lines:
create -k "HKLM\System\CurrentControlSet\Control\Citrix\SelfUpdate" -t "REG_DWORD" -v "fEnabled" -d "0x00000001" –force

create -k "HKLM\System\CurrentControlSet\Control\Citrix\SelfUpdate" -t "REG_SZ" -v "ScheduledTime" -d "Immediately" –force

create -k "HKLM\System\CurrentControlSet\Control\Citrix\SelfUpdate" -t "REG_SZ" -v "Url" -d "<Your-Azure-Container-Url>" –force

create -k "HKLM\System\CurrentControlSet\Control\Citrix\SelfUpdate" -t "REG_SZ" -v "CaCertificate" -d "<Local-Certificate-Path-of-PortalAzureCom>" --force
<!--NeedCopy-->
For RHEL 7 and CentOS 7:
sudo rpm -U XenDesktopVDA-<version>.el7_x.x86_64.rpm
<!--NeedCopy-->
For RHEL 8 and Rocky Linux 8:
sudo rpm -U XenDesktopVDA-<version>.el8_x.x86_64.rpm
<!--NeedCopy-->
For SUSE:
sudo rpm -U XenDesktopVDA-<version>.sle12_x.x86_64.rpm
<!--NeedCopy-->
For Ubuntu 18.04:
sudo dpkg -i xendesktopvda_<version>.ubuntu18.04_amd64.deb
<!--NeedCopy-->
For Ubuntu 20.04:
sudo dpkg -i xendesktopvda_<version>.ubuntu20.04_amd64.deb
<!--NeedCopy-->
For Ubuntu 22.04:
sudo dpkg -i xendesktopvda_<version>.ubuntu22.04_amd64.deb <!--NeedCopy--> -
Edit
/etc/xdl/mcs/mcs.confand/etc/xdl/mcs/mcs_local_setting.reg. -
Take a new snapshot.
-
In Citrix Studio, select the new snapshot to update your machine catalog. Wait before each machine restarts. Do not restart a machine manually.
Automate machine account password updates
Machine account passwords, by default, expire 30 days after the machine catalog is created. To prevent password expiration and to automate machine account password updates, do the following:
-
Add the following entry to /etc/xdl/mcs/mcs.conf before running /opt/Citrix/VDA/sbin/deploymcs.sh.
UPDATE_MACHINE_PW="enabled" -
After running /opt/Citrix/VDA/sbin/deploymcs.sh, open /etc/cron.d/mcs_update_password_cronjob to set the update time and frequency. The default setting updates machine account passwords weekly at 2:30AM, Sunday.
After each machine account password update, the ticket cache on the Delivery Controller becomes invalid and the following error might appear in /var/log/xdl/jproxy.log:
[ERROR] - AgentKerberosServiceAction.Run: GSSException occurred. Error: Failure unspecified at GSS-API level (Mechanism level: Checksum failed)
To eliminate the error, clear the ticket cache regularly. You can schedule a cache cleanup task on all Delivery Controllers or on the domain controller.
Enable FAS on MCS-created VMs
You can enable FAS on MCS-created VMs that run on the following distributions:
| Winbind | SSSD | Centrify | PBIS | |
|---|---|---|---|---|
| RHEL 8 | Yes | No | No | Yes |
| Rocky Linux 8 | Yes | No | No | No |
| RHEL 7, CentOS 7 | Yes | Yes | No | Yes |
| Ubuntu 22.04, Ubuntu 20.04, Ubuntu 18.04 | Yes | No | No | No |
| Debian 11.3, Debian 10.9 | Yes | No | No | No |
| SUSE 15.3 | Yes | No | No | No |
Enable FAS when you are preparing a master image on the template VM
-
Import the root CA certificate.
sudo cp root.pem /etc/pki/CA/certs/ <!--NeedCopy--> -
Run ctxfascfg.sh. For more information, see Run ctxfascfg.sh.
-
Set variables in
/etc/xdl/mcs/mcs.conf.Note:
Set all necessary variables in
/etc/xdl/mcs/mcs.confbecause these variables are called upon VM startup.- Set the value of
Use_Existing_Configurations_Of_Current_VDAto Y. - Set the
FAS_LISTvariable to your FAS server address or multiple FAS server addresses. Separate multiple addresses with semicolons and enclose the address or addresses with single quotes, for example,FAS_LIST='<FAS_SERVER_FQDN>;<FAS_SERVER_FQDN>'. - Set the other variables as required, such as
VDI_MODE.
- Set the value of
-
Run the script
/opt/Citrix/VDA/sbin/deploymcs.sh.
Enable FAS on an MCS-created VM
If FAS is not enabled on the template machine as described earlier, you can enable FAS on each MCS-created VM.
To enable FAS on an MCS-created VM, do the following:
-
Set variables in /etc/xdl/mcs/mcs.conf.
Note:
Set all necessary variables in
/etc/xdl/mcs/mcs.confbecause these variables are called upon VM startup.- Set the value of
Use_Existing_Configurations_Of_Current_VDAto Y. - Set the
FAS_LISTvariable to your FAS server address. - Set the other variables as required, such as
VDI_MODE.
- Set the value of
-
Import the root CA certificate.
sudo cp root.pem /etc/pki/CA/certs/ <!--NeedCopy--> -
Run the
/opt/Citrix/VDA/sbin/ctxfascfg.shscript. For more information, see Run ctxfascfg.sh.