Create machine catalogs
Important:
As of Citrix Virtual Apps and Desktops™ 7 2006, if your current deployment uses any of the following technologies, you can upgrade your deployment to the current release only after removing End of Life (EOL) items that use those technologies.
- Personal vDisks (PvDs)
- AppDisks™
- Public cloud host types: Citrix CloudPlatform, Microsoft Azure Classic
For details, see Remove PVD, AppDisks, and unsupported hosts.
Note:
Starting with version 2511, Citrix Web Studio (web-based) is the only management console for Citrix Virtual Apps and Desktops™. Citrix Studio (MMC-based) has been removed from the installer. This article applies only to Web Studio. For information about Citrix Studio, see the equivalent article in Citrix Virtual Apps and Desktops 7 2212 or earlier.
If you want to use public cloud host connections for your deployment, you need Hybrid Rights License to complete your fresh installation or upgrade to the current release.
When the installer detects one or more of the unsupported technologies or host connections without Hybrid Rights License, the upgrade pauses or stops. An explanatory message appears. The installer logs contain details. For more information, see Upgrade a deployment.
Introduction
Collections of physical or virtual machines are managed as a single entity called a machine catalog. All the machines in a catalog have the same type of operating system: multi-session OS or single-session OS, and Windows or Linux machines.
Web Studio guides you to create the first machine catalog after you create the site. After you create the first catalog, Web Studio guides you to create the first delivery group. Later, you can change the catalog you created, and create more catalogs.
Tip:
Upgrading an existing deployment enables the Machine Creation Services (MCS) storage optimization (MCS I/O) feature, no additional configuration is required. The Virtual Delivery Agent (VDA) and the Delivery Controller upgrade handle the MCS I/O upgrade.
Overview
When you create a catalog of VMs, you specify how to provision those VMs. You can use Machine Creation Services™ (MCS). Or, you can use your own tools to provide machines.
Consider:
- MCS supports a single system disk from the virtual machine image. It ignores the rest of the data disks attached to that image.
- If you use MCS to provision VMs, you provide a master image (or snapshot of an image) to create identical VMs in the catalog. Before you create the catalog, you first use the tools to create and configure the master image. This process includes installing a Virtual Delivery Agent (VDA) on the image. Then you create the machine catalog in Web Studio. You select that image (or snapshot), specify the number of VMs to create in the catalog, and configure additional information.
- If your machines are already available, you must still create one or more machine catalogs for those machines.
- If you are creating a catalog using the PowerShell SDK directly, you can specify a hypervisor template (VMTemplates), rather than an image or a snapshot.
- Using a template to provision a catalog is considered an experimental feature. When using this method, virtual machine preparation might fail. As a result, the catalog cannot be published using the template.
When using MCS or Citrix Provisioning™ to create the first catalog, you use the host connection that you configured when you created the site. Later (after you create your first catalog and delivery group), you can change information about that connection or create more connections.
After you complete the catalog creation wizard, tests run automatically to ensure that it is configured correctly. When the tests complete, you can view a test report. Run the tests at any time from Web Studio.
Note:
MCS does not support Windows 10 IoT Core and Windows 10 IoT Enterprise. Refer to the Microsoft site for more information.
For technical details about the Citrix Provisioning tools, see Citrix Virtual Apps and Desktops Image Management.
RDS license check
Web Studio currently does not perform the check for valid Microsoft RDS licenses while creating a machine catalog that contains Windows multi-session OS machines. To view the status of the Microsoft RDS license for a Windows multi-session OS machine, go to Citrix Director. View the status of the Microsoft RDS license in the Machine Details panel. This panel is in the Machine Details and the User Details page. For more information, see Microsoft RDS license health.
VDA registration
A VDA must be registered with a Delivery Controller™ when launching brokered sessions. Unregistered VDAs can result in underutilization of otherwise available resources. There are various reasons that a VDA might not be registered, many of which an administrator can troubleshoot. Web Studio provides troubleshooting information in the catalog creation wizard, and after you add machines from a catalog to a delivery group.
After you add existing machines using the wizard, the list of computer account names indicates whether each machine is suitable for adding to the catalog. Hover over the icon next to each machine to display an informative message about that machine.
If the message identifies a problematic machine, either remove that machine, or add the machine. For example, if a message indicates that information might not be obtained about a machine, add the machine anyway.
For more information, see:
- CTX136668 for VDA registration troubleshooting guidance
- VDA versions and functional levels
- VDA registration methods
MCS catalog creation summary
Here’s a brief overview of default MCS actions after you provide information in the catalog creation wizard.
- If you selected a master image (rather than a snapshot), MCS creates a snapshot.
- MCS creates a full copy of the snapshot and places the copy on each storage location defined in the host connection.
- MCS adds the machines to Active Directory, which creates unique identities.
- MCS creates the number of VMs specified in the wizard, with two disks defined for each VM. In addition to the two disks per VM, a master is also stored in the same storage location. If you have multiple storage locations defined, each gets the following disk types:
- The full copy of the snapshot which is read-only and shared across the just-created VMs.
- A unique 16 MB identity disk that gives each VM a unique identity. Each VM gets an identity disk.
- A unique difference disk to store writes made to the VM. This disk is thin provisioned (if supported by the host storage) and increases to the maximum size of the master image, if necessary. Each VM gets a difference disk. The difference disk holds changes made during sessions. It is permanent for dedicated desktops. For pooled desktops, it is deleted and a new one created after each restart via the delivery controller.
- For Windows VMs on VDA version 2511 or later, MCS assigns each a unique
MachineGuidto each machine. ThisMachineGuidis used for licensing purposes by some software installed on the VDA.
Alternatively, when creating VMs to deliver static desktops, you can specify (on the Machines page of the catalog creation wizard) thick (full copy) VM clones. Full clones do not require retention of the master image on every data store. Each VM has its own file.
MCS storage considerations
There are many factors when deciding on storage solutions, configurations, and capacities for MCS. The following information provides proper considerations for storage capacity:
Capacity considerations:
-
Disks
The Delta or Differencing (Diff) Disks consume the largest amount of space in most MCS deployments for each VM. Each VM created by MCS is given at minimum 2 disks upon creation.
- Disk0 = Diff Disk: contains the OS when copied from the Master Base Image.
- Disk1 = Identity Disk: 16 MB - contains Active Directory data for each VM.
As the product evolves, you might have to add more disks to satisfy certain use cases and feature consumption. For example:
- MCS Storage Optimization creates a write cache style disk for each VM. In XenServer, VMware, and SCVMM virtualization environments, MCS places Write-back cache (WBC) disk on the same storage location as OS disk if you configure the available OS storage list the same as the available temporary storage list while creating a host connection.
- MCS added the ability to use full clones as opposed to the Delta disk scenario described in the previous section.
Hypervisor features might also enter into the equation. For example:
- XenServer IntelliCache creates a Read Disk on local storage for each XenServer. This option saves on IOPS against the master image which might be held on the shared storage location.
-
Hypervisor overhead
Different hypervisors use specific files that create overhead for VMs. Hypervisors also use storage for management and general logging operations. Calculate the space to include overhead for:
- Log files
- Hypervisor specific files. For example:
- VMware adds more files to the VM storage folder. See VMware Best Practices.
- Calculate your total virtual machine size requirements. Consider a virtual machine containing 20 GB for the virtual disk, 16 GB for the swap file, and 100 MB for log files consuming 36.1 GB total.
- Snapshots for XenServer; Snapshots for VMware.
-
Process overhead
Creating a catalog, adding a machine, and updating a catalog have unique storage implications. For example:
- Initial catalog creation requires a copy of the base disk to be copied to each storage location.
- Adding a machine to a catalog does not require copying of the base disk to each storage location. Catalog creation varies based on the features selected.
- Updating the catalog to create an extra base disk on each storage location. Catalog updates also experience a temporary storage peak where each VM in the catalog has 2 Diff disks for a certain amount of time.
More considerations:
- RAM sizing: Affects the size of certain hypervisor files and disks, including I/O optimization disks, write cache, and snapshot files.
- Thin / Thick provisioning: NFS storage is preferred due to the thin provisioning capabilities.
Machine Creation Services (MCS) storage optimization
The Machine Creation Services (MCS) storage optimization feature is also known as MCS I/O. This feature is only available on Azure, GCP, XenServer, VMware, AWS, and SCVMM.
- The write cache container is file-based, the same functionality found in Citrix Provisioning. For example, the Citrix Provisioning write cache file name is
D:\vdiskdif.vhdxand the MCS I/O write cache file name isD:\mcsdif.vhdx. - Achieve diagnostic improvements by including support for a Windows crash dump file written to the write cache disk.
- MCS I/O retains the technology cache in RAM with overflow to hard disk to provide the most optimal multi-tier write cache solution. This functionality allows an administrator to balance between the cost in each tier, RAM and disk, and performance to meet the desired workload expectation.
Updating the write cache method from disk-based to file-based requires the following changes:
- MCS I/O no longer supports RAM only cache. Specify a disk size in Web Studio during machine catalog creation.
- The VM write cache disk is created and formatted automatically when booting a VM for the first time. Once the VM is up, the write cache file
mcsdif.vhdxis written into the formatted volumeMCSWCDisk. - The pagefile is redirected to this formatted volume,
MCSWCDisk. As a result, this disk size considers the total amount of disk space. It includes the delta between the disk size and the generated workload plus the pagefile size. This is typically associated with VM RAM size.
Enabling MCS storage optimization updates
To enable MCS I/O storage optimization functionality, upgrade the Delivery Controller and the VDA to the latest version of Citrix Virtual Apps and Desktops.
Note:
If you upgrade an existing deployment which has MCS I/O enabled, no additional configuration is required. The VDA and the Delivery Controller upgrade handle the MCS I/O upgrade.
When enabling the MCS storage optimization update, consider the following:
-
When creating a machine catalog, the administrator can configure the RAM and disk size.
-
Updating an existing machine catalog to a new VM snapshot containing a VDA configured for version 1903 results in the following behavior: the new snapshot continues to use the existing catalog’s MCS I/O setting for RAM and disk size. The existing raw disk is formatted.
Important:
MCS storage optimization changed with Citrix Virtual Apps and Desktops version 1903. This release supports file-based write cache technology, providing better performance and stability. The new functionality provided by MCS I/O might require a higher write cache storage requirement compared to previous Citrix Virtual Apps and Desktops releases. Citrix recommends that you reevaluate the disk size to ensure that it has sufficient disk space for the allocated workflow and extra pagefile size. The pagefile size is typically related to the amount of system RAM. If the existing catalog disk size is insufficient, create a machine catalog and allocate a larger write cache disk.
Assign a specific drive letter to MCS I/O write-back cache disk
You can assign a specific drive letter to the MCS I/O write-back cache disk. This implementation helps you to avoid conflicts between the drive letter of any applications that you use and the drive letter of the MCS I/O write-back cache disk. To assign drive letter to MCS I/O write-back cache disk, you can use PowerShell commands. The supported hypervisors are Azure, GCP, VMware, SCVMM, and XenServer.
Note:
This feature requires VDA version 2305 or later.
Limitations
- Applicable to only Windows operating system
- Applicable drive letter for write-back cache disk:
EtoZ - Not applicable when Azure temporary disk is used as a write-back cache disk
- Applicable only when you create a new machine catalog
Assign a drive letter to write-back cache disk
To assign a drive letter to a write-back cache disk:
- Open the PowerShell window.
- Run
asnp citrix*. - Create an identity pool if not already created.
-
Create a provisioning scheme using the
New-ProvSchemecommand with the propertyWriteBackCacheDriveLetter. For example:New-ProvScheme -CleanOnBoot ` -HostingUnitName "<name>" ` -IdentityPoolName $schemeName ` -ProvisioningSchemeName $schemeName ` -InitialBatchSizeHint 1 ` -UseWriteBackCache -WriteBackCacheDiskSize 127 -WriteBackCacheMemorySize 256 -WriteBackCacheDriveLetter E ` -MasterImageVM "XDHyp:\HostingUnits\<name>\image.folder\abcd-resources.resourcegroup\MCSIOMasterVm_OsDisk_1_d3e2d6352xxxxxxxxx2130aa145ec77.manageddisk" ` -NetworkMapping @{"0"="XDHyp:\\HostingUnits\\name\\virtualprivatecloud.folder\\East US.region\\virtualprivatecloud.folder\\abcd-resources.resourcegroup\\abcd-resources-vnet.virtualprivatecloud\\default.network"} ` -ServiceOffering "XDHyp:\\HostingUnits\\<name>\\serviceoffering.folder\\Standard_D2s_v5.serviceoffering" ` -CustomProperties '<CustomProperties xmlns="http://schemas.citrix.com/2014/xd/machinecreation" xmlns:xsi="http://www.w3.org/2001/XMLSchema-instance"> <Property xsi:type="StringProperty" Name="UseManagedDisks" Value="true" /> <Property xsi:type="StringProperty" Name="OsType" Value="Windows" /> <Property xsi:type="StringProperty" Name="StorageType" Value="Premium_LRS"/> <Property xsi:type="StringProperty" Name="PersistWBC" Value="false" /> <Property xsi:type="StringProperty" Name="PersistOsDisk" Value="false" /> <Property xsi:type="StringProperty" Name="PersistVm" Value="false" /> <Property xsi:type="StringProperty" Name="WBCDiskStorageType" Value="Premium_LRS" /> <Property xsi:type="StringProperty" Name="UseTempDiskForWBC" Value="false" /> <Property xsi:type="StringProperty" Name="ResourceGroups" Value="abcd-group1" /> <Property xsi:type="StringProperty" Name="LicenseType" Value="Windows_Client" /> <Property xsi:type="StringProperty" Name="SchemaVersion" Value="2" /> </CustomProperties>' <!--NeedCopy--> - Finish creating the catalog. For information, see https://developer-docs.citrix.com/projects/citrix-virtual-apps-desktops-sdk/en/latest/creating-a-catalog/.
Prepare a master image
For information about creating connections hosts, see Connections and resources.
The master image contains the operating system, non-virtualized applications, VDA, and other software.
Good to know:
- A master image might also be known as a clone image, golden image, base VM, or base image. Host vendors use different terms.
- Ensure that the host has enough processors, memory, and storage to accommodate the number of machines created.
- Configure the correct amount of hard disk space needed for desktops and applications. That value cannot be changed later or in the machine catalog.
- Remote PC Access machine catalogs do not use master images.
Install and configure the following software on the master image:
- Integration tools for your hypervisor (such as Citrix VM Tools, Hyper-V Integration Services, or VMware tools). If you omit this step, applications and desktops might not function correctly.
- A VDA. Citrix recommends installing the latest version to allow access to the newest features. Failure to install a VDA on the master image causes the catalog creation to fail.
- Third-party tools as needed, such as antivirus software or electronic software distribution agents. Configure services with settings that are appropriate for users and the machine type (such as updating features).
- Third-party applications that you are not virtualizing. Citrix recommends virtualizing applications. Virtualizing reduces costs by eliminating having to update the master image after adding or reconfiguring an application. Also, fewer installed applications reduce the size of the master image hard disks, which saves storage costs.
- App-V clients with the recommended settings, if you plan to publish App-V applications. The App-V client is available from Microsoft.
- When using MCS, if you localize Microsoft Windows, install the locales and language packs. During provisioning, when a snapshot is created, the provisioned VMs use the installed locales and language packs.
Important:
If you are using MCS, do not run Sysprep on master images.
To prepare a master image:
- Using your hypervisor’s management tool, create a master image and then install the operating system, plus all service packs and updates. Specify the number of vCPUs. You can also specify the vCPU value if you create the machine catalog using PowerShell. You cannot specify the number of vCPUs when creating a catalog using Web Studio. Configure the amount of hard disk space needed for desktops and applications. That value cannot be changed later or in the catalog.
- Ensure that the hard disk is attached at device location 0. Most standard master image templates configure this location by default, but some custom templates might not.
- Install and configure the software listed above on the master image.
- If you are not using MCS, join the master image to the domain where applications and desktops are members. Ensure that the master image is available on the host where the machines are created. If you are using MCS, joining the master image to a domain is not required. The provisioned machines are joined to the domain specified in the catalog creation wizard.
- Citrix recommends that you create and name a snapshot of your master image. If you specify a master image rather than a snapshot when creating a catalog, Web Studio creates a snapshot. You cannot name it.
Volume licensing activation
MCS supports volume licensing activation to automate and manage the activation of Windows operating systems and Microsoft Office. The three models that MCS supports for volume licensing activation are:
- Key Management Service (KMS)
- Active Directory-based activation (ADBA)
- Multiple Activation Key (MAK)
You can change the activation setting after you create the machine catalog.
Key Management Service (KMS)
The KMS is a lightweight service that does not require a dedicated system and can easily be co-hosted on a system that provides other services. This functionality is supported on all Citrix supported Windows versions. During image preparation, MCS does the Microsoft Windows and Microsoft Office KMS rearm. You can skip rearm by running the command Set-Provserviceconfigurationdata. For more information on KMS activation, see Activate using Key Management Service.
Note:
All machine catalogs created after running the command
Set-Provserviceconfigurationdatahave the same setting as provided in the command.
Active Directory-based activation (ADBA)
ADBA enables you to activate machines through their domain connections. Machines are immediately activated when they join the domain. These machines remain activated as long as they remain joined to the domain and in contact with it. This functionality is supported on all Citrix supported Windows versions. For more information on Active directory-based activation, see Activate using Active Directory-based activation.
Multiple Activation Key (MAK)
MAK is a way of activating volume and authenticating the Windows system with the help of the Microsoft server. You must buy the MAK key from Microsoft which is assigned with a fixed number of activation counts. Every time a Windows system is activated, the activation count reduces. There are two ways of activating the system:
- Online Activation: If the Windows system that you want to activate has internet access, the system automatically activates the Windows on installing the product key. This process reduces the activation count by 1 for the corresponding MAK.
- Offline Activation: If the Windows system is not able to connect to the internet to do the online activation, MCS gets a confirmation id and an installation id from the Microsoft server to get the Windows system activated. This way of activation is useful for non-persistent machine catalogs.
Note:
- MCS doesn’t support Microsoft Office activation using MAK.
- Minimum VDA version required is 2303.
Key requirements
- The Delivery Controller must have internet access.
- Create a new catalog if the new image to be updated has a different MAK Key from the original.
- Install the MAK key on the master image. See Deploy MAK Activation for the steps to install MAK Key on a Windows System.
-
If you are not using image preparation:
- Add the registry DWORD value
ManualunderComputer\HKEY_LOCAL_MACHINE\SOFTWARE\Microsoft\Windows NT\CurrentVersion\SoftwareProtectionPlatform\Activation. - Set the value to
1.
- Add the registry DWORD value
Activation Counts
To view the number of activations remaining for MAK Key or to check if a VM is consuming two or more activations, use the Volume Activation Management Tool (VAMT). See Install VAMT.
Activate the Windows system using MAK
To activate the Windows system using MAK:
- Install the product key on the master image. This step consumes one activation count.
- Create an MCS machine catalog.
-
If you aren’t using image preparation:
- Add the registry DWORD value
ManualunderComputer\HKEY_LOCAL_MACHINE\SOFTWARE\Microsoft\Windows NT\CurrentVersion\SoftwareProtectionPlatform\Activation. - Set the value to
1.
This method disables the option of online activation.
- Add the registry DWORD value
- Add VMs to the machine catalog.
- Power on the VMs.
-
Depending on whether it’s online or offline activation, the Windows system is activated.
- If the activation is online, the Windows system is activated after the product key is installed.
- If the activation is offline, MCS communicates with provisioned VMs to get the activation status of the Windows system. MCS then retrieves a confirmation id and an installed id from the Microsoft server. These IDs are used to activate the Windows system.
Troubleshooting
If the provisioned VM is not activated with the installed MAK Key, run Get-ProvVM or Get-ProvScheme command on a PowerShell window.
- The
Get-ProvSchemecommand: See the parameterWindowsActivationTypeassociated with the MCS machine catalog from the latest master image. - The
Get-ProvVMcommand. See the parametersWindowsActivationType,WindowsActivationStatus,WindowsActivationStatusErrorCode, andWindowsActivationStatusError.
You can check the error and verify the steps to resolve the issue.
Create a machine catalog using Web Studio
Before creating a catalog:
- Review this section to learn about the choices you make and the information you supply.
- Ensure that you have created a connection to the hypervisor, cloud service, and other resources that hosts your machines.
- If you have created a master image to provision machines, ensure that you have installed a VDA on that image.
To start the catalog creation wizard:
- If this is the first catalog being created, you are guided to the correct selection (such as “Set up the machines and create machine catalogs to run apps and desktops”). The catalog creation wizard opens.
-
If you already created a catalog and want to create another, follow these steps:
-
Sign in to Web Studio, select Machine Catalogs in the left pane, and then select Create Machine Catalog in the action bar.
-
To organize catalogs using folders, create folders under the default Machine Catalogs folder. For more information, see Create a catalog folder.
-
Select the folder where you want to create the catalog, and then click Create Machine Catalog. The catalog creation wizard opens.
-
The wizard walks you through the following items. The wizard pages that you see differ, depending on the selections you make.
Operating system
Each catalog contains machines of only one type. Select one.
- Multi-session OS: A multi-session OS catalog provides hosted shared desktops. The machines can be running supported versions of the Windows or Linux operating systems, but the catalog cannot contain both. (See the Linux VDA documentation for details about that OS.)
- Single-session OS: A single-session OS catalog provides VDI desktops that you can assign to various different users.
- Remote PC Access: A Remote PC Access catalog provides users with remote access to their physical office desktop machines. Remote PC Access does not require a VPN to provide security.
Machine management
This page does not appear when you are creating Remote PC Access catalogs.
The Machine Management page indicates how machines are managed and which tools you use to deploy machines.
Choose whether machines in the catalog are power managed through Web Studio.
- Machines are power managed through Web Studio, for example, VMs or blade PCs. This option is available only if you already configured a connection to a host.
- Machines are not power managed through Web Studio, for example, physical machines.
If you indicated that machines are power managed through Web Studio, choose which tool to use to create VMs.
-
Citrix Provisioning Technology
- Citrix Machine Creation Services (MCS) Creates a catalog of VMs provisioned and imaged using MCS. MCS copies images cloned from a master image to those VMs.
-
Citrix Provisioning Services (PVS) Creates a catalog of VMs provisioned using MCS and imaged using PVS. Those VMs serve as PVS target devices and the PVS server can stream a single shared disk image to them.
Note:
- This option is available only for PVS sites registered with Citrix Cloud™ and is currently limited to Azure resources.
- While you create a Citrix Provisioning catalog, on the Target Device page, you might see that in the drop-down menu to select the farm and site for the machines to be provisioned, there are farms and sites listed that no longer exist . As a workaround, you can run the PowerShell command
Unregister-HypPvsSiteto remove the farms and sites from the database. For information on the PowerShell command, see Unregister-HypPvsSite.
-
Other service or technology A tool that manages machines already in the data center. Citrix recommends that you use Microsoft System Center Configuration Manager or another third-party application to ensure that the machines in the catalog are consistent.
Desktop types (desktop experience)
Note:
The options on the Desktop Experience page varies according to the machine type that you select on the Machine Type page.
-
For multi-session OS machines, users are assigned a random desktop each time they log on. Select one of the following options:
- Yes, save changes on the local disk of the machine hosting virtual desktops. (Persistent)
- No, discard all changes and clear virtual desktops when the user logs off. (Non-persistent)
Note:
For persistent multi-session machines, changes users make to the desktops will be saved and accessible to all authorized users.
-
For single-session OS machines, you get the following options on the Desktop Experience page:
- I want users to connect to a new (random) desktop each time they log on.
-
I want users to connect to the same (static) desktop each time they log on.
For static desktops, you can further decide whether changes made by users will be saved or discarded after they log off.
If you select Save changes on the local disk of the machine hosting virtual desktops: Persistent, the fast copy or full copy options are available for the Virtual machine copy mode in the Virtual Machines page.
If you select Discard all changes and clear virtual desktops when the user logs off: Non-persistent, you cannot configure the Virtual machine copy mode in the Virtual Machines page.
Image and machine profile
This page appears only when you are using MCS to create VMs.
-
Select an image type for the machine catalog, and then select an image. Two image types are available:
-
Master image. An image that has not yet gone through the image preparation process. The image preparation process is automatically initiated when catalog creation starts.
Note:
- When you are using MCS, do not run Sysprep on master images.
- If you specify a master image rather than a snapshot, Web Studio creates a snapshot, but you cannot name it.
-
Prepared image. An image that has gone through the image preparation process and can be used for VM creation directly. Opting for prepared images rather than master images during catalog creation ensures faster and more reliable machine catalog creation, along with streamlined image lifecycle management. If needed, add a note for the selected prepared image.
Note:
- VMs created using prepared images don’t support hibernation.
- Currently, creating catalogs using prepared images are available only in Azure and VMware environments.
For more information about how to create prepared images, see Image management (preview).
When selecting an image, you can add a note for the selected image if needed.
To enable use of the latest product features, ensure that the master image has the latest VDA version installed. Do not change the default minimum VDA selection. However, if you must use an earlier VDA version, see VDA versions and functional levels.
An error message appears if you select a snapshot or VM that is not compatible with the machine management technology you selected earlier in the wizard.
-
-
To use an existing VM as the machine profile, select Use a machine profile, and then select the VM.
Note:
Currently, using machine profiles is restricted to Azure, AWS, GCP, and VMware VMs.
For VMware deployments, when creating a machine catalog using a machine profile, you must specify the folder where you want to keep the virtual machines.
To provide the virtual machine folder location, on the catalog creation wizard, go to Virtual Machines page, and go to Select a folder to place the machines section and select the virtual machine folder location. If not specified, the system considers the folder of the selected machine profile as the default location.
- For AWS deployments, you can select a launch template as the machine profile.
- Select the minimum functional level for the catalog. To enable the use of the latest product features, ensure that the master image has the latest VDA version installed.
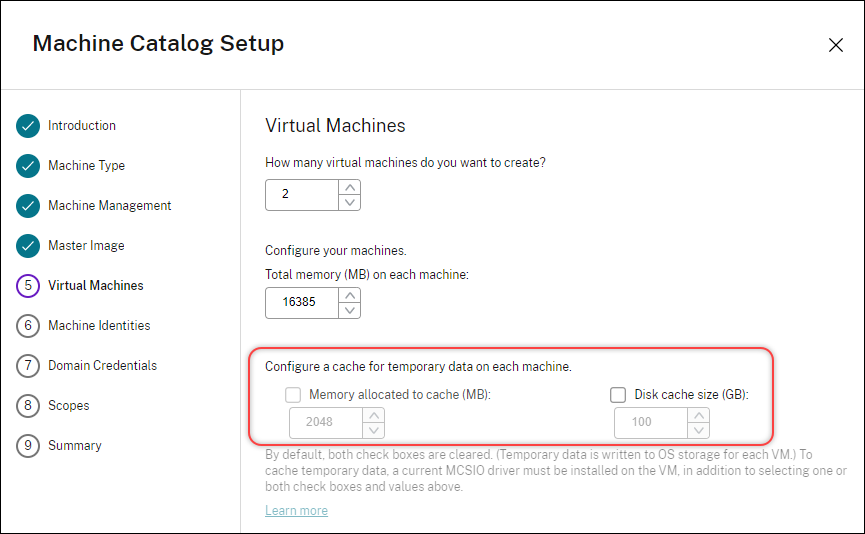
Machines
This page does not appear when you are creating Remote PC Access catalogs.
The title of this page depends on what you selected on the Machine Management page: Machines, Virtual Machines, or VMs and users.
When using MCS:
- Specify how many virtual machines to create. Enter 0 (zero) if you do not want to create any. Later, you can create VMs for an empty catalog by performing Add machines.
- Choose the amount of memory (in MB) each VM has.
- Each created VM has a hard disk. Its size is set in the master image. You cannot change the hard disk size in the catalog.
- If your deployment contains more than one zone, you can select a zone for the catalog.
- If you are creating static desktop VMs, select a virtual machine copy mode. See Virtual machine copy mode.
- If you are creating random desktop VMs that do not use vDisks, you can configure a cache to be used for temporary data on each machine. See Configure cache for temporary data.
When using other tools:
Add (or import a list of) Active Directory machine account names. You can change the Active Directory account name for a VM after you add/import it. If you specified static machines on the Desktop Experience page, you can optionally specify the Active Directory user name for each VM you add.
After you add or import names, you can use the Remove button to delete names from the list, while you are still on this page.
When using other tools (but not MCS):
An icon and tooltip for each machine added (or imported) help identify machines that might not be eligible to add to the catalog, or be unable to register with a Delivery Controller. For details, see VDA versions and functional levels.
Add SIDs while creating virtual machines
You can now add the parameter ADAccountSid to uniquely identify the machines while creating new virtual machines.
To do this:
- Create a catalog with the supported identity type.
-
Add machines to the catalog using
NewProvVM. For example:New-ProvVM -ProvisioningSchemeName "name" -ADAccountSid @("SID ") -RunAsynchronously <!--NeedCopy-->
However, you cannot provision a machine with:
- An AD account that is not in the catalog identity pool
- An AD account that is not in available state
Virtual machine copy mode
The copy mode that you specify on the Machines page determines whether MCS creates thin (fast copy) or thick (full copy) clones from the master image. (Default = thin clones)
- Use fast copy clones for more efficient storage use and faster machine creation.
- Use full copy clones for better data recovery and migration support, with potentially reduced IOPS after the machines are created.
Note:
The Full Copy Clone approach is available only for provisioning persistent VMs on multi- or single-session OSs.
VDA versions and functional levels
A catalog’s functional level controls which product features are available to machines in the catalog. Using features introduced in new product versions require a new VDA. However, machines in that catalog with an earlier VDA version cannot register.
A menu near the bottom of the Machines (or Devices) page allows you to select the minimum VDA level. This sets the catalog’s minimum functional level. By default, the most current functional level is selected for on-premises deployments. If you follow the Citrix recommendation to always install and upgrade VDAs and core components to the latest version, you don’t need to change this selection. However, if you must continue using older VDA versions, select the correct value.
A Citrix Virtual Apps and Desktops release might not include a new VDA version, or the new VDA does not impact the functional level. In such cases, the functional level might indicate a VDA version that is earlier than the installed or upgraded components. Each release’s What’s new article indicates any change in the default functional level.
The selected functional level affects the list of machines above it. In the list, a tooltip next to each entry indicates whether the machine’s VDA is compatible with the catalog at that functional level.
Messages are posted on the page if the VDA on each machine does not meet or exceed the minimum functional level selected. You can continue with the wizard. Those machines will likely not be able to register with a Controller later. Alternatively, you can:
- Remove the machines containing older VDAs from the list, upgrade their VDAs and then add them back to the catalog.
- Choose a lower functional level that prevents access to the latest product features.
A message is also posted if a machine was not be added to the catalog because it is the wrong machine type. Examples include attempting to add a server to a single-session OS catalog, or adding a single-session OS machine originally created for random allocation to a catalog of static machines.
Important:
At release 1811, an extra functional level was added: 1811 (or newer). That level is intended for use with future Citrix Virtual Apps and Desktops features. The 7.9 (or newer) selection remains the default. That default is valid for all deployments now.
If you select 1811 (or newer), any earlier VDA versions in that catalog are unable to register with a Controller. However, if the catalog contains only VDAs at version 1811 or later supported versions, they are all eligible to register. This includes catalogs containing VDAs configured for later Citrix Virtual Apps and Desktops releases, including version 1903 and other 19XX releases before the current release.
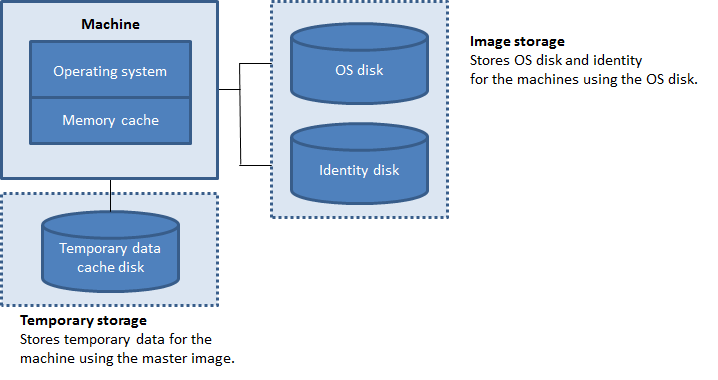
Configure cache for temporary data
When using MCS to manage random non-persistent machines in a catalog, you can enable Write-Back Cache for machines to improve I/O performance.
Write-back Cache is referred to as MCSIO. For more information, see this blog article.
Prerequisites
To enable write-back cache, the catalog must meet the following requirements:
- Uses a connection that specifies storage for temporary data. For more information, see Connections and resources.
-
VDAs must be at least version 7.9 and installed with a current MCSIO driver.
Note:
Installing this driver is an option when you install or upgrade a VDA. By default, that driver is not installed.
- To enable drive letter assignment for disk caches, VMs must meet the following additional requirements:
- Operating System: Windows
- VDA version: 2305 or later
Considerations
- Write-back caches come in Memory cache and Disk cache. By default, their default values differ according to the connection type. Generally, the default values are sufficient for most cases; however, consider the space needed for:
- Temporary data files created by Windows itself, including the Windows page file.
- User profile data.
- ShareFile data that is synced to users’ sessions.
- Data that might be created or copied by a session user or any applications users may install inside the session.
- Configuring the write-back cache with a disk cache and no memory cache is removed. To enable a cache for temporary data, we recommend selecting Disk cache size (GB) and Memory allocated to cache (MB) and specifying a size greater than 0 for the memory cache. Temporary data is initially written to the memory cache. When the memory cache reaches its configured limit, the oldest data is moved to the temporary data cache disk.
- The memory cache is part of the total amount of memory on each machine. Therefore, if you enable the Memory cache size (MB) (recommended) checkbox, consider increasing the total amount of memory on each machine.
- If you keep the Memory cache size (MB) (recommended) checkbox cleared, temporary data is written directly to the disk cache, using a minimal amount of memory.
-
Changing Disk cache size (GB) from its default value can affect performance. The size must match user requirements and the load placed on the machine.
Important:
If the disk cache runs out of space, the user’s session becomes unusable.
-
If you clear the Disk cache size checkbox, no cache disk is created. In this case, specify a Memory allocated to cache value that is large enough to hold all of the temporary data. This is feasible only if large amounts of RAM are available for allocation to each VM.
-
If you clear both checkboxes, temporary data is not cached. It is written to the difference disk (located in the OS storage) for each VM. (This is the provisioning action in releases earlier than 7.9.)
-
Do not enable caching if you intend to use this catalog to create AppDisks.
- You cannot change the cache values in a machine catalog after it is created.
Security
The Security page appears only if you are creating a machine catalog without assigning a machine profile in AWS virtualization environment. Use the Security page to configure the security groups for the VMs. This is also applicable when editing and cloning an existing machine catalog.
If you create a machine profile-based machine catalog, then the security group configurations are inherited from the machine profile and the Security page does not appear.
NIC (NICs)
This page does not appear when you are creating Remote PC Access catalogs.
If you plan to use multiple NICs, associate a virtual network with each card. For example, you can assign one card to access a specific secure network, and another card to access a more commonly used network. You can also add or remove NICs from this page.
Machine accounts
This page appears only when creating Remote PC Access catalogs.
On the Machine Accounts page, specify the Active Directory machine accounts or Organizational Units (OUs) to add that correspond to users or user groups. Do not use a forward slash (/) in an OU name.
When adding OUs, you can do the following if the domain is not shown in the list:
- Search for it using an exact match.
- Browse all domains to find it.
You can choose a previously configured power management connection or elect not to use power management. If you want to use power management but a suitable connection hasn’t been configured yet, you can create that connection later and then edit the machine catalog to update the power management settings.
Machine identities
This page appears only when using MCS to create VMs.
Each machine in the catalog must have a unique identity. This page lets you configure identities for machines in the catalog. The machines are joined to the identity after they are provisioned. You cannot change the identity type after you create the catalog.
A general workflow to configure settings on this page is as follows:
- Select an identity from the list.
- Indicate whether to create accounts or use existing ones, and the location (domain) for those accounts.
You can select one of the following options:
- On-premises Active Directory. Machines owned by an organization and signed into with an Active Directory account that belongs to that organization. They exist on-premises.
-
Microsoft Entra hybrid joined. Machines owned by an organization and signed into with an Active Directory Domain Services account that belongs to that organization. They exist in the cloud and on-premises. For information about the requirements, limitations, and considerations, see Microsoft Entra hybrid joined.
Note:
- Before you can use Microsoft Entra hybrid join, make sure that your Azure environment meets the prerequisites. See Configure Microsoft Entra hybrid join.
- This option requires that the master image meets the operating system prerequisite. For more information, see Microsoft Entra hybrid joined devices.
- Non-domain-joined. Machines not joined to any domain. For information about the requirements and limitations, see Non-domain-joined.
Important:
- If you select On-premises Active Directory or Microsoft Entra hybrid joined as the identity type, each machine in the catalog must have a corresponding Active Directory computer account.
- The Non-domain-joined identity type requires version 2311 or later of the VDA as the minimum functional level for the catalog. To make it available, update the minimum functional level.
Before configuring machine identities, make sure that you have permission to create computer accounts in the OU where the machines reside. Each machine in the catalog must have a unique name. Then choose how to configure machine identities:
-
If you create new machine accounts, specify the OU and the machine naming scheme. For more information, see Machine account naming scheme. When you create a catalog, an identity pool is created automatically to hold all machine identities that you defined for this catalog.
-
If you use existing machine accounts, choose an existing identity pool in your environment.
Note:
Make sure that OU names do not use forward slashes (
/).When you create a catalog and select Use existing identity pool on the Machine Identities page, the service account behavior depends on the identity pool configuration:
If the selected identity pool does not have a service account configured, selecting a stored service account on the Domain credentials page does not take effect. The Add machines operation can fail with an error indicating that the service account cannot be found. To avoid this, manually enter domain credentials on the Domain credentials page.
If the selected identity pool has a service account configured, any service account selected on the Domain credentials page is ignored. The Add machines operation always uses the service account associated with the identity pool.
If you use existing accounts, browse to the accounts or click Import and specify a .csv file containing account names. The imported file content must use the format:
- [ADComputerAccount] ADcomputeraccountname.domain
Ensure that there are enough accounts for all the machines you are adding. The Web Studio interface manages those accounts. Therefore, either allow that interface to reset the passwords for all the accounts or specify the account password, which must be the same for all accounts.
For catalogs containing physical or existing machines, select or import existing accounts and assign each machine to both an Active Directory computer account and to a user account.
Machine account naming scheme
Each machine in a catalog must have a unique name. You must specify a machine account naming scheme when creating a catalog. Use wildcards (hash marks) as placeholders for sequential numbers or letters that appear in the name.
When specifying a naming scheme, be aware of the following rules:
- The naming scheme must contain at least one wildcard. You must put all wildcards together.
- The entire name, including wildcards, must contain at least 2 but no more than 15 characters. It must include at least one non-numeric and one # (wildcard) character.
- The name must not include spaces or any of the following characters:
,~!@'$%^&.()}{\/*?"<>|=+[];:_".. - The name cannot end with a hyphen (-).
Also, leave enough room for growth when specifying the naming scheme. Consider this example: If you create 1,000 machine accounts with the scheme “veryverylong#”, the last account name created (veryverylong1000) contains 16 characters. Therefore, the naming scheme results in one or more machine names that exceed the maximum of 15 characters.
You can indicate whether the sequential values are numbers (0-9) or letters (A-Z):
-
0-9. If selected, the specified wildcards resolve to sequential numbers.
Note:
If there is only one wildcard (#), the account names start with 1. If there are two, the account names start with 01. If there are three, the account names start with 001, and so on.
-
A-Z. If selected, the specified wildcards resolve to sequential letters.
For example, a naming scheme of PC-Sales-## (with 0-9 selected) results in accounts named PC-Sales-01, PC-Sales-02, PC-Sales-03, and so on.
Optionally, you can specify what the account names start with.
- If you select 0-9, accounts are named sequentially, starting with the specified numbers. Enter one or more digits, depending on how many wildcards you use in the preceding field. For example, if you use two wildcards, enter two digits or more.
- If you select A-Z, accounts are named sequentially, starting with the specified letters. Enter one or more letters, depending on how many wildcards you use in the preceding field. For example, if you use two wildcards, enter two letters or more.
Domain credentials
Enter the credentials of an administrator who has permission to perform account operations. Detailed steps are as follows:
- Click Enter credentials. The Windows Security page appears.
-
In the User name field, enter the administrator’s SamName, user name, or user SID:
- If you enter a SamName, the Domain field populates automatically.
- If you enter a user name or SID, you can limit the user search to a specific domain by entering the domain name or SID in the Domain field.
- Click Check name to check whether the user name is valid or unique.
- In the Password field, enter the domain password of the administrator.
- Click Done.
Note:
If the identity type you selected in Machine Identities is Microsoft Entra hybrid joined, the credentials you enter must have been granted the
Write userCertificatepermission.
Summary, name, and description
On the Summary page, review the settings you specified. Enter a name and description for the catalog. This information appears in Web Studio.
When you’re done, click Finish to start the catalog creation. When you’re done, select Finish to start the catalog creation.
In Machine Catalogs, the new catalog appears with an inline progress bar.
To view details of the creation progress:
-
Hover the mouse over the machine catalog.
-
In the tooltip that appears, click View details.
A step-by-step progress graph appears where you can see the following:
- History of steps
- Progress and running time of the current step
- Remaining steps
MCS time synchronization
Time synchronization is determined by the master image and the type of machine identity joined catalog. You get the following time synchronization method according to the master image and the catalog:
| Master image | Catalog | Resultant time synchronization method |
|---|---|---|
| NDJ | AD or Microsoft Entra hybrid | By default, NT5DS. You can disable MCS from changing time synchronization setting using registry settings in the master image |
| NDJ | NDJ or Microsoft Entra ID | Same as the original time synchronization setting |
| AD or Microsoft Entra hybrid | AD or Microsoft Entra hybrid | Same as the original time synchronization setting |
| Microsoft Entra ID | Microsoft Entra ID | Same as the original time synchronization setting |
Note:
The original time synchronization is controlled by the following registry setting and cannot be changed:
- Computer\HKEY_LOCAL_MACHINE\SYSTEM\CurrentControlSet\Services\W32Time\Config
Value: MaxAllowedPhaseOffset, MaxNegPhaseCorrection, and MaxPosPhaseCorrection
- Computer\HKEY_LOCAL_MACHINE\SYSTEM\CurrentControlSet\Services\W32Time\Parameters
Value: Type
To disable MCS from changing the time synchronization setting, set the value of the following registry setting in the master image:
Computer\HKEY_LOCAL_MACHINE\SYSTEM\CurrentControlSet\Control\Citrix- Name: TimeSyncMethodKeep
- Type: DWORD
- 0 (Or, value TimeSyncMethodKeep not configured): Does not keep the original time synchronization setting.
- 1: Keeps original time synchronization setting and default parameters values.
Important consideration about setting custom properties
Custom properties must be set correctly at New-ProvScheme and Set-ProvScheme in GCP and Azure environments. If you specify a non-existing custom property or properties, you get the following error message, and the commands fail to run.
- In Azure:
Invalid property found: <invalid property>. Ensure that the CustomProperties parameter supports the property. - In GCP:
Invalid property found: <invalid property>. Ensure that the value supplied for the property is supported in the Hypervisor.
Troubleshoot
Important:
After creating the machine catalog using Web Studio, you can no longer use the
Get-ProvTaskPowerShell command to retrieve the tasks associated with machine catalog creation. This restriction is a result of Web Studio deleting those tasks after machine catalog creation regardless of whether the catalog is created successfully.
Citrix recommends collecting logs to help the Support team provide solutions. When using Citrix Provisioning, use the following procedure to generate log files:
-
On the master image, create the following registry key with the value of 1 (as a DWORD (32-bit) value):
HKLM\Software\Citrix\MachineIdentityServiceAgent\LOGGING. -
Shut down the master image and create a snapshot.
-
On the Delivery Controller, run the following PowerShell command:
Set-ProvServiceConfigurationData -Name ImageManagementPrep_NoAutoShutdown -Value $True. - Create a catalog based on that snapshot.
- When the preparation VM is created on the hypervisor, log in and extract the following files from the root of C:\: Image-prep.log and PvsVmAgentLog.txt.
- Shut down the machine, at which point it reports the failure.
- Run the following PowerShell command to re-enable auto shutdown of the image preparation machines:
Remove-ProvServiceConfigurationData -Name ImageManagementPrep_NoAutoShutdown.
Assign a specific drive letter to an MCS I/O write-back cache disk
You can assign a specific drive letter to an MCS I/O write-back cache disk. This implementation helps you to avoid conflicts between the drive letter of any applications that you use and the drive letter of MCS I/O write-back cache disk. To do this, you can use PowerShell commands. The supported hypervisors are Azure, GCP, VMware, SCVMM, and XenServer.
Note:
This feature requires VDA version 2305 or later.
Limitations
- Applicable to only Windows operating system
- Applicable drive letter for write-back cache disk:
EtoZ - Not applicable when Azure temporary disk is used as a write-back cache disk
- Applicable only when you create a new machine catalog
Assign a drive letter to a write-back cache disk
To assign a drive letter to write-back cache disk:
- Open the PowerShell window.
- Run
asnp citrix*. - Create an identity pool if not already created. For information, see Creating a Catalog.
-
Create a provisioning scheme using the
New-ProvSchemecommand with the propertyWriteBackCacheDriveLetter. For example:New-ProvScheme -CleanOnBoot ` -HostingUnitName "<name>" ` -IdentityPoolName $schemeName ` -ProvisioningSchemeName $schemeName ` -InitialBatchSizeHint 1 ` -UseWriteBackCache -WriteBackCacheDiskSize 127 -WriteBackCacheMemorySize 256 -WriteBackCacheDriveLetter E ` -MasterImageVM "XDHyp:\HostingUnits\<name>\image.folder\abcd-resources.resourcegroup\MCSIOMasterVm_OsDisk_1_d3e2d6352xxxxxxxxx2130aa145ec77.manageddisk" ` -NetworkMapping @{"0"="XDHyp:\\HostingUnits\\name\\virtualprivatecloud.folder\\East US.region\\virtualprivatecloud.folder\\abcd-resources.resourcegroup\\abcd-resources-vnet.virtualprivatecloud\\default.network"} ` -ServiceOffering "XDHyp:\\HostingUnits\\<name>\\serviceoffering.folder\\Standard_D2s_v5.serviceoffering" ` -CustomProperties '<CustomProperties xmlns="http://schemas.citrix.com/2014/xd/machinecreation" xmlns:xsi="http://www.w3.org/2001/XMLSchema-instance"> <Property xsi:type="StringProperty" Name="UseManagedDisks" Value="true" /> <Property xsi:type="StringProperty" Name="OsType" Value="Windows" /> <Property xsi:type="StringProperty" Name="StorageType" Value="Premium_LRS"/> <Property xsi:type="StringProperty" Name="PersistWBC" Value="false" /> <Property xsi:type="StringProperty" Name="PersistOsDisk" Value="false" /> <Property xsi:type="StringProperty" Name="PersistVm" Value="false" /> <Property xsi:type="StringProperty" Name="WBCDiskStorageType" Value="Premium_LRS" /> <Property xsi:type="StringProperty" Name="UseTempDiskForWBC" Value="false" /> <Property xsi:type="StringProperty" Name="ResourceGroups" Value="abcd-group1" /> <Property xsi:type="StringProperty" Name="LicenseType" Value="Windows_Client" /> <Property xsi:type="StringProperty" Name="SchemaVersion" Value="2" /> </CustomProperties>' <!--NeedCopy--> - Finish creating the catalog.
Validate configuration before creating an MCS machine catalog
You can validate configuration settings before creating an MCS machine catalog using the parameter -validate in New-ProvScheme command. After you run this PowerShell command with the parameter, you get an appropriate error message if there is an incorrect parameter used or a parameter has conflict with another parameter. You can then use the error message to resolve the issue and successfully create an MCS machine catalog using PowerShell. Currently, this feature is applicable to AWS, Azure, GCP, and VMware virtualization environments.
Note:
While validating, you must not create an actual MCS machine catalog. You must use the result of the command to fix the errors, and then create a successful catalog. Therefore, while running the
New-ProvSchemecommand, use a fake identity pool name.
To validate the configuration, do the following steps:
- Open a PowerShell window from the Delivery Controller host.
- Run
asnp citrix*to load the Citrix-specific PowerShell modules. -
Run
New-ProvSchemecommand and use the parameter-validate. Provide a fake identity pool name for the command to work. For example,$result =New-ProvScheme -CleanOnBoot -HostingUnitName "vSanRg" -IdentityPoolName "mptmpcatalogdemo" -InitialBatchSizeHint 1 -MasterImageVM "XDHyp:\HostingUnits\vSanRg\Windows19MasterImage.vm\Citrix_XD_NonMachineProfileWin19Machines.snapshot" -NetworkMapping @{"0"="XDHyp:\HostingUnits\vSanRg\\VM Network.network"} -ProvisioningSchemeName "MachineProfileW10Machines" -Scope @() -VMCpuCount 2 -VM MemoryMB 6143 -MachineProfile "XDHyp:\HostingUnits\vSanRg\TRW-Win11-tpm-BL-TEMPLATE.template" -TenancyType Shared -FunctionalLevel "L7_20" -Validate $result.TerminatingError | Format-List -Property * <!--NeedCopy-->Error message:
ErrorData : {[[ValidationFailureCount, xxx], [InvalidMemoryValue, The memory size provided 6143 must be a multiple of 4 MB and must be greater than or equal to 4 MB.], [InconsistentGuestOsSetting, The GuestOs setting - windows9_64Guest of the selected machine profile does not match with the setting - windows2019srv_64Guest of master image. Please select a machine profile that matches the GuestOs setting of the master image.], [InconsistentVtpmSetting, The vTPM setting of the selected machine profile does not match with the selected master image. Please select a machine profile that matches the vTPM setting of the master image.], [InconsistentFirmwareSetting, The firmware setting - efi of the selected machine profile does not match with the setting - bios of master image. Please select a machine profile that matches the firmware setting of the master image ErrorId : ValidationFailure ErrorMessage : ValidationFailure Operation : ValidatingInputs <!--NeedCopy--> - After validating the configuration setting, you can create an MCS machine catalog with a real identity pool name and correct parameters.
Onboard VMs to Azure Arc
Azure Arc enables organizations to manage resources such as VMs hosted anywhere as if they are running in Azure. With Azure Arc, you can use Azure services such as Azure Monitor for comprehensive visibility and proactive management of the resources.
To onboard VMs to Azure Arc, create an MCS machine catalog using the New-ProvScheme command. You can also update an existing catalog using the Set-ProvScheme command. Only the new VMs added to the catalog are onboarded to Azure Arc.
Currently, this feature is applicable to all Citrix on-premises hypervisors Vmware, Nutanix and SCVMM.
Prerequisites
Consider the following before enabling Azure Arc onboarding on MCS catalog:
-
Azure Resource Group with:
-
Allowsaccounts to read, create, and delete Arc servers. -
Allowsaccounts to manage VM extensions, licenses, and private link scopes. -
Azure Connected Machine Resource Administratorrole assigned to the service principal at the resource group scope.
-
See Assign Azure roles using the Azure portal.
-
Master image with
Steps to onboard VM to Azure Arc
-
Setup a service account with
AzureArcResourceManagementcapability.The service account is used for authentication or authorization by storing credentials to access identity providers like Microsoft Entra ID. Each service account is tied to a single identity provider.
To create a new service account to access AzureAD with
AzureArcResourceManagement capability, run:New-AcctServiceAccount -IdentityProviderType “AzureAD” -IdentityProviderIdentifier “tenant-id” -AccountId “application-id” -AccountSecret “application-secret” -Capabilities “AzureArcResourceManagement” <!--NeedCopy-->The
application-idmust be of the same service principal that was assigned the Azure Connected Machine Resource Administrator role. -
Assign the service account to the identity pool. For example:
Set-AcctIdentityPool -IdentityPoolUid “idn-pool-uid” -ServiceAccountUid “service-account-uid” <!--NeedCopy--> -
Create or update an MCS catalog with the following Arc parameters:
-
EnableAzureArcOnboarding: Indicates whether Arc Onboarding needs to be enabled on the catalog. -
AzureArcSubscriptionId: Indicates the Azure subscription where the Arc-connected VMs are created. -
AzureArcRegion: Indicates the Azure region where the Arc-connected VMs are created. -
AzureArcResourceGroup: Indicates the Azure resource group where the Arc-connected VMs are created. See [Prerequisites]for information on Azure Arc Resource Group.
Example: To enable Azure Arc Onboarding for a new catalog:
`New-ProvScheme -ProvisioningSchemeName "demo" -MasterImageVM "XDHyp:\HostingUnits\hosting-unit\masterVMName.vm\masterSnapshotName.snapshot" -HostingUnitName “hosting-unit” -IdentityPoolName “identity-pool”`

-EnableAzureArcOnboarding -AzureArcSubscriptionId “azure-sub” -AzureArcResourceGroup “azure-resourcegroup” - AzureArcRegion “azure-region”
<!--NeedCopy-->
Example: To enable Azure Arc Onboarding for an existing catalog:
Set-ProvScheme -ProvisioningSchemeName "demo" -EnableAzureArcOnboarding $true -AzureArcSubscriptionId “azure-sub” -AzureArcResourceGroup “azure-resourcegroup” - AzureArcRegion “azure-region”
<!--NeedCopy-->
Example: To disable Azure Arc Onboarding for an existing catalog:
Set-ProvScheme -ProvisioningSchemeName "demo" -EnableAzureArcOnboarding $false: <!--NeedCopy--> -
- Add new machines to the catalog to onboard Arc.
- After you power-on the VM, you must see the VM in the Azure portal under AzureArcResourceGroup as a connected machine.
Considerations
- Arc onboarding is currently supported for only new VMs. So, if you update an existing catalog using
Set-ProvScheme, then only newly added VMs are onboarded to Arc when first powered on. - The Arc Custom Properties are still supported for existing catalogs for backward compatibility. However, if you run
New-ProvSchemewith Arc CustomProperties such asEnableAzureArcOnboarding, then catalog creation fails. - You must add all the parameters in
New-ProvSchemeandSet-ProvSchemeif you configureEnableAzureArcOnboardingastrue.
Troubleshooting
When creating SCVMM catalog using New-ProvScheme, you might get the following error:
Master Image/Machine Profile's VM's device id is different than the NetworkMapping's device id '0'. Please provide a device id that matches the master image/machine profile.
<!--NeedCopy-->
In that case,make sure you explicitly specify the DeviceId in NetworkMapping parameter of New-ProvScheme. For example:
New-ProvScheme -ProvisioningSchemeType "MCS" -InitialBatchSizeHint 1 -HostingUnitName $HostingUnitName `
            -IdentityPoolName $CatalogName -MasterImageVM $MasterImage -ProvisioningSchemeName $CatalogName `
            -VMCpuCount 2 -VMMemoryMB 4096  -EnableAzureArcOnboarding `
            -AzureArcSubscriptionId $AzureArcSubscription -AzureArcRegion $AzureArcRegion `
            -AzureArcResourceGroup $AzureArcResourceGroup
            -NetworkMapping @{"FDDxxxxxx-xxxx-4xxx-9EBC-3xxxxxxxx"="XDHyp:\HostingUnits\<hosting unit name>\abc.network"}
<!--NeedCopy-->
Image replication of additional storage for supported on-premises hypervisors
This feature enables efficient replication and management of image version specification instances across multiple storage locations supported by on-premises hypervisors.
Use cases
- You can replicate image versions to new or superseded storage locations, allowing virtual machines to be provisioned in additional locations either during or after the image preparation process.
- When a new image version is created and additional storage locations are specified, the prepared image version specification is automatically replicated to those designated storage locations.
- If there is a need to use an existing image version with a superseded or newly added storage locations, you can add an image version instance to replicate to the new storage location.
- When a hosting unit is added to an existing image version, along with additional storage, the prepared image version spec instance will be replicated to the specified additional storages within the target hosting unit.
PowerShell commands
-
Add a new image instance that replicates a prepared image version spec to the specified storage location.
Add-ProvImageVersionSpecInstance -ImageVersionSpecUid < ImageVersionSpecUid > -StorageIds "<StorageId1,StorageId2>" -RunAsynchronously <!--NeedCopy--> -
Remove an existing image version spec instance replica and not used by any existing VMs.
Remove-ProvImageVersionSpecInstance -ImageVersionSpecUid < ImageVersionSpecUid > -ImageInstanceUid < ImageInstanceUid > -RunAsynchronously <!--NeedCopy--> -
Get a list of image version specs instances.
Get-ProvImageVersionSpecInstance -ImageVersionSpecUid  < ImageVersionSpecUid >
<!--NeedCopy-->
Where to go next
For information on creating specific cloud services catalogs, see:
- Create an AWS catalog
- Create a XenServer catalog
- Create a Google Cloud Platform catalog
- Create a Microsoft Azure catalog
- Create a Microsoft System Center Virtual Machine Manager catalog
- Create a Nutanix catalog
- Create a VMware catalog
If this is the first catalog created, Web Studio guides you to create a delivery group.
To review the entire configuration process, see Install and configure.
You can create a Citrix Provisioning catalog using Web Studio and PowerShell. This implementation provides you the following advantages:
- A single unified console to manage both MCS and Citrix Provisioning catalogs.
- Have new features for Citrix Provisioning catalogs, such as, identity management solution, on-demand provisioning and so on.
Currently, this feature is available only for Azure and VMware workloads. However, in VMware environments, you can currently create the catalogs using only PowerShell commands. For more information, see Create Citrix Provisioning catalogs in Citrix Studio.
More information
In this article
- Introduction
- Overview
- Assign a specific drive letter to MCS I/O write-back cache disk
- Prepare a master image
- Volume licensing activation
- Create a machine catalog using Web Studio
- Operating system
- Machine management
- Desktop types (desktop experience)
- Image and machine profile
- Machines
- Security
- NIC (NICs)
- Machine accounts
- Machine identities
- Domain credentials
- Summary, name, and description
- MCS time synchronization
- Important consideration about setting custom properties
- Troubleshoot
- Assign a specific drive letter to an MCS I/O write-back cache disk
- Validate configuration before creating an MCS machine catalog
- Onboard VMs to Azure Arc
- Image replication of additional storage for supported on-premises hypervisors
- Where to go next
- More information