Install and configure
Installation checklist
Before you start the installation, complete this list:
| ✔ | Step |
|---|---|
| Choose the computers in your environment where you will install the software and prepare them for installation. See System requirements. | |
| Install the TLS certificate and the accounts required for the service. See Security and account requirements in System requirements. | |
| Install or upgrade the License Server to a minimum of version 11.13.1.2. Download the License Server from https://www.citrix.com/downloads/licensing.html. For more information, see License server documentation. |
Installation and configuration order
Citrix® recommends that you install Self-Service Password Reset in this order:
- Create a central store. See Create a central store.
- Install Self-Service Password Reset. To install the service and run the Service Configuration wizard, your logon account must be a domain user and belong to the local administrator group on the server. For more information, see Install and configure Self-Service Password Reset.
- Configure Self-Service Password Reset using the console. See Install and configure Self-Service Password Reset.
- Configure Self-Service Password Reset on StoreFront. See Configure StoreFront.
- Ensure that your Self-Service Password Reset configuration is securely configured. See Secure configuration.
Create a central store
For security reasons, we recommend that you create the central store directly on the machine running the Self-Password Reset service. For deployments where more than one Self-Password Reset server is required, you can host the central store on a remote network share if the Self-Service Password Reset server and the server hosting the share both support SMB encryption.
This feature is available only on Windows Server 2012 R2 or Windows Server 2016.
Create Data Proxy Account
Create a normal domain user to be used as the Data Proxy Account. Don’t set a user from Domain Administrator/Local Administrator group as the Data Proxy Account.
Create a central store for Windows Server 2012 R2 or Windows Server 2016
When using Windows Server 2012 R2 or Windows Server 2016 for both the Self-Service Password Reset server and the central store, you can use a remote network share if configured as described in this section. Ensure that the Encrypt data access is selected and apply the guidance given in the Secure configuration.
-
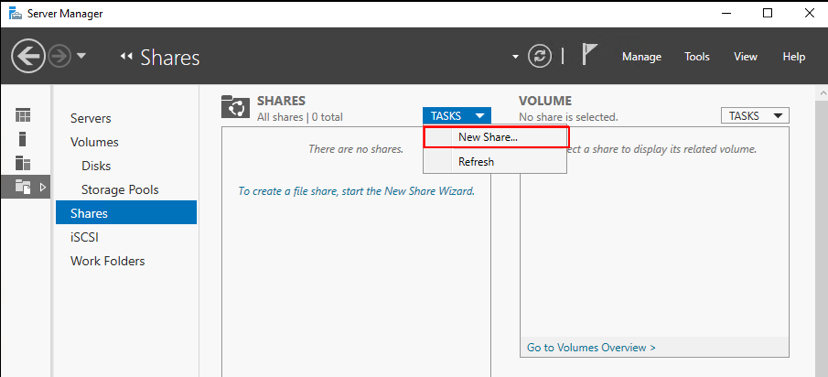
To start the New Share wizard, open Server Manager. From the File and Storage Services details page, select Shares in the left pane, and click Tasks > New Share.
-
Choose Select Profile in the left pane, select SMB Share - Quick, and click Next.

-
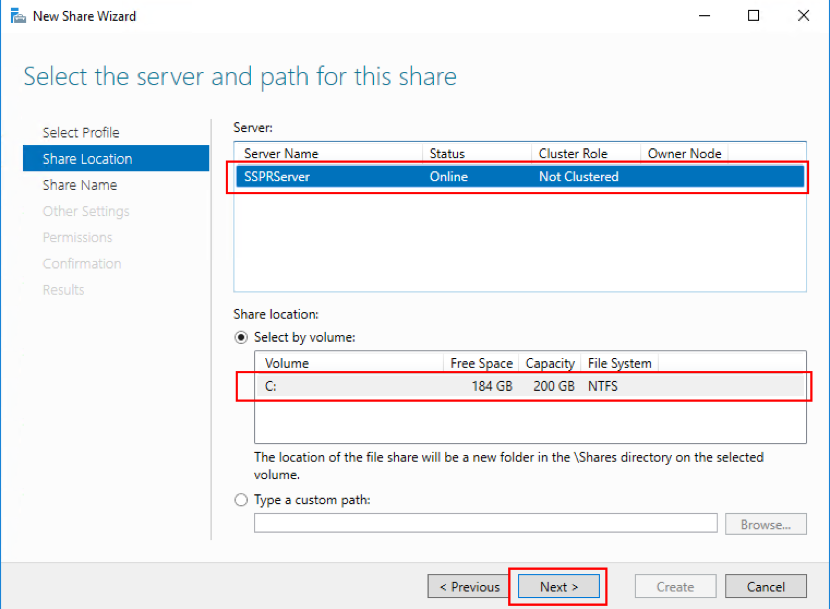
Choose Share Location in the left pane. From the list, select the server on which to create the new share and the volume on which to create the new shared folder, and then click Next.
-
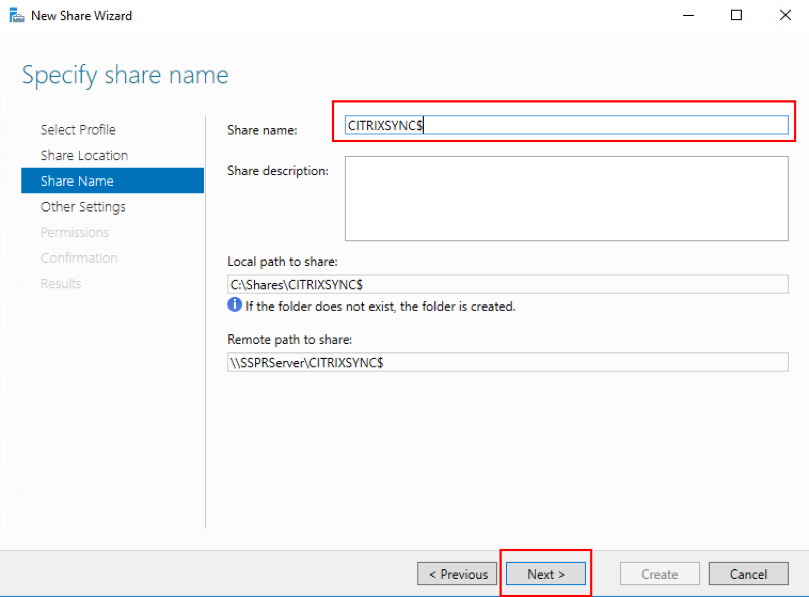
Choose Share Name in the left pane, type the name of your new Share name, for example CITRIXSYNC$, and click Next.
-
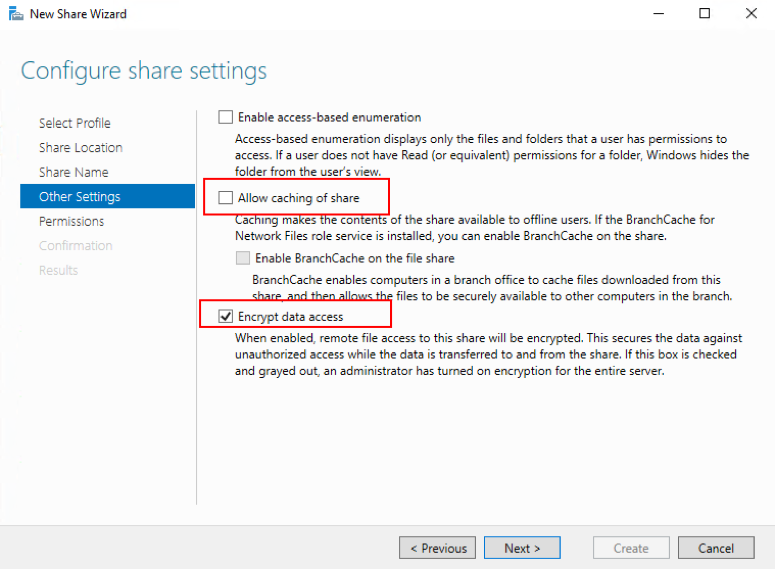
Choose Other Settings in the left pane, select Encrypt data, deselect Allow caching of share, and click Next.
-
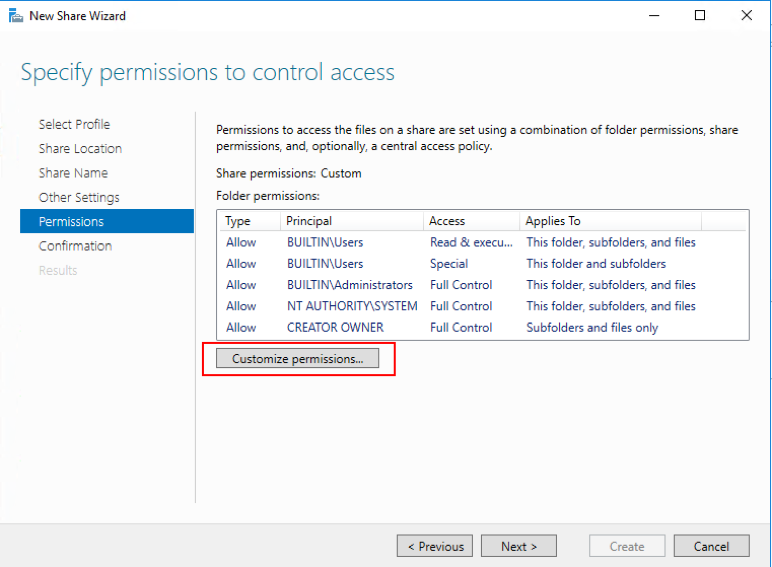
To customize the Share permissions, choose Permissions in the left pane, and then select Customize permissions > Share.
-
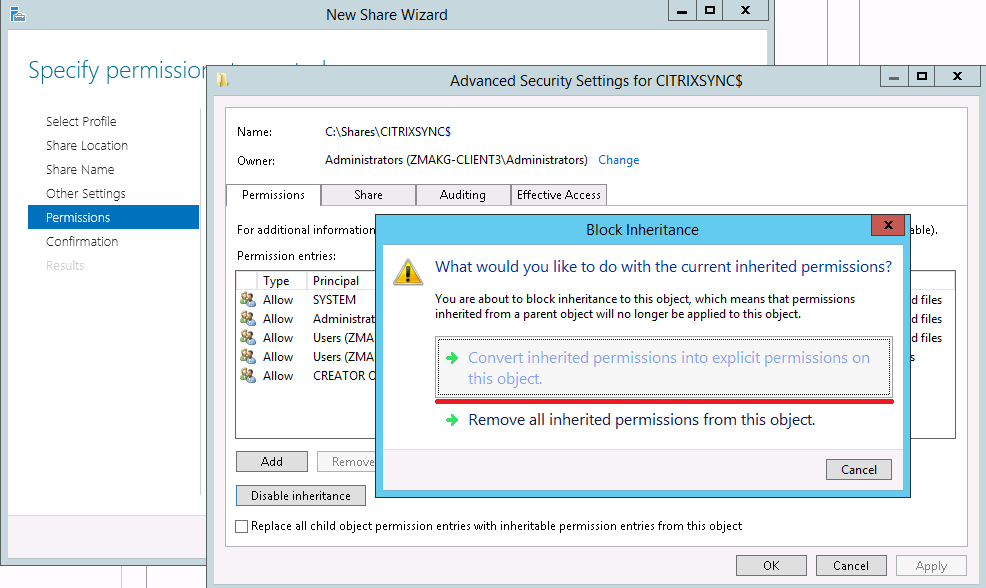
To customize the NTFS permissions, click Disable inheritance, and select Convert inherited permissions into explicit permissions on this object.
-
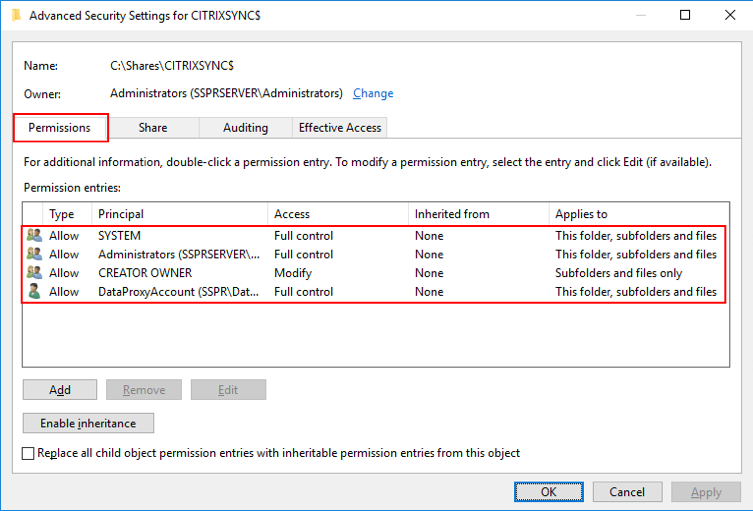
Click the Permissions tab, remove all users except CREATOR OWNER,Local Administrators, and SYSTEM, and add the Data Proxy Account that was created with the Full Control permission.
-
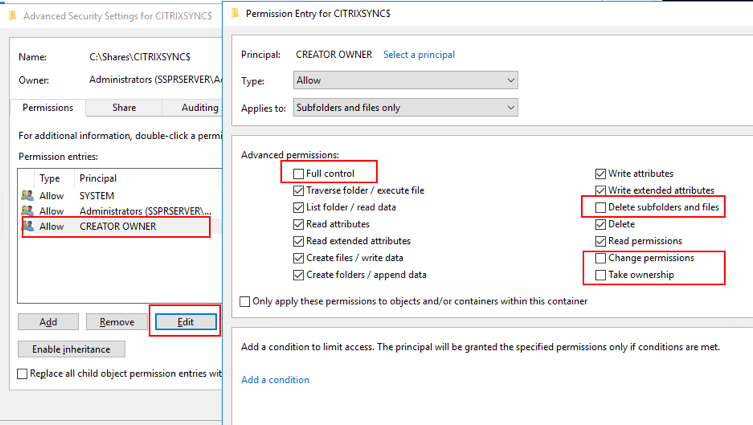
Choose CREATOR OWNER and click Edit to uncheck the following permissions:
-
Full Control
-
Delete subfolders and files
-
Change permissions
-
Take ownership
-
-
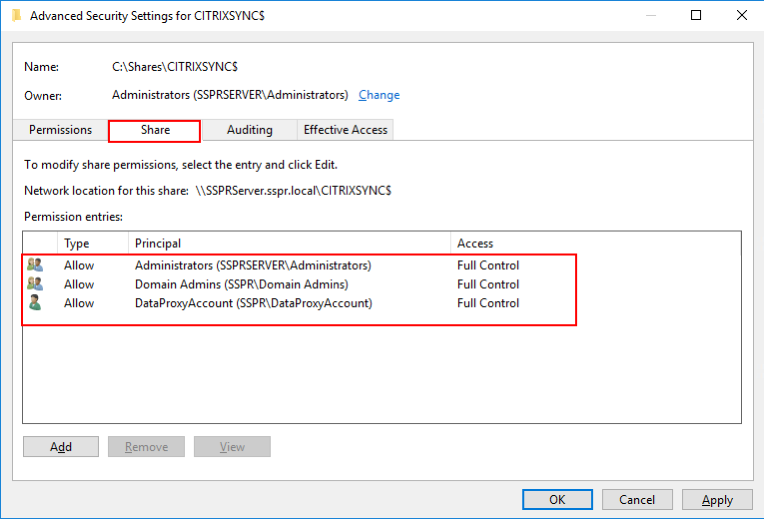
Choose the Share tab, remove Everyone, and add the Data Proxy Account, Local Administrators and Domain Admins with the Full Control permission.
-
Choose Confirmation in the left pane of the New Share wizard, review the currently selected settings for sharing, and click Create to begin the process of creating the new folder, and then Close.
-
Create two subfolders under the CITRIXSYNC$ share folder: CentralStoreRoot and People.
Important: Ensure that the Data Proxy Account has Full Control for these two subfolders.
You must configure EncryptData, RejectUnencryptedAccess, and RequireSecuritySignature for the Self-Service Password Reset central store. For more configuration information, see the following Microsoft articles: https://docs.microsoft.com/en-us/powershell/module/smbshare/set-smbserverconfiguration https://docs.microsoft.com/en-us/powershell/module/smbshare/set-smbshare
Install and configure Self-Service Password Reset
-
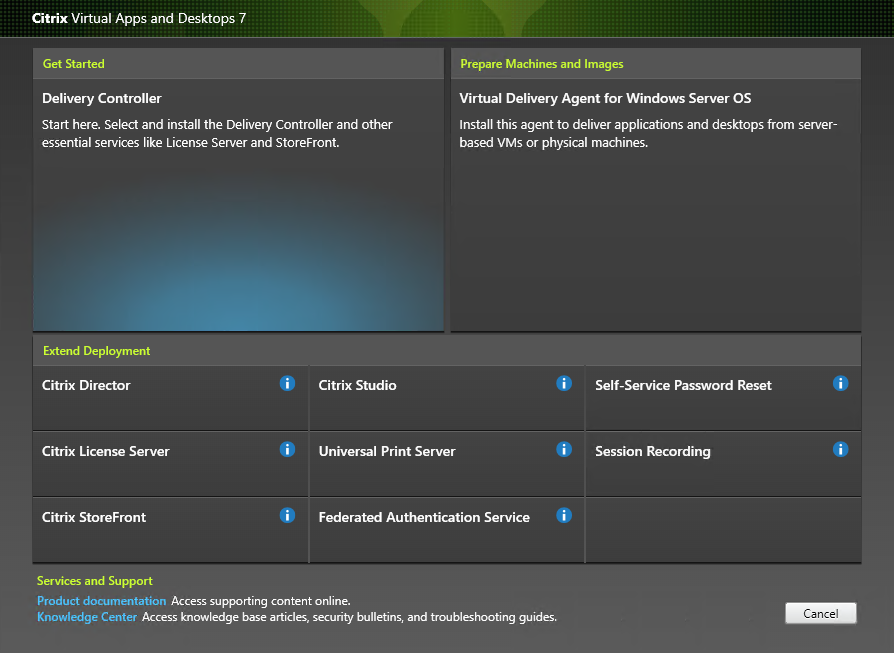
Install Self-Service Password Reset by using the Citrix Virtual Apps and Desktops™ installer.
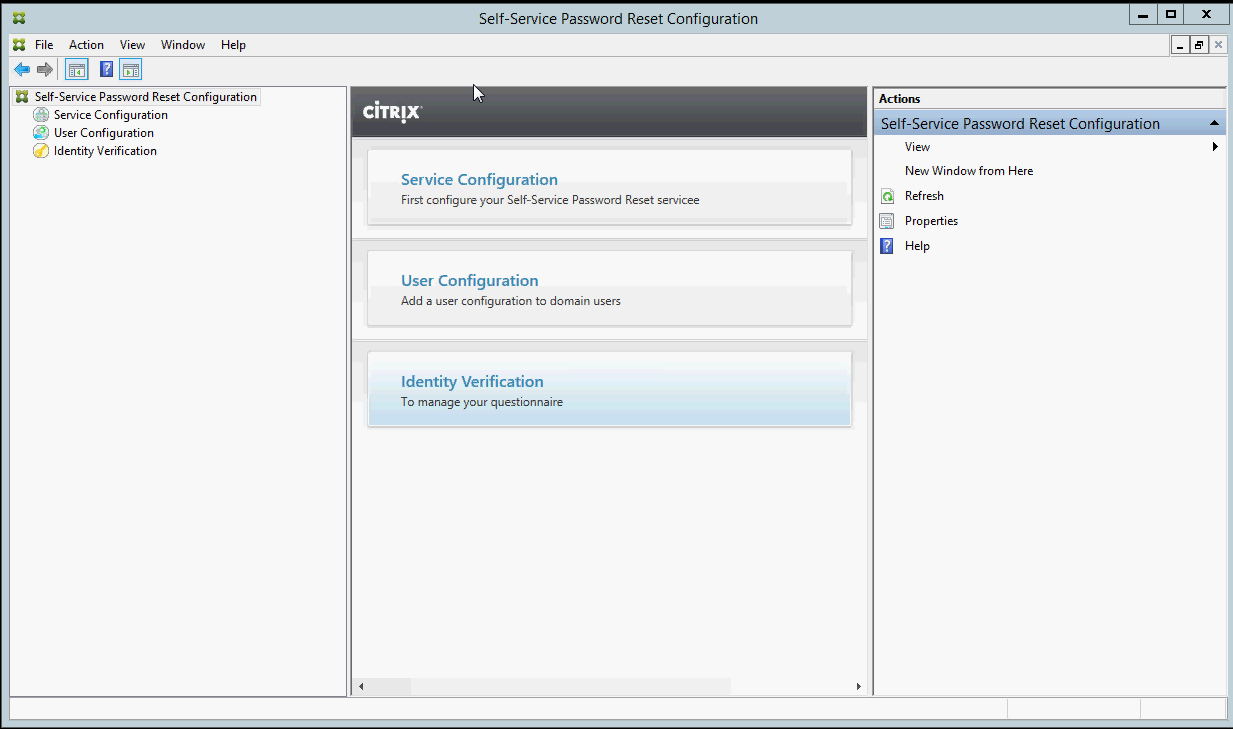
- After installing Self-Service Password Reset, click Start > All Programs > Citrix > Citrix Self-Service Password Reset Configuration to configure the Citrix Self-Service Password Reset service.
-
When the console opens, follow these three basic procedures to configure the service.
Service Configuration
Before configuring the service, ensure you have created the central store, Data Proxy Account, and Self-Service account.
-
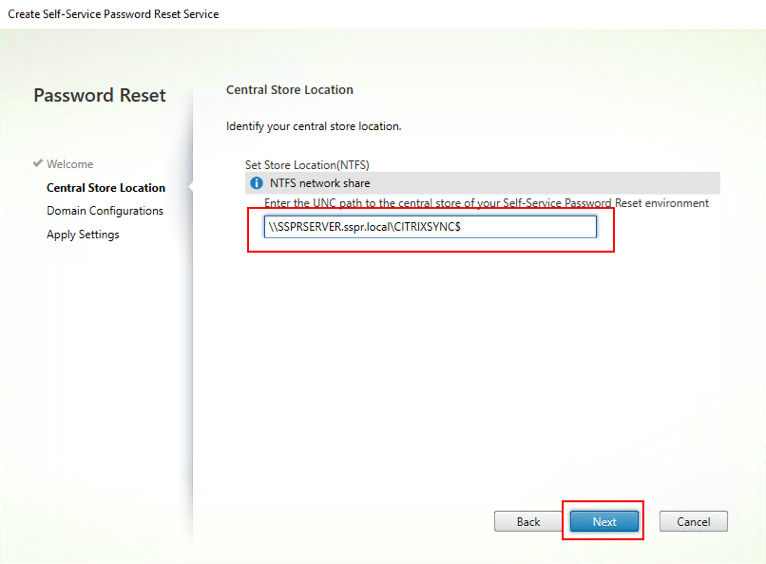
Select Service Configuration in the middle pane, and then click New Service Configuration in the right pane.
-
On the Central Store Location screen, specify the central store location, and click Next.
-
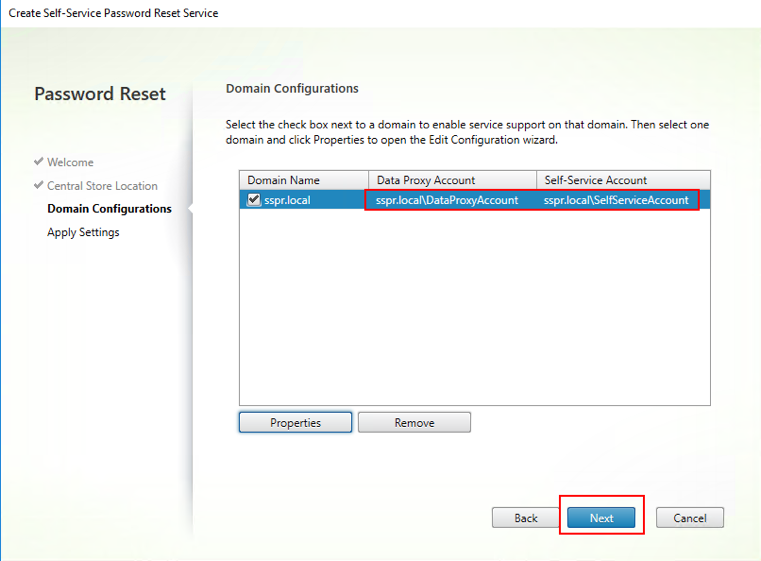
On the Domain Configurations screen, select a domain where you want to enable the Self-Service Password Reset service, and click Properties.
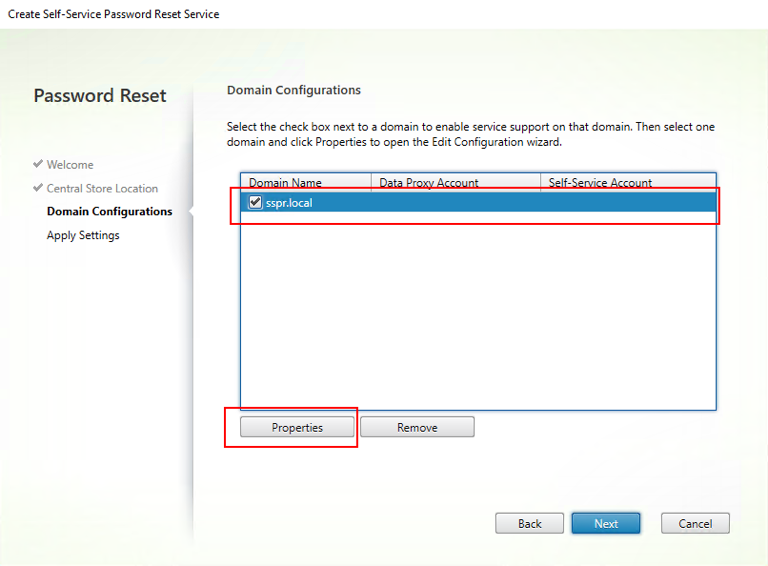
-
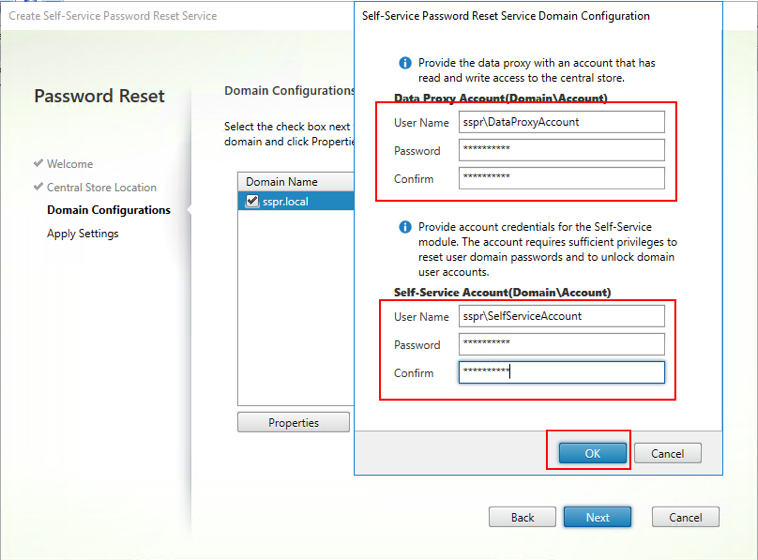
Specify the Data Proxy Account user name and password and the Self-Service Account user name and password, and click OK.
-
Click Next to apply all the settings.
-
Click Finish to complete the configuration.

User Configuration
-
In the left pane, select User Configuration, and then click New User Configuration in the right pane.
-
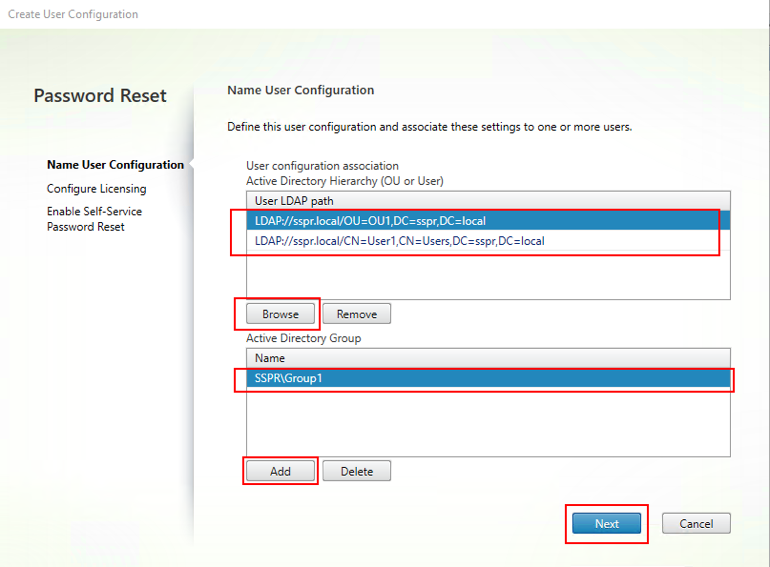
On the Name User Configuration screen, define the Self-Service Password Service target user groups, add users/groups/OUs from Active Directory, and click Next.
-
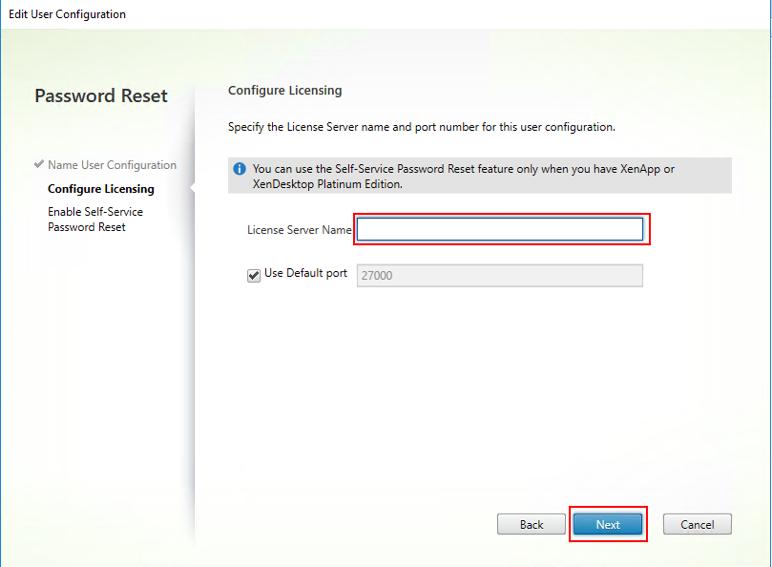
On the Configure Licensing screen, specify the License Server, and click Next.
-
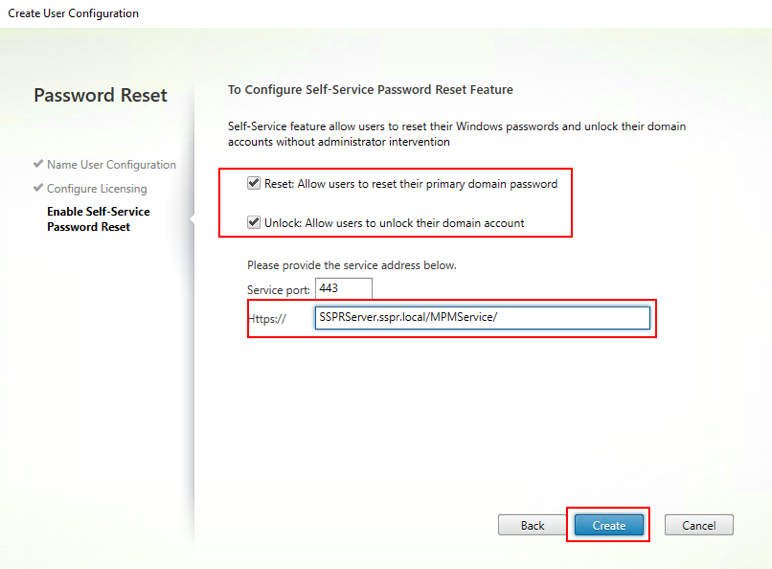
On the Enable Self-Service Password Reset screen, use the check boxes to specify whether users can reset their Windows passwords and unlock their domain accounts without administrative intervention, specify the service port and address, and then click Create.
For more information about managing user configurations, see Manage user configurations.
Identity Verification
- In the left pane, select the Identity Verification node, and then click Manage Questions in the right pane.
- On the Question-Based Authentication screen, select the default language, use the check box to enable or disable masking security question answers, and click Next.
- On the Security Questions screen, click Add Question, type a question in the text box, click OK, and then click Next.
- On the Questionnaire screen, click Add, and select a question. You can reorganize your questions and groups with the Move Up and Move Down buttons. When you are finished on this page, click Create and OK.
For more information about managing identity verification questions, see Manage Identity Verification questions.
Manage user configurations
A user configuration enables you to control the behavior and appearance of the interface when users log on to Storefront. Creating a new configuration is the final step you take before distributing Self-Service Password Reset to users in your environment. You can edit existing user configurations at any time.
A user configuration is a unique collection of settings that you apply to users associated with an Active Directory hierarchy (Organizational Unit [OU] or an individual user) or an Active Directory group.
A user configuration consists of the following:
- Users associated with an Active Directory domain hierarchy (OU or individual user) or Active Directory group
Important: Distribution groups and Domain Local groups in Active Directory mixed mode are not supported.
- License Server
- Self-service features (account unlock and password reset)
Before you create your user configurations, ensure that you already created or defined the following:
- Central store
- Service configuration
To create a user configuration:
- Click Start > All Programs > Citrix > Citrix Self-Service Password Reset Configuration.
- In the left pane, select the User Configurations node.
- From the Actions menu, click Add new user configuration.
To add users, OU, or Group:
The Name User Configuration page of the User Configuration wizard allows you to associate the user configuration to the users.
User configuration association:
You have two choices: associate users according to Active Directory hierarchy (OU or individual user) or Active Directory Group. If necessary, you can associate the user configuration with a different hierarchy or group later, by clicking Edit user configuration in the Actions menu.
Associating user configurations to groups is supported only in Active Directory domains that use Active Directory authentication.
Select the OU, or Users, or Group on the Name User Configuration page (from Add New User Configuration or Edit User Configuration wizard).
Note: We recommend that you not include any privileged accounts (for example, Local Administrators or Domain Administrators) in the group of users for whom the Self-Service Password Reset account can reset passwords. Use a new dedicated group.
To configure licensing:
The Configure Licensing page of the User Configuration wizard allows you to configure the License Server used by the Self-service Password Reset service.
Note: You can use the Unlock and Reset features only if you have Citrix Virtual Apps or Citrix Virtual Desktops™ Platinum Edition.
Enter the License Server name and port number on the Configure Licensing page (from Add New User Configuration or Edit User Configuration wizard).
To enable Unlock or Reset features:
Self-Service Password Reset allows users to reset their Windows password and unlock their domain accounts without administrator intervention. From the Enable Self-Service Password Reset page, you can select which feature to enable.
Select which feature you want to users to use: Unlock or Reset on the Enable Self-Service Password Reset page (from Add New User Configuration or Edit User Configuration wizard).
To configure a blacklist:
IT administrators can add users and groups to the blacklist. Users and groups in the blacklist cannot use any of the Self-Service Password Reset features - including enrollment, account unlock, and password reset. Also, a user in the blacklist cannot see the TASK button on Citrix Workspace™ app after logging on.
To configure the blacklist:
- Click Start > All Programs > Citrix > Citrix Self-Service Password Reset Configuration.
- In the left pane, select User Configuration, and then click Blacklist Configuration in the right pane.
- Use the Add and Remove buttons to add and remove users or groups to and from the blacklist.
Manage Identity Verification questions
The Identity Verification of the Citrix Self-Service Password Reset Configuration Console provides you with a central location for managing all security questions associated with identity verification, Self-Service Password Reset, and account unlock. You can customize your own security questions to the list of default questions and create question groups.
- If you edit the existing default questions after users register their answers, consider the meaning of the edited questions. Editing a question does not force a user re-enrollment. But if you change the meaning of a question, users who answered that question originally might not be able to provide the correct answer.
- Adding, deleting, and replacing security questions after users are enrolled means that all users who were previously enrolled using an older set of questions cannot authenticate and reset their password until they reenroll. Users must answer the new set of questions when they open the Tasks in Citrix Workspace app.
- Individual security questions can belong to multiple security question groups. When you create your security question groups, all questions you create are available for use with any security question group.
Use these steps to access the settings referenced in the following procedures:
- Click Start > All Programs > Citrix > Citrix Self-Service Password Reset Configuration.
- In the left pane, select the Identity Verification node.
- From the Actions menu, click Manage Questions.
To set the default language:
In most instances, users see security questions displayed in the language associated with their current user profile. If the language is not available, Self-Service Password Reset displays the questions in the default language that you specify.
- Click Start > All Programs > Citrix > Citrix Self-Service Password Reset Configuration.
- In the left pane, select the Identity Verification node.
- From the Actions menu, click Manage Questions.
- From the Default Language drop-down list on the Question-Based Authentication page, select the default language.
To enable security answer masking:
Security answer masking provides an added level of security for your users when they register their security question answers or provide their answers during identity verification. When this feature is enabled, the users’ answers are hidden. During the answer registration process, these users are asked to type their answers twice to avoid typing and spelling errors. Users type their answers only once during identity validation because they are prompted to retry if there is an error.
Select Mask answers for security questions on the Question-Based Authentication page.
To create new security questions:
You can create many different questions and designate a language for each question. You can also provide multiple translations of a single question. The Enrollment in Citrix Workspace app presents the user with the questionnaire in the language that corresponds to the language settings of the user’s profile. If the language is not available, Self-Service Password Reset displays the questions in the default language.
Note: When you specify a language for a security question, the question appears to users whose operating system settings are configured for that designated language. If the selected operating system settings do not match any of the questions available, users are shown your selected default language.
- From the Language drop-down list on the Security Questions page, select a language and click Add Question. The Security Question dialog box appears.
- Create the new question on the Security Question dialog box.
Important: Use the Edit button to include the translated text of existing questions. If you select Add Question, you are creating a new question that is not associated with the original.
To add or edit text for existing questions:
Adding, deleting, and replacing security questions after users are enrolled means that all users who were previously enrolled using an older set of questions cannot authenticate and reset their password until they reenroll. Users must answer the new set of questions when they open the Tasks in Citrix Workspace app. Editing a question does not force a user re-enrollment.
Important: If you are editing an existing question, be careful not to change the meaning of a question. This might cause a mismatch in user answers during reauthentication. That is, a user might provide a different answer that might not match the stored answer.
- Select a language from the Language drop-down box on the Security Questions page.
- Select the question and click Edit.
- Edit the question in the Security Question dialog box.
To create a security question group:
You can create some security questions that your users answer to confirm their identities. Each question you add to the questionnaire must be answered by your users. However, you can also group these questions together in a security question group.
For example, putting your questions in a group enables you to add a group of six questions to your questionnaire, and allows your users to choose from that group of questions, answering, for example, three of the six. This gives your users flexibility in selecting questions and providing answers to be used for identity verification.
- Click Add Group on the Security Questions page.
- In the Security Question Group dialog box, name the group, select the questions, and set the number of questions the user must answer.
To edit a security question group:
Select the security group you want to edit and click Edit on the Security Questions page. The Security Question Group dialog box appears, with a list of security questions available to be part of the group. The questions currently in the group are indicated by a check mark. Here you can edit the name of the group, add questions to the group, and select the number of questions from this group that a user must answer.
To add or remove the existing questionnaire:
Add or remove security questions and question groups from the questionnaire. Move the questions up and down in the order to be presented to the user. If the questionnaire has changed, notify the user to do re-enrollment task after logging on Storefront.
- Click Add on the Questionnaire page to add question or group to questionnaire.
- Click Remove to remove a question from the questionnaire.
- Click Move Up or Move Down to manage the questions presented to user.
To import or export the security questions:
You can import or export the data of security questions and groups.
- Click Start > All Programs > Citrix > Citrix Self-Service Password Reset Configuration.
- In the left pane, select the Identity Verification node.
-
From the Actions menu, click one of the following:
Import the security questions Specify the file location to import the data of security questions and groups.
Export the security questions Specify the file location to export the data of security questions and groups.