Configure load balancing in an existing deployment
You can add load balancing nodes using Citrix ADC in an existing Session Recording deployment. The following servers are used as an example. You can also deploy and load-balance Session Recording in Azure.
-
Session Recording
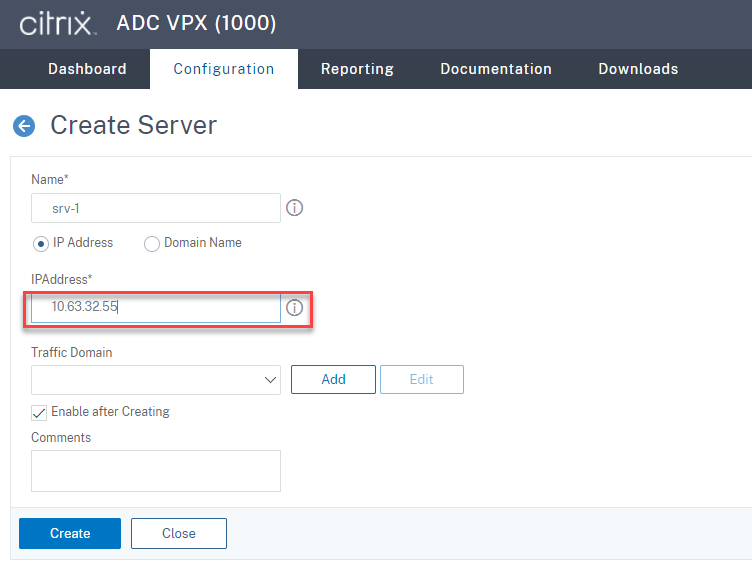
Host Name Server Role OS IP Address SRServer1 Session Recording server Windows Server 10.63.32.55 LBDC Domain controller Windows Server 10.63.32.82 TSVDA Session Recording agent Windows Server 10.63.32.215 SRSQL Session Recording database and the file server Windows Server 10.63.32.91 All Session Recording components and the domain controller share a domain, for example,
lb.com. The domain administrator account, for example, lb\administrator, is used for server logon. -
Citrix ADC
Host Name Server Role Management IP Address (NSIP) Subnet IP Address (SNIP) Netscaler Citrix ADC VPX instance 10.63.32.40 10.63.32.109 For more information, see Deploy a Citrix ADC VPX instance.
Step 1: Create shared folders on the file server
-
Log on to the file server by using a domain administrator account, for example,
lb\administrator. -
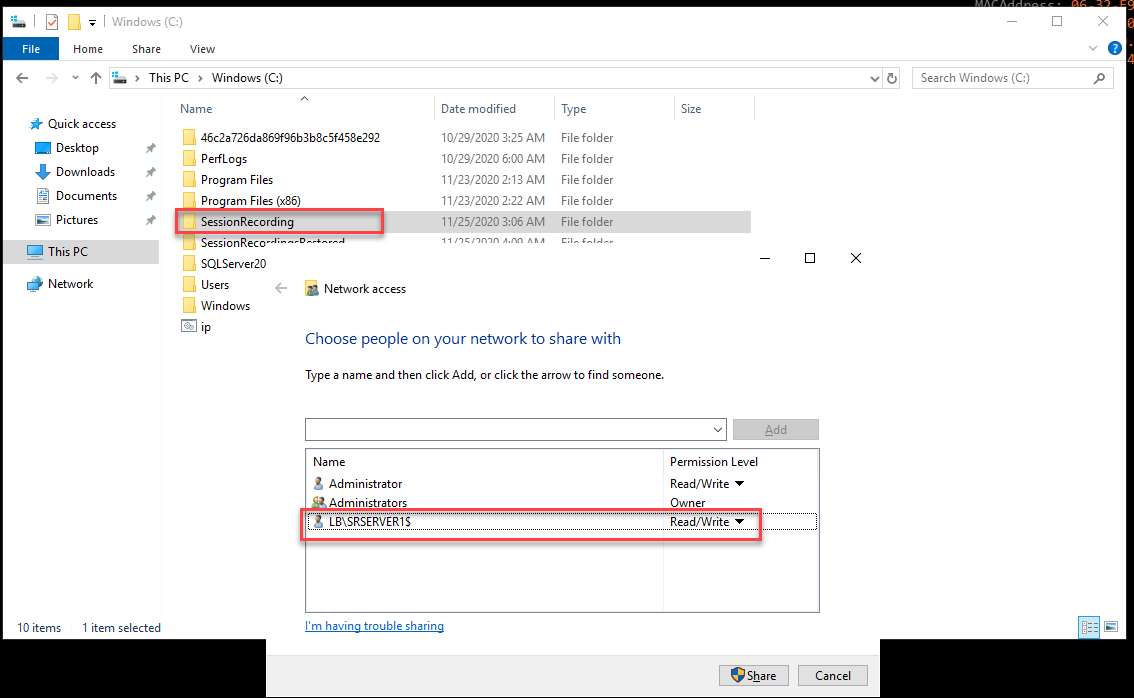
Create a folder to store recordings and name the folder
SessionRecording, for example,C:\SessionRecording. Share the Read/Write permission of the folder with a Session Recording server. UsingSRServer1as an example, typeLB\SRSERVER1$. The dollar sign$is required.
-
Create a subfolder within the
SessionRecordingfolder and name the subfoldershare, for example,C:\SessionRecording\share.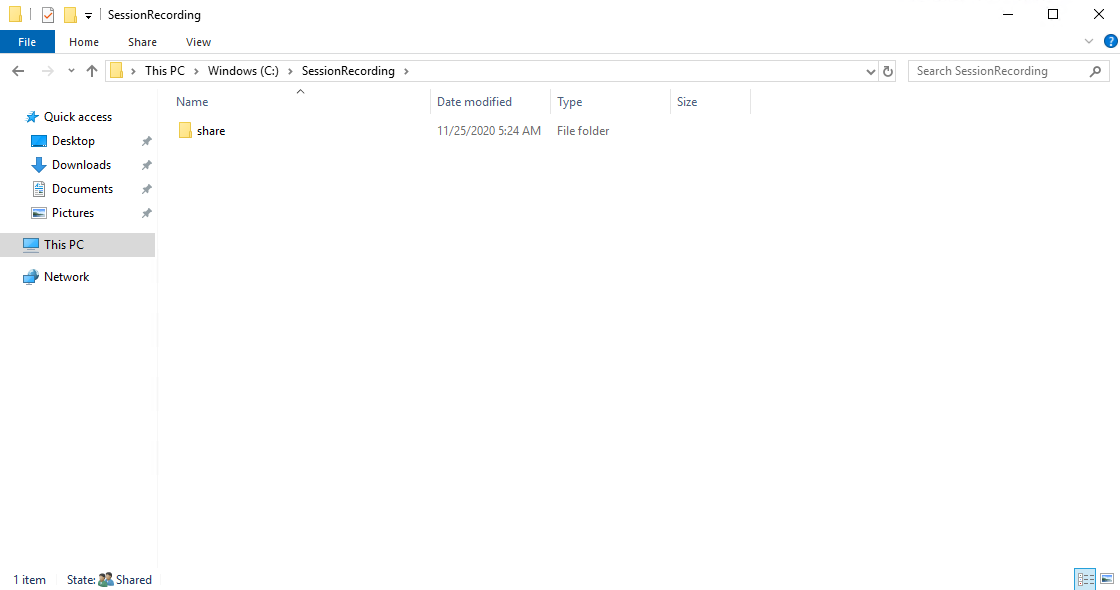
-
Create another folder to restore archived recordings and name the folder
SessionRecordingsRestored, for example,C:\ SessionRecordingsRestored. Share the Read/Write permission of the folder with a Session Recording server. UsingSRServer1as an example, typeLB\SRSERVER1$. The dollar sign$is required. -
Create a subfolder within the
SessionRecordingsRestoredfolder and name the subfoldershare, for example, C:\SessionRecordingsRestored\share.
Step 2: Configure an existing Session Recording server to support load balancing
This step describes how to configure an existing Session Recording server to support load balancing. Step 7 details the procedure of adding more Session Recording servers to your existing deployment.
-
Log on to a Session Recording server by using a domain administrator account.
-
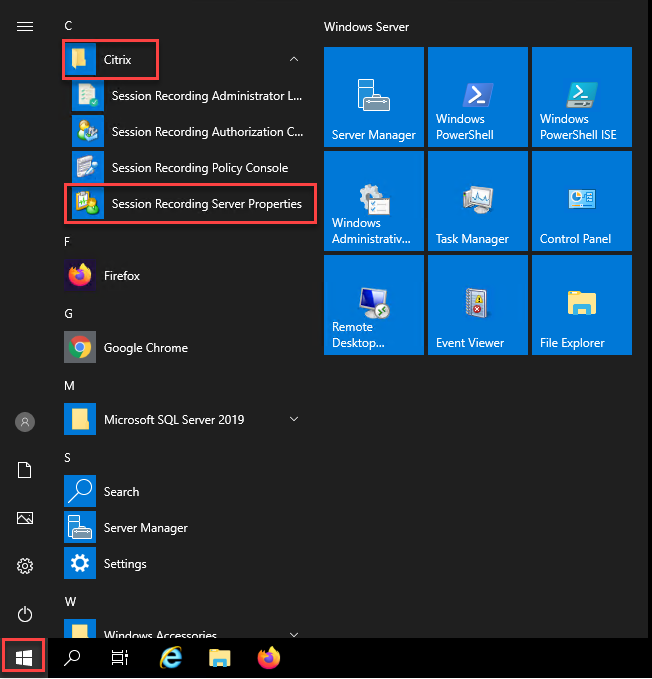
Open Session Recording Server Properties.
-
Add the Universal Naming Convention (UNC) paths created in Step 1 to store and restore recording files, in this example,
\\SRSQL\SessionRecording\shareand\\SRSQL\SessionRecordingRestored\share.SRSQLis the host name of the file server.Note:
The Session Recording player cannot play files under a path that contains a drive letter or a dollar sign (
$). The exception is that you install the player and the Session Recording server on the same machine.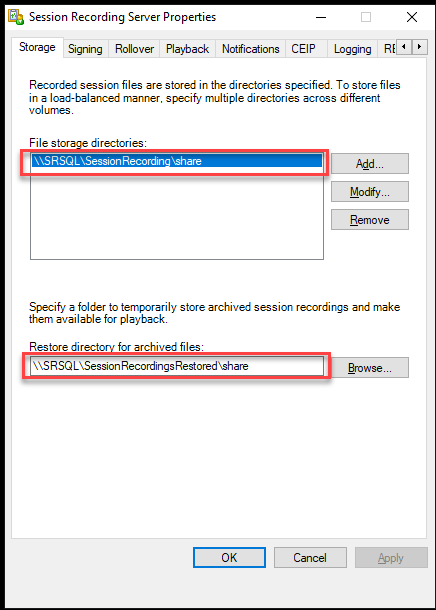
-
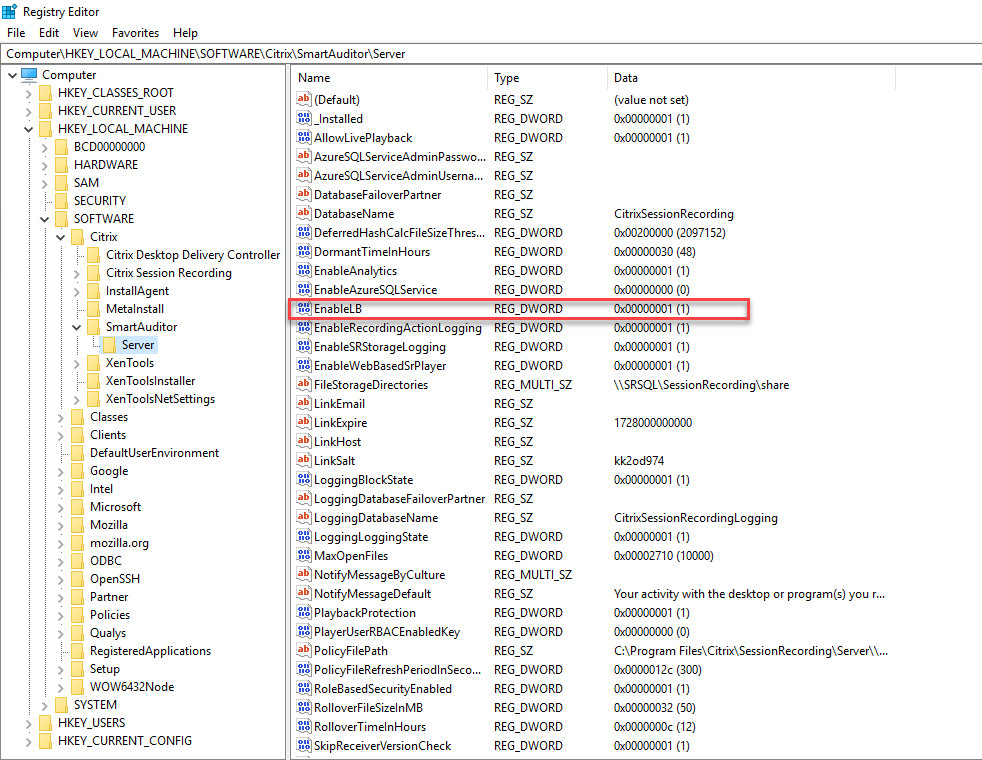
Add a value to the Session Recording server registry key at
HKEY_LOCAL_MACHINE\SOFTWARE\Citrix\SmartAuditor\Server.Value name: EnableLB Value data: 1 (D_WORD, meaning enable)
-
Restart the Citrix Session Recording Storage Manager service.
Step 3: Configure load balancing in Citrix ADC
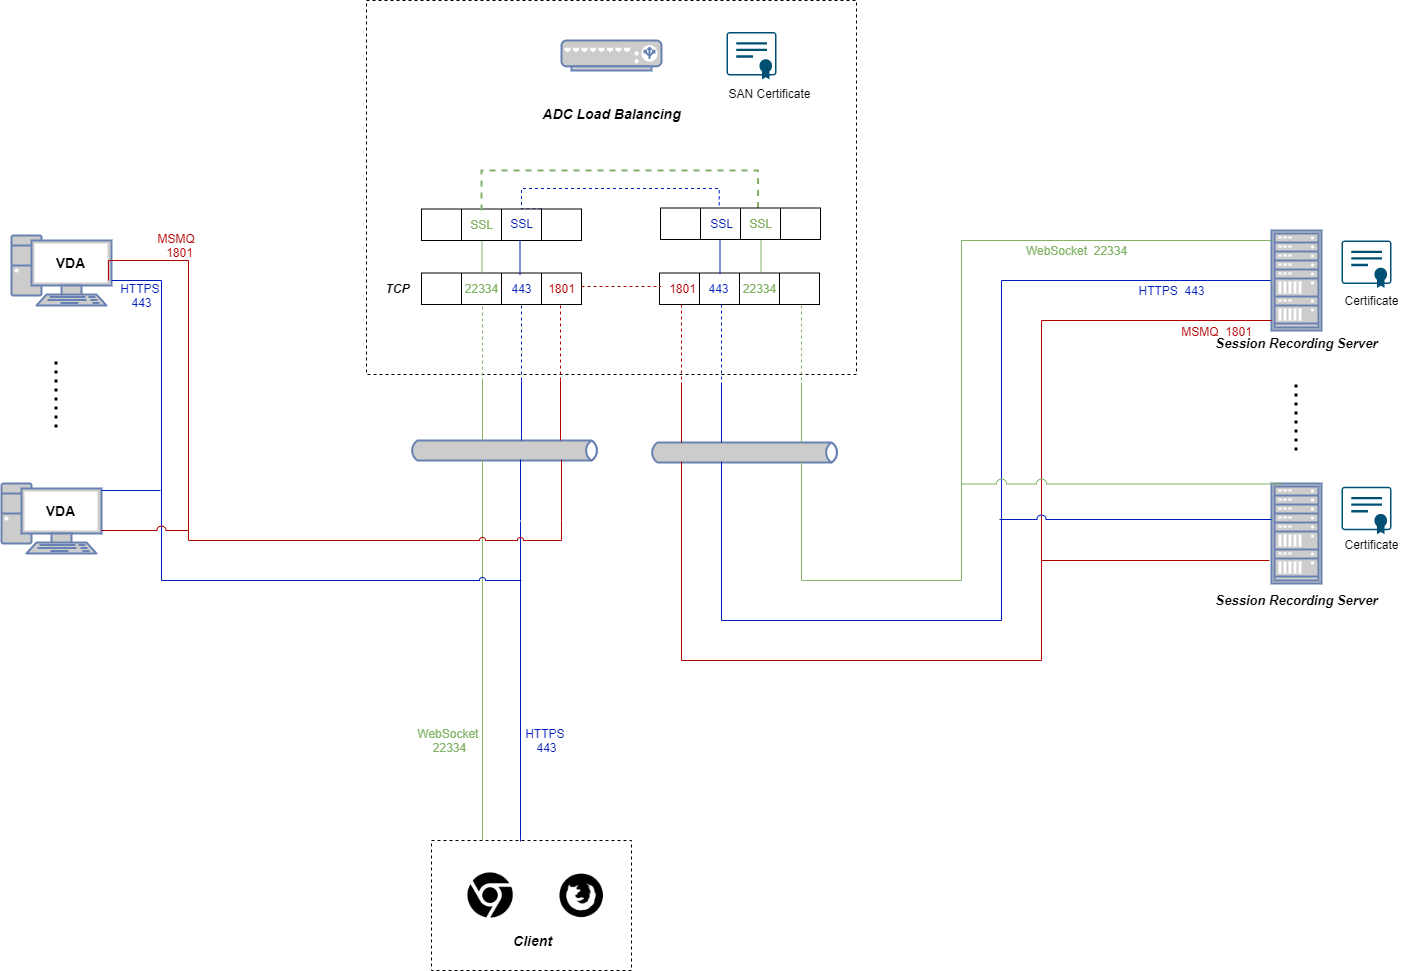
There are two ways to configure load balancing in Citrix ADC - TCP passthrough and SSL offloading.
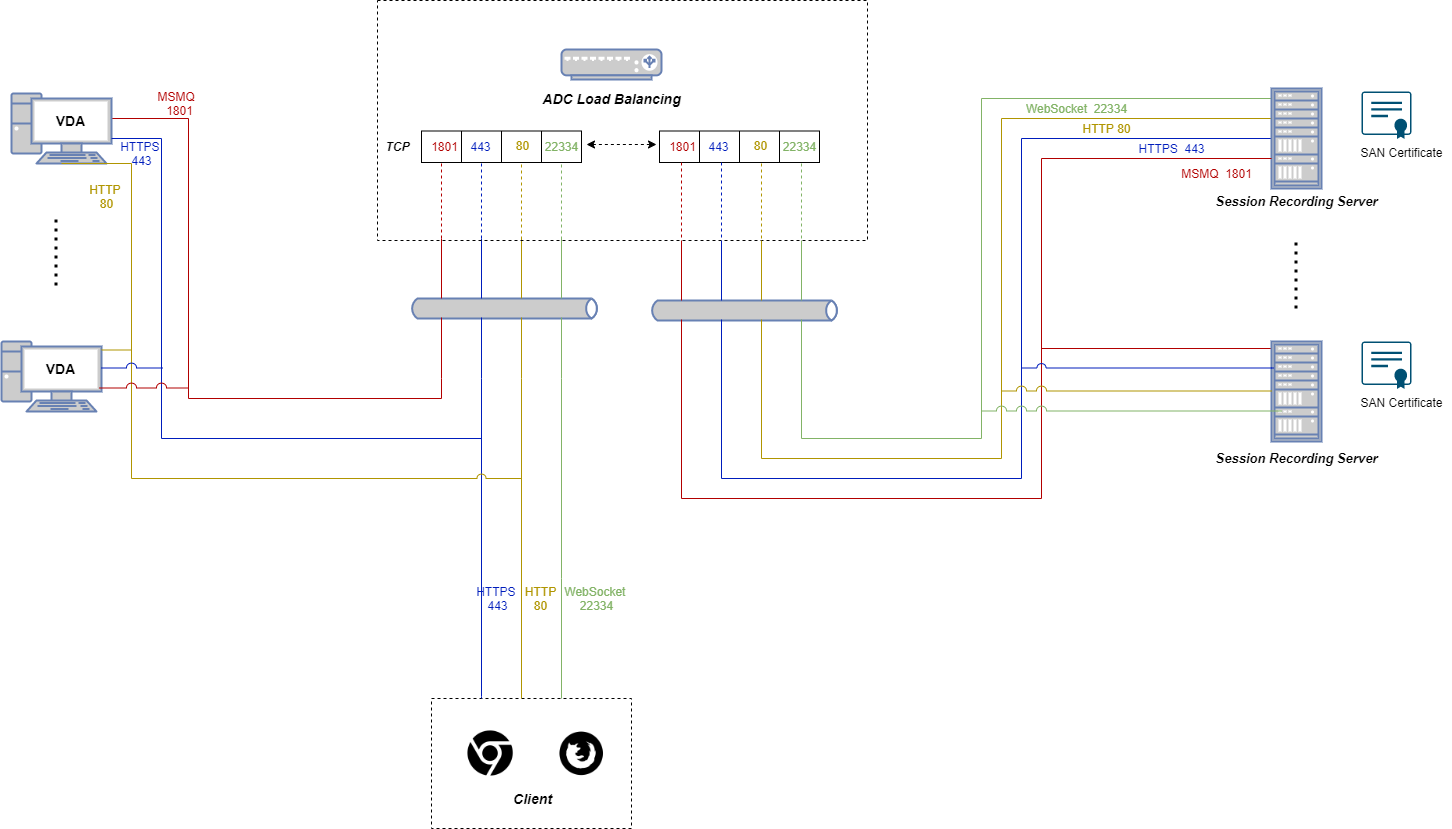
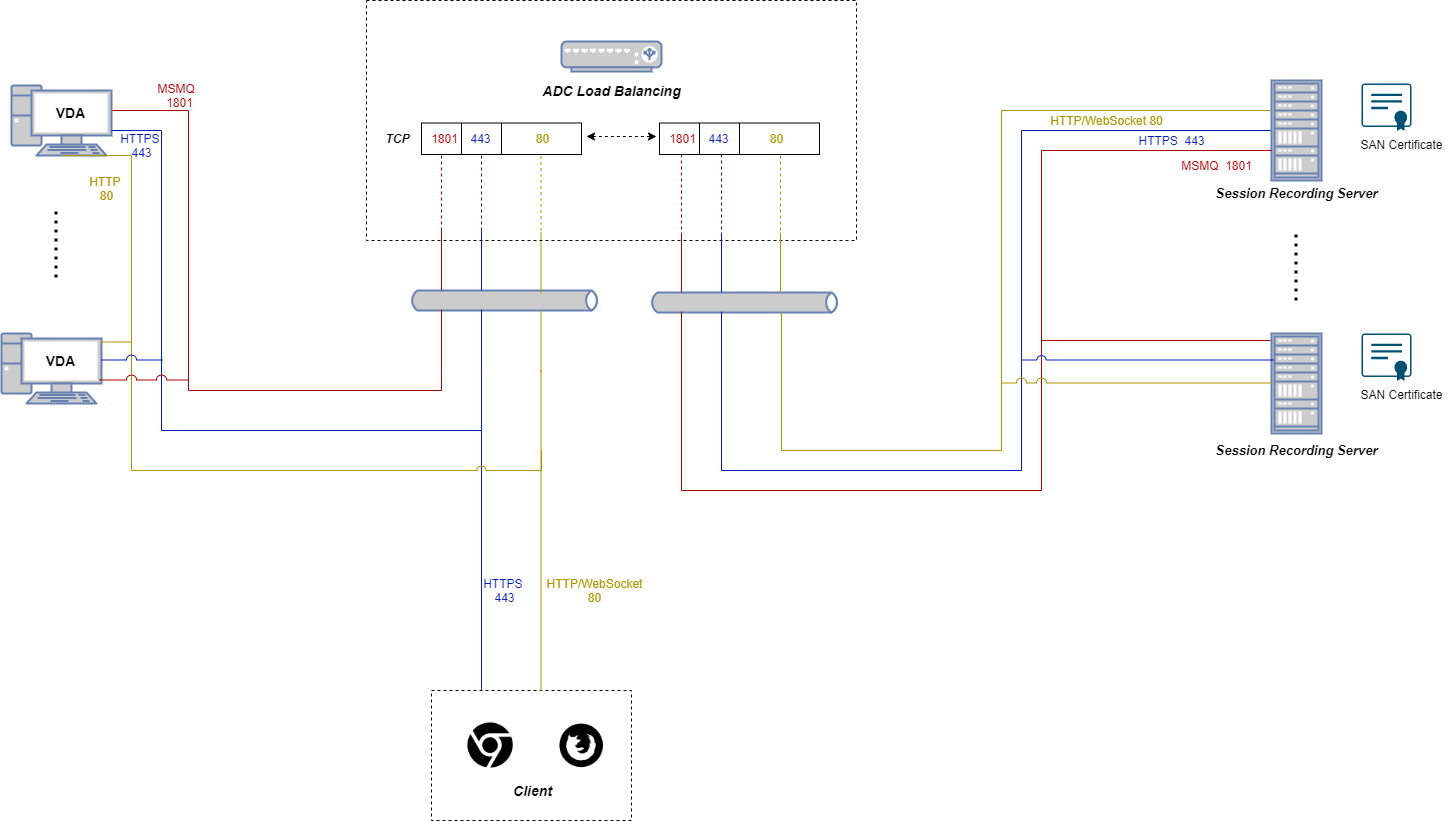
Configure load balancing through TCP passthrough
The following topologies show how to configure load balancing through TCP passthrough.
-
If you are using the Python-based WebSocket server (Version 1.0):
-
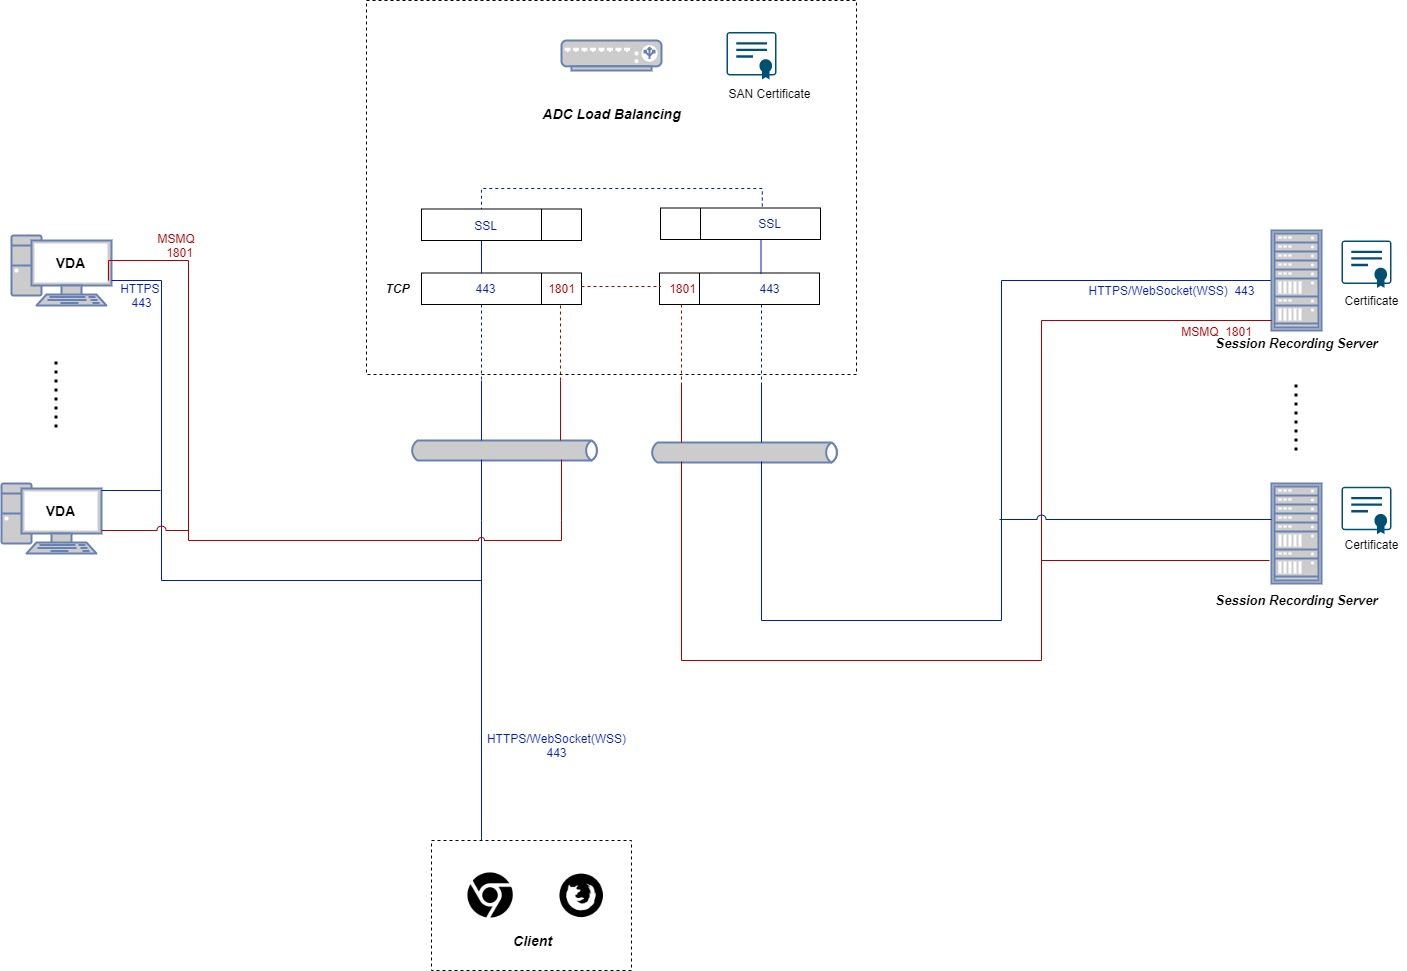
If you are using the WebSocket server hosted in IIS (Version 2.0):
To configure load balancing through TCP passthrough, complete the following steps:
-
Log on to your Citrix ADC VPX instance.
-
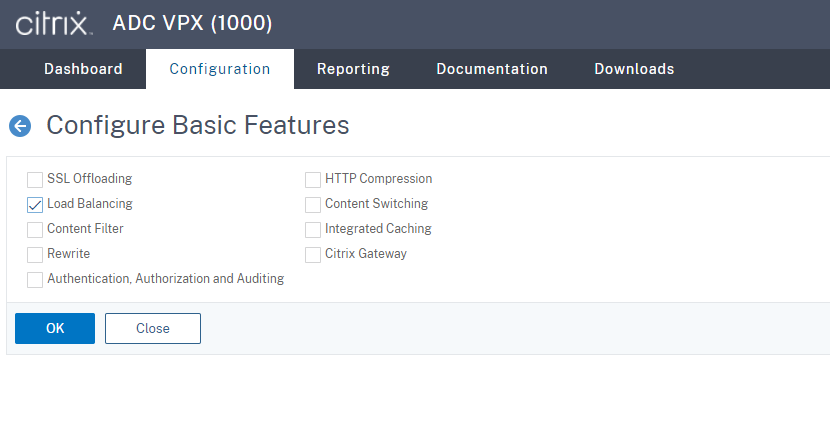
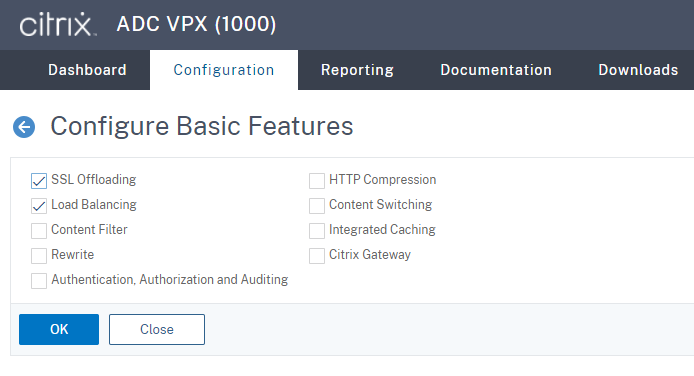
Navigate to Configuration > System > Settings > Configure Basic Features.
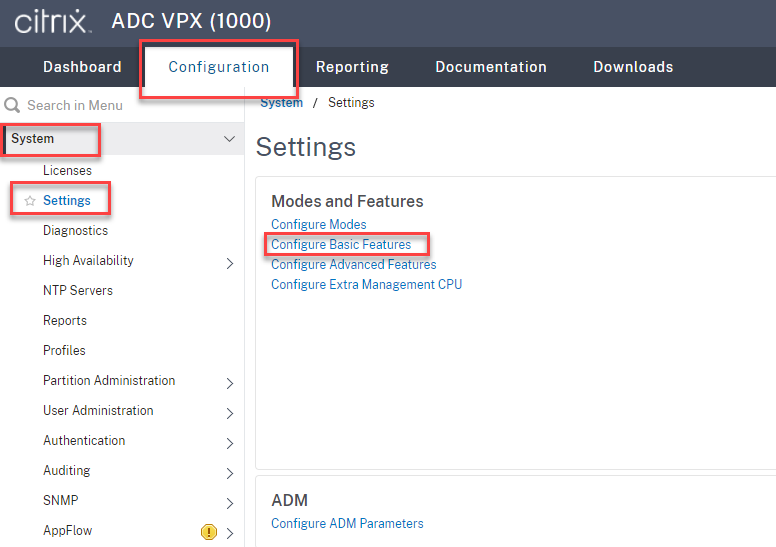
-
Select Load Balancing and click OK.
-
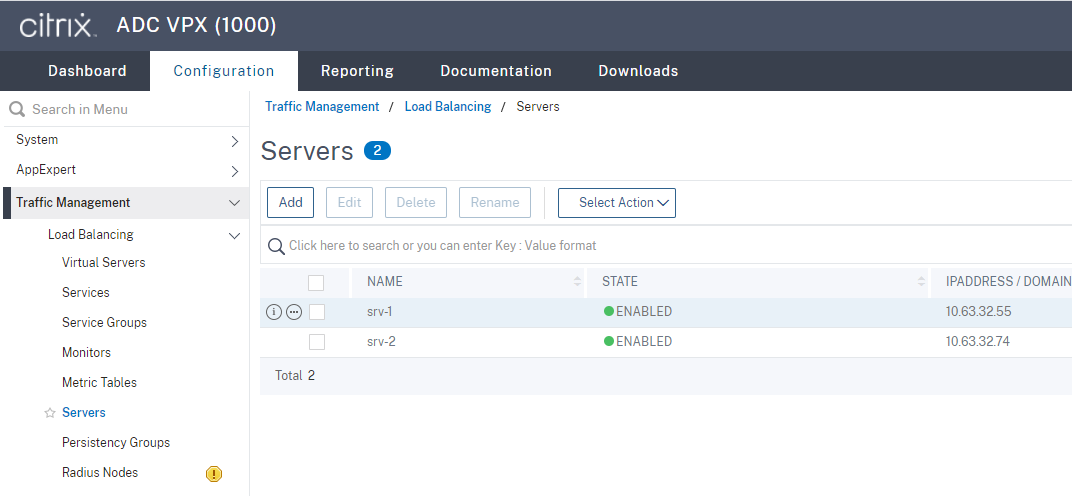
Add load balancing servers.
Navigate to Traffic Management > Load Balancing > Servers and click Add.
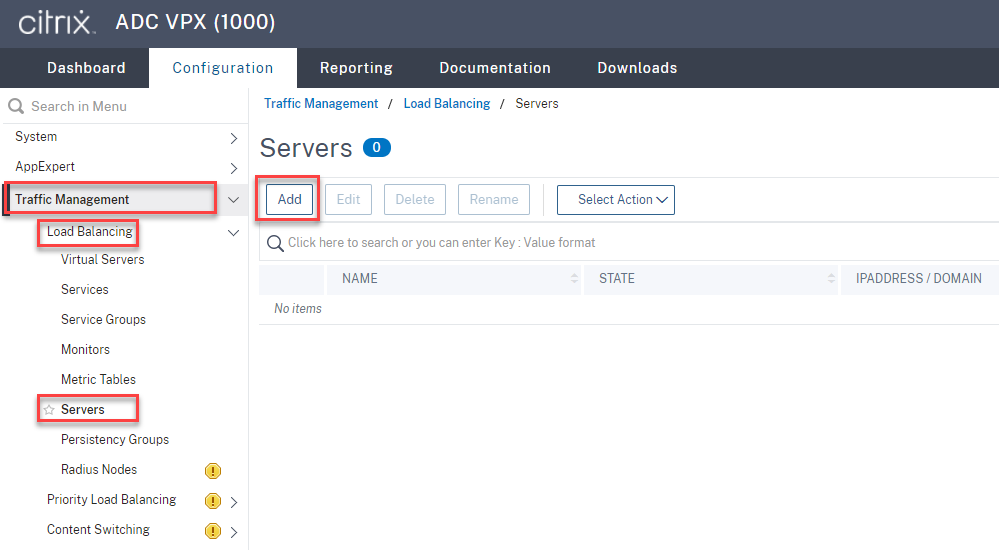
Type the name and IP address of a Session Recording server and then click Create. For example:
Click the save icon in the upper right corner to save your changes.

-
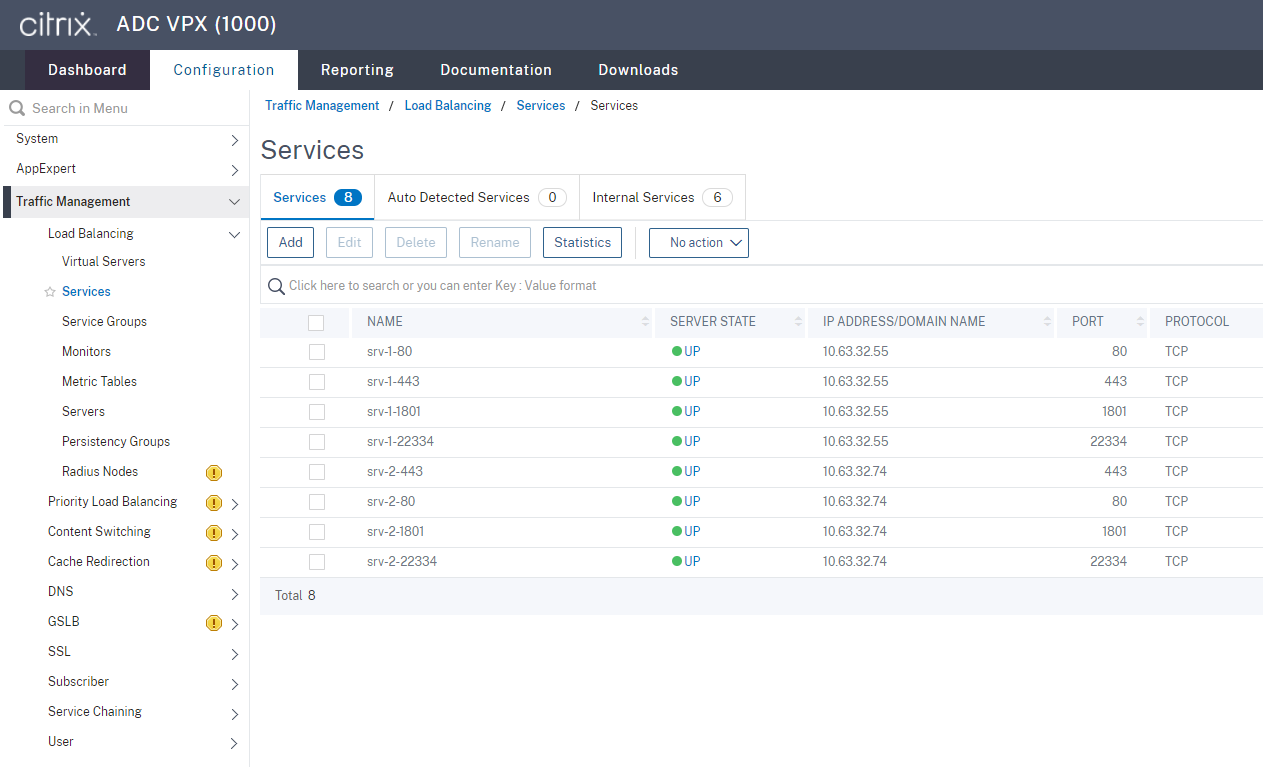
For WebSocket server Version 1.0, add load balancing services of ports 80, 1801, 22334, and 443 for each Session Recording server. For WebSocket server Version 2.0, add load balancing services of ports 80, 1801, and 443 for each Session Recording server.
Navigate to Traffic Management > Load Balancing > Services and click Add.
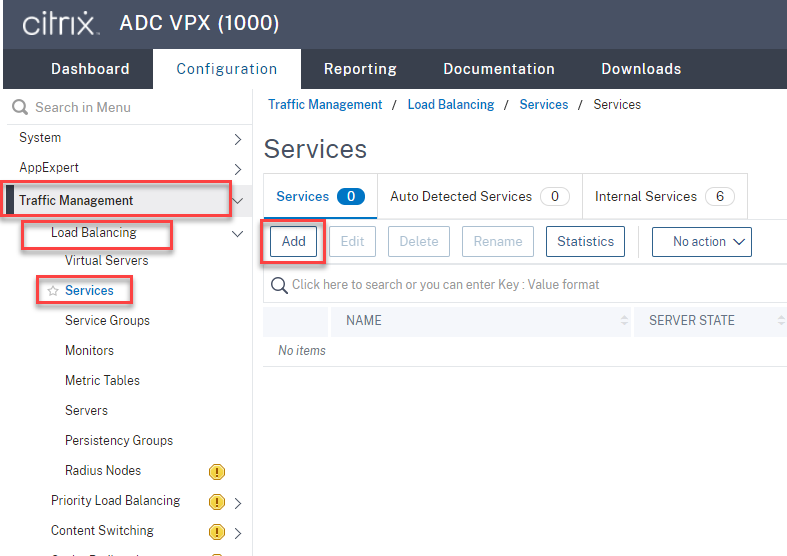
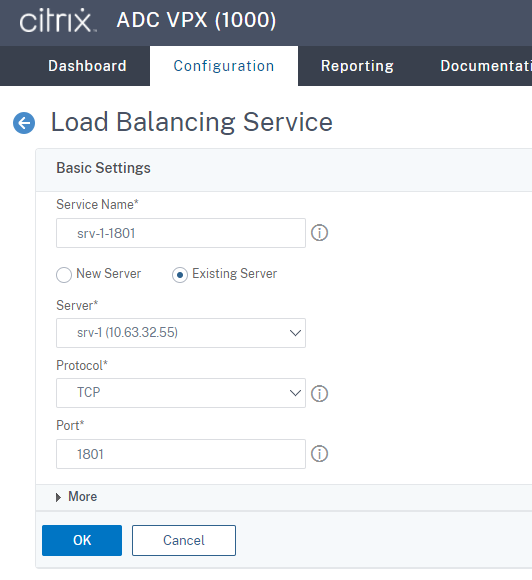
Type a name for each load balancing service that you add. Choose Existing Server, select the IP address of your target Session Recording server, select TCP as the server protocol, and type a port number. Click OK.
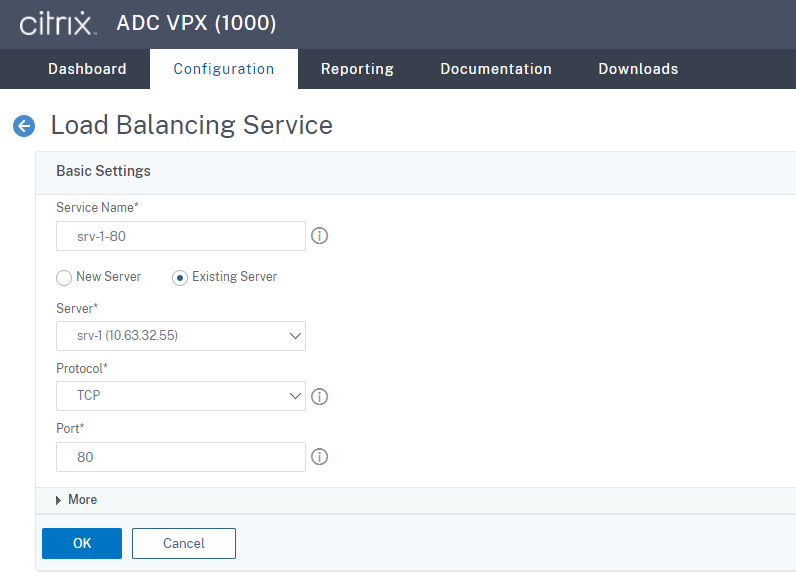
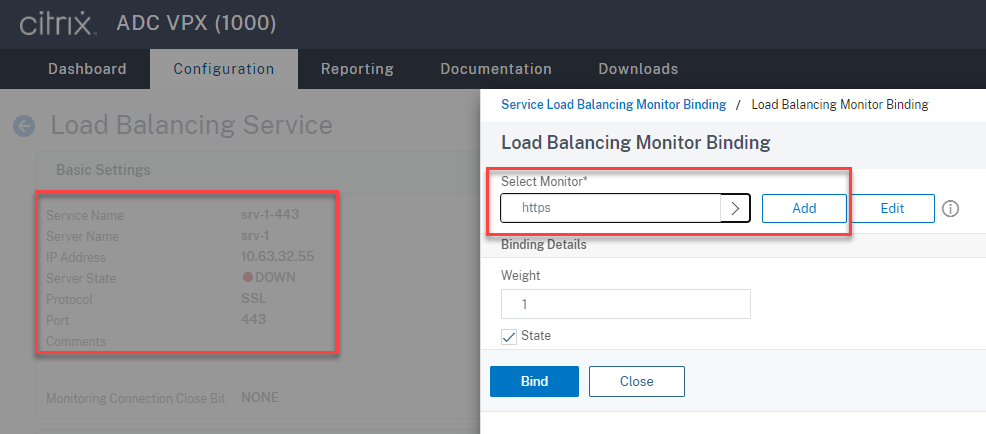
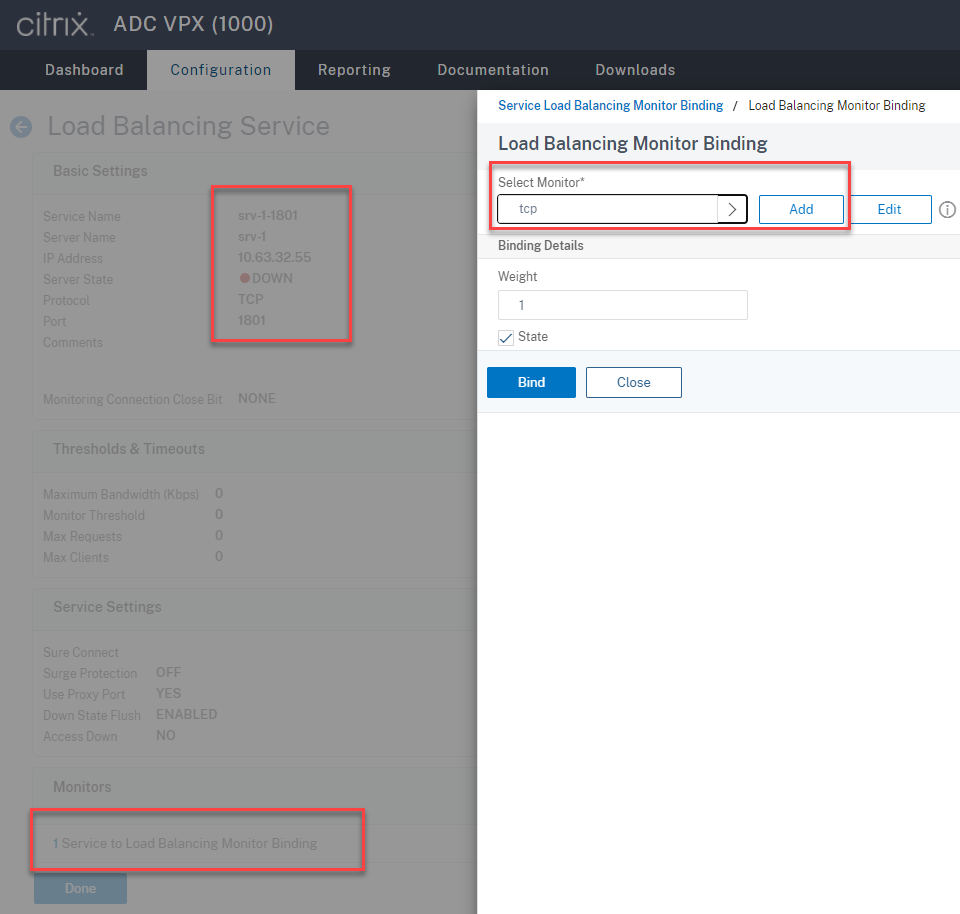
Bind the TCP protocol monitor to each load balancing service.

Click the save icon in the upper right corner to save your changes.

Tip:
The load balancing service of port 22334 is required only for WebSocket server Version 1.0.
-
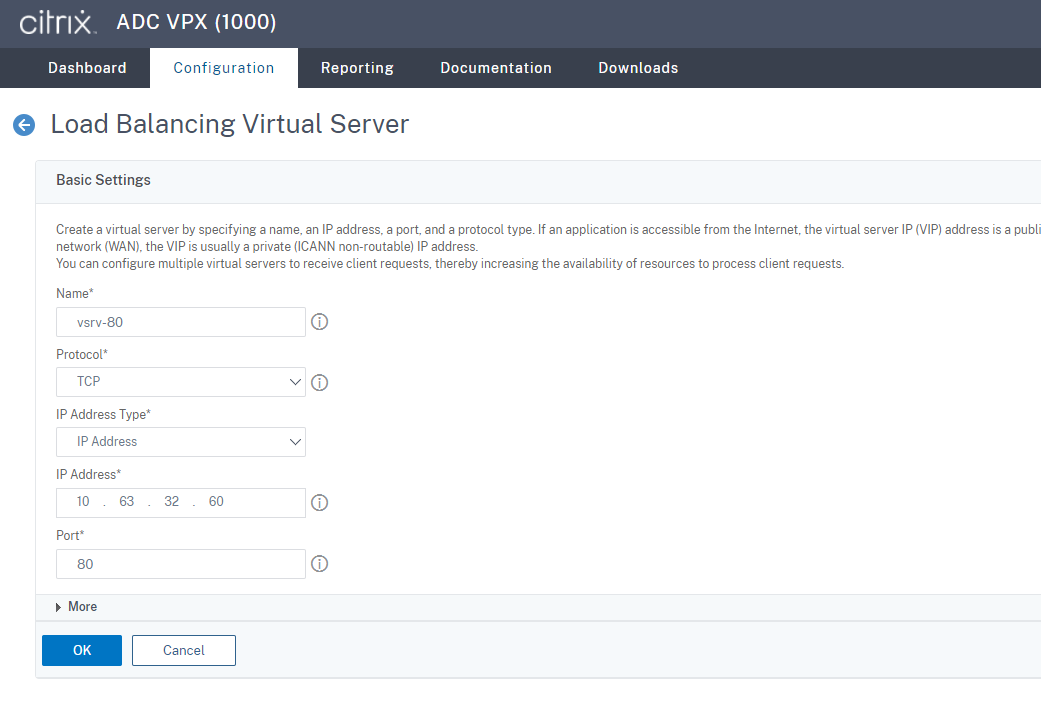
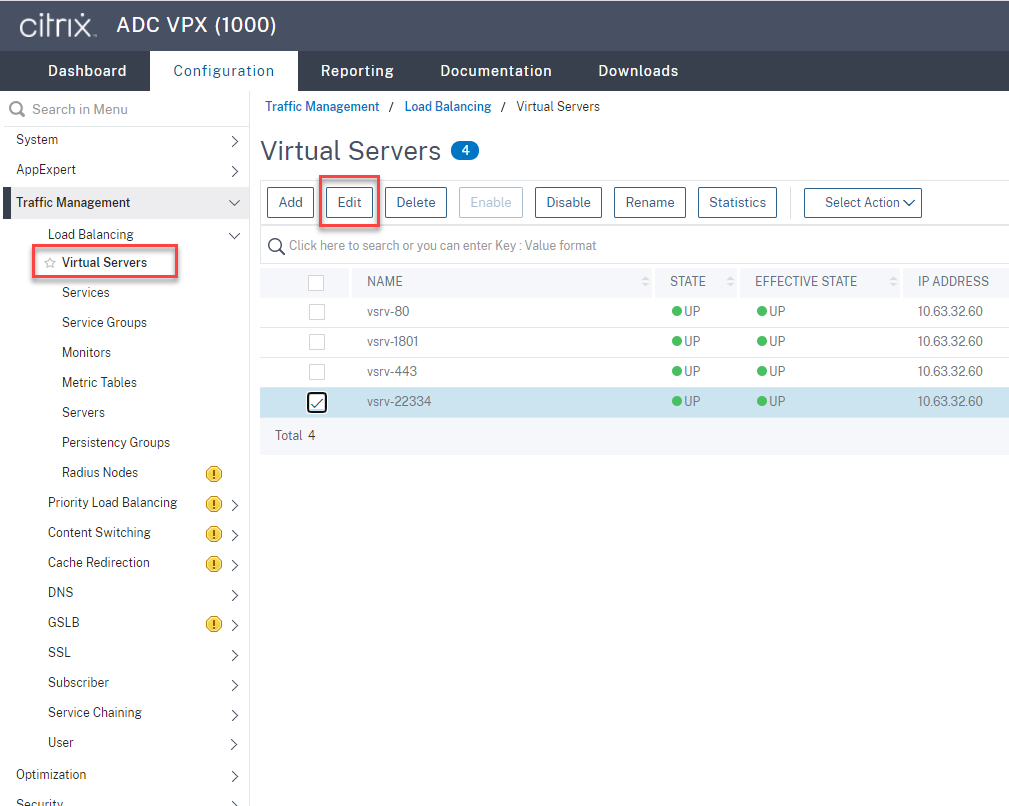
Add load balancing virtual servers.
For WebSocket server Version 1.0, complete the following steps to add load balancing virtual servers of ports 80, 443, 1801, and 22334. For WebSocket server Version 2.0, add load balancing virtual servers of ports 80, 443, and 1801. For example:

Navigate to Traffic Management > Load Balancing > Virtual Servers and click Add.
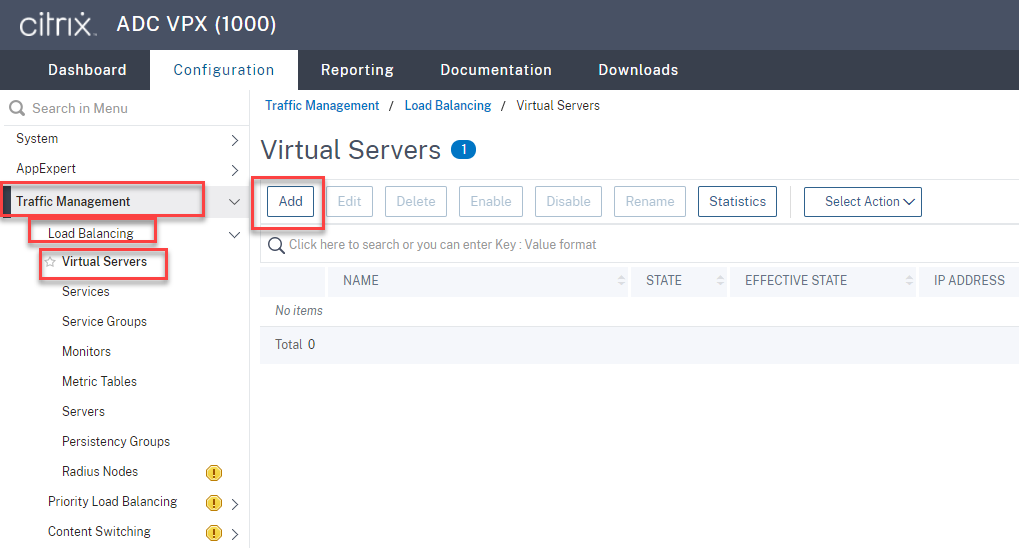
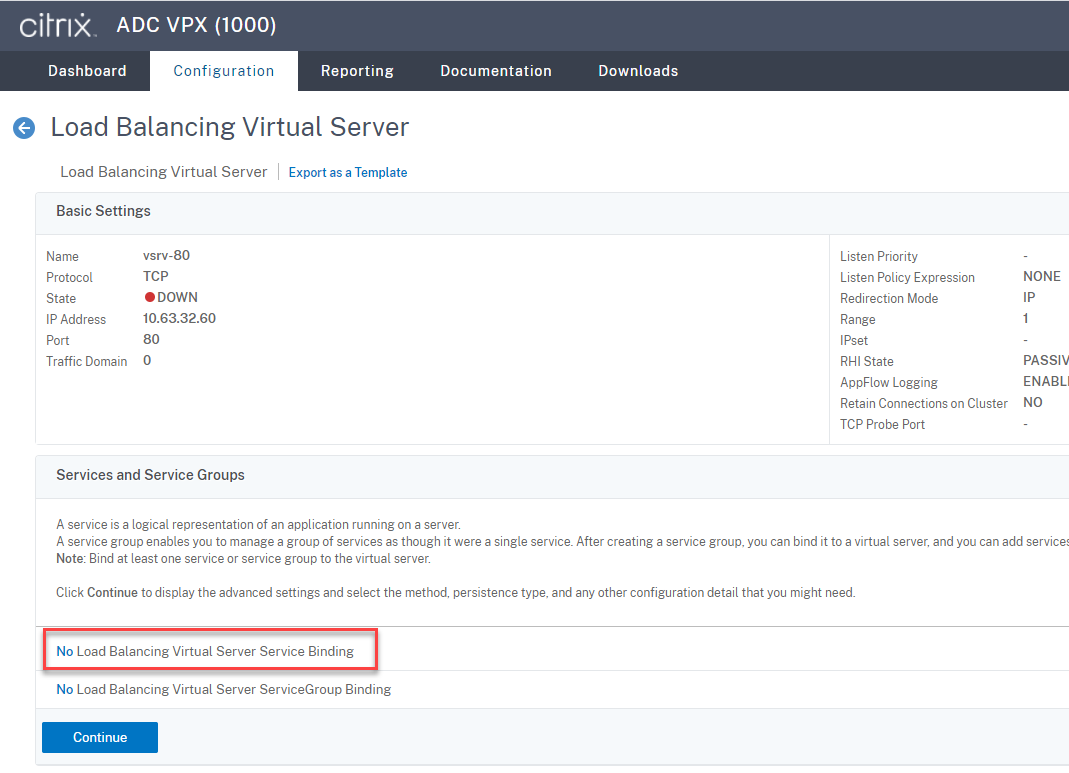
Add each virtual server with the Citrix ADC VIP address based on the TCP protocol.

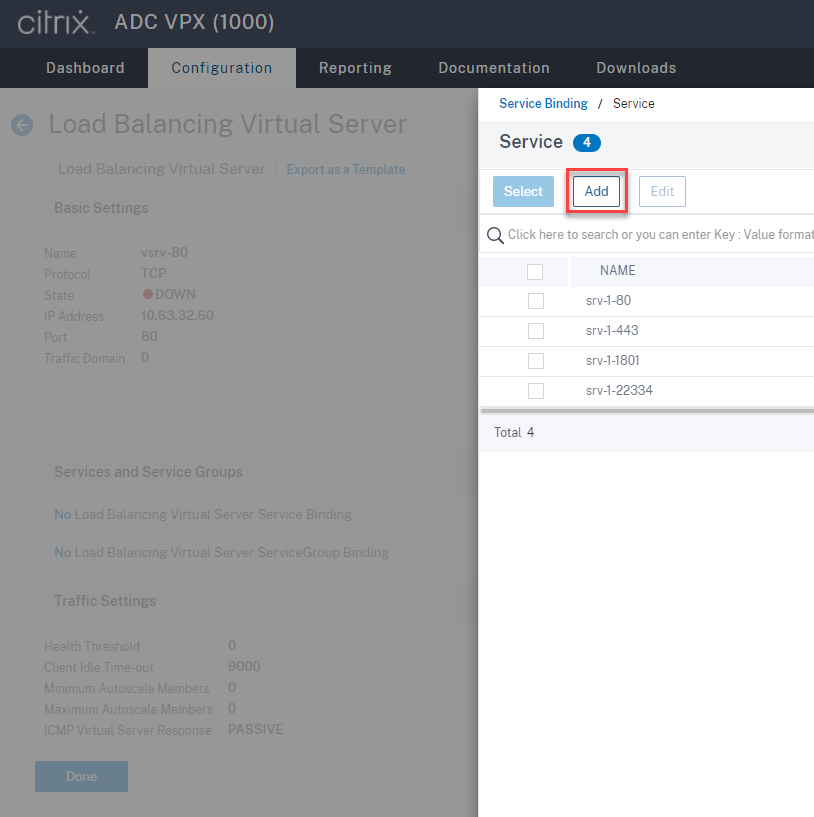
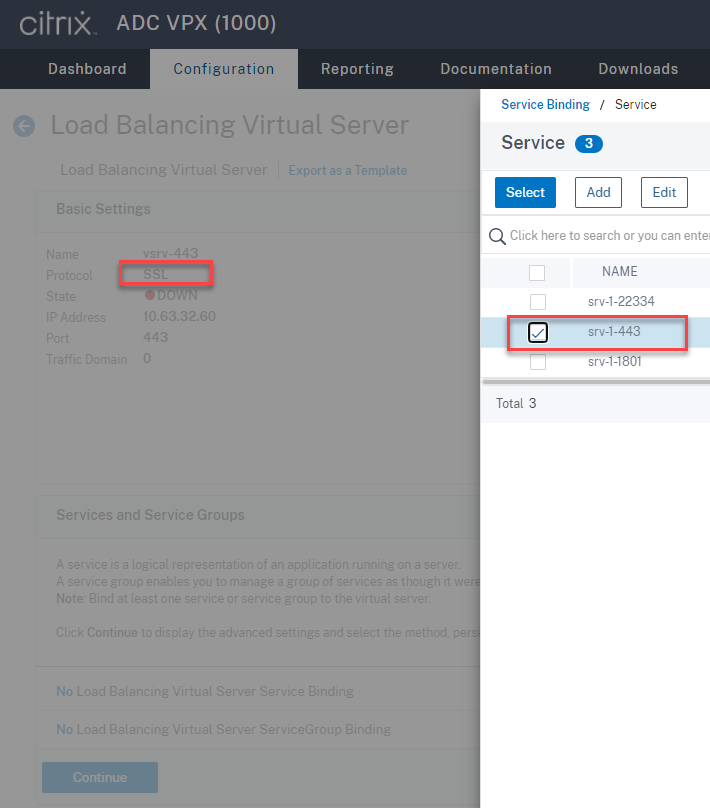
Bind each virtual server to the load balancing service of the same port. For example:
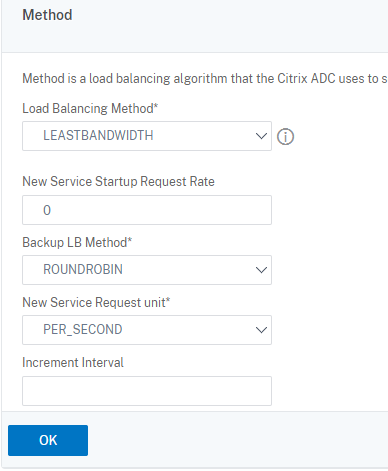
Choose a load balancing method.

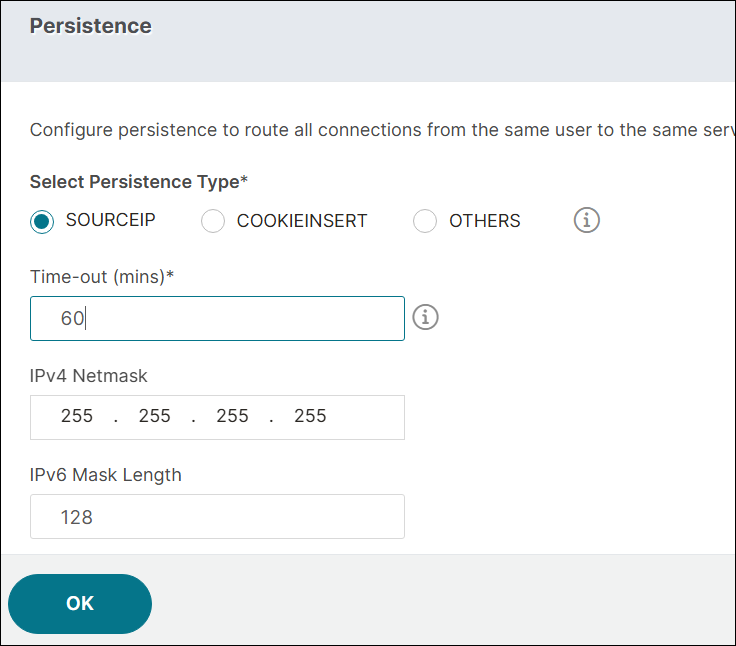
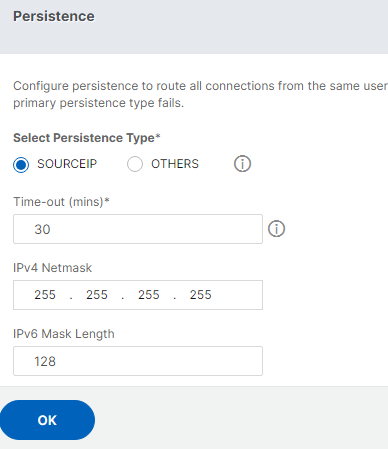
Configure persistence on each virtual server. We recommend you select SOURCEIP as the persistence type. For more information, see Persistence settings.
-
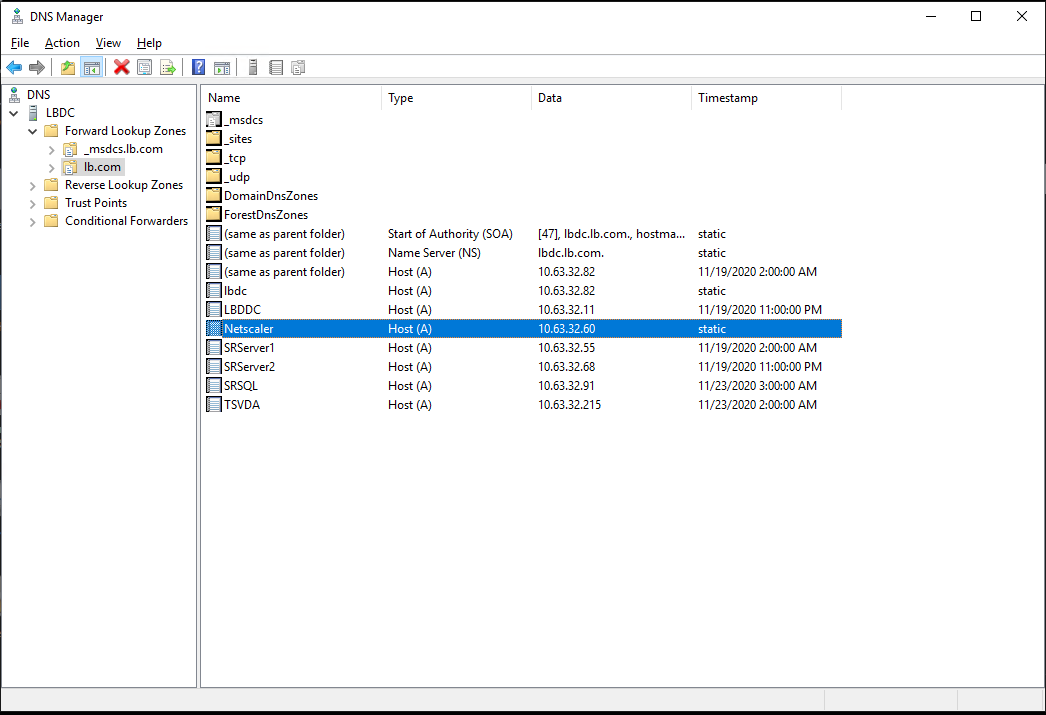
Create a host record for the Citrix ADC VIP address on the domain controller.
-
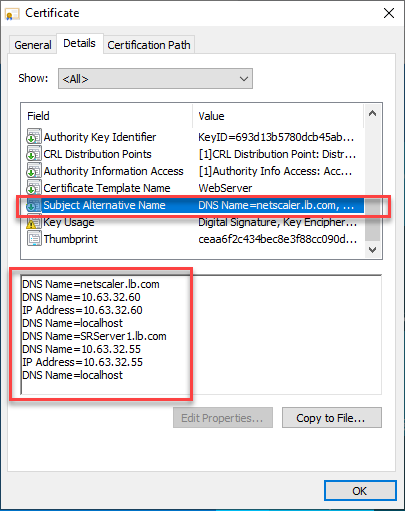
To access the web player over HTTPS, ensure that a SAN certificate is available both on Citrix ADC and on each Session Recording server. A SAN certificate contains the FQDNs of the Citrix ADC and of each Session Recording server.
Configure load balancing through SSL offloading
The following topologies show how to configure load balancing through SSL offloading.
-
If you are using the Python-based WebSocket server (Version 1.0):
-
If you are using the WebSocket server hosted in IIS (Version 2.0):
-
Log on to your Citrix ADC VPX instance.
-
Navigate to Configuration > System > Settings > Configure Basic Features.
-
Select SSL Offloading and Load Balancing and click OK.
-
Add load balancing servers.
Navigate to Traffic Management > Load Balancing > Servers and click Add.
Type the name and IP address of a Session Recording server and then click Create. For example:
Click the save icon in the upper right corner to save your changes.
-
Add load balancing services for each Session Recording server that you added in the previous step.
Add the following load balancing services for each Session Recording server:
- (Required only when you are using the WebSocket server Version 1.0) SSL load balancing service of port 22334 that binds to the TCP monitor
- SSL load balancing service of port 443 that binds to the HTTPS monitor
- TCP load balancing service of port 1801 that binds to the TCP monitor
For example:

Navigate to Traffic Management > Load Balancing > Services and click Add.
(Required only when you are using the WebSocket server Version 1.0) Add an SSL load balancing service of port 22334 for each Session Recording server. Type a name for the load balancing service, choose Existing Server, select the IP address of a Session Recording server, select SSL as the server protocol, type port number 22334, and click OK.
For example, see the following screen capture.
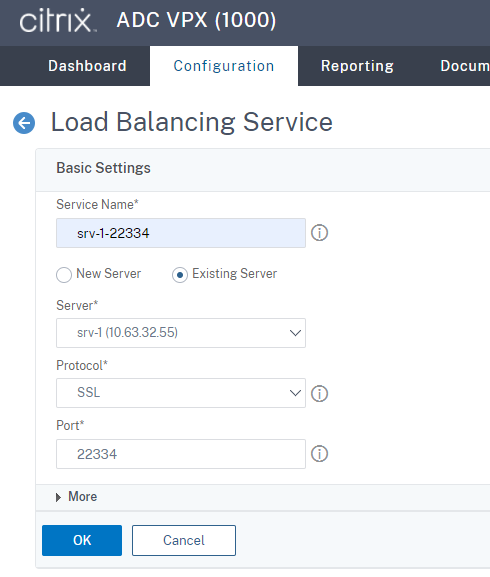
Bind the TCP monitor to the SSL load balancing service you just added.

Add an SSL load balancing service of port 443 for each Session Recording server. Type a name for the load balancing service, choose Existing Server, select the IP address of a Session Recording server, select SSL as the server protocol, type port number 443, and click OK.
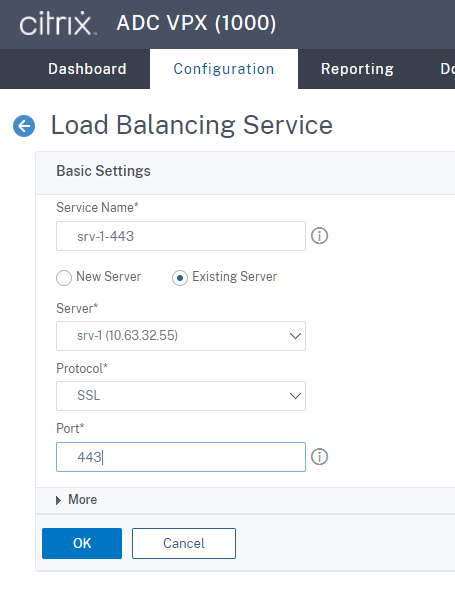
Bind the HTTPS monitor to the SSL load balancing service you just added.
Add a TCP load balancing service of port 1801 for each Session Recording Server. Type a name for the load balancing service, choose Existing Server, select the IP address of a Session Recording server, select TCP as the server protocol, type port number 1801, and click OK.
Bind the TCP monitor to the TCP load balancing service you just added.
-
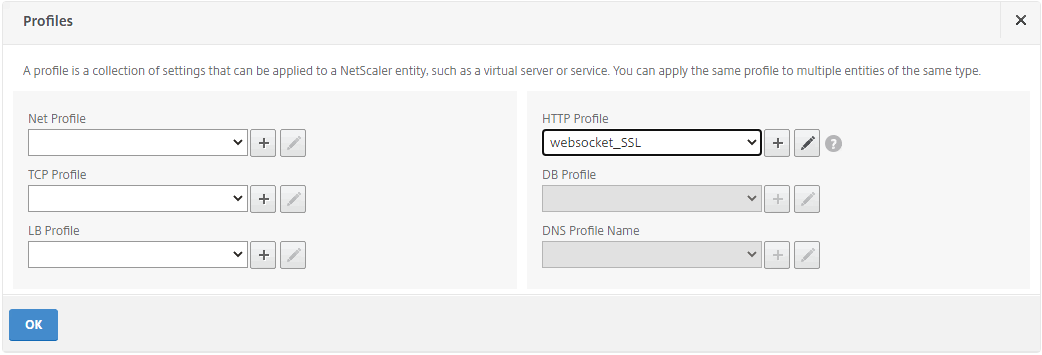
(Required only when you are using the WebSocket server Version 1.0) Add an HTTP profile for each SSL load balancing service of port 22334.
Navigate to System > Profiles > HTTP Profiles and click Add.
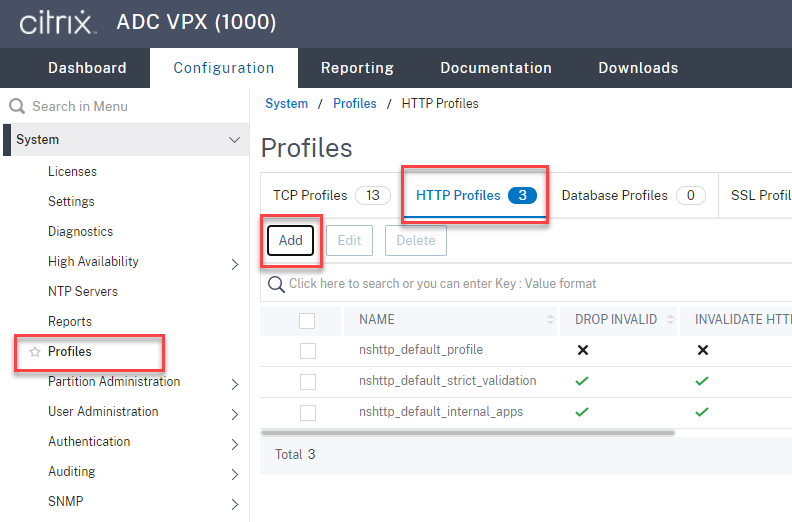
Select the Enable WebSocket connections check box and accept the other default settings.
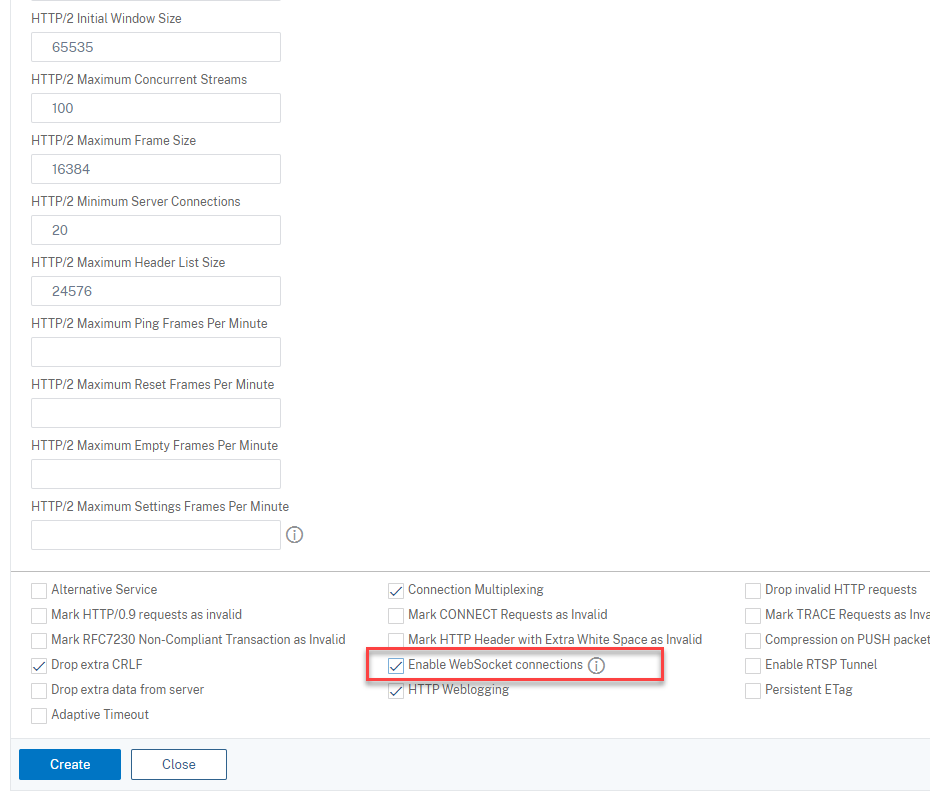
Type a name for the HTTP profile, for example,
websocket_SSL.Go back to each SSL load balancing service of port 22334, for example,
srv-1-22334. Click + Profiles.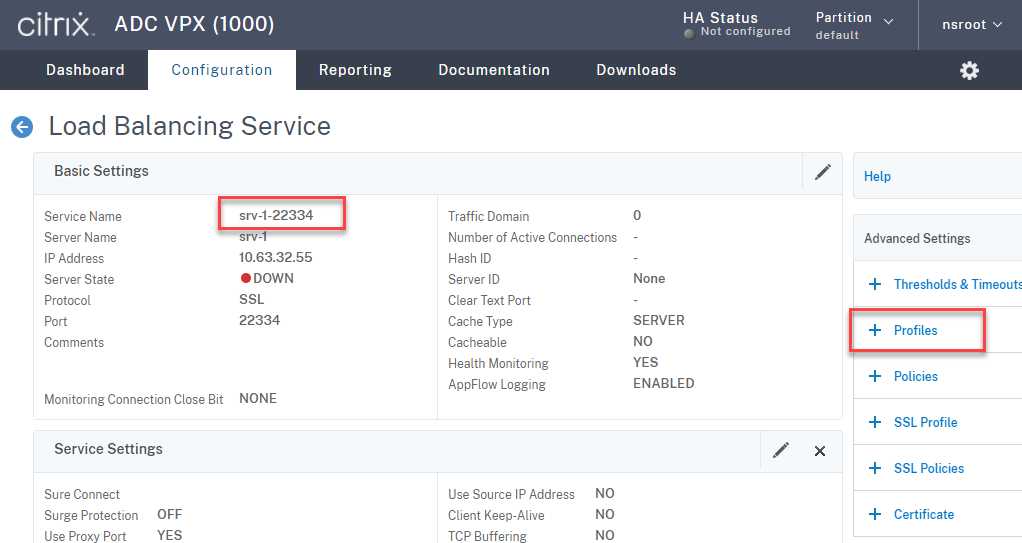
Select the HTTP profile, for example,
websocket_SSL, and click OK and then Done.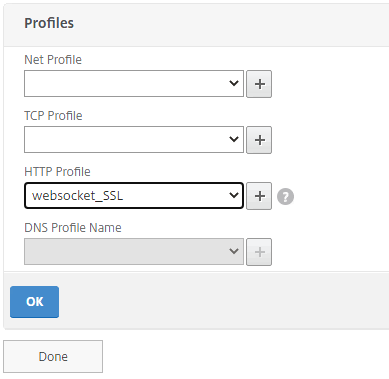
-
(Required only when you are using the WebSocket server Version 2.0) Add an HTTP profile for each SSL load balancing service of port 443.
-
Create a host record for the Citrix ADC VIP address on the domain controller.

-
Add load balancing virtual servers.
Add the following load balancing virtual servers with the Citrix ADC VIP address.
- (Required only when you are using the WebSocket server Version 1.0) load balancing virtual server of port 22334 based on SSL
- load balancing virtual server of port 443 based on SSL
- load balancing virtual server of port 1801 based on TCP
For example, see the following screen capture.
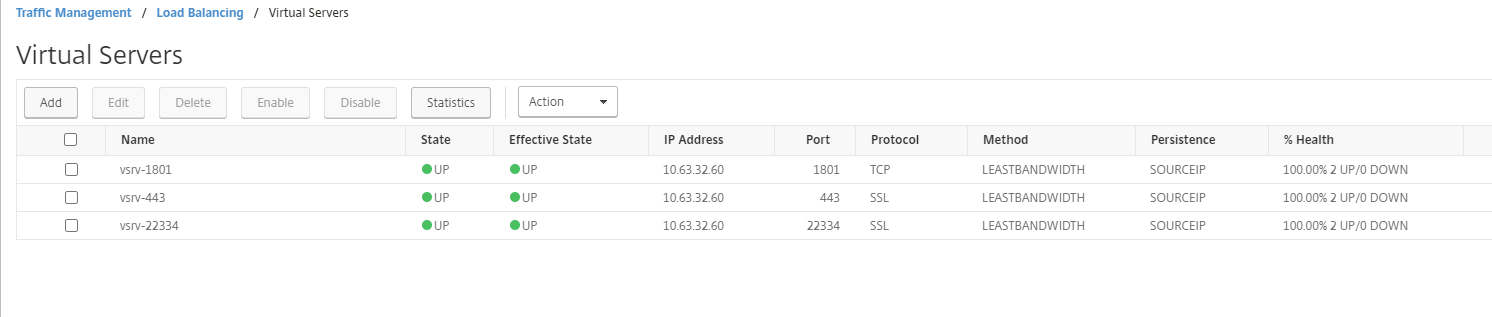
Navigate to Traffic Management > Load Balancing > Virtual Servers and click Add.
Add each virtual server with the Citrix ADC VIP address. Type a server name, select TCP or SSL, and select the relevant port number as described earlier.
Bind each virtual server to the load balancing service of the same port. For example:
Tip:
The load balancing service of port 22334 is required only when you are using the WebSocket server Version 1.0.
Choose a load balancing method.
Configure persistence on each virtual server. We recommend you select SOURCEIP as the persistence type. For more information, see Persistence settings.
(Required only when you are using the WebSocket server Version 1.0) Add an HTTP profile for the load balancing virtual server of port 22334.
-
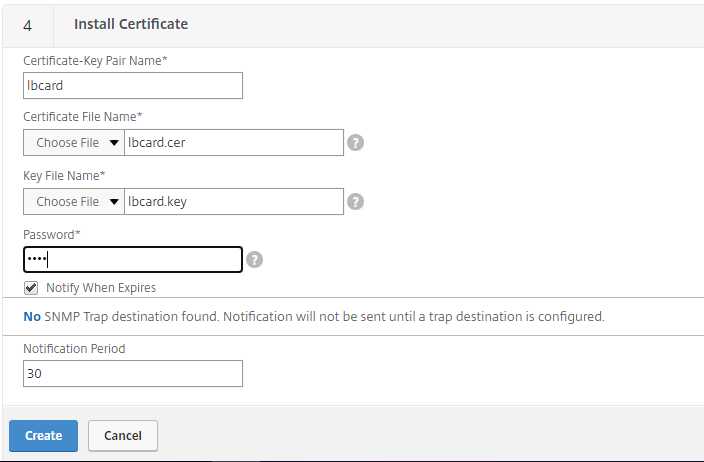
Install a Subject Alternative Name (SAN) certificate in Citrix ADC.
Obtain a SAN certificate in PEM format from a trusted Certificate Authority (CA). Extract and upload the certificate and private key files in Citrix ADC by navigating to Traffic Management > SSL > Server Certificate Wizard.
For more information, see SSL certificates.
-
Bind a SAN certificate to each SSL load balancing virtual server.
Navigate to Traffic Management > Load Balancing > Virtual Servers, select an SSL load balancing virtual server, and click Server Certificate.
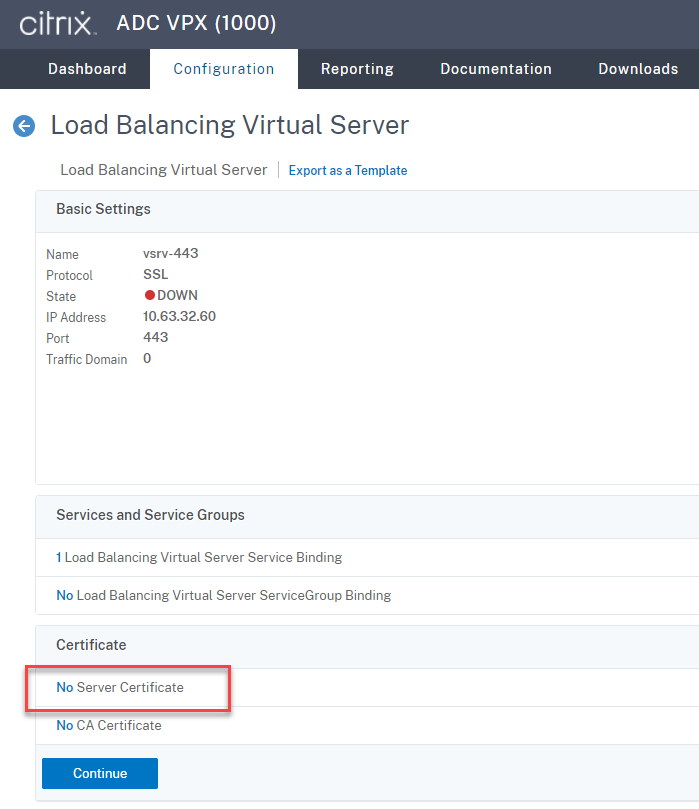
Add the previously mentioned SAN certificate and click Bind.
Step 4: Configure an existing Session Recording agent to support load balancing
-
Log on to the Session Recording agent by using a domain administrator account.
-
Open Session Recording Agent Properties.
-
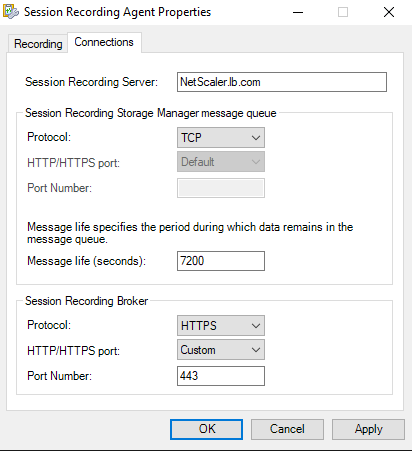
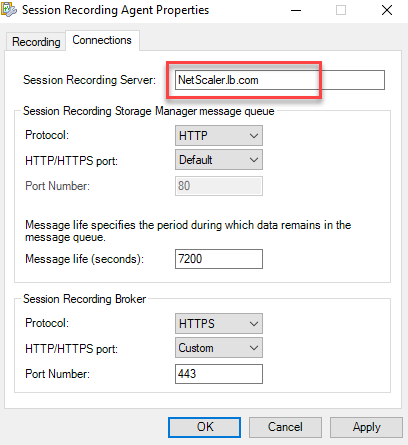
Complete this step if you use Microsoft Message Queuing (MSMQ) over TCP.
Type your Citrix ADC VIP address or FQDN in the Session Recording Server box.
On each Session Recording server, add and set the
IgnoreOSNameValidationDWORD value to1underHKEY_LOCAL_MACHINE\ SOFTWARE\Microsoft\MSMQ\Parameters. -
Complete this step if you use MSMQ over HTTP or HTTPS.
(Skip if this step is done) Create a host record for the Citrix ADC VIP address on the domain controller.

On each Session Recording server, run the
powershell.exe -file SrServerConfigurationSync.ps1 –Action AddRedirection – ADCHost <ADCHost>command to add redirections from Citrix ADC to the local host.<ADCHost>is the FQDN of the Citrix ADC VIP address. A redirection file, for example,sr_lb_map.xmlis generated underC:\Windows\System32\msmq\Mapping.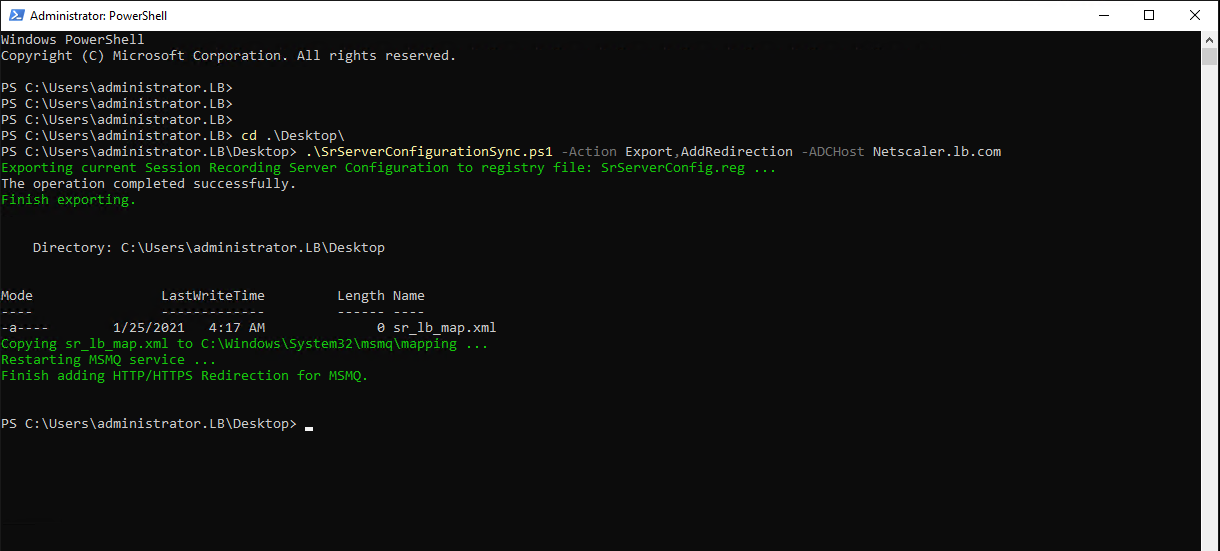
Note: Change to the folder where
SrServerConfigurationSync.ps1resides when you run PowerShell.exe.Type the FQDN of your Citrix ADC VIP address in the Session Recording Server box. For example:
Step 5: Configure an existing Session Recording player to support load balancing
On each machine where you installed the Session Recording player component, add the Citrix ADC VIP address or its FQDN as the connected Session Recording server.
Step 6: Check whether load balancing works for the configured, existing Session Recording server
- Launch a Citrix virtual session.
- Check whether the session can be recorded.
- Check whether the web player and the Session Recording player can play back the recording file.
Step 7: Add more Session Recording servers
-
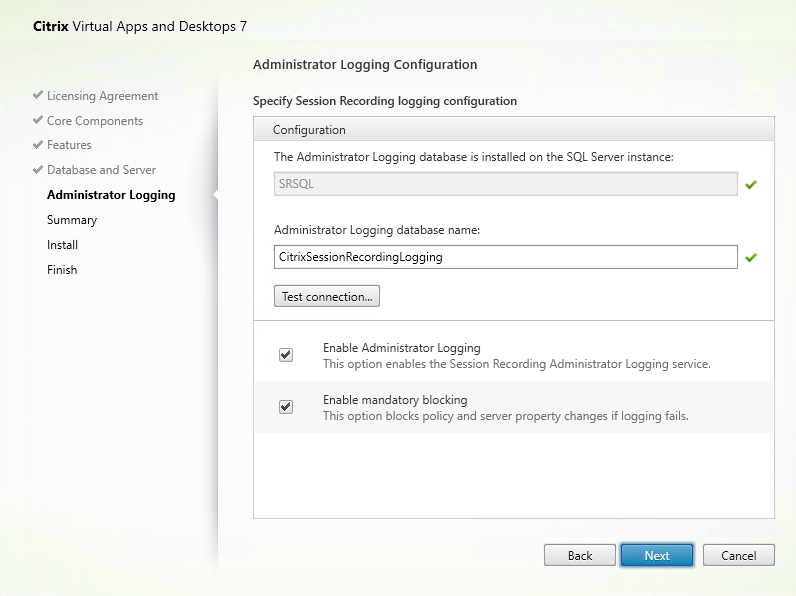
Prepare a machine in the same domain and install the Session Recording server, database, and administrator logging modules on the machine.
Note:
The Session Recording administrator logging is an optional subfeature of the Session Recording server. Select the Session Recording server before you can select the Session Recording administrator logging. The Session Recording database is a mandatory subfeature of the Session Recording server. When the Session Recording server is selected for installation, the Session Recording database is also selected automatically and cannot be unselected.

-
Use the same database names as the existing Session Recording server. For example:
-
Disable the network firewall on the machine.
-
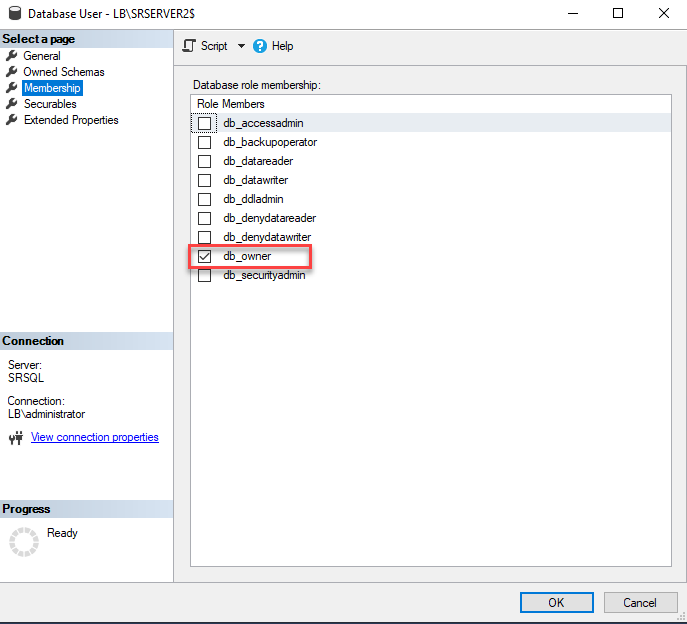
On the SQL Server where you installed the Session Recording database, add all the Session Recording server machine accounts to the shared Session Recording database and assign them with the
db_ownerpermission. For example: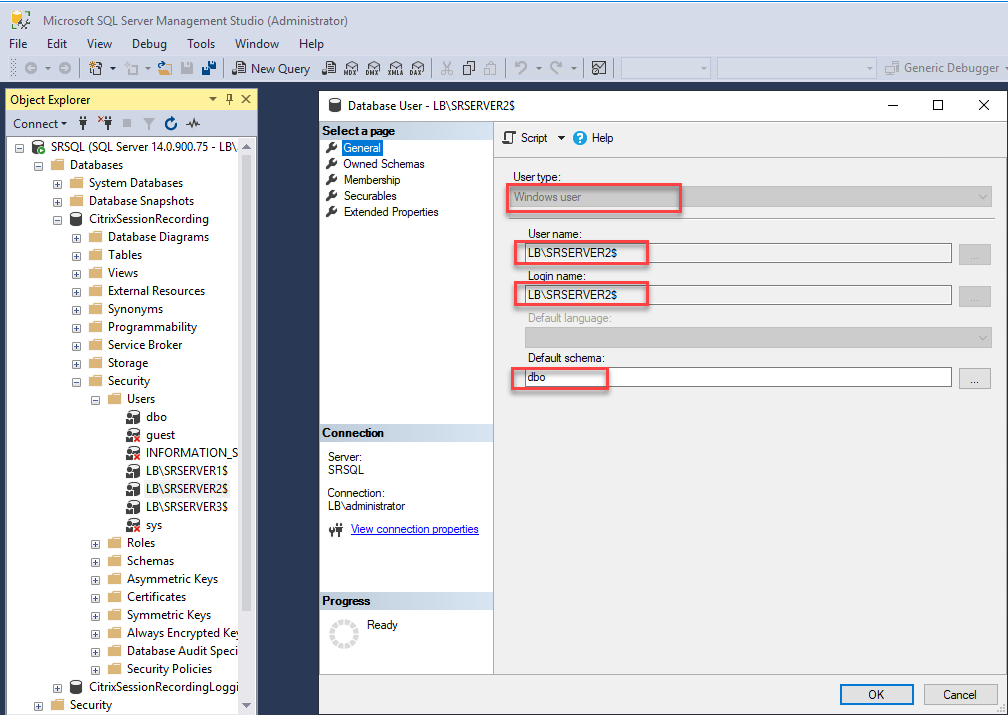
-
Share the Read/Write permission of the recording storage and restore folders, for example,
SessionRecordingandSessionRecordingsRestored, with the machine account of the new Session Recording server, for example,LB\SRServer2$. The dollar sign$is required. -
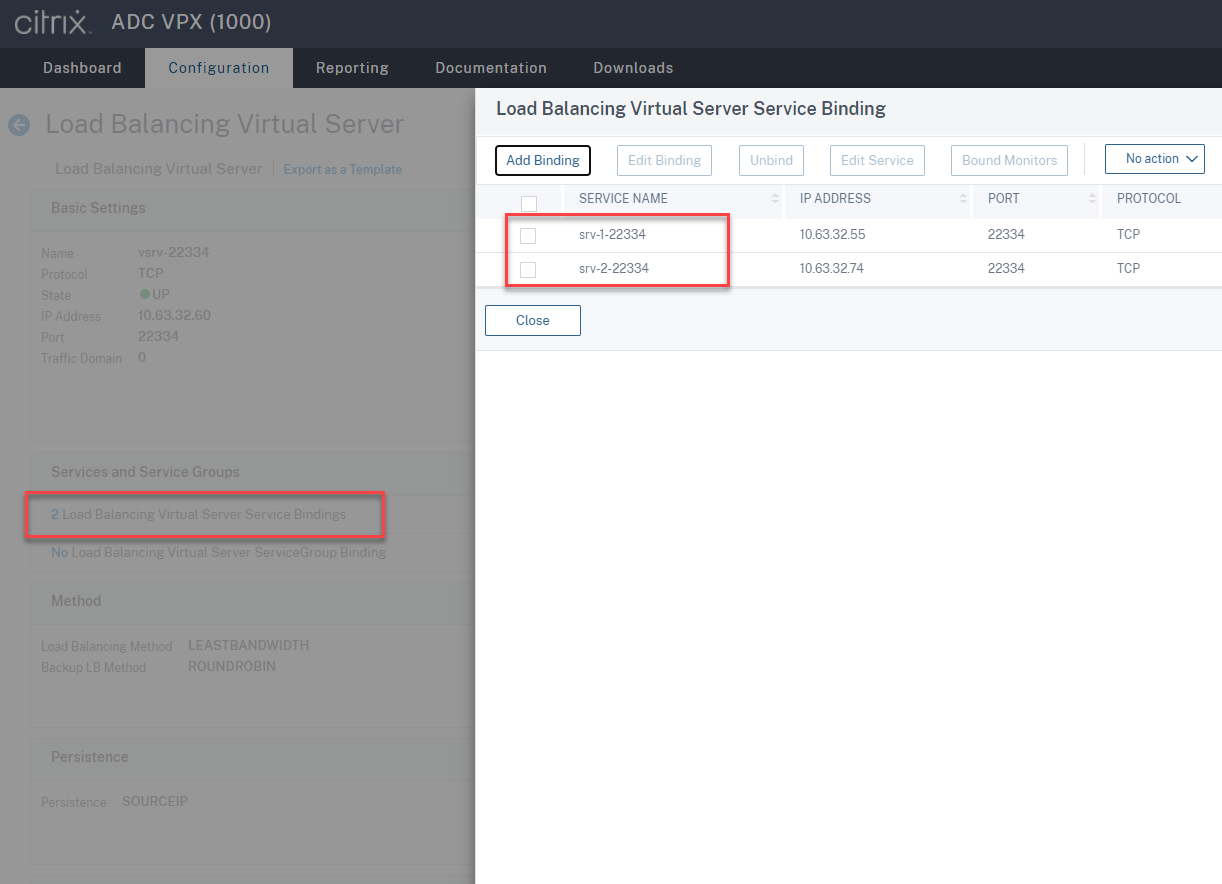
Repeat Step 3 to add load balancing services for the new Session Recording server and edit existing virtual servers to add bindings to the load balancing services. There is no need to add more virtual servers. For example:
-
Copy the Session Recording Authorization Console configuration file,
SessionRecordingAzManStore.xml, from the existing Session Recording server to the new Session Recording server. The file lives in<Session Recording server installation path>\App_Data. -
To use MSMQ over HTTP or HTTPS for the new Session Recording server, complete the following steps to import the registry settings of the currently functioning Session Recording server.
On the existing Session Recording server, for example,
SRServer1, run thepowershell.exe -file SrServerConfigurationSync.ps1 –Action Export – ADCHost <ADCHost >command, where<ADCHost>is the FQDN of the Citrix ADC VIP address. An exported registry file,SrServerConfig.reg, is generated.Copy the
SrServerConfig.regfile to the new Session Recording server and run thepowershell.exe -file SrServerConfigurationSync.ps1 –Action Import,AddRedirection – ADCHost <ADCHost>command. The EnableLB value is added to the registry key of the new Session Recording server atHKEY_LOCAL_MACHINE\SOFTWARE\Citrix\SmartAuditor\Serverand asr_lb_map.xmlfile is added underC:\Windows\System32\msmq\Mapping. -
Repeat the procedure to add another Session Recording server.
Troubleshoot
-
Sessions are not recording when you use a CNAME record or an ALIAS record for a Session Recording server. To address this issue, see the Microsoft documentation.
-
Recording files can be stored locally but cannot be stored in a Universal Naming Convention (UNC) path. To address this issue, change the start mode of the Citrix Session Recording Storage Manager service to Automatic (Delayed Start).
In this article
- Step 1: Create shared folders on the file server
- Step 2: Configure an existing Session Recording server to support load balancing
- Step 3: Configure load balancing in Citrix ADC
- Step 4: Configure an existing Session Recording agent to support load balancing
- Step 5: Configure an existing Session Recording player to support load balancing
- Step 6: Check whether load balancing works for the configured, existing Session Recording server
- Step 7: Add more Session Recording servers
- Troubleshoot