Configure session recording policies
You can activate system-defined recording policies or create and activate your own custom recording policies. System-defined recording policies apply a single rule to entire sessions. Custom recording policies specify which sessions are recorded.
The active recording policy determines which sessions are recorded. Only one recording policy is active at a time.
System-defined recording policies
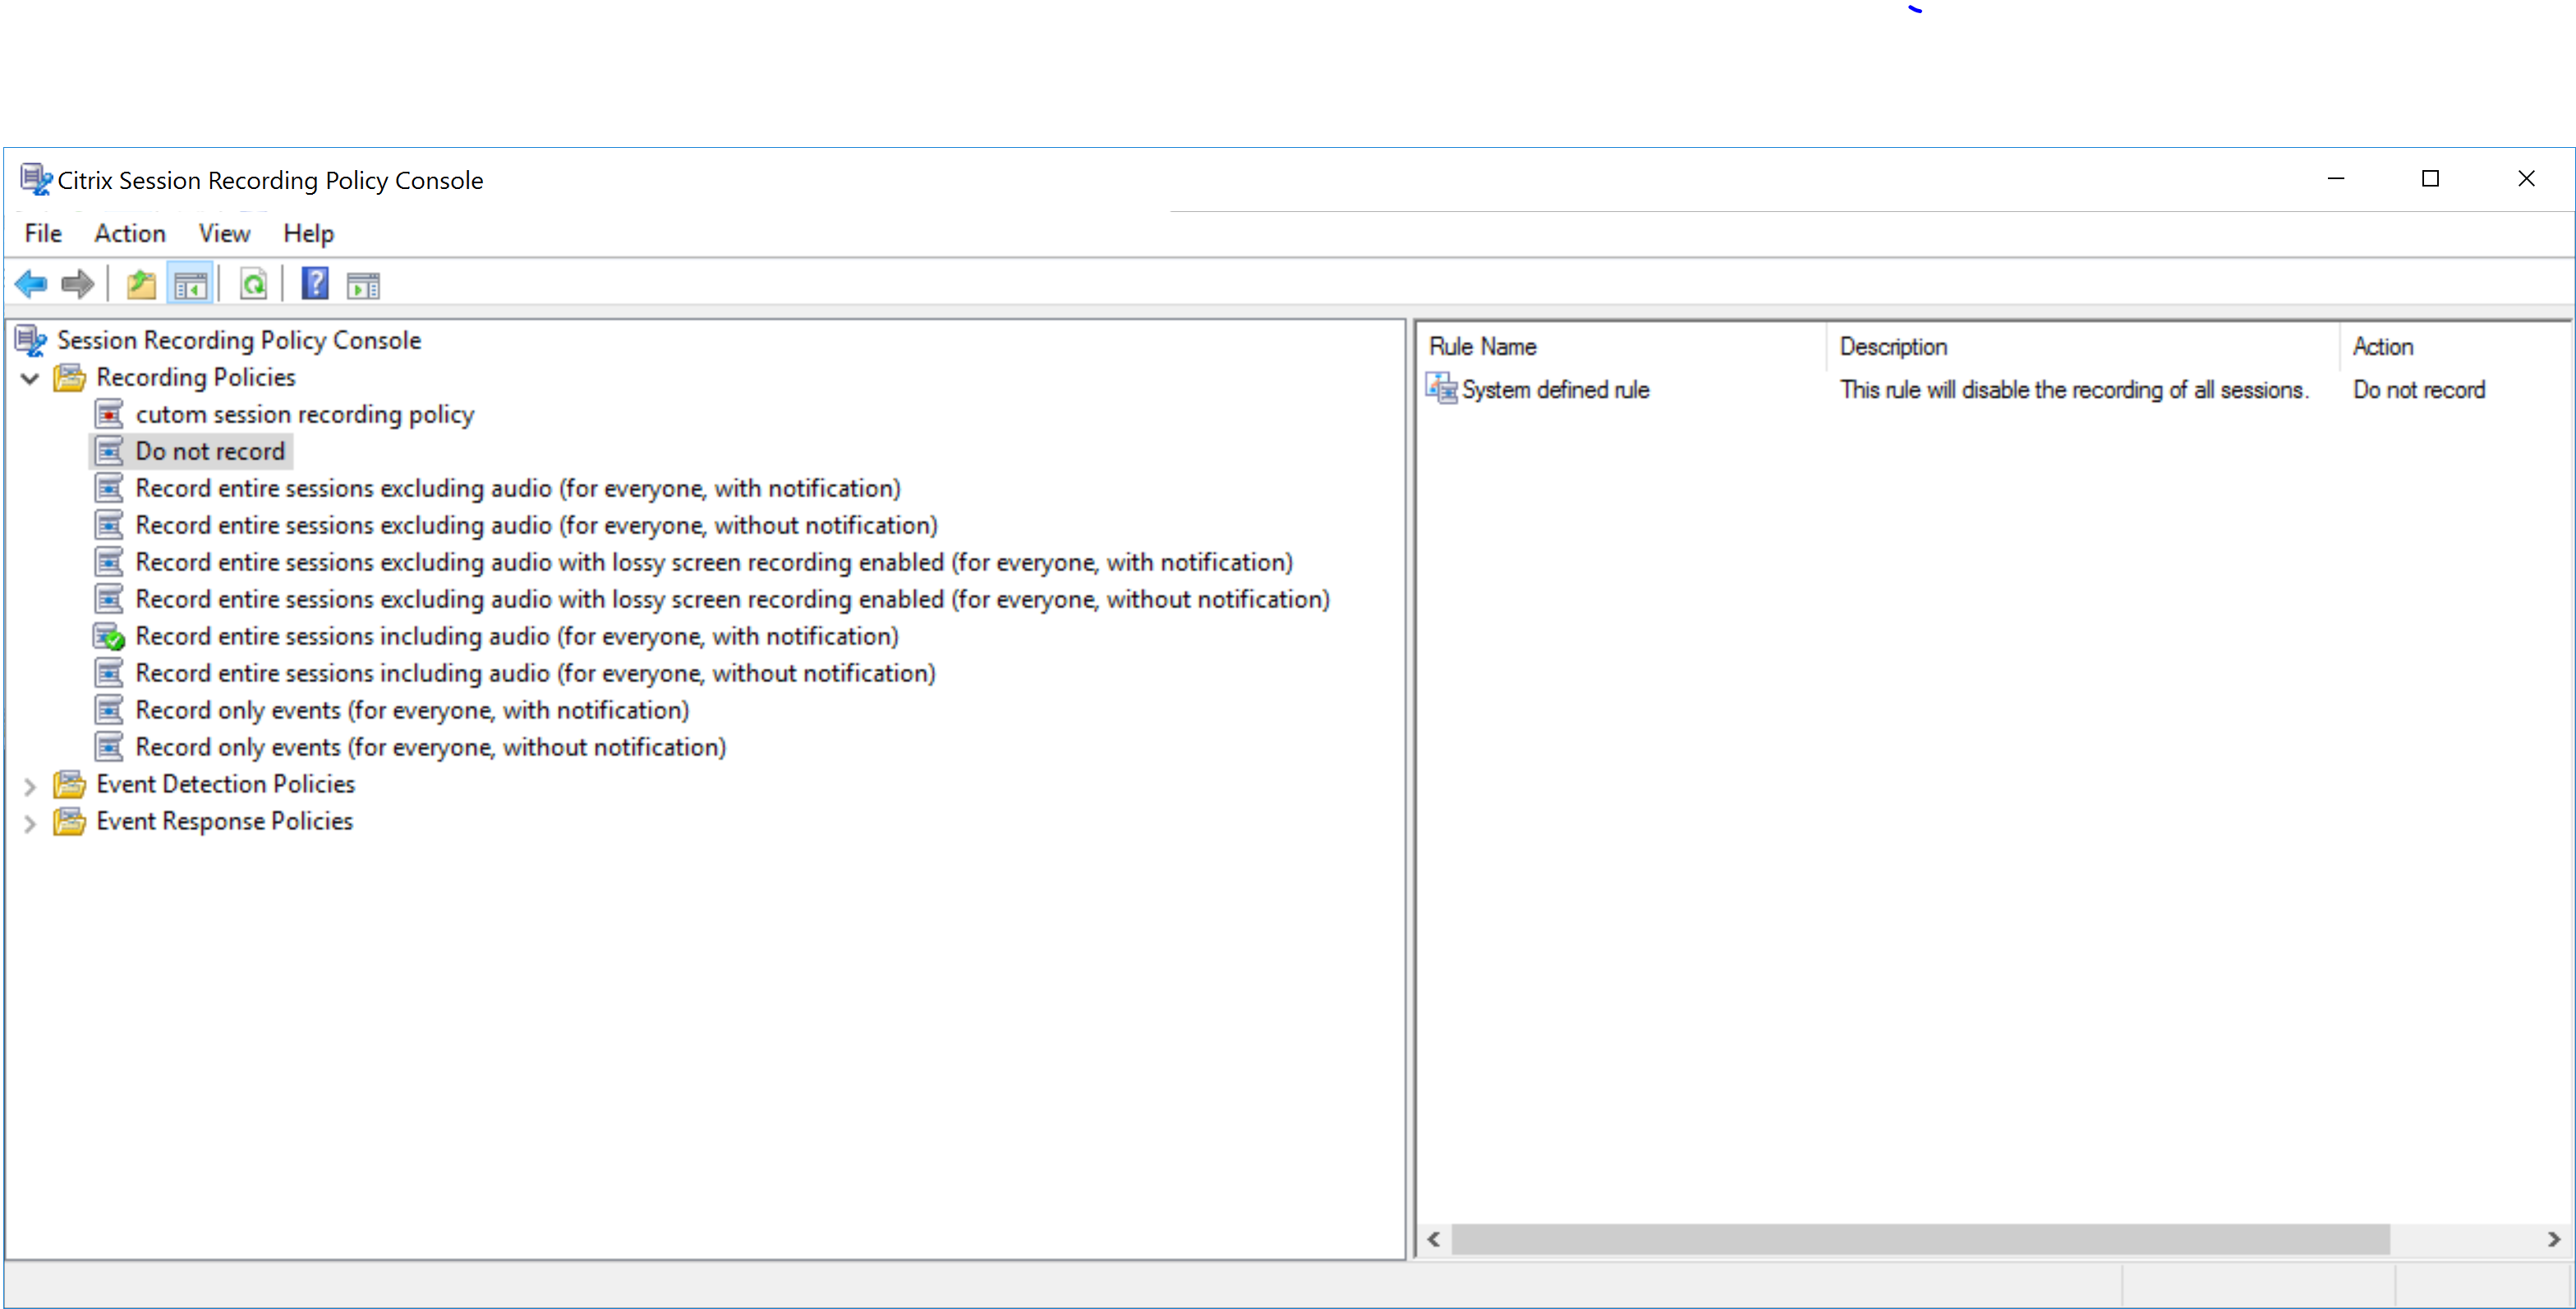
Session Recording provides the following system-defined recording policies:
-
Do not record. The default policy. If you do not specify another policy, no sessions are recorded.
-
Record entire sessions excluding audio (for everyone, with notification). This policy records entire sessions (including screens and events but excluding audio). Users receive recording notifications in advance.
-
Record entire sessions excluding audio (for everyone, without notification). This policy records entire sessions (including screens and events but excluding audio). Users do not receive recording notifications.
-
Record entire sessions excluding audio with lossy screen recording enabled (for everyone, with notification). This policy records entire sessions (including screens and events but excluding audio). Lossy screen recording is enabled to reduce the size of recording files. Users receive recording notifications in advance.
-
Record entire sessions excluding audio with lossy screen recording enabled (for everyone, without notification). This policy records entire sessions (including screens and events but excluding audio). Lossy screen recording is enabled to reduce the size of recording files. Users do not receive recording notifications.
-
Record entire sessions including audio (for everyone, with notification). This policy records entire sessions (including screens, events, and audio). Users receive recording notifications in advance. You can now enable audio recording for non-optimized HDX audio. The audio that is handled on the VDA and delivered to/from the client where the Citrix Workspace app is installed is referred to as non-optimized HDX audio. Unlike non-optimized HDX audio, optimized HDX audio has its processing offloaded to the client, as seen in the Browser Content Redirection (BCR) and Optimization for Microsoft Teams scenarios.
-
Record entire sessions including audio (for everyone, without notification). This policy records entire sessions (including screens, events, and audio). Users do not receive recording notifications.
-
Record only events (for everyone, with notification). This policy records only events that your event detection policy specifies. It does not record screens or audio. Users receive recording notifications in advance.
-
Record only events (for everyone, without notification). This policy records only events that your event detection policy specifies. It does not record screens or audio. Users do not receive recording notifications.
Note:
When upgrading Citrix Session Recording from version 1912 , existing policy names are retained (e.g., Record everyone with notification, Record everyone without notification).
However, fresh installations use updated policy names.
This is expected behavior and does not affect policy functionality.
You can’t modify or delete the system-defined recording policies.
Create a custom recording policy
Considerations
You can record sessions of specific users or groups, published applications or desktops, delivery groups or VDA machines, and Citrix Workspace™ app client IP addresses. To obtain the lists of published applications or desktops and delivery groups or VDA machines, you must have the read permission as a site administrator. Configure the administrator read permission on the Delivery Controller™ of the site.
You can also specify smart access tags to use as scopes for a custom recording policy to apply to. This feature is available for Session Recording 2402 and later. It lets you apply policies based on the user access context including:
- The user’s location
- IP address range
- Delivery group
- Device type
- Installed applications
A wizard within the Session Recording policy console helps you create rules. For each rule you create, you specify a recording action and rule criteria. The recording action applies to sessions that meet the rule criteria.
For each rule, choose one recording action:
-
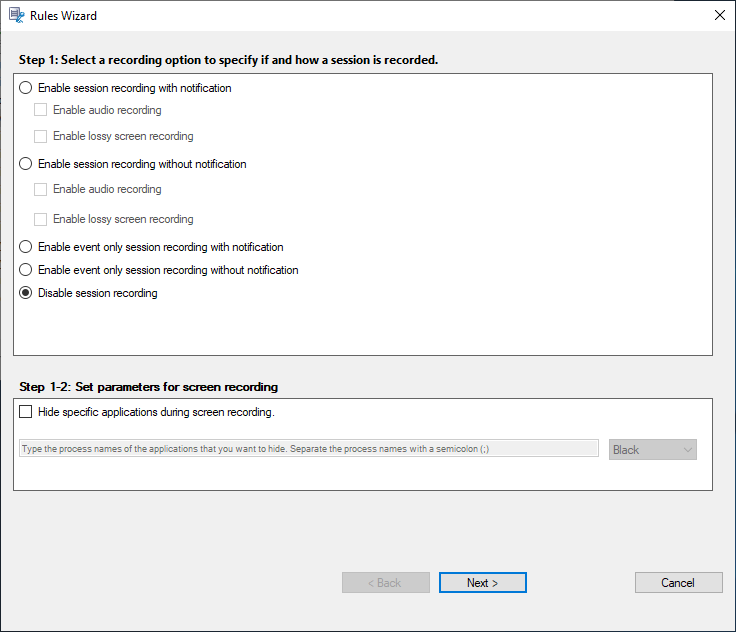
Enable session recording with notification. This option records entire sessions (screens and events). Users receive recording notifications in advance. With this option selected, you can further select to enable audio recording or lossy screen recording. Additionally, you can choose to hide specific applications in screen recordings.
-
Enable session recording without notification. This option records entire sessions (screens and events). Users do not receive recording notifications. With this option selected, you can further select to enable audio recording or lossy screen recording. Additionally, you can choose to hide specific applications in screen recordings.
-
Enable event only session recording with notification. Recording only specific events helps to free up storage space. This option records throughout sessions only events that your event detection policy specifies. It does not record screens. Users receive recording notifications in advance.
-
Enable event only session recording without notification. Recording only specific events helps to free up storage space. This option records throughout sessions only events that your event detection policy specifies. It does not record screens. Users do not receive recording notifications.
-
Disable session recording. This option means that no sessions are recorded.
-
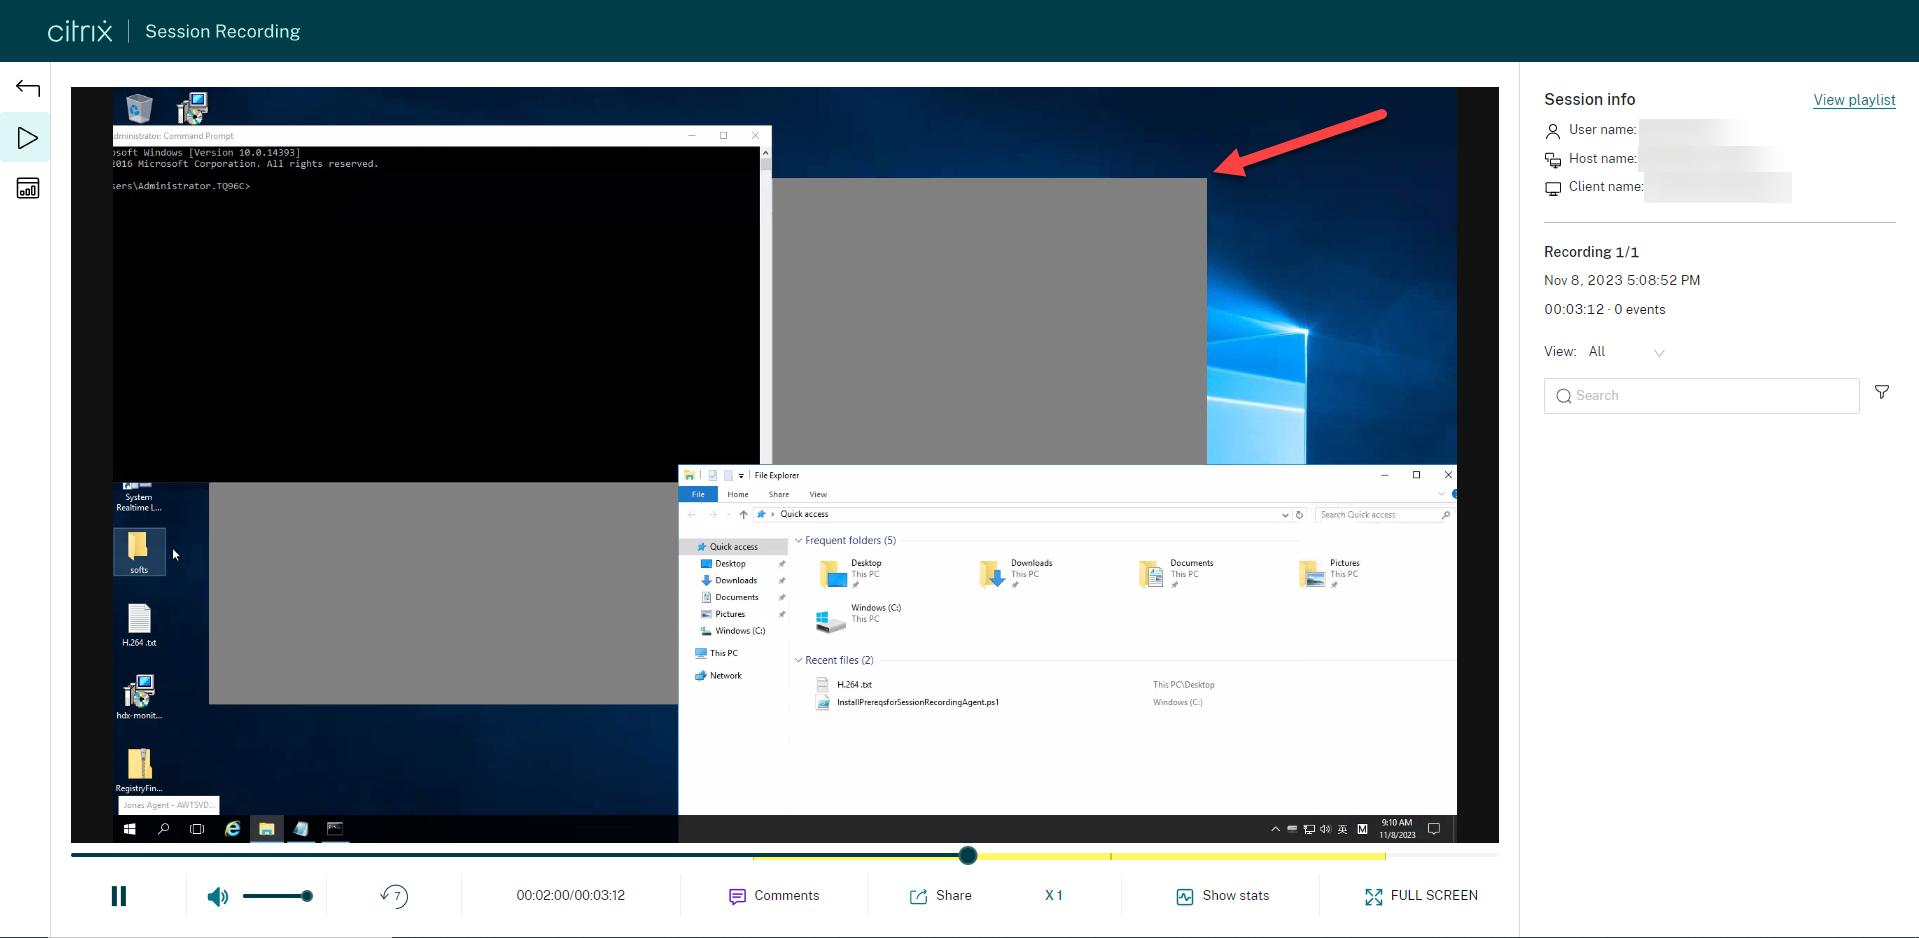
Hide specific applications during screen recording. This feature lets you hide specific applications with a layer mask during screen recording. The color for the layer mask is configurable, which can be Black, Gray, or White.
For example, you can see that an application is hidden during the recording playback:
-
Allow user-initiated recording without interrupting admin or policy-driven recordings. This feature lets end users start and stop recordings on demand. Administratorinitiated and policydriven recordings take precedence and are not interrupted by enduser triggered recordings.
For each rule, choose at least one of the following items to create the rule criteria:
- Users or Groups. Creates a list of users or groups to which the action of the rule applies. Session Recording allows you to use Active Directory groups and white list users.
- Published Applications or Desktop. Creates a list of published applications or desktops to which the action of the rule applies. In the Rules wizard, choose the Citrix Virtual Apps and Desktops™ or Citrix DaaS (formerly Citrix Virtual Apps and Desktops service) sites on which the applications or desktops are available.
- Delivery Groups or Machines. Creates a list of Delivery Groups or machines to which the action of the rule applies. In the Rules wizard, choose the location of the Delivery Groups or machines.
- IP Address or IP Range. Creates a list of IP addresses or ranges of IP addresses to which the action of the rule applies. On the Select IP Address and IP Range screen, add a valid IP address or IP range for which recording is enabled or disabled. The IP addresses mentioned here are the IP addresses of the Citrix Workspace apps.
-
Filter. Creates a list of smart access tags to which the action of the rule applies. You can configure contextual access (smart access) using smart access policies on Citrix NetScaler.
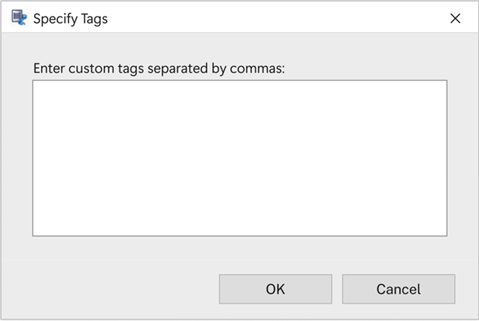
Note:
The Session Recording policy console supports configuring multiple criteria within a single rule. When a rule applies, both the “AND” and the “OR” logical operators are used to compute the final action. Generally speaking, the “OR” operator is used between items within a criterion, and the “AND” operator is used between separate criteria. If the result is true, the Session Recording policy engine takes the rule’s action. Otherwise, it goes to the next rule and repeats the process.
When you create more than one rule in a recording policy, some sessions might match the criteria for more than one rule. In these cases, the rule with the highest priority is applied to the sessions.
The recording action of a rule determines its priority:
- Rules with the Disable session recording action have the highest priority.
- Rules with the Enable session recording with notification action have the second-to-highest priority.
- Rules with the Enable session recording without notification action have the second-to-lowest priority.
- Rules with the Enable event only session recording with notification action have the medium priority.
- Rules with the Enable event only session recording without notification action have the lowest priority.
Some sessions might not meet any rule criteria in a recording policy. For these sessions, the action of the policy fallback rule applies. The action of the fallback rule is always Disable session recording. You can’t modify or delete the fallback rule.
Steps
To create a custom recording policy:
- Log on as an authorized Policy Administrator to the server where the Session Recording policy console is installed.
- Start the Session Recording policy console and select Recording Policies in the left pane. From the menu bar, choose Add New Policy.
- Right-click the New policy and select Add Rule.
-
In the rules wizard, select a recording option and then click Next.
When you select Enable session recording with notification or Enable session recording without notification, you can further select to enable audio recording or lossy screen recording.
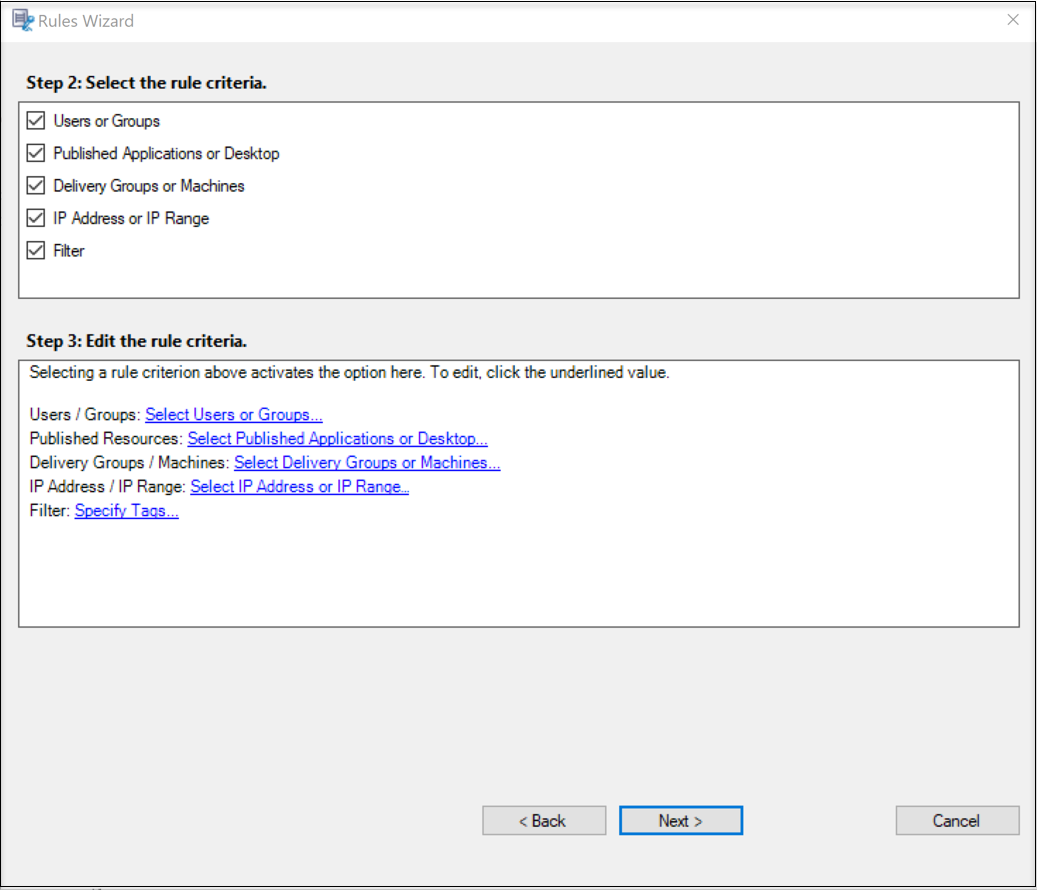
- Select the rule criteria - You can choose one or more rule criteria:
- Users or Groups
- Published Applications or Desktop
- Delivery Groups or Machines
- IP Address or IP Range
- Filter
-
Edit the rule criteria - To edit, click the underlined values. The values are underlined based on the criteria that you chose in the previous step.
Note:
If you choose the Published Applications or Desktop underlined value, the Site Address is the IP address, a URL, or a machine name if the Controller is on a local network. The Name of Application list shows the display name.
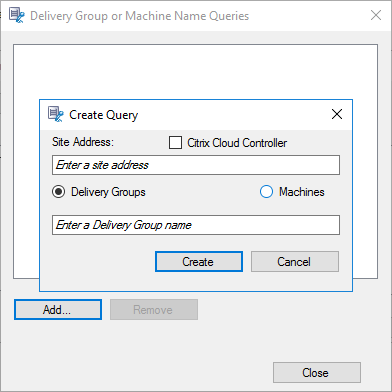
When choosing Published Applications or Desktop or Delivery Groups or Machines, specify the Delivery Controller for your Session Recording policy console to communicate with.
The Session Recording policy console is the only channel to communicate with Delivery Controllers from the Citrix Cloud™ and on-premises environments.
For example, when choosing Delivery Groups or Machines, click the corresponding hyperlink in the preceding screenshot and click Add to add queries to the Controller.
For a description of use cases that cover the on-premises and the Citrix Cloud Delivery Controllers, see the following table:
Use Case Action Required On-Premises Delivery Controller - Install Broker_PowerShellSnapIn_x64.msi. 2. Clear the Citrix Cloud Controller check box.
Citrix Cloud Delivery Controller - Install the Citrix DaaS™ Remote PowerShell SDK. 2. Validate the Citrix Cloud account credentials. 3. Select the Citrix Cloud Controller check box.
Switch from an on-premises Delivery Controller to a Citrix Cloud Delivery Controller - Uninstall Broker_PowerShellSnapIn_x64.msi and restart the machine. 2. Install the Citrix DaaS Remote PowerShell SDK. 3. Validate the Citrix Cloud account credentials. 4. Select the Citrix Cloud Controller check box.
Switch from a Citrix Cloud Delivery Controller to an on-premises Delivery Controller - Uninstall the Citrix DaaS Remote PowerShell SDK and restart the machine. 2. Install Broker_PowerShellSnapIn_x64.msi. 3. Clear the Citrix Cloud Controller check box.
Validating the Citrix Cloud credentials
To query Delivery Controllers hosted in the Citrix Cloud, manually validate your Citrix Cloud credentials on the machine where the Session Recording policy console is installed. Failure to comply can cause an error and your Session Recording policy console might not work as expected.
To do the manual validation:
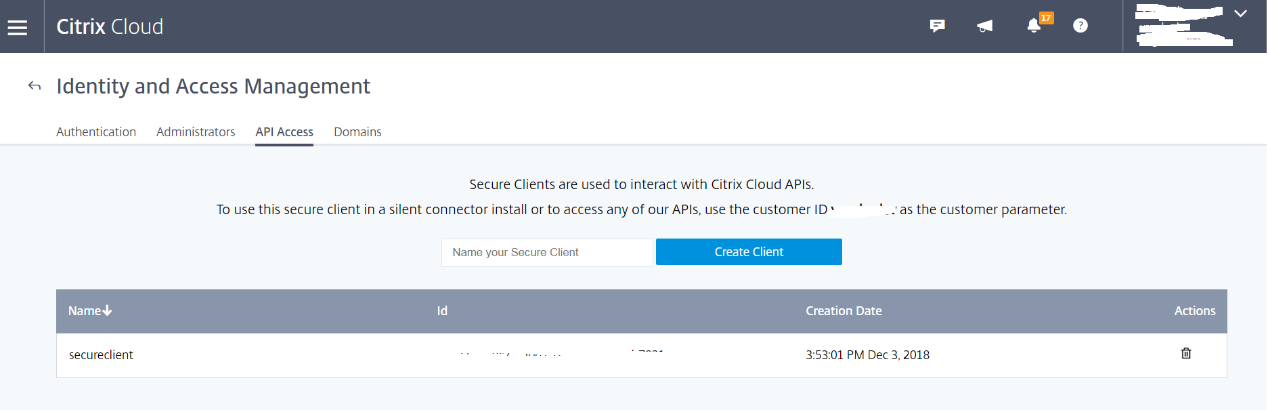
-
Log on to the Citrix Cloud console and locate Identity and Access Management > API Access. Create an API access Secure Client for obtaining an authentication profile that can bypass the Citrix Cloud authentication prompts. Download your Secure Client, rename, and save it in a safe location. The file name is defaulted to secureclient.csv.
-
Open a PowerShell session and run the following command to have the authentication profile (obtained in the preceding step) take effect.
asnp citrix.*
Set-XDCredentials -CustomerId "citrixdemo" -SecureClientFile "c:\temp\secureclient.csv" -ProfileType CloudAPI –StoreAs "default"

<!--NeedCopy-->
Set CustomerId and SecureClientFile as required. The preceding command creates a default authentication profile for the customer
citrixdemoto bypass authentication prompts in the current and all subsequent PowerShell sessions.
- Follow the wizard to finish the configuration.
Note: Limitation regarding prelaunched application sessions:
- If the active policy tries to match an application name, it can’t match applications that are opened in a prelaunched session. As a result, the prelaunched session can’t be recorded.
- If the active policy records every application and session prelaunch is enabled, a recording notification appears when a user logs on to Citrix Workspace app for Windows. The prelaunched (empty) session and any applications to be launched in that session going forward are recorded.
As a workaround, publish applications in separate Delivery Groups according to their recording policies. Do not use an application name as a recording condition. This approach ensures that prelaunched sessions can be recorded. However, notifications still appear.
Use Active Directory groups
Session Recording allows you to use Active Directory groups when creating policies. Using Active Directory groups instead of individual users simplifies the creation and management of rules and policies. For example, if users in your company’s finance department are contained in an Active Directory group named Finance, you can create a rule that applies to all the group members by selecting the Finance group in the Rules wizard.
White list users
You can create Session Recording policies ensuring that the sessions of some users in your organization are never recorded. This case is called white listing these users. White listing is useful for users who handle privacy-related information or when your organization does not want to record the sessions of a certain class of employees.
For example, if all managers in your company are members of an Active Directory group named Executive, you can ensure that sessions of these users are never recorded by creating a rule that disables session recording for the Executive group. While the policy containing this rule is active, no sessions of members of the Executive group are recorded. The sessions of other members of your organization are sessions recorded based on other rules in the active policy.
Configure the Director to use the Session Recording server
You can use the Director console to create and activate the recording policies.
- For an HTTPS connection, install the certificate to trust the Session Recording server in the Trusted Root Certificates of the Director server.
- To configure the Director server to use the Session Recording server, run the
C:\inetpub\wwwroot\Director\tools\DirectorConfig.exe /configsessionrecordingcommand. - Type the IP address or FQDN of the Session Recording server and the port number and connection type (HTTP/HTTPS) that the Session Recording agent uses to connect to the Session Recording Broker on the Director server.
Understand rollover behavior
When you activate a policy, the previously active policy remains in effect until the session being recorded ends or the session recording file rolls over. Files roll over when they’ve reached the maximum size or recording duration. For more information about the rollover thresholds, see Specify file size for recordings.
The following table details what happens when you apply a new recording policy while a session is being recorded and a rollover occurs:
| If the previous recording policy was | And the new recording policy is | After a rollover, the recording policy will be |
|---|---|---|
| Do not record | Any other policy | No change. The new policy takes effect only when the user logs on to a new session. |
| Record without notification | Do not record | The recording stops. |
| Record without notification | Record with notification | Recording continues and a notification message appears. |
| Record with notification | Do not record | The recording stops. |
| Record with notification | Record without notification | Recording continues. No message appears the next time a user logs on. |