This content has been machine translated dynamically.
Dieser Inhalt ist eine maschinelle Übersetzung, die dynamisch erstellt wurde. (Haftungsausschluss)
Cet article a été traduit automatiquement de manière dynamique. (Clause de non responsabilité)
Este artículo lo ha traducido una máquina de forma dinámica. (Aviso legal)
此内容已经过机器动态翻译。 放弃
このコンテンツは動的に機械翻訳されています。免責事項
이 콘텐츠는 동적으로 기계 번역되었습니다. 책임 부인
Este texto foi traduzido automaticamente. (Aviso legal)
Questo contenuto è stato tradotto dinamicamente con traduzione automatica.(Esclusione di responsabilità))
This article has been machine translated.
Dieser Artikel wurde maschinell übersetzt. (Haftungsausschluss)
Ce article a été traduit automatiquement. (Clause de non responsabilité)
Este artículo ha sido traducido automáticamente. (Aviso legal)
この記事は機械翻訳されています.免責事項
이 기사는 기계 번역되었습니다.책임 부인
Este artigo foi traduzido automaticamente.(Aviso legal)
这篇文章已经过机器翻译.放弃
Questo articolo è stato tradotto automaticamente.(Esclusione di responsabilità))
Translation failed!
Enable or disable recording
You can install the Session Recording agent on both multi-session OS and single-session OS VDAs for recording sessions hosted on those VDAs. Within each agent is a setting that enables recording for the VDA on which it is installed. After recording is enabled, Session Recording evaluates the active recording policy that determines which sessions are recorded.
We recommend you disable session recording on VDAs that are not recorded. There is a small impact on performance, even if no recording takes place.
Enable or disable recording on a VDA
- Log on to the server where the Session Recording agent is installed.
- From the Start menu, choose Session Recording Agent Properties.
-
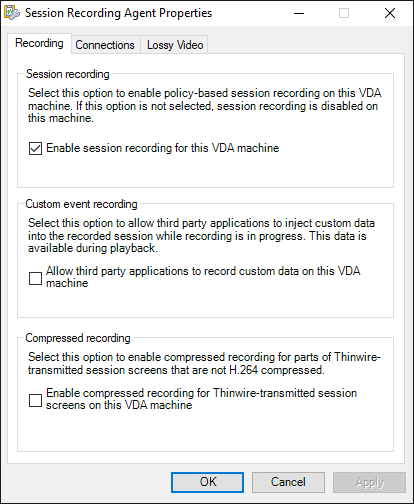
Under Session Recording, select or clear the Enable session recording for this VDA machine check box to specify whether sessions can be recorded for this VDA.

- When prompted, restart the Session Recording agent service to accept the change.
Note:
When you install Session Recording, the active policy is Do not record (no sessions are recorded on any server). To begin recording, use the Session Recording policy console to activate a different policy.
Enable custom event recording
Session Recording allows you to use third-party applications to insert custom data, known as events, to recorded sessions. These events appear when the recorded session is played back. Events are part of the recorded session file and can’t be modified after the session is recorded.
For example, an event might contain the following text: “User opened a browser.” Each time a user opens a browser during a session being recorded, the text inserts to the recording at that point. When a viewer plays back the recorded session, the viewer can locate and count the times that the user opened a browser by noting the number of markers.
To insert custom events to recordings on a server:
- Use Session Recording Agent Properties to enable a setting on each server where you want to insert custom events. Enable each server separately. You can’t globally enable all servers in a site.
- Write applications built on the Event API that runs within each user’s virtual session, to inject the data into the recording.
The Session Recording installation includes an event recording COM application (API) that allows you to insert text from third-party applications to a recording. You can use the API from many programming languages including Visual Basic, C++, or C#. For more information, see the Knowledge Center article CTX226844. The Session Recording Event API .dll is installed as part of the Session Recording installation. You can find it at C:\rogram Files\Citrix\SessionRecording\Agent\Bin\Interop.UserApi.dll.
To enable custom event recording on a server, complete the following steps:
- Log on to the server where the Session Recording agent is installed.
- From the Start menu, choose Session Recording Agent Properties.
- In Session Recording Agent Properties, click the Recording tab.
- Under Custom event recording, select the Allow third party applications to record custom data on this server check box.
Enable compressed recording
You can enable compressed recording for parts of Thinwire-transmitted session screens that are not H.264 compressed. This feature reduces recording file size significantly.
Note:
- This feature is disabled by default.
- This feature is incompatible with the H.264 package dropping feature.
- The minimum version required for the VDA is 2303.
To enable compressed recording, complete the following steps:
- Log on to the server where the Session Recording agent is installed.
- From the Start menu, choose Session Recording Agent Properties.
- In Session Recording Agent Properties, click the Recording tab.
-
Under Compressed recording, select the Enable compressed recording for Thinwire-transmitted session screens on this VDA machine check box.

Share
Share
This Preview product documentation is Citrix Confidential.
You agree to hold this documentation confidential pursuant to the terms of your Citrix Beta/Tech Preview Agreement.
The development, release and timing of any features or functionality described in the Preview documentation remains at our sole discretion and are subject to change without notice or consultation.
The documentation is for informational purposes only and is not a commitment, promise or legal obligation to deliver any material, code or functionality and should not be relied upon in making Citrix product purchase decisions.
If you do not agree, select I DO NOT AGREE to exit.