Configure user access
Important
In multiple server deployments, use only one server at a time to change the configuration of the server group. Ensure that the Citrix StoreFront management console is not running on any of the other servers in the deployment. Once complete, propagate your configuration changes to the server group so that the other servers in the deployment are updated.
Configure support for connections through XenApp Services URLs
Use the Configure XenApp Services Support task to configure access to your stores through XenApp Services URLs. Users of domain-joined desktop appliances and repurposed PCs running the Citrix Desktop Lock, along with users who have older Citrix clients that cannot be upgraded, can access stores directly using the XenApp Services URL for the store. When you create a new store, the XenApp Services URL is enabled by default.
Important: In multiple server deployments, use only one server at a time to make changes to the configuration of the server group. Ensure that the Citrix StoreFront management console is not running on any of the other servers in the deployment. Once complete, propagate your configuration changes to the server group so that the other servers in the deployment are updated.
-
On the Windows Start screen or Apps screen, locate and click the Citrix StoreFront tile.
-
Select the Stores node in the left pane of the Citrix StoreFront management console and, in the results pane, select a store. In the Actions pane, click Configure XenApp Services Support.
-
Select or clear the Enable XenApp Services Support check box to, respectively, enable or disable user access to the store through the displayed XenApp Services URL.
The XenApp Services URL for a store has the form http[s]://serveraddress/Citrix/storename/PNAgent/config.xml, where serveraddress is the fully qualified domain name of the server or load balancing environment for your StoreFront deployment and storename is the name specified for the store when it was created.
-
If you enable XenApp Services Support, optionally specify a default store in your StoreFront deployment for users with the Citrix Online Plug-in.
Specify a default store so that your users can configure the Citrix Online Plug-in with the server URL or load-balanced URL of the StoreFront deployment, rather than the XenApp Services URL for a particular store.
Disable or enable workspace control reconnect for all Citrix Receivers
Workspace control enables applications to follow users as they move between devices. This allows, for example, clinicians in hospitals to move from workstation to workstation without having to restart their applications on each device.
StoreFront contains a configuration to disable workspace control reconnect in the Store Service for all Citrix Receivers. Manage this feature by using the StoreFront console or PowerShell.
Use the StoreFront management console
- On the Windows Start screen or Apps screen, locate and click the Citrix StoreFront tile.
- Select the Stores node in the left pane of the Citrix StoreFront management console and, in the Actions pane, click Configure Store Settings.
- Select Advanced Settings and check or uncheck Allow session reconnect.
Use PowerShell
Make sure that you close the Administration Console. Run the following code snippet to import the StoreFront PowerShell modules:
$dsInstallProp = Get-ItemProperty \`
\-Path HKLM:\\SOFTWARE\\Citrix\\DeliveryServicesManagement -Name InstallDir
$dsInstallDir = $dsInstallProp.InstallDir
& $dsInstallDir\\..\\Scripts\\ImportModules.ps1
<!--NeedCopy-->
Then the PowerShell command Set-DSAllowSessionReconnect turns Workspace control reconnect on or off.
Syntax
Set-DSAllowSessionReconnect \[\[-SiteId\] \<Int64\>\] \[\[-VirtualPath\] \<String\> \] \`
\[\[-IsAllowed\] \<Boolean\>\]
<!--NeedCopy-->
For example, to turn off workspace control reconnect for a store in /Citrix/Store, the following command configures the store:
Set-DSAllowSessionReconnect -SiteId 1 -VirtualPath /Citrix/Store \` -IsAllowed $false
<!--NeedCopy-->
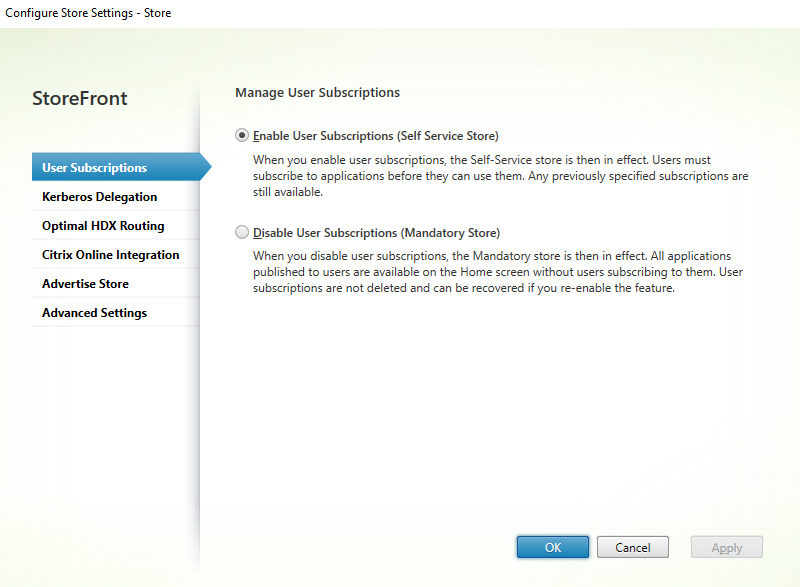
Configure user subscriptions
Use the User Subscriptions task to do select one of the following options:
- Require users to subscribe to applications before using them (Self Service Store).
- Enable users to receive all applications when they connect to the store (Mandatory Store).
Disabling user subscriptions for a store within StoreFront also prevents the display of the Favorites tab to users in Citrix Receiver. Disabling subscriptions does not delete the Store subscription data. Re-enabling subscriptions for the store will allow the user to see their subscribed apps in Favorites whenever they next log on.
- On the Windows Start screen or Apps screen, locate and click the** Citrix StoreFront** tile.
- Select the Stores node in the left pane of the Citrix StoreFront management console and, in the results pane, select a store. In the Actions pane, click Configure Store Settings > User Subscriptions to toggle the user subscriptions feature off or on.
- Choose Enable user subscriptions (Self Service Store) to make users subscribe to the applications to use them. Any previously specified subscriptions are still available.
- Choose Disable user subscriptions (Mandatory Store) to make all applications published to the users available on the Home screen without users subscribing to them. Their subscriptions are not deleted and they can recover them if you re-enable the feature.
In StoreFront 3.5 or later, you can use the following PowerShell script to configure user subscriptions for a store:
$StoreObject = Get-STFStoreService -SiteID 1 -VirtualPath “/citrix/<yourstore>”
Set-STFStoreService -StoreService $StoreObject -LockedDown $True -Confirm:$False
For more information on Get-STFStoreService, see https://developer-docs.citrix.com/projects/storefront-powershell-sdk/en/latest/Get-STFStoreService/
Manage subscription data for a store
Manage subscription data for a store using PowerShell cmdlets.
Note
Use either the StoreFront management console or PowerShell to manage StoreFront. Do not use both methods at the same time. Always close the StoreFront management console before using PowerShell to change your StoreFront configuration. Citrix also recommends that you take a backup of your existing subscription data before making changes so that rollback to a previous state is possible.
Purge subscription data
A folder and datastore containing subscription data exists for each store in your deployment.
- Stop the Citrix Subscriptions Store service on the StoreFront server. If the Citrix Subscriptions Store service is running, it is not possible to delete subscription data for any of your stores.
- Locate the subscription store folder on the StoreFront server: C:\Windows\ServiceProfiles\NetworkService\AppData\Roaming\Citrix\SubscriptionsStore\1__Citrix_<StoreName>
- Delete the contents of the subscription store folder, but do not delete the folder itself.
- Restart the Citrix Subscriptions Store service on the StoreFront server.
In StoreFront 3.5 or later, you can use the following PowerShell script to purge subscription data for a store. Run this PowerShell function as an administrator with rights to stop or start services and delete files. This PowerShell function achieves the same result as the manual steps described above.
To run the cmdlets successfully, the Citrix Subscriptions Store service must be running on the server.
function Remove-SubscriptionData

{

        [CmdletBinding()]

        [Parameter(Mandatory=$False)][String]$Store = "Store"

        $SubsService = "Citrix Subscriptions Store"

        # Path to Subscription Data in StoreFront version 2.6 or higher

        $SubsPath = "C:\Windows\ServiceProfiles\NetworkService\AppData\Roaming\Citrix\SubscriptionsStore\1__Citrix_$Store\*"

        Stop-Service -displayname $SubsService

        Remove-Item $SubsPath -Force -Verbose

        Start-Service -displayname $SubsService

        Get-Service -displayname $SubsService

}

Remove-SubscriptionData -Store "YourStore"
Export subscription data You can obtain a backup of the Store subscription data in the form of a tab separated .txt file using the following PowerShell cmdlet.
$StoreObject = Get-STFStoreService -SiteID 1 -VirtualPath "/citrix/<yourstore>"

Export-STFStoreSubscriptions -StoreService $StoreObject -FilePath "$env:USERPROFILE\Desktop\Subscriptions.txt"
If you are managing a multiple-server deployment, you can run this PowerShell cmdlet on any server within the StoreFront server group. Each server in the server group maintains an identical synced copy of the subscription data from its peers. If you believe you are experiencing issues with subscription synchronization between the Storefront servers, then export the data from all servers in the group and compare them to see differences.
Restore subscription data
Use Restore-STFStoreSubscriptions to overwrite your existing subscription data. You can restore a Store’s subscription data using the tab separated .txt file backup you created earlier using Export-STFStoreSubscriptions.
$StoreObject = Get-STFStoreService -SiteID 1 -VirtualPath "/citrix/<yourstore>"

Restore-STFStoreSubscriptions -StoreService $StoreObject -FilePath "$env:USERPROFILE\Desktop\Subscriptions.txt"
For more information on Restore-STFStoreSubscriptions, see https://developer-docs.citrix.com/projects/storefront-powershell-sdk/en/latest/Restore-STFStoreSubscriptions/.
Restoring Data on a Single StoreFront Server
In a single server deployment, there is no need to shut down the Subscriptions Store service. There is also no need to purge the existing subscription data before restoring the subscription data.
Restoring Data on a StoreFront Server Group
To restore subscription data to a server group, the following steps are required.
Example Server Group Deployment containing three StoreFront servers.
StoreFrontA
StoreFrontB
StoreFrontC
- Back up of the existing subscription data from any of the three servers.
- Stop the Subscriptions Store service on servers StoreFrontB and C. This action prevents the servers from sending or receiving subscription data during the update of StoreFrontA.
- Purge the subscription data from servers StoreFrontB and C. This action prevents mismatch of the restored subscription data.
- Restore the data on StoreFrontA using the Restore-STFStoreSubscriptions cmdlet. It is not necessary to stop the Subscriptions Store service, or to purge the subscription data on StoreFrontA (it is overwritten during the restore operation).
- Restart the Subscriptions Store service on servers StoreFrontB and StoreFrontC. The servers can then receive a copy of the data from StoreFrontA.
- Wait for synchronization to occur between all servers. The time required depends on the number of records that exist on StoreFrontA. If all servers are on a local network connection, synchronization normally occurs quickly. Synchronization of subscriptions across a WAN connection may take longer.
- Export the data from StoreFrontB and C to confirm that the synchronization has completed, or view the Store Subscription counters.
Import subscription data
Use Import-STFStoreSubscriptions when there is no subscription data for the Store. This cmdlet also allows subscription data to be transferred from one Store to another or if subscription data is imported to newly provisioned StoreFront servers.
$StoreObject = Get-STFStoreService -SiteID 1 -VirtualPath "/citrix/<yourstore>"

Import-STFStoreSubscriptions -StoreService $StoreObject -FilePath "$env:USERPROFILE\Desktop\Subscriptions.txt"
For more information on Import-STFStoreSubscriptions, see https://developer-docs.citrix.com/projects/storefront-powershell-sdk/en/latest/Import-STFStoreSubscriptions/.
Subscription data file details
The subscription data file is a text file containing one line per user subscription. Each line is a tab-separated sequence of values:
<user-identifier> <resource-id> <subscription-id> <subscription-status> <property-name> <property-value> <property-name> <property-value> …
The values are defined as follows:
- <user-identifier> - Required. A sequence of characters identifying the user. This identifier is the user’s Windows Security Identifier.
- <resource-id> - Required. A sequence of characters identifying the subscribed resource.
- <subscription-id> - Required. A sequence of characters uniquely identifying the subscription. This value is not used (although, a value must be present in the data file).
- <subscription-status> - Required. The status of the subscription: subscribed or unsubscribed.
- <property-name> and <property-value> -Optional. A sequence of zero or more pairs of <property-name> and <property-value> values. These represent properties associated with the subscription by a StoreFront client (typically a Citrix Receiver). A property with multiple values that is represented by multiple name/value pairs that have the same name (for example, “… MyProp A MyProp B …” represents the property MyProp with values A, B).
Example:
S-0-0-00-0000000000-0000000000-0000000000-0000 XenApp.Excel 21EC2020-3AEA-4069-A2DD-08002B30309D Subscribed dazzle:position 1
Size of subscription data on the StoreFront server disk

Size of import and export .txt files

Store Subscription Counters
You can use Microsoft Windows Performance Monitor counters (Start > Run > perfmon) to show, for example, the total numbers of subscription records on the server or number of records synchronized between StoreFront server groups.
View the Subscription Counters using PowerShell
Get-Counter -Counter "\Citrix Subscription Store(1__citrix_store)\Subscription Entries Count (including unpurged deleted records)"

Get-Counter -Counter "\Citrix Subscription Store Synchronization\Subscriptions Store Synchronizing"

Get-Counter -Counter "\Citrix Subscription Store Synchronization\Number Subscriptions Synchronized"

Get-Counter -Counter "\Citrix Subscription Store Synchronization\Number Subscriptions Transferred"

<!--NeedCopy-->