-
-
-
-
-
-
Multi-Tenancy With Splunk
-
Data Distribution and Separation (Routing to Multiple Backends)
-
-
This content has been machine translated dynamically.
Dieser Inhalt ist eine maschinelle Übersetzung, die dynamisch erstellt wurde. (Haftungsausschluss)
Cet article a été traduit automatiquement de manière dynamique. (Clause de non responsabilité)
Este artículo lo ha traducido una máquina de forma dinámica. (Aviso legal)
此内容已经过机器动态翻译。 放弃
このコンテンツは動的に機械翻訳されています。免責事項
이 콘텐츠는 동적으로 기계 번역되었습니다. 책임 부인
Este texto foi traduzido automaticamente. (Aviso legal)
Questo contenuto è stato tradotto dinamicamente con traduzione automatica.(Esclusione di responsabilità))
This article has been machine translated.
Dieser Artikel wurde maschinell übersetzt. (Haftungsausschluss)
Ce article a été traduit automatiquement. (Clause de non responsabilité)
Este artículo ha sido traducido automáticamente. (Aviso legal)
この記事は機械翻訳されています.免責事項
이 기사는 기계 번역되었습니다.책임 부인
Este artigo foi traduzido automaticamente.(Aviso legal)
这篇文章已经过机器翻译.放弃
Questo articolo è stato tradotto automaticamente.(Esclusione di responsabilità))
Translation failed!
Multi-Tenancy in Splunk With Different Access Roles
Introduction
Service providers servicing many different customers typically have the need to provide access to each tenant’s data independently. Similarly, other types of customers may need to provide access to subsets of their data to users from individual departments or geo locations.
For such use cases where granular data access and visibility need to be granted, Splunk provides appropriate RBAC controls, fully supporting multi-tenancy. The same applies, by extension, to uberAgent.
This practice guide describes the muli-tenancy uberAgent scenario with Splunk Cloud in more detail.
Let’s think about the following use case. There is one IT infrastructure that serves multiple departments (which we’re going to call “customers”). Additionally, there is an admin team that oversees all departments. Now, the requirement is that all customer environments are monitored with uberAgent. All uberAgent instances on all customer devices should send data to a single Splunk instance. However, each customer should be able to use the uberAgent Splunk apps but only see their data. Additionally, the admin team should see all customers’ data.
Concept
Splunk stores data in indexes. This makes it necessary to work with different indexes, and permissions that are assigned to those indexes. As mentioned earlier, the administrators should be able to analyze all customer specific indexes. This means that the administrator team needs permissions for all indexes.
Setting up a multi-tenant Splunk and uberAgent installation is simple. We’re going to follow the concept outlined in this Splunk blog post.
Implementation
This guide shows the necessary steps in Splunk Cloud. The steps performed can also be applied to Splunk Enterprise. Please note that menus can look slightly different in Splunk Enterprise.
Index Creation
We need indexes for each of the customers in Splunk. Therefore, as a first step, one needs to create the customer specific indexes. An index is where Splunk stores processed, searchable events.
This can be done by clicking Settings and then selecting Indexes under the Data menu in the Splunk Cloud Web GUI.

In the following screen, the uberAgent indexes need to be created. While the “main index” name can be customized (it must still start with uberagent* to avoid additional configuration changes), the default score index names have to be kept.
In this scenario, we’re working with two customer indexes: uberagent_customer_a and uberagent_customer_b for the uberAgent event data. As you can see below, both score indexes are kept as is (see more details here).

Max size, retention times, and any other individual configuration options can be configured based on infrastructure requirements.
Note: On Splunk Enterprise, the required default indexes are created automatically when installing the uberAgent indexer app. You’d only need to create the customer-specific indexes. To avoid confusion, please delete or modify the index called “uberagent” as it is not needed when you follow the multi-tenancy approach.
Creating HTTP Event Collector Tokens
Now that the indexes have been created, we need to create individual HTTP Event Collector (HEC) inputs. A HEC is a high-performance REST API that accepts data via HTTP or HTTPS (Splunk Cloud only supports HTTPS). Clients must authenticate with a token in order to be able to send data to a HEC input. Therefore, we’re generating the HEC tokens through Settings-> Data Inputs.
From here, add new HTTP Event Collector Inputs.

Configure the HEC input as shown in the screenshot below. Give it a meaningful name and description. Click Next.
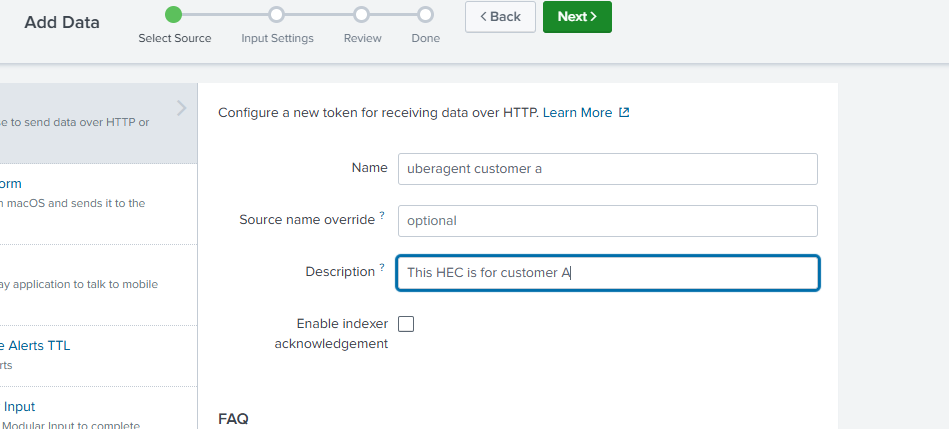
In the next step, assign the corresponding index to this HEC input by selecting one of the customer specific indexes. As you can see in the screenshot below, we’re assigning the index for customer A. Please make sure that Source type is set to automatic.
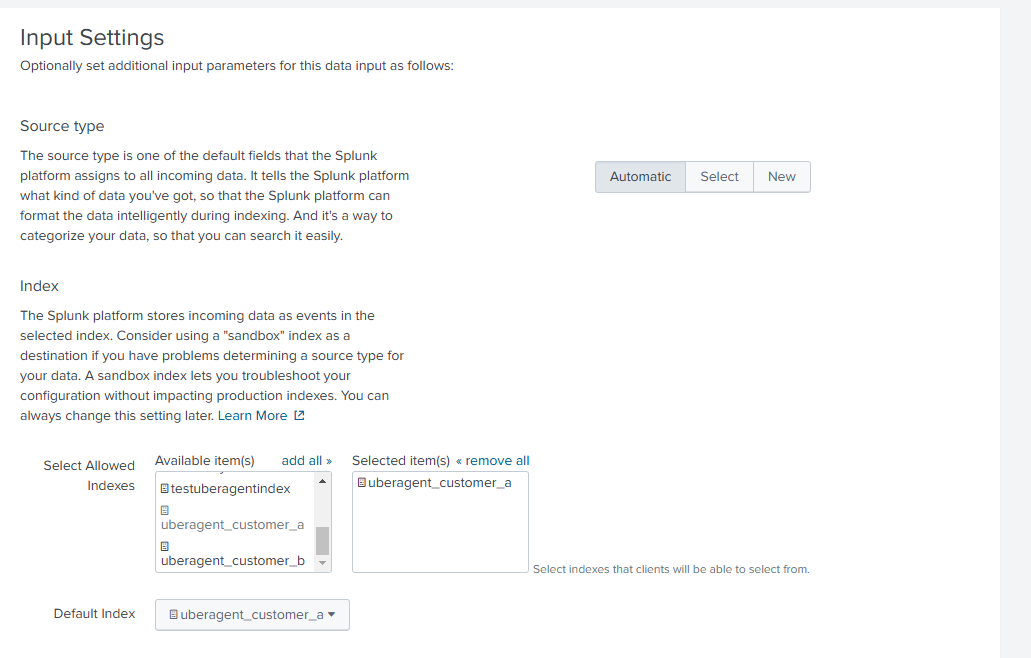
Click Review to see a summary of all settings. If everything is correct, click Submit to create the HEC input.

Please take a note of the HEC token that is shown after HEC input creation, and save it for the next step. If you want your customers to use individual HEC inputs, repeat the steps above for all customer indexes. A benefit of this approach would be that your customers are not able to accidentally send data to another customer’s index as they have different HEC tokens to authenticate with.
If all customers should use the same HEC token, feel free to assign multiple indexes to that HEC input. However, make sure that the indexes are specified in the uberAgent configuration. In all cases, the uberAgent configuration must match the indexes as configured in Splunk.
Configuring uberAgent® To Send to Custom Indexes
Now that we have the HEC input(s) created, we need to update the uberAgent receiver configuration on the endpoint with the HEC token.
Example for customer A:
[Receiver]
Name = Splunk Cloud
Type = Splunk
Protocol = http
Servers = https://<instance-name>.splunkcloud.com:433
RESTToken=99201b14-4d48-49bf-8580-e856e80939f3
Index=uberagent_customer_a
<!--NeedCopy-->
Note that although HTTP Event Collector to Splunk Cloud always uses an encrypted connection through HTTPS, the protocol has to be set to HTTP. uberAgent uses a secured connection based on the connection target listed in the Servers setting.
Replace the RESTToken value with the token that you’ve seen after creating the HEC input. Finally, enter the custom index name that was created in the first step of this guide. uberAgent sends its data to the index specified in the index setting. If you don’t configure this option, uberAgent attempts to send its data to the default index called “uberagent”. Please note that the send attempt may fail if you assigned a custom index to the HEC input.
Creating Roles
Customer Roles
With the previous step, we’ve enabled uberAgent to send data to a custom index. In this step, we’re going to build roles that determine a user’s permissions.
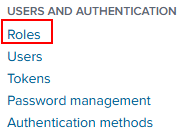
Navigate to Settings -> Users and Authentication -> Roles.
Add a new role for each customer-specific index. New roles can be set up by inheriting permissions/privileges from different roles. In this guide, we’re focusing on the basics. Hence, we’re not inheriting any permissions for the customer-specific roles.
Attention: Please consult your Splunk team for the specific permissions to assign.
Next is the Capabilities tab. In this section, we need to select the “search” capability. You may need additional capabilities.

In the next tab, we’re selecting the indexes which this role should be allowed to access.

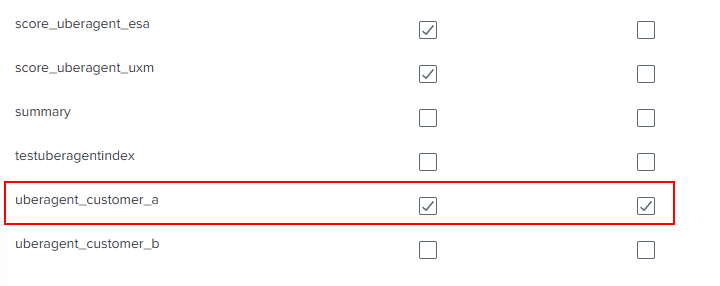
Be sure to select (at least) three uberAgent indexes:
- The customer-specific index (specified in the uberAgent receiver config above)
- score_uberagent_uxm
- score_uberagent_esa
Select the customer specific index as the default index. Make sure you don’t select an index that is for a different customer.
On the next tab, we need to configure restrictions. This setting determines which events this role is allowed to search. As the score indexes are used for all customer indexes, we need to limit access to only customer specific data. When scores are written into the score index, they’re referenced where they came from. Therefore, we need to combine this in the restrictions as well.
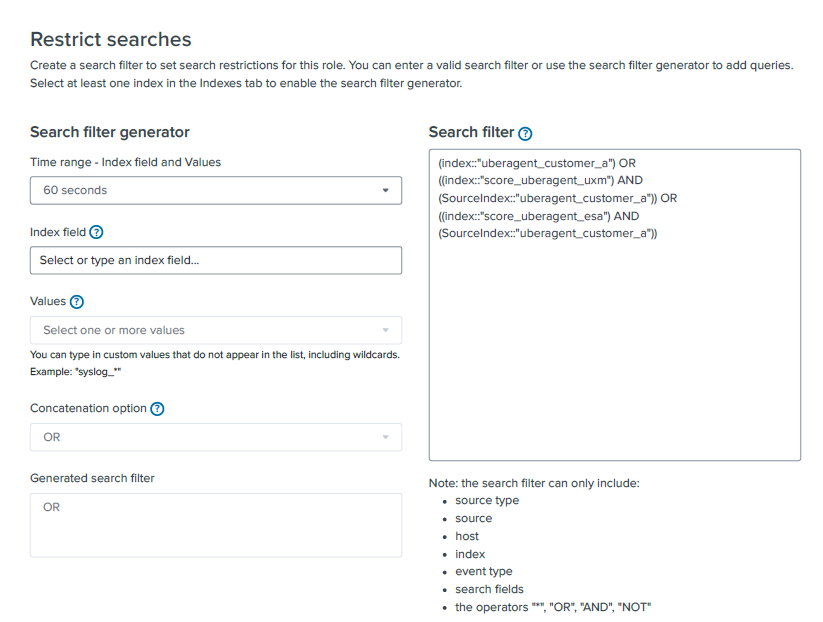
Search filter:
(index::"uberagent_customer_a") OR ((index::"score_uberagent_uxm") AND (SourceIndex::"uberagent_customer_a")) OR ((index::"score_uberagent_esa") AND (SourceIndex::"uberagent_customer_a"))
<!--NeedCopy-->
To break it down:
- The role is allowed to search in the customer specific index uberagent_customer_a.
and
- In index score_uberagent_uxm but only if the source index is equal to the customer specific index, in this case uberagent_customer_a.
and
- In index score_uberagent_esa but only if the source index is equal to the customer specific index, in this case uberagent_customer_a.
Repeat the above steps for the second index, uberagent_customer_b by exchanging the index specific variables.
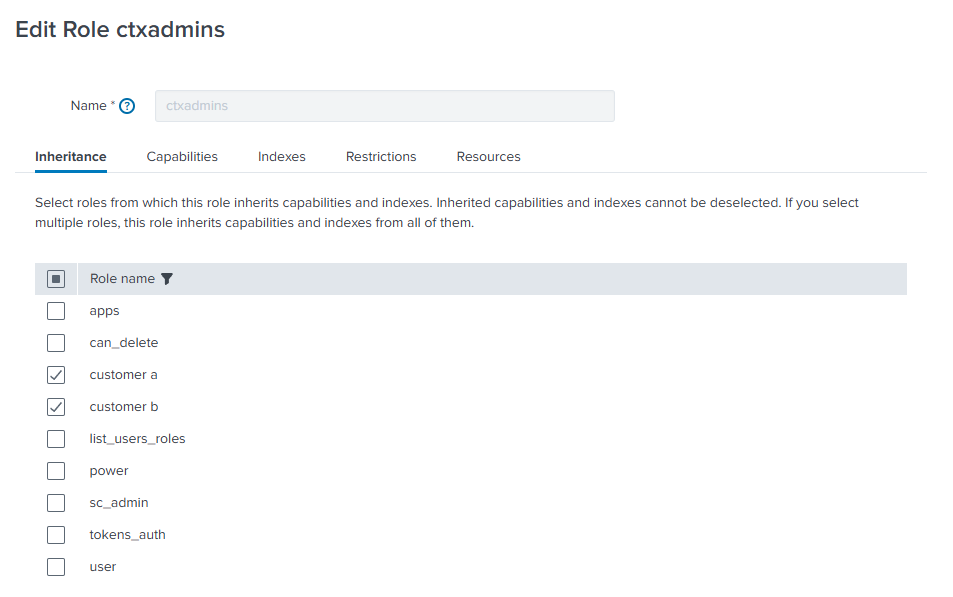
Administrator Role
Finally, we need to create a group for the administrators that is available to search in all uberAgent indexes.
In this case, we can simply inherit the permissions from our customer specific roles unless you want to add capabilities.
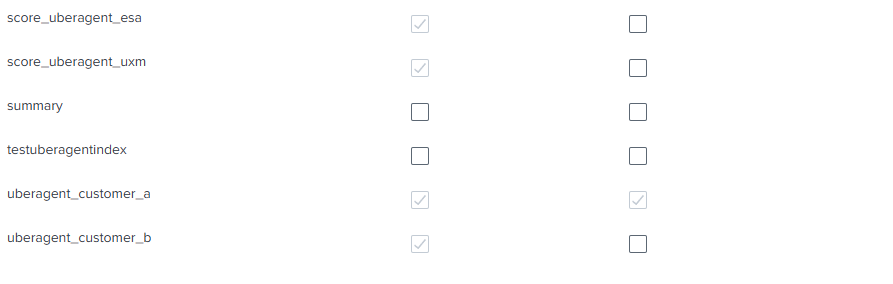
When selecting the “Indexes” tab, you see the corresponding indexes being automatically selected:
Assign Roles to Users
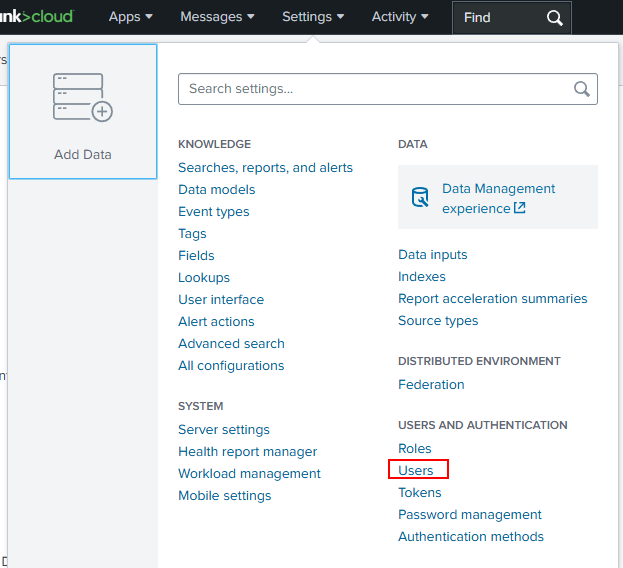
As a last step, we need to assign user accounts to these new roles. This can be done through the menu Settings -> Users and Authentication -> Users.
When editing the user of interest, be sure to select the checkbox for the specific group and the little arrow sign to “assign” the membership.
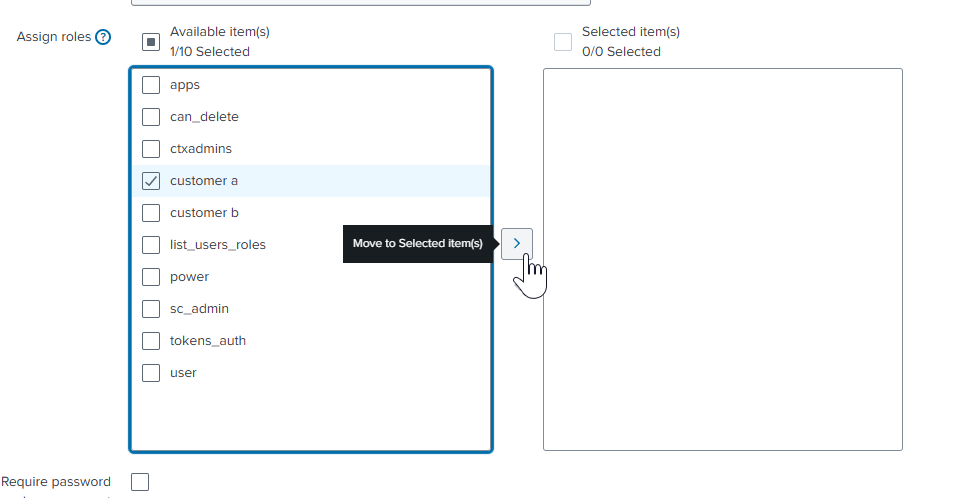
After adding the group, make sure to save the user account.
Conclusion
Let’s review what we’ve configured. We created two separated indexes for our customer-specific requirements. uberAgent was configured to send the collected data to a customer-specific index. As Splunk users should be able to view only “their” data in the Splunk dashboards, we’ve configured roles that grant the access. Additionally, we’ve created an administrator group that has access to both indexes. This way, they can support both customers while the data itself is separated.
Share
Share
In this article
This Preview product documentation is Citrix Confidential.
You agree to hold this documentation confidential pursuant to the terms of your Citrix Beta/Tech Preview Agreement.
The development, release and timing of any features or functionality described in the Preview documentation remains at our sole discretion and are subject to change without notice or consultation.
The documentation is for informational purposes only and is not a commitment, promise or legal obligation to deliver any material, code or functionality and should not be relied upon in making Citrix product purchase decisions.
If you do not agree, select I DO NOT AGREE to exit.