Configure Session Recording
Configure Session Recording to play and record sessions
After you install the Session Recording components, perform the following steps to configure Session Recording to record XenApp or XenDesktop® sessions and allow users to view them:
- Authorize users to play recordings
- Authorize users to administer recording policies
- Set an active recording policy to record sessions
- Configure custom policies
- Configure the Session Recording Player to connect to the Session Recording Server
Authorize users to play recorded sessions
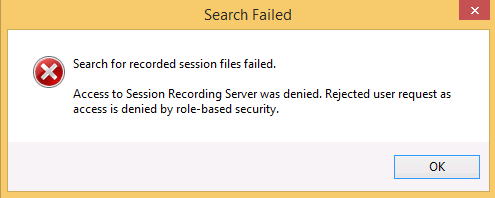
When you install Session Recording, no user has the permission to play recorded sessions. You must assign the permission to each user, including the administrator. A user without the permission to play recorded sessions receives the following error message when trying to play a recorded session:
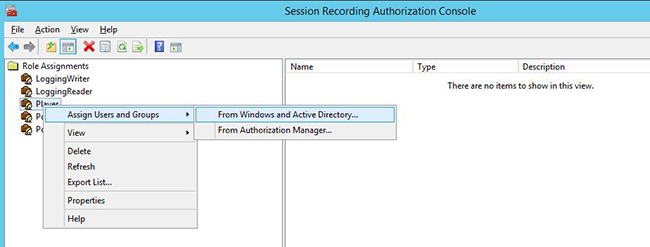
- Log on as an administrator to the computer hosting the Session Recording Server.
- Start the Session Recording Authorization Console.
- In the Session Recording Authorization Console, select Player.
- Add the users and groups you want to authorize to view recorded sessions.
Authorize users to administer recording policies
When you install Session Recording, domain administrators grant the permission to control the recording policies by default. You can change the authorization setting.
- Log on as an administrator to the machine hosting the Session Recording Server.
- Start the Session Recording Authorization Console and select PolicyAdministrators.
- Add the users and groups who can administer recording policies.
Set the active recording policy to record sessions
The active recording policy specifies a session recording behavior on all VDAs or VDIs that have the Session Recording Agent installed and connected to the Session Recording Server. When you install Session Recording, the active recording policy is Do not record. Sessions cannot be recorded until you change the active recording policy.
Important: A policy can contain many rules, but only one active policy can be running at a time.
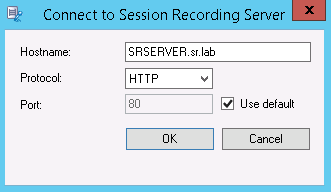
- Log on as an authorized Policy Administrator to the server where the Session Recording Policy Console is installed.
- Start the Session Recording Policy Console.
-
If the Connect to Session Recording Server dialog box appears, ensure that the name of the computer hosting the Session Recording Server, the protocol, and the port number are correct.
- In the Session Recording Policy Console, expand Recording Policies to display the recording policies available, with a check mark indicating which policy is active:
- Do not record. The default policy. If you do not specify another policy, no sessions are recorded.
- Record everyone with notification. If you choose this policy, all sessions are recorded. A window appears to notify each recording occurrence.
- Record everyone without notification. If you choose this policy, all sessions are recorded. No window appears to notify recording occurrence.
- Select the policy you want to make active.
- From the menu bar, choose Action > Activate Policy.
Session Recording allows you to create your own recording policy. When you create recording policies, they appear in the Recording Policies folder of the Session Recording Policy Console.
The generic recording policy might not fit your requirements. You can configure policies and rules based on users, VDA and VDI servers, Delivery Groups, and applications. For more information about custom policies, see Create custom recording policies.
Note: The Administrator Logging feature of Session Recording allows you to log the recording policy changes. For more information, see Log administration activities.
Configure the Session Recording Player
Before a Session Recording Player can play sessions, you must configure it to connect to the Session Recording Server that stores the recorded sessions. Each Session Recording Player can be configured with the ability to connect to multiple Session Recording Servers, but can connect to only one Session Recording Server at a time. If the Player is configured with the ability to connect to multiple Session Recording Servers, users can change which Session Recording Server the Player connects to by selecting a check box on the Connections tab at Tools > Options.
- Log on to the workstation where the Session Recording Player is installed.
- Start the Session Recording Player.
- From the Session Recording Player menu bar, choose Tools > Options.
- On the Connections tab, click Add.
- In the Hostname field, type the name or IP address of the computer hosting the Session Recording Server and select the protocol. By default, Session Recording is configured to use HTTPS/SSL to secure communications. If SSL is not configured, select HTTP.
- To configure the Session Recording Player with the ability to connect to multiple Session Recording Servers, repeat Steps 4 and 5 for each Session Recording Server.
- Ensure that you select the check box for the Session Recording Server you want to connect to.
Configure the connection to the Session Recording Server
The connection between the Session Recording Agent and the Session Recording Server is typically configured when the Session Recording Agent is installed. To configure this connection after the Session Recording Agent is installed, use Session Recording Agent Properties.
- Log on to the server where the Session Recording Agent is installed.
- From the Start menu, choose Session Recording Agent Properties.
- Click the Connections tab.
-
In the Session Recording Server field, type the FQDN of the Session Recording Server.
Note:
To use Message Queuing over HTTPS (TCP is used by default), type an FQDN in the Session Recording Server field. Otherwise, session recording fails.
-
In the Session Recording Storage Manager message queue section, select the protocol that is used by the Session Recording Storage Manager to communicate and modify the default port number if necessary.
Note:
To use Message Queuing over HTTP and HTTPS, install all the IIS recommended features.
- In the Message life field, accept the default 7,200 seconds (two hours) or type a new value for the number of seconds each message is retained in the queue if there is a communication failure. After this period of time elapses, the message is deleted and the file is playable until the point where the data is lost.
- In the Session Recording Broker section, select the communication protocol that the Session Recording Broker uses to communicate and modify the default port number if necessary.
- When prompted, restart the Session Recording Agent Service to accept the changes.