Citrix Workspace app 分析
如果您拥有 Citrix Analytics,则可以配置 StoreFront,以便 Citrix Workspace app 将用户事件发送到 Citrix Analytics 进行处理。Citrix Analytics 聚合有关用户、应用程序、端点、网络和数据的指标,以提供对用户行为的全面洞察。要了解 Citrix Analytics 文档中的此功能,请参阅使用 StoreFront 载入 Virtual Apps and Desktops 站点。
要配置此行为,请执行以下操作:
- 从 Citrix Analytics 下载配置文件。
- 使用 PowerShell 将 Citrix Analytics 数据导入到您的本地 StoreFront 部署中。
配置 StoreFront 后,当 Citrix Analytics 服务请求时,Citrix Workspace app 可以从 StoreFront 存储发送数据。
重要提示:
您的 StoreFront 部署必须能够联系 Citrix API Services。请参阅分析网络要求。
从 Citrix Analytics 下载配置文件
重要提示:
初始配置需要包含敏感信息的配置文件。下载后请妥善保管该文件。请勿与组织外部的任何人共享此文件。配置完成后,您可以删除此文件。如果需要在另一台计算机上重新应用配置,可以从 Citrix Analytics 服务管理控制台再次下载该文件。
- 使用管理员帐户登录到 monitor (
https://citrix.cloud.com/)。 - 选择一个 monitor 客户。
-
单击管理以打开 Citrix Analytics 服务管理控制台。
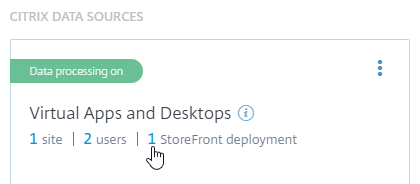
- 在 Citrix Analytics 服务管理控制台中,选择设置 > 数据源。
- 在 Virtual App and Desktops 卡片中,选择 (⋮) 菜单图标,然后选择连接 StoreFront 部署。
- 在“连接 StoreFront 部署”页面上,选择下载文件以下载 StoreFrontConfigurationFile.json 文件。
示例配置文件
{
  "customerId": "<yourcloudcustomer>",
  "enablementService": " https://api.analytics.cloud.com /casvc/<yourcloudcustomer>/ctxana/v1/cas/<yourcloudcustomer>/XenDesktop/<deviceid>/dsconfigdata",
  "cwsServiceKey": "PFJTPn…….. T4=",
  "enablementServiceStatus": " https://api.analytics.cloud.com /casvc/<yourcloudcustomer>/ctxana/v1/cas/storefront/config",
  "instanceId": "d98f21d0-56e0-11e9-ba52-5136d90862fe",
  "name": "CASSingleTenant"
}
<!--NeedCopy-->
其中
customerId 是当前 monitor 客户的唯一 ID。
cwsServiceKey 是标识当前 monitor 客户帐户的唯一密钥。
instanceID 是一个生成的 ID,用于签署(保护)从 Citrix Workspace app 到 Citrix Analytics 的请求。如果您向 monitor 注册了多个 StoreFront 服务器或服务器组,则每个服务器或服务器组都有一个唯一的 instanceID。
将 Citrix Analytics 数据导入到您的 StoreFront™ 部署中
- 将 StoreFrontConfigurationFile.json 文件复制到本地 StoreFront 服务器(或 StoreFront 服务器组中的一台服务器)上的相应文件夹中。以下命令假定该文件已保存到桌面。
- 打开 PowerShell ISE 并选择以管理员身份运行。
-
运行以下命令:
Import-STFCasConfiguration -Path "$Env:UserProfile\Desktop\StoreFrontConfigurationFile.json" Get-STFCasConfiguration <!--NeedCopy--> -
此命令返回导入数据的副本并将其显示在 PowerShell 控制台中。

注意:
安装在 Windows Server 2012 R2 上的本地 StoreFront 服务器可能需要手动安装 C++ 运行时软件组件,以便它们可以向 CAS 注册。如果在 Citrix Virtual Apps and Desktops 安装期间安装 StoreFront,则不需要此步骤,因为 CVAD 元安装程序已安装 C++ 运行时组件。如果仅使用 CitrixStoreFront-x64.exe 元安装程序安装 StoreFront 而未安装 C++ 运行时,则在导入 CAS 配置文件后,它可能无法向 monitor 注册。
将 Citrix Analytics 数据传播到 StoreFront 服务器组
如果您正在 StoreFront 服务器组上执行这些操作,则必须将导入的 Citrix Analytics 数据传播到服务器组的所有成员。在单个 StoreFront 服务器部署中,此步骤不是必需的。
要传播数据,请使用以下方法之一:
- 使用 StoreFront 管理控制台。
- 使用 PowerShell cmdlet Publish-STFServerGroupConfiguration。
检查 StoreFront 服务器组 ID
要检查您的部署是否已成功向 Citrix Analytics 服务注册,您可以使用 PowerShell 发现部署的 ServerGroupID。
- 登录到您的 StoreFront 服务器,或登录到服务器组中的一台 StoreFront 服务器。
- 打开 PowerShell ISE 并选择以管理员身份运行。
-
运行以下命令:
$WebConfigPath = "C:\Program Files\Citrix\Receiver StoreFront\Framework\FrameworkData\Framework.xml"
$XMLObject = (Get-Content $WebConfigPath) -as [Xml]
$XMLObject.framework.properties.property
<!--NeedCopy-->
例如,这些命令会生成如下所示的输出:
name value
---- -----
ClusterId 8b8ff5c8-44ba-46e4-87f0-2df8cff31432
HostBaseUrl https://storefront.example.com/
SelectedIISWebSiteId 1
AdminConsoleOperationMode Full
<!--NeedCopy-->
停止从 StoreFront 向 Citrix Analytics 发送数据
- 打开 PowerShell ISE 并选择以管理员身份运行。
-
运行以下命令:
Remove-STFCasConfigurationGet-STFCasConfiguration如果以前导入的 Citrix Analytics 数据已成功删除,则 Get-STFCasConfiguration 不会返回任何内容。
-
如果您正在 StoreFront 服务器组上执行这些操作,请传播更改并从服务器组的所有成员中删除导入的 Citrix Analytics 数据。在服务器组中的一台服务器上,运行以下命令:
Publish-STFServerGroupConfiguration -
在任何其他服务器组成员上,运行以下命令以确认 Citrix Analytics 配置已从组中的所有服务器成功删除:
Get-STFCasConfiguration - 使用管理员帐户登录到 monitor (
https://citrix.cloud.com/)。 - 选择一个 monitor 客户。
- 单击管理以打开 Citrix Analytics 服务管理控制台。
- 在 Citrix Analytics 服务管理控制台中,选择设置 > 数据源。
-
在 Virtual App and Desktops 卡片中,选择 StoreFront 部署计数:
- 通过引用其主机基本 URL 和 ServerGroupID 来识别要删除的 StoreFront 部署。
-
在 (⋮) 菜单中,选择从 Analytics 中删除 StoreFront 部署。
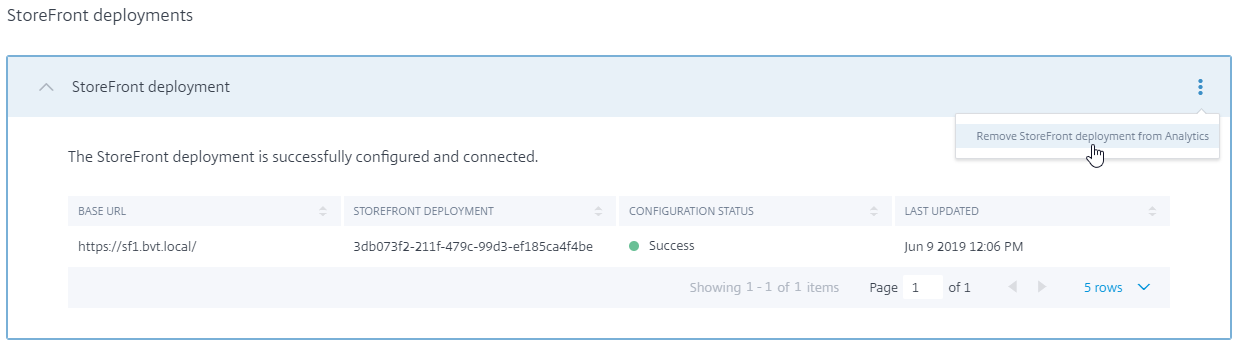
注意:
如果您从服务器端删除配置,但未从 Citrix Analytics 中删除,则 StoreFront 部署条目仍保留在 Citrix Analytics 中,但不会从 StoreFront 接收任何数据。如果您仅从 Citrix Analytics 中删除配置,则 StoreFront 部署条目将在下一次应用程序池回收(在 IIS 重置或每 24 小时自动执行一次)时重新添加。
配置 StoreFront 以使用 Web 代理联系 monitor 并向 Citrix Analytics 注册
如果 StoreFront 放置在 Web 代理后面的主机 Web 服务器上,则向 Citrix Analytics 的注册将失败。如果 StoreFront 管理员在其 Citrix 部署中使用 HTTP 代理,则发往 Internet 的 StoreFront 流量必须先通过 Web 代理,然后才能到达云中的 Citrix Analytics。StoreFront 不会自动使用托管操作系统的代理设置;需要进行额外配置才能指示存储通过 Web 代理发送出站流量。您可以通过向存储 web.config 文件添加新部分来配置 <system.net> 代理配置。对 StoreFront 服务器上将用于向 Citrix Analytics 发送数据的每个存储执行此操作。
方法 1:通过 Powershell 为一个或多个存储设置存储代理配置(推荐)
运行 Powershell 脚本 Config-StoreProxy.ps1 可自动为一个或多个存储执行此过程,并自动插入有效的 XML 以配置 <system.net>。该脚本还会将存储 web.config 文件备份到当前用户的桌面,从而允许在必要时恢复未修改的 web.config 文件。
注意:
多次运行脚本可能会导致添加多个
<system.net>XML 副本。每个存储应只有一个<system.net>条目。添加多个副本会阻止存储代理配置正常工作。
-
打开 Powershell ISE 并选择以管理员身份运行。
-
设置
$Stores = @("Store","Store2")以包含您希望使用 Web 代理配置的存储。 -
指定以下任一选项:
- IP 地址,或
- Web 代理的 FQDN
-
运行以下 Powershell:
$Stores = @("Store","Store2") $ProxyIP = "10.0.0.1" $ProxyFQDN = "proxyserver.example.com" $ProxyPort = 8888 # Set this for every Store using Stores array function Set-StoreProxyServer() # Tested with both IP and FQDN { [CmdletBinding()] param([Parameter(Mandatory=$true,ParameterSetName="ProxyIP")][Parameter(Mandatory=$true,ParameterSetName="ProxyFQDN")][array]$Stores, [Parameter(Mandatory=$true,ParameterSetName="ProxyIP")][string]$ProxyIP, [Parameter(Mandatory=$true,ParameterSetName="ProxyFQDN")][string]$ProxyFQDN, [Parameter(Mandatory=$true,ParameterSetName="ProxyIP")][Parameter(Mandatory=$true,ParameterSetName="ProxyFQDN")][int]$ProxyPort) foreach($Store in $Stores) { Write-Host "Backing up the Store web.config file for store $Store before making changes..." -ForegroundColor "Yellow" Write-Host "`n" if(!(Test-Path "$env:UserProfile\desktop\$Store\")) { Write-Host "Creating $env:UserProfile\desktop\$Store\ directory for backup..." -ForegroundColor "Yellow" New-Item -Path "$env:UserProfile\desktop\$Store\" -ItemType "Directory" | Out-Null Write-Host "`n" } Write-Host "Copying c:\inetpub\wwwroot\Citrix\$Store\web.config to $env:UserProfile\desktop\$Store\..." -ForegroundColor "Yellow" Copy-Item -Path "c:\inetpub\wwwroot\Citrix\$Store\web.config" -Destination "$env:UserProfile\desktop\$Store\" -Force | Out-Null if(Test-Path "$env:UserProfile\desktop\$Store\web.config") { Write-Host "$env:UserProfile\desktop\$Store\web.config file backed up" -ForegroundColor "Green" } else { Write-Host "$env:UserProfile\desktop\$Store\web.config file NOT found!" -ForegroundColor "Red" } Write-Host "`n" Write-Host "Setting the proxy server to $ProxyAddress for Store $Store..." -ForegroundColor "Yellow" Write-Host "`n" $StoreConfigPath = "c:\inetpub\wwwroot\Citrix\$Store\web.config" $XMLObject = (Get-Content $StoreConfigPath) -as [Xml] if([string]::IsNullOrEmpty($ProxyFQDN)) { $ProxyServer = ("HTTP://$ProxyIP"+":"+$ProxyPort) } else { $ProxyServer = ("HTTP://$ProxyFQDN"+":"+$ProxyPort) } $XMLObject = (Get-Content $StoreConfigPath) -as [Xml] # Create 3 elements $SystemNet = $XMLObject.CreateNode("element","system.net","") $DefaultProxy = $XMLObject.CreateNode("element","defaultProxy","") $Proxy = $XMLObject.CreateNode("element","proxy","") $Proxy.SetAttribute("proxyaddress","$ProxyServer") $Proxy.SetAttribute("bypassonlocal","true") # Move back up the XML tree appending new child items in reverse order $DefaultProxy.AppendChild($Proxy) $SystemNet.AppendChild($DefaultProxy) $XMLObject.configuration.AppendChild($SystemNet) # Save the modified XML document to disk $XMLObject.Save($StoreConfigPath) Write-Host "Getting the proxy configuration for c:\inetpub\wwwroot\Citrix\$Store..." -ForegroundColor "Yellow" $XMLObject = (Get-Content $StoreConfigPath) -as [Xml] $ConfiguredProxyServer = $XMLObject.configuration.'system.net'.defaultProxy.proxy.proxyaddress | Out-Null Write-Host ("Configured proxy server for Store $Store"+": "+ $ConfiguredProxyServer) -ForegroundColor "Green" Write-Host "`n" } Write-Host "Restarting IIS..." -ForegroundColor "Yellow" IISReset /RESTART } Set-StoreProxyServer -Stores $Stores -ProxyFQDN $ProxyFQDN -ProxyPort $ProxyPort # OR Set-StoreProxyServer -Stores $Stores -ProxyIP $ProxyIP -ProxyPort $ProxyPort <!--NeedCopy--> -
检查
C:\inetpub\wwwroot\Citrix\<Store>\web.config现在是否在文件末尾包含<system.net>部分。</dependentAssembly> </assemblyBinding> </runtime> <system.net> <defaultProxy> <proxy proxyaddress="HTTP://proxyserver.example.com:8888" bypassonlocal="true" /> </defaultProxy> </system.net> </configuration> <!--NeedCopy--> -
按照将 Citrix Analytics 数据导入到您的 StoreFront 部署中中的说明导入 Citrix Analytics 数据。
方法 2:手动将 <system.net> 部分添加到存储 web.config 文件
必须对 StoreFront 服务器上将用于向 Citrix Analytics 发送数据的每个存储执行此操作。
-
备份存储的 web.config 文件并将其复制到
C:\inetpub\wwwroot\Citrix\<Store>\web.config之外的另一个位置。 -
使用 FQDN 和端口组合或 IP 和端口组合修改以下 XML,以设置您的代理设置。
例如,使用 FQDN 和端口组合时,请使用以下
<system.net>元素:<system.net> <defaultProxy> <proxy proxyaddress="HTTP://proxyserver.example.com:8888" bypassonlocal="true" /> </defaultProxy> </system.net> <!--NeedCopy-->例如,使用 IP 和端口组合时,请使用以下
<system.net>元素:<system.net> <defaultProxy> <proxy proxyaddress="HTTP://10.0.0.1:8888" bypassonlocal="true" /> </defaultProxy> </system.net> <!--NeedCopy--> -
在存储 web.config 文件的末尾,在此处指示的位置插入相应的
<system.net>元素:<runtime> <gcServer enabled="true" /> <assemblyBinding xmlns="urn:schemas-microsoft-com:asm.v1"> <dependentAssembly> <assemblyIdentity name="System.Web.MVC" publicKeyToken="31BF3856AD364E35" culture="neutral" /> <bindingRedirect oldVersion="0.0.0.0-5.0.0.0" newVersion="5.0.0.0" /> </dependentAssembly> <dependentAssembly> <assemblyIdentity name="Newtonsoft.Json" publicKeyToken="30ad4fe6b2a6aeed" culture="neutral" /> <bindingRedirect oldVersion="0.0.0.0-9.0.0.0" newVersion="9.0.0.0" /> </dependentAssembly> </assemblyBinding> </runtime> Insert the <system.net> element here </configuration> <!--NeedCopy--> -
按照将 Citrix Analytics 数据导入到您的 StoreFront 部署中中的说明导入 Citrix Analytics 数据。