Citrix Analytics service
If you are a Monitor customer and you have an on-premises StoreFront deployment, you can configure StoreFront so that data is sent to the Citrix Analytics service in Monitor. When configured, Citrix Workspace app and web browsers send user events to Citrix Analytics for processing. Citrix Analytics aggregates metrics on users, applications, endpoints, networks, and data to provide comprehensive insights into user behavior. To read about this feature in the Citrix Analytics documentation, see Onboard Virtual Apps and Desktops Sites using StoreFront.
To configure this behavior:
- Download a configuration file from Citrix Analytics.
- Import Citrix Analytics data into your on-premises StoreFront deployment using PowerShell.
After StoreFront is configured, Citrix Workspace app can send data from StoreFront stores when the Citrix Analytics service requests it.
Important:
Your StoreFront deployment must be able to contact the following addresses at port 443 for this feature to work properly and consume the Monitor services:
https://*.cloud.comhttps://*.citrixdata.com
Download the configuration file from Citrix Analytics
Important:
A configuration file containing sensitive information is required for initial configuration. Keep the file safe after downloading. Do not share this file with anyone outside of your organization. After configuration you can delete this file. If you need to reapply the configuration again on another machine, you can download the file again from the Citrix Analytics service management console.
- Log on to Monitor (
https://citrix.cloud.com/) using an administrator account. - Select a Monitor customer.
-
Open the Citrix Analytics service management console by clicking Manage.
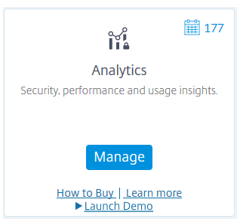
- In the Citrix Analytics service management console, select Settings > Data Sources.
- In the Virtual App and Desktops card, select the (⋮) menu icon then select Connect StoreFront deployment.
- On the Connect StoreFront Deployment page, select Download File to download the StoreFrontConfigurationFile.json file.
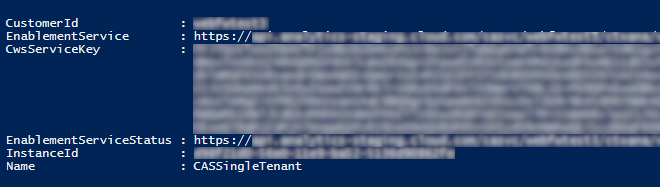
Example configuration file
{
  "customerId": "<yourcloudcustomer>",
  "enablementService": " https://api.analytics.cloud.com /casvc/<yourcloudcustomer>/ctxana/v1/cas/<yourcloudcustomer>/XenDesktop/<deviceid>/dsconfigdata",
  "cwsServiceKey": "PFJTPn…….. T4=",
  "enablementServiceStatus": " https://api.analytics.cloud.com /casvc/<yourcloudcustomer>/ctxana/v1/cas/storefront/config",
  "instanceId": "d98f21d0-56e0-11e9-ba52-5136d90862fe",
  "name": "CASSingleTenant"
}
<!--NeedCopy-->
where
customerId is the unique ID for the current Monitor customer.
cwsServiceKey is a unique key identifying the current Monitor customer account.
instanceID is a generated ID used to sign (secure) requests made from Citrix Workspace app to Citrix Analytics. If you register multiple StoreFront servers or server groups with Monitor, then each one has a unique instanceID.
Import Citrix Analytics data into your StoreFront deployment
- Copy the StoreFrontConfigurationFile.json file to a suitable folder on the on-premises StoreFront server (or one server in a StoreFront server group). The following commands assume that the file is saved to the Desktop.
- Open PowerShell ISE and select Run as Administrator.
-
Run the following commands:
Import-STFCasConfiguration -Path "$Env:UserProfile\Desktop\StoreFrontConfigurationFile.json" Get-STFCasConfiguration <!--NeedCopy--> -
This command returns a copy of the imported data and displays it in the PowerShell console.
Note:
On-premises StoreFront servers, which are installed on Windows Server 2012 R2, may require the C++ run time software components to be manually installed, so that they can register with CAS. If StoreFront is installed during Citrix Virtual Apps and Desktops installation, this step is not required, because the CVAD metainstaller already installs the C++ run time components. If StoreFront is installed using just the CitrixStoreFront-x64.exe metainstaller without the C++ runtime, it may fail to register with Monitor after you have imported the CAS configuration file.
Propagate Citrix Analytics data to a StoreFront server group
If you are performing these actions on a StoreFront server group, you must propagate the imported Citrix Analytics data to all members of the server group. This step is not necessary in a single StoreFront server deployment.
To propagate the data, use one of the following approaches:
- Use the StoreFront management console.
- Use the PowerShell cmdlet Publish-STFServerGroupConfiguration.
Check StoreFront server group ID
To check whether your deployment has successfully registered with the Citrix Analytics service, you can use PowerShell to discover the ServerGroupID for your deployment.
- Log on to your StoreFront server, or to one StoreFront server in the server group.
- Open PowerShell ISE and select Run as Administrator.
-
Run the following commands:
$WebConfigPath = "C:\Program Files\Citrix\Receiver StoreFront\Framework\FrameworkData\Framework.xml"
$XMLObject = (Get-Content $WebConfigPath) -as [Xml]
$XMLObject.framework.properties.property
<!--NeedCopy-->
For example, these commands generate output like the following:
name value
---- -----
ClusterId 8b8ff5c8-44ba-46e4-87f0-2df8cff31432
HostBaseUrl https://storefront.example.com/
SelectedIISWebSiteId 1
AdminConsoleOperationMode Full
<!--NeedCopy-->
Stop sending data to Citrix Analytics from StoreFront
- Open PowerShell ISE and select Run as Administrator.
-
Run the following commands:
Remove-STFCasConfigurationGet-STFCasConfigurationGet-STFCasConfiguration returns nothing if the previously imported Citrix Analytics data has been successfully removed.
-
If you are performing these actions on a StoreFront server group, propagate the change and remove the imported Citrix Analytics data from all members of the server group. On one server in the server group, run the following command:
Publish-STFServerGroupConfiguration -
On any other server group members, run the following command to confirm that Citrix Analytics configuration has been successfully removed from all servers in the group:
Get-STFCasConfiguration - Log on to Monitor (
https://citrix.cloud.com/) using an administrator account. - Select a Monitor customer.
- Open the Citrix Analytics service management console by clicking Manage.
- In the Citrix Analytics service management console, select Settings > Data Sources.
-
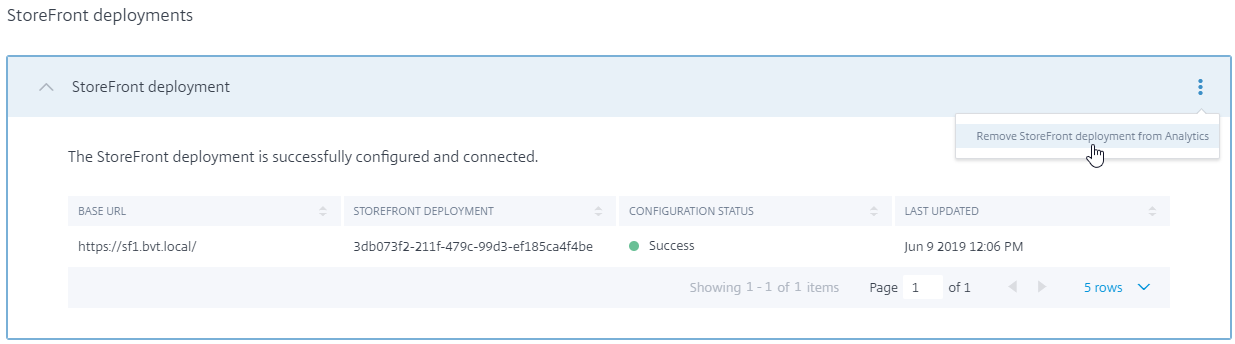
In the Virtual App and Desktops card, select the StoreFront deployment count:
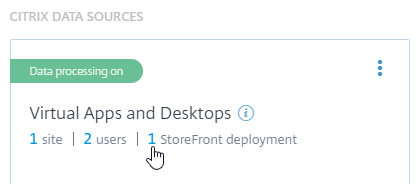
- Identify the StoreFront deployment you want to remove by referring to its host base URL and ServerGroupID.
-
In the (⋮) menu, select Remove StoreFront deployment from Analytics.
Note:
If you remove the configuration from the server side, but not from Citrix Analytics, the StoreFront deployment entry remains in Citrix Analytics but receives no data from StoreFront. If you remove the configuration only from Citrix Analytics, the StoreFront deployment entry is re-added at the next App pool recycle (done on an IIS reset or automatically every 24 hours).
Configure StoreFront to use a web proxy to contact Monitor and register with Citrix Analytics
If StoreFront is placed on a host webserver behind a web proxy, registration with Citrix Analytics will fail. If StoreFront administrators use an HTTP proxy in their Citrix deployment, StoreFront traffic bound for the Internet must pass through the web proxy before it reaches Citrix Analytics in the cloud. StoreFront does not automatically use the hosting OS’s proxy settings; additional configuration is required to instruct the store to send outbound traffic through the web proxy. You can configure a <system.net> proxy configuration by adding a new section to the store web.config file. Do this for every store on the StoreFront server that will be used to send data to Citrix Analytics.
Method 1: Set the store proxy configuration via Powershell for one or more stores (recommended)
Running the Powershell script Config-StoreProxy.ps1 automates this process for one or more stores and automatically inserts valid XML to configure <system.net>. The script also backs up the store web.config file to the current user’s desktop, allowing the unmodified web.config file to be restored if necessary.
Note:
Running the script more than once may result in multiple copies of the
<system.net> XML being added. Each store should only have a single entry for<system.net>. Adding multiple copies prevents the Store proxy configuration from working correctly.
-
Open up the Powershell ISE and select Run as Admin.
-
Set
$Stores = @("Store","Store2")to include the stores you wish to configure with a web proxy. -
Specify either:
- an IP address, OR
- an FQDN for the web proxy
-
Run the following Powershell:
$Stores = @("Store","Store2") $ProxyIP = "10.0.0.1" $ProxyFQDN = "proxyserver.example.com" $ProxyPort = 8888 # Set this for every Store using Stores array function Set-StoreProxyServer() # Tested with both IP and FQDN { [CmdletBinding()] param([Parameter(Mandatory=$true,ParameterSetName="ProxyIP")][Parameter(Mandatory=$true,ParameterSetName="ProxyFQDN")][array]$Stores, [Parameter(Mandatory=$true,ParameterSetName="ProxyIP")][string]$ProxyIP, [Parameter(Mandatory=$true,ParameterSetName="ProxyFQDN")][string]$ProxyFQDN, [Parameter(Mandatory=$true,ParameterSetName="ProxyIP")][Parameter(Mandatory=$true,ParameterSetName="ProxyFQDN")][int]$ProxyPort) foreach($Store in $Stores) { Write-Host "Backing up the Store web.config file for store $Store before making changes..." -ForegroundColor "Yellow" Write-Host "`n" if(!(Test-Path "$env:UserProfile\desktop\$Store\")) { Write-Host "Creating $env:UserProfile\desktop\$Store\ directory for backup..." -ForegroundColor "Yellow" New-Item -Path "$env:UserProfile\desktop\$Store\" -ItemType "Directory" | Out-Null Write-Host "`n" } Write-Host "Copying c:\inetpub\wwwroot\Citrix\$Store\web.config to $env:UserProfile\desktop\$Store\..." -ForegroundColor "Yellow" Copy-Item -Path "c:\inetpub\wwwroot\Citrix\$Store\web.config" -Destination "$env:UserProfile\desktop\$Store\" -Force | Out-Null if(Test-Path "$env:UserProfile\desktop\$Store\web.config") { Write-Host "$env:UserProfile\desktop\$Store\web.config file backed up" -ForegroundColor "Green" } else { Write-Host "$env:UserProfile\desktop\$Store\web.config file NOT found!" -ForegroundColor "Red" } Write-Host "`n" Write-Host "Setting the proxy server to $ProxyAddress for Store $Store..." -ForegroundColor "Yellow" Write-Host "`n" $StoreConfigPath = "c:\inetpub\wwwroot\Citrix\$Store\web.config" $XMLObject = (Get-Content $StoreConfigPath) -as [Xml] if([string]::IsNullOrEmpty($ProxyFQDN)) { $ProxyServer = ("HTTP://$ProxyIP"+":"+$ProxyPort) } else { $ProxyServer = ("HTTP://$ProxyFQDN"+":"+$ProxyPort) } $XMLObject = (Get-Content $StoreConfigPath) -as [Xml] # Create 3 elements $SystemNet = $XMLObject.CreateNode("element","system.net","") $DefaultProxy = $XMLObject.CreateNode("element","defaultProxy","") $Proxy = $XMLObject.CreateNode("element","proxy","") $Proxy.SetAttribute("proxyaddress","$ProxyServer") $Proxy.SetAttribute("bypassonlocal","true") # Move back up the XML tree appending new child items in reverse order $DefaultProxy.AppendChild($Proxy) $SystemNet.AppendChild($DefaultProxy) $XMLObject.configuration.AppendChild($SystemNet) # Save the modified XML document to disk $XMLObject.Save($StoreConfigPath) Write-Host "Getting the proxy configuration for c:\inetpub\wwwroot\Citrix\$Store..." -ForegroundColor "Yellow" $XMLObject = (Get-Content $StoreConfigPath) -as [Xml] $ConfiguredProxyServer = $XMLObject.configuration.'system.net'.defaultProxy.proxy.proxyaddress | Out-Null Write-Host ("Configured proxy server for Store $Store"+": "+ $ConfiguredProxyServer) -ForegroundColor "Green" Write-Host "`n" } Write-Host "Restarting IIS..." -ForegroundColor "Yellow" IISReset /RESTART } Set-StoreProxyServer -Stores $Stores -ProxyFQDN $ProxyFQDN -ProxyPort $ProxyPort # OR Set-StoreProxyServer -Stores $Stores -ProxyIP $ProxyIP -ProxyPort $ProxyPort <!--NeedCopy--> -
Check that the C:\inetpub\wwwroot\Citrix< Store>\web.config now contains a new
<system.net>section at the end of the web.config file.</dependentAssembly> </assemblyBinding> </runtime> <system.net> <defaultProxy> <proxy proxyaddress="HTTP://proxyserver.example.com:8888" bypassonlocal="true" /> </defaultProxy> </system.net> </configuration> <!--NeedCopy--> -
Import the Citrix Analytics data as described in Import Citrix Analytics data into your StoreFront deployment.
Method 2: Manually add a <system.net> section to the store web.config file
This must be done for every store on the StoreFront server that will be used to send data to Citrix Analytics.
-
Back up the web.config file for the store and copy it to another location outside of C:\inetpub\wwwroot\Citrix< Store>\web.config.
-
Modify the following XML with your proxy settings using either an FQDN-and-port combination, or using an IP-and-port combination.
For example, using an FQDN-and-port combination, use the following
<system.net>element:<system.net> <defaultProxy> <proxy proxyaddress="HTTP://proxyserver.example.com:8888" bypassonlocal="true" /> </defaultProxy> </system.net> <!--NeedCopy-->For example, using an IP-and-port combination, use the following
<system.net>element:<system.net> <defaultProxy> <proxy proxyaddress="HTTP://10.0.0.1:8888" bypassonlocal="true" /> </defaultProxy> </system.net> <!--NeedCopy--> -
At the end of the store web.config file, insert the appropriate
<system.net>element where indicated here:<runtime> <gcServer enabled="true" /> <assemblyBinding xmlns="urn:schemas-microsoft-com:asm.v1"> <dependentAssembly> <assemblyIdentity name="System.Web.MVC" publicKeyToken="31BF3856AD364E35" culture="neutral" /> <bindingRedirect oldVersion="0.0.0.0-5.0.0.0" newVersion="5.0.0.0" /> </dependentAssembly> <dependentAssembly> <assemblyIdentity name="Newtonsoft.Json" publicKeyToken="30ad4fe6b2a6aeed" culture="neutral" /> <bindingRedirect oldVersion="0.0.0.0-9.0.0.0" newVersion="9.0.0.0" /> </dependentAssembly> </assemblyBinding> </runtime> Insert the <system.net> element here </configuration> <!--NeedCopy--> -
Import the Citrix Analytics data as described in Import Citrix Analytics data into your StoreFront deployment.
In this article
- Download the configuration file from Citrix Analytics
- Import Citrix Analytics data into your StoreFront deployment
- Propagate Citrix Analytics data to a StoreFront server group
- Check StoreFront server group ID
- Stop sending data to Citrix Analytics from StoreFront
- Configure StoreFront to use a web proxy to contact Monitor and register with Citrix Analytics