Related Adaptive Authentication configurations
Edit an FQDN
You cannot edit an FQDN if Adaptive Authentication is selected as the authentication method in the Workspace configuration. You must switch to a different authentication method to edit the FQDN. However, you can edit the certificate if necessary.
Important:
- Before modifying the FQDN, ensure that the new FQDN is mapped to the IdP virtual server public IP address.
- Existing users who are connected to Citrix Gateway using OAuth policies must migrate your authentication method to Adaptive Authentication. For details, see Migrate your authentication method to Adaptive Authentication.
To edit an FQDN, perform the following:
-
Switch to a different authentication method from Adaptive Authentication.
-
Select I understand the impact on the subscriber experience, and then click Confirm.
When you click Confirm, the workspace login to end users is impacted and Adaptive Authentication is not used for authentication until Adaptive Authentication is enabled again. Therefore, it is recommended that you modify the FQDN during a maintenance window.
-
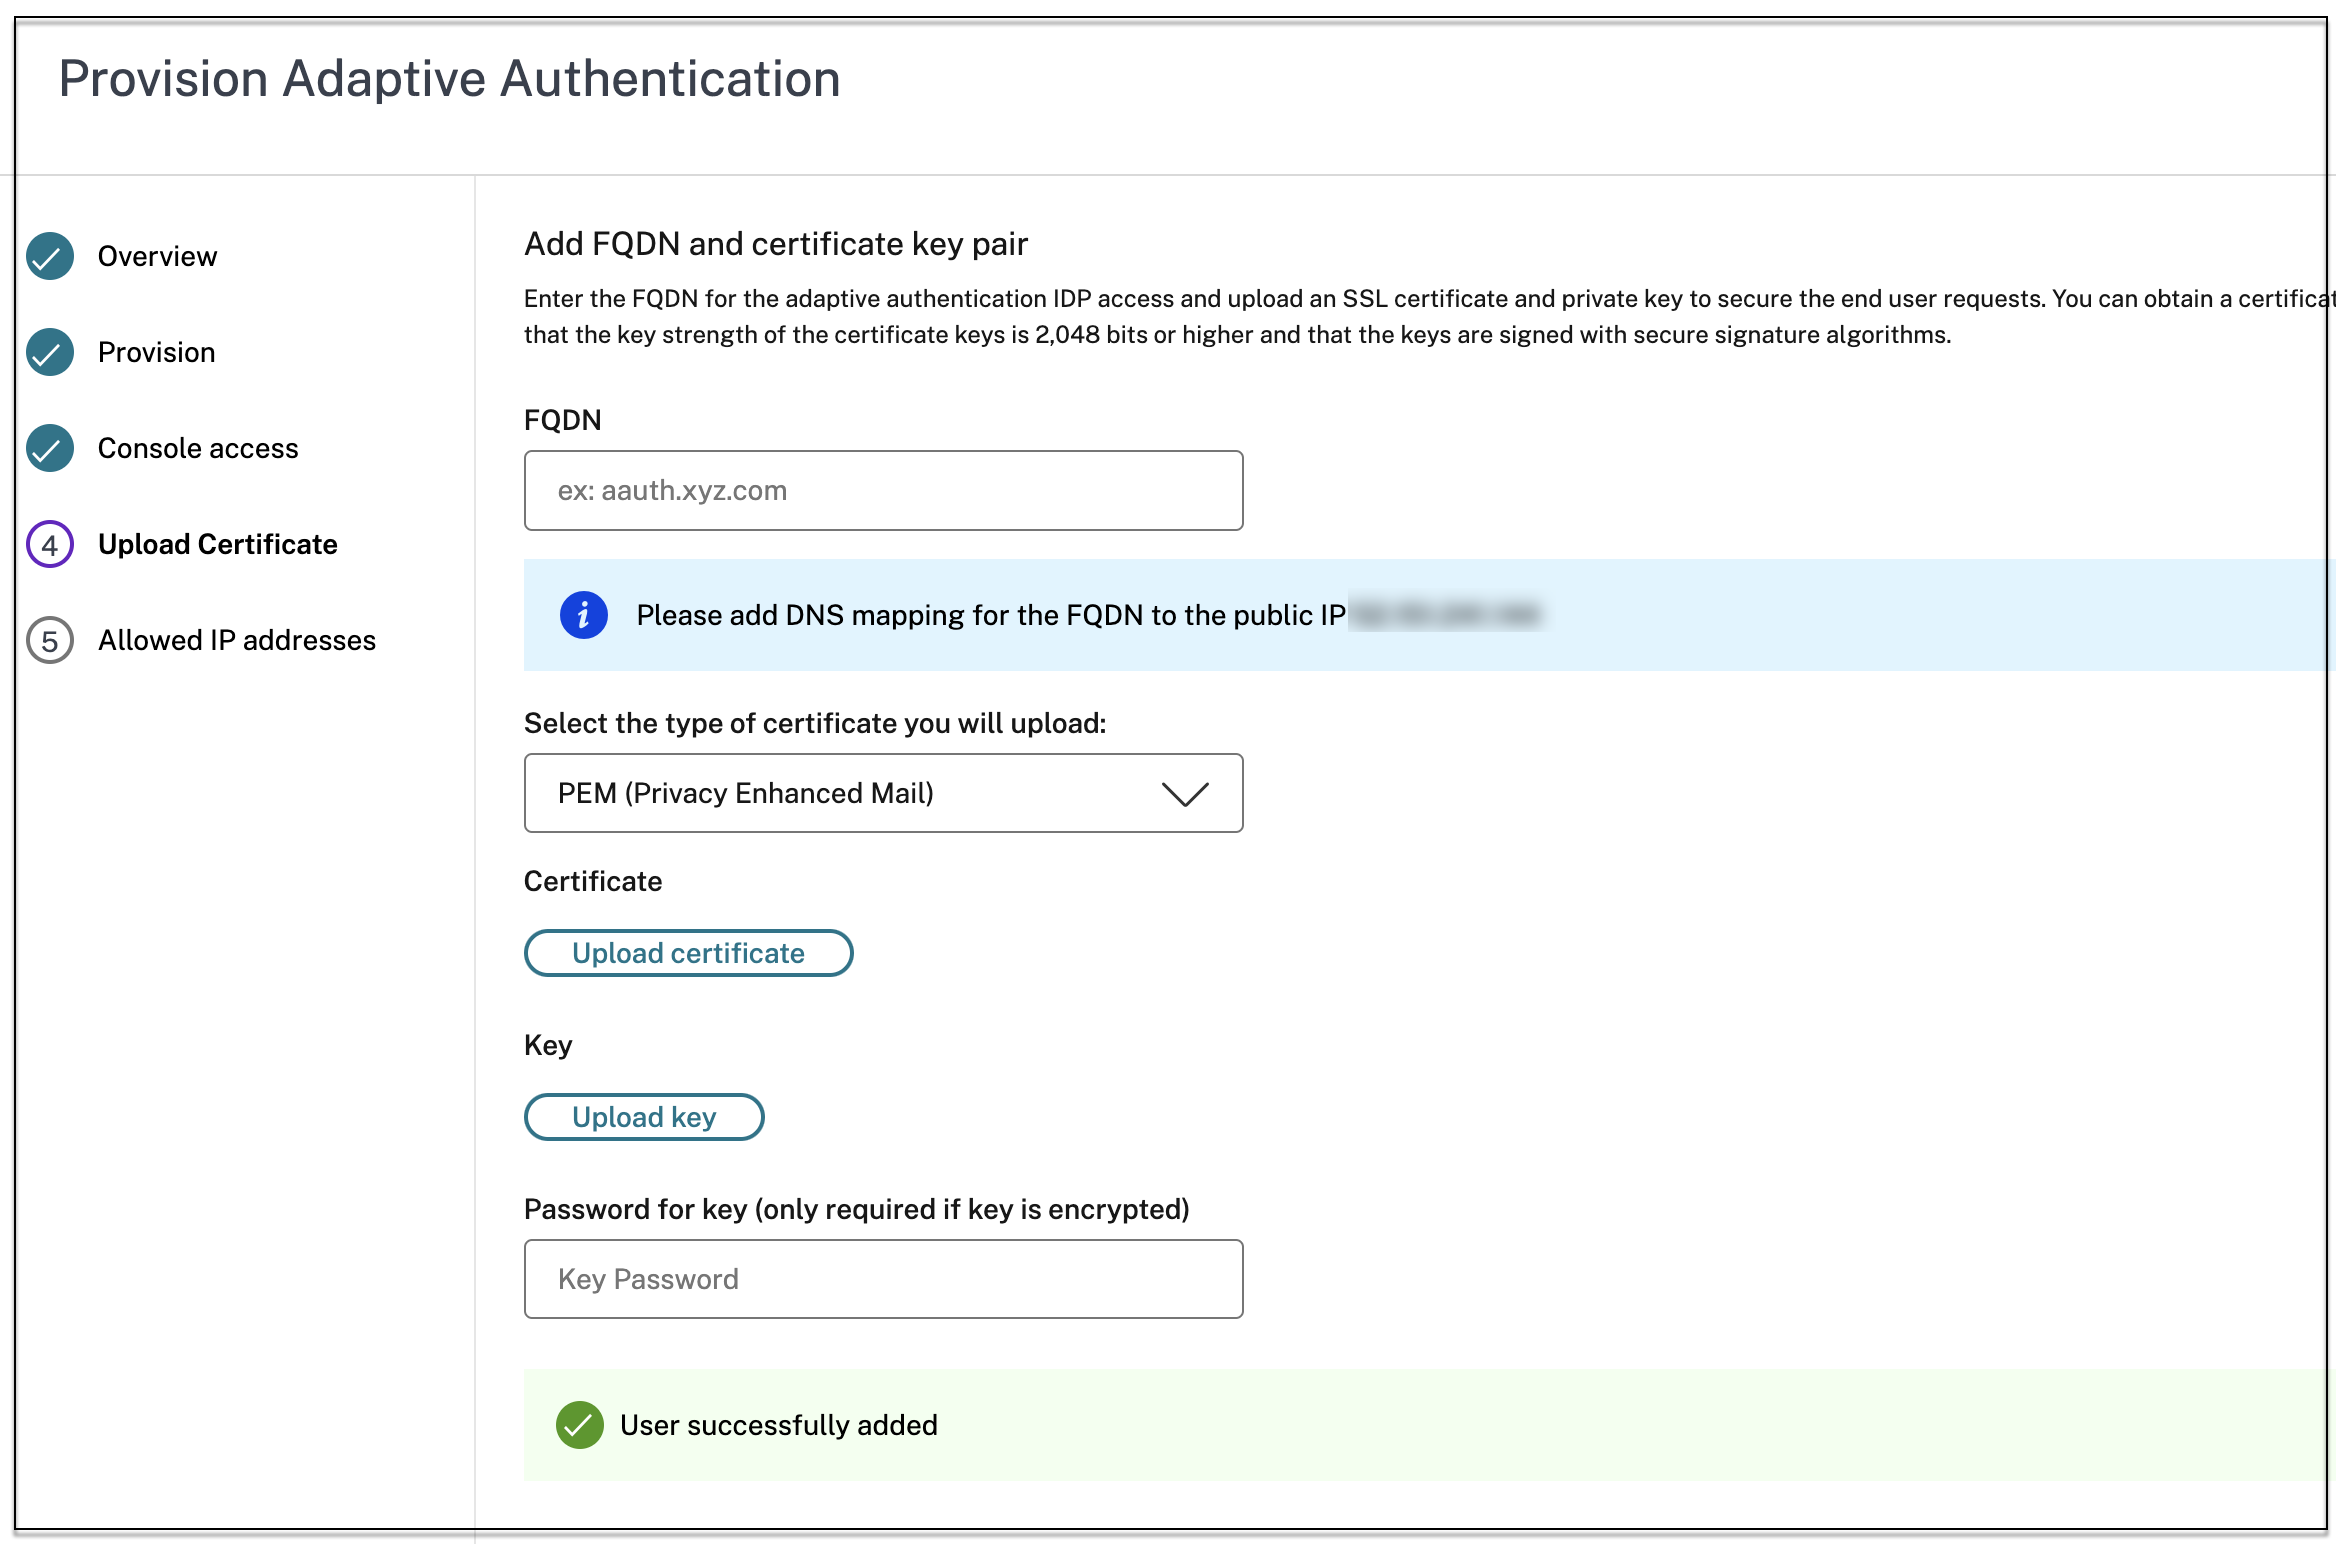
In the Upload Certificate screen, modify the FQDN.
-
Click Save Changes.
Important:
If you edit an FQDN, you must also upload the certificate again.
-
Enable the Adaptive Authentication method again by clicking Enable (step 3) in the Adaptive Authentication home page.

-
Click Refresh.
Custom workspace URL or vanity URL
A custom workspace URL allows you to use a domain of your choice to access your Citrix Workspace store. Users can access Workspace using the default Workspace URL or the custom workspace URL or both.
To configure a custom workspace URL or vanity URL, you must perform the following:
- Configure your custom domain. For details, see Configuring your custom domain.
-
Configure a new OAuthIDP profile with the same client ID, secret, and audience as your current or default profile (AAuthAutoConfig_oauthIdpProf) but with a different redirect URL. For details, see Configuring OAuth Policies and Profiles.
Example:
Current profile:
-
add authentication OAuthIDPProfile AAuthAutoConfig_oauthIdpProf -clientID xxxx -clientSecret yyyy -encrypted -encryptmethod ENCMTHD_3 -kek -suffix 2023_07_09_20_09_30 -redirectURL "https://accounts-internal.cloud.com/core/login-cip" -audience zzzz -sendPassword ONadd authentication OAuthIdPPolicy AAuthAutoConfig_oauthIdpPol -rule true -action AAuthAutoConfig_oauthIdpProfbind authentication vserver auth_vs -policy AAuthAutoConfig_oauthIdpPol -priority 100 -gotoPriorityExpression NEXTNew profile:
add authentication OAuthIDPProfile AAuthAutoConfig_oauthIdpProf_Custom1 -clientID xxxx -clientSecret yyyy -encrypted -encryptmethod ENCMTHD_3 -kek -suffix 2023_07_09_20_09_30 -redirectURL "https://custom_domain/core/login-cip" -audience zzzz -sendPassword ONadd authentication OAuthIdPPolicy AAuthAutoConfig_oauthIdpPol_Custom1 -rule true -action AAuthAutoConfig_oauthIdpProf_Custom1bind authentication vserver auth_vs -policy AAuthAutoConfig_oauthIdpPol_Custom1 -priority 101 -gotoPriorityExpression NEXT
Important:
- The OAuth policy and profile is created by the Adaptive Authentication service during the provisioning phase. As a result, the Citrix Cloud admin does not have access to the unencrypted client secret. You can obtain the encrypted secret from the ns.conf file. To create an OAuth profile, you must use the encrypted secret and create the profile using only the CLI commands.
- You cannot create an OAuth profile using the NetScaler user interface.
Schedule upgrade of your Adaptive Authentication instances
For the current site or deployment, you can select the maintenance window for upgrade.
Important:
Do not upgrade the Adaptive Authentication instances to random RTM builds. All upgrades are managed by Citrix Cloud.
-
On the Adaptive Authentication UI, in the Provision Adaptive Authentication instances section, click the ellipsis button.
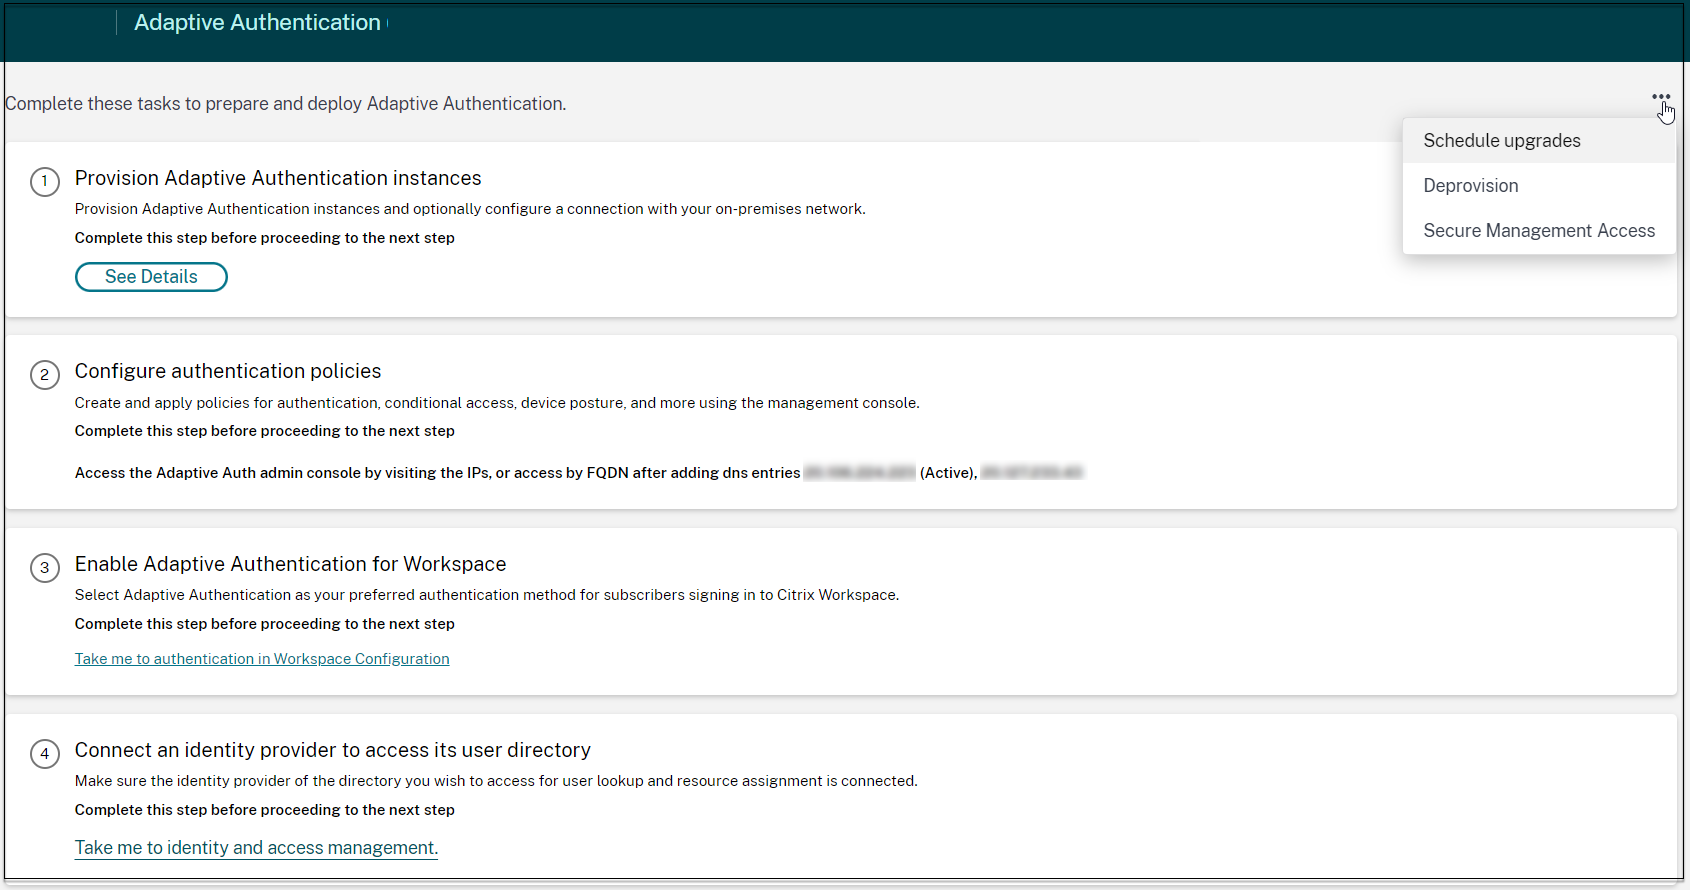
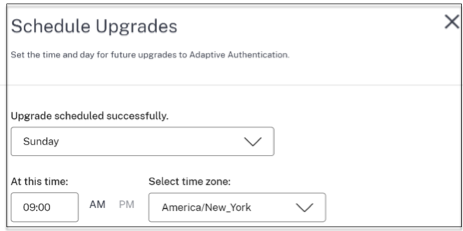
- Click Schedule upgrades.
- Select the day and time for the upgrade.
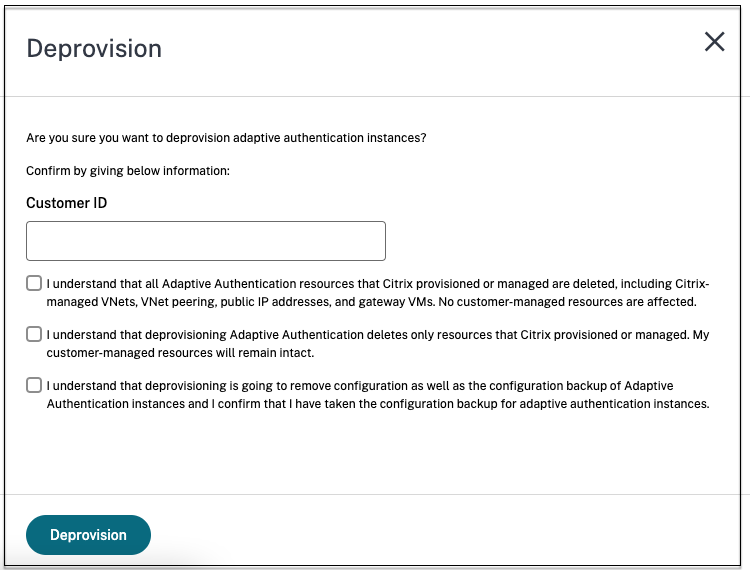
Deprovision your Adaptive Authentication instances
Customers can deprovision the Adaptive Authentication instances in the following cases and as per the suggestion from Citrix support.
- The Adaptive Authentication instances are not accessible (especially after a scheduled upgrade), though this scenario might not occur.
- If the customer has to switch from VNet peering mode to connector mode or conversely.
- If the customer selected a wrong subnet at the time of provisioning VNet peering mode (the subnet conflicts with other subnets in their data center or Azure VNet).
Note:
Deprovisioning also deletes the config backup of the instances. Therefore you must download the backup files and save it before you deprovision your Adaptive Authentication instances.
Perform the following to deprovision an Adaptive Authentication instance:
-
On the Adaptive Authentication UI, in the Provision Adaptive Authentication instances section, click the ellipsis button.

-
Click Deprovision.
Note:
Before deprovisioning, you must disconnect Citrix Gateway from the Workspace Configuration.
-
Enter the customer ID to deprovision the Adaptive Authentication instances.
Enable secure access to the gateway
- On the Adaptive Authentication UI, in the Provision Adaptive Authentication instances section, click the ellipsis button.
-
Click Secure Management Access.
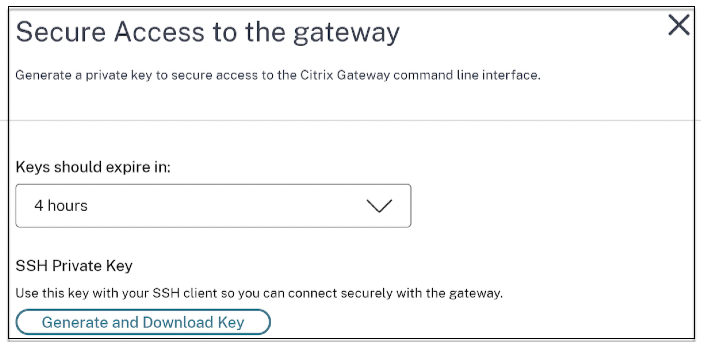
- In Keys should expire in, select an expiration duration for the new SSH key.
-
Click Generate and Download keys. Copy or download the SSH private key for later use as it is not displayed after the page is closed. This key can be used to log in to the Adaptive Authentication instances with the user name
authadmin.You can click Generate and Download keys to create a new key pair if the earlier key pair expires. However, only one key pair can be active.
- Click Done.
Important:
If you are using PuTTY on Windows to connect to Adaptive Authentication instances, you must convert the downloaded private key to PEM. For details, see https://www.puttygen.com/convert-pem-to-ppk.
- It is recommended to use the following command to connect to the Adaptive Authentication instances via the terminal from the MAC or PowerShell/Command prompt from Windows (version 10).
ssh -i <path-to-private-key> authadmin@<ip address of ADC>- If you want the AD users to access the Adaptive Authentication GUI, you must add them as new administrators to the LDAP group. For details, see https://support.citrix.com/article/CTX123782. For all other configurations, Citrix recommends that you use the Adaptive Authentication GUI and not the CLI commands.
Set up connectivity to on-premises authentication servers using Azure VNet peering
You must set up this configuration only if you have selected the connectivity type as Azure VNet peering.
Note:
If you are using third-party IDPs like Okta, Azure AD, Ping, this step is not required.
-
On the Connect Adaptive Authentication UI, click Provision, and then click Azure VNet Peering.
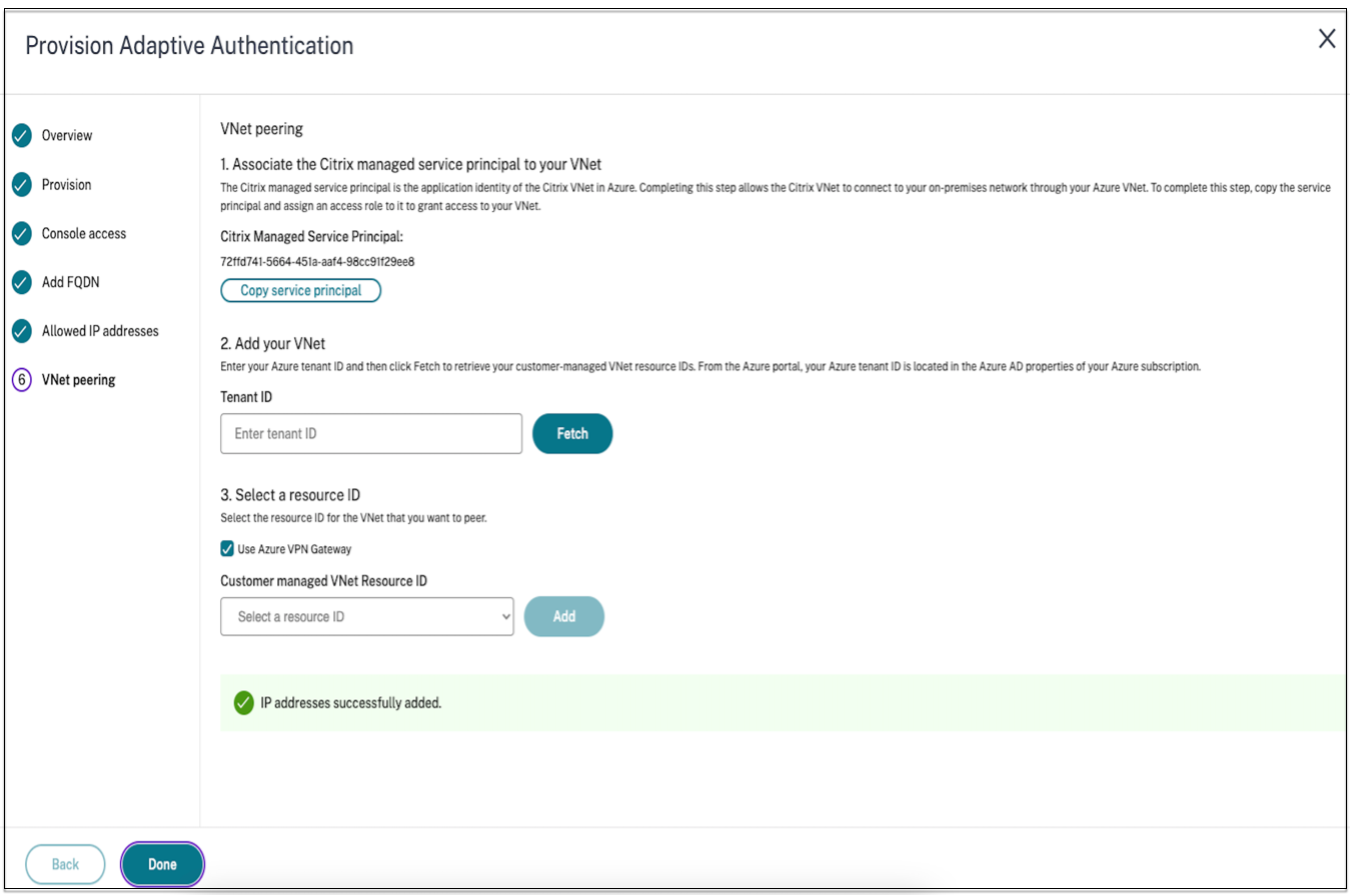
The Citrix Managed Service Principal field contains the application ID of an Azure Service Principal created by Citrix for your customer. This service principal is required to allow Citrix to add a VNet peering to a VNet in your subscription and tenant.
To allow this service principal to log in to the customer tenant, the admin at the customer site (global admin of the tenant) must run the following PowerShell commands to add the SPN to the tenant. CloudShell can also be used.
Connect-AzureADNew-AzureADServicePrincipal -AppId $App_IDWhere$App_IDis an SPN Application ID shared by Citrix.Note:
- The earlier-mentioned command outputs a service principal name that must be used for the role assignments.
- To allow this service principal to add an Azure VNet peering, the admin at the customer site (not limited to global admin) must add a “Network Contributor” role to the VNet that must be linked to the Citrix Managed VNet.
- SPN is a unique identifier that is used to associate the Citrix virtual network in Azure. Associating the SPN with VNet enables Citrix virtual network to connect to the customers’ on-premises network through Azure’s VNet.
-
Create a VNet peering.
- Enter the tenant ID for which the earlier steps were run and click Fetch.
This populates the customer-managed VNet resource ID with the candidate VNets for which the network contributor role is added for the SPN. If you do not see your VNet, make sure that the earlier steps are run correctly or repeat the steps.
Note:
For details on how to find your tenant ID, see https://docs.microsoft.com/en-us/azure/active-directory/fundamentals/active-directory-how-to-find-tenant.
- Select Use Azure VPN Gateway to connect your on-premises networks to Azure.
- In Customer managed VNet Resource ID, select the VNet identified for peering, and click Add. The VNet is added to the table with the status initially as In Progress. Once the peering is completed successfully, the Status changes to Done.
- Click Done.
-
Continue with the configuration, see Step 1: Provision Adaptive Authentication.
Important:
- For traffic to flow between the Citrix managed VNet and the on-premises network, firewall and routing rules might be changed on the on-premises to direct the traffic to the Citrix Managed VNet.
- You can add only one VNet peer at a time. Multiple VNet peerings are not allowed currently. You can delete a VNet peering or create one as required.
Config backup and restore
Application Delivery Management service performs backup management for the Adaptive Authentication instances. For details, see Back up and restore NetScaler instances.
- On the Application Delivery Management tile, click Manage.
- Navigate to Infrastructure > Instances and access the backups.
Note:
If you do not see the service onboarded, onboard the Application Delivery Management service. For details, see Getting started.
Sample LDAP and LDAPS load balancing configuration
The Citrix Adaptive Authentication instance provides LDAP/LDAPS support using a load balancing virtual server.
Note:
- If you are not using load balancing for LDAP/LDAPS, avoid creating a service or a server for an LDAP server as this might break the Adaptive Authentication tunnel.
- If you are using load balancing for LDAP, create a service group and bind it to the load balancing service and not to a standalone service.
- When using load balancing virtual server for authentication, ensure that you add the load balancing virtual server IP address instead of the actual LDAP server IP address in the LDAP action.
- By default, a TCP monitor is bound to the service that you create. On the Adaptive Authentication NetScaler instances, the service is marked as UP by default if a TCP monitor is used.
- For monitoring, it is recommended that you use custom monitors.
Prerequisites
Private IP address (RFC1918 address) of the load balancing virtual server. It can be a dummy IP address as this address is used for internal configuration.
Load balancing LDAP servers
For load balancing LDAP servers, create a service group and bind it to the load balancing virtual server. Do not create a service for load balancing LDAP servers.
Configure LDAP by using the NetScaler CLI:
You can use the following CLI commands as a reference to configure LDAP.
add serviceGroup <serviceGroupName> <serviceType>bind servicegroup <serviceGroupName> (<IP> | <serverName>) <port>-
add lb vserver <name> <serviceType> <ip> <port>- The port must be 389. This port is used for internal communication and connection to an on-premises server is over SSL based on the port configured for the service group. bind lb vserver <name> <serviceGroupName>add authentication ldapAction <name> {-serverIP} <ip_addr> | {-serverName <string>}} <lb vserver ip>add authentication policy <ldap_policy_name> -rule <expression> -action <string>bind authentication vserver auth_vs -policy <ldap_policy_name> -priority <ldap_policy_priority> -gotoPriorityExpression NEXT
Configure LDAP by using the NetScaler GUI:
- Navigate to Traffic Management > Load Balancing and then click Virtual Servers.
-
Create a virtual server of type TCP and port 389.
Do not create a load balancing virtual server of type SSL/SSL_TCP.
- Navigate to Traffic Management > Load Balancing and then click Service Groups.
- Create a service group of type TCP and port 389.
- Bind the service group to the virtual server that you have created in step 1.
For details on the procedures, see Setup basic load balancing.
Load balancing LDAPS servers
For load balancing LDAPS servers, you must create a load balancing virtual server of type TCP to avoid internal SSL encryption or decryption into the Adaptive Authentication instance. The load balancing virtual server handles the TLS encryption/decryption in this case. Do not create a load balancing virtual server of type SSL.
Configure LDAPS by using the NetScaler CLI:
You can use the following CLI commands as a reference to configure LDAPS.
-
add lb vserver <name> <serviceType> <ip> <port>- The port must be 636. bind lb vserver <name> <serviceGroupName>add authentication ldapAction <name> {-serverIP} <ip_addr> | {-serverName <string>}} <lb vserver ip>add authentication policy <ldap_policy_name> -rule <expression> -action <string>bind authentication vserver auth_vs -policy <ldap_policy_name> -priority <ldap_policy_priority> -gotoPriorityExpression NEXT
Configure LDAPS by using the NetScaler GUI:
- Navigate to Traffic Management > Load Balancing and then click Virtual Servers.
-
Create a virtual server of type TCP and port 636.
Do not create a load balancing virtual server of type SSL/SSL_TCP.
- Navigate to Traffic Management > Load Balancing and then click Service.
- Create a service of type SSL_TCP and port 636.
- Bind the service to the virtual server that you have created in step 1.
For details on the procedures, see Setup basic load balancing.
Create custom monitors
Create custom monitors by using the NetScaler GUI:
- Navigate to Traffic Management > Load Balancing > Monitors.
- Create a monitor of type LDAP. Ensure that you set the monitor probe interval to 15 seconds and the response timeout to 10 sec.
- Bind this monitor to your service.
For more details, see Custom monitors.
Provision to add up to 15 admin IP addresses
Adaptive Authentication service allows you to enter up to 15 Public IP subnets and individual IP addresses to access the Adaptive Authentication management console.
Points to note while entering the IP addresses/subnets:
- Ensure that the CIDRs of the public IP subnets are between /20 to /32.B.
- Ensure that there is no overlap between the entries.
Examples:
- 192.0.2.0/24 and 192.0.2.8 are not accepted because 192.0.2.8 lies within 192.0.2.0/24.
- Overlapping Subnets :192.0.2.0/24 and 192.0.0.0/20 are not accepted because the subnets overlap.
-
While entering a network subnet value, enter the network IP address as the IP address value.
Example:
- 192.0.2.2/24 is incorrect, instead use 191.0.2.0/24
- 192.0.2.0/20 is incorrect, instead use 192.0.0.0/20
To get this feature enabled, reach out to Citrix Support.
Migrate your authentication method to Adaptive Authentication
Customers already using Adaptive Authentication with authentication method as Citrix Gateway must migrate Adaptive Authentication and then remove the OAuth configuration from the Adaptive Authentication instance.
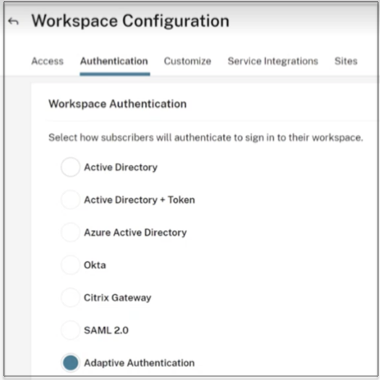
- Switch to a different authentication method other than Citrix Gateway.
-
In Citrix Cloud > Identity and Access Management, click the ellipsis button corresponding to Citrix Gateway and then click Disconnect.
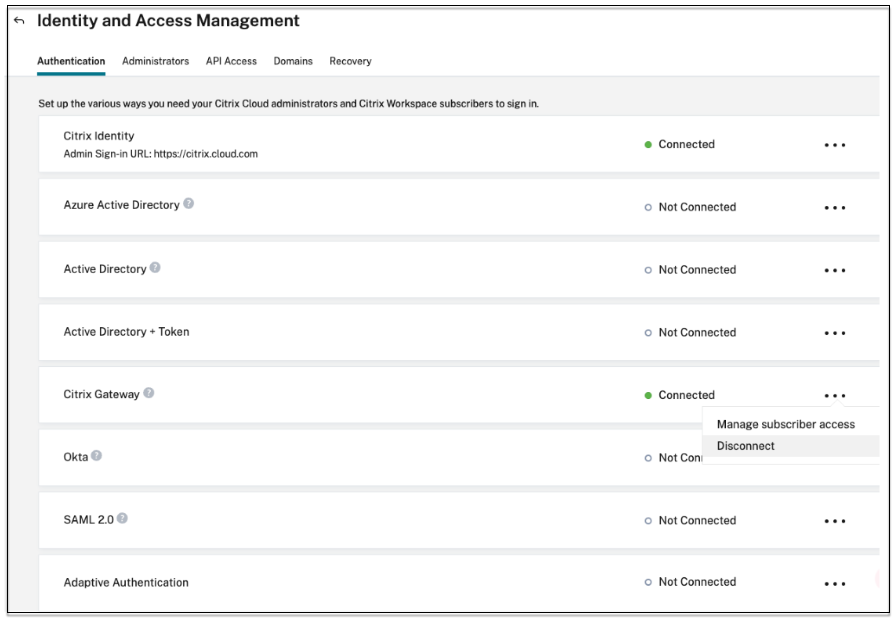
-
Select I understand the impact on the subscriber experience, and then click Confirm.
When you click Confirm, the workspace login to end users is impacted and Adaptive Authentication is not used for authentication until Adaptive Authentication is enabled again.
-
In the Adaptive Authentication instance management console, remove the OAuth related configuration.
By using the CLI:
unbind authentication vs <authvsName> -policy <oauthIdpPolName>
rm authentication oauthIdpPolicy <oauthIdpPolName>
rm authentication oauthIdpProfile <oauthIdpProfName>
<!--NeedCopy-->
By using the GUI:
- Navigate to Security > AAA - Application Traffic > Virtual Servers.
- Unbind the OAuth policy.
- Navigate to Security > AAA - Application Traffic > Policies > Authentication > Advanced Policies > OAuth IDP.
- Delete the OAuth policy and profile.
-
Navigate to Citrix Cloud > Identity and Access Management. In the Authentication tab, in Adaptive Authentication, click the ellipsis menu and select Manage.
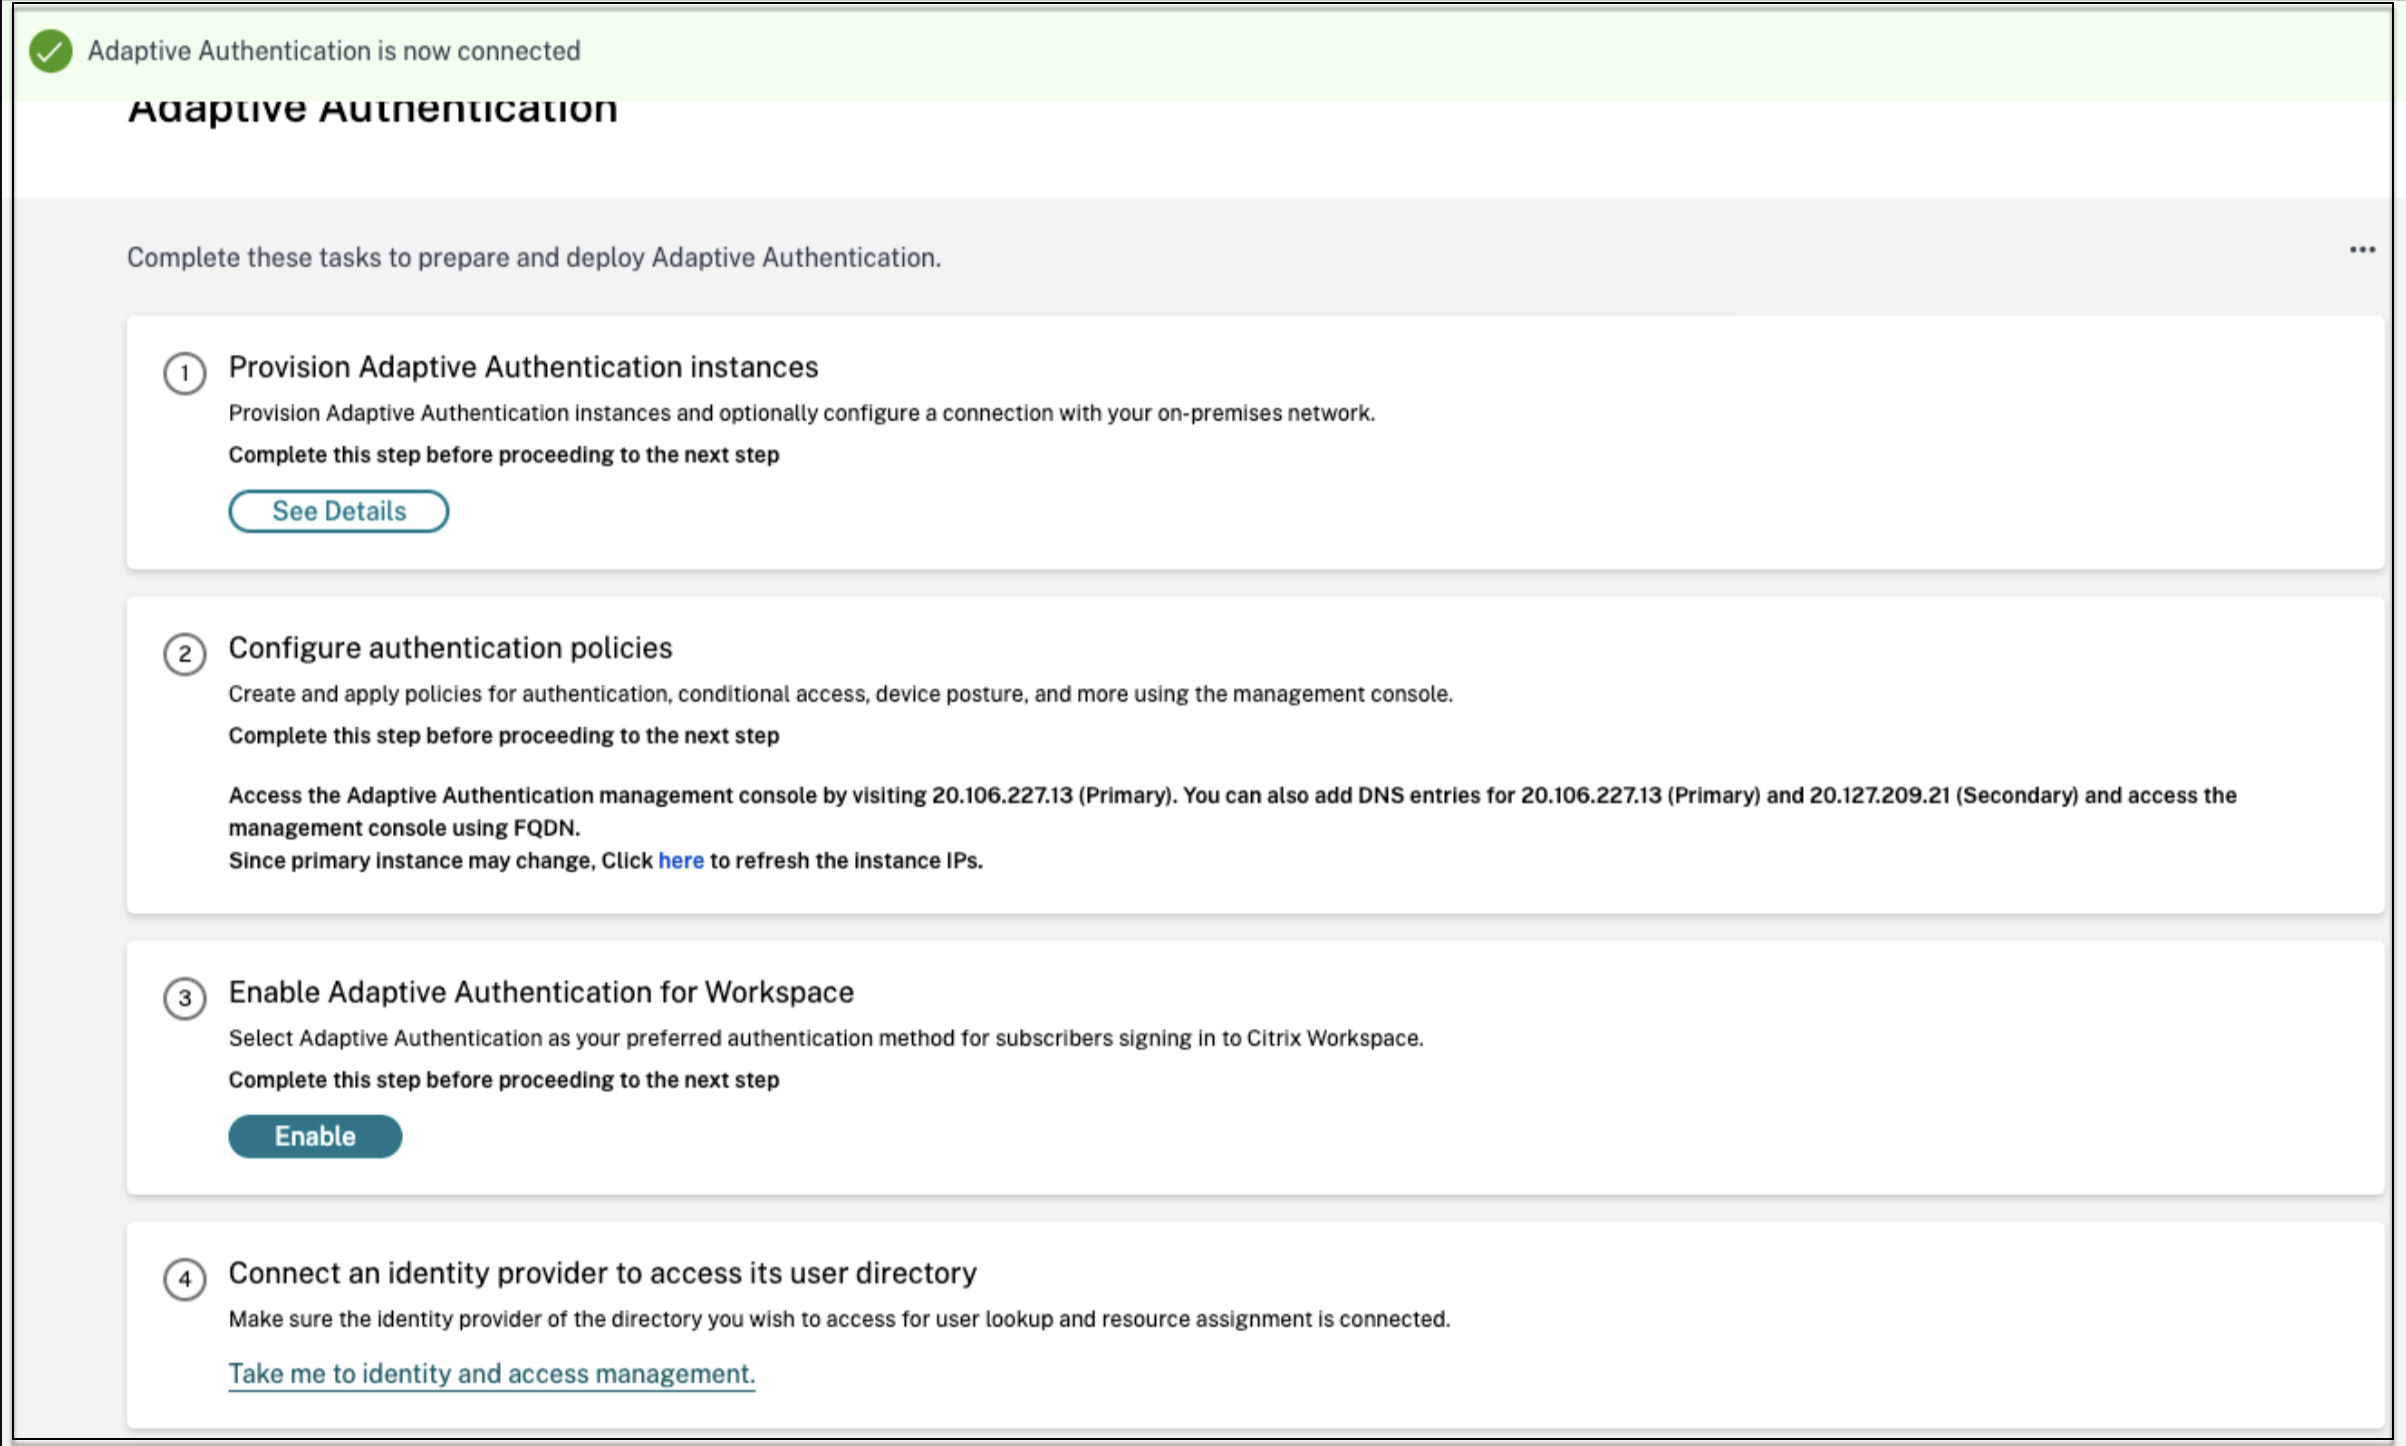
- Click See Details.
- In the Upload Certificate screen, do the following:
- Add the Adaptive Authentication FQDN.
- Remove the certificates and key files and upload it again.
Important:
If you edit an FQDN or the certificate-key pair directly without migrating to Adaptive Authentication, connection to Identity and Access Management fails and the following errors are displayed. You must migrate to the Adaptive Authentication method to fix these errors.
- ADC command failed with an error. A policy is already bound to the specified priority.
- ADC command failed with an error. Cannot unbind a policy that is not bound.
-
Click Save Changes.
At this point, Identity and Access Management displays Adaptive Authentication as Connected and the Adaptive Authentication instance has the OAuth profile auto configured.
You can validate this from the GUI.
- Access your Adaptive Authentication instance and log in with your credentials.
- Navigate to Security > AAA - Application Traffic > Virtual Servers. You must see that the OAuth IdP profile created.
- Navigate to Citrix Cloud > Identity and Access Management. Adaptive Authentication is in the Connected status.
-
Enable the Adaptive Authentication method again by clicking Enable (step 3) in the Adaptive Authentication home page.
This step enables the authentication method as Adaptive Authentication in your workspace configuration.
- Click the workspace link on step 3 after clicking Enable. You must see that the authentication method is changed to Adaptive Authentication.
Note:
New users must follow the same steps excluding the step to remove the OAuth related configuration.
Sample authentication configurations
Customers can configure an authentication policy of their choice and bind it to the authentication virtual server. Authentication profile bindings are not required for the authentication virtual server. Only the authentication policies can be configured. The following are some of the use cases.
Important:
Authentication configuration must be done on the primary nodes only.
Multifactor authentication with conditional authentication
- Dual factor authentication with LDAP and RADIUS using dual factor schema (taking user input only once)
- Authentication log on method according to user’s departments (Employee, Partner, Vendor) in organization with drop-down menu to select the department
- Authentication log on method according to user domains with drop-down menu
- Configure email ID (or user name) input as first factor with conditional access based on group extraction with email ID at first factor and provide different logon type for each group
- Multifactor authentication using Certificate authentication for users with user certificates and Native OTP registration for non-cert users
- Different authentication type with conditional authentication according to user host name inputs
- Dual factor authentication with Native OTP authentication
- Google Re-CAPTCHA
Third-party integration with multifactor authentication
- Configure Azure AD as SAML IdP (Configure next factor as LDAP policy - NO_AUTH to complete OAuth trust)
- Conditional authentication with First factor as SAML and then custom login to certificate or LDAP based on SAML attributes
- First factor as webauth login followed by LDAP
Device posture scans (EPA)
- Device posture check for version check followed by customized login for compliant (RADIUS) and non-compliant users(LDAP)
- LDAP authentication followed by mandatory device posture scan
- Device posture check before and after AD authentication - Pre and Post-EPA as a factor
- Device Certificate as an EPA factor
Miscellaneous scenarios
In this article
- Edit an FQDN
- Custom workspace URL or vanity URL
- Schedule upgrade of your Adaptive Authentication instances
- Deprovision your Adaptive Authentication instances
- Enable secure access to the gateway
- Set up connectivity to on-premises authentication servers using Azure VNet peering
- Config backup and restore
- Sample LDAP and LDAPS load balancing configuration
- Provision to add up to 15 admin IP addresses
- Migrate your authentication method to Adaptive Authentication
- Sample authentication configurations